Transcript
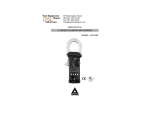
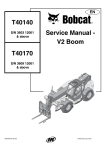
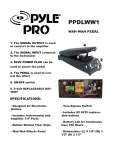
NOMENCLATURE
Control Section
ELECTRIC
ACOUSTIC GUITAR
Battery Holder
Owner’s Manual
Thank you for choosing a Yamaha electric-acoustic guitar.
In order to make the most of the advanced features and
performance provided by your guitar, please read this
manual carefully before using the instrument.
Bar Sensor
SYSTEM-44
SYSTEM-46
Output Jack (with power switch function)
PRECAUTIONS
SPECIFICATIONS
The output jack is an EIAJ-standard 1/4" phone jack. Be sure to use
an appropriate connection cable.
The built-in preamplifier is automatically turned on when a plug is
inserted into the output jack. When not using the instrument, or
when playing it without amplification, be sure to remove the plug
from the output jack so that the preamplifier power is turned off.
Always set the VOLUME control to “0” when plugging in or
unplugging the connection cable.
The battery check indicator (BATT.) will light briefly when a plug is
inserted or removed from the output jack. This is normal and does
not indicate a malfunction.
Be sure to remove the battery if the instrument will not be used for
an extended period of time in order to prevent possible damage due
to battery leakage.
System
SYSTEM-44 : Monaural 1 way
SYSTEM-46 : Monaural 1 way
Pickup
Pre-amplifier Controls
Bar Sensor (Piezo type)
VOL., 3 Band (HIGH, MID, LOW) EQ
control, AMF control
Output jack
SYSTEM-44 : Combination end pin/power
switch
SYSTEM-46 : Combination power switch
Output impedance
Power supply
Battery life
Accessories
1 kΩ
9V DC, S-006P (6F22) dry cell battery
Approx. 500 hours
• Hexagonal wrench for neck adjustment x1
• S-006P (6F22) dry cell battery x1
THE CONTROLS
BATTERY REPLACEMENT
Be sure to replace the battery as soon as possible when the battery check
indicator lights in order to avoid reduced sound quality.
q
e
* Be sure to remove the battery if the instrument will not be used for
an extended period of time in order to prevent possible damage
due to battery leakage.
q Press the catch on the battery holder
in the direction indicated by the
arrow in the illustration in order to
unlock it.
w
w Slide out the battery case.
r
Battery case
OP
EN
q VOL. (Volume) Control
Adjusts the overall output volume level.
OP
EN
* Make sure that the VOL. is turned to “0” before connecting or disconnecting.
w BATT. (Battery Check) Indicator
Catch
e Remove the old battery from the
battery case, and insert the new
battery making sure that the (+) and
(–) terminals of the battery are
positioned as shown in the
illustration. Use only a DC9V, S006P (6F22) or equivalent battery.
DC9V
S-006P (6F22)
r Slide the battery case
back into the battery
holder and press firmly
so that the battery case
locks into place.
EN
OP
This indicator will light when the battery needs to be replaced.
Please replace the battery as soon as possible when the BATT. indicator
lights.
e 3 Band Equalizer
LOW : Boosts or cuts the level of the low frequencies.
MID
: Boosts or cuts the level of the middle frequencies.
The AMF control r adjusts the center frequency of the band
affected by this control.
HIGH : Boosts or cuts the level of the high frequencies.
r AMF Control
Sets the center frequency of the band of frequencies affected by the MID
equalizer control. The range is from 80 Hz to 10 kHz.
* This control has no effect when the MID equalizer control is set to its center (“0”)
position.
EleAco/System44/46
4
06.1.11, 11:43 AM