1
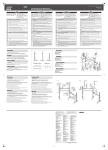
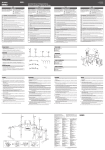
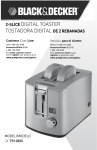
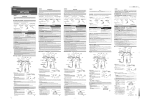
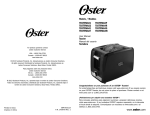
FP9415/FP9315/FP8215
FOOT PEDAL
PEDAL
ヤマハ フットペダル
FP9415/FP9315/FP8215/
FP8110/FP7210/FP6210/DFP9415/
DFP9315/DFP9315L/DFP8215/DFP7210
Thank you for purchasing a Yamaha Foot Pedal.
Please read this owner's manual thoroughly before use.
CAUTION
• To prevent the foot pedal from coming loose during performance, tighten all securing bolts and adjustment bolts firmly.
• To maintain smooth action, apply some grease-grade oil (ex.
lithium grease) to all of the moving parts as needed.
* Specifications and design are subject to change without notice.
Beater Head
Maza
ビーター固定ボルト
ビーターヘッド
Beater Angle Adjustment Bolt
Perno de ajuste del ángulo de la maza
ビーターアングル調整ボルト
フットボード
アングル調整ボルト
Spring Roller
Rodillo de resorte
スプリングローラー
Frame
Bastidor
Hoop Clamp
Adjustment Bolt
Perno de ajuste de la
abrazadera de la anilla
フレーム
フープクランプ調整ボルト
Foot Board
Plataforma para el pie
See front view below
Vea abajo la vista
frontal
フットボード
Key Holder
Soporte de la llave
矢視
* Especificaciones y diseño sujetos a cambios sin previo aviso.
Spur
Puntal
ストッパー
Base Plate
Placa de la base
人身傷害の危険を防止するには ∼以下の指示を必ず守ってください∼
・ この
「安全へのこころがけ」
は製品を安全に
正しくお使いいただき、お客様や他の人々
注意(危険・警告を含む)
を促す
内容があることを告げるものです。
への危害や財産への損害を未然に防止す
るために、いろいろな絵表示を使って説明
Clamp Lever
Palanca de la abrazadera
キーレンチ
クランプレバー
お読みください。
警告
禁止の行為を告げるものです。
行為を強制したり指示する
内容を告げるものです。
この表示を無視して誤った取扱いをすると、
人が死亡又は
重傷を負う危険の恐れがある内容を示しています。
先端が鋭利な部分に触れる時は十分な注意をしてください。
機能上先端部分が針状になっている部品があります。
(フットペダルのストッ
パー等)
けがの原因となるので取扱いには十分注意してください。
また遊びの道具として使用しないでください。
注意
● Adjusting the Footboard Angle
(Photo 3)
(Except FP8215)
The angle of the footboard is adjustable.
Use the supplied key wrench to
loosen the Footboard Angle Adjustment Bolt, adjust the angle of
the footboard then, tighten the bolt
to secure.
スプリング調整ボルト
Front View
Vista frontal
BD Hoop Support
(Except FP8215)
Soporte de la anilla BO
(Excepto el FP8215)
(FP8215を除く)
Insert Bolt A located at the bottom of the frame into the hole on Base Plate B
then slide it in the direction as indicated by the arrow in the illustration.
At this time, also align Bolts B with their corresponding Holes b on the Base
Plate B. After confirming that Bolts A and B are aligned with their corresponding holes use the supplied key wrench to firmly tighten Bolt A.
■ Montaje del peda (Foto 1)
Inserte el perno A, situado en la parte inferior del bastidor, en el orificio de la
placa B de la base y deslícelo en la dirección de la flecha indicada en la
ilustración.
Entonces, alinee también los pernos B con sus orificios b correspondientes en la
placa de la base B. Después de haber confirmado que los pernos A y B están
alineados con sus orificios correspondientes, emplee la llave suministrada para
apretar firmemente el perno A.
Photo 1
Foto 1
写真1
Underside of the frame
Lado inferior del bastidor
Bolt B
Perno B
フレーム底面
ボルトB
Underside of the Base Plate
Lado inferior de la placa de la base
ベースプレート裏面
Hole b
Orificio b
Hole a
Orificio a
穴b
● フープクランプ
ベースドラムのフープを挟み、クランプレバーを手前に倒す事でクランプできます。
一般のモデルにくらべ、ベースドラムへの着脱がワンタッチで行なえ、かつ保持力も安
定しています。フープの厚みによってフープクランプ調整ボルトを調整してください。
調整ボルトは、付属のキーレンチを使わなくても手で回すことができます。
Beater Angle Adjustment Bolt
Perno de ajuste del ángulo de la
plataforma para el pie
フットボードアングル調整ボルト
● ストッパーの調整
ペダル全体が前進するのを防ぎます。
時計方向に回すと針が出ますので、必要な長さに調整してご使用ください。
● Key Wrench (Photo 4)
Attach the supplied key wrench to
the key holder on the base plate.
Photo 4
Foto 4
写真4
● Llave (Foto 4)
Coloque la llave suministrada en el
soporte de la llave, que está en la
placa de la ase.
● フットボードアングルの調整
● キーレンチ(写真4)
付属のキーレンチは、ベースプレート
にあるキーホルダーに取り付けてくだ
さい。
(写真3)
(FP8215を除く)
フットボードの傾き角度を調整すること
ができます。
付属のキーレンチを使ってフットボード
アングル調整ボルトをゆるめ、フット
ボードのアングルを調整し、固定します。
key wrench
Llave
キーレンチ
Caution : Use the supplied key wrench to adjust or tighten
all parts. Use of any other tool may result in
damage to parts.
● Adjusting the SpringTension
The strength of the footboard return is adjustable.
Use the supplied key wrench (or a drum key) to loosen the spring tension
locking bolt. Rotate the locking nut and spring tension adjustment nut to
adjust the tension. After adjustment is complete, tighten the spring tension
locking bolt and then secure the locking nut.
Precaución : Emplee la llave suministrada para ajustar o
apretar todas las partes. El empleo de
cualquier otra herramienta podría ocasionar
daños enlas partes componentes.
穴a
● Hoop Clamp
Fit the clamp onto the bass drum hoop, and then pull the lever down
towards yourself.
Compared to standard models this system can be attached to, or removed
from the bass drum with a one-touch operation. Its grip is also firm and
solid. Use the Hoop Clamp Adjustment Bolt to adjust the clamp to fit
different sized hoops.
The adjustment bolt can be turned by hand without using the supplied key
wrench.
フットペダルを単品で使う場合も取扱いには十分注意してください。
演奏中にゆるみを生じないように、各固定ボルト・調整ボルトはしっか
りと締め付けてください。
よりスムースなアクションを保持するために、可動部分には時々グリス
等の油を塗布してください。
Bolt A
Perno A
※ 製品の規格及び仕様は、改良のため予告なく変更する場合がありますのでご了承ください。
ボルトA
Bolt B
Perno B
Hole b
Orificio b
ボルトB
穴b
FP9415/FP9315/FP8215
A metal support, bolt and washer are attached to the supplied belt.
Remove the bolt and washer fixing the chain and attach to the foot
pedal.
写真3
フレーム底面部のボルトAをベースプレートaの穴に入れ矢印方向にずらします。
その時ボルトBが、ベースプレートbの穴に合う様にします。ボルトA,Bが穴に合った事を
確認し、付属のキーレンチでボルトAをしっかり締め付けてください。
フットペダルの下や可動部に、手や足を入れないでください。
挟まれてけがの原因となります。
* The FP9315 can be used with either the double-chain, which is attached to the pedal when shipped, or with the supplied belt. Feel free
to use either one.
Photo 3
Foto 3
■ フットペダル組立方法(写真1)
この表示を無視して誤った取扱いをすると、人が傷害を負った
り、財産が損害を受ける危険の恐れがある内容を示しています。
■ Attaching the Belt (FP9315/DFP9315)
● Abrazadera de la anilla
Acople la abrazadera en la anilla del bombo y luego empuje la palanca
hacia usted.
En comparación con los modelos estándar, este sistema puede montarse o
extraerse, al bombo con una operación de enganche. Su agarre es también
firme y sólido. Emplee el perno de ajuste de la abrazadera de la anilla para
ajustar la abrazadera de modo que se adapte a anillas de distintos tamaños.
El perno de ajuste puede girarse con la mano sin emplear la llave suministrada.
● スプリングテンションの調整
フットボードの戻り強さを調整することができます。
付属のキーレンチ
(またはドラムキー)
を使ってスプリング調整ボルトをゆるめ、固定ナッ
トとスプリング調整ナットを回してテンションを調整します。調整が済んだら、スプリ
ング調整ボルトを締めてから固定ナットを締めます。
● Ajuste del ángulo de la plataforma
para el pie(Foto 3)
(Excepto el FP8215)
El ángulo de la plataforma para el
pie es ajustable.
Emplee la llave suministrada para
aflojar el perno de ajuste del ángulo
de la plataforma para el pie, ajuste
entonces el ángulo de la plataforma
para el pie, y luego apriete el perno
con seguridad.
■ Assembling the Foot Pedal (Photo 1)
しています。
・ 絵表示の意味をよく理解してから、本文を
付属のキーレンチ
(またはドラムキー)
でビーターアングル調整ボルト をゆる
め、ビーターのアングルを調整し、固
定します。
Spring Tension
Locking Bolt
Perno de bloqueo de la
tensión del resorte
Key Wrench
Llave
ベースプレート
● Ajuste de la tensión del resorte
La fuerza de retorno de la plataforma para el pie es ajustable. Emplee la
llave suministrada (o una llave de bombo) para aflojar el perno de bloqueo
de la tensión del resorte. Gire la tuerca de bloqueo y la tuerca de ajuste de
la tensión del resorte para ajustar la tensión. Después de haber completado
el ajuste, apriete el perno de bloqueo de la tensión del resorte y luego fije
la tuerca de bloqueo.
● Ajuste los puntales
Los puntales evitan que resbale el pedal hacia delante mientras se está
tocando.
Gire los puntales (hacia la derecha para extenderlo, y hacia la izquierda
para retractarlo) para ajustar la longitud más adecuada para usted.
(写真2)
BDフープ受け
ご使用の前に、この『安全へのこころがけ』をよくお読みのうえ正しくお使い
ください。
フットペダルはドラム本体とシンバル、スティック等とともに使ったり、単体とし
て使います。
室内での置き場所や日常の取扱いについて、下記の注意を必ず守ってください。
特に小さなお子様には、最初にご家族の方、または指導者から取扱い方法の指導を
お願いいたします。
ビーターアングル調整ボルト
スプリング調整ナット
はじめに
安全へのこころがけ
Perno de ajuste del ángulo de la
maza
■ 各種調整について
Spring Tension
Adjustment Nut
Tuerca de ajuste de la
tensión del resorte
矢視
このたびは、ヤマハ・フットペダル をお買い求めいただきまして、
まことにありがとうございます。
製品の機能をよく理解していただき、末永くご愛用いただくために、
本取扱説明書をよくお読みください。
Foot Board Angle Adjustment Bolt
● Ajuste del ángulo de la maza
(Foto 2)
Emplee la llave suministrada (o una
llave de bombo) para aflojar el perno
de ajuste del ángulo de la maza,
ajuste el ángulo de la maza, y luego
apriete el perno con seguridad.
Locking Nut
Contratuerca
Introducción
• Para evitar que se afloje el pedal durante la interpretación,
apriete firmemente todos los pernos de fijación y los pernos
de ajuste.
• Para conservar un movimiento suave del pedal, aplique un
poco de aceite de engrase (por ejemplo, grasa de litio) a
todas las partes móviles cuando sea necesario.
写真2
■ Ajustes
固定ナット
PRECAUCIÓN
Photo 2
Foto 2
● ビーターアングルの調整
キーホルダー
Muchas gracias por la adquisición del pedal Yamaha.
Lea toda este manual del usuario antes de la utilización.
絵表示に
ついて
● Adjusting the Beater Angle
(Photo 2)
Use the supplied key wrench (or a
drum key) to loosen the Beater Angle
Adjustment Bolt, adjust the angle
of the beater then, tighten the bolt
to secure.
Beater Locking Bolt
Perno de retención de la maza
Foot Board Angle
Adjustment Bolt
Perno de ajuste del ángulo de la
plataforma para el pie
Introduction
フットペダル
■ About the Adjustments
[FP9415]
OWNER'S MANUAL
MANUAL DEL USUARIO
取扱説明書
Foot Pedal
Pedal
注:各部の調整には付属のキーレンチをご使用ください。
その他の工具等を使った場合、部品を破損させるおそれがあります。
● Adjusting the Spurs
The spurs keep the pedal from sliding forward during performance.
Rotate the spurs (clockwise to extend, counter clockwise to retract) to
adjust the length according to your requirements.
Foot Pedal
Pedal
FP8110
フットペダル
■ Soft Case (FP9415/DFP9415/FP9315/DFP9315)
A soft case is included with this set. Before putting the pedal into the soft case,
fold the pedal then slide on the protective bag, which protects the footboard
(photo 5).
At this time, slide the bag on so the Velcro strip that is on the bag is on the
underside of the pedal (see photo 6).
Beater Head
Maza
Next, use the belt to secure the bag to the frame (see photo 7).
Securethesoftcase's partitiontotheVelcro® inside the soft case and then
place the foot pedal, with the protective bag attached, into the case
(photo 8).
Accessories such as beaters, etc., can be stored in the case's pockets,
etc.
The soft case is also designed to accommodate either single or double
pedal setups.
Foot Pedal
Pedal
フットペダル
Beater Angle Adjustment Bolt
Perno de ajuste del ángulo de la maza
ビーターヘッド
ビーターアングル調整ボルト
Spring Roller
Rodillo de resorte
Beater Locking Bolt
Perno de retención de la maza
スプリングローラー
ビーター固定ボルト
Frame
Bastidor
Hoop Clamp
Adjustment Bolt
Perno de ajuste de la
abrazadera de la anilla
フレーム
■ Montaje de la correa (FP9315/DFP9315)
* El FP9315 puede empleando con cadena doble, que está montada en el
pedal al salir de fábrica, o con la correa suministrada.
Utilice la que prefiera.
La correa suministrada tiene unidos un soporte metálico, un perno y una
arandela. Extraiga el perno y la arandela que fijan la cadena y enganche la
correa al pedal.
■ Estuche blando (FP9415/DFP9415/FP9315/DFP9315)
Se incluye un estuche blando con este juego. Antes de poner el pedal en el
estuche blando, pliegue el pedal e introdúzcalo en la bolsa protectora, que
protege la plataforma para el pie (foto 5).
Entonces, deslice la bolsa de modo que la cinta adhesiva de la bolsa quede
en el lado inferior del pedal (vea la foto 6).
Belt
Correa
A continuación, emplee la correa para fijar la bolsa al bastidor (vea la foto 7).
Fije la placa divisora del estuche blando a la parte adhesiva Velcro® del
estuche blando y entonces ponga el pedal, con la bolsa protectora colocada,
en la funda (foto 8).
Los accesorios tales como los de montaje, etc. pueden guardarse en los
bolsillos del estuche, etc.
El estuche blando también está diseñado para conjuntos de pedales sencillos
y dobles.
フープクランプ調整ボルト
ベルト
Foot Board
Plataforma para el pie
Locking Nut
Contratuerca
フットボード
固定ナット
Spring Tension
Adjustment Nut
Tuerca de ajuste de la
tensión del resorte
スプリング調整ナット
Spur
Puntal
■ ベルト取付方法 (FP9315/DFP9315)
※ 出荷時に取り付けられているFP9315ダブルチェーンは、同梱のベルトと取替えが可能で
す。どちらかで、使い分けてください。
ストッパー
■ ソフトケース(FP9415/DFP9415/FP9315/DFP9315)
本品にはソフトケースが同梱されています。まずペダルを折りたたんだ状態でフットボー
ドの保護のため保護袋に入れます(写真5)
。
その時、マジックテープの固定部を底面にしてください
(写真6参照)。
同梱のベルトには、あらかじめ金具とボルト・ワッシャーが取り付けられていますので、
チェーンを固定してるボルト・ワッシャーを外し、そのまま本体に固定してください。
Velcro Fastener
Cierre adhesivo
Photo 5
Foto 5
写真5
マジックテープ
次に、ベルトでフレームといっしょに固定します
(写真7)
。
そして、ソフトケースの仕切り板をソフトケース内部のマジックテープに固定をして、先
程のペダル本体を入れます(写真8)
。
ビーター等の小物は、ケースのポケット等をご利用ください。
尚、ソフトケースはシングルペダルとダブルペダルとで、共に同じ仕様です。
Clamp Lever
Palanca de la abrazadera
クランプレバー
Foot Board Stabilizer Rod
Barra estabilizadora de la plataforma para el pie
連結棒
Spring Tension
Locking Bolt
Perno de bloqueo de la
tensión del resorte
スプリング調整ボルト
■ ADJUSTMENTS
Photo 7
Foto 7
写真7
• Beater Angle Adjustment
• Spring Tension Adjustment
• Hoop Clamp
• Spur Adjustment
Same as FP9415/FP9315/FP8215.
■ AJUSTES
Protective Bag
Bolsa protectora
ベルト
保護袋
Photo 8
Foto 8
写真8
Photo 6
Foto 6
写真6
•
•
•
•
Belt
Correa
Partition Board
Placa divisoria
Ajuste del ángulo de la maza
Ajuste la tensión del resorte
Abrazadera de la anilla
Ajuste de los puntales
Igual que para los modelos FP9415/FP9315/FP8215.
■ 各種調整について
仕切板
・ビーターアングルの調整
・スプリングテンションの調整
・フープクランプ
・ストッパーの調整
すべてFP9415/FP9315/FP8215と同様。
Velcro strip attached to the protective bag.
Cinta adhesiva unida a la bolsa protectora.
マジックテープ固定部
管弦打楽器事業部 GDマーケティング部 営業課
〒438-0192 静岡県磐田市松之木島203 TEL.(0539)62-5976
Printed in Indonesia
FP7210
Foot Pedal
Pedal
Foot Pedal
Pedal
FP6210
フットペダル
Beater Head
Maza
Beater Head
Maza
ビーターヘッド
ビーターヘッド
フットペダル
Beater Angle Adjustment Bolt
Perno de ajuste del ángulo de la maza
ビーターアングル調整ボルト
Beater Locking Bolt
Perno de retención de la maza
Beater Angle Adjustment Bolt
Perno de ajuste del ángulo de la maza
ビーター固定ボルト
ビーターアングル調整ボルト
Beater Locking Bolt
Perno de retención de la maza
Frame
Bastidor
ビーター固定ボルト
Spring Roller
Rodillo de resorte
フレーム
Spring Roller
Rodillo de resorte
スプリングローラー
スプリングローラー
Chain
Cadena
Chain
Cadena
チェーン
チェーン
A Nut
Tuerca A
Foot Board
Plataforma para el pie
Aナット
A Nut
Tuerca A
フットボード
Foot Board
Plataforma para el pie
Aナット
フットボード
B Nut
Tuerca B
Bナット
Spur
Puntal
B Nut
Tuerca B
ストッパー
Bナット
Foot Board Stabilizer Rod
Barra estabilizadora de la plataforma para el pie
連結棒
Foot Board Stabilizer Rod
Barra estabilizadora de la plataforma para el pie
連結棒
■ ADJUSTMENTS
■ ADJUSTMENTS
● Adjusting the Spring Tension
● Adjusting the Beater Angle
Use a drum key (not supplied) to loosen the beater angle adjustment bolt and
adjust the angle of the beater, then secure.
● Adjusting the Spurs
The spurs keep the pedal from sliding forward duringperformance.
Rotate the spurs (clockwise to extend, counter clock-wise toretract) to adjust the
length according to your re-quirements.
● Adjusting the Spring Tension
● Adjusting the Beater Angle
The recoil tension of the foot board is adjustable.
• To increase spring tension, loosen nut A then tighten nut B shown in the
illustration.
• To decrease spring tension, loosen nut B shown in the illustration.
Once the desired spring tension has been obtained,firmly tighten nuts A and B.
■ AJUSTES
Use a drum key (not supplied) to loosen the beater angle adjustment bolt and
adjust the angle of the beater, then secure.
The recoil tension of the foot board is adjustable.
• To increase spring tension, loosen nut A then tighten nut B shown in the
illustration.
• To decrease spring tension, loosen nut B shown in the illustration.
Once the desired spring tension has been obtained,firmly tighten nuts A and B.
■ AJUSTES
● Ajuste del ángulo de la maza
● Ajuste la tensión del resorte
Emplee una llave de bombo (no suministrada) para aflojar el perno de ajuste del
ángulo de la maza, ajuste el ángulo de la maza, y luego apriételo.
•
● Ajuste los puntales
•
TLos puntales evitan que resbale el pedal hacia delante mientras se está tocando.
Gire los puntales (hacia la derecha para extenderlo, y hacia la izquierda para
retractarlo) para ajustar la longitud más adecuada para usted.
● Ajuste del ángulo de la maza
La tensión del resorte de la plataforma para el pie es ajustable.
Para incrementar la tensión del resorte, afloje la tuerca A y luego apriete la tuerca
B, mostradas en la ilustración.
Para reducir la tensión del resorte, afloje la tuerca B, mostrada en la ilustración.
Una vez haya obtenido la tensión deseada del resorte, apriete firmemente las tuercas A y B.
■ 各種調整について
● Ajuste la tensión del resorte
Emplee una llave de bombo (no suministrada) para aflojar el perno de ajuste del
ángulo de la maza, ajuste el ángulo de la maza, y luego apriételo.
•
•
La tensión del resorte de la plataforma para el pie es ajustable.
Para incrementar la tensión del resorte, afloje la tuerca A y luego apriete la tuerca
B, mostradas en la ilustración.
Para reducir la tensión del resorte, afloje la tuerca B, mostrada en la ilustración.
Una vez haya obtenido la tensión deseada del resorte, apriete firmemente las tuercas A y B.
■ 各種調整について
● スプリングテンションの調整(上写真参照)
● ビーターアングルの調整
● ストッパーの調整
● スプリングテンションの調整(上写真参照)
● ビーターアングルの調整
フットボードの戻り強さを調整することができます。
・ テンションを強くしたい場合は、Aナットをゆるめた後、Bナットを締めます。
・ テンションを弱くしたい場合は、Bナットをゆるめます。
お好みのテンションに調整したら、A,B両方のナットを締めます。
ドラムキー(別売)
でビーターアングル調整ボルトをゆるめ、ビーターのアングルを調整
し、固定します。
フットボードの戻り強さを調整することができます。
・ テンションを強くしたい場合は、Aナットをゆるめた後、Bナットを締めます。
・ テンションを弱くしたい場合は、Bナットをゆるめます。
お好みのテンションに調整したら、A,B両方のナットを締めます。
ドラムキー(別売)
でビーターアングル調整ボルトをゆるめ、ビーターのアングルを調整
し、固定します。
ペダル全体が前進するのを防ぎます。
時計方向に回すと針が出ますので、必要な長さに調整してご使用ください。
DFP9415/DFP9315/DFP9315L/DFP8215
Double Foot Pedal
Pedal doble
DFP7210
ダブルフットペダル
Center Shaft
Eje central
Universal Joint
Junta universal
Beater Head
Maza
Beater Angle Adjustment Bolt
Perno de ajuste del ángulo de la maza
センターシャフト
ユニバーサルジョイント
ビーターヘッド
ビーターアングル調整ボルト
[DFP9415]
Double Foot Pedal
Pedal doble
ダブルフットペダル
Center Shaft
Eje central
Universal Joint
Junta universal
Beater Head
Maza
Beater Angle Adjustment Bolt
Perno de ajuste del ángulo de la maza
センターシャフト
ユニバーサルジョイント
ビーターヘッド
ビーターアングル調整ボルト
Spring Roller Bearing
Cojinete de rodillos del resorte
スプリングローラーベアリング
Spring Roller Bearing
Rodillo de resorte
スプリングローラーベアリング
Hoop Clamp Adjustment Bolt
Perno de ajuste de la abrazadera de la anilla
フープクランプ調整ボルト
Beater Locking Bolt
Perno de retención de la maza
ビーター固定ボルト
Foot Board Angle Adjustment Bolt
Perno de ajuste del ángulo de la
plataforma para el pie
Spur
Puntal
フットボードアングル調整ボルト
ストッパー
Spur
Puntal
固定ナット
フープクランプ調整ボルト
Frame
Bastidor
Locking Nut
Contratuerca
フレーム
ストッパー
Foot Board
Plataforma para el pie
Spring Tension Adjustment Nut
Tuerca de ajuste de la tensión del resorte
フットボード
ストッパー
Base Plate
Placa de la base
フットボード
Base Plate
Placa de la base
Spring Tension Locking Bolt
Perno de bloqueo de la tensión del resorte
key wrench
Llave
ベースプレート
固定ナット
Foot Board
Plataforma para el pie
スプリング調整ナット
Spu
Puntalr
ベースプレート
[DFP9315L]
Hoop Clamp Adjustment Bolt
Perno de ajuste de la abrazadera de la anilla
ビーター固定ボルト
Locking Nut
Contratuerca
Frame
Bastidor
フレーム
Base Plate
Placa de la base
Beater Locking Bolt
Perno de retención de la maza
See front view below
Vea abajo la vista frontal
矢視
Spring Tension Adjustment Nut
Tuerca de ajuste de la tensión del resorte
ベースプレート
スプリング調整ボルト
スプリング調整ナット
キーレンチ
Key Holder
Soporte de la llave
Clamp Lever
Palanca de la abrazadera
Spring Tension Locking Bolt
Perno de bloqueo de la tensión del resorte
クランプレバー
キーホルダー
スプリング調整ボルト
Front View
Vista frontal
BD Hoop Support
(Except DFP8215)
Soporte de la anilla BO
(Excepto el DFP8215)
矢視
Foot Board Stabilizer Rod
Barra estabilizadora de la plataforma para el pie
連結棒
BDフープ受け
(DFP8215を除く)
■ Assembling the Double Foot Pedal
• Attaching the Universal Joint
Attach either end of the universal joint to the center shafts on each of the foot
pedal, align, and then use the supplied key wrench (or a drum key) to secure.
(Refer to the photo on the left.)
■ Assembling the Foot Pedal
Same as on the FP9415, FP9315, and FP8215.
■ About the Adjustments
• Adjusting the Beater Angle
• Adjusting the Footboard Angle (except on the DFP8215)
• Adjusting Spring Tension
• Hoop Clamp
• Adjusting the Spurs
• Key Wrench
All adjustments are the same as on the FP9415, FP9315, and FP8215.
■ Attaching the Belt
( DFP9315/DFP9315L only)
■ Assembling the Double Foot Pedal
● Attaching the Universal Joint
Attach either end of the universal joint to the center shafts on each of the
foot pedal, align, and then use the drum key (not supplied ) to secure.
(Refer to the photo on the upper.)
■ Montaje del pedal
Igual que para los modelos FP9415, FP9315, y FP8215.
■ Ajustes
• Ajuste del ángulo de la maza
• Ajuste del ángulo de la plataforma para el pie
(excepto el DFP8215)
• Ajuste la tensión del resorte
■ Soft Case
(DFP9415/DFP9315/DFP9315L only)
Same as the FP9415, FP9315, and FP8215.
■ Montaje del pedal doble
● Montaje de la junta universal
Una uno de los extremos de la junta uni versal a los ejes centrales de cada
pedal, alinéelos, y emplee una llave de bombo (no suministrada) para
fijarlos. (Consulte la foto de arriba.)
• Abrazadera de la anilla
• Ajuste de los puntales
• Llave
Todos los ajustes son iguales que para los modelos FP9415,FP9315, and
FP8215.
ユニバーサルジョイントの両端をそれぞれのフットペダルのセンターシャフト先端部には
めあわせ、付属のキーレンチ
(またはドラムキー)を使って固定します。
(上写真参照)
■ フットペダルの組立
FP9415/FP9315/FP8215と同様。
■ 各種調整について
・ビーターアングルの調整
・フットボードアングルの調整(DFP8215を除く)
・スプリングテンションの調整
■ 各ダブルフットペダルの組立
■ AJUSTES
• Ajuste del ángulo de la maza
• Ajuste la tensión del resorte
• Ajuste de los puntales
Lgual que para el modelo FP7210.
■ 各種調整について
● ユニバーサルジョイントの取付
■ Montaje de la correa ( sólo los DFP9315/DFP9315L)
Igual que para el modelo FP9315.
ユニバーサルジョイントの両端をそれぞれのフットペダルのセンターシャフト先端部に
はめあわせ、ドラムキー
(別売)
を使って固定します。(上写真参照)
・ ビーターアングルの調整
・ スプリングテンションの調整
・ ストッパーの調整
すべてFP7210と同様。
■ Estuche blando ( sólo los DFP9415/DFP9315/DFP9315L)
Igual que para los modelos FP9415, FP9315, y FP8215.
■ ダブルフットペダルの組立
● ユニバーサルジョイントの取付
• Adjusting the Beater Angle
• Adjusting Spring Tension
• Adjusting the Spurs
The same as on the FP7210.
Same as the FP9315.
■ Montaje del pedal doble
• Montaje de la junta universal
Una uno de los extremos de la junta universal a los ejes centrales de cada
pedal, alinéelos, y emplee la llave suministrada (o una llave de bombo) para
fijarlos. (Consulte la foto de la izquierda.)
■ ADJUSTMENTS
・フープクランプ
・ストッパーの調整
・キーレンチ
すべてFP9415/FP9315/FP8215と同様。
■ ベルトの取付(DFP9315/DFP9315Lのみ)
Caution : Use the supplied key wrench to adjust or tighten all parts.
Use of any other tool may result in damage to parts.
Precaución : Emplee la llave suministrada para ajustar o apretar todaslas
partes. El empleo de cualquier otra herramienta podría ocasionar
daños en las partes componentes.
FP9315と同様。
■ ソフトケース(DFP9415/DFP9315/DFP9315L)
FP9415/FP9315/FP8215と同様。
注:各部の調整には付属のキーレンチをご使用ください。
その他の工具等を使った場合、部品を破損させるおそれがあります。
Printed in Indonesia
1K90043 R1