1
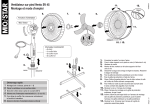
Banyan VINES Network Quick Install Card
Xerox Document Centre 240/255/265 LP/ST
Before You Start
If your printer is equipped with a Token Ring
interface you must enable TCP/IP and use lpr to
submit print jobs. Use the Token Ring Quick
Install Card supplied in this Quick Install Card
set to set the Ring Speed and Source Routing
settings for your environment.
button.
e) At the next screen, press the Enable
4.
Go to the printer and...
1.
2.
b) At the next screen, press the User
Name/PC Print Destination button,
enter the desired text for this item
using the touch panel keys, then press
Save.
Enter the Tools pathway
b) On the keypad enter 1111 or the
c) Press the User Password button,
current password. Press the Enter
button when finished. If your printer is
an ST model press the Go to Tools
button, otherwise skip to the next step.
enter the desired text for this item
using the touch panel keys, then press
Save.
c) The Touch Screen will be used for the
d) Press the Print Service Name button,
remainder of the data entry.
enter the desired text for this item
using the touch panel keys, then press
Save.
Enable Banyan VINES printing.
a) Press the Connectivity and Network
b) At the next screen, press the Network
Setup button.
c) At the next screen, press the Banyan
VINES button.
Configure User Name settings and
Password.
button.
Connect your Document Centre to the
network with the appropriate cabling.
Setup button.
button to start the Banyan Vines
protocol and press Save.
a) At the next screen, press the Settings
a) Press the Access ( ) button.
3.
b) Check the Configuration Report
d) At the next screen, press the Protocol
5.
e) Press the Exit Tools button.
Wait a MINIMUM of 7 minutes for the
printer to reset.
a) Obtain a Configuration Report page
from your printer.
For assistance, contact your local Xerox Customer Support Center:
USA: 1-800-821-2797
Canada: 1-800-939-3769
Page 1
6.
page and verify that Banyan VINES is
enabled and the other Banyan
Settings are correct.
From the documentation package
supplied with your printer, retrieve the
CentreWare Network Services CD-ROM
(CD-ROM 2) and the document entitled
Getting Started with Print and Fax
Services. Proceed to the next section of
this procedure called Go to the server
and...
Banyan VINES Network Quick Install Card
Xerox Document Centre 240/255/265 LP/ST
Go to the server and...
1.
2.
Screen will be displayed.
a) Using the MUSER utility, create a user
b) Using the MSERVICE utility, highlight
and select ADD a server-based
service.
c) At the Add A Service screen, enter
the StreetTalk name and description
when prompted.
d) Select the server on which you want to
create the service.
e) Select Banyan Print Service.
f) Select an appropriate disk location
when prompted.
g) A message will be displayed stating
that the service is running, but is not
yet available to users.
h) Press the F10 key to continue.
i) The Configure Queue screen will be
displayed. Press the F10 key to accept
the defaults displayed on the screen.
a) The Configure Paper Formats
Configure the Service and Queue.
name and assign a password for the
printer. The user name and password
must be the same that were entered at
the Document Centre.
f) The Output Strings Screen will be
Configure the Paper Formats.
g) The Enable Strings Screen will be
b) Press the Escape key to continue
3.
displayed. Press the F10 key to accept
the defaults displayed on the screen.
without making any changes.
Configure Access Lists and Print
Destination.
a) The Access Lists Screen will be
displayed.
b) Press the F10 key to accept the
h) Select No and press Enter when you
4.
are prompted to add another
destination.
Enable the Print Queue
a) The Print Queue Status screen will
defaults.
be displayed.
c) The Add a Destination Screen will be
b) Change the Printing jobs and the
displayed.
Accepting jobs fields to Yes and then
press the F10 key.
d) Select PCPrint and press Enter.
c) A message will be displayed stating
e) From the Destination Attributes
that the printer is ready to accept and
print jobs. Press the F10 key to
continue.
Screen, enter the Document Centre
user name as the PCPRINT ST name
and Description, and then press the
F10 key.
d) The Manage A Service screen will be
displayed.
Note The PCPrint ST name must be the same
as the user name created and must also
match the Street Talk (user) Name
entered at the printer.
displayed.
j) Press the F10 key to accept the
defaults.
Page 2
e) Press the Escape Key to return to the
5.
Manage Services main menu.
Power off and power on the Document
Centre 240/255/265 for these setup
options to take effect.