1
BD9:AB&%&(
*M+B:I6A8JII>C<
76C9H6L
DLC:GHB6CJ6A
;DGBD9:AHB6CJ;68IJG:9H>C8:+$%.
E]dcZ/(+%,()"()-'Dca^cZIZX]c^XVaHjeedgi/iZX]"hjeedgi5h]de[dm#W^o
8DENG><=I?6CJ6GN!'%%*7NLDD9HID8@>CI:GC6I>DC6A!>C8#!G:K>H:96J<JHI!'%%.IH
+,(&8G
L6GC>C</CDEDGI>DCD;I=>HB6CJ6AB6N7:G:EGD9J8:9>C6CNH=6E:DG;DGBL>I=DJI
I=:LG>II:C6EEGDK6AD;LDD9HID8@>CI:GC6I>DC6A!>C8#
Eg^ciZY^c8]^cV
K_`jdXelXcgifm`[\jZi`k`ZXcjX]\kp`ejkilZk`fejfek_\gifg\ij\klg#
fg\iXk`fe#dX`ek\eXeZ\Xe[j\im`Z\f]k_`jdXZ_`e\&\hl`gd\ek%
=X`cli\kfi\X[#le[\ijkXe[Xe[]fccfnk_\`ejkilZk`fej^`m\e`ek_`j
dXelXcdXpi\jlck`ej\i`fljg\ijfeXc`ealip#`eZcl[`e^XdglkXk`fe#
\c\ZkifZlk`fefi[\Xk_%
K_\fne\if]k_`jdXZ_`e\&\hl`gd\ek`jjfc\cpi\jgfej`Yc\]fi`kjjX]\
lj\%K_`ji\jgfej`Y`c`kp`eZcl[\jYlk`jefkc`d`k\[kfgifg\i`ejkXccX$
k`fe`eXjX]\\em`ifed\ek#g\ijfee\ckiX`e`e^Xe[ljX^\Xlk_fi`qX$
k`fe#gifg\i`ejg\Zk`feXe[dX`ek\eXeZ\#dXelXcXmX`cXY`c`kpXe[
Zfdgi\_\ej`fe#Xggc`ZXk`fef]jX]\kp[\m`Z\j#YcX[\&Zlkk\i`ek\^i`kp#
Xe[k_\ljX^\f]g\ijfeXcgifk\Zk`m\\hl`gd\ek%
K_\dXel]XZkli\in`ccefkY\_\c[c`XYc\]fi`ealipfigifg\ikp
[XdX^\]ifde\^c`^\eZ\#`dgifg\ikiX`e`e^#dXZ_`e\df[`]`ZXk`fejfi
d`jlj\%
Jfd\[ljkZi\Xk\[Ypgfn\ijXe[`e^#jXn`e^#^i`e[`e^#[i`cc`e^#Xe[
fk_\iZfejkilZk`feXZk`m`k`\jZfekX`ejZ_\d`ZXcjbefnekfk_\JkXk\f]
:Xc`]fie`XkfZXlj\ZXeZ\i#Y`ik_[\]\Zkjfifk_\ii\gif[lZk`m\_Xid%
Jfd\\oXdgc\jf]k_\j\Z_\d`ZXcjXi\1
C\X[]ifdc\X[$YXj\[gX`ekj%
:ipjkXcc`e\j`c`ZX]ifdYi`Zbj#Z\d\ekXe[fk_\idXjfeipgif[lZkj%
8ij\e`ZXe[Z_ifd`ld]ifdZ_\d`ZXccp$ki\Xk\[cldY\i%
Pflii`jb]ifdk_\j\\ogfjli\jmXi`\j#[\g\e[`e^fe_fnf]k\epfl
[fk_`jkpg\f]nfib%Kfi\[lZ\pfli\ogfjli\kfk_\j\Z_\d`ZXcj1
Nfib`eXn\ccm\ek`cXk\[Xi\X#Xe[nfibn`k_Xggifm\[jX]\kp\hl`g$
d\ek#jlZ_Xjk_fj\[ljkdXjbjk_XkXi\jg\Z`Xccp[\j`^e\[kf]`ck\i
flkd`ZifjZfg`ZgXik`Zc\j%
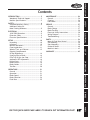
J8=<KP%%%%%%%%%%%%%%%%%%%%%%%%%%%%%%%%%%%%%%%%%%%%%%%Standard Machinery Safety ..................... 6
Additional Safety for
Metal Cutting Bandsaws ......................... 8
G8IKJ%%%%%%%%%%%%%%%%%%%%%%%%%%%%%%%%%%%%%%%%%%%%%% *+
Motor & Feed Rate Control ................... 34
Saw Assembly ................................... 36
Stand Assembly ................................. 38
Guides & Shafts ................................ 40
Machine Labels ................................. 42
N8II8EKP%%%%%%%%%%%%%%%%%%%%%%%%%%%%%%%%%%%%%%%% +,
FG<I8K@FEJ
D8@EK<E8E:<
FG<I8K@FEJ%%%%%%%%%%%%%%%%%%%%%%%%%%%%%%%%%%%%%%% )(
General .......................................... 21
Operation ........................................ 21
Blade Speed ..................................... 23
Blade Selection ................................. 24
Feed Rate ....................................... 25
J<KLG
J<KLG%%%%%%%%%%%%%%%%%%%%%%%%%%%%%%%%%%%%%%%%%%%%%% ('
Unpacking ....................................... 10
Inventory ........................................ 10
Machine Placement ............................ 11
Cleaning Machine............................... 11
Wheels, Feet, and Cabinet ................... 12
Shipping Strap Removal
& Stop Adjustment ............................. 14
Squaring Vise to Blade ........................ 14
Chip Tray & Cast Iron Stop.................... 15
Automatic OFF Adjustment ................... 16
Pulley Cover..................................... 17
Blade Tension ................................... 18
Blade Guides .................................... 19
Test Run.......................................... 20
J<IM@:<%%%%%%%%%%%%%%%%%%%%%%%%%%%%%%%%%%%%%%%%%%%% ).
General .......................................... 27
Blade Change ................................... 27
Blade Tracking .................................. 29
Electrical Safety Instructions................. 30
Wiring Diagram ................................. 31
Troubleshooting................................. 32
<C<:KI@:8C
<C<:KI@:8C%%%%%%%%%%%%%%%%%%%%%%%%%%%%%%%%%%%%%%%%%0
110V/220V Operation ............................ 9
Extension Cords .................................. 9
Electrical Specifications ........................ 9
D8@EK<E8E:<%%%%%%%%%%%%%%%%%%%%%%%%%%%%%%%%%%%% )General .......................................... 26
Cleaning ......................................... 26
Lubrication ...................................... 26
J8=<KP
@EKIF;L:K@FE%%%%%%%%%%%%%%%%%%%%%%%%%%%%%%%%%%%%%)
Woodstock Technical Support .................. 2
Machine Specifications .......................... 3
@EKIF;L:K@FE
:fek\ekj
J<IM@:<
G8IKJ
LJ<K?<HL@:B>L@;<G8><C89<CJKFJ<8I:?FLK@E=FID8K@FE=8JK
@EKIF;L:K@FE
D('(*Fne\ijDXelXcD]^%J`eZ\-&'0
@EKIF;L:K@FE
Nff[jkfZbK\Z_e`ZXcJlggfik
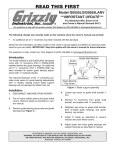
This machine has been specially designed to provide many years of trouble-free service. Close attention
to detail, ruggedly built parts and a rigid quality control program assure safe and reliable operation.
Woodstock International, Inc. is committed to customer satisfaction. Our intent with this manual is to
include the basic information for safety, setup, operation, maintenance, and service of this product.
We stand behind our machines! In the event that questions arise about your machine, please contact
Woodstock International Technical Support at (360) 734-3482 or send e-mail to: k\Z_$jlggfik7j_fg]fo%
Y`q. Our knowledgeable staff will help you troubleshoot problems and process warranty claims.
If you need the latest edition of this manual, you can download it from _kkg1&&nnn%j_fg]fo%Y`q.
If you have comments about this manual, please contact us at:
Nff[jkfZb@ek\ieXk`feXc#@eZ%
8kke1K\Z_e`ZXc;fZld\ekXk`feDXeX^\i
G%F%9fo)*'0
9\cc`e^_Xd#N80/)).
<dX`c1dXelXcj7nff[jkfZb`ek%Zfd
-2-
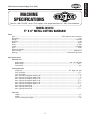
B68=>C:
HE:8>;>86I>DCH
Phone #: (360) 734-3482 • Online Tech Support: [email protected] • Web: www.shopfox.biz
BD9:AB&%&(
*M+B:I6A8JII>C<76C9H6L
Dfkfi
Type .......................................................................................... TEFC Capacitor Start Induction
Horsepower ............................................................................................................... 1⁄2 HP
Voltage ................................................................................................................ 110/220V
Prewired ..................................................................................................................... 110V
Phase....................................................................................................................... Single
Amps .......................................................................................................................7/3.5A
Speed .................................................................................................................. 1725 RPM
Cycle ........................................................................................................................ 60 Hz
Number Of Speeds ............................................................................................................. 1
Power Transfer .................................................................................................... V-Belt Drive
Bearings ............................................................................................... Sealed and Lubricated
DX`eJg\Z`]`ZXk`fej
Fg\iXk`fe@e]f
Blade Speeds ..........................................................................................80, 120, 200 FPM
Blade Length ........................................................................................................64 1⁄2"
Head Swivel ........................................................................................................... 45°
:lkk`e^:XgXZ`k`\j
Angle Cuts .......................................................................................... 45° Right, 60° Left
Vise Jaw Depth ...................................................................................................... 4 3⁄8"
Vise Jaw Height ..................................................................................................... 2 1⁄2"
Max. Capacity Rectangular Height @ 90° .......................................................................... 5"
Max. Capacity Rectangular Width @ 90° ........................................................................... 6"
Max. Capacity Rectangular Height @ 60° ....................................................................... 1 3⁄4"
Max. Capacity Rectangular Width @ 60° ....................................................................... 2 3⁄16"
Max. Capacity Rectangular Height @ 45° ......................................................................2 15⁄16"
Max. Capacity Rectangular Width @ 45° ........................................................................ 3 3⁄4"
Max. Capacity Round @ 90° .......................................................................................... 5"
Max. Capacity Round @ 60 ......................................................................................... 1 3⁄4"
Max. Capacity Round @ 45° ....................................................................................... 3 3⁄4"
KXYc\`e]f
Length ................................................................................................................... 12"
Width .................................................................................................................. 4 1⁄2"
Floor To Cutting Area Height ........................................................................................ 29"
DXZ_`e\Jg\Z`]`ZXk`fej
-3-
@EKIF;L:K@FE
D('(*Fne\ijDXelXcD]^%J`eZ\-&'0
@EKIF;L:K@FE
D('(*Fne\ijDXelXcD]^%J`eZ\-&'0
Fm\iXcc;`d\ej`fej
Weight .................................................................................................................. 150 lbs.
Length ......................................................................................................................... 39"
Width ....................................................................................................................... 23 3⁄8"
Height ...................................................................................................................... 54 3⁄4"
Foot Print (Length/Width).....................................................................................26 1⁄2" x 20 1⁄2"
:fejkilZk`feDXk\i`Xcj
Table .............................................................................................. Precision-Ground Cast Iron
Wheels ..................................................................................................... Machined Cast Iron
Body..................................................................................................................... Cast Iron
Base ..............................................................................Formed & Welded Steel w/Coolant Sump
Wheel Cover ..................................................................................................... Formed Steel
Paint ........................................................................................................................Epoxy
J_`gg`e^;`d\ej`fej
Weight ................................................................................................................... 176 lbs.
Length ......................................................................................................................... 41"
Width .......................................................................................................................... 19"
Height ......................................................................................................................... 22"
<c\Zki`ZXc
Switch ..................................................................................................... Automatic Shut-Off
Switch Voltage ............................................................................................................. 110V
Cord Length................................................................................................................. 6 ft.
Cord Gauge ............................................................................................................ 18 gauge
Recommended Breaker Size for 110V ................................................................................... 15A
Recommended Breaker Size for 220V ................................................................................... 15A
Included Plug Type ................................................................................................. NEMA 5-15
Fk_\i
Wheel Size .................................................................................................................... 13"
Blade Guides.............................................................................................. Adjustable Carbide
ISO Factory ............................................................................................................ ISO 9001
Country of Origin ......................................................................................................... China
Warranty ................................................................................................................. 2 Years
Serial Number Location .................................................................Machine ID Label on Body Frame
Assembly Time ......................................................................................................30 Minutes
=\Xkli\j
Control Panel Conveniently Located
Adjustable Hydraulic Downfeed
Quick Release Vise for Rapid Workpiece Change-Out
Blade Included
-4-
@EKIF;L:K@FE
D('(*Fne\ijDXelXcD]^%J`eZ\-&'0
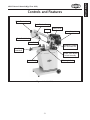
:fekifcjXe[=\Xkli\j
Blade Tension Knob
Blade Tension Gauge
Pulley Cover
Gearbox
Heavy-Duty Motor
Blade Guide Knob
Blade Guides
Hydraulic Cylinder
& Feed Rate Dial
Vise Clamp
Handwheel
ON/OFF Push-Button
Switch Assembly
Cast Iron Stop
Table Angle Scale
=`^li\(% Model M1013.
-5-
D('(*Fne\ijDXelXcD]^%J`eZ\-&'0
J8=<KP
J8=<KP
JkXe[Xi[
J8=<KP DXZ_`e\ipJX]\kp
I<8;D8EL8C9<=FI<FG<I8K@E>D8:?@E<%
=8@CLI<KF=FCCFN@EJKIL:K@FEJ9<CFNN@CC
I<JLCK@EG<IJFE8C@EALIP%
@e[`ZXk\jXe`dd`e\ekcp_XqXi[fljj`klXk`fen_`Z_#`]efkXmf`[\[#N@CC
i\jlck`e[\Xk_fij\i`flj`ealip%
@e[`ZXk\jXgfk\ek`Xccp_XqXi[fljj`klXk`fen_`Z_#`]efkXmf`[\[#:FLC;
i\jlck`e[\Xk_fij\i`flj`ealip%
@e[`ZXk\jXgfk\ek`Xccp_XqXi[fljj`klXk`fen_`Z_#`]efkXmf`[\[#D8P
i\jlck`ed`efifidf[\iXk\`ealip%
EFK@:<
K_`jjpdYfc`jlj\[kfXc\ikk_\lj\ikflj\]lc`e]fidXk`feXYflkgifg\i
fg\iXk`fef]k_\\hl`gd\ek#Xe[&fiXj`klXk`fek_XkdXpZXlj\[XdX^\
kfk_\dXZ_`e\ip%
JkXe[Xi[JX]\kp@ejkilZk`fej
(% I<8;K?IFL>?K?<<EK@I<D8EL8C9<=FI<JK8IK@E>D8:?@E<IP%DXZ_`e\ipgi\j\ekjj\i`flj
`ealip_XqXi[jkflekiX`e\[lj\ij%
)% 8CN8PJ LJ< 8EJ@ 8GGIFM<; J8=<KP >C8JJ<J N?<E FG<I8K@E> D8:?@E<IP% <m\ip[Xp \p\$
^cXjj\jfecp_Xm\`dgXZki\j`jkXekc\ej\jÇk_\pXi\EFKjX]\kp^cXjj\j%
*% 8CN8PJN<8I8E@FJ?8GGIFM<;I<JG@I8KFIN?<EFG<I8K@E>D8:?@E<IPK?8KGIF;L:<J
;LJK%Nff[[ljk`jXZXiZ`ef^\eXe[ZXeZXlj\ZXeZ\iXe[j\m\i\i\jg`iXkfip`cce\jj\j%
+% 8CN8PJ LJ< ?<8I@E> GIFK<:K@FE N?<E FG<I8K@E> D8:?@E<IP% DXZ_`e\ip ef`j\ ZXe ZXlj\
g\idXe\ek_\Xi`e^[XdX^\%
,% N<8IGIFG<I8GG8I<C%;FEFKn\Xicffj\Zcfk_`e^#^cfm\j#e\Zbk`\j#i`e^j#fia\n\cipn_`Z_dXp
^\k ZXl^_k `e dfm`e^ gXikj% N\Xi gifk\Zk`m\ _X`i Zfm\i`e^ kf ZfekX`e cfe^ _X`i Xe[ n\Xi efe$jc`g
]ffkn\Xi%
-% E<M<IFG<I8K<D8:?@E<IPN?<EK@I<;#FILE;<IK?<@E=CL<E:<F=;IL>JFI8C:F?FC%
9\d\ekXccpXc\ikXkXcck`d\jn_\eilee`e^dXZ_`e\ip%
.% FECP8CCFNKI8@E<;8E;GIFG<ICPJLG<IM@J<;G<IJFEE<CKFFG<I8K<D8:?@E<IP%DXb\
jli\fg\iXk`fe`ejkilZk`fejXi\jX]\Xe[Zc\Xicple[\ijkff[%
/% B<<G:?@C;I<E8E;M@J@KFIJ8N8P%B\\gXccZ_`c[i\eXe[m`j`kfijXjX]\[`jkXeZ\]ifdk_\nfib
Xi\X%
0% D8B<NFIBJ?FG:?@C;GIFF=%Lj\gX[cfZbj#dXjk\ijn`kZ_\j#Xe[i\dfm\jkXikjn`kZ_b\pj%
-6-
D('(*Fne\ijDXelXcD]^%J`eZ\-&'0
('% E<M<IC<8M<N?<ED8:?@E<@JILEE@E>%Kliegfn\iF==Xe[XccfnXccdfm`e^gXikjkfZfd\kf
XZfdgc\k\jkfgY\]fi\c\Xm`e^dXZ_`e\leXkk\e[\[%
((% ;FEFKLJ<@E;8E><IFLJ<EM@IFED<EKJ%;FEFKlj\dXZ_`e\ip`e[Xdg#n\kcfZXk`fej#fi
n_\i\Xep]cXddXYc\fiefo`flj]ld\jdXp\o`jk%
(*% LJ<8>IFLE;<;<OK<EJ@FE:FI;I8K<;=FIK?<D8:?@E<8DG<I8><%Le[\ij`q\[Zfi[jfm\i$
_\XkXe[cfj\gfn\i%I\gcXZ\\ok\ej`feZfi[j`]k_\pY\Zfd\[XdX^\[%;FEFKlj\\ok\ej`feZfi[j
]fi))'MdXZ_`e\ip%
(+% 8CN8PJ;@J:FEE<:K=IFDGFN<IJFLI:<9<=FI<J<IM@:@E>D8:?@E<IP%DXb\jli\jn`kZ_`j
`eF==gfj`k`feY\]fi\i\Zfee\Zk`e^%
(,% D8@EK8@ED8:?@E<IPN@K?:8I<%B\\gYcX[\jj_XigXe[Zc\Xe]fiY\jkXe[jX]\jkg\i]fidXeZ\%
=fccfn`ejkilZk`fej]ficlYi`ZXk`e^Xe[Z_Xe^`e^XZZ\jjfi`\j%
(-% D8B<JLI<>L8I;J8I<@EGC8:<8E;NFIB:FII<:KCP9<=FI<LJ@E>D8:?@E<IP%
(.% I<DFM< 8;ALJK@E> B<PJ 8E; NI<E:?<J% DXb\ X _XY`k f] Z_\Zb`e^ ]fi b\pj Xe[ X[aljk`e^
ni\eZ_\jY\]fi\klie`e^dXZ_`e\ipFE%
(/% :?<:B =FI ;8D8><; G8IKJ 9<=FI< LJ@E> D8:?@E<IP% :_\Zb ]fi Y`e[`e^ Xe[ Xc`^ed\ek f]
gXikj#Yifb\egXikj#gXikdflek`e^#cffj\Yfckj#Xe[Xepfk_\iZfe[`k`fejk_XkdXpX]]\ZkdXZ_`e\
fg\iXk`fe%I\gX`ifii\gcXZ\[XdX^\[gXikj%
(0% LJ<I<:FDD<E;<;8::<JJFI@<J%I\]\ikfk_\`ejkilZk`fedXelXc]fii\Zfdd\e[\[XZZ\jjfi`\j%
K_\lj\f]`dgifg\iXZZ\jjfi`\jdXpZXlj\i`jbf]`ealip%
)'%;FEFK=FI:<D8:?@E<IP%NfibXkk_\jg\\[]fin_`Z_k_\dXZ_`e\fiXZZ\jjfipnXj[\j`^e\[%
)(% J<:LI< NFIBG@<:<% Lj\ ZcXdgj fi X m`j\ kf _fc[ k_\ nfibg`\Z\ n_\e giXZk`ZXc% 8 j\Zli\[
nfibg`\Z\gifk\Zkjpfli_Xe[jXe[]i\\jYfk__Xe[jkffg\iXk\k_\dXZ_`e\%
))% ;FEFKFM<II<8:?%B\\ggifg\i]ffk`e^Xe[YXcXeZ\XkXcck`d\j%
)*% D8EPD8:?@E<JN@CC<A<:KK?<NFIBG@<:<KFN8I;K?<FG<I8KFI%BefnXe[Xmf`[Zfe[`$
k`fejk_XkZXlj\k_\nfibg`\Z\kfb`ZbYXZb%
)+% 8CN8PJCF:BDF9@C<98J<J@=LJ<; 9<=FI<FG<I8K@E>D8:?@E<IP%
),% 9< 8N8I< K?8K :<IK8@E ;LJK D8P 9< ?8Q8I;FLJ kf k_\ i\jg`iXkfip jpjk\dj f] g\fgc\ Xe[
Xe`dXcj#\jg\Z`Xccp]`e\[ljk%DXb\jli\pflbefnk_\_XqXi[jXjjfZ`Xk\[n`k_k_\kpg\f][ljkpfl
n`ccY\\ogfj\[kfXe[XcnXpjn\XiXi\jg`iXkfiXggifm\[]fik_Xkkpg\f][ljk%
-7-
J8=<KP
()% B<<GNFIB8I<8:C<8E8E;N<CCC@K%:clkk\iXe[[Xibj_X[fnjdXpZXlj\XZZ`[\ekj%
D('(*Fne\ijDXelXcD]^%J`eZ\-&'0
J8=<KP
8[[`k`feXcJX]\kp]fiD\kXc:lkk`e^9Xe[jXnj
I<8;Xe[le[\ijkXe[k_`j
\ek`i\dXelXcY\]fi\lj`e^
k_`jdXZ_`e\%J\i`fljg\i$
jfeXc `ealip dXp fZZli
`] jX]\kp Xe[ fg\iXk`feXc
`e]fidXk`fe `j efk le[\i$
jkff[ Xe[ ]fccfn\[% ;F
EFK i`jb pfli jX]\kp Yp
efki\X[`e^
LJ<k_`jXe[fk_\idXZ_`e\ipn`k_ZXlk`fe
Xe[ i\jg\Zk% 8cnXpj Zfej`[\i jX]\kp ]`ijk#
Xj `k Xggc`\j kf pfli `e[`m`[lXc nfib`e^
Zfe[`k`fej%Efc`jkf]jX]\kp^l`[\c`e\jZXe
Y\ Zfdgc\k\Ç\m\ip j_fg \em`ifed\ek `j
[`]]\i\ek%=X`cli\kf]fccfn^l`[\c`e\jZflc[
i\jlck `e j\i`flj g\ijfeXc `ealip# [XdX^\
kf\hl`gd\ekfigffinfibi\jlckj%
(% 9cX[\:fe[`k`fe1 Do not operate with a dull, cracked or badly worn blade—they can break during
use or greatly decrease cutting performance. Inspect blades for cracks and missing teeth before
each use.
)% 9cX[\I\gcXZ\d\ek1 Wear gloves to protect hands and safety glasses to protect eyes when
replacing the blade. When replacing blades, make sure teeth face forward and down toward the
table in the direction of blade travel.
*% Nfibg`\Z\?Xe[c`e^1 Your hands can be cut or drawn into the blade during operation if the
workpiece moves unexpectedly. Always keep your hands a safe distance away from the moving
blade.
+% DX^e\j`ld=`i\?XqXi[1 Use EXTREME CAUTION if cutting magnesium. Using the wrong cutting
fluid or overheating material could lead to an extremely hot fire that is difficult to extinguish.
Additionally, do not allow magnesium swarf or dust to pile up around the machine and only dispose
of the waste using approved methods.
,% ?fkJli]XZ\j1 Be aware that touching hot workpieces or chips after welding, grinding, or cutting
can cause burns.
-% :lkk`e^=cl`[JX]\kp1 If cutting fluid is used for operations, only use the minimum amount
necessary, and promptly clean it from the machine and work area after use. Cutting fluid is
associated with skin disease, lung damage, and cancer. Avoid breathing, ingesting, or touching
cutting fluid and always wear approved personal protective equipment when using or cleaning it.
Always follow the manufacturer's recommendation to ensure safe and appropriate use.
.% <ekXe^c\d\ek?XqXi[j1 Always keep the blade guard correctly positioned and wheel doors closed
and secured when bandsaw is in operation. Loose clothing, jewelry, long hair and work gloves can
be drawn into working parts.
/% LejkXYc\Nfibg`\Z\j1 Workpieces that cannot be supported or stabilized without a vise or jig
should not be cut on a vertical metal-cutting bandsaw, because they can unexpectedly move while
cutting and draw the operator's hands into the blade causing serious personal injury. Examples are
chains, cables, round or oblong-shaped workpieces, workpieces with internal or built-in moving or
rotations parts, etc.
0% :c\Xi`e^:_`gj1 Metal chips can easily cut skin—even through a piece of cloth. Avoid clearing chips
by hand or with a rag. Use a brush or vacuum to clear metal chips.
-8-
D('(*Fne\ijDXelXcD]^%J`eZ\-&'0
<C<:KI@:8C
K_\ dXZ_`e\ dljk Y\ gifg\icp j\k lg Y\]fi\ `k `j
jX]\kffg\iXk\%;FEFKZfee\Zkk_`jdXZ_`e\kfk_\
gfn\i jfliZ\ lek`c `ejkilZk\[ kf [f jf `e k_\ K\jk
Ilegfik`fef]k_`jdXelXc%
<C<:KI@:8C
(('M&))'MFg\iXk`fe
The ModelM1013 is prewired for 110V operation. For 220V
operation, the motor must be re-wired as directed by
the wiring diagram on the inside of the motor junction
box cover. If this diagram is not available, use the wiring
diagram on GX^\*(.
The power supply circuit used for this machine MUST be
grounded and rated for the amperage given below. Never
replace a circuit breaker with one of higher amperage
without consulting a qualified electrician to ensure
compliance with wiring codes.
-$(,G
-$(,I
=`^li\)% NEMA 5-15 and 6-15 plugs and
receptacles.
This machine must be grounded! The cord supplied with
this machine comes with a grounding wire. If your outlet
does not accommodate a ground pin, have it replaced by
a qualified electrician.
@]pflXi\lejli\XYflkk_\n`i`e^Zf[\j`epfliXi\X
fipflgcXekfZfee\ZkpflidXZ_`e\kfXj_Xi\[Z`i$
Zl`k#pfldXpZi\Xk\X]`i\fiZ`iZl`kfm\icfX[_XqXi[Ç
ZfejlckXhlXc`]`\[\c\Zki`Z`Xekfi\[lZ\k_`ji`jb%
<ok\ej`fe:fi[j
We do not recommend using an extension cord; however,
if you have no alternative, use the following guidelines:
•
•
•
•
Use a cord rated for Standard Service (S).
Do not use an extension cord longer than 50 feet.
Ensure that the cord has a ground wire and pin.
Use the gauge size listed below as a minimum.
;FEFKnfibfepfli\c\Zki`ZXcjpjk\d
`] pfl Xi\ lejli\ XYflk \c\Zki`ZXc
Zf[\jXe[n`i`e^J\\bXjj`jkXeZ\]ifd
X hlXc`]`\[ \c\Zki`Z`Xe% @^efi`e^ k_`j
nXie`e^ZXeZXlj\\c\ZkifZlk`fe#]`i\#
fidXZ_`e\[XdX^\%
<c\Zki`ZXcJg\Z`]`ZXk`fej
Fg\iXk`e^MfckX^\
8dg;iXn
D`e%:`iZl`kJ`q\
I\Zfdd\e[\[Gcl^
<ok\ej`fe:fi[
110V Operation
7 Amps
15A
NEMA 5-15 (incl.)
14 Gauge
220V Operation
3.5 Amps
15A
NEMA 6-15 (not incl.)
16 Gauge
-9-
D('(*Fne\ijDXelXcD]^%J`eZ\-&'0
J<KLG
A%
B%
C%
D%
LegXZb`e^
This machine has been carefully packaged for safe
transportation. If you notice the machine has been
damaged during shipping, please contact your authorized
Shop Fox dealer immediately.
8jj\dYcp?Xi[nXi\EfkJ_fne 1
—Hex Wrench 4mm ............................1
—Hex Bolt M8-1.25 x 30.......................4
—Flat Washer 17mm (Wheels) ...............4
—Flat Washer 8mm ............................4
—Cotter Pin 1⁄8" x 1" (Wheels) ...............2
—Hex Nut M8-1.25 (Feet) .....................2
—Phillips Head Screw M6-1 x 12 ........... 16
—Flat Washer 6mm .......................... 16
—Hex Bolt 1⁄4"-20 x 1⁄2" .......................2
—Flat Washer 1⁄4" ..............................2
@em\ekfip
The following is a description of the main components
shipped with the Model M1013. Lay the components out to
inventory them.
J<KLG
Belt Cover .................................1
Work Stop ..................................1
Work Stop Shaft...........................1
Wheels .....................................2
Efk\1 @]pflZXek]`e[Xe`k\dfek_`jc`jk#Z_\Zbk_\
dflek`e^cfZXk`fefek_\dXZ_`e\fi\oXd`e\k_\
gXZbX^`e^dXk\i`XcjZXi\]lccp%FZZXj`feXccpn\gi\$`ejkXcc
Z\ikX`eZfdgfe\ekj]fijX]\ij_`gg`e^%
@em\ekfip=`^li\* Hkp
8% Base ..........................................................1
9% Front Panel .................................................1
:% Rear Panel ..................................................1
;% Right Panel .................................................1
<% Left Panel ...................................................1
=% Chip Tray ....................................................1
>% Feet ..........................................................4
?% Axle ..........................................................1
@% V-Belt ........................................................1
B\\g dXZ_`e\ [`jZfee\Zk\[ ]ifd
gfn\ilek`c`ejkilZk\[fk_\in`j\%
:
9
8
>
=
?
@
A
<
D
B
C
=`^li\*% Model M1013 inventory.
-10-
;
D('(*Fne\ijDXelXcD]^%J`eZ\-&'0
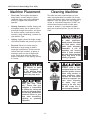
:c\Xe`e^DXZ_`e\
=cffiCfX[1 This machine distributes a
heavy load in a small footprint. Some
residential floors may require additional
bracing to support both machine and
operator.
Nfib`e^:c\XiXeZ\j1 Consider existing and
anticipated needs, size of material to be
processed through the machine, and space
for auxiliary stands, work tables or other
machinery when establishing a location for
your Machine Type.
The table and other unpainted parts of your
metal cutting bandsaw are coated with a waxy
grease that protects them from corrosion during
shipment. Clean this grease off with a solvent
cleaner or citrus-based degreaser. DO NOT use
chlorine-based solvents such as brake parts
cleaner or acetone—if you happen to splash
some onto a painted surface, you will ruin the
finish.
C`^_k`e^1 Lighting should be bright enough
to eliminate shadow and prevent eye strain.
<c\Zki`ZXc1Electrical circuits must be
dedicated or large enough to handle
amperage requirements. Outlets must be
located near each machine, so power or
extension cords are clear of high-traffic
areas. Follow local electrical codes for
proper installation of new lighting, outlets,
or circuits.
E<M<IZc\Xen`k_^Xjfc`e\
fi fk_\i g\kifc\ld$
YXj\[jfcm\ekj%Dfjk_Xm\
cfn ]cXj_ gf`ekj# n_`Z_
dXb\ k_\d \oki\d\cp
]cXddXYc\% 8 i`jb f]
\ogcfj`fe Xe[ Ylie`e^
\o`jkj `] k_\j\ gif[lZkj
Xi\lj\[%J\i`fljg\ijfeXc
`ealip dXp fZZli `] k_`j
nXie`e^`j`^efi\[
LJ< _\cg\ij fi gfn\i
c`]k`e^ \hl`gd\ek kf
c`]k k_`j DXZ_`e\ EXd\%
Fk_\in`j\# j\i`flj g\i$
jfeXc`ealipdXpfZZli%
8CN8PJ nfib `e n\cc$
m\ek`cXk\[Xi\Xj]Xi]ifd
gfjj`Yc\ `^e`k`fe jfliZ\j
n_\e lj`e^ jfcm\ekj kf
Zc\Xe dXZ_`e\ip% DXep
jfcm\ekj Xi\ kfo`Z n_\e
`e_Xc\[ fi `e^\jk\[% Lj\
ZXi\ n_\e [`jgfj`e^
f] nXjk\ iX^j Xe[
kfn\cj kf Y\ jli\ k_\p
;F EFK Zi\Xk\ ]`i\ fi
\em`ifed\ekXc_XqXi[j%
D8B< pfli j_fg ÈZ_`c[
jX]\%É <ejli\ k_Xk pfli
nfibgcXZ\ `j `eXZZ\jj`Yc\
kf Z_`c[i\e Yp Zcfj`e^ Xe[
cfZb`e^Xcc\ekiXeZ\jn_\e
pflXi\XnXp%E<M<IXccfn
lekiX`e\[ m`j`kfij `e pfli
j_fg n_\e Xjj\dYc`e^#
X[aljk`e^ fi fg\iXk`e^
\hl`gd\ek%
-11-
J<KLG
DXZ_`e\GcXZ\d\ek
D('(*Fne\ijDXelXcD]^%J`eZ\-&'0
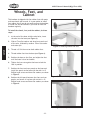
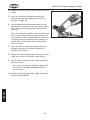
N_\\cj#=\\k#Xe[
:XY`e\k
This bandsaw is shipped with four rubber feet with posts
and two wheels with an axle. It is your option to install
four rubber feet if you do not need to move the bandsaw,
or install the axle and wheels if you need to move the
bandsaw regularly.
J<KLG
Kf`ejkXcck_\n_\\cj#]\\k#Xe[k_\ZXY`e\k#[fk_\j\
jk\gj1
(%
At the end of the base with the axle holes, insert
the axle into the base (see =`^li\+).
)%
Slide a 17mm flat washer and wheel onto each end
of the axle, followed by another 17mm flat washer
and cotter pin.
*%
Thread a 3⁄8-16 hex nut on both rubber feet.
+%
Thread rubber feet into the base (see =`^li\+).
,%
Position the base on the floor, and adjust the feet
until the base is level and stable.
-%
Tighten the hex nuts against the base to lock the
feet in position.
.%
Position the front and rear panels on the base and
install the panels to the base with four M6-1 x 12
Phillips head screws and 6mm flat washers, as shown
in =`^li\,.
/%
Position the left panel between the front and rear
panels, and secure it in place with six M6-1 x 12
Phillips head screws and 6mm flat washers, as shown
in =`^li\-.
=`^li\+% Installing wheels and feet.
=`^li\,% Front and rear panels installed.
=`^li\-% Left panel installed.
-12-
D('(*Fne\ijDXelXcD]^%J`eZ\-&'0
0%
Position the right panel between the front and rear
panel, and secure it in place with six M6-1 x 12
Phillips head screws and 6mm flat washers, as shown
in =`^li\..
K_\Df[\cD('(*`j_\XmpKf
Xmf`[g\ijfeXc`ealip#^\k_\cgkf
c`]kk_`jdXZ_`e\%
('% With the help of an assistant or a hoisting device,
place the bandsaw onto the cabinet.
=`^li\.% Installing right panel.
((% Secure the bandsaw to the cabinet with four M8-1.25
x 30 hex bolts and 8mm flat washers, as shown in
=`^li\/.
J<KLG
=`^li\/% Installing bandsaw to cabinet.
-13-
D('(*Fne\ijDXelXcD]^%J`eZ\-&'0
J_`gg`e^JkiXgI\dfmXc
Jkfg8[aljkd\ek
To ensure that your bandsaw arrives without damage to
the hinge system, a shipping strap was installed. After
removing the shipping strap, you will have to make a
series of adjustments, beginning with the feed stop bolt.
Shipping Brace
Kfi\dfm\k_\j_`gg`e^jkiXgXe[X[aljkk_\]\\[jkfg
Yfck#[fk_\j\jk\gj1
(%
Remove the shipping strap hex bolt and strap with a
12mm wrench, as shown in =`^li\0.
Efk\1 B\\gk_`jj_`gg`e^jkiXg`ek_\\m\ekk_Xkpfl
dljkkiXejgfikfij_`gk_\YXe[jXn%
J<KLG
)%
Adjust the feed stop bolt and jam nut with a 14mm
wrench (=`^li\('), so the bandsaw blade teeth
are just below the table surface when the cut is
complete.
=`^li\0% Removing shipping strap.
JhlXi`e^M`j\kf9cX[\
To ensure that your bandsaw will make cuts that match
the degree scale, you must make sure to square the vise
to the blade.
KfjhlXi\k_\m`j\kfk_\YcX[\#[fk_\j\jk\gj1
(%
)%
Rotate the headstock until the pointer reads "0" on
the tabletop scale, and tighten the headstock lock
lever so the headstock stays indexed at zero.
Using a 6mm wrench, loosen the two cap screws that
hold the vise to the table, as shown in =`^li\((.
*%
Using a small machinists square, adjust the vise so it
is square to the blade.
+%
Tighten the two cap screws, so the vise and blade
are square with one another.
Feed Stop
Bolt
=`^li\('% Feed stop bolt.
Headstock
Lock
Lever
=`^li\((% Squaring vise to blade,
headstock, and table scale.
-14-
D('(*Fne\ijDXelXcD]^%J`eZ\-&'0
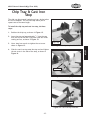
:_`gKiXp:Xjk@ife
Jkfg
The chip tray directs small workpieces into a bucket when
the cut is complete. The cast iron stop allows you to
repeat cuts at the same length.
Kf`ejkXcck_\Z_`gkiXpXe[ZXjk`ifejkfg#[fk_\j\
jk\gj1
(%
Position the chip tray, as shown in =`^li\().
)%
Insert the stop rod approximately 3⁄4" into the saw
until the end of the rod is just flush with the inside
casting surface, as shown in =`^li\(*.
*%
Use a 4mm hex wrench to tighten the set screw
shown in =`^li\(*.
Chip Tray
Slide the cast iron stop onto the stop rod and tighten
the set screw in the side of the stop, as shown in
=`^li\(+.
J<KLG
+%
=`^li\()% Chip tray installed.
Set Screw
=`^li\(*% Installing stop rod.
Set Screw
=`^li\(+% Cast iron stop installed.
-15-
D('(*Fne\ijDXelXcD]^%J`eZ\-&'0
8lkfdXk`ZF==
8[aljkd\ek
After you have removed the shipping strap and have
adjusted the headstock stop bolt, you must adjust the
OFF button lever stop bolt, so the bandsaw shuts OFF
automatically when a cut is complete.
Stop Bolt
& Jam Nut
J<KLG
Kfj\kk_\X[aljkk_\F==Ylkkfe#[fk_\j\jk\gj1
(%
With the headstock in the complete down position,
loosen the 12mm stop bolt and jam nut shown in
=`^li\(,.
)%
Push down on the OFF button lever so the button is
completely depressed.
*%
While keeping the lever depressed, use your
fingertips to turn the stop bolt until the head just
touches the lever.
4.
Back off the stop bolt 1⁄3 turn and tighten the jam
nut.
-16-
OFF Button
Lever
=`^li\(,% Automatic OFF components.
D('(*Fne\ijDXelXcD]^%J`eZ\-&'0
Glcc\p:fm\i
When opened, the pulley cover gives you access to change
the pulley ratio so the bandsaw can cut at one of three
speeds.
<EK8E>C<D<EK?8Q8I;
D8B< JLI< k_\ YXe[jXn `j
legcl^^\[ Y\]fi\ gifZ\\[`e^
Fk_\in`j\# j\m\i\ `ealip dXp
fZZli%
Kf`ejkXcck_\glcc\pZfm\i#[fk_\j\jk\gj1
=`^li\(-% Positioning the pulley cover.
Position and rotate the pulley cover into place, as
shown in =`^li\(-.
)%
Install the two 1⁄4-20 x 1⁄2" hex bolts and washers to
secure the pulley cover.
*%
Loosen the belt tension knob enough to install the
belt on the appropriate pulley that will give the
required blade speed. Refer to 9cX[\Jg\\[ on GX^\
)* for blade speed selections.
+%
Adjust the belt tension knob (=`^li\(.), so the
belt has approximately 1⁄4" deflection when pressed
in between the pulleys, then close and secure the
cover.
J<KLG
(%
Belt Tension
Knob
=`^li\(.% Belt tension knob.
-17-
D('(*Fne\ijDXelXcD]^%J`eZ\-&'0
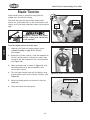
9cX[\K\ej`fe
Proper blade tension is essential to long blade life,
straight cuts, and efficient cutting.
Two major signs that you do not have proper blade
tension are: 1) the blade stalls in the cut and slips on the
wheels, and 2) the blade frequently breaks from being too
tight.
Cylinder
Lock Pin
Safety
Stop
;`jZfee\Zk YXe[jXn ]ifd gfn\i
9<=FI< dXb`e^ Xe[ X[aljkd\ekj
kfk_\dXZ_`e\
=`^li\(/%Raising and locking headstock.
Kfj\kk_\YcX[\k\ej`fe#[fk_\j\jk\gj1
Make sure the blade is tracking properly (refer
to 9cX[\KiXZb`e^ on GX^\)0 for detailed
instructions).
)%
Remove the cylinder lock pin, raise the headstock to
the full vertical position, and push the safety stop
inward to lock the headstock in the vertical position
(see =`^li\(/ .
*%
Open the blade cover, as shown in =`^li\(0#slide
the blade guides as far apart as possible, then
secure them in place
+%
Turn the blade tension knob until the blade is snug,
and the blade tension scale indicates "medium" (see
=`^li\)').
,%
Adjust the blade guides as instructed in the next
subsection
-%
Close and secure the blade guard.
J<KLG
(%
Blade
Tension
Knob
=`^li\(0%Blade tension adjustment knob.
Blade Tension Scale
=`^li\)'% Typical blade tension scale.
-18-
D('(*Fne\ijDXelXcD]^%J`eZ\-&'0
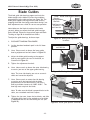
9cX[\>l`[\j
The blade guide side bearings support and twist the
blade straight so the blade will enter the workpiece
perpendicular to the table surface (see Figure )(). The
blade guide support bearings prevent blade twist by
stopping the blade from being pushed back during a cut.
Both adjustments are critical for correct saw operation.
Note: Make sure the blade is tensioned and tracks
correctly before you adjust the blade guide bearings.
Refer to Blade Tension on the previous page and Blade
Tracking on Page)0 for detailed instructions.
To adjust the guide bearings, do these steps:
Guide Blade Guide Support Bearing
Bearing
Adjustment
Hex Bolt
Side Bearing
Eccentric
and Jam Nut
Blade Guide Side Bearing
=`^li\)(% Blade guide adjustment
locations.
DISCONNECT BANDSAW FROM POWER!
)%
Let the bandsaw headstock park in the full down
position.
*%
Use a 12mm wrench to loosen the lower guide
bearing adjustment hex bolt shown in =`^li\)).
+%
Adjust the blade guide housing so the support
bearing rests against the rear of the blade, as
illustrated in =`^li\)(%
,%
Tighten the adjustment hex bolt.
-%
Use a 14mm wrench to loosen the outer side bearing
eccentric jam nuts of the upper guide bearing.
Side Bearing Eccentric
and Jam Nut
J<KLG
(%
Guide Bearing
Adjustment
Hex Bolt
=`^li\))% Blade guide adjustments.
Note: The inner side bearing are not on eccentric
shafts and cannot be adjusted.
.%
Use a 12mm wrench to rotate the side bearing
eccentrics until the bearings hold the blade
perpendicular to the table surface, and have a
bearing-to-blade clearance of 0.000"—0.001". The
bearings must not pinch the blade.
Note: To make sure the blade is perpendicular to the
table, use a standard machinist's square.
/%
Tighten the jam nuts, loosen the lock knob, and slide
the blade guide close to the workpiece so the blade
is supported and will not twist during the cut (see
=`^li\)*).
-19-
Lock Knob
=`^li\)*% Blade guide position lock knob.
D('(*Fne\ijDXelXcD]^%J`eZ\-&'0
K\jkIle
Once the assembly is complete, test run your machine to
make sure it runs properly.
If, during the test run, you cannot easily locate the
source of an unusual noise or vibration, stop using the
machine immediately, then review the KiflYc\j_ffk`e^
on GX^\*).
If you still cannot remedy a problem, contact our Tech
Support at (360) 734-3482 for assistance.
J<KLG
Kfk\jkilek_\dXZ_`e\#[fk_\j\jk\gj1
(%
Make sure you understand the safety instructions
at the beginning of the manual, and verify that the
machine is setup properly.
)%
Ensure all tools and objects used during set up are
cleared away from the machine.
*%
Connect the machine to the power source.
+%
Start the bandsaw while keeping your finger near
the ON/OFF switch at all times during the test run.
The bandsaw should run smoothly with little or no
vibration.
— Strange or unusual noises should be investigated
and corrected before operating the machine
further. Always disconnect the machine from
power when investigating or correcting potential
problems.
,%
Turn the machine F==.
-20-
Gifa\Zk`c\j k_ifne ]ifd k_\ dXZ_`e\
Zflc[ ZXlj\ j\i`flj \p\ `ealip% N\Xi
jX]\kp ^cXjj\j kf i\[lZ\ k_\ i`jb f]
`ealip%
Cffj\ _X`i Xe[ Zcfk_`e^ Zflc[ ^\k
ZXl^_k`edXZ_`e\ipXe[ZXlj\j\i`flj
g\ijfeXc `ealip% B\\g cffj\ Zcfk_`e^
ifcc\[ lg Xe[ cfe^ _X`i k`\[ lg Xe[
XnXp]ifddXZ_`e\ip%
D('(*Fne\ijDXelXcD]^%J`eZ\-&'0
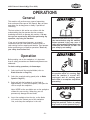
FG<I8K@FEJ
>\e\iXc
This machine will perform many types of operations
that are beyond the scope of this manual. Many of these
operations can be dangerous or deadly if performed
incorrectly.
The instructions in this section are written with the
understanding that the operator has the necessary
knowledge and skills to operate this machine. @]XkXep
k`d\pflXi\\og\i`\eZ`e^[`]]`Zlck`\jg\i]fid`e^Xep
fg\iXk`fe#jkfglj`e^k_\dXZ_`e\
If you are an inexperienced operator, we strongly
recommend that you read books or trade articles, or
seek training from an experienced DXZ_`e\Kpg\ operator
before performing any unfamiliar operations. 8Yfm\Xcc#
pflijX]\kpj_flc[Zfd\]`ijk
I<8;Xe[le[\ijkXe[k_`j\ek`i\`ejkilZ$
k`fe dXelXc Y\]fi\ lj`e^ k_`j dXZ_`e\%
J\i`flj g\ijfeXc `ealip dXp fZZli `]
jX]\kpXe[fg\iXk`feXc`e]fidXk`fe`jefk
le[\ijkff[ Xe[ ]fccfn\[% ;F EFK i`jb
pflijX]\kpYpefki\X[`e^
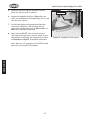
Fg\iXk`fe
=fiYXj`ZZlkk`e^fg\iXk`fej#[fk_\j\jk\gj1
(%
Select and install the required blade (refer to
9cX[\J\c\Zk`fe on GX^\)+).
)%
Select the required cutting speed (refer to 9cX[\
Jg\\[ on GX^\)*).
*%
Raise and lock the headstock, so the blade is
approximately 3" from the workpiece, and open the
vise to accept the workpiece.
;FEFK`em\jk`^Xk\gifYc\djfiX[aljk
k_\ dXZ_`e\ n_`c\ `k `j ilee`e^% NX`k
lek`c k_\ dXZ_`e\ `j klie\[ F==#
legcl^^\[ Xe[ Xcc nfib`e^ gXikj
_Xm\Zfd\kfXZfdgc\k\jkfgY\]fi\
gifZ\\[`e^
Note: NEVER let the saw blade rest on the workpiece
without the saw running. Otherwise, you will
permanently damage the saw blade!
+%
Insert the workpiece into the vise, so the blade
will contact the flattest part of the workpiece
first, and clamp the workpiece in the vise.
-21-
8cnXpjn\XijX]\kp^cXjj\jn_\efg\i$
Xk`e^ k_`j dXZ_`e\% =X`cli\ kf Zfdgcp
dXpi\jlck`ej\i`fljg\ijfeXc`ealip%
FG<I8K@FEJ
Before making cuts to the workpiece, it is important
that all safety precautions and bandsaw adjustments are
addressed.
D('(*Fne\ijDXelXcD]^%J`eZ\-&'0
,%
Adjust the cast iron stop for duplicate cuts and
install the ejector chute if required.
-%
Loosen the headstock lock lever (=`^li\)+), and
swivel the headstock to the needed angle of cut, and
lock the lever in place.
.%
Set the blade guide so the guides hold the blade
close to the workpiece, and the blade will not
twist with a cutting load (refer to 9cX[\>l`[\j on
GX^\(0 for detailed instructions).
/%
Open the feed ON/OFF valve and turn the feed
rate knob so the feed rate is correct, based on your
observations of the blade chip characteristics. Refer
to =\\[IXk\ on GX^\), for detailed instructions.
FG<I8K@FEJ
Note: When the cut is complete, the ON/OFF switch
push lever will shut F== the bandsaw.
-22-
Lock Lever
=`^li\)+% Headstock swivel system.
D('(*Fne\ijDXelXcD]^%J`eZ\-&'0
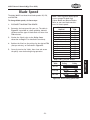
9cX[\Jg\\[
The Model M1013 has these three blade speeds: 80, 120,
and 200 FPM.
KfZ_Xe^\YcX[\jg\\[j#[fk_\j\jk\gj1
(%
DISCONNECT BANDSAW FROM POWER!
)%
Determine the best speed for your cut. The table in
=`^li\), is provided as a basic guideline. Material
thickness and the type of blade used will factor into
FPM selection.
*%
Slacken the V-belt (refer to the Glcc\p:fm\i
subsection on GX^\(. for detailed instructions).
+%
Position the V-belt on the pulleys for the desired FPM
(feet per minute), as illustrated in =`^li\),.
,%
Correctly tension the V-belt, then close and secure
the pulley cover before beginning operation.
Efk\1 These suggested blade speeds
are an average for both High
Carbon Blades and Bimetal Blades.
Refer to your saw blade manufacturer for exact speeds.
Nfibg`\Z\
DXk\i`Xc
Tool Steel
Stainless Steel
Alloy Steel
Bearing Bronze
High Carbon Steel
Medium Carbon Steel
Hard Brass
Hard Bronze
Low Carbon Steel
Soft Brass
Copper
Aluminum
Plastics
Jg\\[`e
=GD
90
90
90
90
135
135,195
195
195
195
195
255
255
255
Efk\1=GD4Feet Per Minute.
N_\\c
Glcc\p
Dfkfi
Glcc\p
80 FPM
120 FPM
200 FPM
=`^li\),% Blade cutting speed chart.
-23-
FG<I8K@FEJ
Jg\\[Xk
-'?q
D('(*Fne\ijDXelXcD]^%J`eZ\-&'0
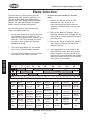
9cX[\J\c\Zk`fe
The chart below is a basic starting point for
choosing blade type based on teeth per inch
(TPI) for variable tooth pitch blades and for
standard raker type bimetal blades/HSS blades.
However, for exact specifications of bandsaw
blades, contact the blade manufacturer.
Kfj\c\Zkk_\Zfii\ZkYcX[\KG@#[fk_\j\
jk\gj1
(%
Measure the material thickness. This
measurement is the length of cut
taken from where the tooth enters the
workpiece, sweeps through, and exits the
workpiece.
)%
Refer to the "Material Thickness" row of
the blade selection chart in =`^li\)-, and
read across to find the workpiece thickness
you need to cut.
*%
Refer to the "Shape" of metal and "Material
Type" columns, and find the shape and
material to be cut.
+%
In the applicable row, read across to the
right and find the box where the row and
column intersect. Listed in the box is the
minimum TPI recommended for the variable
tooth pitch blades, and the TPI for bimetal
raker blades in parentheses.
Here are some general rules of thumb with
respect to bandsaw blade use.
•
•
FG<I8K@FEJ
•
At least three teeth must contact the metal
at any phase of the cut. Otherwise, the
teeth can load up with metal, fracture, and
break off. If the TPI is too high, the teeth
can load up with material and overheat,
damaging the blade.
For a faster but rougher cut, use a blade
with a lower TPI and a higher feed rate.
For a slower but smoother cut, use a blade
with more TPI and a lower feed rate.
KFFK?J<C<:K@FE
dd ,'
.,
(''
(,'
,&/
+&+&*&+
)&*
*&+
`eZ_
) ) *
* + ,
-
)''
),'
*''
*,'
+''
)&*
*&+
)&*
(%,&%/
(%+&)%,
(%,&%/
(%+&)%,
.
/
+,'
0
('
((
()
(*
(+
(,
(-
(.
(/
(0
:LKK@E>JG<<;I8K<I<:FDD<E;8K@FE
DXk\i`Xc
Jg\\[=GD
D&D`e
DXk\i`Xc
Jg\\[=GD
D&D`e
DXk\i`Xc
Jg\\[=GD
D&D`e
DXk\i`Xc
Jg\\[=GD
D&D`e
:XiYfe
Jk\\c
(0-u*,+
-' ('/
KffcJk\\c
)'*
-)
8ccfp
Jk\\c
(((u*)(
*+ 0/
=i\\DXZ_`e`e^
JkX`ec\jjJk\\c
(,'u)'*
+- -)
8e^c\
Jk\\c
(/'u))'
,+ -.
?`^_$Jg\\[
KffcJk\\c
.,u((/
), *-
Dfc[Jk\\c
)+.,
>iXp
:Xjk@ife
('/u)),
** .,
K_`e
KlY\
(/'u))'
,+ -.
:fc[$Nfib
KffcJk\\c
0,u)(*
)0 -,
NXk\i
?Xi[\e\[
KffcJk\\c
)+)
.,
;lZk`c\
8ljk\e`k`Z
:Xjk@ife
-,u/,
)' )-
8cld`eld ))'u,*+
-. (-*
8ccfp
?fk$Nfib
KffcJk\\c
)'*
-)
JkX`ec\jj
Jk\\c
/,
)-
DXcc\XYc\
:Xjk@ife
*)(
0/
F`c$?Xi[\e\[
KffcJk\\c
)'*u)(*
-) -,
:IJkX`ec\jj
Jk\\c
/,$)'*
)- -)
GcXjk`Zj
))'
-.
:fgg\i
8ccfp
))0u+/)
.' (+.
=`^li\)-% Blade selection chart.
-24-
D('(*Fne\ijDXelXcD]^%J`eZ\-&'0
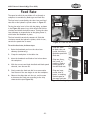
=\\[IXk\
The speed at which the saw blade will cut through a
workpiece is controlled by blade type and feed rate.
The feed rate is controlled by the valve lever and feed
rate dial on the hydraulic cylinder shown in =`^li\)..
Feed Rate
Dial
Turning the valve lever in-line with the piping, as shown
in the =`^li\)/, opens it up, which allows the fluid to
circulate and allows the head to move. Turning the valve
lever sideways or perpendicular to the piping closes it,
which locks the headstock in place.
The feed rate dial controls the amount of fluid that
circulates around the hydraulic cylinder, which in turn,
controls the speed that it moves.
Valve Lever
=`^li\).% Feed rate dial and lever.
Kfj\kk_\]\\[iXk\#[fk_\j\jk\gj1
Chips are width
of tooth, thin and
curled, and silvery:
Optimum speed and
feed rate.
Raise the headstock and turn the valve lever
sideways (horizontally).
)%
Clamp the workpiece in the table vise.
*%
Move the headstock and blade a few inches above
the workpiece.
+%
With the correct saw blade installed and blade speed
selected, turn the saw ON.
,%
Slowly rotate the feed rate dial to a conservative
feed rate until the saw begins to cut the workpiece.
-%
Observe the chips that exit the cut, and increase
or decrease the feed rate according to the chip
characteristics (see =`^li\)/).
-25-
Chips are silvery,
thin, small, or
powdery: Reduce
cutting speed or
increase feed rate.
Chips are large,
curled, blue or
brown, or smoking:
Reduce speed or
decrease feed rate.
=`^li\)/% Reading chip characteristics.
FG<I8K@FEJ
(%
D('(*Fne\ijDXelXcD]^%J`eZ\-&'0
D8@EK<E8E:<
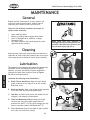
>\e\iXc
Regular periodic maintenance on your machine will
ensure its optimum performance. Make a habit of
inspecting your machine each time you use it.
:_\Zb]fik_\]fccfn`e^Zfe[`k`fejXe[i\gX`ifi
i\gcXZ\n_\ee\Z\jjXip1
Loose mounting bolts.
Missing or leaking rubber toggle switch boots.
Worn or damaged cords, switches, or plugs.
Damaged V-belt.
Any other condition that could hamper the safe
operation of this machine.
D8B< JLI< k_Xk pfli dXZ_`e\ `j
legcl^^\[ [li`e^ Xcc dX`ek\eXeZ\ gif$
Z\[li\j@]k_`jnXie`e^`j`^efi\[#j\i`$
fljg\ijfeXc`ealipdXpfZZli%
:c\Xe`e^
A
Keeping metal chips away from bandsaw mechanisms is
important to ensure that your bandsaw lasts a long time.
Use a shop vacuum or brush-off metal chips frequently.
D8@EK<E8E:<
ClYi`ZXk`fe
The gearbox and all bearings are sealed and permanently
lubricated and no scheduled lubrication is needed.
However, you must periodically lubricate adjustment
locations and bare metal surfaces. Refer to =`^li\j
)0Ç*'for lubrication points.
ClYi`ZXk\k_\]fccfn`e^Xi\Xjc`jk\[Y\cfn1
=`^li\)0% Lubrication points.
8% 9cX[\K\ej`feD\Z_Xe`jd1 Open the main blade
guard, and drop a few drops of oil on the tension
knob lead screw.
B
9% 9cX[\Xe[>l`[\j1Drop a few drops of light machine
oil on the blade and the blade guides daily.
:% >\Xi9fo1 Is packed with grease and should only be
changed if you suspect contamination.
E
D
C
;% KXYc\Xe[DXZ_`e\[Jli]XZ\j1Keep bare metal
surfaces rust-free with regular applications of
products like SLIPIT®. For long term storage you may
want to consider products like Boeshield T-9™.
<% M`j\C\X[JZi\n1Drop a few drops of light machine
oil on the vise lead screw weekly.
-26-
D
=`^li\*'% Lubrication points.
D('(*Fne\ijDXelXcD]^%J`eZ\-&'0
J<IM@:<
>\e\iXc
This section covers the most common service adjustments
or procedures that may need to be made during the life
of your machine.
If you require additional machine service not included
in this section, please contact Woodstock International
Technical Support at (360) 734-3482 or send e-mail to:
k\Z_$jlggfik7j_fg]fo%Y`q.
D8B< JLI< k_Xk pfli dXZ_`e\ `j
legcl^^\[ [li`e^ Xcc j\im`Z\ gifZ\$
[li\j @] k_`j nXie`e^ `j `^efi\[# j\i`$
fljg\ijfeXc`ealipdXpfZZli%
9cX[\:_Xe^\
Change the blade when it becomes dull, damaged, or
when you are using materials that require a blade of a
certain type or tooth count.
KfZ_Xe^\k_\YXe[jXnYcX[\#[fk_\j\jk\gj1
(%
DISCONNECT BANDSAW FROM POWER!
)%
Hold the headstock, un-attach the feed cylinder by
removing the cap screw, then raise the headstock to
the full vertical position (see =`^li\*().
*%
Push the safety stop in, use a screwdriver to remove
the upper and lower blade guide guards, and loosen
the blade guides (see =`^li\*)).
Feed Cylinder
Cap Screw
=`^li\*(% Feed cylinder cap screw.
Guide
Knob
Guide
Bolt
Blade
Guide
Guards
=`^li\*)% Blade guide guards and
fasteners.
-27-
J<IM@:<
Safety
Stop
D('(*Fne\ijDXelXcD]^%J`eZ\-&'0
+%
Loosen the tension knob and slip the blade off of the
wheels.
,%
Install the new blade through both blade guide
bearings and around the bottom wheel (see the
example in =`^li\**).
-%
Hold the blade around the bottom wheel with one
hand and slip it around the top wheel with the other
hand, keeping the blade between the blade guide
bearings.
Note: It is sometimes possible to flip the blade inside
out, in which case the blade will be installed in the
wrong direction. Check to make sure the blade teeth
are facing toward the workpiece after mounting on
the bandsaw. Some blades will have a directional
arrow as a guide.
.%
When the blade is around both wheels, adjust the
position so the back of the blade is against the
shoulder of the wheels.
/%
Tighten the tension knob as tight as necessary so the
blade will not slip on the wheels during start up.
0%
Spin the wheel by hand until the blade resumes the
previous tracking.
—If the tracking needs to be adjusted, complete the
instructions in the 9cX[\KiXZb`e^ procedure in
the next section.
J<IM@:<
('% Properly adjust the blade tension (GX^\(/) and the
guide bearings (GX^\(0).
-28-
=`^li\**% Typical blade installation.
D('(*Fne\ijDXelXcD]^%J`eZ\-&'0
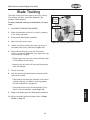
9cX[\KiXZb`e^
The blade tracking has been properly set at the factory.
The tracking will rarely need to be adjusted if the
bandsaw is used properly.
Blade
Tension
Knob
KfX[aljkk_\YcX[\kiXZb`e^fek_\YXe[jXn#[fk_\j\
jk\gj1
Hex Bolts
(%
DISCONNECT BANDSAW FROM POWER!
)%
Raise the headstock and lock it in place by pushing
in the safety stop knob.
*%
Remove both blade guide assemblies.
+%
Open the wheel access cover.
,%
Loosen, but do not remove the lower cap screw in
the blade wheel tilting mechanism (=`^li\*+).
-%
Adjust the tracking set screw with a 4mm hex
wrench, as shown in =`^li\*+, then tighten the cap
screw loosened in Jk\g,.
4mm Set
Screw
=`^li\*+% Tracking adjustment controls.
—Tightening the set screw will move the blade closer
to the shoulder of the wheel.
—Loosening the set screw will move the blade away
from the shoulder.
.%
Tension the blade.
/%
Spin the wheel by hand and observe how the blade
tracks on the wheel.
—If the blade tracks along the shoulder of the wheel
(without rubbing), the blade is tracking properly
and this adjustment is completed.
—If the blade drifts away from the shoulder of the
wheel or hits the shoulder, repeat Jk\gj,$/.
Replace the blade guard and blade guide assemblies.
('% Adjust the blade guides as needed. Refer to 9cX[\
>l`[\j on GX^\(0.
-29-
J<IM@:<
0%
D('(*Fne\ijDXelXcD]^%J`eZ\-&'0
<c\Zki`ZXcJX]\kp@ejkilZk`fej
These pages are current at the time of printing. However, in the spirit of improvement, we may
make changes to the electrical systems of future machines. Study this diagram carefully. If you notice
differences between your machine and these wiring diagrams, call Woodstock International Technical
Support at (360) 734-3482.
(% J?F:B?8Q8I;% Working on wiring that is
connected to a power source is extremely
dangerous. Touching electrified parts will
result in personal injury including but not
limited to severe burns, electrocution,
or death. Disconnect the power from
the machine before servicing electrical
components!
,% DFKFIN@I@E>% The motor wiring shown
in these diagrams is current at the time
of printing, but it may not match your
machine. Always use the wiring diagram
inside the motor junction box.
-% DF;@=@:8K@FEJ% Using aftermarket parts or
modifying the wiring beyond what is shown
in the diagram may lead to unpredictable
results, including serious injury or fire.
)% HL8C@=@<;<C<:KI@:@8E% Due to the
inherent hazards of electricity, only a
qualified electrician should perform wiring
tasks on this machine. If you are not a
qualified electrician, get help from one
before attempting any kind of wiring job.
*% N@I<:FEE<:K@FEJ% All connections must
be tight to prevent wires from loosening
during machine operation. Double-check all
wires disconnected or connected during any
wiring task to ensure tight connections.
+% N@I<&:FDGFE<EK;8D8><% Damaged
wires or components increase the risk of
serious personal injury, fire, or machine
damage. If you notice that any wires or
components are damaged while performing
a wiring task, replace those wires or
components before completing the task.
.% :8G8:@KFIJ&@EM<IK<IJ% Some capacitors
and power inverters store an electrical
charge for up to five minutes after being
disconnected from the power source. To
avoid being shocked, wait at least this long
before working on these components.
/% <C<:KI@:8CI<HL@I<D<EKJ% You MUST
follow the electrical requirements at the
beginning of this manual when connecting
your machine to a power source.
0% <OG<I@<E:@E>;@==@:LCK@<J% If you are
experiencing difficulties understanding
the information included in this section,
contact our Technical Support at (360) 7343482.
J<IM@:<
WIRING DIAGRAM COLOR KEY
The photos and diagrams
included in this section are
best viewed in color. You
can view these pages in
color at www.shopfox.biz.
BLACK
BLUE
WHITE
BROWN
GREEN
GRAY
YELLOW
YELLOW
GREEN
PURPLE
RED
ORANGE
PINK
-30-
LIGHT
BLUE
BLUE
WHITE
TURQUOISE
wiring diagram
D('(*Fne\ijDXelXcD]^%J`eZ\-&'0
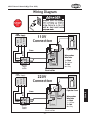
N`i`e^;`X^iXd
Read
Page 30
JKFG
Before
Wiring
Ground
Neutral
(('M
:fee\Zk`fe
>i\\e
Dfkfi
N_`k\
9cXZb
>i\\e
I\[
9cXZb
FE&F==
Kf^^c\
Jn`kZ_
Ground
Neutral
(49cXZb
)4P\ccfn
)4
*4I\[
+4>iXp
+4
>iXp
P\ccfn
9Xe[jXnDfkfi
<c\Zki`ZXc9fo
))'M
:fee\Zk`fe
9cXZb
>iXp
N_`k\
9cXZb
FE&F==
Kf^^c\
Jn`kZ_
I\[
P\ccfn
9Xe[jXnDfkfi
<c\Zki`ZXc9fo
-31-
9Xe[jXnDfkfi
:XgXZ`kfi:fm\i
Wire number
Wire Color
(49cXZb
)4P\ccfn
*4I\[
+4>iXp
+4
J<IM@:<
>i\\e
Dfkfi
N_`k\
9cXZb
>i\\e
:XgXZ`kfi
Load
))'M
Gfn\iJlggcp
9Xe[jXnDfkfi
:XgXZ`kfi:fm\i
Wire number
Wire Color
N_`k\
9cXZb
:XgXZ`kfi
:XgXZ`kfi
Load
(('M
Gfn\iJlggcp
D('(*Fne\ijDXelXcD]^%J`eZ\-&'0
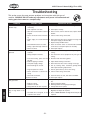
KiflYc\j_ffk`e^
This section covers the most common problems and corrections with this type of
machine. N8IE@E>;FEFKdXb\XepX[aljkd\ekjlek`cgfn\i`j[`jZfee\Zk\[Xe[
dfm`e^gXikj_Xm\Zfd\kfXZfdgc\k\jkfg
GIF9C<D
GFJJ@9C<:8LJ<
:FII<:K@M<8:K@FE
Machine does not start or a 1. Plug/receptacle is at fault or wired
breaker trips.
incorrectly.
2. Start capacitor is at fault.
3. Wall fuse/circuit breaker is blown/
tripped.
4. Motor connection wired incorrectly.
5. Power supply is at fault/switched
OFF.
1. Test for good contacts; correct the wiring.
2. Test/replace if faulty.
3. Ensure correct size for machine load; replace weak
breaker.
4. Correct motor wiring connections.
5. Ensure hot lines have correct voltage on all legs and
main power supply is switched ON.
6. Replace faulty ON/OFF switch.
7. Check for broken wires or disconnected/corroded
6. Motor ON/OFF switch is at fault.
connections, and repair/replace as necessary.
7. Wiring is open/has high resistance.
8. Test/repair/replace.
8. Motor is at fault.
Machine stalls or is under- 1. Wrong blade for the workpiece 1. Use blade with correct properties for your type of
powered.
cutting.
material.
2. Use metal with correct properties for your type of
2. Wrong workpiece material.
cutting.
3. Feed rate/cutting speed too fast 3. Decrease feed rate/cutting speed.
for task.
4. Adjust blade tracking and tension.
4. Blade is slipping on wheels.
5. Ensure hot lines have correct voltage on all legs.
5. Low power supply voltage.
6. Test by rotating shaft; rotational grinding/loose
6. Motor bearings are at fault.
shaft requires bearing replacement.
7. Test for good contacts; correct the wiring.
7. Plug/receptacle is at fault.
8. Motor connection is wired incor- 8. Correct motor wiring connections.
rectly.
9. Clean off motor, let cool, and reduce workload.
9. Motor has overheated.
10. Test/repair/replace.
10. Motor is at fault.
Machine has vibration or 1. Motor fan is rubbing on fan cover.
noisy operation.
J<IM@:<
2. Blade is at fault.
3. Gearbox is at fault.
4. Wrong blade & too slow of speed.
1. Replace dented fan cover; replace loose/damaged
fan.
2. Replace/resharpen blade.
3. Rebuild gearbox for bad gear(s)/bearing(s).
4. Change blade and or speed.
Machine is loud when cut- 1. Excessive feed rate.
1. Refer to Feed Rate on Page 25, or Blade Speed on
ting or bogs down in the
Page 23, and adjust as required.
cut.
2. The blade TPI is too great, or the 2. Refer to Blade Selection on Page 24 and adjust as
required.
material is too coarse.
-32-
D('(*Fne\ijDXelXcD]^%J`eZ\-&'0
GIF9C<D
Blades break often.
GFJJ@9C<:8LJ<
:FII<:K@M<8:K@FE
1. Blade is not tensioned correctly.
2. The workpiece is loose in the vise.
3. The feed or cut speed is wrong.
1. Check to see that blade is not excessively tight or
too loose.
2. Clamp the workpiece tighter, or use a jig to hold the
workpiece.
3. Refer to Feed Rate on Page 25, or Blade Speed on
Page 23, and adjust as required.
4. Refer to Blade Selection on Page 24 and adjust as
required.
5. Refer to Blade Tracking on Page 29, and adjust as
required.
6. Start bandsaw and then slowly lower the headstock
by setting the feed rate.
4. The blade TPI is too great, or the
material is too coarse.
5. The blade is rubbing on the wheel
flange.
6. The bandsaw is being started
with the blade resting on the
workpiece.
7. The guide bearings are misaligned, 7. Refer to Blade Tracking on Page 29, or Blade Guides
on Page 19 and adjust as required.
or the blade is rubbing on the
wheel flange.
8. The blade is too thick, or the 8. Use a higher quality blade.
blades are of low quality.
Blade dulls prematurely.
2.
3.
4.
5.
6.
Blade wears on one side.
1. Refer to Blade Speed on Page 23, and adjust as
required.
2. Refer to Blade Selection on Page 24, and adjust as
The blade TPI is too coarse.
required.
The blade feed pressure is too 3. Refer to Feed Rate on Page 25, and adjust as
required.
light.
The workpiece has hard spots, 4. Increase the feed pressure, and reduce the cutting
speed.
welds, or scale is on the material.
5. Replace the blade.
The blade is twisted.
The blade is slipping on the 6. Refer to Blade Tension on Page 18, and adjust as
required.
wheels.
1. The cutting speed is too fast.
1. The blade guides are worn or mis- 1. Refer to Blade Guides on Page 19 and replace or
adjust.
adjusted.
2. The blade guide slide bracket is 2. Tighten the blade guide bracket.
loose.
3. Refer to Blade Tracking on Page 29, and adjust as
3. The wheels are out of alignment.
required.
Teeth are ripping from the 1. The feed pressure is too heavy and 1. Refer to Blade Selection on Page 24 and decrease
blade.
the feed pressure. Refer to Feed Rate on Page 25,
the blade speed is too slow; or
and adjust as required.
the blade TPI is too coarse for the
workpiece.
2. The workpiece is vibrating in the 2. Re-clamp the workpiece in the vise, and use a jig if
required.
vise.
3. The blade gullets are loading up 3. Use a coarser-tooth blade.
with chips.
G8IKJ
-33-
D('(*Fne\ijDXelXcD]^%J`eZ\-&'0
G8IKJ
Dfkfi=\\[IXk\:fekifc
/
,
0
-
($)
+
($(
*
.
($*
(
)
($+
((
('
()
(*
*0
*)
+'8
(+
+(
(,
((0
(.
*(
+*8
(/
)*
*'
)+8
),
)'
)(
).
))8
)/
G8IKJ
)-8
-34-
)0
D('(*Fne\ijDXelXcD]^%J`eZ\-&'0
Dfkfi=\\[IXk\:fekifcGXikjC`jk
REF PART #
DESCRIPTION
REF PART #
DESCRIPTION
1
1-1
1-2
1-3
1-4
2
3
4
5
6
7
8
9
10
11
12
13
14
15
16
MOTOR 1/2HP 110/220V 1PH
MOTOR FAN COVER
MOTOR FAN
CAPACITOR COVER
S CAPACITOR 200M 125V
MOTOR PULLEY
KEY 5 X 5 X 30
SET SCREW 5/16-18 X 5/16
TAP SCREW 1/4 X 5/16(3/4)
BELT COVER
PHLP HD SCR 1/4-20 X 1/2
MOTOR CABLE
POWER CABLE
HEX BOLT 5/16-18 X 1
HEX BOLT 5/16-18 x 3/4
FLAT WASHER 5/16
PIVOT
KNOB BOLT 1/4-20 X 5/8
SPECIAL PIN 10 X 38.5 MM
HEX BOLT 3/8-16 X 2
17
18
19
20
21
22A
23
24A
25
26A
27
28
29
30
31
32
39
40A
41
43A
HEX NUT 3/8-16
BRACKET
HANDLE
CAP SCREW 1/2-12 X 2-1/2
HEX NUT 1/2-13
SPECIAL BOLT 3/8"-16 X 1 3/4"
BUSHING 19 X 17 X 7
SWITCH BASE V2.10.06
PHLP HD SCR 10-24 X 3/8
SWITCH BOX V2.08.06
SUPPORT ROD
FLAT WASHER #10
PHLP HD SCR 10-24 X 3/8
CYLINDER ASSEMBLY
SET SCREW 1/4-20 X 5/16
PIVOTING ROD
CAP SCREW 1/4-20 X 3/4
CYLINDER UPPER SUPPORT V2.10.06
LOCK WASHER 5/16
SPECIAL CAP SCREW V2.10.06
XM1013001
XM1013001-1
XM1013001-2
XM1013001-3
XM1013001-4
XM1013002
XPK12M
XPSS17
XPHTEK11
XM1013006
XPS04
XM1013008
XM1013009
XPB03
XPB07
XPW07
XM1013013
XM1013014
XM1013015
XPB58
XPN08
XM1013018
XM1013019
XPCAP97
XPN13
XM1013022A
XM1013023
XM1013024A
XPS06
XM1013026A
XM1013027
XPW03
XPS06
XM1013030
XPSS04
XM1013032
XPCAP05
XM1013040A
XPLW01
XM1013043A
G8IKJ
-35-
D('(*Fne\ijDXelXcD]^%J`eZ\-&'0
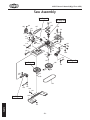
JXn8jj\dYcp
J\\GX^\+'
J\\GX^\+'
((,
(-+
('0
(',
('.
(('
(((
(*,
('+
(*(*+
(()
((*
((, ((+
((((.
((/
()+
()* (''
((-
(*.
(')
(*.
(*)
(*'
(*(
((0
()0
()/
()(
()'
(+(
()(
(('
()-
(*/
(*0
(+'
(+,8
().
(++
(+.
J\\GX^\+'
J\\GX^\+'
(+/
()-
(,(
(,()(
(,'
(,)
(,*
(,+
(,0
()(-'
(-(
J\\GX^\+'
(-)8
G8IKJ
(-*
-36-
D('(*Fne\ijDXelXcD]^%J`eZ\-&'0
JXn8jj\dYcpGXikjC`jk
REF
PART #
DESCRIPTION
REF
PART #
DESCRIPTION
100
102
104
105
107
109
110
111
112
113
114
115
116
117
118
119
120
121
123
124
126
127
128
129
130
131
XM1013100
XPB41
XM1013104
XM1013105
XPVA23
XM1013109
XM1013110
XM1013111
XPS24
XPB03
XPB07
XPB02
XM1013116
XPW07
XM1013118
XM1013119
XM1013120
XPW02
XM1013123
XPSS38
XPS08M
XM1013127
XPCAP05
XPN05
XM1013130
XPS06
BODY FRAME
HEX BOLT 1/2-12 X 1-1/2
GEAR BOX GASKET
PLATE
V-BELT A-23
PULLEY
BEARING COVER
OIL SEAL
PHLP HD SCR 8-32 X 3/8
HEX BOLT 5/16-18 X 1
HEX BOLT 5/16-18 x 3/4
HEX BOLT 1/4-20 X 5/8
BLADE TENSION SLIDING GUIDE
FLAT WASHER 5/16
SHAFT BLOCK
COMPRESSION SPRING
BLADE TENSION KNOB
FLAT WASHER 3/8
BLADE TENSION SLIDING PLATE
SET SCREW 5/16-18 X 5/8
PHLP HD SCR M5-.8 X 12
BUSHING
CAP SCREW 1/4-20 X 3/4
HEX NUT 1/4-20
WIRE CLAMP
PHLP HD SCR 10-24 X 3/8
132
134
135
136
137
138
139
140
141
144
145A
147
148
150
151
152
153
154
156
159
160
161
162A
163
164
XPN02
XM1013134
XM1013135
XPB07
XPW07
XPN08
XM1013139
XPCAP04
XPB24
XM1013144
XM1013145A
XPK23M
XM1013148
XPR05M
XPSS17
XPW07
XPB07
XM1013154
XM1013156
XM1013159
XM1013160
XPW06
XM1013162A
XPS06
XPSS17M
HEX NUT 5/16-18
MOTOR MOUNT PLATE
KNOB BOLT 5/16-18 X 1-3/4
HEX BOLT 5/16-18 x 3/4
FLAT WASHER 5/16
HEX NUT 3/8-16
SWITCH CUT OFF TIP
CAP SCREW 1/4-20 X 1/2
HEX BOLT 3/8-16 X 1-1/4
RIGHT SAFETY GUARD (OPTION)
STOP BOLT 3/8-16 X 1 V2.10.06
KEY 5 X 5 X 25
FRONT BLADE WHEEL
EXT RETAINING RING 15MM
SET SCREW 5/16-18 X 5/16
FLAT WASHER 5/16
HEX BOLT 5/16-18 x 3/4
BLADE 1/2" X 0.025" X 64-1/2"
KNOB BOLT 3/8-16 X 1-1/4
LEFT SAFETY GUARD
KNOB BOLT 1/4"-20 X 5/8"
FLAT WASHER 1/4
PLASTIC SAFETY COVER V2.08.06
PHLP HD SCR 10-24 X 3/8
SET SCREW M8-1.25 X 6
G8IKJ
-37-
D('(*Fne\ijDXelXcD]^%J`eZ\-&'0
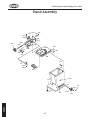
JkXe[8jj\dYcp
)*)8
)**8 )*+)*,
)*(
)*'
)(0
))08
))/8
)*-
)).
)),
))-
)')
)'+
))) ))*8
)'*
))'
))(
)''
)()
)((
)('
)(*
)'0
)'/
)(+$-
)(+
)(-
)(.
)(/$(
)(,
G8IKJ
**/
-38-
)(/$(
)(/
D('(*Fne\ijDXelXcD]^%J`eZ\-&'0
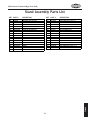
JkXe[8jj\dYcpGXikjC`jk
REF
PART #
DESCRIPTION
REF
PART #
DESCRIPTION
200
202
203
204
208
209
210
211
212
213
214
214-6
215
216
217
218
218-1
219
XM1013200
XPB26M
XPLW04M
XM1013204
XM1013208
XPSS17
XM1013210
XM1013211
XPW03M
XPS14M
XM1013214
XM1013214-6
XM1013215
XM1013216
XM1013217
XM1013218
XPW27MM
XM1013219
BASE
HEX BOLT M8-1.25 X 30
LOCK WASHER 8MM
SCALE
EJECTOR PLATE
SET SCREW 5/16-18 X 5/16
DISTANCE SET BRACKET
STOCK STOP ROD 1/2"
FLAT WASHER 6MM
PHLP HD SCR M6-1 X 12
DELUXE STAND ASSEMBLY
SHOP FOX LOGO 2-5/16" X 5"
RUBBER FOOT
WHEEL ROD
COTTER PIN 1/8 X 1
WHEEL
FLAT WASHER 17MM
HANDWHEEL ASSEMBLY
220
221
222
223A
225
226
227
228A
229A
230
231
232A
233A
234
235
236
338
XM1013220
XPCAP30
XPS04
XM1013223A
XPSS03
XM1013226
XPLW01
XM1013228A
XM1013229A
XPW07
XPCAP69
XM1013232A
XM1013233A
XPW07
XPB07
XPCAP08
XM1013338
PLATE
CAP SCREW 5/16-18 X 1/2
PHLP HD SCR 1/4-20 X 1/2
BRACKET W/NUT V2.01.08
SET SCREW 1/4-20 X 3/8
BUSHING
LOCK WASHER 5/16
ACME SCREW V2.01.08
VISE BASE V2.01.08
FLAT WASHER 5/16
CAP SCREW 5/16-18 X 1/4
VICE HALF V2.01.08
WALL PLATE V2.01.08
FLAT WASHER 5/16
HEX BOLT 5/16-18 x 3/4
CAP SCREW 5/16-18 X 1-1/2
STRIPE FOR STAND 6" X 4'
G8IKJ
-39-
guides and shafts
D('(*Fne\ijDXelXcD]^%J`eZ\-&'0
>l`[\jJ_X]kj
*)0
*(.
*(.
*(-
*(/
**)
**,
**+
***
**(
***
**+
*).
**,
*))
*).
*))
*)*
**'
*)*
*)+
*).
*).
*)+
*(/
*(,
*)-
*)-
*'*M)
*'+
*')M)
*'(M)
**0
*+'
**0
*''M)
*',
*'-
*(*
*'.
*'/
*'0
*(0
*'0
*('
*()
G8IKJ
*'0
-40-
D('(*Fne\ijDXelXcD]^%J`eZ\-&'0
>l`[\jJ_X]kjGXikjC`jk
REF
PART #
DESCRIPTION
REF
PART #
DESCRIPTION
300V2
301V2
302V2
303V2
304
305
306
307
308
309
310
312
313
315
316
317
XM1013300V2
XM1013301V2
XM1013302V2
XM1013303V2
XPRP39M
XM1013305
XPRP20M
XM1013307
XPK23M
XP6202-OPEN
XM1013310
XM1013312
XM1013313
XM1013315
XM1013316
XPN08
REAR BLADE WHEEL V2.06.09
BUSHING V2.06.09
BLADE WHEEL SHAFT V2.06.09
AXLE BLOCK V2.06.09
ROLL PIN 4 X 20
WORM GEAR
ROLL PIN 4 X 22
TRANSMISSION WHEEL SHAFT
KEY 5 X 5 X 25
BALL BEARING 6202 OPEN
BUSHING
SEAL
BUSHING
LEFT ADJUSTABLE BRACKET
FRONT GUIDE CASTING
HEX NUT 3/8-16
318
319
322
323
324
326
327
329
330
331
332
333
334
335
339
340
XPLW04
XM1013319
XM1013322
XM1013323
XM1013324
XPR01M
XP6000-OPEN
XM1013329
XM1013330
XPFH03
XM1013332
XPB03
XPLW01
XPW07
XP6202ZZ
XM1013340
LOCK WASHER 3/8
WORM GEAR SHAFT
SPECIAL PIN 10 X 40MM
GUIDE ECCENTRIC
GUIDE SHAFT
EXT RETAINING RING 10MM
BALL BEARING 6000 OPEN
RIGHT ADJUSTABLE BRACKET
STOP PLATE
FLAT HD SCR 1/4-20 X 1/2
REAR GUIDE CASTING
HEX BOLT 5/16-18 X 1
LOCK WASHER 5/16
FLAT WASHER 5/16
BALL BEARING 6202 ZZ
BUSHING
G8IKJ
-41-
D('(*Fne\ijDXelXcD]^%J`eZ\-&'0
DXZ_`e\CXY\cj
JX]\kp cXY\cj nXie XYflk dXZ_`e\ _XqXi[j Xe[ _fn kf gi\m\ek dXZ_`e\ [XdX^\ fi `ealip% K_\
fne\i f] k_`j dXZ_`e\ DLJK dX`ekX`e k_\ fi`^`eXc cfZXk`fe Xe[ i\X[XY`c`kp f] Xcc cXY\cj fe k_`j
dXZ_`e\%@]XepcXY\c`ji\dfm\[fiY\Zfd\jlei\X[XYc\#I<GC8:<k_XkcXY\cY\]fi\Xccfn`e^k_\
dXZ_`e\kf\ek\ij\im`Z\X^X`e%:fekXZkNff[jkfZb@ek\ieXk`feXc#@eZ%Xk(*-').*+$*+/)finnn%
j_fg]fokffcj%Zfdkffi[\ie\ncXY\cj%
400
401
402
403
404
405
408
407
405
406
REF PART #
DESCRIPTION
REF PART #
DESCRIPTION
400
401
402
403
404
MACHINE ID LABEL
SAFETY GLASSES LABEL
DISCONNECT POWER LABEL
AMPUTATION HAZARD LABEL
SHOPFOX BLACK TOUCH-UP PAINT
405
406
407
408
ELECTRICITY LABEL
SHOPFOX WHITE TOUCH-UP PAINT
BLADE TENSION LABEL
READ MANUAL LABEL
G8IKJ
XM1013400
XM1013401
XM1013402
XM1013403
XPPAINT-7
-42-
XPLABLE-14B
XPPAINT-1
XM1013123-1
XPLABEL-12A
D('(*Fne\ijDXelXcD]^%J`eZ\-&'0
FOLD ALONG DOTTED LINE
Place
Stamp
Here
NFF;JKF:B@EK<IE8K@FE8C@E:%
G%F%9FO)*'0
9<CC@E>?8D#N80/)).$)*'0
FOLD ALONG DOTTED LINE
TAPE ALONG EDGES--PLEASE DO NOT STAPLE
N8II8EKP
N8II8EKP
Nff[jkfZb@ek\ieXk`feXc#@eZ%nXiiXekjXccJ_fg=fodXZ_`e\ipkfY\]i\\f][\]\Zkj]ifdnfibdXej_`g
Xe[dXk\i`Xcj]fiXg\i`f[f]knfp\Xij]ifdk_\[Xk\f]fi`^`eXcgliZ_Xj\Ypk_\fi`^`eXcfne\i%
K_`jnXiiXekp[f\jefkXggcpkf[\]\Zkj[l\[`i\Zkcpfi`e[`i\Zkcpkfd`jlj\#XYlj\#e\^c`^\eZ\fi
XZZ`[\ekj#cXZbf]dX`ek\eXeZ\#fii\`dYlij\d\ekf]k_`i[gXikp\og\ej\j`eZlii\[%
Nff[jkfZb@ek\ieXk`feXc#@eZ%n`cci\gX`ifii\gcXZ\#Xk`kj\og\ej\Xe[Xk`kjfgk`fe#k_\J_fg=fo
dXZ_`e\fidXZ_`e\gXik#n_`Z_`eefidXclj\_Xjgifm\ekfY\[\]\Zk`m\#gifm`[\[k_Xkk_\fi`^`eXc
fne\ii\kliejk_\gif[lZkgi\gX`[kfXJ_fg=fo]XZkfipj\im`Z\Z\ek\in`k_giff]f]k_\`igliZ_Xj\
f]k_\gif[lZkn`k_`eknfp\Xij#Xe[gifm`[\jNff[jkfZb@ek\ieXk`feXc#@eZ%i\XjfeXYc\fggfikle`kpkf
m\i`]pk_\Xcc\^\[[\]\Zkk_ifl^_`ejg\Zk`fe%@]`k`j[\k\id`e\[k_\i\`jef[\]\Zk#fik_Xkk_\[\]\Zk
i\jlck\[]ifdZXlj\jefkn`k_`ek_\jZfg\f]Nff[jkfZb@ek\ieXk`feXc@eZ%jnXiiXekp#k_\ek_\fi`^`eXc
fne\idljkY\Xik_\Zfjkf]jkfi`e^Xe[i\klie`e^k_\gif[lZk%
K_`j`jNff[jkfZb@ek\ieXk`feXc#@eZ%jjfc\ni`kk\enXiiXekpXe[XepXe[XccnXiiXek`\jk_XkdXp
Y\`dgc`\[YpcXn#`eZcl[`e^Xepd\iZ_XekXY`c`kpfi]`ke\jj#]fiXepgXik`ZlcXigligfj\#Xi\_\i\Yp
c`d`k\[kfk_\[liXk`fef]k_`jni`kk\enXiiXekp%N\[fefknXiiXekk_XkJ_fg=fodXZ_`e\ipZfdgc`\j
n`k_k_\gifm`j`fejf]XepcXnfiXZkj%@eef\m\ekj_XccNff[jkfZb@ek\ieXk`feXc#@eZ%jc`XY`c`kple[\i
k_`jnXiiXekp\oZ\\[k_\gliZ_Xj\gi`Z\gX`[]fik_\gif[lZk#Xe[Xepc\^XcXZk`fejYifl^_kX^X`ejk
Nff[jkfZb@ek\ieXk`feXc#@eZ%j_XccY\ki`\[`ek_\JkXk\f]NXj_`e^kfe#:flekpf]N_XkZfd%N\j_Xcc
`eef\m\ekY\c`XYc\]fi[\Xk_#`eali`\jkfg\ijfejfigifg\ikpfi]fi`eZ`[\ekXc#Zfek`e^\ek#jg\Z`Xcfi
Zfej\hl\ek`Xc[XdX^\jXi`j`e^]ifdk_\lj\f]fligif[lZkj%
<m\ip\]]fik_XjY\\edX[\kf\ejli\k_XkXccJ_fg=fodXZ_`e\ipd\\kj_`^_hlXc`kpXe[[liXY`c`kp
jkXe[Xi[j%N\i\j\im\k_\i`^_kkfZ_Xe^\jg\Z`]`ZXk`fejXkXepk`d\Y\ZXlj\f]fliZfdd`kd\ekkf
Zfek`elfljcp`dgifm\k_\hlXc`kpf]fligif[lZkj%
=^\]FjVa^inBVX]^cZhVcYIddah
LddYhidX`>ciZgcVi^dcVa!>cX#XVgg^Zhi]djhVcYhd[egdYjXihYZh^\cZY
idbZZii]ZcZZYhd[idYVnhlddYldg`ZghVcYbZiValdg`Zgh#
6h`ndjgYZVaZgVWdjii]ZhZ[^cZegdYjXih/