1
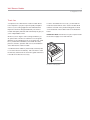
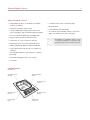
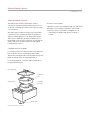
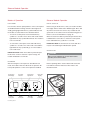
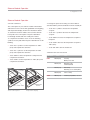
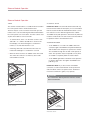
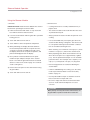
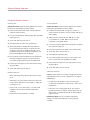
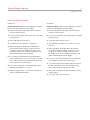
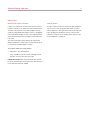
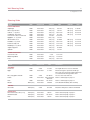
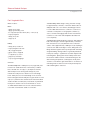
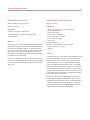
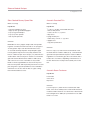
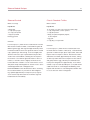
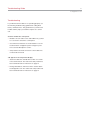
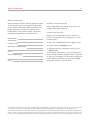
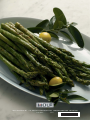
USE & CARE GUIDE
Steamer Module
Contents
Important Note
Wolf Steamer Module . . . . . . . . . . . . . . . . .
3
Safety Instructions . . . . . . . . . . . . . . . . . .
4
Steamer Module Features . . . . . . . . . . . . . . .
6
Steamer Module Operation . . . . . . . . . . . . . .
8
Wolf Steaming Guide . . . . . . . . . . . . . . . . . 15
Steamer Module Care . . . . . . . . . . . . . . . . . 16
Steamer Module Recipes . . . . . . . . . . . . . . . 17
Troubleshooting Guide . . . . . . . . . . . . . . . . 21
Service Information . . . . . . . . . . . . . . . . . . 22
Wolf Warranty . . . . . . . . . . . . . . . . . . . . . 23
Features and specifications are subject to change at any time
without notice. Visit our website, wolfappliance.com for the
most up-to-date information.
IMPORTANT NOTE: Throughout this guide, dimensions in
parentheses are millimeters unless otherwise specified.
To ensure the safe and efficient use of Wolf equipment,
please take note of the following types of highlighted
information throughout this guide:
IMPORTANT NOTE highlights information that is especially
important.
CAUTION signals a situation where minor injury or product
damage may occur if instructions are not followed.
WARNING states a hazard that may cause serious injury or
death if precautions are not followed.
Wolf Steamer Module
3
wolfappliance.com
Thank You
Your purchase of a Wolf electric steamer module attests
to the importance you place upon the quality and performance of your cooking equipment. We understand this
importance and have designed and built your steamer
module with quality materials and workmanship to give you
years of dependable service.
We know you are eager to start cooking, but before you
do, please take some time to read this use & care guide.
Whether you are a beginning cook or an expert chef, it will
be to your benefit to familiarize yourself with the safety
practices, features, operation and care recommendations
of the Wolf electric steamer module.
If service should become necessary, you will need the
model and serial numbers of the steamer module. Both
numbers are listed on the product rating plate, located
on the underside of the module. Refer to the illustration
below.
IMPORTANT NOTE: Performance may be compromised if
the electrical supply is less than 240 volts.
Your Wolf steamer module is protected by a warranty that
is one of the finest in the industry. Take a moment to read
the warranty statement at the end of this guide and refer to
it should service become necessary.
RATING PLATE
Location of rating plate.
Safety Instructions
4
IMPORTANT INSTRUCTIONS
IMPORTANT NOTE: Read all safety instructions before
using this appliance.
t Read this use & care guide carefully before using
your new steamer module to reduce the risk of fire,
electric shock or injury to persons.
WARNING
The steamer module must be installed at least 15"
(381) from a Wolf fryer module. Contact between
water and hot oil may cause burns from steam and
hot oil.
t Ensure proper installation and servicing. This appli-
ance must be properly installed and grounded by
a qualified technician. Have the installer show you
the location of the circuit breaker or fuse so that you
know where to turn off power.
t Warranty service must be performed by Wolf factory
certified service.
t Before performing any service, disconnect the power
supply to the module by switching off the circuit
breaker or removing the fuse.
t Always properly clean and maintain the module as
outlined in care recommendations on page 16.
WARNING
To eliminate the risk of burns or fire when reaching
over heated surface units, cabinet storage space
located above the surface units should be avoided.
If cabinet storage is to be provided, the risk can be
reduced by installing a ventilation hood that projects
horizontally a minimum of 5" (127) beyond the
bottom cabinets.
Safety Instructions
5
wolfappliance.com
IMPORTANT INSTRUCTIONS
GENERAL SAFETY REQUIREMENTS
t This appliance is for household use only and must
not be put to any other use.
t Use sturdy, properly insulated gloves or pot holders.
Dish towels or other substitutes can become entangled, causing burns. Keep pot holders dry. Wet
pot holders create steam and cause burns. Keep
pot holders away from open flames when lifting or
moving utensils.
t Use only the insert pans included with the steamer
module.
t Children should not be left alone or unattended in an
area where the steamer module is being used. Never
allow them to sit, stand or play on or around the
module at any time. Do not store items of interest to
children around or below the module.
t When using the steamer module, do not touch the
module or immediate surrounding areas. These
surfaces become extremely hot and could cause
burns. Be certain that all controls are turned off by
touching the OFF ON touch pad and that the module
has cooled before touching or cleaning any surfaces.
t Never leave the steamer module unattended.
t Do not repair or replace any part of the steamer
module unless specifically recommended in literature included with this appliance. All service is to be
referred to Wolf factory certified service.
t Do not line the steamer module with aluminum foil.
t Do not operate the steamer module empty. Always
have liquid in the steamer basin while operating.
t This appliance is suitable for use with water or other
soup-based liquids. This appliance must not be used
for deep-frying.
t Do not use the steamer module for warming a room.
t Do not store combustible, flammable or explosive
materials near the steamer module or adjacent
cabinets or let grease or other flammable substances
accumulate on the module.
t Do not heat unopened glass or metal containers of
food in the steamer module. Pressure may build up
and cause the container to burst, resulting in serious
personal harm or damage to the module.
Steamer Module Features
6
Steamer Module Features
t Integrated design allows for installation of multiple
cooktops or modules.
t Crafted of heavy-duty stainless steel.
t Countdown timer with 1 to 99 minute range.
t Electronic drain.
t CSA certified for US and Canada.
t Powerful 2,600-watt heating element steam cooks
meats, vegetables, eggs, custard and grains beautifully.
t Two and five year residential warranty—exclusions
apply, see warranty at the end of this guide.
t Uses also include double boiling, proofing bread
dough, warming food and melting chocolate.
t Can function as a slow cooker for 8–10 hours.
t Illuminated touch controls with graduated control
lighting, temperature display and preheat indicator.
t Large-capacity basin with 10-cup (2.4 L) capacity for
steaming.
t Two stackable stainless steel insert pans—solid and
perforated.
t Reversible domed glass lid for easy storage.
t Lock mode.
STEAMER MODULE
Model IS15/S
Reversible domed
glass lid
2,600-watt heating
element
Illuminated touch
controls
Minimum water
level line
Large-capacity
basin
Graduated control
lighting
Stainless steel
construction
This appliance is certified by Star-K to meet
strict religious regulations in conjunction with
specific instructions found on www.star-k.org.
Steamer Module Features
7
wolfappliance.com
Steamer Module Features
The Wolf electric steamer module allows steam to
surround the food that is being cooked to prevent a loss
of nutrients. Steaming also allows food to retain its shape,
color and aroma.
The Wolf steamer module has an electronic temperature
control that closely regulates the water temperature for
optimal cooking performance. The temperature range is
140°F (60°C) to HIGH. This provides the ability to proof
bread dough, melt chocolate, hold stews for long periods
of time, and steam rice and a variety of foods without
losing nutrients or flavor.
STEAMER MODULE ASSEMBLY
For storage, position the solid insert pan on top and place
both insert pans into the steamer basin with handles
aligned. The domed glass lid can be inverted to keep a low
profile for storage. Refer to the illustration below.
For stacked alignment, rotate the solid insert pan 90° to
the perforated insert pan.
Domed glass lid
Solid insert
pan
Steamer basin
Perforated
insert pan
Drain outlet
Steamer module assembly.
OPTIONAL ACCESSORIES
Optional accessories are available through your authorized
Wolf dealer. For local dealer information, visit the find a
showroom section of our website, wolfappliance.com.
t Filler strip for installation with another cooktop or
module.
Steamer Module Operation
8
Modes of Operation
Steamer Module Operation
LOCK MODE
INITIAL START-UP
In lock mode, all touch pad operations on the control panel
are disabled and the heating element is deenergized. A
steady glowing light within the key symbol indicates that
the module is locked. Refer to the illustration below.
Before using for the first time, clean your steamer module
thoroughly with hot water and a mild detergent. Rinse and
dry with a soft cloth. This removes any residual oil and
grease left on the surface from the manufacturing process.
Refer to care recommendations on page 16.
t To lock the control panel, touch and hold the key
symbol for 3 seconds. Three chimes will sound and the
light within the key symbol will illuminate. The module is
now in lock mode.
t To unlock the control panel, touch and hold the key
symbol for 3 seconds. Two chimes will sound and the
light within the key symbol will go out. The module is
now in idle mode.
IMPORTANT NOTE: When the module is powered up for
the first time or if there has been a power outage, the
module will default to lock mode.
When the steamer module is powered up for the first time
it will default to lock mode. To unlock the control panel,
touch and hold the key symbol for 3 seconds.
IMPORTANT NOTE: A small amount of smoke and odor
may be noticed during the initial break-in period.
WATER LEVEL
CAUTION
Water must be added to the steamer basin before
operating the steamer module.
IDLE MODE
After unlocking the control panel as described in lock
mode, the module enters the idle mode of operation. All
touch pad operations on the control panel are enabled.
Temperature
LED display
Power bar
indicator
Temperature
adjustment
Before operating, fill the steamer basin with water until
level with the minimum water level line. Refer to the
illustration below.
Timer LED
display
MINIMUM
WATER LEVEL
Lock key
touch pad
Control panel.
DRAIN
touch pad
OFF ON
touch pad
CLEAR
touch pad
Water level.
Steamer Module Operation
9
wolfappliance.com
Steamer Module Operation
SETTING CONTROLS
The control panel of your steamer module is illuminated
and features touch controls with graduated control lighting
and temperature display. Refer to the illustrations below.
To activate the steamer module, first touch the OFF ON
touch pad on the control panel. The power bar indicator will begin to blink and show a half-power status.
To complete the activation, touch one of the following
symbols or touch pads while the power bar indicator is still
blinking:
t Touch the + symbol to set the temperature to 180°F
(80°C) and complete the activation.
t Touch the – symbol to set the temperature to 180°F
(80°C) and complete the activation.
t Touch HIGH to set the temperature to full power and
complete the activation.
To change the power level setting once the module is
activated and the power bar indicator remains steadily lit:
t Touch the + symbol to increase the temperature
set point.
t Touch the – symbol to decrease the temperature
set point.
t Touch HIGH to increase the temperature set point to
full power.
t Touch LOW to decrease the temperature set point to
140°F (60°C).
t Touch OFF ON to turn the module off.
TEMPERATURE SETTING GUIDE
SETTING
MELT
t Touch LOW to set the temperature to 140°F (60°C) and
complete the activation.
TEMP
USES
140°F (60°C)
Proofing
Melting chocolate
160°F (70°C)
Warming foods
Steaming bread
170°F (75°C)
Defrosting
Warming (use as chafing dish)
190°F (90°C)
Slow-cooking
200°F (95°C)
Steaming vegetables, rice etc.
+ AND –
TOUCH PADS
HIGH
LOW
OFF ON
Touch control panel.
HIGH
TEMPERATURE
DISPLAY
Temperature display.
Steamer Module Operation
10
Steamer Module Operation
TIMER
AUTOMATIC DRAIN
The steamer module features a countdown timer located in
the control panel. Refer to the illustration below.
IMPORTANT NOTE: The automatic drain feature will only
function if water is below 140°F (60°C). It is recommended
that the steamer module be installed with a drain connection and access to the drain through the base cabinet.
The timer may be set in one-minute increments up to 99
minutes. Once set, the remaining time will be illuminated in
the control panel as it counts down. The timer can be used
anytime the module is not in lock mode.
t To start the timer, touch + on the timer control. Touch
and hold + or – until the desired time is shown in the
timer display. The timer will begin its countdown in
minutes, 3 seconds after the time is set.
t A warning chime will sound when the timer has one
minute left and begins to countdown in seconds.
t When the timer reaches 0, an audible chime will sound.
The chime will continue to sound every 30 seconds
until CLEAR is touched.
+ AND –
TOUCH PADS
The DRAIN touch pad operation is functional only while the
module is in idle mode. The unit must be unlocked and not
in operation. Refer to the illustration below.
To activate the drain:
t Touch DRAIN for 3 seconds. An audible chime will
sound, the light in the DRAIN touch pad will illuminate
and the drain valve will open for a period of 2 minutes.
This should be enough time to drain a full capacity of
water. This operation may be repeated as many times
as needed to completely drain the steamer basin.
t Touch DRAIN again while in the drain mode operation
to shut the drain valve. The light in the DRAIN touch
pad will go out.
IMPORTANT NOTE: If you do not have a fixed drain
connection, a heat-resistant bucket can be positioned
under the drain outlet to accept the water. The bucket
must have a minimum 2 gallon (7.6 L) capacity.
CAUTION
Use caution when draining hot water from the steamer
basin to avoid burns.
TIMER DISPLAY
Timer controls.
DRAIN
TOUCH PAD
Automatic drain.
Steamer Module Operation
11
wolfappliance.com
Using the Steamer Module
STEAMING
STEAMING TIPS
IMPORTANT NOTE: Water must be added to the steamer
basin before operating the steamer module.
t Cooking with steam is a healthy and efficient way to
prepare food.
1) Fill the steamer basin with water or soup stock until
level with the minimum water level line.
t The steamer module can be used with either the solid
or perforated insert pan.
2) Cover the steamer basin with the glass lid to speed the
heating process.
t Always preheat the steamer module except when slowcooking.
3) Touch OFF ON to turn the unit on.
t It is recommended that you keep the glass lid on the
steamer module during cooking time. This allows foods
to cook quicker and keeps heat and water condensation run off underneath the glass lid.
4) Touch HIGH to set the temperature and preheat.
5) When preheating, the display alternates between
the actual temperature and the set point. Once the
set point is reached, an audible chime will sound,
the display will show the set point temperature, and
preheat will disappear from the display.
6) Once preheat is finished, add food to the perforated insert pan and place the pan in the steamer
basin. Cover with the glass lid and steam to desired
doneness. Refer to the chart on page 15 to estimate
steam cooking times.
7) Remove the insert pan from the steamer basin using
dry pot holders.
8) Touch OFF ON to turn the unit off.
t When steaming, use a minimum of 10 cups (2.4 L) and a
maximum 12 cups (2.8 L) water in the steamer basin.
t When preparing pasta, fill the steamer basin to the lip
where the insert pans rest, or approximately 2 gallons
(7.6 L). Use the perforated insert pan to cook and drain
pasta when done. The insert pan has a capacity of 14
cups (3.3 L) cooked pasta or 6 cups (1.4 L) dry pasta.
t Remove large particles of food before draining the
steamer basin.
t If water is added during the cooking cycle, the safety
mode may be initiated. Refer to water level safety
feature on page 14.
t Use the perforated insert pan as a bamboo steamer.
Place food in the insert pan and cover.
t Be sure to empty and clean the steamer basin after
each use. Food and mineral deposits can cause
corrosion.
CAUTION
When placing an insert pan into the steamer basin, use
dry pot holders to protect hands from steam burns.
Steamer Module Operation
12
Using the Steamer Module
DEFROSTING
SLOW-COOKING
IMPORTANT NOTE: Water must be added to the steamer
basin before operating the steamer module.
IMPORTANT NOTE: Water must be added to the steamer
basin before operating the steamer module.
1) Fill the steamer basin with water until level with the
minimum water level line.
1) Fill the steamer basin with 16 cups (3.8 L) water, so
water will reach the bottom of the insert pan and up the
sides slightly.
2) Cover the steamer basin with the glass lid to speed the
heating process.
3) Touch OFF ON to turn the unit on.
4) Set temperature at 170°F (75°C) and preheat.
5) When preheating, the display alternates between
the actual temperature and the set point. Once the
set point is reached, an audible chime will sound,
the display will show the set point temperature, and
preheat will disappear from the display.
6) Once preheat is finished, add food to the perforated
insert pan and place the pan in the steamer basin.
Cover with the glass lid and steam until defrosted.
7) Remove the insert pan from the steamer basin using
dry pot holders.
8) Touch OFF ON to turn the unit off.
DEFROSTING TIPS
t When defrosting, always preheat the water to 170°F
(75°C).
t Add water only to the minimum water level line in the
steamer basin. Watch the food carefully so edges do
not begin to cook.
t Some foods, such as frozen peas, corn and mixed
vegetables, do not need to be defrosted before
steaming.
t Meat must be defrosted before cooking.
2) Add food to the solid insert pan. Add up to 7 cups
(1.7 L) liquid to be cooked. Make sure the food is
completely covered with liquid.
3) Cover the insert pan tightly with heavy plastic wrap and
then with heavy-duty foil.
4) Place the insert pan in the water in the steamer basin.
5) Touch OFF ON to turn the unit on.
6) Set temperature at 190°F (90°C).
7) Cover with the glass lid and slow cook food for 8–10
hours or until meat and vegetables are tender.
8) Remove the insert pan from the steamer basin using
dry pot holders.
9) Touch OFF ON to turn the unit off.
SABBATH FEATURE
Sabbath feature allows for cooking or keeping food warm
while adhering to the “no work” requirements on religious
Sabbath days.
t Prepare the food and place in the solid insert pan.
Food may be heated first to 140°F (60°C) or left at room
temperature.
t Follow the slow-cooking steps above. The steamer
module will remain on until the steamer basin runs dry
and the unit is automatically turned off without adjusting the controls.
IMPORTANT NOTE: Do not use higher temperature
settings. The water will evaporate, causing a boil dry
condition.
Steamer Module Operation
13
wolfappliance.com
Using the Steamer Module
PROOFING
WARMING
IMPORTANT NOTE: Water must be added to the steamer
basin before operating the steamer module.
IMPORTANT NOTE: Water must be added to the steamer
basin before operating the steamer module.
1) Fill the steamer basin with water until level with the
minimum water level line.
1) Fill the steamer basin with water until level with the
minimum water level line.
2) Cover the steamer basin with the glass lid to speed the
heating process.
2) Cover the steamer basin with the glass lid to speed the
heating process.
3) Touch OFF ON to turn the unit on.
3) Touch OFF ON to turn the unit on.
4) Set temperature at 140°F (60°C) and preheat.
4) Set temperature at 160°F (70°C) to 165°F (75°C) and
preheat.
5) When preheating, the display alternates between
the actual temperature and the set point. Once the
set point is reached, an audible chime will sound,
the display will show the set point temperature, and
preheat will disappear from the display.
6) Once preheat is finished, place the bread dough in
bowl, greasing the top. It is not necessary to cover the
bowl. Place the bowl in the perforated insert pan and
place the pan in the steamer basin.
5) When preheating, the display alternates between
the actual temperature and the set point. Once the
set point is reached, an audible chime will sound,
the display will show the set point temperature, and
preheat will disappear from the display.
6) Once preheat is finished, add food to the solid insert
pan and place the pan in the steamer basin.
7) Cover with the glass lid. Proof bread dough until it is
doubled in bulk (approx 1/2 –1 hour).
7) Cover with the glass lid and keep food in the steamer
module until ready to serve. This will keep food at
above 140°F (60°C) for long periods of time.
8) Repeat rising procedure a second time in the pans in
which the dough will be baked.
8) Remove the insert pan from the steamer basin using
dry pot holders.
9) Touch OFF ON to turn the unit off.
Steamer Module Operation
14
Water Level
WATER LEVEL SAFETY FEATURE
TYPE OF WATER
If there is no water in the steamer basin and the steamer
module is turned on, the water level safety feature will be
activated. Three chimes will sound, the light in the key
symbol touch pad will flash and the word ‘Lo’ will appear
in the temperature display. Power to the heating element
will be automatically turned off and the module will enter
lock mode.
The type of water used in the steamer module will determine how easy clean up will be. Hard water can leave
calcium deposits in the steamer basin and soft water can
leave salt deposits. Distilled or reverse osmosis water
will leave no deposits in the steamer basin. Refer to care
recommendations on page 16.
The water level safety feature will also be activated if
during extended use, water in the steamer basin boils off
to a level that could damage the module.
To reset the water level safety feature:
t
Add water to the steamer basin.
t Touch CLEAR to reset the control and begin normal
operation once the unit exits lock mode.
IMPORTANT NOTE: When the water level safety feature
has been activated, the control may take a few minutes to
reset after water has been added.
Wolf Steaming Guide
15
wolfappliance.com
Steaming Guide
FOOD
TEMP
INSERT PAN
AMOUNT
TIME
AMOUNT
TIME
HIGH
HIGH
HIGH
HIGH
HIGH
HIGH
HIGH
HIGH
HIGH
HIGH
HIGH
HIGH
Perforated
Perforated
Perforated
Perforated
Perforated
Perforated
Perforated
Perforated
Perforated
Perforated
Perforated
Perforated
1 lb (.5 kg)
1 lb (.5 kg)
1 lb (.5 kg)
1 lb (.5 kg)
7–8 ears
2 lbs (.9 kg)
1 lb (.5 kg)
1 lb (.5 kg)
1 lb (.5 kg)
1 lb (.5 kg)
1 lb (.5 kg)
1 lb (.5 kg)
6–8 min
5–6 min
10–12 min
9–11 min
15–18 min
2–4 min
8–10 min
10–12 min
15–17 min
10–12 min
8–10 min
2–4 min
2 lbs (.9 kg)
2 lbs (.9 kg)
2 lbs (.9 kg)
2 lbs (.9 kg)
8–10 min
10–12 min
16–18 min
15–17 min
2 lbs (.9 kg)
2 lbs (.9 kg)
2 lbs (.9 kg)
2 lbs (.9 kg)
12–14 min
15–17 min
20–22 min
15–17 min
HIGH
HIGH
HIGH
Perforated
Perforated
Perforated
2 ears
1 lb (.5 kg)
1 lb (.5 kg)
15–17 min
14–16 min
10–12 min
TEMP
INSERT PAN
TIME
Couscous
Eggs
HIGH
HIGH
Solid
Perforated
4–5 min
5–7 min
Rice, long grain or brown
Pasta
HIGH
HIGH
Solid
Perforated
HIGH
160°F (70°C)
Perforated
Perforated
20–30 min
Follow package
directions
10–12 min
5–60 min
140°F (60°C)
Solid
6–15 min
Break into small pieces and stir until melted.
170°F (60°C)
170°F (60°C)
170°F (60°C)
Perforated
Perforated
Perforated
90 min
20–25 min
20 min
Refer to defrosting tips on page 12.
Refer to defrosting tips on page 12.
Refer to defrosting tips on page 12.
FRESH VEGETABLES
Asparagus
Broccoli, flowerettes
Carrots, 1/4" (6) slices
Cauliflower, flowerettes
Corn on the cob, husk removed
Eggplant, 1/2" (13) slices
Green beans, fresh
Kohlrabi, 1/4" (6) slices
Potatoes, baby red
Rutabaga, 1/4" (6) slices
Sugar snap peas
Spinach
FROZEN VEGETABLES
Corn on the cob
Mixed vegetables
Peas
FOOD
COMMENTS
STEAMING
Fish
Bread
Use equal amounts couscous and water.
Break each egg into greased custard cup.
Place cups in insert pan after preheating water.
Cover and steam until egg white is firm.
Use 25% less water than rice.
Refer to steaming tips on page 11.
Refer to steaming tips on page 11.
Serve bread immediately after steaming.
MELTING
Chocolate
DEFROSTING
Beef chuck roast, 3 lbs (1.4 kg)
Chicken breasts
Fish
Steamer Module Care
16
Care Recommendations
IMPORTANT NOTE: Make sure the steamer module is
off and all surfaces are cool before cleaning any part of the
unit.
STAINLESS STEEL SURFACES
IMPORTANT NOTE: Do not use abrasive cleaners; they
will permanently scratch stainless steel surfaces. Salt
and some cooking liquids may pit and stain the surface.
Remove these spatters immediately.
Use a spray degreaser to remove fingerprints and greasy
spatters. Spray on a cloth and wipe the surface. Buff dry
immediately to avoid streaking. For hard water stains, use
white vinegar and water.
For general cleaning, use a soft, nonabrasive stainless
steel cleaner like Signature polish and apply with a soft
lint-free cloth. To bring out the natural luster, lightly wipe
the surface with a water-dampened microfiber cloth
followed by a dry polishing chamois. All work should follow
the grain direction of the finish. Better results are obtained
by keeping the cloth in continuous contact with the stainless steel.
Signature polish is available from Signature Limited
Laboratory, P. O. Box 13436, Dayton, Ohio 45413, or
call 877-376-5474.
GENERAL CLEANING
Control panel.
t Use a spray degreaser to remove fingerprints and
greasy spatters. Spray on a cloth and wipe the surface.
Do not spray directly on the control panel.
t Use a clean cloth or sponge and wipe the control panel
with warm water and a mild detergent. Rinse and dry
immediately.
Steamer basin.
t Empty water from the steamer basin. Pour approximately 4 quarts (3.8 L) of warm water with a mild detergent into the empty basin. Scrub with a nylon brush.
Rinse well, drain and dry thoroughly.
t For hard water calcium deposits, clean with white
vinegar and water or a cleaner designed to remove
minerals. Let mixture stand in the steamer basin, then
scrub with a nylon brush. Rinse well.
t For soft water salt deposits, wipe out with a wet cloth.
Rinse well.
Glass lid.
t The reversible domed glass lid is dishwasher safe, or
wash by hand with warm water and mild detergent.
Rinse and dry thoroughly.
DRAIN STRAINER
A screen drain strainer is installed into the drain outlet
to keep food particles from clogging the drain valve. The
strainer should remain in the drain outlet during normal use
and cleaning. Lift the drain strainer out and rinse after each
use to remove food particles.
Steamer insert pans.
t The solid and perforated insert pans are dishwasher
safe, or wash by hand with warm water and a mild
detergent. Rinse and dry.
Steamer Module Recipes
17
wolfappliance.com
Pork Vegetable Buns
Makes 18 buns.
Buns:
1 Tbsp (15 ml) sugar
1 pkg (8 g) active dry yeast
11/2 cups (360 ml) water, 105°F (40°C) – 115°F (45°C)
4 cups (480 g) flour
1 Tbsp (15 ml) salt
1 tsp (5 ml) oil
Filling:
2 Tbsp (30 ml) sesame oil
2 cups (300 g) broccoli slaw
1 lb (.5 kg) ground pork
2 green onions, chopped
1/4 cup (60 ml) soy sauce
2 tsp (10 ml) cornstarch
1/2 tsp (2 ml) ground ginger
METHOD
To make dough: Mix 1 tablespoon (15 ml) sugar and yeast
in water. Let stand 10 minutes or until foamy. Combine
flour, salt and oil in 14-cup (3.3 L) food processor bowl.
Start food processor running and slowly pour yeast
mixture into food processor bowl. Process until dough
forms. Allow processor to knead dough for 45 seconds.
Remove dough from bowl and place in glass bowl. Pour 10
cups (2.4 L) water into the steamer basin. Preheat the Wolf
steamer module to 140°F (60°C). Place bowl on perforated
insert pan in steamer. Let rise for 30 minutes to 1 hour
or until doubled in bulk. Turn out onto a floured surface.
Cover with a cloth and let stand 3 to 5 minutes.
To make filling: While dough is rising, heat wok on high
for approximately 5 minutes, or until hot. Add sesame oil.
Add pork and cook 1 to 2 minutes, breaking up meat as
it cooks. Add slaw and onions; continue to cook for 3 to
4 minutes or until pork is no longer pink. Combine soy
sauce, cornstarch and ginger and mix into meat mixture.
Continue to cook in wok until all liquid is absorbed. Let
cool completely.
To make buns: Divide dough into 18 pieces and shape into
balls. Allow dough to relax for approximately 15 minutes,
then roll each into a 4" (102) diameter circle on floured
surface. Place approximately 2 tablespoons (30 ml) filling in
center of each ball. Pleat edges of circle, lifting sides over
filling and twist together at the top. Repeat with remaining
dough and filling. Arrange 9 buns on greased perforated
insert pan, leaving 1" (25) between each bun. Repeat with
remaining buns, placing them under a damp cloth. Heat
the steamer module to HIGH, covered with the glass lid.
After reaching temperature, carefully place insert pan in
steamer. Cover with the glass lid. Steam 12–14 minutes or
until dough is done. Remove from insert pan and repeat
with remaining buns. Serve hot.
Steamer Module Recipes
18
Steamed Broccoli and Dip
Slow-Cooked Herbed Pot Roast
Makes breading for 15 to 20 pieces.
Makes 6 servings
Makes 10 servings
Ingredients:
Ingredients:
3 lbs (1.4 kg) chuck roast, excess fat trimmed
3 cups (720 ml) red wine
2 cups (240 ml) water
4 cloves garlic, smashed
2 tsp (10 ml) kosher or sea salt
1/2 tsp (2 ml) black pepper
1 stalk celery
8 sprigs fresh thyme
11/2 lbs (.7 kg) red potatoes, each cut in half
3 carrots, cut into 2" (51) pieces
1 bay leaf
1–2 lbs (.5–.9 kg) broccoli flowerettes
1/ 3
cup (80 ml) Italian or Russian salad dressing
or cheese dip
METHOD
Pour 10 cups (2.4 L) water in the steamer basin. Heat the
Wolf steamer module to HIGH, covered with the glass lid.
Place broccoli around the edge of the perforated insert
pan. In the center, fill a custard cup with either the salad
dressing or cheese dip. Carefully place the insert pan in
the steamer. Cover with the glass lid. Steam for 6 minutes
or until broccoli is crisp-tender.
NOTE: To melt butter in a custard cup at the same time as
the broccoli, heat the broccoli for 4 minutes before adding
the custard cup with butter. Butter can be seasoned with
garlic salt.
METHOD
Combine roast, wine, water, garlic salt and pepper in large
bowl and marinade for 12 hours. Tie celery and thyme
together with string. In solid insert pan, add roast with
marinade, potatoes, carrots, celery with thyme and bay
leaf. Cover tightly with heavy plastic wrap. Cover tightly
again with heavy-duty foil. Pour 16 cups (3.8 L) water into
the steamer basin. Place the insert pan on top. The water
should come around the sides, but not over the top. Cover
with the glass lid. Heat the Wolf steamer module to 190°F
(90°C) and cook for 8 to 10 hours.
NOTE: If you like the concentrated flavor of the juices,
strain liquid through a fine mesh strainer, remove celery
bundle and skim any fat from the top. Pour the liquid into
a large saucepan and cook until the juices are reduced
by half. Adjust seasonings if needed. Add the meat and
vegetables back to the pan to heat through.
Steamer Module Recipes
19
wolfappliance.com
Slow-Cooked Saucey Spare Ribs
Aromatic Poached Fish
Makes 4 servings
Makes 2 servings
Ingredients:
Ingredients:
1 cup (240 ml) barbecue sauce
1 tsp (5 ml) fresh ground black pepper
1/2 tsp (2 ml) ground allspice
1/2 tsp (2 ml) onion powder
1 rack of pork spare ribs
1/2–1
METHOD
Mix barbecue sauce, pepper, allspice and onion powder
together. Cut rib rack in half. Place ribs on 24" (610) piece
of heavy plastic wrap. Coat ribs with half of the sauce
on each side and wrap in plastic wrap. Wrap ribs again
in heavy plastic wrap, then in heavy-duty aluminum foil.
Place in solid insert pan. Pour 16 cups (3.8 L) water into the
steamer basin. Place insert pan in steamer. Cover with the
glass lid. Heat the Wolf steamer module to 190°F (90°C)
and cook for 6 to 7 hours or until ribs are very tender.
NOTE: To make a great barbecue sauce from the juices
that are in the plastic and foil packet, place them in a saute
pan along with 1 cup (240 ml) barbecue sauce and reduce
until thick. You can also char the ribs on a grill, coating
them with the barbecue sauce.
lb (.2–.5 kg) fish, cleaned and defrosted
1 lemon, thinly sliced
1 carrot, cut into 1/2" (13) slices
4 bay leaves
6 sprigs fresh thyme
1 stalk celery, cut into 1/2" (13) slices
5 peppercorns
1 cup (240 ml) white wine
METHOD
Place 15 cups (3.5 L) water into the steamer basin. Heat
the Wolf steamer module to 200°F (95°C), covered with the
glass lid. Place perforated insert pan in steamer. Add all
ingredients. Cover with the glass lid. Cook until the fish is
tender, 10 to 15 minutes, depending on the thickness of
the fish. Remove the insert pan and carefully remove the
fish.
Aromatic Room Freshener
Ingredients:
Fresh herbs
Citrus slices
Bay leaves
METHOD
Pour 10 cups (2.4 L) water into the steamer basin. Add
herbs, citrus slices and bay leaves. Heat the Wolf steamer
module to HIGH. Steam for 5 to 10 minutes. If desired, turn
heat setting down to 200°F (95°C) and leave in for an additional 2 to 3 hours.
Steamer Module Recipes
20
Steamed Custard
Classic Chocolate Truffles
Makes 4 servings
Makes 3 dozen
Ingredients:
Ingredients:
4 large eggs
2/3 cups (130 g) sugar
11/3 cups (320 ml) milk
2 tsp (10 ml) vanilla
Nutmeg, ground
12 oz (340 g) or 2 cups semi-sweet chocolate chips
1/2 cup (120 g) butter, cut into 4 pieces
1/3 cup (80 ml) water
1 Tbsp (15 ml) black raspberry liqueur,
or other liqueur
1 egg yolk
3/4 cup (90 g) cocoa powder
METHOD
Pour 10 cups (2.4 L) water into the steamer basin. Heat the
Wolf steamer module to HIGH, covered with the glass lid.
Whisk together eggs and sugar until light and frothy. Beat
in milk and vanilla. Pour into four greased ceramic custard
cups, sprinkle tops with nutmeg. Cover each tightly with
aluminum foil. Place cups in perforated insert pan. After
steamer has reached HIGH, carefully place insert pan in
the steamer. Cover with the glass lid. Steam for 10 to 12
minutes, or until the center is slightly soft. Remove the
foil and allow the custard to cool for a few minutes. Cover
with plastic wrap and refrigerate for at least 2 hours. Serve
chilled topped with fruit or whipped cream.
For Crème Brûlée: Follow the directions above, steaming
the custard 10 minutes or just until set. After refrigerating, sprinkle approximately 2 teaspoons (10 ml) sugar on
each. Heat the top with a blow torch until the sugar has
hardened. Serve immediately.
METHOD
Pour 10 cups (2.4 L) water into the steamer basin. Heat
the Wolf steamer module to 140°F (60°C), covered with the
glass lid. In solid insert pan, place chips, butter, water and
liqueur. Place insert pan in steamer. Heat until chocolate
and butter are melted, approximately 10 minutes, stirring
as little as possible. Remove insert pan from the steamer
and gently whisk in egg yolk until just combined. Place
insert pan in refrigerator for approximately 1 hour. When
chilled, scoop chocolate by tablespoon (15 ml) and roll into
a ball. Place balls on a waxed paper lined baking sheet.
Repeat until all mixture is used. Refrigerate until firm. Roll
in cocoa and serve. Store in refrigerator.
Troubleshooting Guide
21
wolfappliance.com
Troubleshooting
If your Wolf steamer module is not operating properly, use
the following troubleshooting guide before calling Wolf
factory certified service. This guide will save you time and
trouble and may help you avoid the expense of a service
call.
Steamer module does not operate.
t Module is in lock mode. Touch and hold the key symbol
for 3 seconds to unlock the control panel.
t Check the household fuse or circuit breaker to see if it
has been blown or tripped. A power outage may also
have caused a disruption in service.
t Verify that the electrical connection to the module has
not been disconnected.
‘LO’ appears in the temperature display.
t Steamer module was started with too little or no water
in the steamer basin. The water level safety feature has
been activated. Refer to instructions on page 14.
t During extended use, water level in the steamer basin
has dropped too low. The water level safety feature has
been activated. Refer to instructions on page 14.
Service Information
22
Service Information
When requesting information, literature, replacement parts
or service, always refer to the model and serial numbers
of your steamer module. Both numbers are listed on the
product rating plate, located on the underside of the
module. Refer to the illustration on page 3. Record the
rating plate information below for future reference.
Model Number:
Serial Number:
Installation Date:
Wolf Factory Certified Service:
BEFORE CALLING FOR SERVICE
Before calling Wolf factory certified service, refer to the
troubleshooting guide on page 21.
PRODUCT REGISTRATION
Register your new Wolf product today so that we may
ensure your satisfaction. You may register by one of the
following options:
1) Mail in the completed Wolf product registration card.
2) Register online at wolfappliance.com.
3) Register by phone by calling Wolf customer care at
800-222-7820.
Phone:
Authorized Wolf Dealer:
Phone:
The model and serial numbers of your unit are printed on
the enclosed Wolf product registration card. If you provide
us with your e-mail address, we will send you exciting new
product updates and recipes as they become available,
along with information on special events.
The information and images in this guide are the copyright property of Wolf Appliance, Inc. Neither this guide nor any information or images contained herein
may be copied or used in whole or in part without the express written permission of Wolf Appliance, Inc. ©Wolf Appliance, Inc. all rights reserved.
Wolf, Wolf & Design, Wolf Gourmet, W & Design and the color red as applied to knobs are registered trademarks and service marks of Wolf Appliance, Inc.
Sub-Zero, Sub-Zero & Design, Dual Refrigeration, Constant Care and The Living Kitchen are registered trademarks and service marks of Sub-Zero, Inc.
(collectively, the “Company Marks.”) All other trademarks or registered trademarks are property of their respective owners in the United States and other countries.
Wolf Appliance Products Limited Warranty
FOR RESIDENTIAL USE ONLY
FULL TWO YEAR WARRANTY*
For two years from the date of original installation, your Wolf Appliance product warranty covers all parts
and labor to repair or replace, under normal residential use, any part of the product that proves to be defective in materials or workmanship. All service provided by Wolf Appliance under the above warranty must be
performed by Wolf factory certified service, unless otherwise specified by Wolf Appliance, Inc. Service will be
provided during normal business hours.
LIMITED FIVE YEAR WARRANTY
For five years from the date of original installation, Wolf Appliance will repair or replace the following parts
that prove to be defective in materials or workmanship: gas burners (excluding appearance), electric heating
elements, blower motors (ventilation hoods), electronic control boards, magnetron tubes and induction
generators. The part(s) will be repaired or replaced, free of charge, with the owner paying for all other costs
including labor. All service provided by Wolf Appliance under the above warranty must be performed by Wolf
factory certified service, unless otherwise specified by Wolf Appliance, Inc. Service will be provided during
normal business hours.
TERMS APPLICABLE TO EACH WARRANTY
The warranty applies only to products installed for normal residential use. The warranty applies only to products
installed in any one of the fifty states of the United States, the District of Columbia or the ten provinces of
Canada. This warranty does not cover any parts or labor to correct any defect caused by negligence, accident
or improper use, maintenance, installation, service or repair.
THE REMEDIES DESCRIBED ABOVE FOR EACH WARRANTY ARE THE ONLY ONES THAT WOLF APPLIANCE,
INC. WILL PROVIDE, EITHER UNDER THIS WARRANTY OR UNDER ANY WARRANTY ARISING BY OPERATION
OF LAW. WOLF APPLIANCE, INC. WILL NOT BE RESPONSIBLE FOR ANY CONSEQUENTIAL OR INCIDENTAL DAMAGES ARISING FROM THE BREACH OF THIS WARRANTY OR ANY OTHER WARRANTY, WHETHER
EXPRESS, IMPLIED OR STATUTORY.
Some states do not allow the exclusion or limitation of incidental or consequential damages, so the above
limitation or exclusion may not apply to you. This warranty gives you specific legal rights and you may also
have other legal rights that vary from state to state.
To receive parts and/or service and the name of Wolf factory certified service nearest you, contact Wolf
Appliance, Inc., P. O. Box 44848, Madison, WI 53744; check the contact & support section of our website,
wolfappliance.com or call 800-222-7820.
*Stainless steel doors, panels, handles, product frames and interior surfaces are covered by a limited 60-day
parts and labor warranty for cosmetic defects.
*Replacement filters for ventilation hood recirculating kits are not covered by the product warranty.
WOLF APPLIANCE, INC.
P. O. BOX 44848 MADISON, WI 53744
819443 REV-A
WOLFAPPLIANCE.COM
7 /2011
800.222.7820