1
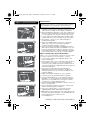
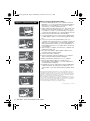
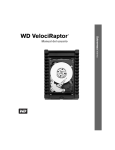
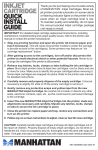
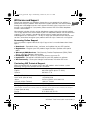
Endeavor_QIG.book Page 1 Wednesday, October 23, 2013 2:17 PM WD Service and Support Should you encounter any problem, please give us an opportunity to address it ENG before returning this product. Most technical support questions can be answered through our knowledge base or e-mail support service at http://support.wd.com. If the answer is not available or, if you prefer, please contact WD at the best telephone number shown below. Your product includes 30 days of free telephone support during the warranty period. This 30-day period starts on the date of your first telephone contact with WD technical support. E-mail support is free for the entire warranty period and our extensive knowledge base is available 24/7. To help us keep you informed of new features and services, remember to register your product online at https://www.wd.com/register. Accessing Online Support Visit our product support website at http://support.wd.com and choose from these topics: Downloads - Download drivers, software, and updates for your WD product. Registration - Register your WD product to get the latest updates and special offers. Warranty & RMA Services - Get Warranty, Product Replacement (RMA), RMA Status, and Data Recovery Information. Knowledge Base - Search by keyword, phrase, or answer ID. Installation - Get online installation help for your WD product or software. WD Community – Share your thoughts and connect with other WD users. Contacting WD Technical Support When contacting WD for support, have your WD product serial number, system hardware, and system software versions available. United States/North America English 800.ASK.4WDC (800.275.4932) Spanish 800.832.4778 Asia Pacific (toll free where available) +800.6008.6008 Asia Pacific (non toll free) +65.6848.6008 Japan 00 531 650442/ 0120 994 120 Australia & New Zealand +800.2275.4932 South America http://support.wd.com/contact Europe (toll free*) 00800.27549338 * Austria, Belgium, Denmark, France, Germany, Ireland, Italy, Netherlands, Norway, Spain, Sweden, Switzerland, United Kingdom Europe (non toll free) Russia Middle East +31.880062100 8 10 8002 335 50110 0031.880062100 WD Black2 Dual Drive Quick Install Guide | 1 Endeavor_QIG.book Page 2 Wednesday, October 23, 2013 2:17 PM Kit Contents WD Black2 Dual Drive 2 WD BLA CK Quick Install Guide (includes USB web key for software download) Tech Support & Warranty Guide Data/power USB connector Power only USB connector SATA to USB Adapter Cable (for cloning) Introducing WD Black2 Dual Drive, a revolutionary storage solution that is specifically designed for the modern enthusiast. The power of two, WD Black2 Dual Drive is a fusion of a fully accessible solid-state drive for your operating system with a generous capacity hard drive for personal data and large files. It is the must-have upgrade solution for your single drive PC. Compatibility Windows® 8.1/8/7/Vista Windows XP (32-bit) Note: Compatibility may vary depending on your hardware configuration and operating system. OEM recovery partitions generated at the factory by computer manufacturers cannot be replicated. When drive security is enabled, only the SSD portion is considered secure. The HDD portion of the drive is still accessible when the drive is locked. These drives are not recommended or designed for use in RAID environments. Windows Storage Spaces feature is not supported. NVidia storage drivers are not supported. Systems using 28 bit LBA addressing may not be supported. A partition may not span across the SSD to the HDD. Unpacking & Drive Handling WD hard drives are precision instruments and should be handled with care during unpacking and installation. Hard drives can be damaged by rough handling, shock and vibration, or electrostatic discharge (ESD). Be aware of the following precautions: This product contains no userserviceable parts; refer servicing to WD-authorized personnel only. Do not unpack the dual drive until you are ready to install it. The dual drive is packaged in an antistatic bag. 2 | WD Black2 Dual Drive Quick Install Guide To avoid ESD problems, ground yourself by touching the metal chassis of the computer before handling the dual drive. Articles of clothing generate static electricity. Do not allow clothing to come in direct contact with the dual drive or circuit board components. Handle the dual drive by its sides only. Avoid touching the circuit board components on the bottom of the dual drive. Do not drop, shake, or knock down the dual drive. Do not stack dual drives or stand your dual drive on its edge. Do not press on the top cover of the dual drive. Important: It is recommended that you back up the contents of your original drive prior to installing the dual drive. WD assumes no responsibility for any loss of data that may occur in the cloning or installation process and will not be held liable for data recovery services. To back up your existing data or clone your current hard drive before installing your new WD dual drive, see “Option 1: New Operating System (OS) Installation” on page 3. or “Option 2: Cloning Your Existing Hard Drive” on page 4. Endeavor_QIG.book Page 3 Wednesday, October 23, 2013 2:17 PM Figure A - New OS Installation Getting Started Important: Before disassembling your computer, check the terms and conditions of your manufacturer’s warranty. Disassembling your computer may void its warranty. 1. Gather these materials and tools: WD dual drive kit; computer system manual; operating system DVD or CD and instructions; Phillips and flat-blade screwdrivers. 2. Before handling the dual drive or any other components, discharge static electricity by touching the metal chassis of your computer or by using an anti-static wrist strap. 3. Locate and record the dual drive serial number, model number, and date code on the label on top of the drive. 4. Back up the contents of your original drive prior to installing the dual drive. 5. Remove the USB web key on the front of the install guide. This contains the software link required to download the drive installation software. 6. Please note that the dual drive is shipped with only the SSD capacity visible (120 GB) and available for use. You must use the dual drive installation software located at http://support.wd.com to activate and partition the HDD portion and make the full capacity (1.12 TB) available. Option 1: New Operating System (OS) Installation Note: To clone your existing HDD, follow the instructions under “Cloning Your Existing 2.5-inch Hard Drive” on page 4. 1. Power off the computer and unplug the power cord. Remove the battery. 2. Remove the system cover or open the notebook/remove the hard drive cover (refer to your system manual for instructions) and carefully remove the hard drive from its slot (Figure A, Step 01). If applicable, remove the old hard drive from the bracket. 3. Remove the new dual drive from the ESD bag. If applicable, attach the new dual drive to the bracket. Insert the drive into the slot. Close the hard drive cover (Figure A, Step 01). 4. Replace the battery and power on your computer. 5. Install the OS on the dual drive (Figure A, Step 02). 6. Insert the USB web key into your computer’s external USB port to go to the software download site (Figure A, Step 03). If you have difficulty accessing the software download, go to http://support.wd.com. 7. Download the dual drive installation software to your local drive or storage media. 8. Run the dual drive installation software to activate and partition the HDD (Figure A, Step 04). 9. Attach your original HDD to your system using the supplied USB to SATA cable (Figure A, Step 05). 10.Manually transfer user data from your original drive to the dual drive. See Article #10490 in our knowledge base at http://support.wd.com for data transfer recommendations. WD Black2 Dual Drive Quick Install Guide | 3 Endeavor_QIG.book Page 4 Wednesday, October 23, 2013 2:17 PM Figure B - Clone Existing HDD Option 2: Cloning Your Existing Hard Drive 1. Insert the USB web key into your computer’s external USB port to go to the software download site (Figure B, Step 01). If you have difficulty accessing the software download, go to http://support.wd.com. 2. Select and download both the Acronis® True Image™ WD Edition and the dual drive installation software to your local drive or storage. If you have difficulty accessing the software download, please go to http://support.wd.com. 3. Remove the new dual drive from the ESD bag. 4. Connect the SATA connector end of the included SATA to USB adapter cable to your dual drive (Figure B, Step 02). 5. Launch Acronis True Image WD Edition from your computer. Follow the instructions to transfer your OS and data from your original drive to the dual drive (Figure B, Step 03). See Article #10491 in our knowledge base at http://support.wd.com if your original drive is larger than your dual drive. 6. After cloning is complete, shut down the computer and unplug the power cord. 7. Disconnect the SATA to USB adapter cable from the computer and the new dual drive. 8. Remove the notebook battery. 9. Remove the drive currently installed in your computer and install the dual drive (Figure B, Step 04). 10.Replace the battery and power on your computer. 11.Run the dual drive installation software that you downloaded in step number 2 to activate and partition the HDD (Figure B, Step 05). 12.If needed, attach the original HDD using the USB/SATA cable and transfer any remaining user data from your original HDD to your new WD dual drive (Figure B, Step 06). Information furnished by WD is believed to be accurate and reliable; however, no responsibility is assumed by WD for its use nor for any infringement of patents or other rights of third parties which may result from its use. No license is granted by implication or otherwise under any patent or patent rights of WD. WD reserves the right to change specifications at any time without notice. Western Digital, WD, and the WD logo are registered trademarks in the U.S. and other countries of Western Digital Technologies, Inc., and WD Black2 is a trademark in the U.S. and other countries of Western Digital Technologies, Inc. Other marks may be mentioned herein that belong to other companies. © 2013 Western Digital Technologies, Inc. All rights reserved. 2079-800000-800 Oct 2013 4 | WD Black2 Dual Drive Quick Install Guide