1
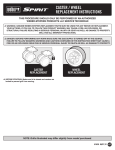
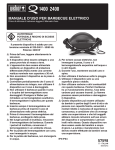
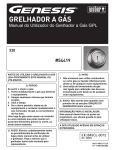
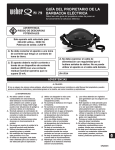
MAIN GAS LINE REPLACEMENT INSTRUCTIONS THIS PROCEDURE SHOULD ONLY BE PERFORMED BY AN Authorized Weber-Stephen products LLC SERVICE TECHNICIAN Warning: Genuine weber-stephen replacement parts MUST be used for any repair or replacement. Your actions, if you fail to follow this Product Warning, may cause a fire, an explosion, or structural failure resulting in serious personal injury or death as well as damage to property. (Will void all warranty protection.) DANGER: before performing any work make sure the gas supply is turned off at the source. Failure to follow dangers, warnings and cautions contained in this Instruction sheet may cause a fire or an explosion resulting in serious personal injury or death as well as damage to property. MAIN GAS LINE Replacement m Before Starting: Make sure lid is closed and casters are locked to prevent grill from moving. NOTE: Grills illustrated may have slight differences than model purchased. 61626 07/18/12 AT 1 DISCONNECTION OF HOSE FROM GAS SOURCE NoRTH AMERICAN Grills LP UNITS: A) Make sure gas supply is turned off at source. B) Disconnect LP cylinder from inside of cabinet base. C) Remove LP cylinder from cabinet base. mWARNING: Do not use a wrench to loosen the connection. Using a wrench could damage the regulator coupling and could cause a leak. NG UNITS: A) Make sure gas supply is turned off at source. B) Slide collar of quick-disconnect back to remove flexible gas supply hose from gas source. 1 EXPORT Grills LPG UNITS: m WARNING: Make sure that the LPG cylinder or regulator valve is closed. A) Remove the gas supply cylinder by shutting off the gas supply and disconnecting the hose and regulator assembly from the cylinder. Identify your regulator type. Follow the disconnection instructions for that regulator. Disconnect by Turning Anti-Clockwise Unscrew regulator from cylinder by turning fitting anti-clockwise (1). Disconnect by Turning Clockwise Unscrew regulator from cylinder by turning fitting clockwise (2) (3). Disconnect by Turning Lever Turn regulator lever to the down/off position (4). Push in on regulator lever (5) until it releases from the cylinder (6). Disconnect by Sliding Collar Make sure regulator lever is in the off position (7) (9). Slide the collar of the regulator up (8) (10) to disconnect from the cylinder. 2 34 3 4 6 5 7 8 B) Remove LPG cylinder. 9 10 NG UNITS: A) Make sure gas supply is turned off at source. Manual Shut-Off Valve B) Disconnect flexible gas supply hose from manual shut-off valve (11). Refer to instructions included with your flexible gas supply hose. — OR — Gas Outlet Valve B) Disconnect flexible gas supply hose from gas outlet valve (12). Pull plug out to disengage hose from cover plate. (This automatically shuts off gas.) Refer to instructions included with your flexible gas supply hose. 11 See Owner’s Guide for complete gas connection and removal instructions. 12 2 LID ASSEMBLY AND COOKBOX COMPONENTS REMOVAL 3 CONTROL PANEL REMOVAL TOOLS NEEDED: 4 TOOLS NEEDED: - PHILLIPS 310 / 320 210 / 220 MAIN GAS LINE TO MANIFOLD REMOVAL - 3/4" 5 TOOLS NEEDED: MAIN GAS LINE TO BULKHEAD REMOVAL - 3/4", 3/4" • REPLACEMENT PART INSTALLATION 6 TOOLS NEEDED: 7 TOOLS NEEDED: MAIN GAS LINE TO BULKHEAD INSTALLATION - 3/4", 3/4" MAIN GAS LINE TO MANIFOLD INSTALLATION - 3/4" m WARNING: Make sure all control knobs are turned to the OFF position before reconnecting gas supply and operating grill. Your actions, if you fail to follow this Product Warning, may cause a fire, an explosion, or structural failure resulting in serious personal injury or death as well as damage to property. 8 CONNECTION OF HOSE to GAS SOURCE NoRTH AMERICAN Grills LP UNITS: A) Reinstall LP cylinder into cabinet base. B) Screw regulator coupling onto cylinder valve; turn clockwise, or to the right. m WARNING: Do not use a wrench to tighten connection. Using a wrench could damage regulator coupling and could cause a leak. NG UNITS: A) Slide collar of quick-disconnect back and reconnect flexible gas supply hose. EXPORT Grills 1 LPG UNITS: 2 m WARNING: Make sure that the LPG cylinder or regulator valve is closed. A) Connect regulator to LPG cylinder. Some regulators push ON to connect and pull OFF to disconnect; others have a nut with a left-hand thread that connects to the cylinder valve. Identify your regulator type and follow one of the connection instructions specific to that regulator. Connect by Turning Clockwise Screw regulator onto cylinder by turning fitting clockwise (1). Position the regulator so that the vent hole (2) faces down. Connect by Turning Anti-Clockwise Screw regulator onto cylinder by turning fitting anti-clockwise (3) (4). Connect by Pushing Lever/Snapping into Position Turn regulator lever (5) to the down/off position. Push regulator down on cylinder valve until regulator snaps into position (6). Connect by Sliding Collar Make sure regulator lever is in the off position (7) (10). Slide the collar of the regulator up (8) (11). Push the regulator down onto the cylinder valve and maintain pressure. Slide collar down to close (9) (12). If regulator does not lock, repeat procedure. 3 44 3 6 5 7 8 9 10 11 NG UNITS: 12 A) Make sure gas supply is turned off at source. Manual Shut-Off Valve B) Connect flexible gas supply hose to manual shut-off valve (13). Refer to instructions included with your flexible gas supply hose. — OR — 13 Gas Outlet Valve B) Connect flexible gas supply hose to gas outlet valve (14). Insert plug into circular receptacle on cover plate, slide plug upward, and push plug in to engage. Refer to instructions included with your flexible gas supply hose. 14 See Owner’s Guide for complete gas connection and removal instructions. m WARNING: Make sure all control knobs are turned to the OFF position before reconnecting gas supply and operating grill. Your actions, if you fail to follow this Product Warning, may cause a fire, an explosion, or structural failure resulting in serious personal injury or death as well as damage to property. 9 CHECK FOR GAS LEAKS m DANGER Do not use an open flame to check for gas leaks. Be sure there are no sparks or open flames in the area while you check for leaks. Sparks or open flames will result in a fire or explosion, which can cause serious bodily injury or death and damage to property. 2 1 You will need: a soap and water solution and a rag or brush to apply it. A) Mix soap and water. B) Turn gas supply on at source. C) Check for leaks by wetting fittings with soap and water solution and watching for bubbles. If bubbles form, or if a bubble grows, there is a leak. NOTE: When leak checking is complete, turn gas supply off at the source and rinse connections with water. 3 4 Check: D) Hose-to-Bulkhead connection (1). E) Main gas line-to-Bulkhead connection (2). F) Main gas line-to-Manifold connection (3). G) Side burner line-to-Manifold connection (4). H) Side burner valve-to-Side burner line connection (5). mDANGER: If there is a leak at connection (1,2,3,4 or 5), retighten the fitting with a wrench and recheck for leaks with soap and water solution. If a leak persists, turn OFF the gas. DO NOT OPERATE THE BARBEQUE. Failure to follow dangers, warnings and cautions contained in this Instruction sheet may cause a fire or an explosion resulting in serious personal injury or death as well as damage to property. Contact the Customer Service Representative in your area using the contact information on our website. Log onto www.weber.com . 5 ® E) Valves-to-manifold connections (6). F) Regulator-to-cylinder connections (7) (10). G) Regulator hose-to-regulator connections (8) (11). H) Flexible gas supply hose to gas supply connection (9) (12). mDANGER: If there is a leak at connection (6, 7, 8, 9, 10, 11 or 12), turn off the gas. DO NOT OPERATE THE BARBEQUE. Failure to follow dangers, warnings and cautions contained in this Instruction sheet may cause a fire or an explosion resulting in serious personal injury or death as well as damage to property. Contact the Customer Service Representative in your area using the contact information on our website. Log onto www.weber.com . 6 ® When leak checks are complete, turn gas supply OFF at the source and rinse connections with water. US Gas Sources: LP 7 8 NG 9 mIMPORTANT: To do a proper leak check, the control panel must be removed. After checking for leaks, replace the control panel and control knobs. Export Gas Sources: 10 LP 12 11 NG 10 TOOLS NEEDED: 11 CONTROL PANEL REINSTALLATION - PHILLIPS 310 / 320 210 / 220 LID ASSEMBLY AND COOKBOX COMPONENTS REINSTALLATION m PROPOSITION 65 Warning: Handling the brass material on this product exposes you to lead, a chemical known to the State of California to cause cancer, birth defects or other reproductive harm. (Wash hands after handling this product.) m WARNING: Make sure all parts are assembled and hardware is fully tightened before operating the grill. Your actions, if you fail to follow this product warning, may cause a fire, an explosion, or structural failure resulting in serious personal injury or death as well as damage to property. mATTENTION: This product has been safety-tested and is only certified for use in a specific country. Refer to country designation located on outside of box. These parts may be gas-carrying or gas-burning components. Please contact Weber-Stephen Products LLC Customer Service Department for genuine Weber-Stephen Products LLC replacement part(s) information. mWARNING: Do not attempt to make any repair to gas-carrying or gas-burning components without contacting Weber-Stephen Products LLC Customer Service Department. Your actions, if you fail to follow this product warning, may cause a fire or an explosion resulting in serious personal injury or death and damage to property. This symbol indicates that the product cannot be disposed of with household refuse. For instructions regarding proper disposal of this product in Europe, please visit www.weber.com , and contact the importer listed for your country. If you do not have internet access, contact your dealer for the importer’s name, address and telephone number. ® When you decide to dispose of or discard your barbeque, all electrical components (e.g., rotisserie motor, batteries, ignition module, handle lights) must be removed and disposed of properly according to WEEE. They should be disposed of separately from the barbeque. WEBER-STEPHEN ÖSTERREICH GMBH JARN & GLER WHOLESALE EHF WEBER-STEPHEN PRODUCTS LLC Maria-Theresia-Straße 51 4600 Wels AUSTRIA TEL: +43 7242 890 135 0; [email protected] Skutuvogur 1H 1-104 Reykjavik ICELAND TEL: +354 58 58 900 200 East Daniels Road Palatine, IL 60067-6266 USA TEL: 847 934 5700; [email protected] WEBER-STEPHEN PRODUCTS BELGIUM Sprl D&S IMPORTS OOO WEBER-STEPHEN Vostok Blarenberglaan 6 Bus 4 Industriezone Noord BE-2800 Mechelen BELGIUM TEL: +32 015 28 30 90; [email protected] 14 Shenkar Street Petach, Tikva 49001 ISRAEL TEL: +972 392 41119; [email protected] 142784 Moscow Region, Leninskiy District Rumyantsevo Village Building 1 RUSSIA TEL: +7 495 973 16 49; [email protected] WEBER-STEPHEN CZ & SK spol. s r.o. WEBER-STEPHEN PRODUCTS ITALIA Srl U Hajovny 246 ˚ 25243 Pruhonice CZECH REPUBLIC TEL: +42 267 312 973; [email protected] Centro Polifunzionale “Il Pioppo” Viale della Repubblica 46 36030 Povolaro di Dueville – Vicenza ITALY TEL: +39 0444 360 590; [email protected] WEBER-STEPHEN NORDIC ApS WEBER-STEPHEN POLSKA Sp. z o.o. Bøgildsmindevej 23, DK-9400 Nørresundby DANMARK TEL: +45 99 36 30 10; [email protected] Ul. Trakt Lubelski 153 04-766 Warszawa POLSKA TEL: +48 22 392 04 69; [email protected] WEBER-STEPHEN NORDIC MIDDLE EAST Ras Al Khaimah FTZ P.O. Box 10559 UNITED ARAB EMIRATES TEL: +971 4 360 9256; [email protected] WEBER-STEPHEN FRANCE SAS Eragny sur Oise – BP 80322 95617 Cergy Pontoise Cedex FRANCE TÉL: +33 810 19 32 37 [email protected] WEBER-STEPHEN DEUTSCHLAND GmbH Rheinstraße 194 55218 Ingelheim DEUTSCHLAND TEL: +49 6132 8999 0; [email protected] WEBER-STEPHEN NETHERLANDS B.V. Tsjûkemarwei 12 8521 NA Sint Nicolaasga Postbus 18 8520 AA Sint Nicolaagsa NETHERLANDS TEL: +31 513 4333 22; [email protected] WEBER-STEPHEN MAGYARORSZÁG KFT. 1138 Budapest, Váci út 186. HUNGARY TEL: +36 70 / 70-89-813; [email protected] For Republic of Ireland, please contact: Weber-Stephen Products (U.K.) Limited. For other eastern European countries, such as ROMANIA, SLOVENIA, CROATIA, TURKEY, or GREECE, please contact: Weber-Stephen Deutschland GmbH, [email protected]. GALACTEX OUTDOOR (PTY) LTD. 141-142 Hertz Draai Meadowdale, Edenvale Gauteng SOUTH AFRICA TEL: +27 11 454 2369; [email protected] For Baltic States, please contact: Weber-Stephen Nordic ApS. WEBER-STEPHEN IBERICA Srl Avda. de les Corts Catalanes 9-11 Despacho 10 B E-08173 Sant Cugat del Vallès Barcelona SPAIN TEL: +34 93 584 40 55; [email protected] WEBER-STEPHEN SCHWEIZ GMBH Talackerstr. 89a 8404 Winterthur SWITZERLAND TEL: +41 52 24402 50; [email protected] WEBER-STEPHEN PRODUCTS (U.K.) LIMITED The Four Columns, Broughton Hall Business Park Skipton, North Yorkshire BD23 3AE UNITED KINGDOM TEL: +44 01756 692611; [email protected] WEBER-STEPHEN PRODUCTS LLC www.weber.com ® © 2012 Designed and engineered by Weber-Stephen Products LLC, a Delaware limited liability company, located at 200 East Daniels Road, Palatine, Illinois 60067 U.S.A. WEBER-STEPHEN PRODUCTS LLC Customer Service Center: 90 West Hillcrest Boulevard, Schaumburg, IL 60195 ® 1-800-446-1071 (USA ONLY) www.weber.com