1
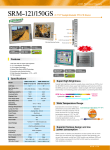
V-Talk
VT 1311
Antenna
External
Speaker
and
Microphone
Jacks
LED
Indicator
UP
DOWN
MODE
POWER
Microphone
PTT
(Push to Talk)
Thank you for purchasing this license-free
personal communication V-Talk two-way
radio for Family Radio Service (FRS) designated
frequencies.
IMPORTANT
Please read this manual carefully and
completely before attempting operation.
WARNING
•
•
•
Do not operate the radio when driving a
vehicle or riding a bicycle.
Do not operate the radio near unshielded
electrical blasting caps or in an explosive
atmosphere. An explosion or fire may
result.
Changing or modifying the radio could
void the user’s authorization to operate
this radio. Never open your radio case.
FCC INFORMATION
Do not open your radio to make any internal
adjustment. Your radio is set to transmit a
regulated signal on an assigned frequency. It
is against the law to alter or adjust the settings
inside the radio to exceed those limitations.
INTRODUCTION
With the VTech two-way radio, you can talk
with another person who has a similar radio
when both radios are tuned to the same
channel.
If someone else is using the channel you have
selected use the CTCSS (Continuous Tone
Coded Squelch System) feature for silent
monitoring.
Please take a few minutes to read this manual
carefully. The information described below will
allow you to obtain maximum performance
from your radio.
BATTERIES
This radio operates with 3 AAA alkaline
batteries.
To Install:
1.
2.
3.
Firmly remove the battery cover.
Insert 3 AAA batteries.
Replace the battery cover carefully.
Low Battery Alert:
When the batteries are low, the display on the
radio will flash for indication, and transmitting
will be disabled. Replace the batteries to
avoid interrupted use.
Note:
1.Please remove the batteries if they are
discharged or before storing your radio
for
extended
periods.
Batteries
corrode over time, and if left in the
radio
may
cause
permanent
damage.
2.The use of high capacity batteries is
recommended
for
maximum
operating life
between
battery
changes.
button to select the desired channel.
To Adjust the Receive Volume
1. Press the MODE button one or more times
until “VOL” appears and flashes.
2. Press the UP/DOWN buttons to select the
desired volume.
To Select A CTCSS Code
1. Press the MODE button one or more times
until “CTS” appears and flashes.
2. Press the UP/DOWN buttons to select the
desired CTCSS tone (“oF” means the
CTCSS feature is disabled).
To Receive
When an incoming signal is received, the LED
indicator will go green.
Monitor
This feature is used to check activity on the
current channel before transmitting. You can
also adjust the volume by pressing the
UP/DOWN button when monitoring.
Press the MODE button for 1 second, and the
monitor feature will be activated until the
MODE button is released.
To Transmit
1. Do not transmit if someone is talking on the
operating channel.
2. Press the PTT (Push-To-Talk) button and the
LED indicator will go red.
3. Hold the radio a few inches from your
mouth, and speak in a normal voice into
the microphone.
4. Release the PTT button to receive again.
Note:
When the batteries are low, transmitting
could be disabled. If you press the PTT
key, the LCD will be dark and a beep
sound will be generated for indication.
Please replace the batteries to avoid
interrupted use.
Time-out Timer
3 AAA BATTERY
OPERATION
To Turn the Radio On
1. Press the POWER button for 1 second. The
radio will beep and the operating channel
number will appear to indicate the radio is
on.
2. To turn the radio off, press the POWER
button for 1 second. The radio will beep to
confirm.
To Select an Operating Channel
Turn the radio on, then press the UP/DOWN
This feature helps extend battery life. The
radio will beep a warning tone and stop
transmitting if the PTT button is pressed for 30
seconds or 3 minutes (default) continuously.
The “oF” also appears to indicate The timeout Timer is activated. You can change the
time-out timer from 30 seconds to 3 minutes
(default) as follows.
1. Turn the radio off.
2. Turn the radio on while pressing the PTT
button. The time-out timer will switch
between 30 seconds and 3 minutes.
Communication Range
It is recommended that you do not use the
radios closer than 5 feet due to heavy
interference.
Communication
range
depends on the environment and will be
adversely affected by concrete structures,
indoor or in vehicle operation.
Channel Scan
1. Turn the radio off.
2. Turn the radio on while pressing the DOWN
button. “SC” will appear for indication.
You can change the scan direction by
pressing the UP/DOWN button.
3. The scan functioin will stop if there is a
signal present on a channel, and will
resume about 3 seconds after signal drop
out.
4. Press the MODE button or turn the radio off
to exit channel scan.
Note:
1. During scanning, the CTCSS feature is
disabled.
2. Transmitting is allowed during scanning.
When the PTT is released, the radio will
wait for an answer for 5 seconds before
starting to scan again.
CTCSS Code Scan
This feature helps you to detect and set the
correct CTCSS code for a received signal. By
monitoring a received signal, you can
determine its correct CTCSS code used on
the air.
1. Turn the radio off.
2. Turn the radio on while pressing the UP
button. “SC” and “CTS” will appear for
indication.
3. Scan activates only when a signal is
received and stops when the correct
CTCSS code is decoded, which will then
be selected automatically.
4. Press the MODE or PTT buttons, or turn the
radio off to exit CTCSS code scan mode.
Note:
When Key Lock feature enabled,
Channel Scan and CTCSS Code Scan
can not be activated.
Backlight Control
Normally, the LCD backlight will turn on when
any button except the PTT is pressed and turn
off again after 5 seconds except when the
radio is scanning.
The backlight can be permanently
illuminated by the following procedure.
1. Turn the radio off.
2. Turn the radio on while pressing the MODE
button. “bL”(Backlight) will appear for
indication.
To return to the normal backlight feature,
repeat the same procedure described
above and “oF” will appear for indication.
Beep
You can mute the beep sound by the
following procedures.
1. Turn the radio off.
2. Turn the radio on while pressing both the
UP and DOWN buttons. “oF” will appear
for indication.
To activate the beep again, repeat the
procedures
described
above
and
“bP”(Beep) will appear for indication.
TROUBLESHOOTING
Symptom
Solutions
Display is dark
Reposition or replace
batteries
No transmitter
output
1. Be sure the PTT button is
pressed completely when
transmitting.
2. Reposition or replace
batteries.
The loudspeaker is
muted when the
green LED is
illuminated
1. Check the volume level.
2. Check your CTCSS code or
disable the CTCSS feature.
3. Reposition or replace
batteries.
MODE/UP/DOWN
buttons do not
function
System Reset
1. Turn the radio off.
2. Turn the radio on by
pressing the MODE and
DOWN buttons.
No beep
1. Turn the radio off.
2. Turn the radio on by
pressing the UP and DOWN
buttons simultaneously with
the POWER button to
activate the beep.
Automatic Power Off
Radio will not work
with an external
speakermicrophone
Confirm that the ground
connections between the
speaker and microphone are
separate.
Key Lock
The key lock feature prevents accidental
channel changes and accidental function
activation. Only the PTT and the POWER
buttons will be available.
1. Turn the radio off.
2. Turn the radio on while pressing both the
MODE and DOWN buttons. “Lc”(Lock) will
appear for indication.
3. Repeat 1 and 2 to exit the key lock mode.
The factory default settings are Channel
1/CTCSS disabled/Volume 8. You can reset
the radio to the initial state by the following
procedures.
1. Turn the radio off.
2. Turn the radio on while pressing the MODE,
UP,DOWN and the PTT buttons to return to
the factory default settings.
This feature turns the power off automatically
if you forget to turn your radio off. If, after 30
minutes of receive inactivity and no button
has been pressed, the radio will turn the
power off automatically. The initial setting is
OFF.
1. Turn the radio off.
2. Turn the radio on while pressing both the
MODE and UP buttons. “AP”(APO) will
appear for indication.
3. Repeat 1 and 2 to exit the Automatic
Power Off mode and “oF” will appear for
indication.
External Speaker and
Microphone Jacks
Connect an optional speaker-microphone or
headset if needed. When an external
speaker-microphone
or
headset
is
connected the internal microphone and
speaker will be deactivated.
Note: Some types of speaker microphone units
have a common ground connection, and
the use of this type of unit may cause
damage to your VTech transceiver.
SPECIFICATIONS
Frequency Range
Channels
CTCSS Code
462.550~467.725MHz
14
1-38 (Encode/Decode/Scan)
Communication
Range
up to 2.5Km
Power Source
3 AAA Batteries
APPENDIX
Channel Frequency Table
Channel
MHz
Channel
MHz
1
2
3
4
5
6
7
462.5625
462.5875
462.6125
462.6375
462.6625
462.6875
462.7125
8
9
10
11
12
13
14
467.5625
467.5875
467.6125
467.6375
467.6625
467.6875
467.7125
CTCSS Code Frequency Table
Code
Frequency(Hz)
Code
Frequency(Hz)
Code
Frequency(Hz)
1
2
3
4
5
6
7
8
9
10
11
12
13
67.0
71.9
74.4
77.0
79.7
82.5
85.4
88.5
91.5
94.8
97.4
100.0
103.5
14
15
16
17
18
19
20
21
22
23
24
25
26
107.2
110.9
114.8
118.8
123.0
127.3
131.8
136.5
141.3
146.2
151.4
156.7
162.2
27
28
29
30
31
32
33
34
35
36
37
38
167.9
173.8
179.9
186.2
192.8
203.5
210.7
218.1
225.7
233.6
241.8
250.3
11035 SW 11th Street
BEAVERTON, OREGON 97005
VTech Communications assumes no responsibility
for units sent without prior Return Authorization.
WHAT DOES OUR WARRANTY NOT COVER?
y Batteries
y Damage from misuse, neglect, or acts of
nature (lightning, floods, power surges, etc.)
y Products which may have been modified or
incorporated into other products.
y Products purchase and/or operated outside
the USA, its territories, or Canada.
y Products serviced by the owner or a service
facility not expressly authorized by VTech
Communications.
y Products purchased more than 12 months
from current date
y Units purchased in "AS IS" condition or units
purchased as "Distressed Merchandise".
HOW DOES STATES LAW RELATES TO THIS
WARRANTY?
y This warranty gives you specific rights. You
may also have other rights that vary from state
to state.
WARRANTY
WHAT DOES OUR WARRANTY COVER?
y Any defect in material or workmanship.
FOR HOW LONG AFTER THE ORIGINAL
PURCHASE?
y To the original purchaser only - ONE YEAR.
WHAT WILL VTECH DO?
y Call VTech Communications customer service
for Return Authorization at::
1-800-595-9511
y Properly pack your unit. Include any cables &
accessories, which were originally provided
with the product. We recommend using the
original carton and packing materials.
y Include in the package a copy of the sales
receipt of other evidence of date of original
purchase (if the unit was purchased within the
last twelve months).
y Print your name and address, along with a
description of the defect, and include this in
the package.
y Include payment for any service or repair not
covered by warranty, as determined by
VTech Communications.
y Ship the unit via UPS insured, or equivalent to:
VTECH COMMUNICATIONS