1
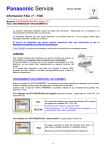
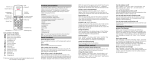
FP205
LCD Display
Caller ID
Speaker Phone
FP205 OM 1
24/9/07 2:38:11 PM
CONTENTS
Introduction ..................................................................................................................1
Features .................................................................................................................1
Included in your package ......................................................................................1
Location and Controls ...................................................................................................2
Setup..............................................................................................................................2
Connecting Handset Cord and Desktop Bracket. ....................................................3
Connecting Line Cords and AC Adaptors ................................................................3
Setting Time and Date ...........................................................................................3
Optional Backup Battery Installation .....................................................................3
Set Time and Date ..................................................................................................4
Digit Insert 0 Caller ID............................................................................................4
Telephone Key and Switch Functions ............................................................................5
Display Messages ..........................................................................................................6
Caller ID ........................................................................................................................7
Caller ID Operation .......................................................................................................7
Speed Dial Numbers .....................................................................................................8
Storing One-Touch Speed Dial Numbers ................................................................8
Storing name and Number ................................................................................... 8
Phonebook ................................................................................................................... 8
Dialling One-Touch Numbers .................................................................................8
To Review Phonebook ........................................................................................... 8
To Edit a Phonebook Entry ................................................................................... 8
To Delete a Phonebook Entry ............................................................................... 8
Troubleshooting ............................................................................................................9
Warranty .....................................................................................................................10
INTRODUCTION
TIP
To get the most from
your phone, please read
the Owner’s Manual
thoroughly.
Features
Included in your package
Caller Display
Up to 99 Caller ID memory
Call Back Function
NEW CALL light
Speaker Phone
Last number redial
Last 10 numbers call back
FLASH button
REDIAL/PAUSE button
Message waiting function
8 one-touch memories
Up to 70 Phonebook memories
Clock
1 - Handset with curly cord and phone
base
1 - Telephone line cord
1- Owner’s manual
1 - AC Adaptor
1 - Desktop Mount Bracket
Optional extras
4 - AAA size 1.5V batteries
1
FP205 OM Page1
24/9/07 2:38:13 PM
LOCATION OF CONTROLS
TIP
The earcap of this
telephone may attract
and retain small
metallic objects.
IN USE
Indicator
NEW CALL
Indicator
MUTE
IN US E
NE W
MUTE
VOL
FLASH
VOL
abc
2
1
jkl
ghi
DEL
TIP
This unit is not
waterproof. Do not
expose this product to
rain, water, moisture or
any other liquid.
REDIAL/PAUSE
VOL+
LCD
Handset
4
DIAL
pqrs
STORE
M1
M2
M3
M4
AUTO
M5
M6
M7
M8
Up/Down Buttons
SPK
def
3
mno
5
VOL-
FLASH
SPEAKER
6
wxyz
tuv
7
RD/P
8
9
0
Delete Dial
Phonebook
Memory
buttons
SETUP
_
+
_
+
SIZE "AAA" 1.5V
SIZE "AAA" 1.5V
SIZE "AAA" 1.5V
SIZE "AAA" 1.5V
_
Battery
compartment
+
_
+
+
Ring
Volume
_
+
_
SIZE "AAA" 1.5V
SIZE "AAA" 1.5V
SIZE "AAA" 1.5V
SIZE "AAA" 1.5V
Ring
Pitch
TELE
+
_
+
_
TELE
Handset
Cord Channel
DC 7.5V
DC 7.5V
Telephone
line jack
Power line jack
Handset
jack
2
FP205 OM Page2
24/9/07 2:38:13 PM
Connecting Handset Cord and Desktop Bracket
1. Plug the handset cord into the handset jack located at the rear of the phone.
2. Route the handset cord through the handset cord channel.
3. Locate the Desktop Bracket over the positioning posts at the rear of the phone and
slot in place. The handset cord channel will be secured by the Desktop Bracket.
Connecting Line Cords and AC Adaptor
1. Plug one end of the supplied telephone cord into the telephone line
jack located at the rear of the phone.
2. Plug the other end into the telephone line wall jack.
3. Plug the AC Adaptor lead into the power line jack at the rear of the phone.
4. Plug AC Adaptor into a standard wall outlet and switch it on.
Optional Backup Battery Installation
Batteries may be used instead of the supplied AC Adaptor.
1. Remove the battery compartment cover.
2. Fit 4 x AAA alkaline batteries.
3. Replace the cover.
Based on ½ hour use per day, good alkaline
batteries should last 2-3 months.
_
TIP
4x AAA Batteries
Battery
compartment
+
_
+
If using the AC Adaptor,
Batteries are not required
for normal operation.
SIZE "AAA" 1.5V
SIZE "AAA" 1.5V
SIZE "AAA" 1.5V
SIZE "AAA" 1.5V
+
_
+
_
TELE
Always ensure telephone
cord is disconnected
before opening the battery
compartment door and
installing batteries.
3
FP205 OM Page3
24/9/07 2:38:13 PM
Setting Time and Date
If you subscribe to a Caller ID Service, your time and date will automatically be set for
you when you receive your first call to this unit.
1. Press and hold FLASH , display shows SET TIME.
and
to select the correct number, press DIAL to confirm
2. Use
and move to the next digit, HH:MM DD/MM.
3. Press DEL to exit.
Digit Insert 0 Caller ID
TIP
Telecom New Zealand
Customers: this code is
already set to ”0N”.
Australian Customers:
This code is already set to
”OFF”.
To correctly display and dial Call ID numbers, you may need to insert a digit at the
beginning of your telephone number. (eg: in New Zealand, Telecom requires a ’0’ to
be inserted.)
New Zealand:
If you subscribe to Telecom New Zealand, this code has already been set for you to
’0N’. If you subscribe to another telephone company, please set the insert 0 to ”ON”.
If this phone is used with a business PABX - consult the PABX manufacturer for the
correct setting.
Australia:
For private household telephone lines, set insert 0 to OFF.
If this phone is used with a business PABX - consult the PABX manufacturer for the
correct setting.
While the handset is on the base:
1. Press DEL button twice quickly. INSERT O OFF or INSERT O ON will be
displayed.
and
to choose on or off.
2. Use
3. Press DIAL to store.
4
FP205 OM Page4
24/9/07 2:38:13 PM
TELEPHONE KEY and SWITCH FUNCTIONS
Ring Volume (Hi/Lo/Off)
Set the ring volume switch to the desired level (Hi, Lo or Off). The maximum level is
Hi. The switch is located at the back of the unit.
Ring Pitch (Hi/Lo)
Set the ring pitch switch to the desired level (Hi or Lo). The switch is located at the
back of the unit.
Regular dialling
Lift the handset and listen for dial tone. Then enter the telephone number you wish to
call. The dialled number will appear on the display screen whenever you make a call.
Redial function
To redial the previous number you called. Lift the handset or press
press REDIAL .
and then
Last 10 number redial
1. With the handset on the cradle press REDIAL .
2. Press
or
to review the last 10 numbers dialled.
3. Pick up the handset or press
to dial the selected number.
Pause function
To insert a temporary pause. Press the REDIAL /pause button during a dialling sequence. For example, in some cases when dialling an international number you need
to place a pause between the clusters of numbers to allow the telephone company,
relaying the call, time to process it. The number 011-886-22-795-1234 would need to
be dialled 011 REDIAL /pause 886, REDIAL /pause 22, REDIAL /pause795, REDIAL /pause
1234.
Mute button
For privacy when you are required to consult with a person standing next to you and
do not wish the party on the line to hear your conversation, press MUTE . MUTE will
be displayed. Press MUTE again to resume the conversation.
Handset Volume
During the conversation press VOL+ or VOL - to set the desired handset volume
between volume 1 (min) and volume 4 (max).
TIP
For ’Call Waiting’ to
operate you must
subscribe to this service
through your local
telephone company.
If you do not have this
service, then pressing the
flash button during a call
may disconnect the caller.
Flash button - Call Waiting
If the Call Waiting tone sounds while you are on a call New Zealand: Press the FLASH button to switch between callers.
Australia: Press FLASH then
to switch between callers.
Speaker Button
To switch your call to speaker phone, press
and hang up the handset. To switch
back, simply pick up the handset and speak. You can make, receive and dial in the
speaker mode.
Speaker Volume
During the conversation press VOL+ or VOL - to set the desired speaker volume
between volume 1 (min) and volume 4 (max).
5
FP205 OM Page5
24/9/07 2:38:14 PM
DISPLAY MESSAGES
Message Waiting - MSG
TIP
For LCD messages to
operate, you must first
subscribe to the Caller ID
service through your local
telephone company.
If you have arranged a voice mail service with your
telephone company, the LCD screen will display MESSAGE
WAITING for a few seconds after a call is received. The
screen will then display MSG in the upper left corner until
you retrieve the message from the voice mail service.
MESSAGE WAITING will be saved as a Caller ID record. The
MSG function may not be available in all areas.
Total & New Calls
This displays the total calls received and which of those
are new calls.
No Calls
When all calls have been deleted the screen will display
NO CALL.
Private
If a caller has exercised the option which prevents the
caller’s name and number from being sent, the screen
will display PRIVATE.
Repeat Calls
If the same call is received again on the same day, REPEAT
will be displayed in the top right of the LCD screen.
End of List
This is displayed when you use the review
or
and have reached the top end of the call history list. If
there are no calls in the list the LCD screen displays NO
CALL.
Out of Area
This will be displayed when the caller’s telephone
company does not provide Caller ID services or does not
provide name and number services via the long distance
network.
Battery Low Indicator
If you are using batteries, this icon is displayed when the
batteries require replacing.
6
FP205 OM Page6
24/9/07 2:38:16 PM
CALLER ID
A Caller ID record consists of the following information:
TIP
Time and Date of call
Number of new calls or record number
Total calls
The LCD display will not
operate if the AC Adaptor
is not connected or if the
batteries are flat or not
installed.
Caller’s number
Caller’s name (if available)
CALLER ID OPERATION
New Call Indicator
TIP
For Caller ID features to
operate you must first
subscribe to this service
through your local telephone company.
The red indicator light of your phone will flash when you have New Calls. It will continue to flash until you have reviewed the calls displayed on the LCD screen.
Review Call Records
Use the review
or
buttons to scroll through the caller list. At the end of
the call record list, END OF LIST will be displayed.
Call Records
Your phone stores up to 99 Call records. When the list is full a new incoming call will
automatically delete the oldest call record.
Call Back feature
You can automatically dial the number of a person who has recently called.
1. Select the caller that you wish to call back by pressing the review
button.
2. Pick up the handset of press
and the number will be dialled.
or
Del button - for deleting Caller ID records
Individual Delete
1. With the handset in its cradle, press
or
buttons or select the number
you wish to delete.
2. Now press the DEL button. The LCD screen will show DEL?
3. To confirm the number chosen is to be deleted, press DEL again. The number
will be deleted.
Delete All
1. With the handset in its cradle, press
or
buttons or select the
number you wish to delete.
DEL
and ALL DEL? will be displayed.
2. Press and hold
3. Press DEL to delete all records.
7
FP205 OM Page7
24/9/07 2:38:16 PM
SPEED DIAL NUMBERS
TIP
A Speed Dial label has
been provided to record
Speed Dial names. You
may wish to stick it on the
inside of the handset.
Three speed dial numbers can be programmed into the memory of your telephone
( M1 - M8 ). Each memory location can store a maximum of 16 digits.
Storing One-Touch Speed Dial Numbers
1.
2.
3.
4.
5.
Press STORE . The LCD shows -Enter phone number using the keypad (up to 16 digits).
Press STORE . The LCD shows --> .
Press the speed dial location you wish to store the number to
The LCD shows
.
M1
-
M8
.
Dialing One-Touch Numbers
To dial a stored memory number:
1. Pick up the handset or press
.
2. Press the desired speed dial button,
M1
-
M8
.
PHONEBOOK
Storing Name and Number
1. Press and hold
until a new entry appears with the cursor at the
second line.
2. Enter the number using the keypad (up to 20 digits). Press REDIAL to insert a
to confirm number.
pause . Use DEL to delete previous digit. Press
3. Enter the name using the keypad. Press DIAL to move the cursor to the right. Use
Delete to delete previous digit. Press
to confirm name. Number and
Name are stored and cursor appears at new entry.
To Review Phonebook
Press
. Use
or
to review. You can quickly review an entry by pressing the first letter of the name, the LCD will display the matching name(s).
To Edit a Phonebook Entry
Review an entry as per instructions above. Press and hold
until the first
character of the name flashes. Edit the name or press DEL to move cursor to edit the
number.
To Delete a Phonebook Entry
During review process select the entry you wish to delete. Press
shows
Press DEL again to delete the entry.
DEL
once, the LCD
8
FP205 OM Page8
24/9/07 2:38:18 PM
TROUBLESHOOTING
Blank or faint screen
Check the line cord, AC Adaptor or replace batteries.
Batteries not lasting
Review new calls immediately to prevent the new call light flashing for extended
periods.
Based on ½ hour use per day, good alkaline batteries should last 2-3 months.
Caller ID will not work properly
Your phone stores up to 99 Call records. When the list is full a new incoming call will
automatically delete the oldest call record.
Phone will not ring
You may have too many communication devices connected to a single line.
A communication device can be a phone, a modem or fax machine. Disconnect some
devices.
Check that Ring Volume switch at rear of phone is not set to OFF.
How can the listening volume be increased?
Adjust the handset or speaker volume by pressing
conversation.
VOL+
or
VOL -
during a
No dial tone
Verify that you are using the correct line cord and that it is plugged in correctly.
Caller ID
Please check with your service provider that your subscription to this service is active.
If the screen is blank check the AC adaptor or replace batteries.
Please refer to our website for further information and frequently asked questions.
New Zealand - www.uniden.co.nz
Australia - www.uniden.com.au
9
FP205 OM Page9
24/9/07 2:38:20 PM
WARRANTY
One Year Limited Warranty
UNIDEN FP205 CORDED PHONE
Important: Evidence of original purchase is required for warranty service.
Warrantor: Uniden Australia Pty Limited A.B.N. 58 001 865 498
Uniden New Zealand Limited
Warranty is only valid in the original country of purchase.
ELEMENT OF WARRANTY:
Uniden warrants to the original retail owner for the duration of this warranty, its FP205
corded phone (herein after referred to as the Product), to be free from defects in
materials and craftsmanship with only the limitations or exclusions set out below.
WARRANTY
WARRANTY DURATION:
This warranty to the original retail owner only, shall terminate and be of no further
effect 1year (12 months) after the date of original retail sale. This warranty will be
deemed invalid if the Product is;
(A) Damaged or not maintained as reasonable and necessary,
(B) Modified, altered or used as part of any conversion kits, subassemblies, or any
configurations not sold by Uniden,
(C) Improperly installed,
(D) Repaired by someone other than an authorized Uniden Repair Agent for a defect
or malfunction covered by this warranty,
(E) Used in conjunction with any equipment or parts or as part of a system not manufactured by Uniden, or
(F) Where the Serial Number label of the product has been removed or damaged
beyond recognition.
Warranty only valid in the country of original retail/sale.
PARTS COVERED:
This warranty covers for one (1) year, the Product and included accessories.
STATEMENT OF REMEDY:
In the event that the Product does not conform to this warranty at any time while this
warranty is in effect, the warrantor at its discretion, will repair the defect or replace the
Product and return it to you without charge for parts or service. This warranty does not
provide for reimbursement or payment of incidental or consequential damages. This
EXPRESS WARRANTY is in addition to and does not in any way affect your rights under
the TRADE PRACTICES ACT 1974 (Cth) (Australia) or the CONSUMER GUARANTEES
ACT (New Zealand).
PROCEDURE FOR OBTAINING PERFORMANCE OR WARRANTY:
In the event that the Product does not conform to this warranty, the Product should be
shipped or delivered, freight pre-paid, with evidence of original purchase (e.g. a copy
of the sales docket), to the warrantor at:
UNIDEN AUSTRALIA
UNIDEN NEW ZEALAND LIMITED
SERVICE DIVISION
SERVICE DIVISION
345 Princes Highway,
150 Harris Road,
Rockdale NSW 2216
East Tamaki, Auckland
Fax (02) 9599 3278
Fax (09) 274 4253
www.uniden.com.au
www.uniden.co.nz
Customers in other States should ship or deliver the Product freight pre-paid to their
nearest Uniden Authorized Repair Centre (Contact Uniden for the nearest Warranty
Agent to you).
10
FP205 OM Page10
24/9/07 2:38:20 PM
© 2007
Uniden Australia Pty Limited
Uniden New Zealand Limited
11
FP205 OM Page11
24/9/07 2:38:20 PM