1
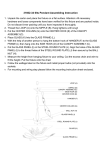
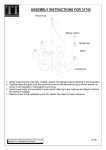
31601-24 3lts Pendant Assembling Instruction (for PENDANT)
1. Unpack the carton and place the fixture on a flat surface. Attention: All necessary
hardware and loose components have been verified for this fixture and are packed inside.
Do not discard inner packing until you have inspected it thoroughly.
2. Thread the LOOP (A) onto the NIPPLE (B). Hang tightens until snug!
3. Put the CENTER COLUMN (G) onto the CENTER HOOK (E) of the CANOPY
ASSEMBLY(C).
4. Place GLASS (K) Into the GLASS FRAME (L).
5. With the help of another person to hang the bottom hook of HANGER (F) to the GLASS
FRAME (L) then hang onto the SIDE HOOK (D) of the CANOPY ASSEMBLY (C).
6. Put the GLASS PANEL (I) on the STEEL ROUND PLATE (J). Align the holes of the GLASS
PANEL (I) to the thread holes of the STEEL ROUND PLATE (J) then secure by the BALL
NUT (H).
7. Measure the height from hanging fixture to your ceiling. Cut the excess chain and wire to
fit the height. Put the fixture onto the chain
8. Follow the wattage label on the fixture and install proper bulbs (not provided) onto the
sockets.
9. For mounting and wiring step please follow the mounting instruction sheet enclosed.
LOOP (A)
NIPPLE (B)
CANOPY ASSEMBLY(C)
SIDE HOOK (D)
CENTER HOOK (E)
HANGER (F)
CENTER COLUMN (G)
BALL NUT (H)
GLASS PANEL (I)
STELL ROUND PLATE (J)
GLASS (K)
GLASS FRAME (L)
31601-34 6lts Pendant Assembling Instruction (for SEMI-FLUSH)
1. Unpack the carton and place the fixture on a flat surface. Attention: All necessary
hardware and loose components have been verified for this fixture and are packed inside.
Do not discard inner packing until you have inspected it thoroughly.
2. Put the CENTER COLUMN (G) onto the CENTER HOOK (E) of the CANOPY
ASSEMBLY(C).
3. Place GLASS (K) Into the GLASS FRAME (L).
4. With the help of another person to hang the bottom hook of HANGER (F) to the GLASS
FRAME (L) then hang onto the SIDE HOOK (D) of the CANOPY ASSEMBLY (C).
5. Put the GLASS PANEL (I) on the STEEL ROUND PLATE (J). Align the holes of the GLASS
PANEL (I) to the threaded holes of the STEEL ROUND PLATE (J) then secure by the
BALL NUT (H).
6. Follow the wattage label on the fixture and install proper bulbs (not provided) onto the
sockets.
7. For mounting and wiring step please follow the mounting instruction sheet enclosed.
LOOP (A)
NIPPLE (B)
CANOPY ASSEMBLY(C)
SIDE HOOK (D)
CENTER HOOK (E)
HANGER (F)
CENTER COLUMN (G)
BALL NUT (H)
GLASS PANEL (I)
STELL ROUND PLATE (J)
GLASS (K)
GLASS FRAME (L)