1
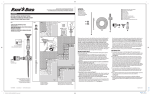
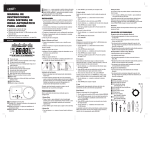
Blue Stripe® Drip Multi-Program Automatic Timer
You have purchased a quality, multi-program automatic hose-end timer that uses an efficient solenoid snap-on/snap off valve. Please read these operating instructions carefully in order to
become familiar with the features, correct installation, and use of the timer. Verify that the timer performs as programmed when used for the first time. This timer should only be operated by
adults who are familiar with the operating instructions.
Designed Use This timer is designed for use outdoors only for the control of sprinklers and water systems. The timer is not suitable for use: 1) If your water pressure exceeds 145 psi (10 bar);
2) If you use a well, bore, or unfiltered water supply; 3) If you use any type of pump to draw water; 4) For any commercial/industrial application; and 5) In conjunction with chemicals, foodstuffs,
flammable, or explosive materials.
How the Electronic Timer Works Your automatic timer will water your garden and hanging baskets automatically according to the program you choose. You can set the timer to water your
garden early in the morning or late at night when water evaporates the least. It will continue to water while you are away. It provides two flexible methods to control irrigation:
1. Manual: Press Man/Auto button to switch between: On - Off - Auto (you will hear a click when on; off is silent).
2. Automatic: Can water up to 8 times per day. Choose quickly from 15 different day combinations to control which days of the week the timer operates.
Figure 1
Installing the Battery (see Figure 1)
1. Remove the timer face by pressing the release button on the underside of the timer.
2. Remove the battery cover and gasket (secured by two screws).
3. Connect a 9V battery (not included) to the battery terminals.
4. Install the battery cover and gasket. Make sure the gasket is properly aligned. Secure battery cover (two screws).
5. We recommend planning and recording your watering programs before programming the timer.
6. Set the current day and time
7. Set the desired watering programs
8. Re-install the timer face.
9. Attach the timer to the water tap. For 0.75" (20mm) – attach directly. For 1" (25mm) – remove 0.75" (20mm)
threaded bushing.
Note: Timer must only be mounted in a vertical position with the connector nut pointing vertically upwards
10.Attach the hose to threaded outlet or attach 0.710 compression fitting to connect Blue Stripe® Drip 1/2" (13mm)
tubing.
11.Do not use tools! Tighten connections by hand only – do not over tighten!
Understanding the Multi-Program Automatic Timer (see Figure 2)
Control Keys
1. Time – used to set current time of day and return to clock
screen. Press and hold to set the current time and day.
Figure 2
2. Min – used to set minutes of current time and watering
11 8
start/finish times. Press to advance one minute.
3. Hour – used to set hour, current time, and watering
start/finish times. Press to advance one hour.
4. Day – used to set current day and watering days.
12
Press to advance to next day.
13
5. Man/Auto – used to select between manual on/off and
automatic watering mode.
14
6. Prog – used to set or change stored watering programs.
Note: If the timer is left in programming mode for 1 minute
without any selections made, the timer will return to
automatic mode.
7. Esc – used to clear programs in programming mode or to
set the keypad lock. To lock the keypad, hold Esc for
1 2
more than 3 seconds. Hold again for 3 seconds to
unlock the keypad.
Battery Cover
and Gasket
9V Battery
Timer Face
Release Tab
9 10
5
6
7
3
4
Programming the Timer
1. Press “Program” once. Program 1 ON appears on the display (see Figure 3).
2. Press “Hour” and “Minute” to set start time, program 1 (24hr clock; see Figure 4).
3. Press “Day” to set days of the week that program 1 operates. (defaults to Mon-Sun, i.e. every day).
4. Press “Program” again. Program 1 OFF appears on the display (see Figure 5).
5. Press “Hour” and “Minute” to set finish time, program 1 (see Figure 6).
If you only want your watering system to activate once per day, for the Days set in step 3 above,
stop here.
6. Press “Program” again. Program 2 ON appears on the display.
7. Repeat steps 2 through 5 above for a second watering program on the above days, or watering on
selected days only.
• Up to 8 programs may be set from a total of 15 different day-of-the-week configurations
• Ensure that the days for the OFF setting are the same as those for the ON setting
• Ensure that every ON time has an OFF time!!
• To exit programming press “time” which returns the display to the current time and day
20mm
Bushing
25mm
Fitting
Functions
All functions can be selected by pressing the Man/Auto button.
8. ON – when selected, an arrow appears above ‘ON’ on the
display panel. The valve will open and watering will commence
immediately.
9. Auto – when selected, an arrow appears above ‘AUTO’ on the
display panel. The timer is in Automatic Mode and watering will
occur according to the programs set by the User.
10.OFF – when selected, an arrow appears above ‘OFF’ on the
display panel. The valve is shut off and water is prevented from
flowing from the timer. In this mode, no watering will take place.
Display Symbols
11.Day of Week – indicates the current day of the week in
Automatic Mode and watering days selected for calendar
watering program mode.
12.Batt. – low battery symbol displayed when the battery is low.
13.Display Lock (A and a) – indicates that the keypad has been
locked. Prevents changes being made to set programs, current
time, and manual activation.
14.Program – indicates program number in programming mode.
Figure 3
Figure 4
Figure 5
Figure 6
If after pressing “Program” you press “Day” repeatedly the following day combinations appear (see step 3 above)
1
MO
4
TH
7
SU
10
SA SU
10
MO TU WE TH FR
2
TU
5
FR
8
MO WE FR
11
MO TU WE
11
MO TU WE TH FR SA
3
WE
6
SA
9
TU TH SA
12
TH FR SA
12
MO TU WE TH FR SA SU
To ensure long life and prevent damage to the automatic timer
• Use with cold, main connection water only. Check the filter as necessary.
• Avoid tension or pulling on the hose leading or drip tubing from the timer.
• We recommend removing the timer from the tap during cold months, particularly where temperature drops below 41°F (5°C). The timer must not be subjected to freezing temperatures or frosts.
• Do not use the timer if it is likely to be subject to more than ‘seasonal’ amounts of water (eg. In the path of sprinklers or other emitter or with a leaking tap).
Technical Data
Power: One 9-volt alkaline battery (use a high power alkaline battery)
Battery life: 1 season (6 months) normal use.
Recommended operating temperature: 41°F – 100°F (5°C to 38°C)
Recommended water pressure: 21 PSI – 100 PSI (1.4 bar to 6.9 bar)
Maximum operating pressure: 145 PSI (10 bar). In higher pressure areas, use a pressure reducer from the tap.
© The Toro Company • www.toro.com • 800-367-8676
Part Number 373-0564 Rev. 03
Blue Stripe® Drip Programador de Electrónico Multiprograma
Ha adquirido un programador de electrónico multiprograma de alta calidad que emplea una válvula de solenoide de bajo consumo. Lea atentamente las instrucciones de uso para familiarizarse con las
características y el funcionamiento del aparato, y para instalarlo correctamente. La primera vez que haga funcionar el programador, compruebe que éste sigue el programa. El programador debe ser utilizado
únicamente por personas adultas que conozcan las instrucciones de uso.
Uso previsto Este programador está diseñado para utilizarse en exterior para controlar exclusivamente aspersores y sistemas de riego. Este programador no debe utilizarse en las siguientes condiciones:
1) si la presión del agua es superior a 10 bar (145 psi); 2) si utiliza agua de pozo o no filtrada; 3) si utiliza algún tipo de bomba para extraer el agua; 4) para usos comerciales o industriales; y 5) en contacto con
productos químicos, alimentos, o materiales inflamables o explosivos.
Cómo funciona el programador de electrónico Este programador sirve para regar el jardín y las macetas automáticamente de acuerdo con el programa que elija. Puede programar el aparato para que
riegue el jardín a primera hora de la mañana o de noche, cuando hay menos evaporación. También le permitirá seguir regando el jardín cuando esté de viaje. Le ofrece dos formas flexibles de controlar el riego:
1. Manual: pulse el botón Man/Auto para seleccionar una de las opciones: On - Off - Auto. Oirá un clic cuando seleccione On (activado); cuando seleccione Off (desactivado), no oirá ningún ruido.
2. Automático: Permite regar hasta 8 veces al día. Puede escoger fácilmente entre 15 modalidades de riego diferentes para controlar qué días de la semana quiere que el programador se active.
Figura 1
Instalación de la pila (ver Figura 1).
Retire el frontal del programador presionando la pestaña que se encuentra en la parte inferior.
Retire la tapa (sujeta con dos tornillos) y la junta del compartimento de la pila.
Conecte la pila de 9 V (no incluida) a los terminales eléctricos.
Vuelva a colocar la junta y la tapa. Asegúrese de que la junta está bien colocada. Cierre la tapa con sus dos tornillos.
Antes de programar el aparato, recomendamos planificar y registrar sus programas de riego.
Ajuste la fecha y hora actuales.
ConFigura sus programas de riego.
Vuelva a colocar el frontal en su sitio.
Coloque el programador en el grifo. Si el es de 20 mm (0.75"), puede conectarlo directamente. Si el es de 25 mm (1"), retire el
adaptador de rosca de 20 mm (1").
Nota: El programador tiene que instalarse en posición vertical, con la tuerca de conexión del orientada verticalmente hacia
arriba.
10.Conecte la manguera a la salida con rosca o conectarse al conector de compresión de 0.710 para conectar al tube de 13 mm
(1/2") de Blue Stripe Drip.
11.No utilice herramientas. Apriete los conectores a mano. No los apriete demasiado.
Battery Cover
and Gasket
1.
2.
3.
4.
5.
6.
7.
8.
9.
Descripción funcional del programador de electrónico multiprograma (ver Figura 2)
Teclas de control
1. Time – se utiliza para entrar en el modo de ajuste de la hora y
2.
3.
4.
5.
6.
7.
volver a la pantalla del reloj. Manténgala pulsada para ajustar
la hora.
Min – se utiliza para ajustar los minutos de la hora actual y de
las horas de inicio/fin del riego. Púlsela para avanzar un minuto.
Hour – se utiliza para ajustar la hora actual y las horas de
inicio/fin del riego. Púlsela para avanzar una hora.
Day – se utiliza para ajustar el día actual y los días de riego.
Púlsela para avanzar un día.
Man/Auto – se utiliza para seleccionar el modo de riego
automático o manual.
Prog – se utiliza para seleccionar o cambiar programas de riego
guardados en la memoria.
Nota: Si se deja el temporizador en el modo de programación
durante 1 minuto sin tocar ninguna tecla, volverá al modo
automático.
Esc – se utiliza para borrar programas en el modo de
programación o activar el bloqueo del teclado. Para bloquear
el teclado, pulse Esc durante más de 3 segundos. Para
desbloquearlo, vuelva a pulsar Esc durante 3 segundos.
Figura 2
11 8
9 10
5
6
7
14
2
9V Battery
Timer Face
Release Tab
25mm
Fitting
Funciones
12
13
1
20mm
Bushing
3
4
Cómo programar el aparato
1. Pulse “Prog” una vez. Aparece Program 1 ON en la pantalla (ver Figura 3).
2. Pulse “Hour” y “Min” para indicar la hora de inicio, programa 1 (reloj de 24 horas; ver Figura 4).
3. Pulse “Day” para indicar los días de la semana que quiere que funcione el programa 1 (de manera
predeterminada es de lunes a domingo, es decir, todos los días).
4. Pulse “Prog” otra vez. Aparece Program 1 OFF en la pantalla (ver Figura 5).
5. Pulse “Hour” y “Min” para indicar la hora de finalización, programa 1 (ver Figura 6).
Si quiere que el sistema de riego se active sólo una vez al día en los días indicados en el paso 3,
termine aquí la configuración.
6. Pulse “Prog” otra vez. Aparece Program 2 ON en la pantalla.
7. Repita los pasos del 2 al 5 para configurar un segundo programa de riego para los días antes configurados o
para regar solamente en los días seleccionados.
• Se pueden configurar hasta 8 programas a partir de un total de 15 configuraciones de días de la semana diferentes.
• Cerciórese de que los días de inicio son los mismos que los días de finalización.
• Asegúrese también de que cada hora de inicio tenga una hora de finalización.
• Para salir del modo de programación, pulse “Time” y en la pantalla aparecerá la hora y fecha actuales.
Todas las funciones se pueden seleccionar pulsando el botón Man/Auto.
8. ON – cuando se selecciona, aparece una flecha encima de ON. La
válvula se abrirá y el riego comenzará de inmediato.
9. Auto – cuando se selecciona, aparece una flecha encima de AUTO.
El programador está en modo Automático y el riego se iniciará de
acuerdo con los programas definidos por el usuario.
10. OFF – cuando se selecciona, aparece una flecha encima de OFF. La
válvula se cierra e impide que pase el agua por el programador. En
este modo, no se producirá el riego.
Símbolos de la pantalla
11. Día de la semana – indica el día de la semana actual en modo
Automático y los días de riego seleccionados para el modo de
programación de riego con calendario.
12. Pila – cuando se esté acabando la pila, se encenderá un símbolo en
forma de pila.
13. Bloqueo de pantalla (A y a) – indica que se ha bloqueado
el teclado. Impide que se realicen cambios en los programas
configurados y en la hora actual, así como que se pueda activar el
riego manual.
14. Programa – indica el número de programa en el modo de
programación.
Figura 3
Figura 4
Figura 5
Figura 6
Si, después de pulsar “Prog”, pulsa “Day” varias veces, aparecerán las siguientes combinaciones de días (ver paso 3)
1
MO
4
TH
7
SU
10
SA SU
10
MO TU WE TH FR
2
TU
5
FR
8
MO WE FR
11
MO TU WE
11
MO TU WE TH FR SA
3
WE
6
SA
9
TU TH SA
12
TH FR SA
12
MO TU WE TH FR SA SU
Para que el aparato dure más tiempo y evitar que sufra averías
• Úselo únicamente con agua fría procedente de la red pública. Compruebe el filtro periódicamente.
• Evite tensiones o’ jalar la manguera o tubo de goteo que esta conectada al programador.
• Recomendamos remover el programador del grifo durante los meses frios, en particular cuando las temperaturas bajan de 5 °C (41 °F).
El programador de no debe someterse a temperaturas de congelación.
• No use el programador en lugares expuestos a cantidades inusuales de agua (p. ej. si se encuentra en la trayectoria de un aspersor o si el pierde agua).
Datos técnicos
Alimentación: una pila alcalina de 9 voltios (utilice una de alto rendimiento)
Duración de la pila: 1 temporada (6 meses) con un uso normal.
Temperatura de trabajo recomendada: de 5 a 38 °C (41 - 100 °F)
Presión del agua recomendada: de 1,4 a 6,9 bar (21 - 100 psi)
Presión de trabajo máxima: 10 bar (145 psi). En zonas con una presión más alta, utilice un reductor de presión en el grifo.
© The Toro Company • www.toro.com • 800-367-8676
Part Number 373-0564 Rev. 03