1
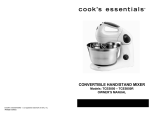
READ AND SAVE THESE INSTRU C T I O N S
WARNING: A risk of fire and electrical shock exists in all electrical appliances
and may cause personal injury or death. Please follow all safety instructions.
Heavy Duty Stand Mixer
Use and Care Guide
Model 1770U
IMPORTANT SAFEGUARDS
When using electrical appliances, basic safety precautions should always be followed
to reduce the risk of fire, electric shock and injury to persons, including the following:
• Read all instructions before using the heavy duty stand mixer.
• This mixer is not for use by children.
• Close supervision is necessary when the mixer is used near children.
• Do not operate the mixer unattended.
• Unplug from outlet when not in use, before putting on or taking off parts and
before cleaning.
• To disconnect, switch off, then remove plug from power supply.
• Do not operate a damaged mixer. Do not operate with a damaged cord or plug
or after the mixer malfunctions, or has been dropped or damaged in any manner.
Return the mixer to the nearest authorized service facility for examination, repair
or mechanical adjustment.
• Do not place any part of the mixer base in or under water or other liquid. See
instructions for cleaning.
• Do not use outdoors or when standing in damp area.
• Do not use mixer for other than intended use.
• Do not let cord hang over edge of table or counter or touch hot surfaces.
• Do not place mixer or cord on or near any hot surface, including a gas or electric
burner or in a heated oven.
• Always operate mixer with appropriate covers in place.
• Use accessory attachments only if recommended by Toastmaster Inc.
• Avoid contact with moving parts. Keep hands, hair, clothing, as well as spatulas
and other utensils away from beaters during operation.
• Remove beater, dough hook or whisk from mixer before washing them.
SAVE
THESE INSTRUCTIONS
THIS PRODUCT IS FOR HOUSEHOLD USE ONLY
CAUTION: A short power supply cord is provided to reduce the risk of personal
injury resulting from becoming entangled in or tripping over a longer cord. If a
longer cord is required, extension cords are available from local hardware stores
and may be used if care is exercised in their use. If an extension cord is used, (1)
the marked electrical rating of the extension cord should be at least 10A., 125 V.,
1250 W., and (2) the longer cord should be arranged so that it will not drape over
the counter top or tabletop where it can be pulled on by children or tripped over
accidentally.
POLARIZED PLUG:This appliance has a polarized plug, (one blade is wider than
the other), as a safety feature to reduce the risk of electric shock. This plug is
intended to fit in a polarized outlet only one way. If the plug does not fit fully in the
outlet, reverse the plug. If it still does not fit, contact a qualified elect ri c i a n t o
replace the obsolete outlet. Do not attempt to defeat this safety feature.
ELECTRIC POWER: If the electric circuit is overloaded with other appliances
your appliance may not operate properly. It should be operated on a separate
electrical circuit from other appliances.
Thank You for purchasing this Toastmaster Heavy Duty Stand Mixer.
Featuring superior technology and craftsmanship, the Global Design Collection is an
exceptional line of kitchen appliances. The state-of-the-art design of the appliances and
accessories is matched only by their excellent performance. Enjoy!
Read all instructions carefully before using your stand mixer. We recommend that
you become familiar with this appliance and its attachments before using (see figures 1-9).
The maximum amount of ingredients to be used in recipes is 81⁄4 cups. Using larger amounts may damage your stand mixer and will void your warranty.
If the appliance becomes overloaded and jams, the motor will shut off automatically.
To make the appliance operational again, turn the speed control dial to the Off
position. Unplug the unit and allow to cool. Reduce amount of food in mixing bowl
and also remove food from mixing attachment before turning on again.
2
5
4
6
7
3
8
2
1
9
Figure 1 - Stand mixer
1. Insert slot for mixing
bowl
2. Drive mechanism “a”
for mixing attachments, ice cream
maker and meat
grinder
3. Drive mechanism “b”
for juicer
4. Release button
5. Swivel arm
6. Drive mechanism “c”
for blender and food
processor
7. Protective cap for
drive mechanism “c”
8. Speed control dial
with 4 speed settings,
Off and park
setting
9. Mixer base
Figure 1
1
4
2
Figure 2 - Mixing
attachments
1. Mixing bowl
with splatter
guard
2. Dough hook
with pastry
deflector
3. Beater
4. Whisk
Figure 3 Speed
control
dial with
4 speed
settings,
Off and
the park
setting
3
Figure 3
Figure 2
Figure 4 Cord storage
1. Protective
cap for
drive
mechanism
“c” only
2. Cord wrap
1
Figure 5 Swivel
arm and
release
button
2
Figure 5
Figure 4
3
Figure 6 - Mixing bowl and insert slot
Figure 7 - Insertion of mixing attachments into drive mechanism “a”
Figure 6
Figure 7
PLANETARY MIXING
The following pictures represent the planetary motion of the beater, whisk, or dough
hook for thorough mixing.
Figure 8 & 9 - Planetary motion
Figure 8
Figure 9
Motion of the mixing
attachments projected
onto the base of the mixing
bowl.
The stand mixer mixes
ingredients together as
the beater rotates inside
the bowl.
4
The swivel arm can be moved into 5 positions by pressing the release button.
Positions 1, 2 and 3 are used with the mixing attachments. Positions 3, 4 and 5 are
specially designed to be used with accessories available for purchase separately at
your retailer or by contacting the Toastmaster consumer relations department at
1-800-947-3744. Refer to stand mixer recipe book for attachments that may be
used to prepare recipes.
POSITION
ATTACHMENTS/
ACCESSORIES
USE
1
Addition of large quantities for mixing.
2
Insertion and removal of whisk, beater,
dough hook and mixing bowl.
3
Work position for whisk, beater or dough
hook using drive mechanism “a.”
This position is also for the Ice Cream Maker
Accessory.*
4
Specially designed for the Juicer
Accessory*, using drive mechanism “b.”
5
Specially designed using drive mechanism
“c” for the Food Processor and Blender
Accessories.*
Use the same position and drive mechanism
“a” for the Meat Grinder Accessory.*
5
MIXING GUIDE
SPEED
MIXING PROCEDURE
1
STIR
FOLD
Use when stirring liquid ingredients or when a gentle action is
needed to moisten dry ingredients.
Use when folding two portions of a recipe together, like a beaten
egg white into a batter.
2
MIX
Use when mixing dry ingredients and liquid ingredients together
alternately in a recipe.
Use when preparing any of the ready-prepared or packaged
instant puddings.
Use when recipe calls for kneading until the dough is smooth and
elastic.
3
BLEND
BEAT
CREAM
Use when preparing packaged cake mixes and directions calling
for medium speed.
Use when recipe calls for beating to develop a smooth batter.
Use when creaming sugar and butter together.
4
WHIP
Use when preparing a frosting from a recipe or a package.
Use to whip whipping cream or potatoes.
Use when beating egg whites.
USE OF ATTACHMENTS
Whisk
whipping cream, egg whites, egg yolks, sauce,
souffle, mousse, meringue, salad dressing
Beater
blending, beating mixes
Dough Hook
bread dough, pie crust and pasta dough and blending
large amounts of heavy ingredients together
Park Setting Operation or “Parking”
The park setting or “parking”aligns the drive mechanism into position so that the
mixing attachments may be raised out of the bowl and the bowl may be removed
from the mixer base. It is ONLY in this parked position that the swivel arm should
be moved and the attachment (beater, whisk or dough hook) removed. DO NOT
attempt to remove any attachment when the mixer is not parked. To park the unit,
simply turn the speed control dial to the
park position, (see figure 3) and hold
until the drive mechanism and the attachment have moved to the park position.
The stand mixer will automatically turn off and the dial will return to the Off position when released.
6
USING YOUR HEAVY DUTY STAND MIXER
1. Place mixer on a large secure surface and turn to Off position.Make sure the
counter is clean so the rubber feet can grip the countertop. Unwind cord and
plug into 120V ~ 60 Hz outlet. A safety protective cap is provided to place
over drive mechanism “c”.
2. Hold the speed control dial in the
park setting, (see figure 3). For further
details, refer to “Park Setting Operation.”
3. Press the release button and move the swivel arm to position 2, (see figure
5). Insert the small rim on the base of the bowl into the slots on the mixer
base, (see figure 6). Insert the whisk, beater or dough hook until it locks into
place, (see figure 7).
4. Add the ingredients to the mixing bowl according to recipe or package directions. Press the release button and move the swivel arm to the work position
3, this will lock the bowl into place.
NOTE: It may be necessary to rotate the pastry deflector on the dough hook until it
fits over the drive mechanism.
5. Slide the splatter guard securely in place. The splatter guard prevents splattering at the start of the mixing and kneading process.
6. To turn on the stand mixer, move the speed control to the desired speed.
NOTE: To add ingredients you may either remove the splatter guard or pour through
the splatter guard opening. We recommend turning the stand mixer off when removing the splatter guard.
7. Turn mixer off, remove splatter guard and scrape bowl as necessary during
mixing process.
8. When finished mixing, turn the dial to the Off position.
9. Before removing the mixing attachment, the drive mechanism must be
placed in the park position.See “Park Setting Operation” for details. DO NOT
attempt to remove an attachment when the drive mechanism has not been
parked.The attachment will not be in a position that allows you to lift the swivel arm out of the bowl.
10. Unplug from outlet and remove splatter guard. Press the release button and
raise the swivel arm to position 2 until it locks into place.
11. Remove the whisk, beater, or dough hook and then the mixing bowl.Refer to
cleaning instructions.
CLEANING
1. Unplug the stand mixer and wrap the cord around the cord storage.
2. The mixing bowl, splatter guard, whisk, beater and dough hook may be
washed in the dishwasher. Make sure the mixing bowl is not bent between
the dishwasher racks or it may warp.
3. Wipe the stand mixer with a damp cloth. Do not use any abrasive cleaning
materials. Never immerse it or clean it under running water.
SERVICE INFORMATION
Please refer to warranty statement to determine if in-warranty service applies.
This appliance must be serviced by a Toastmaster authorized service center.
Unauthorized service will void warranty. Consult your phone directory under
“Appliances-Household-Small-Service and Repair,” or call 1-800-947-3744 in the
United States and Canada, 52-5-397-2848 in Mexico.
If an authorized service center is not available locally, your appliance may be
7
returned postage prepaid to our National Service Center at the address shown on
the back of this book.
Products must be adequately protected to avoid shipping damage. Surround your
appliance with three inches of protective padding and include a copy of your dated
sales receipt along with a note explaining the problem you have experienced. We
recommend insuring your package. No CODs accepted.
SPECIFICATIONS
Power Supply
Power Consumption
Weight
120V ~ 60 Hz
450 Watts
17 Pounds
ONE YEAR LIMITED WARRANTY
Toastmaster Inc. warrants this product, to original purchaser, for one year from purchase date to be free of defects in material and
workmanship.
This warranty is the only written or express warranty given by Toastmaster Inc.This warranty gives you specific legal rights. You may
have other rights which vary from state to state. ANY OTHER RIGHT WHICH YOU MAY HAVE, INCLUDING ANY IMPLIED WARRANTY OF MERCHANTABILITY OR FITNESS FOR A PARTICULAR PURPOSE IS LIMITED IN DURATION TO THE DURATION OF
THIS WARRANTY.
Defective product may be brought or sent (freight prepaid) to an authorized service center listed in the phone book, or to Service
Department, Toastmaster Inc., South Missouri St., Macon, MO 63552, for free repair or replacement at our option.
Your remedy does not include: cost of inconvenience, damage due to product failure, transportation damages, misuse, abuse, accident
or the like, or commercial use. IN NO EVENT SHALL TOASTMASTER INC. BE LIABLE FOR INCIDENTAL OR CONSEQUENTIAL
DAMAGES.
Some states do not allow limitations on how long an implied warranty lasts, or allow the exclusion or limitation of incidental or
consequential damages, so the above limitations or exclusions may not apply to you.
For information, write Consumer Claims Manager, at the Macon address. Send name, address, zip, telephone area code and
daytime number, model, serial number, and purchase date.
KEEP DATED SALES RECEIPT FOR WARRANTY SERVICE.
Keep this booklet. Record the following for reference:
Date purchased
Model number
Date code (stamped on bottom)
Horario:8:00 a.m.hasta 4:30 p.m., hora del
National Service Center
Centro
708 South Missouri St.
Toastmaster de México, SA de CV
Macon , MO 63552
Cerrada de Recursos
In USA and Canada call:
Hidráulicos Numero 6
Consumer Service 1-800-947-3744
La Loma Industrial
Consumer Parts 1-800-947-3745
Tlalnepantla de Baz, C.P. 54060
Hours:8:00 a.m.- 4:30 p.m.CST
Estado de México
Aux É.-U. et au Canada, veuillez appeler
Service consommateur :1-800-947-3744
Piéces détachées consommateur :1-800-947-3745
Heures ouvrables :8 h - 16 h 30 Heure Centrale
En México - 52-5-397-2848
PART NO. 32721P01
FOR SPANISH SECTION ONLY
ESPECIFICACIONES TECNICAS
Potencia Nominal (Watts)
Tension de Alimentacíon o Tensíon Nominal (Volts)
Frencuencia de Operacion o Frecuencia Nominal (Hertz)
510 W
127 V ~
60 Hz