1
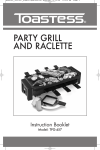
Booklet_TTO652_ENG.qxd:Salton Booklet
8/16/10
12:11 PM
Page 1
CAROUSEL CONVECTION
OVEN/BROILER
Instruction Booklet
Model: TTO652
Booklet_TTO652_ENG.qxd:Salton Booklet
8/16/10
12:11 PM
Page 2
IMPORTANT SAFEGUARDS
When using electrical appliances, basic safety precautions should
always be followed including the following:
1. Read all instructions.
2. Do not touch hot surfaces. Use handles or knobs. The glass door and
exterior of the oven will be hot during use.
3. To protect against electrical hazards, do not immerse cord, plugs, or
the appliance in water or other liquid.
4. Close supervision is necessary when any appliance is used by or
near children.
5. Unplug from outlet when not in use and before cleaning. Allow to
cool before putting on or taking off parts, and before cleaning the
appliance.
6. Do not operate any appliance with a damaged cord or plug or after
the appliance malfunctions, or has been damaged in any manner. Return
appliance for examination, repair or adjustment. See Warranty section.
7. The use of accessories or attachments not recommended may cause
fire, electric shock or injury.
8. Do not use outdoors.
9. Do not let cord hang over edge of table or counter, or touch hot
surfaces.
10. Do not place on or near a hot gas or electric burner, or in a heated
oven.
11. Extreme caution must be used when moving an appliance
containing hot oil or other hot liquids.
12. Always attach plug to appliance first, then plug cord into the wall
outlet. To disconnect, turn any control to ‘OFF’, then remove plug
from wall outlet.
13. Do not use appliance for other than intended use.
2
Booklet_TTO652_ENG.qxd:Salton Booklet
8/16/10
12:11 PM
Page 3
14. Do not leave unit unattended while in use, especially when
broiling or toasting.
15. Do not cover broiling drip tray with metal foil as this prevents fats
and juices from dripping into the Broiling Pan and could cause a
fire.
16. Use extreme caution when removing the Broiling Drip Tray and
disposing of hot grease.
17. Do not insert oversized foods or utensils into the oven as they
may create a fire or risk of electric shock.
18. Use only metal containers that are ovenproof. Do not place paper,
cardboard, plastic and the like in the oven.
19. Do not cover the Crumb Tray or any part of the Oven with metal foil;
this can cause overheating of the Oven.
20. Do not clean with metal scouring pads. Pieces can break off the
pad and touch electrical parts, creating a risk of electrical shock.
21. Do not store any materials other than manufacturer recommended
accessories in the Oven when not in use.
22. A fire may occur if this Oven is covered by or touches flammable
material, including curtains, draperies, walls, etc when in
operation. Do not store any item on top of the appliance when in
operation.
23. The oven can be turned off while using any of the functions by
pressing the “Stop” button.
SAVE THESE INSTRUCTIONS
HOUSEHOLD USE ONLY
POLARIZED PLUG
This appliance has a polarized plug (one blade is wider than the
other). To reduce the risk of electric shock, this plug will fit in a
polarized outlet only one way. If the plug does not fit fully in the
outlet, reverse the plug. If it still does not fit, contact a qualified
electrician. Do not modify the plug in any way.
3
Booklet_TTO652_ENG.qxd:Salton Booklet
8/16/10
12:11 PM
Page 4
DESCRIPTION OF PARTS
1. Top Heating Elements
2. Bottom Heating Elements
3. Convection Fan (inside oven)
4. Crumb Tray
5. Broiling Drip Tray
6. Baking/Broiling Pan
7. Wire Racks
8. Pizza Carousel
9. Carousel Assembly
1
3
2
4
8
9
7
6
5
10.Control Panel
a) Display Window
b) Cooking Time Setting Button
c) Temperature Setting Button
d) “+” or “-“ Adjustment Buttons
e) Broil Function (grilling)
f) Toast Function (toasting)
g) Convection Bake
Function (cooking)
h) Bake Function (cooking)
i) Defrost Function
j) Clock Setting Button
k) Start/Stop Button
l) Turntable (carousel) Function
m) Keep Warm Function
a
b
h
i
j
l
k
d
c
e
f
g
m
4
Booklet_TTO652_ENG.qxd:Salton Booklet
8/16/10
12:11 PM
Page 5
BEFORE FIRST USE
1. Remove all accessories and shipping materials packed inside the
Oven.
2. Wash the Wire Racks, Baking/Broiling Pan, Broiling Drip Tray, Pizza
Carousel Assembly and Crumb Tray in warm soapy water. Dry.
3. Wipe the inside of the Oven with a damp cloth or sponge. Blot dry
with paper towels to be sure the unit is dry before using.
4. Place the Oven on a flat counter or other stable surface close to a
120 volt wall outlet. DO NOT OPERATE ON THE SAME CIRCUIT
WITH ANOTHER APPLIANCE.
5. Position the Oven so that it is a least 2” (5 cm) from any
surrounding object. Ensure that nothing has been placed on top of
the Oven.
6. Slide the Crumb Tray in the slot under the oven.
7. For the first time only, press the “TOAST” button. The default
temperature of 450°F will appear on the display. Now press the
“TIME” button, the default time of “0:00” will be blinking on the
screen. Press the “+” button until the cooking time is set to
20 minutes. Press the “START” button. The oven will now start. The
time will be counted down in one-second intervals. At the end of the
cooking time, the appliance will beep five times and the oven will
turn off. This will burn off any manufacturing oils still on the oven.
NOTE: The oven may smoke during this process. This is normal for
a new Oven and will not last more than 10 – 15 minutes.
5
Booklet_TTO652_ENG.qxd:Salton Booklet
8/16/10
12:11 PM
Page 6
HOW TO USE
1. General Instructions
Always use the appropriate accessory for the type of cooking
selected. (Read instructions that follow). The accessories provided
are designed specifically for the Oven. Some of your own
ovenware (loaf, muffin tins, bundt or spring form pans) may also
be used provided they are oven safe and leave an open space
all around to permit the fan forced air to circulate. Heat resistant
ovenware should only be used if they can be placed at least 2”
(5 cm) away from the heating elements. Food and/or containers
must never touch the Elements or the oven interior or interfere
with closing the Door.
• Be careful not to bang elements.
• Never use glass or ceramic lids.
• Never use plastic or cardboard containers in the Oven.
• Remove all cardboard covers from aluminum containers. If
necessary, cover ovenware with aluminum foil tucked tightly
around the edges.
• Do not allow foil to touch Oven sides or Heating Elements.
• Never cover the Broiling Drip Tray, Carousel or Crumb Tray with
aluminum foil as this could cause accumulated grease or crumbs
to ignite.
• Always use oven mitts when removing hot racks or pans.
• Always press the “STOP” button when cooking is complete.
2. Wire Rack Positioning
The Oven is equipped with 2 Wire Racks which can be slid into
either of the three levels provided for the racks during cooking
with the Convection Fan. NOTE: Only one Rack should be used if
the Convection Fan is not being used during cooking.
3. Pizza Carousel Assembly
Place the Drive Shaft of the Pizza Carousel Assembly into the hole
on the right hand side of the oven cavity. The left side of the Pizza
Carousel Assembly will rest on the Carousel Assembly Support.
Place the Pizza Carousel onto the Pizza Carousel Assembly so that
the center hole in the Carousel fits inside the center hole of the
Pizza Carousel Assembly.
6
Booklet_TTO652_ENG.qxd:Salton Booklet
8/16/10
12:11 PM
Page 7
4. Setting the Clock
When the toaster oven is first plugged into the outlet, “12:00” will
appear on the display.
• Press the “Clock” button. The hour on the display screen will
begin to blink.
• Press the “+” or “-“ buttons to enter the correct hour. For
example, to set the hour of 11:30, press the “+” or “-“ buttons
until you reach 11.
• Once you have selected the correct hour press “Clock”. The minutes
on the display screen will now blink.
• Press the “+” or “-“ buttons to enter the correct minutes. For
example if we are setting the minutes of 11:30, press the “+” or
“-“ until you reach 30 minutes.
• Press “Clock” to finish setting the clock.
NOTE: If you do not press the “Clock” button, the time will be
entered automatically after 20 seconds.
5. Helpful hints for the control panel
• At any time you may change the temperature or time before
confirming the programming. Before pressing “Start” press
“TIME” or “TEMP“ to change the selected cooking time or
temperature.
• If you press and hold the “+” or “-“ button the digits on the
display will change more quickly.
• This oven is equipped with “Memory cook” which recalls the last
cooking instructions entered. Example: If you selected
“Convection Bake” mode at 30 minutes, the system records this
time.
The next time you select the “Convection Bake” mode, the system
will recall the previous setting of 30 minutes as default.
7
Booklet_TTO652_ENG.qxd:Salton Booklet
8/16/10
12:11 PM
Page 8
BAKE
How to Bake
(For this setting only the bottom elements are used.)
Position the Wire Rack in the middle or lower rack level.
NOTE: Never use double level cooking during the regular bake
function.
Setting the temperature:
• Press the “Bake” button. “Bake” will light up in the display.
• The default temperature of 450°F will be shown blinking on the
display.
• Press the “+“ or “-“ buttons to select the desired temperature. The
temperature will increase or decrease in increments of 25°F.
• Once you have selected the desired temperature the display will
continue to blink.
Selecting the cooking time:
• Press the “Time” button.
• The default cooking time of “0:00” (or the time entered the last
time this function was used) will be shown blinking on the display.
• Press the “+” or “-“ buttons to select the desired cooking time, up
to a maximum of 90 minutes.
• Press “Start”. The oven will now start.
• At the end of the cooking time, the oven will beep five times and
cooking will stop.
• You can stop the cooking at any time by pressing the “Stop” button.
NOTE: In this mode the fan will not operate so you may require a
higher temperature or longer cooking time than suggested in the
Convection Cooking Guide. Time and temperature for recipes or heating
instructions for prepackaged foods calling for regular baking will work
in this mode.
8
Booklet_TTO652_ENG.qxd:Salton Booklet
8/16/10
12:11 PM
Page 9
BROIL
How to Broil
(For this setting only the top elements are used.)
Position the Wire Rack into any of the three levels depending on the
thickness of the food.
Setting the temperature:
• Press the “Broil” button. “Broil” will light up in the display.
• The default temperature of 450°F will be shown blinking on the
display.
• Broiling is normally used at 450°F.
• If you wish to change the temperature, press the “+“ or “-“
buttons to select the desired temperature. The temperature will
increase or decrease in increments of 25°F.
• Once you have selected the desired temperature the display will
continue to blink.
Selecting the cooking time:
• Press the “Time” button.
• The default broiling time of “0:00” (or the time entered the last
time this function was used) will be shown blinking on the display.
• Press the “+” or “-“ buttons to select the desired cooking time, up
to a maximum of 90 minutes.
• Press “Start”. The oven will now start.
• At the end of the cooking time, the oven will beep five times and
cooking will stop.
• You can stop the cooking at any time by pressing the “Stop”
button.
NOTE: The broiling food should be watched carefully to avoid
overcooking or burning. Turn food over about halfway through the
cooking cycle. Use oven mitts to pull out the Rack and
Baking/Broiling Pan. Be careful to avoid spilling hot grease.
9
Booklet_TTO652_ENG.qxd:Salton Booklet
8/16/10
12:11 PM
Page 10
IMPORTANT:
Always use the Broiling Drip Tray and Baking/Broiling Pan provided with this
Oven when Broiling. Use of other cooking utensils might cause a hazard.
Sample Broiling Guide
Food
Weight/Thickness
Doneness
Time (minutes)
Sirloin Steak
1" (2.5 cm)
Medium
22 – 25
Rib Eye
Steak
1" (2.5 cm)
Medium
18 – 20
8 ozs. (225 g.)
Medium
16 – 18
3/4" (1.7 cm)
Well
22 – 25
Fillets
1/2" (1.25 cm)
Well
8 – 10
Steaks
1" (2.5 cm)
Well
15 – 18
Beef:
Hamburger
Pork:
Chops
Fish:
DEFROST
How to Defrost
(For this setting none of the elements are used. The convection fan
circulates air to thaw frozen foods.)Position the Wire Rack in the middle
or lower rack level. Always use the Broiling Drip Tray and Baking/
Broiling Pan provided with this Oven when defrosting to catch water as
the food defrosts.
• Press the “Defrost” button. “Defrost” will light up in the display.
• The default defrost time of “0:00” (or the time entered the last time
this function was used) will be shown blinking on the display.
• Press the “+” or “-“ buttons to select the desired defrost time, up to
a maximum of 90 minutes.
• Press “Start”. The oven will now start.
• At the end of the defrost time, the oven will beep five times and
defrost will stop.
10
• You can stop the defrost at any time by pressing the “Stop”
button.
Booklet_TTO652_ENG.qxd:Salton Booklet
8/16/10
12:11 PM
Page 11
TOAST
How to Toast
(For this setting both top and bottom elements are used) Position the
Wire Rack into the middle rack level.
• Press the “Toast” button. “Toast” will light up in the display.
• The default temperature of 450°F will be shown blinking on the
display.
• Press the “Time” button. The default toasting time of “0:00” will be
shown blinking on the display.
• Press the “+” or “-“ buttons to select the toasting time:
5 minutes – light
7 minutes – medium
9 minutes – dark
• Press “Start”. The oven will now start.
• At the end of the toasting time, the oven will beep five times and
toasting will stop.
• You can stop the toasting at any time by pressing the “Stop”
button.
Helpful Hints
1. When making a second batch of toast you may need to turn the
timer to fewer minutes than on the first batch to achieve the same
results.
2. To stop the Toast cycle before completion, press the “STOP”
button.
3. A variety of breads and thicknesses can be used; whole wheat, rye,
white and muffins, bagels or roll halves. Thicker, fresher bread will
require more toasting time.
11
Booklet_TTO652_ENG.qxd:Salton Booklet
8/16/10
12:11 PM
Page 12
CONVECTION BAKE
How to Bake
(For this setting only the bottom elements are used along with the
convection fan.) Position the Wire Rack(s) into any of the three levels
or a combination of any two levels.
Setting the temperature:
• Press the “Convection Bake” button. “Convection Bake” will light
up in the display.
• The default temperature of 450°F will be shown blinking on the
display.
• Press the “+“ or “-“ buttons to select the desired temperature. The
temperature will increase or decrease in increments of 25°F.
• Once you have selected the desired temperature the display will
continue to blink.
Selecting the cooking time:
• Press the “Time” button
• The default cooking time of “0:00” (or the time entered the last
time this function was used) will be shown blinking on the display.
• Press the “+” or “-“ buttons to select the desired cooking time, up
to a maximum of 90 minutes.
• Press “Start”. The oven will now start.
• At the end of the cooking time, the oven will beep five times and
cooking will stop.
• You can stop the cooking at any time by pressing the “Stop”
button.
12
Booklet_TTO652_ENG.qxd:Salton Booklet
8/16/10
12:11 PM
Page 13
HELPFUL HINTS
Your convection toaster oven uses a fan to gently and evenly circulate
heated air. This produces more uniform cooking temperatures resulting
in an even browning and a shorter cooking time. Convection baking
cooks approximately 30% faster than conventional baking. It generally
requires lower temperatures or shorter cooking time than conventional
cooking. The following adjustments to package directions or recipes are
recommended:
1. For baked goods and convenience foods, lower the temperature by
25°F/5°C, to a minimum of 300°F/150°C. Check baked goods
10 minutes before the end of the cooking cycle to adjust time or
temperature as required.
2. When baking cookies or cakes on two levels simultaneously, halfway
through the cooking time move the pan on the top level to the
bottom and the pan on the bottom level to the top.
3. For meats and poultry, use a meat thermometer to check doneness
and adjust time and temperature as required.
13
Booklet_TTO652_ENG.qxd:Salton Booklet
8/16/10
12:11 PM
Page 14
Cooking Guide for Convection Cooking
Food
Temp °F
Approx.
Time (min)
Comments
Biscuits &
Cookies*
350 – 400
varies with recipe Two rack levels
can be used
Cakes*
300 – 325
Check 10
varies with recipe minutes before
time is up
Chicken (cut
up whole)
300 – 350
50
Use Baking/
Broiling Pan
350
50
Until cooked
through
Meat Loaf
(1-1/2 lbs. meat)
Muffins
300 – 325
Place muffin tin
on Rack in
varies with recipe middle position.
Check 10
minutes before
time is up.
Pies – frozen
chicken pot
400
45
Pizza – frozen
350 – 400
see package
directions
Place on
Baking/Broiling
Pan.
450
45 – 50
Pierce with fork.
Bake directly on
Wire Rack.
Potatoes (baked)
Potatoes (frozen
French fries)
Beef Roast
(4-5 lbs)
325 – 375
350
20
20-30/lb.
Until top crust
is golden
Use Baking/
Broiling Pan.
Stir after
10 minutes.
Use Baking/
Broiling Pan in
lower rack
position. Adjust
time to desired
doneness.
*Check before the end of cooking time to test for doneness.
14
Booklet_TTO652_ENG.qxd:Salton Booklet
8/16/10
12:11 PM
Page 15
TURNTABLE
How to Bake Pizza
• Place the Pizza Carousel Drive Shaft in the oven as per the
instructions.
• Press the Bake Button. Follow the directions for setting
temperature and time in the Bake section. Set the temperature
according to the frozen pizza package directions or the fresh pizza
recipe.
• Press the Start Button
• Preheat the oven for 5-8 minutes.
• Slide the Pizza onto the Pizza Plate and carefully place on the
Pizza Turntable Assembly making sure that the center hole in the
Pizza Plate fits inside the center hole of the Pizza Turntable
Assembly. NOTE: Always use oven mitts when adding or removing
anything from a hot oven.
• Press the Turntable Button.
• Cook for the required amount of time.
KEEP WARM
How to use
Slide the Wire Rack into the middle rack level.
• Press the Keep Warm Button. Press the ‘+’ or ‘-‘ Buttons to switch
between the 3 preset temperatures 150, 175 or 200°F (65, 80,
95°F)
• Press the Time Button then the ‘+’ or ‘-‘ Button to select the
desired time.
• Press the Start Button
NOTE:It is not recommended to leave food in the oven for
extended periods of time, as the food may dry out.
15
Booklet_TTO652_ENG.qxd:Salton Booklet
8/16/10
12:11 PM
Page 16
CARE AND CLEANING
Press the “stop” button to turn off the oven. Unplug cord from wall
outlet and let the Oven cool completely. Wash the Crumb Tray,
Carousel Assembly, Baking/Broiling Drip Tray, Baking Pan and the Wire
Racks in warm soapy water or in the dishwasher. If necessary, use a
nylon scrubber, to remove stuck on food. Wipe the inside of the Oven
with a damp cloth or sponge. Blot dry with paper towels to be sure the
oven is dry before using. NOTE: Do not use any abrasives as this
could damage the
non-stick interior finish. Clean the glass door with a damp soapy cloth.
NOTE: If the glass door has stubborn stains, open the door and cover
the inside of the door with a few damp paper towels. Leave for a few
minutes, then remove paper towels and wipe door clean. Never use
sharp utensils to clean the Oven glass door as scratching may weaken
it and cause it to shatter.
The outside of the oven can be cleaned with a damp cloth or sponge.
Do not use any abrasive cleaners or pads as these will scratch the
surface. NOTE: The best way to keep your oven clean and operating
safely is to let the Oven cool to room temperature and wipe away any
spills, spatter and crumbs after each use.
16
Booklet_TTO652_ENG.qxd:Salton Booklet
8/16/10
12:11 PM
Page 17
A short supply cord is provided to reduce the hazards of becoming
entangled in or tripping over a long cord. Extension cords may be used if
care is exercised in their use. If an extension cord is used, the marked
electrical rating of the detachable power-supply cord or extension cord
should be at least as great as the electrical rating of the appliance. If the
appliance is of the grounded type, the extension cord should be of a
grounded 3-wire cord. The extension cord should be arranged so that it
will not drape over the counter top or table top, where it can be pulled
on by children or tripped over.
LIMITED WARRANTY
Toastess International warrants that this appliance shall be free from defects in
material and workmanship for a period of one year from the date of purchase.
During this ‘in-warranty’ period, defective products will be repaired or replaced
at the discretion of the retailer and/or Toastess International. This warranty covers
normal domestic usage and does not cover damage which occurs in shipment
or failure which results from alteration, accident, misuse, abuse, glass breakage,
neglect, commercial use or improper maintenance.
A defective product should be returned to the original place of purchase within
the retailer’s stipulated return/exchange period*. If you are unable to have a
defective product replaced under warranty by the retailer, please check our
website at “www.toastess.com” for the service centre nearest you or you may
contact us for assistance by mail, e-mail, fax or telephone as listed below.
To ensure prompt ‘in-warranty’ service, securely package and return the product
to us prepaid. Be sure to include the original proof of purchase and a description
of the defect along with your address and zip/postal code.
For repairs not covered by the warranty, please contact us for assistance.
TOASTESS INTERNATIONAL
Customer Service Department
81A Brunswick
Dollard-des-Ormeaux
Québec, Canada H9B 2J5
E-mail: [email protected]
Fax: 514-685-8300
Tel: 514-685-2820 (Ext. 226)
* Return/exchange policies at each retailer vary and may differ from the Toastess International
1 year limited warranty period.
17