1
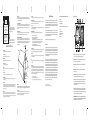
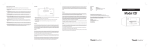
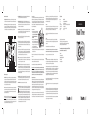
Front Panel Features Continued:
4. ANTENNA SWITCH: Switch between internal and external FM antennae. If the included FM antenna is
used, set this switch to external. This switch has no affect on AM reception.
9. SNOOZE (top of cabinet): When the Alarm sounds, press, hold, and then release the Snooze button to
silence the Alarm for approximately 5 minutes. After 5 minutes, the alarm sound will automatically resume.
10. CLOCK: This quartz analog clock features a fine mechanical quartz movement for superb accuracy. The
clock operates off of a single “AA” battery so power failures will not affect the clock’s accuracy. Check the
battery annually so the clock remains accurate. The clock’s illumination cannot be turned off or adjusted. It
is normal for the light to take several seconds to extinguish if the power supply is disconnected.
1
10
8
9
4
5
13
5. EXTERNAL FM CONNECTION: The Model Three has built-in AM and FM antennae. To improve FM
reception, insert the end of the supplied FM antenna into the center of this “F” connector and set the switch
to External. Adjust the wire for best reception. See the section marked “Reception” for more information.
This connection has no affect on AM reception.
6. HEADPHONE: Connect a headset (not included) to this stereo output for private listening. The headphone
volume is controlled by the Model Three’s volume knob. Connecting a pair of headphones will mute the
Model Three’s speaker. This jack accepts a 1/8" stereo male mini plug.
7. SUB OUT: Connect Tivoli Audio’s Model Subwoofer (sold separately) to this output to enhance the bass.
This jack accepts a 1/8" stereo male mini plug.
How to set the clock:
The clock hands will automatically rotate when the battery is correctly installed to indicate the clock is functioning. Within 5 minutes of inserting a fresh battery, a beep will be heard indicating the alarm is functioning. This
beep will not be heard if the radio is on at the time. Set the hands to the correct time with the Time Set button
once the hands have finished rotating. Push the Time Set button in and release to move the hour hand in small
increments or hold the button in to continuously advance the hands. Be sure the front panel alarm button is in
the off position when adjusting the time.
How to set the alarm:
1. Rotate the alarm thumbwheel counter-clockwise and
set the alarm hand to the approximate time you wish to
wake to. DO NOT TURN THE ALARM BEZEL
Tivoli Audio
CLOCKWISE OR YOU MAY DAMAGE THE
12
1
11
MECHANISM.
10
2
2. Turn the source knob to AM or FM and tune to a sta9
3
tion that will be broadcasting during the set wake-up
4
8
5
7
6
time. Set the volume to the desired level you wish to
wake to. If you prefer to wake to the tone, set the
source knob to Aux instead of AM or FM.
3. Press the Alarm button ON. The green alarm LED will
light and the radio sound will turn off. The radio will turn back on when the clock time roughly coincides with
the setting of the alarm hand.
VOL
96
94
98
106
108
550
Tivoli Audio
9. REC OUT: You may record from the Model Three by connecting a cassette deck or other recording device
to this fixed level, stereo output. You may also use the Model Three as a high-performance AM/FM analog
tuner by connecting a preamplifier or integrated amplifier to this output. The Model Three’s speaker will not
be muted when using this output. This jack accepts a 1/8" stereo male mini plug.
10. MIX IN: Connect your computer’s (or other device) audio output to this stereo input to hear audio mixed-in
with either the tuner or auxiliary device if one is connected. The volume level of this input must be adjusted
at the source. This jack accepts a 1/8" stereo male mini plug.
2
3
7
6
11
12
14
11. MONO/STEREO: This switch should remain in the Mono position unless the right Stereo Speaker (sold
separately) is connected, in which case the Stereo position should be selected. If you are using the Stereo
Speaker and have the switch set to Stereo, you may wish to experiment with this switch during radio listening, as the Mono position may help to clean up FM static noise. The Headphone and Record outputs are
Stereo and are not affected by this switch, unless the Source knob is set to AM (which is always Mono) or
FM and this switch is set to Mono.
Guide to features (rear panel):
1. BALANCE: If The Stereo Speaker or Dual Alarm Speaker (sold separately) is not connected, the Balance
knob should be set to the Left channel position and the Mono/Stereo switch should be set to Mono. If the
Dual Alarm Speaker or Stereo Speaker (sold separately) is connected, set the Balance control to the center
detent position for equal balance, or upward to hear the main unit speaker, or downward to hear the (right)
Stereo Speaker, and set Mono/Stereo switch to Stereo.
2 R-SPR: Connect the male RCA cable from the right Dual Alarm or Stereo Speaker (sold separately) to this
output, switch the Mono/Stereo switch to Stereo, and place the Balance knob in the center detent position.
Connecting a speaker other than The Stereo Speaker or Dual Alarm Speaker may cause damage to the
Model Three and void your warranty.
3. 12VDC, 1.5A: Connect the included AC power supply to this input. Use only the power supply provided with
this product. To obtain a replacement, contact your authorized dealer or Tivoli Audio, USA: 1.877.297.9479.
The power supply connector is 5.5mm/2.1mm x 13mm long, center positive. Do not connect the power supply to an electrical outlet controlled by a wall switch. It is normal for the power supply to become warm during use. An optional 12VDC nominal, 1.5A fused source may also be used.
12. TIME SET: Briefly press and release this button to advance the hands in small increments. Press and hold
this button to continuously advance the clock’s hands. Release the button when the clock is set properly.
Be sure the alarm button is in the Off position when setting the time. See “How to set the clock”.
13. ALARM GRILLE: The alarm beep emits from this grille. Do not block this grille
14. BATTERY BACK UP: Remove the battery cover and install a fresh major brand 1.5V “AA” alkaline battery,
observing correct +/– polarity. The clock operates off of the battery continuously and the battery
also acts as a back up. In the event of a power failure, the battery back up will maintain the clock’s
operation and sound the wake-up tone if the alarm button is in the On position, provided a fresh
battery is correctly installed. The clock face will not illuminate and the radio will not operate during a power
failure in order to conserve battery life. Check the battery’s strength annually and replace only with a major
brand, 1.5V “AA” alkaline battery. If the clock stops operating, replace the battery. To reduce the risk of fire
or injury, do not leave a dead battery in the clock. Do not dispose of the spent battery into a fire. Do not
open or tamper with the battery. Do not recharge the supplied battery. Dispose of the spent battery according to your state/country's regulations. See also "How to set the clock".
1700
FM
Model Three™
Quartz analog clock AM/FM radio
One 3" full-range driver
M3-PS, 12VDC, 1.5A, 120V-60Hz (UL); 230V-50Hz (CE)
“AA” 1.5V alkaline
8 3/8" W x 4 1/2" H x 5 1/4" D
4.25 lbs
The Model Three is not magnetically shielded and should be kept at least 5” away from a computer monitor or
television set.
OWNER'S MANUAL
Model Three
™
104
92
AM
600
1400
OFF
Model:
Type:
Driver:
Power Supply:
Clock Battery:
Dimensions:
Weight:
102
90
Tivoli
Placement:
Placing your Model Three inside a bookshelf or against a wall will inflate the bass as well as confine the speaker’s output. For best sound reproduction, allow the sound from the speaker to reflect off of a ceiling without
restriction. Do not place objects over the speaker grille. Do not obstruct the rear bass port.
Specifications:
100
88
8. AUX IN: To hear audio from another device, such as Tivoli Audio's Model CD, connect the device’s audio
output to this stereo input and switch the source knob to Aux. Note that you may need to adjust the volume
level differently for an auxiliary device than the level normally used for radio listening. This jack accepts a
1/8" stereo male mini plug.
Buildings made with concrete, steel, or aluminum siding will hinder reception. Household appliances, electric
blankets, computers, CD players, and other electronic devices can also adversely affect reception or cause
noise. If you experience this, plug the Model Three into an outlet not shared by another device or move it
further away from the offending device.
AUX
700
1200
1000
800
Cleaning:
Never use harsh cleansers or solvents or abrasive pads. The face may be cleaned with a slightly damp,
soft cloth. Take care not to rub too hard. For the wood cabinet, liquid polish usually yields better results than
spray-on waxes.
HENRY KLOSS
MODEL THREE
Specifications subject to change without notice.
Tivoli Audio reserves the right to make product changes without notice.
Tivoli Audio, the Tivoli Audio logo, Model Three, Model Three Dual Alarm Speaker
and The Stereo Speaker are trademarks of Tivoli Audio, LLC.
Painting or staining the cabinet is not recommended and will void your warranty.
Since the cabinet is natural wood, it is not always possible to achieve an exact color/grain match
between the main unit and other Tivoli Audio products. You may also notice the wood darken over time.
For more information about other exciting audio products by Tivoli Audio,
please visit our web sites or contact us directly:
Tivoli Audio
11
96
94
12
1
10
If the Alarm is in the ON position and the source knob is in the OFF position, the tone will sound during the set
wake-up time.
If the Alarm is in the ON position and there is a power failure, the tone will sound in lieu of the radio during the
set wake-up time, provided a fresh battery is properly installed.
Do not use glass cleaner or other chemicals to clean the clock’s window.
9
Warranty:
Tivoli Audio manufactures its products to very high standards and we are confident our products will perform
well. Accordingly, we warranty this product against manufacturing defects in material and workmanship to the
original owner, for a period of one year from the original date of purchase.
4. To turn the Alarm OFF, press the Alarm button again and the Alarm LED will extinguish.
Important Note: Due to the nature of the alarm thumbwheel’s analog mechanism, which was designed
for simplicity, there can be up to a five-minute deviation from when the alarm activates. For example, if
the alarm is set for 10.00, it is possible it could activate at 9:55 or 10:05. We recommend you set the
alarm early the first time you use it to accommodate for this. As you use your Model Three you will get
a better idea of where you need to set the-- alarm in order to wake-up at the desired time.
A word about radio reception:
For difficult FM reception conditions, if an outdoor antenna is not an option, attach the included antenna to the
external FM antenna jack on the back panel and set the switch to “External”. Alternately, an FM dipole antenna
or amplified indoor FM antenna may be used. The best place to locate an indoor antenna is near a window or
outside wall. Sometimes just reorienting the radio will improve reception. Since the power cord acts as an
extension of the internal FM antenna, moving the power cord may also improve reception. Connecting your
cable television wire to the external antenna jack may also provide clear local FM reception, although you usually must request activation of this service through your local cable company.
Although there is no connection to wire an external AM antenna, a wireless AM loop antenna (not included)
often provides better AM reception than most wire-type AM antennas. Reorienting or relocating the radio sometimes improves AM reception as well. Note the rear panel “External” switch has no affect on AM reception.
This warranty does not extend to damage caused by improper use/installation, faulty ancillary equipment, modifications, unauthorized repair, shipping damage or loss, abuse, accidents, use on improper voltage/current, lightning or other acts of God, normal wear and tear, commercial use, or purchases from unauthorized dealers.
Proof of purchase as evidence the unit was purchased from an authorized dealer within the warranty period
may be required for warranty service. Should service be necessary, DO NOT return the product without first
contacting your dealer or Tivoli Audio. This warranty is non-transferable.
Please resist the temptation to take apart your clock radio. There are no user serviceable parts, and any attempt
at modifying or repairing your radio will void the warranty.
Tivoli Audio will not pay for loss of time, inconvenience, loss of use of your product, or damaged caused by this
product.
This warranty gives you specific legal rights, and you may also have other rights which vary from state to state.
Some states do not allow limitations on implied warranties or the exclusion of consequential damages, therefore, these restrictions may not apply to you. If you purchased an extended warranty from your dealer and service is required after the manufacture’s warranty has expired, you should contact your dealer to obtain service.
Please complete and return the enclosed card within 30 days of purchase to register your product for warranty
coverage, or you may register on-line at: www.tivoliaudio.com
M3403
Tivoli
106
108
550
1700
4
AM
600
1400
OFF
6
104
88
3
7
102
90
2
8
100
92
FM
Tivoli Audio
One Broadway, Suite 600
Cambridge, Massachusetts 02142
Tel: 877-297-9479
www.tivoliaudio.com
98
AUX
5
700
1200
1000
HENRY KLOSS
MODEL THREE
800
POWER SOURCES
This product should be operated only from the type of power source indicated on the marking label. If you are not sure of the type of
power supply to your home, consult your product dealer or local power company. For products intended to operate from battery power,
or other sources, refer to the operating instructions.
CAUTION
RISK OF
ELECTRIC SHOCK
DO NOT OPEN
ATTENTION
RISQUE DE CHOC ELECTRIQUE,
NE PAS OUVRIR
PRECAUCION
RIESGO DE CHOQUE ELECTRICO
NO ABRIR
CAUTION: TO REDUCE THE RISK OF
ELECTRIC SHOCK, DO NOT
REMOVE COVER (OR BACK).
NO USER-SERVICEABLE PARTS
INSIDE.
REFER SERVICING TO QUALIFIED
SERVICE PERSONNEL.
This symbol is intended to alert the user to the presence
of uninsulated “dangerous voltage” within the product’s
enclosure that may be of sufficient magnitude to constitute a risk of electric shock to persons.
This symbol is intended to alert the user to the presence
of important operating and maintenance (servicing)
instructions in the literature accompanying the appliance.
GROUNDING OR POLARIZATION
This product may be equipped with a polarized alternating-current line plug (a plug having one blade wider than the other). This plug will
fit into the power outlet only one way. This is a safety feature. If you are unable to insert the plug fully into the outlet, try reversing the
plug. If the plug should still fail to fit, contact your electrician to replace your obsolete outlet. Do not defeat the safety purpose of the
polarized plug.
POWER CORD PROTECTION
Power-supply cords should be routed so that they are not likely to be walked-on or pinched by items placed upon or against them. Pay
particular attention to cords at plugs, convenience receptacles, and the point where they exit from the product.
EXTERNAL/OUTDOOR ANTENNA GROUNDING
If an outside antenna or cable system is connected to the product, be sure the antenna or cable system is grounded so as to provide
some protection against voltage surges and built-up static charges. Article 810 of the National Electrical Code, ANSI/NFPA 70, provides
information with regard to proper grounding of the mast and supporting structure, grounding of the lead-in wire to an antenna discharge
unit, size of grounding conductors, location of antenna-discharge unit, connection to grounding electrodes, and requirements for the
grounding electrode. See figure A.
IMPORTANT SAFETY INSTRUCTIONS
READ INSTRUCTIONS
All the safety and operating instructions should be read before operating this product.
ANTENNA
LEAD IN WIRE
FIGURE A
HEED WARNINGS
All warnings on the product and in the operating instructions should be adhered to.
ANTENNA
DISCHARGE UNIT
(NEC SECTION 810-21)
CLEANING
Unplug the product from the wall outlet before cleaning. Do not use liquid cleaners or aerosol cleaners. Use a damp cloth
for cleaning.
WATER AND MOISTURE
Do not use this product near water – for example, near a bath tub, wash bowl, kitchen sink, laundry tub, in a wet basement, or near a
swimming pool and the like.
ACCESSORIES
Do not place this product on an unstable cart, stand, tripod, bracket or table. The product may fall, causing serious damage to a child or
adult, and serious damage to the product. Use only with a cart, stand, tripod, bracket or table recommended by the manufacturer, or
sold with the product. Any mounting of the product should follow the manufacturer’s instructions, and should use a mounting accessory
recommended by the manufacturer.
VENTILATION
Slots and openings in the cabinet are provided for ventilation and to ensure reliable operation of the product and to protect it from overheating. These openings must not be blocked or covered. The openings should never be blocked by placing the product on a bed, sofa,
rug or other similar surface. This product should not be placed in a built-in installation such as a bookcase or rack unless proper ventillation is provided or the manufacturer’s instructions have been adhered to.
SERVICING
Do not attempt to service this product yourself as opening or removing covers may expose you to dangerous voltage or other hazards.
Refer all servicing to qualified service personnel.
DAMAGE REQUIRING SERVICE
Unplug this product from the wall outlet and refer servicing to qualified service personnel under the following conditions:
When the power-supply cord or plug is damaged.
If liquid has been spilled, or objects have fallen into the product.
If the product has been exposed to rain or water.
If the product does not operate normally by following the operating instructions. Adjust only those controls that are
covered by the operating instructions as an improper adjustment of other controls may result in damage and will
often require extensive work by a qualified technician to restore the product to its normal operation.
e. If the product has been dropped or damaged in any way.
f. When the product exhibits a distinct change in performance – this indicates a need for service.
a.
b.
c.
d.
REPLACEMENT PARTS
When replacement parts are required, be sure the service technician has used replacement parts specified by the manufacturer or have
the same characteristics as the original part. Unauthorized substitutions may result in fire, electric shock or other hazards.
HEAT
The product should be situated away from heat sources such as radiators, heat registers, stoves or other products (including amplifiers)
that produce heat.
FOLLOW INSTRUCTIONS
All operating and use instructions should be followed.
ATTACHMENTS
Do not use attachments not recommended by the product manufacturer as they may cause hazards.
OBJECT AND LIQUID ENTRY
Never push objects of any kind into this product through openings as they may touch dangerous voltage points or short-out parts which
could result in fire or electric shock. Never spill liquid of any kind on the product.
SAFETY CHECK
Upon completion of any service or repairs to this product, ask the service technician to perform safety checks to determine that the product is in proper operating condition.
RETAIN INSTRUCTIONS
The safety and operating instructions should be retained for future reference.
GROUNDING
CONDUCTORS
(NEC SECTION 810-21)
NOTIFICATION
This product has been tested and found to comply with the limits for Part 15 of the FCC Rules. These limits are designed to provide reasonable protection against harmful interference in a residential installation. This product generates, uses, and can radiate radio frequency
energy and, if not installed and used in accordance with the instructions, may cause harmful interference with radio communications.
However, there is no guarantee that interference will not occur in a particular installation. If this equipment does cause harmful interference to radio or television reception, which can be determined by turning the equipment off and on, the user is encouraged to try to correct the interference by one or more of the following measures:
l
l
GROUND CLAMPS
Model Three Instructions
OVERLOADING
Do not overload wall outlets, extension cords, or integral convenience receptacles as this can result in a risk of fire or electric shock.
l
Reorient or relocate the receiving antennas.
Increase the separation between the equipment and the receiver.
Connect the equipment to an outlet on a circuit different from that to which the receiver is connected.
Congratulations on your purchase of The Model Three. We believe the Model Three to be one of the finest
AM/FM clock radios available. Henry Kloss dedicated over half his life introducing people to the joy of music
through his finely crafted, hi-fidelity products. From his classic AR speakers of the 1950’s, to the Model 8 table
radio of the 60’s, to the Tivoli Audio radios of today, he consistently impressed consumers and critics alike with
the quality and value of his offerings.
In order to take full advantage of what your new Model Three is capable of, please take a moment to fully read
this owner’s manual. If you have any questions, do not hesitate to contact your dealer or Tivoli Audio directly. It
is a good idea to save the carton and original packing should you ever need to ship your radio, as shipping
damage is not covered by the factory warranty.
POWER LINES
An outside antenna system should not be located in the vicinity of overhead power lines or other electric light or power circuits, or where
it can fall into such power lines or circuits. When installing an outside antenna system, extreme care should be taken to keep from
touching such power lines or circuits as contact with them might be fatal.
Guide to features (front panel):
10
• 1 FM antenna
• 1 external power supply
• 1 warranty registration card
Please contact your dealer or Tivoli Audio if any of these items are missing.
5
4
1
9
Tivoli Audio
96
98
100
102
94
Tivoli Audio
One Broadway, Suite 600
Cambridge, Massachusetts 02142
Tel: 877-297-9479
www.tivoliaudio.com
11
12
104
92
1
10
106
90
2
108
88
8
9
3
1700
8
On behalf of all of us, thank you for choosing Tivoli Audio, and enjoy your new clock radio!
FM
Tivoli
7
6
AM
4
550
OFF
5
AUX
600
1400
1200
About Tivoli Audio:
Tivoli Audio was started by Model Three designerTom DeVesto with the goal of bringing simple to use, highquality audio products to the consumer at reasonable prices. His long professional association with Henry Kloss
includes co-founding Cambridge SoundWorks*. As the CEO and head of research and development at his former company, Tom was responsible for the development of many of the best-selling home entertainment and
multi-media products on the market today. He also held senior management positions in product development
for both Advent and Kloss Video.
Henry Kloss (1929-2002) began his long love affair with audio back in the early 1950’s when, as a student at
M.I.T., he began building speaker enclosures for fellow students who wanted to exploit the sound of live FM
broadcasts of the Boston Symphony Orchestra. With encouragement from Major Edwin Armstrong, the inventor
of FM, and M.I.T. lab staff, he co-founded Acoustic Research in 1952. Here, Henry helped develop the revolutionary AR1 acoustic suspension loudspeaker, which forever changed the way audio was reproduced. In 1957
he went on to co-found KLH where he introduced audio enthusiasts to the Model Six loudspeaker, Model Eight
FM table radio, and the Model 11 portable phonograph. Ten years later he founded Advent where, along with
great sounding speakers, he produced one of the first projection televisions (which later earned him an Emmy)
and one of the first consumer cassette decks with Dolby* B noise reduction. Kloss Video entered the picture in
1977. After Kloss Video, Henry co-founded Cambridge SoundWorks in 1988 along with long-time associate
Tom DeVesto, offering factory direct savings in hi-fi and manufacturing the number-one selling multimedia
speakers. In 2000, at the age of 70, Henry emerged from retirement to once again team-up with DeVesto to
produce the critically acclaimed Model One mono table radio.
POWER SERVICE GROUNDING
ELECTRODE SYSTEM
(NEC ART 250, PART H)
LIGHTNING
For added protection for this product during a lightning storm, or when it is left unattended and unused for long periods of time, unplug it from
the wall outlet and disconnect the antenna or cable system. This will prevent damage to the product due to lightning and power-line surges.
Packed with your Tivoli Audio Model Three Clock Radio you should find:
*Dolby is a registered trademark of Dolby Labs, Inc.
HENRY KLOSS
MODEL THREE
SLEEP OFF
ALARM OFF
SLEEP ON
ALARM ON
7
6
2
700
1000
800
3
1. VOLUME: Turn the volume knob to the right to increase the volume or to the left to decrease the volume.
This knob will also control the volume of headphones (not included) when connected.
2. SOURCE KNOB: Turn the knob 1 click to the right to select the FM band, 2 clicks to the right to select the
AM band, or 3 clicks to the right to select the auxiliary input.
3. TUNING DIAL: Turn the analog tuning dial to the right or to the left to change the AM and FM frequency
range.
4. POWER LIGHT: Glows green when the Source knob is in any position other than Off, except when the
Alarm button is activated.
5. TUNING INDICATOR: Glows bright amber when best tuning has been achieved. Some listenable AM stations will not light the tuning indicator and should be tuned by ear for the clearest signal.
6. ALARM: Once you have set the wake-up time using the Alarm Thumbwheel, push this button in to activate
the alarm and the corresponding green LED will light. The LED will remain lit until the Alarm button is
turned off. Push the Alarm button out to deactivate the alarm and the LED will extinguish. See “How to set
the alarm” for more information.
*Cambridge SoundWorks is a registered trademark of Creative Labs, Singapore.
7. SLEEP: Turn the source knob to AM or FM, set the radio to a station you wish to fall asleep to and adjust
the volume to the desired level. Press the Sleep button and the corresponding green LED will light. The
radio will turn off automatically after approximately 20 minutes. The LED will remain lit until the Sleep button
is turned off or when Sleep has ended but the Sleep button is still pressed in.
8. ALARM THUMBWHEEL: Rotate the aluminum Thumbwheel counterclockwise until the Alarm hand points
to the designated time you wish to wake to. Do NOT turn the Thumbwheel clockwise or you may damage the mechanism. See “How to set the Alarm” for more information.