1
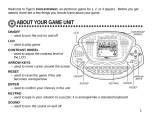
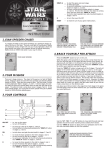
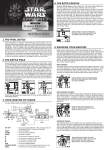
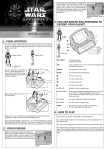
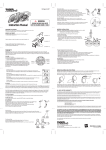
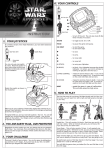
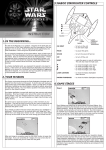
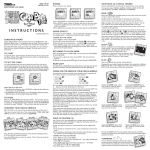
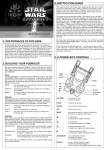
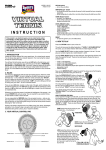
AGES 5 & UP
MODEL 88-308
883080001IWTI-01
6. HEADPHONE AND HI - FI CONNECTION
3. WARNING:
CLASS 1
LASER PRODUCT
Listening with the Headphones
Connect the plug of the stereo headphones (included)
into the PHONES (green) socket.
CAUTION: Avoid excessive volume levels for a long
period of time when using headphones, as this may
impair your hearing.
CAUTION
INVISIBLE LASER RADIATION
WHEN OPEN AND INTERLOCKS
DEFEATED
This product contains a low power laser device.
DARTH MAUL
CD PLAYER
TM
INSTRUCTION
Incorporated into the design of this full-feature Compact Disc Player is a face
plate depicting the evil Sith Lord Darth Maul. Darth Maul learns the power
of the dark side from his master Darth Sidious. Darth Sidious is a Dark Lord
of the Sith and the mysterious power behind the Trade Federation's blockade
of Naboo.
IMPORTANT NOTE
1. This product does not contain a separate Power On / Off switch. After
inserting a disc and installing batteries / AC adaptor, simply press
the Play button to switch on and play a disc.
2. In order to maximize battery life and provide optimum playing time,
this product has an Auto Power Off function. The player will automatically
switch off approximately 1 minute after a disc has finished playing or
when the CD lid is opened.
TABLE OF CONTENTS
Warning & Safety Precautions . . . . . . . . . . . . . . . . . . . . . . . . . . . . . . 1 - 2
Warning & FCC Compliance . . . . . . . . . . . . . . . . . . . . . . . . . . . . . . . 3 - 4
Power Sources . . . . . . . . . . . . . . . . . . . . . . . . . . . . . . . . . . . . . 5
Batteries
AC Adaptor
Headphone and Hi-Fi Connection . . . . . . . . . . . . . . . . . . . . . . . . . . . . . . 6
Location of Controls . . . . . . . . . . . . . . . . . . . . . . . . . . . . . . . . . 7
Basic Disc Play . . . . . . . . . . . . . . . . . . . . . . . . . . . . . . . . . . . . . 8
LCD Display Information . . . . . . . . . . . . . . . . . . . . . . . . . . . . . . . 9
Repeat / Play Modes . . . . . . . . . . . . . . . . . . . . . . . . . . . . . . . 10
Intro Scan and Programmed Track Play . . . . . . . . . . . . . . . . . . . . . . . . 11
Random Play / Skip and Search Functions . . . . . . . . . . . . . . . . . . . . . . 12
Electronic Anti-Shock Operation . . . . . . . . . . . . . . . . . . . . . . . . 13
Player Maintenance . . . . . . . . . . . . . . . . . . . . . . . . . . . . . . . 14
Disc Cleaning and Trouble-Shooting Guide . . . . . . . . . . . . . . . . . . . . . 15
90 - Day Limited Warranty . . . . . . . . . . . . . . . . . . . . . . . . . . . . . . . . . . . 16
1. WARNING:
To prevent fire or shock hazard, do not expose the unit to rain or moisture.
To avoid electrical shock, do not open the cabinet. Refer servicing to
qualified personnel only.
2. SAFETY PRECAUTION
1. As the laser beam used in this compact disc player is harmful to the
eyes, do not attempt to disassemble the casing.
2. Stop operation immediately if any liquid or solid object should fall into
the cabinet. Unplug the unit and have it checked by qualified personnel.
3. Do not touch the lens or poke at it. If you do, you may damage the
lens and the player may not operate properly.
4. Do not put anything in the safety slot. If you do, the laser diode will
be ON when the lid is still opened.
5. If the unit is not to be used for a long period of time, make sure that
all power sources are disconnected from the unit. Remove all batteries
from the battery compartment, and unplug the AC adaptor from the
wall outlet. Make it a practice to remove the AC adaptor by grasping
the main body and not by pulling the cord.
6. This unit employs a laser. The use of controls or adjustment or
performance of procedures other than those specified herein may result
in exposure to hazardous radiation.
4. COMPLIANCE WITH FCC REGULATIONS
This equipment has been tested and found to comply with the limits for
a Class B digital device, pursuant to Part 15 of the FCC Rules. These
limits are designed to provide reasonable protection against harmful
interference in a residential installation. This equipment generates, uses
and can radiate radio frequency energy and, if not installed and used in
accordance with the instructions, may cause harmful interference to radio
communications. However, there is no guarantee that interference will
not occur in a particular installation. If this equipment does cause harmful
interference to radio or television reception, which can be determined
by turning the equipment off and on, the user is encouraged to try to
correct the interference by one or more of the following measures:
* Reposition or relocate the receiving antenna.
* Increase the separation between the equipment and receiver.
* Connect the equipment into an outlet on a circuit different from that
to which the receiver is connected.
* Consult the dealer or an experienced radio technician for help.
TO
9. LCD DISPLAY INFORMATION
TO LINE OUT
Note: Always switch the power off
before making any connections
between the player and another unit.
During STOP mode
The total number of tracks and the
total playing time of the disc are
displayed.
Total no. of tracks
7. LOCATION OF CONTROLS
Average Playing Time (continuous play)
Anti Shock Mode
Normal Mode
Approximately
3.5 hours
Approximately
6 hours
Note: Carbon-zinc or Zinc Chloride type batteries are not recommended
for this unit as their use will result in extremely short playing times.
Wherever possible and for economy, it is recommended that the AC
adaptor (not included) be used.
Note: When the unit is to be operated using batteries, always unplug
the AC adaptor from the AC power outlet and the DC input jack from the
set. Otherwise the player will not operate.
This sixth track has elapsed 2 min. 30 sec.
During PAUSE mode
The track playback is paused, the
elapsed time and track number is
flashing.
Note: When lid is opened during play mode ----- shows in the display
indication the door is open.
Note: A flashing
indication
appears in the upper right of the
display when the batteries need to be
changed.
DC Input
Socket
Bass Boost
Switch
Program
Button
Display Lens
Play / Pause Button
Mode
Button
8. BASIC DISC PLAY
2. Press the OPEN button to open the
CD compartment lid.
MODE
1
MODE
MODE
MODE
3
2
3. Adjust the VOLUME to minimum.
4. Insert the disc with the label side
facing up.
5
5. Close the lid securely until a click is
heard.
4
6. Press the PLAY button to start playing.
1. Use an AC/DC (6V) Adaptor with
6
Push MODE button once and
is shown in
the LCD display, the current track on the disc
will be repeated.
To enhance the bass effect
Set the BASS BOOST switch to the ON position.
a). A class 2 power source.
b). Input: 120V AC/60Hz
c). Output: 6V D.C., 500mA
d). Centre positive
e). Dimension
4mm
3. Plug the AC/DC (6V) adaptor
into a 120V, 60Hz AC power
wall outlet socket. (Make sure
the input of the AC/DC (6V)
adaptor match with your local
supply, if you have any problem,
please consult with your dealer.)
Every time the MODE button is pressed, the corresponding mode appears
in the display window, in the following sequence:
Stop Button
AC/DC (6V) Adaptor Operation ( Not Included )
2. Insert the DC plug, at the end
of the AC/DC (6V) adaptor cord
into the DC input jack, on the
side of the unit.
10. REPEAT / PLAY MODES
ASP Button
1. Connect the headphones to the
PHONES (green) socket.
3. For better performance and longer
operation time, wrecommend the use
of alkaline batteries.
4. a)Do not mix old and new batteries.
b)Do not mix alkaline, standard
(carbon-zinc) or rechargeable
(nickel-cadmium) batteries.
5. If the unit is not to be used for an
extended period of time, remove the
batteries. Old or leaking batteries can
cause damage to the unit and may
void the warranty.
Total playing time
During PLAY mode
The track number and the elapsed
playing time are displayed.
Volume Control Knob
Headphone Socket
Line Out Socket
Skip / Search
Button
Batteries
1. Open the battery compartment cover and insert two "AA" alkaline
batteries inside the battery compartment. Follow the polarity as
indicated in the battery compartment.
2. Close the battery compartment cover.
Alkaline MN 1500,
LR6 or Equivalent
Connecting to Component Audio
Systems
Connect the stereo connection cable
(not included)) into the LINE OUT
(black) socket of the unit and the
CD / AUX inputs of an audio system.
Remove the disc
Hold the edge and gently press the
center pivot as illustrated, then pick
up the disc.
Caution: Wait for the disc to stop
rotating before pressing the OPEN
button.
Note: This unit can play 3" (8cm)
single CDs without an adaptor. Do
not use a CD single adaptor for
these discs.
Door Open
Button
5. POWER SOURCES
Battery Type
TO CD / AUX
IMPUT
Auto Power-Off Function
When the unit is stopped (standby mode) for approximately 1 minute,
the power is automatically turned off.
Push the MODE button twice and
is
shown in the LCD display, all tracks on the disc
will be repeated.
2
3
Note: The bass boost performance will be dependent on the VOLUME
control setting.
Note: In normal mode none of the above
symbols appear in the display.
Turning Power On and Off
This unit has no ON / OFF switch. To turn on and off, press the following
buttons.
NORMAL PLAY
To play the entire disc, press PLAY once.
To turn on: Press
x 1 press
MODE
During play
x 2 press
MODE
Press once to play
x 1 press
PLAY / PAUSE (playback starts)
To turn off: Press
STOP button once for standby mode. Press
button again to turn off the power.
During play
STOP
PLAY / PAUSE
11. Intro Scan and Programmed Track Play 13. ELECTRONIC ANTI-SHOCK OPERATION 15. DISC CLEANING AND
TROUBLESHOOTING GUIDE
INTRO
To listen to the first 10 seconds of each song on the disc use the INTRO
feature. To initiate INTRO, press MODE button three times while the disc
is playing. If you wish to start the disc in INTRO mode, press MODE
button three times and then press
During play
x 3 press
MODE
IThis player incorporates an electronic anti-shock circuit to help prevent
interruption of the sound output when the unit is subjected to shock or
vibration during disc playback. If in use the player is likely to be subjected
to shock or vibration (i.e. while walking or if used in a vehicle) press the
anti-shock button to provide uninterrupted playback.
When the anti-shock button is pressed in the play mode, the display will
show and the function is initialized. When shows in the display, the
data buffer is full.
ASP Indicator
PROGRAM
This allows selected tracks on the disc to by played in any desired order.
To set the program play
Note: Programs can be set in the STOP mode.
ASP Indicator
1. Press the PROGRAM button when
the unit is in the stop mode. The
track number will appear in the
display with the
indicator
flashing.
ASP Indicator
2. Press
or
desired track.
Note: Do not use solvents such as benzene, thinner, commercially
available cleaners or anti-static spray intended for analog discs.
Should you experience difficulties in the use of this player, please refer
to the following chart or call 1- 888-844-7767 for customer service.
to select the
4. Repeat steps 2 and 3 to program up
to 24 tracks into memory.
The sound will mute for approximately 1 second while the buffer fills.
Once filled the buffer will give approximately 10 seconds of protection
against interruption of sound output. If the player is subjected to shocks
of over 10 second duration some interruption of sound output will occur.
This is normal and to be expected and the sound will resume once the
player has stabilized from the shock.
To turn this function off, press the ANTI-SHOCK button again.
The second selection
During STOP mode
to start the programmed play.
6. To erase the program, press the
TROUBLESHOOTING GUIDE
Track no. of the first desired selection
3. Press the PROG button to enter
the track into memory.
5. Press
When a disc becomes dirty, clean it with a cleaning cloth. Wipe the disc
from the center out.
x 1 press
PROG
STOP button twice.
12. RANDOM PLAY/SKIP AND SEARCH
FUNCTIONS
RANDOM
This enables all the tracks on a disc to be played in a random (RAND)
sequence.
For example: if RAND is selected while playing track 8, the random
function will begin operating when track 8 has finished playing.
When all the tracks on the disc have been played in the random mode,
the CD player will automatically stop and power down in one minute to
conserve battery life.
During play
14. PLAYER MAINTENANCE
Cleaning the Cabinet
Wipe with a soft cloth. If the cabinet is very dirty, dampen the cloth with
a weak solution of neutral detergent and water, then wipe clean.
Dust or Dry Particles
Using a camera lens brush / blower, blow on the lens a couple of times,
then wipe it lightly with the brush to remove dust. Then, blow on the
lens once more.
x 4 press
MODE
To select RAND mode, push the MODE button four times during play.
Pressing MODE once more will return the unit to NORMAL play mode.
Locating a Particular Track
To return to the beginning of the current or a previous track, press the
lightly and repeatedly.
To move to the beginning of each subsequent track, press the
and repeatedly.
Notes:
1. When using the ANTI-SHOCK function the battery power consumption
increases because the disc rotates faster than normal and the dynamic
memory is active.
2. While the ANTI-SHOCK function provides for continuous sound output
when the unit is subjected to shock or vibration, it will not correct
errors arising from the use of defective, scratched or dirty discs.
3. When powering the player solely from batteries, only use the ANTISHOCK function where necessary to preserve battery life.
Fingerprints
If the lens cannot be cleaned using the brush / blowing method, use a
cotton swab starting in the middle and work to the outside edge.
PROBLEM
THINGS TO CHECK
Player fails to function
Disc may be inserted upside down.
Disc not mounted correctly on chuck
Dirty or defective disc
Dirty pick up lens
Player lid is not closed properly
Moisture / condensation, slowly warm
player up to room temperature for 60
minutes
AC power to adaptor is switched off
Weak batteries
Auto power off has occurred, press
play button to restore power
No sound from Headphones
Headphone plug is not firmly inserted
into the green PHONES socket.
No sound when played
through an external amplifier
Connection is incorrect
Power to external amplifier not
switched on
Intermittent sound
Dirty or defective disc
Dirty pick up lens
Player is subject to excessive vibration
or shock
Low battery power
Poor Headphone connection
16. 90-DAY LIMITED WARRANTY
Tiger Electronics, Ltd. (Tiger) warrants to the original consumer purchaser of
this product that the product will be free from defects in materials or
workmanship for 90 days from the date of original purchase. This warranty
does not cover damages resulting from accident, negligence, improper service
or use or other causes not arising out of defects in materials or workmanship.
During this 90-day warranty period, the product will either be repaired or
replaced (at Tiger’s option) without charge to the purchaser, when returned
with proof of the date of purchase to either the dealer or to Tiger.
Product returned to Tiger without proof of the date of purchase or after the
90-day warranty period has expired, but prior to one year from the original
date of purchase, will be repaired or replaced (at Tiger’s option) for a service
fee of U.S.$60.00. Payments must be by check or money order payable to
Tiger Electronics, Ltd.
The foregoing states the purchaser’s sole and exclusive remedy for any
breach of warranty with respect to the product.
All product returned must be shipped prepaid and insured for loss or damage
to:
Tiger Electronics, Ltd. Repair Dept.
980 Woodlands Parkway,
Vernon Hills, Illinois 60061, U.S.A.
The product should be carefully packed in the original box or other packing
materials sufficient to avoid damage during shipment. Include a complete
written description of the defect, a check if product is beyond the 90-day
warranty period, and your printed name, address and telephone number.
THIS WARRANTY IS IN LIEU OF ALL OTHER WARRANTIES AND NO OTHER
REPRESENTATIONS OR CLAIMS OF ANY NATURE SHALL BE BINDING ON
OR OBLIGATE TIGER IN ANY WAY. ANY IMPLIED WARRANTIES APPLICABLE
TO THIS PRODUCT, INCLUDING WARRANTIES OF MERCHANTABILITY AND
FITNESS FOR A PARTICULAR PURPOSE, ARE LIMITED TO THE NINETY (90)
DAY PERIOD DESCRIBED ABOVE. IN NO EVENT WILL TIGER BE LIABLE
FOR ANY SPECIAL, INCIDENTAL, OR CONSEQUENTIAL DAMAGES
RESULTING FROM POSSESSION, USE, OR MALFUNCTION OF THIS TIGER
PRODUCT.
Some states do not allow limitations as to how long an implied warranty lasts
and/or exclusions or limitations of incidental or consequential damages, so
the above limitations and/or exclusions of liability may not apply to you. This
warranty gives you specific rights, and you may also have other rights which
vary from state to state.
For more information about Tiger Electronics, our products and special
promotions, please visit our Web Site at: www.tigertoys.com
If you experience trouble with this equipment, please contact the following
address and phone number for information on obtaining service or repairs.
Company:
Address:
Tel. No.
Tiger Electronics, Ltd., Repair Dept.
980 Woodlands Parkway
Vernon Hills, IL 60061, U.S.A.
847-913-8100
lightly
Locating a Particular Point in a track
To search backward at high speed, press and hold the
To search forward at high speed, press and hold the
button.
button.
Low level audio will be heard during the search process to assist in
locating the correct point in the track.
© Lucasfilm Ltd. & TM. All rights reserved. Used under authorization.
®, TM, & © 1999 Tiger Electronics, Ltd. All rights reserved.
980 Woodlands Parkway, Vernon Hills, Illinois 60061, U.S.A.
®, TM, & © 1999 Tiger Electronics UK Ltd. All rights reserved.
Belvedere House, Victoria Avenue,
Harrogate, North Yorkshire HG1 1EL, England.
www.tigertoys.com
PRINTED IN CHINA