1
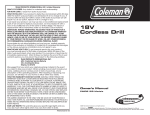
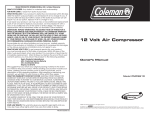
TEAM PRODUCTS INTERNATIONAL INC. Limited Warranty
What is covered: Any defect in materials and workmanship.
For how long: 2 years from date of purchase.
What we will do: If your product is defective and returned within 30 days
after the date it was purchased, we will replace it at no charge to you. If
returned after 30 days but within 2 years of the date of purchase we will
repair it or, at our option, replace it at no charge to you.
If we repair your product, we may use new or reconditioned replacement
parts. If we choose to replace your product, we may replace it with a
new or reconditioned one of the same or similar design. The repair or
replacement will be warranted under our standard 2 year warranty.
LIMITATIONS: Implied warranties, including those of fitness for a
particular purpose and merchantability (an unwritten warranty
that the product is fit for ordinary use), are limited to 2 years
from date of purchase. We will not pay for loss of time, inconvenience, loss of use of your product or property damage caused
by your product or its failure to work, or any other incidental
or consequential damages including personal injury.
Some states do not allow limitations on how long an implied warranty
lasts or the exclusion or limitation of incidental or consequential damages,
so the above exclusions or limitations may not apply to you.
What we ask you to do: To get warranty service for your product,
you must provide proof of the date of purchase. Within 30 days of the
date it was purchased, return your product to your place of purchase for
immediate replacement. After 30 days, but before the end of the 2 year
warranty period, you may return the product to the following address:
Customer Service Department
TEAM PRODUCTS INTERNATIONAL INC.
3 Entin Road
Parsippany, NJ 07054
We suggest that you retain your original packing material in the event
you need to ship your product. When sending your product include your
name, address, phone number, proof of date of purchase, and a
description of the operating problem. After repairing or replacing your
product, we will ship it to your home or office within four weeks.
What this warranty does not cover: Among other things this
warranty does not cover defects resulting from accidents,
damage while in transit to our service location, alterations,
unauthorized repair, failure to follow instructions, misuse, fire,
flood, and acts of God. If your product is not covered by our
warranty, call our Customer Service number at (888) 231-4022 to
determine whether we will repair your product and other repair
information, including charges. We, at our option, may replace
rather than repair your product with a new or reconditioned
one of the same or similar design. The repair or replacement will
be warranted for 2 years.
This limited warranty is the only one we give on your product,
and it sets forth all our responsibilities regarding your product.
There are no warranties which extend beyond the description set
forth above.
State Law Rights: This warranty gives you specific legal rights and you
may also have other rights which may vary from state to state.
PMD8141093005-205
18V Cordless
Reciprocating Saw
Owner’s Manual
Model: PMD8141
©2005 The Coleman Company, Inc. All rights reserved.
COLEMAN® and
are registered trademarks of The Coleman Company, Inc., used under license. Designed in the USA and
custom-manufactured in China for Team Products International Inc. Distributed by Team Products International Inc., Parsippany, NJ 07054
Model: PMD8141
Welcome
This COLEMAN® product has been carefully engineered and manufactured to
give you dependable operation. Please read this manual thoroughly before
operating your new COLEMAN® product, as it contains the information you
need to become familiar with its features and obtain the performance that will
bring you continued enjoyment for many years. Please keep this manual on file
for future reference.
GENERAL OPERATING INSTRUCTIONS WHEN USING ANY BATTERY
OPERATED TOOL.
WARNING! READ AND UNDERSTAND ALL INSTRUCTIONS PRIOR
TO USING ANY POWER TOOLS. FAILURE TO DO SO MAY RESULT IN
ELECTRIC SHOCK, FIRE AND/OR SERIOUS PERSONAL INJURY.
1. SAVE THESE INSTRUCTIONS FOR FUTURE REFERENCE.
2. Keep work area clean. Cluttered work areas and workbenches may cause
injury.
3. Be conscious of the work area. Do not use the power tools in damp or
moist areas. Do not expose power tools to rain. Do not use these tools in the
presence of flammable liquids or gases.
4. Keep work area well lit.
Owner’s Manual
15. Remove adjustment keys and wrenches. Form a habit to make sure
that the adjustment keys and wrenches are removed from the tools before
turning them ON.
16. Stay alert. To avoid injury pay attention to the work you are doing when
operating these power tools.
17. Check damaged parts. Before continuing to use any power tool, check
for damaged parts to determine that it will operate properly and perform
its intended function. Check alignment of moving parts, mounting of parts,
breakage of parts and anything else that may affect its operation. A part
that has been damaged or broken must be properly repaired or replaced by
an authorized service technician unless otherwise indicated in this manual.
Have damaged ON/OFF switches replaced by a qualified service technician.
Do not use a tool that will not turn OFF or ON.
18. Keep hands clear of moving parts.
19. Do not touch moving parts. Allow the power tool accessories (bit and
blades etc.) to cool before touching them. They can become extremely hot
during use and can burn your skin.
20. READ ALL INSTRUCTIONS BEFORE USING THESE POWER TOOLS.
SPECIFIC OPERATING INSTRUCTIONS WHEN USING THIS SAW.
6. Store idle tools. Remove the batteries and store tools in a dry place when
not in use.
1. Be sure to hold this tool by the insulated gripping surfaces when using it
for any operation where it is possible that the cutting tool may contact any
hidden wiring or the cord of the tool. Contact with a “live” wire will make
exposed metal parts of the tool “live” and may cause harm to the operator.
7. Do not force tools. Forcing the tools can cause damage to the unit or
serious injury.
2. Use extra caution when cutting in hard to reach or high places. Be wary of
any possible wires or falling debris that may result from your use of this tool.
8. Use the right tool for the right job. Use power tools for the purpose
intended.
3. BE CERTAIN TO KEEP HANDS AND FEET AWAY FROM CUTTING
AREA. When the saw is in use, be sure to keep hands firmly gripped on the
tool. Never reach towards or below the cutting operation. Never use your
legs or feet to stabilize the cutting operation.
5. Keep out of reach of children.
9. Dress properly. Do not wear loose clothing or dangling jewelry when
operating any power tool as they can be caught in moving parts. Rubber
gloves and nonskid footwear are recommended when working outdoors.
Keep longer hair pulled back.
10. Always wear protective safety glasses when operating power
tools. Wear a facemask when environment is dusty.
11. Secure items being worked on. Use a vice or clamp to securely hold the
item you are working on. Do not use your hands.
12. Never overreach. Keep proper footing and balance at all times.
13. Maintain tools. Keep tool blades sharp and keep tools clean for better and
safer performance. Inspect batteries before using them with the tools. Keep
hands dry and free from grease and oil when operating these power tools.
14. Disconnect tools. Remove the batteries from the tools before changing
bits and blades. This will prevent unintentional use.
1
4. The operation of this saw may result in foreign objects being thrown into your
eye, which may result in severe damage. Before beginning any power tool
operation, always wear safety goggles or safety glasses with side shield and
a full- face shield when needed. Consider using a Wide Vision Safety Mask
for use over eyeglasses or standard safety glasses with side shields. Always
use eye protection that is marked to comply with ANSI287.1.
5. To ensure proper usage, always use a sharp blade. This will produce the best
results and minimize poor performance results.
6. WARNING: Some dust created by power sanding, sawing, grinding, drilling
and other construction activities contains chemicals known to cause cancer,
birth defects or other reproductive harm. Some examples of these
chemicals:
a. Lead from lead-based paints,
b. Cement and other masonry products,
c. Chemically-treated lumber
2
Model: PMD8141
Owner’s Manual
Your risk from these types of exposures varies depending on how often you do
this type of work and what type of work you are doing. To reduce your risks,
10. Unplug the charger from its power source when not in use.
• Work in a well-ventilated area.
• Work with specially designed equipment and masks.
11. Do not touch the terminals inside the battery charger with any other metal
object such as nails or coins. This can short the charger.
12. Do not store the unit in areas where the temperature can exceed 120°F.
IMPORTANT SAFETY INSTRUCTIONS FOR BATTERY CHARGER:
1. This manual includes important safety instructions for the battery charger.
Fully read all instructions and warning labels before using the battery or battery charger.
2. To reduce the risk of electric shock or injury, use ONLY the battery charger
supplied with this unit to charge the battery(ies).
3. Do NOT expose the battery or battery charger to rain or moisture.
4. Use of any attachment not recommended in this manual may result in the risk
of fire, electric shock or injury to a person and will void the warranty.
5. To reduce the risk of damaging the battery charger power cord, be sure to pull
the plug rather then the cord when disconnecting it from the power supply.
Always position the cord so it will not be stepped on or tripped over. This will
prevent damage to the cord.
6. An extension cord should not be used unless absolutely necessary. Use of an
improper extension cord can result in risk of fire or electric shock. If using an
extension cord make sure that:
A) The pins on the plug of the extension cord are the same number,
size and shape as those on the plug on the charger.
B) The extension cord is properly wired and in good working condition.
13. Do not throw the battery or battery charger in fire. This can cause an
explosion.
14. WARINING: Batteries vent hydrogen gas and may explode in the
presence of a source of ignition, such as a pilot light. To reduce the risk of
serious personal injury, never use any cordless product in the presence of
an open flame. An exploded battery can propel debris and chemicals. If
exposed, flush with water immediately for a minimum of 10 minutes and
seek medical attention.
15. During extreme conditions, the battery may leak. This does not indicate a
battery failure. However, if the liquid gets on your skin, immediately wash
with soap and water, neutralize the area with a mild acid such as lemon
juice or vinegar. If the liquid gets into your eyes, flush them with clean
water immediately for a minimum of 10 minutes and seek medical
attention.
Controls and Components:
Battery and AC Charger
1. Battery with Release Buttons On Each Side
2. 120V AC Adaptor
3. Charging Stand with LED Charging Indicators
C) The wire size is the same or larger than the ones specified below:
Recommended size of Extension Cord for Battery Charger
Length of Cord (Feet)
25
50
100
150
AWG Size of Cord*
18
18
16
14
2
1
3
*The smaller the AWG (American Wire Gauge) number of the extension cord,
the higher the capacity of the cable for conducting current to ensure proper usage of the tool.
7. Do not operate charger with a damaged cord or plug.
8. Do not operate the charger if it has received a sharp blow, been dropped or
damaged in any other way.
9. Do not open the saw, battery or battery charger. There are no user serviceable
parts. Opening the unit will void the warranty.
3
4
Model: PMD8141
1) To begin charging, remove the battery pack from the tool by pressing on the
battery release buttons on either side of the battery pack and pulling down.
Reciprocating Saw:
4. Base (Shoe)
7. Lock-Off Button
5. Saw Blades (2)
8. Comfort Rubber Grip
6. Trigger Switch
9. Allen Wrench
Owner’s Manual
2) Plug the battery pack into the battery charger making sure the positive (+) and
negative (-) poles of the battery match the positive (+) and negative (-) poles
of the battery charger.
NOTE: The battery will only fit into the battery charger and the tool one way.
7
4
8
3) Plug one end of the 120 Volt AC Adaptor into the battery charger and the
other end into any standard 120 Volt wall outlet. The RED LED indicator on
the battery charger will illuminate to indicate that the battery is charging.
NOTE: While the battery is placed in the charger, the RED LED indicator light
will remain on. If charging more than one battery, wait at least 15 minutes between each
charge.
Use only the battery charger that is supplied with this tool. Using another
charger may cause damage to the battery.
6
9
WARNING: Never charge a battery pack again immediately after it has been
fully charged. This can give rise to the battery pack being overcharged and a
reduced battery life.
Length of service of your battery will depend on the type of work you are doing.
5
The batteries in this tool have been designed to provide maximum, trouble-free
life. However, like all batteries, it will eventually wear out. Do not disassemble
battery pack and attempt to replace the batteries.
INSTRUCTIONS FOR USE: Charging The Battery
To make your batteries last as long as possible, we suggest the following:
THE BATTERY(IES) MAY NOT BE FULLY CHARGED FROM THE
FACTORY. READ ALL INSTRUCTIONS THOROUGHLY PRIOR TO FIRST
USE.
1. Store and charge your batteries in a cool area. Temperatures above or below
normal room temperatures will shorten battery life.
The Saws covered by this manual use the same battery and battery charger.
Your Saw comes complete with a rechargeable battery, we recommend that you
fully charge before the first use.
Your Saw must be charged for 3-8 hours prior to first use. After initial charge,
allow approximately 3-8 hours to recharge your battery. Your battery should be recharged when the saw does not operate up to its
normal performance level. Do not continue to operate the saw in this depleted
capacity. Recharge the battery immediately.
To increase the life of your battery, do not leave the battery charging for more
than 8 hours. While this is not a safety concern, overcharging may reduce the
life of the battery(ies).
Overtime, if the saw is not used, the battery will lose capacity. For maximum
performance, recharge the battery after prolonged storage or non-use periods.
NOTE: Before inserting or removing the battery from the charging base, always
ensure that the base is not plugged into a 120V power source.
5
2. Never store batteries in a discharged condition. Recharge them immediately
after they are discharged.
3. All batteries gradually lose their charge. The higher the temperature the
quicker they lose their charge. If you store your tool for long periods of time
without using it, recharge the batteries every month or two. Getting into this
habit will prolong battery life.
ABOUT YOUR SAW
THE FEATURES OF THIS SAW:
Before attempting to use your reciprocating saw, familiarize yourself with all of
its operating features and safety requirements.
WARNING: Carefully read through this entire owner’s manual before using
your new reciprocating saw. Pay close attention to all of the Safety Rules,
Warnings and Cautions as laid out above. If you use you’re reciprocating saw
properly and only for what it is intended, you will enjoy years of safe, reliable
service.
6
Model: PMD8141
Allen Wrench: (1) Allen Wrench (5mm hex key) is stored in your saw. This is
needed to insert and/or change your saw blade.
Lock-Off Button: Your saw is equipped with a “lock off” button to help to
eliminate the possibility of accidental starting. The Lock-Off button is located
on the handle above the trigger switch. You must depress the lock-off button in
order to activate the trigger switch. The lock resets each time the trigger switch
is released.
NOTE: You can depress the lock-off button from either the left or right side.
Trigger Switch: To turn your saw ON, depress the lock-off button and press
the trigger switch. Release the trigger switch to turn your saw OFF.
Variable Speed: Your saw has a variable speed switch that delivers higher
speed with increased trigger pressure. Speed is controlled by the amount of
trigger switch depression.
Types of Application that are right for this saw:
Owner’s Manual
To install the saw blade (Figure 3 &4):
1. FIRST REMOVE battery pack.
WARNING: Failure to remove battery pack from the saw could result in
accidental starting causing possible serious personal injury.
2. Loosen the blade clamp screw enough to permit the saw blade to be inserted
between blade clamp and the saw bar using the
Allen Wrench.
NOTE: It is never necessary to completely
remove the blade clamp screw from the blade
clamp when installing or removing the blade.
3. Align the hole in the shank of the blade and the
blade clamp with the pin in the saw bar, firmly
press the pin against the saw bar.
• Cutting all types of wood
4. Tighten the blade clamp screw securely.
• Cutting masonite and plastic
• Cutting drywall
5. Remove the Allen Wrench and store it in the
body of the saw.
• Cutting metals such as sheet steel, pipe, steel rods, aluminum, brass and copper.
Blade Selection: To obtain the best performance from your saw it is important
to select a specific blade for the particular application and type of material you
wish to cut. By doing this you will get a smoother faster cut and prolong blade
life. Replacement blades for this saw are available at your nearest dealer or by
contacting us at the number below.
THE ASSEMBLY OF THIS SAW:
WARNING: Always remove the battery pack from your saw when you are
assembling parts, making adjustments, assembling or removing blades,
cleaning or when not in use. Removing the battery pack will prevent accidental
starting that could cause serious personal injury.
To remove/attach Battery Pack (Figure 2):
To Remove:
1. Locate latches on side of the battery pack and
depress both sides to release battery pack from
your saw.
2. Remove the battery pack from your saw.
To Attach:
1. Place the battery pack in your saw by
aligning the raised ribs on the battery pack with
the groove in the saw’s battery port.
2. Make sure that the latches on each side of the
battery pack snap into place and the battery
pack is secured to the saw before beginning
operation.
7
6. Replace the battery pack.
Note: There may be times when the blade clamp
sticks to the saw bar and will not loosen enough
to allow blades to be installed or removed. If this
happens, loosen the blade clamp screw with the
Allen Wrench, then tap lightly on the end of the
Allen Wrench with a mallet.
THE OPERATION OF THIS SAW:
WARNING: Always wear eye protection while
operating this tool.
GENERAL CUTTING (Figure 5)
Hold your saw firmly in front of and clearly away from you. Make sure the saw
blade is clear of any foreign material. Do not use your hands or feet anywhere
near the object to be cut. Be sure material to be cut is held firmly. Small work
pieces should be securely clamped in a vise or
with clamps to the workbench or table. Make the
line of cut clearly. Depress the lock-off button,
then pull the trigger switch to start the cutting action. Place the base assembly against the object
you are cutting. Then move the blade into the
object you are cutting. Do not force. Use only
enough pressure to keep the saw cutting. Let
the blade and saw do the work. Use of excessive
pressure that causes bending or twisting of the
blade may result in broken blades.
8
Model: PMD8141
Owner’s Manual
PLUNGE CUTTING (Figure 6)
TROUBLESHOOTING TIPS:
Mark the line of the cut clearly. Choose a
convenient starting point inside the area to be cut
out and place the tip of the blade over that point.
Rest the front edge of the base (shoe) on the
work area and hold firmly in position. Depress
the lock-off button, then pull trigger switch to
start the cutting action.
SAW DOES NOT WORK?
WARNING: Make sure the blade does not touch
work until motor reaches full speed, since this
could cause loss of control resulting in serious
injury.
• Check that the AC Adaptor is properly connected at both ends
With the saw blade at full cutting speed, slowly tilt saw downward until the tip
of the blade starts cutting work. After blade penetrates work, tilt saw until blade
is perpendicular to the work.
Voltage
18V
Length of Stroke
7/8” (22mm)
Switch
Variable Speed with Brake
METAL CUTTING (Figure 7)
Charger Input
120V AC 60Hz
Metals such as sheet steel, pipe, steel rods,
aluminum, brass and copper may be cut with
your saw. Be careful not to twist or bend the
saw blade. Do not force. We recommend
cutting oil when cutting most soft metals and
steel. Cutting oil will also keep blades cool,
increase cutting action and prolong blade life.
Charging Time
Approx. 3-8 Hours
Battery Type
Ni-Cad
Never use gasoline since normal sparking of
motor could ignite fumes. Clamp the work
firmly and cut close to the clamping point to
eliminate any vibration of the object being cut.
When cutting conduit pipe or angle iron, clamp
work in a vise if possible and cut close to the
vise. To cut thin sheet material, “sandwich”
the material between hardboard or plywood and clamp the layers to eliminate
vibration and material tearing.
• Recharge the battery
CHARGING INDICATOR LED NOT ILLUMINATED DURING
RECHARGING?
• Check that battery pack is properly connected to the battery recharger
SPECIFICATIONS
QUESTIONS?
If you have any questions about this product, please contact our Customer
Service Department at (888) 231-4022, 9 am to 5 pm EST, Monday through
Friday or visit our website at: www.colemanpower.com.
MAINTENANCE OF THE SAW:
WARNING: Always remove the battery pack from your saw when you are
assembling parts, making adjustments, assembling or removing blades,
cleaning or when not in use. Removing the battery pack will prevent accidental
starting that could cause serious personal injury.
WARNING: Do not at any time let brake fluids, gasoline, petroleum-based
products, penetrating oils, etc., come in to contact with plastic parts. They
contain chemicals that may damage, weaken or destroy the plastic.
Use only clean cloths to remove dirt, carbon dust, etc. Chemical solvents can
damage the plastic.
9
10