1
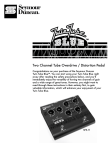
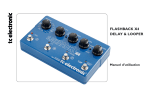
NDY -1
NOVA
Dynamics
USER’S MANUAL
TABLE OF CONTENTS
INTRODUCTION
ADDITIONAL FEATURES
Table of Contents . . . . . . . . . . . . . . . . . . . . . . . . . . . .3
Introduction . . . . . . . . . . . . . . . . . . . . . . . . . . . . . . . .4
Calibration . . . . . . . . . . . . . . . . . . . . . . . . . . . . . . . .17
APPENDIX
SETUP EXAMPLES
Technical Specifications . . . . . . . . . . . . . . . . . . . . . .18
Mono + Dual Processing . . . . . . . . . . . . . . . . . . . . . .5
Single Input – Dual Output . . . . . . . . . . . . . . . . . . . . .6
Pre and Post Processing . . . . . . . . . . . . . . . . . . . . . .7
Dual Inputs – Single Output . . . . . . . . . . . . . . . . . . . .8
OPERATION
Overview . . . . . . . . . . . . . . . . . . . . . . . . . . . . . . . . . .9
Connections . . . . . . . . . . . . . . . . . . . . . . . . . . . . . . .10
Switches . . . . . . . . . . . . . . . . . . . . . . . . . . . . . . . . . .10
Compression Basics . . . . . . . . . . . . . . . . . . . . . . . . .11
Compression Parameters . . . . . . . . . . . . . . . . . . . . .11
Suggested Settings – Compressor . . . . . . . . . . . . .14
Noise Gate Basics . . . . . . . . . . . . . . . . . . . . . . . . . .15
Noise Gate Parameters . . . . . . . . . . . . . . . . . . . . . .15
Suggested Settings – Noise Gate . . . . . . . . . . . . . .16
TC Electronic, Sindalsvej 34, DK-8240 Risskov – [email protected]
English Version
Manual revision 1.1 – SW – V 1.0
Prod. No: E60508511
3
INTRODUCTION
NOVA Dynamics – Contents Under Pressure
A high quality dual engine compression and noise gate stomp box, packed with never before seen functionalities:
NOVA Dynamics sets new standards for floor-based dynamics control. Its dual engine design offers a variety of setup
and control options that allow you to tailor NOVA Dynamics to fit your rig. Use the two engines for different
compression settings or switch between stomp compression for that classic “squash” and TC’s advanced multiband
compression for subtle, studio-style dynamics control. You can even split the NOVA Dynamics’ two engines, allowing
you to use a compressor in front of your amp and a noise gate in your amp’s effects loop for true noise reduction of
high gain signals. The Dry Blend feature lets you blend your dry signal in with the compressed signal. This gives you
an optimized attack without eating into the dynamics. At the same time, the automatic input gain adjustment on both
engines provides perfect settings for e.g. both a Strat and a Les Paul at the flick of a switch.
Brings control to any guitar rig
NOVA Dynamics Features
• 2 Compressor Modes: Studio and Stomp
• Noise Gate
• Dual Engine Design
• Dry Blend – Parallel Compression
• Flexible Routing
• Auto Input Gain Adjustment
• Precise Gain Reduction Meter
4
SETUP EXAMPLE: MONO + DUAL PROCESSING
In this setup, the two engines can be used
individually or serially. You can use two
compressors, two noise gates, or one of each at
the same time.
•
•
•
•
Connect your guitar to input A of the NOVA
Dynamics.
Connect output A of the NOVA Dynamics to
the input of your guitar amp.
Activate engine A and/or B and select the
desired compression type and/or noise gate
algorithm.
That’s all!
Note: For best signal to noise ratio, calibrate the
pedal according to the level of the input signal.
For further information, refer to this manual’s
“Calibration” section.
5
SETUP EXAMPLE: SINGLE INPUT – DUAL OUTPUT
In this setup, the guitar signal on input A is
fed to both engines A and B. This means that
the two channels are processed 100 %
separately.
Please note that this is not a stereo setup.
•
•
•
Connect your guitar to input A of the
NOVA Dynamics.
Connect output A of the NOVA Dynamics
to the input of one amp.
Connect output B to the input of another
amp.
You can now use the two engines like two
completely separate pedals for processing
your guitar’s sound.
Note: For best signal to noise ratio, calibrate
the pedal according to the level of the input
signal. For further information, refer to this
manual’s “Calibration” section.
6
SETUP EXAMPLE: PRE & POST PROCESSING
In this example, we are using the two engines
of NOVA Dynamics in two different places in a
signal chain. One engine is used in front of the
pre-amp for compression, while the other is
being used in the effects-loop as a noise gate.
•
•
•
•
Connect your guitar to input A of the NOVA
Dynamics.
Connect output A of the NOVA Dynamics to
the amp’s regular input.
Connect the “Send” jack of the effect loop to
input B of the NOVA Dynamics.
Connect output B of the NOVA Dynamics to
the “Return” jack of the effects loop.
Note: For best signal to noise ratio, calibrate the
pedal according to the level of the input signal.
You will love the fact that each engine of the
NOVA Dynamics has its own individual level
calibration. For further information, refer to this
manual’s “Calibration” section.
7
SETUP EXAMPLE: DUAL INPUTS
In this setup, we utilize the NOVA Dynamics’
auto-sensing inputs to connect two guitars at
the same time. This allows for individual level
calibration of the inputs, which is a great
advantage if e.g. you want to use two guitars
which have very different output levels due to
different pick-up configurations. This might be
the case if there are passive single coils on
one guitar and active humbuckers on the
other. Furthermore, you save an A/B switch
in your setup.
•
•
•
Connect two guitars to the inputs A and B
of the NOVA Dynamics.
Connect output A of the NOVA Dynamics
to the input of your amp.
Be sure to turn down the volume
potentiometer on the guitar not currently
in use.
Note: For best signal to noise ratio, calibrate
your guitars individually. For further
information, refer to this manual’s
“Calibration” section.
8
OVERVIEW
A output B
thresh
A input B
level/damp
attack
ratio/rel
GAIN
RED
-2
-4
-6
-8
-10
-12
-16
-20
-24
min
med
max
A B
dry blend
A/B toggle
studio
stomp
n.gate
power
thresh
level/damp
attack
ratio/rel
studio
stomp
n.gate
HOLD
to calib
algorithm
min
med
max
HOLD
to calib
A
algorithm
dry blend
B
NDY1
NOVA DYNAMICS
DUAL COMPRESSOR + NOISE GATE
9
OPERATION
CONNECTIONS
Switches
1 – Power
The NOVA Dynamics requires 12V DC 300 mA. Use
the power supply provided in the product box.
4 & 5 – On/Off Switches
In “normal” mode (when the A/B button is turned off),
these switches operate as standard on/off switches for
engines A and B.
In “A/B” mode (when the A/B button is lit), you can
toggle between engine A and B simply by pressing
either switch A or B.
2 – Input Jacks
These are ¼" mono jack connectors for signal input.
NOVA Dynamics operates as two independent pedals
with various possible combinations. Two different
guitars can be connected to inputs A and B.
Always use input A if you connect only one guitar.
When a guitar or other signal source is connected to
input B, inputs A and B can be calibrated individually.
3 – Output Jacks
These are ¼" mono jack connectors which carry the
signals from channels A and B.
10
OPERATION
Compression Basics
A compressor is used to control the dynamic content of
a signal. It can be used either for leveling out the
signals dynamics (thus letting your guitar sound stand
out clearer), or for immediately recognizable sustaining
effects.
Illustration - Signal Compression
Compressor Parameters
6 – Threshold
Range: -40 dB to 0 dB
The THRESHOLD knob on the NOVA Dynamics pedal
is equivalent to what is called “sustain” on many other
pedals. Basically it sets the threshold level where the
compressor kicks in. The lower the threshold, the less
input level the compressor needs to start compressing
and the more sustain you will get. Turn the
THRESHOLD knob counter-clockwise for more
compression (= lower threshold) and clockwise for less
compression.
7 – Level
Any degree of compression, and especially “heavy”
compression, will cause a reduction in output volume.
Use the LEVEL knob to compensate for this or to even
boost the signal.
8 – Attack
The Attack time is the response time of the
Compressor. The shorter the Attack time, the sooner
the Compressor will reach the amount of compression
11
OPERATION
set by the Ratio parameter. Turn the ATTACK knob
counter-clockwise for “squashing” the signal more and
clockwise for a more subtle compression.
9 – Ratio
This parameter determines how hard the signal is
compressed – see the illustration on the previous
page. Turn clockwise for more extreme compression.
For more information, refer to this manual’s
“Suggested Settings” section.
The “Studio” compressor mode uses so-called
multiband compression (in this case, three bands), that
you would normally only find in expensive studio
compressors. This 3-band compressor allows
individual processing of low, mid and high-end
frequencies. The advantage of this technique is that
e.g. a loud, pumping bass figure is processed
separately and therefore won’t influence the mid and
high-end frequencies.
10 – Meter
In Compressor Mode, the meter indicates the current
attenuation (compression) of the signal while you are
playing. In Noise Gate Mode, the meter indicates the
amount of attenuation of the signal when the gate is
active.
“Stomp” (Compressor):
The “Stomp” compressor mode gives you the kind of
hard compression typically associated with stomp box
compressors. Use this mode if you aim for an audible
compression effect with either a “twang” or a “popping”
sound.
11 + 14 – Algorithm
Use these switches to select the algorithms for the two
channels. The options are:
Gate:
In Gate Mode, the engine acts as a noise gate.
Read more in the manual section: “Noise Gate”.
Studio (Compressor):
This is a subtle compression type. It ensures that your
guitar is present with a constant level in the mix.
12
OPERATION
12 + 15 – Dry/Blend
The Dry/Blend function allows you to use parallel
compression. Basically, this means splitting the signal
in two and compressing only one part of the signal.
With the DRY BLEND switch, you can cycle through
three predefined levels of blend and “off”.
LED A flashing - the input level for input A is too hot.
Recalibrate the pedal.
Choose between
Off:
No blend
Min: 75 % wet
Med: 50 % wet
Max: 25 % wet
LED B flashing - the input level for input B is too hot. If
you are using dual input mode (two instruments) recalibrate input B. If you are using Engines A+B in
serial - reduce the output level of Engine A using the
LEVEL knob.
the following settings:
and 25 % dry
and 50 % dry
and 75 % dry
The Dry Blend function is especially useful for creating
hard sustaining compression without sacrificing the
natural attack.
16 – Clipping indicators
If these LEDs flash you have a too hot signal
somewhere in the signal processing.
Both LEDs flashing - recalibrate and reduce the
general level on both Engines A and B.
13
SUGGESTED SETTINGS
This section is a short guide on how to achieve
different kinds of compression and gating with NOVA
Dynamics. In these examples, we will only look at a
single engine. Start out by setting all controls at a 12
o’clock (center) position. This is always an excellent
starting point.
Notice that the calibration of the pedal and the general
output of your pick-ups has a huge influence on where
the Threshold knob should be positioned.
Compressor – Suggested Settings
All-round compression
Set TYPE to “Studio”
14
Sustaining compression
Set TYPE to “Stomp”
Gentle Compression:
E.g. for clean chords.
Set TYPE to “Studio”
Sustaining compression
with natural attack
Set Type to Stomp and
experiment with the three
Dry Blend options.
Heavy Squash for
Country & Funk:
Set type to Stomp and set
Dry Blend to off
OPERATION
Noise Gate Basics
The NOVA Dynamics Noise Gate is used to attenuate
the signal when you are not playing your guitar. This
way, you can mute hissing, humming and other noise
coming from cables, pedals etc. Of course, a noise
gate can only cancel noises from equipment which is
located before the gate in the signal path.
Please note that a noise gate is not the ultimate
solution to noise problems. You should always try to
avoid noise in the first place! Noise can be introduced
by a number of factors. Poor cables, poorly shielded
single coil pickups and power supplies placed too close
to signal cables are common problems that you can
work around by experimenting.
However, a certain amount of noise will always be
present in any guitar setup. The NOVA Dynamics
Noise Gate can help you attenuate this noise when
you are not playing. Be careful, though, when setting
the Threshold and Release parameters. A Threshold
set too high may result in the Gate not opening when
you play the guitar softly. A Release time set too slow,
may result in the gate cutting into the attack phase of
the signal.
Furthermore it is worth noticing that the NOVA
Dynamics Gate offers 4 modes of Noise Gate
selectable via the DRY BLEND button. From full-range
mode to three tuned 3-band Noise Gate modes.
Illustration - Noise Gate
Noise Gate Parameters
6 – Threshold
The Threshold point determines at what point the Noise
Gate should start dampening the signal.
Start by setting the THRESHOLD knob to the “min”
15
OPERATION
position (fully counter-clockwise) and set all other
controls to “12 o’clock” (center) position. Now turn up
your guitar’s volume potentiometer, but do not play.
Then turn up the THRESHOLD knob to the point
where the gate starts dampening you signal.
7 – Damp
This parameter determines how hard the signal should
be attenuated when the signal level falls below the set
Threshold. Now you may think that you should always
go for maximum dampening. However, bear in mind
that you should also strive for a smooth transition from
the “gated/attenuated” stage to the “open” stage. The
more dBs that are released when the Gate opens, the
more obvious the gating effect becomes. This means
that you will have to experiment to fine-tune the Noise
Gate to your sounds – there is no “one-size-fits-all”
setting.
8 – Attack
Attack is the time it takes for the Noise Gate to release
the gain reduction of the signal after the level of the
input signal has exceeded the Threshold. In other
words: With Attack, you determine how fast the gate
16
should open when you are playing your guitar. For
guitar setups it is very common to use very fast attack
times. Turn ATTACk counter-clockwise for faster attack
times.
9 – Release
Release is the time it takes for the Noise Gate to reach
the attenuation specified by the Damp parameter when
the signal drops below the Threshold point. In other
words: with Release, you determine how fast the gate
should close when you stop playing. Slow release
times are achieved by turning the knob clockwise and
results in a very natural sounding fade out. A faster
release time is achieved by turning the knob counterclockwise and is typically used for hard-rock and metal
where the gate needs to close very fast.
12 – Dry Blend function in the Noise Gate
Dry Blend mode off (no LEDs):
Select this mode for a full-band Noise Gate.
Dry Blend modes; Min, Mid & Max:
These modes process low, mid and high frequencies
OPERATION & SUGGESTED SETTINGS
individually and allows more gentle gating compared to
the full-band mode. This is achieved by letting certain
frequency areas of the dry signal pass, even when the
gate is active.
Dry Blend is excellent for reducing/removing significant
noise without sounding un-natural. Noise Gate with Dry
Blend activated works great when the gate is used in
an amp’s effects loop or after hi-gain distortion pedals.
Noise Gate simple setup procedure:
• Start out by setting all controls in 12 o’clock
position
• Turn up the guitars volume pot without playing
• Now tweak the THRESHOLD knob until you find
the exact point where the desired attenuation of the
noise is achieved
• Experiment with the three Dry Blend modes
Note that “Min”, “Mid” and “Max” refers to Dry Blend
and therefore “Min” mode provides the most
attenuation, “Max” mode provides the least.
Noise Gate – Suggested Settings
13 – A/B toggle
When the A/B switch is off (not lit), you can switch off
channels A and B as if you were using two separate
pedals. When the A/B switch is on (LED green), you
can toggle between channels A and B simply by
pressing the A or B switch. To completely bypass the
pedal, press the switch of the currently active channel.
Gentle Noise Gate
Dry Blend set to “max”
Heavy Noise Gate
17
INPUT LEVEL CALIBRATION
Your NOVA Dynamics pedal is per default set to work
well right out of the box – just as any other “stomp box”
pedal. However, you can optimize the performance of
the NOVA Dynamics pedal’s AD/DA converters by
calibrating the input sensitivity.
Follow the step-by-step guide below for EACH of the
engines** – especially if you are using one engine
before the amp and one after the amp as described in
the “Pre & Post” setup example on page 7.
Automatic Calibration
• Calibration of the input sensitivity should be set
according to the expected maximum input level.
Therefore, you should always start by turning on
boosters and other signal-attenuating equipment
that has been placed before the NOVA Dynamics
pedal in the signal chain.
• Press and hold the ALGORITHM button, for the
engine you intend to calibrate**, until all Meter
LEDs (-2 to -24) are lit.
• Play with your loudest* sound for a few seconds.
The nine LEDs will turn off one by one. How many
LEDs are turned off depends on the output of your
18
•
•
guitar. When there seem to be no more changes,
the pedal is calibrated.
Press any key to exit.
The pedal is now calibrated.
*
By “loudest”, we mean the sound with the highest dynamic
content. This is most likely a clean sound, as by definition
overdrive sounds are compressed – i.e. they have less
dynamics.
**
In single engine mode (nothing connected to input B), only
Engine A can be calibrated.
Manual Calibration
If you prefer to change the input gain manually, you
can.
• Press and hold the ALGORITHM switch of the
engine for which you intend to change the input
gain.
• All meter LEDs are lit briefly. After that, a single
LED will stay lit to indicate the current gain setting.
• Now turn the LEVEL knob and adjust the gain
setting.
• Press any key to exit.
TECHNICAL SPECIFICATIONS
Analog Inputs
Connectors:
Input Type
Impedance:
Max. Input Level:
Analog Outputs
Connectors:
Max. Output Level:
Output Type
Impedance
Sense Input Impedance
Overall Data
D to A Conversion
A to A Delay
Dynamic Range
THD
Frequency Response
Crosstalk
EMC
Complies with:
¼" phone jacks w. mono-sense
Single ended
1 MOhm
10 dBu @ 12V supply
Environment
Operating Temperature:
Storage Temperature:
Humidity:
General
Finish:
¼" phone jacks w. mono-sense
10 dBu @ 12V supply
Balanced/Single ended w. ground sense
0 Ohm
225 Ohm
24 bit, 128 x oversampling bitstream
1.65 ms
106/98 dB, 20 Hz to 20 KHz
@ Input level 16/-2 dBu, not A-weighted
< -90 dB (0.0032 %) @ 1 kHz, I/O Level
16 dBu, Load > 2400 Ohm
+0.1/-0.2 dB, 20 Hz to 20 KHz
< -100 dB, 20 Hz to 7 KHz, < -94 dB,
7 kHz to 20 kHz
EN 55103-1 and EN 55103-2 FCC Part 15,
Class B, CISPR 22, Class B
32° F to 122° F (0° C to 50° C)
-22° F to 167° F (-30° C to 70° C)
Max. 90 % non-condensing
Power Consumption
Anodized aluminum front
Plated and painted steel end caps
130 x 130 x 55 mm
765 g
100 to 240 VAC, 50 to 60 Hz
(auto-select) AC wall adapter.
AC adapter supplies 12 VDC
minimum 0.3 A to pedal.
<5 W
Warranty
Parts and labor
1 year
Dimensions:
Weight:
Mains Voltage
Due to continuous development, these
specifications are subject to change
without notice.
19