1
12-1611.fm Page 1 Friday, July 9, 1999 10:31 AM
R
-308
Cat. No. 12-1611
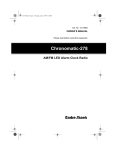
AM/FM LED CLOCK RADIO
WITH AUTOMATIC TIMER AND NIGHTLIGHT
Your Radio Shack Chronomatic-308
AM/FM LED Clock Radio with Automatic Timer and Night Light provides
excellent radio reception and also has
a soft light you can use as a night light.
It is ideal for a child’s room.
Warning: To prevent fire or shock hazard, do not expose this product to rain
or moisture.
CAUTION
RISK OF ELECTRIC SHOCK.
DO NOT OPEN.
Your clock radio has these features:
Light— produces a soft light.
Auto Timer—automatically turns on
the radio and the light at a preset time.
CAUTION: TO REDUCE THE RISK OF
ELECTRIC SHOCK, DO NOT REMOVE
COVER OR BACK. NO USER-SERVICEABLE PARTS INSIDE. REFER SERVICING TO QUALIFIED PERSONNEL.
This symbol is intended to alert you
to the presence of uninsulated dangerous voltage within the product’s
enclosure that might be of sufficient
magnitude to constitute a risk of
electric shock. Do not open the
product’s case.
Snooze —lets you temporarily silence
the alarm to give you a few more minutes of sleep.
Sleep—sets the radio to play for up to
1 hour and 59 minutes then automatically turn off, so you can go to sleep to
music.
Battery Backup
with
Battery
®
Sentinel —maintains clock operation
during a power failure so you do not
have to reset the clock and alarm times
when power resumes. The battery
sentinel indicator lights to let you know
if the battery is weak or missing.
!
!
This symbol is intended to inform
you that important operating and
maintenance instructions are included in the literature accompanying this product.
© 1995 Tandy Corporation.
All Rights Reserved.
Battery Sentinel, Chronomatic, and Radio Shack are registered trademarks
used by Tandy Corporation.
12-1611.fm Page 2 Friday, July 9, 1999 10:31 AM
PREPARATION
• The backup battery only powers
the clock (not the light).
Connecting to AC Power
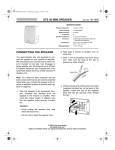
Follow these steps to install the backup battery.
Plug the clock’s power cord into a standard AC outlet.
1. Press the tab and remove the battery compartment cover.
The display flashes when you first plug
in the clock or when the power is interrupted and the back-up battery is weak
or missing. When you set the time, the
display stops flashing.
2. Snap the battery onto the terminals and place it inside the battery
compartment.
3. Replace the cover.
Installing the Backup Battery
OPERATION
To keep the clock running during an
AC power failure, install a 9-volt alkaline battery. We recommend Radio
Shack Cat. No. 23-553.
Setting the Time
Notes:
• To prevent unnecessary battery
drain, install the battery after you
connect the radio to AC power.
• If the BATTERY SENTINEL indicator lights after an AC power failure, or when you press SNOOZE,
the battery is too low to power the
clock. Replace the battery and set
the time.
1. While holding down TIME, repeatedly press (or press and hold
down) HOUR until the clock displays the correct hour.
2
12-1611.fm Page 3 Friday, July 9, 1999 10:31 AM
Using the Alarm
Note: The PM indicator on the
display lights when you set the
time to a PM hour.
2. While holding down TIME, repeatedly press (or press and hold
down) MINUTE until the clock displays the correct minute.
3. Release TIME when you have set
the correct time.
Setting the Alarm
Once you set the alarm time, follow
these steps to turn on the alarm.
ON/OFF/AUTO/ALARM
to
AUTO to turn on the radio and light
at the preset time, or to ALARM to
1. Set
sound the alarm buzzer and turn
on the light at the preset time.
When you turn on the alarm, the
alarm indicator appears at the
lower left corner of the display.
2. When the buzzer or radio sounds,
set ON/OFF/AUTO/ALARM to OFF
to turn it off.
1. While holding down ALARM,
repeatedly press (or press and
hold down) HOUR until the clock
displays the correct hour.
Note: You can press SNOOZE to
silence the alarm for about 9 minutes. You can repeatedly press
SNOOZE for up to 2 hours. Then
the alarm turns off and sounds
again at the set time.
Note: The PM indicator on the
display lights when you set the
time to a PM hour.
2. While holding down ALARM,
repeatedly press (or press and
hold down) MINUTE until the clock
displays the correct minute.
ON/OFF/AUTO/ALARM to
AUTO or ALARM to reset the alarm
3. Slide
to sound at the preset time 24
hours later.
3. Release ALARM when you have
set the correct alarm time.
To view the alarm time, hold down
ALARM on the top of the clock radio.
3
12-1611.fm Page 4 Friday, July 9, 1999 10:31 AM
Using the Sleep Timer
Playing the Radio
You can set the radio to play for up to
1 hour and 59 minutes, then automatically turn off.
1. Set AM/FM to AM or FM.
2. Set ON/OFF/AUTO/ALARM to ON
to turn on the radio.
1. Set ON/OFF/AUTO/ALARM to OFF.
3. Rotate the tuning control to select
your desired station.
2. To set the sleep timer to the maximum 1 hour and 59 minutes,
press SLEEP and HOUR at the
same time.
4. Adjust VOLUME to a comfortable
listening level.
Notes:
To set the sleep timer to less than
the maximum, while pressing and
holding SLEEP, press HOUR to set
a time longer than 1 hour then
press and hold MINUTE to set the
desired sleep time.
• The AM antenna is built-in. Rotate
the clock radio for the best AM
reception.
• The power cord serves as an FM
antenna. For the best FM reception, stretch the power cord to its
full length.
Using the Night Light
To turn on the night light, push LIGHT
to the left.
To turn off the night light, push LIGHT
to the right.
4
12-1611.fm Page 5 Friday, July 9, 1999 10:31 AM
Replacing the Night Light
Bulb
MAINTENANCE
Your Radio Shack Chronomatic-308
AM/FM LED Clock Radio with Automatic Timer and Night Light is an example of superior design and
craftsmanship. The following suggestions will help you care for it so you can
enjoy it for years.
If the night light bulb burns out, replace
it with a 6.3-Volt, Type-44 bulb. We
recommend Radio Shack Cat. No.
272-1108.
Caution: If the night light has been on
several minutes, let the bulb and bulb
socket cool before you touch them.
• Keep the clock radio dry. If it gets
wet, wipe it dry.
Follow these steps to replace the light
bulb.
• Use and store the clock radio only
in normal temperature environments.
1. Gently pull up the night light lens
cover to remove it.
• Handle the clock radio gently and
carefully.
• Keep the clock radio away from
dust and dirt, which can cause
premature wear of parts.
• Wipe the clock radio with a damp
cloth occasionally to keep it looking new.
2. Unscrew the bulb.
• Use only a fresh battery of the recommended size and type. Always
remove an old or weak battery.
Modifying or tampering with the clock
radio’s internal components can cause
a malfunction and might invalidate its
warranty and void your FCC authorization to operate it. If your clock radio is
not performing as it should, take it to
your local Radio Shack store for assistance.
3. Insert a new bulb into the bulb
socket and screw it into place.
4. Replace the lens cover.
5
12-1611.fm Page 6 Friday, July 9, 1999 10:31 AM
FCC INFORMATION
SPECIFICATIONS
Your clock radio might cause TV or radio interference even when it is operating properly. To determine whether
your clock radio is causing the interference, turn off your clock radio. If the interference goes away, your clock radio
is causing the interference. Try to eliminate the interference by:
GENERAL
Power Supply . . . . . 120V AC, 60 Hz
8 W, DC 9V
Dimensions . . . . . . 4 × 9 × 3 Inches
(102 × 229 × 76 mm)
Weight . . . . . . 1 lb, 9 oz (720 grams)
• Moving your clock radio away
from the receiver.
RADIO
• Connecting your clock radio to an
outlet that is on a different electrical circuit from the receiver.
Frequency . . . . . . AM 530-1710 kHz
FM 88-108 MHz
• Contacting your local
Shack store for help.
Radio
Antenna . . . . . . . . . . AM Ferrite Rod
FM Antenna (in Power Cord)
If you cannot eliminate the interference, the FCC requires that you stop
using your clock radio.
Specifications are typical; individual
units might vary. Specifications are
subject to change and improvement
without notice.
RADIO SHACK LIMITED WARRANTY
This product is warranted against defects for 90 days from date of purchase from Radio
Shack company-owned stores and authorized Radio Shack franchisees and dealers.
Within this period, we will repair it without charge for parts and labor. Simply bring your
Radio Shack sales slip as proof of purchase date to any Radio Shack store. Warranty
does not cover transportation costs. Nor does it cover a product subjected to misuse or
accidental damage.
EXCEPT AS PROVIDED HEREIN, RADIO SHACK MAKES NO EXPRESS WARRANTIES AND ANY IMPLIED WARRANTIES ARE LIMITED IN DURATION TO THE
DURATION OF THE WRITTEN LIMITED WARRANTIES CONTAINED HEREIN. Some
states do not permit limitation or exclusion of implied warranties; therefore, the aforesaid limitation(s) or exclusion(s) may not apply to the purchaser.
This warranty gives you specific legal rights and you may also have other rights which vary from state to state.
We Service What We Sell
9/94
RADIO SHACK
A Division of Tandy Corporation
Fort Worth, Texas 76102
7A5
Printed in Hong Kong