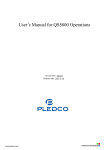
1
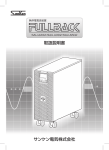
Español English The IDP-100 digital photo frame is capable of receiving photos via compatible Bluetooth™ devices, USB drive or memory card. The unique user interface makes it a great tool for browsing photos. You can tag, rotate or copy photos all while viewing them. To setup the frame 1. Attach the backside support to stand the IDP-100 on any flat surface (Figure 2A). Optionally the IDP-100 can be mounted on a wall using the wall mount hanger (Figure 2B). 2. Connect the AC adapter to the power connector on the backside of the IDP-100 and plug into an electrical outlet. 3. Press the on/off key. 4. During the first startup, select a language, set current date and time, and select a time zone. User guide Navigating the menus Depending on the menu choices that are available some keys may not appear. Navigation keys English Español 简体中文 繁體中文 Pulsar para ir hacia la izquierda. Press to navigate to the right. Pulsar para ir hacia la derecha. Pulsar para volver a la pantalla anterior. Press to view available options. keys are sensitive to a single press or a sliding motion in either Activate Bluetooth in the device you wish to interact with the IDP-100. Open a photo in your device and send it to the IDP-100 via Bluetooth. Select the IDP-100 as the receiving device. A four digit code appears on the IDP-100. Enter the code into your device and the transfer will begin. Note: You only need to enter a four digit code during the first interaction with a device and every time you add a new device. You can send pictures from most Bluetooth devices that have an OPP profile. To connect external storage devices MS DUO/SD slot Ranura MS DUO/SD USB connector Conector USB M2/microSD slot Ranura M2/microSD On/off key Tecla de activación/ desactivación Desk stand Soporte de mesa Security slot Ranura de seguridad To connect a USB flash drive or memory card 1. Introduzca la unidad flash USB o la tarjeta de memoria en la ranura correspondiente. 2. El marco IDP-100 iniciará una presentación de imágenes con todas las fotos contenidas en la unidad o la tarjeta. Photos can be loaded to the IDP-100 from external devices such as a USB flash drive, memory card, or compatible Bluetooth device. To optimize space the IDP-100 compresses all photos that are loaded to internal memory. To view the latest photo 1. From the main menu select Photo albums. 2. To view all of the photos in a chosen month, navigate using the arrow keys and press Select to chose a month. Photos are sorted by the date they were taken. Para ver fotos Las fotos se pueden cargar en el marco IDP-100 desde dispositivos externos como una unidad flash USB, una tarjeta de memoria y un dispositivo Bluetooth compatible. Para optimizar el espacio, el marco IDP-100 comprime todas las fotos que se cargan en su memoria interna. Para ver las fotos más recientes 1. En el menú principal, seleccione Última foto. 2. Pulse la tecla Seleccionar para ver las fotos en forma de presentación de imágenes, ordenadas según la fecha en la que se cargaron en el marco IDP-100. 1. En el menú principal, seleccione Álbumes de fotos. 2. Para ver todas las fotos de un mes determinado, desplácese utilizando las teclas de flecha y pulse Seleccionar para elegir el mes. Las fotos se ordenan según la fecha en la que fueron hechas. To manage photos Para ver fotos etiquetadas To copy photos 1. En el menú principal, seleccione Fotos etiquetadas. 2. Use las teclas de flecha para desplazarse hasta el icono de la etiqueta deseada y pulse la tecla Seleccionar. Se iniciará una presentación de imágenes de las fotos etiquetadas con el icono elegido. 1. To copy single photos from a storage device, while viewing photos in full screen or thumbnail view, press the Options key > Copy photo to. To copy all photos from a storage device, press the Options key > Copy all photos to. 2. Select a location to store the photos and press the Select key. Para gestionar fotos To rotate photos Para copiar fotos 1. While viewing photos, press the Options key > Rotate. 2. Use the left arrow key to rotate the photo counter clockwise or the right arrow key to rotate clockwise. 3. Press the Select key to save and return to the previous mode. 1. Para copiar fotos de una en una desde un dispositivo de almacenamiento, pulse la tecla Opciones > Copiar la foto en mientras ve las fotos en pantalla completa o en forma de miniaturas. Para copiar todas las fotos desde un dispositivo de almacenamiento, pulse la tecla Opciones > Copiar todas fotos en. To tag photos 1. While viewing photos, press the Options key > Tag. 2. Use the arrow keys to navigate to the desired tag icon and press the Select key. To delete photos 1. To delete single photos, press the Options key > Delete photo > Yes. To delete all photos press the Options key > Delete all photos > Yes. 2. Press the Select key. C Para conectar una unidad flash USB o una tarjeta de memoria Para ver álbumes de fotos 1. From the main menu select Tagged photos. 2. Use the arrow keys to navigate to the desired tag icon and press the Select key. A slideshow will begin of photos tagged with chosen tag icon. B Nota: Sólo tendrá que introducir el código de cuatro dígitos la primera vez que el marco interactúe con un dispositivo y cada vez que se añada uno nuevo. Puede enviar fotos desde casi todos los dispositivos Bluetooth que tengan un perfil OPP. To view photos To view tagged photos A 1. Active Bluetooth en el dispositivo que desea que interactúe con el marco IDP-100. 2. Abra una foto en dicho dispositivo y envíela al marco IDP-100 mediante Bluetooth. 3. Seleccione el marco IDP-100 como dispositivo de destino. En el marco IDP-100 aparece un código de cuatro dígitos. 4. Introdúzcalo en el dispositivo y se iniciará la transferencia. Para conectar dispositivos de almacenamiento externos To view photo albums Figure 2 Para cargar fotos con Bluetooth 1. Insert the USB flash drive or memory card into the designated slot. 2. The IDP-100 will begin a slideshow of all the photos on the drive or card. 1. From the main menu select Latest photo. 2. Press the Select key to view the photos in a slideshow, sorted by the date they were loaded into the IDP-100. Power connector Conector de alimentación Pulsar para ver las opciones disponibles. Nota: Las teclas y se pueden manejar pulsándolas levemente o deslizando el dedo sobre ellas en cualquier dirección (Figura 2C). To upload photos via Bluetooth 1. 2. 3. 4. Desplazamiento por los menús Pulsar para seleccionar un elemento. Press to go back to the previous screen. Figure 1 1. Sujete el soporte trasero para colocar el marco IDP-100 en una superficie plana (Figura 2A). Si lo prefiere, puede colgar el marco IDP-100 de la pared usando el gancho para montaje mural (Figura 2B). 2. Conecte el adaptador de CA al conector de alimentación situado en la parte posterior del marco IDP-100 y enchúfelo a la toma de corriente. 3. Pulse la tecla de activación/desactivación. 4. Al utilizar el marco por primera vez, seleccione un idioma, establezca la fecha y la hora, y seleccione una zona horaria. Teclas de dirección Press to navigate to the left. Note: Both the and direction (Figure 2C). Para montar el marco Algunas teclas estarán o no disponibles en función de las opciones de menú elegidas. Press to select an item. IDP-100 El marco de fotos digital IDP-100 puede recibir fotos a través de dispositivos Bluetooth™ compatibles, una unidad USB o una tarjeta de memoria. La interfaz de usuario única constituye una herramienta idónea para compartir fotos. Le permite etiquetarlas, girarlas o copiarlas mientras las está mirando. To manage the clock 2. Seleccione una ubicación para guardar las fotos y pulse la tecla Seleccionar. Para girar las fotos 1. Mientras está viendo las fotos, pulse la tecla Opciones > Rotar. 2. Use la tecla de flecha derecha para girarlas en el sentido de las agujas del reloj y la izquierda para girarlas en dirección contraria. 3. Pulse la tecla Seleccionar para guardar y volver al modo anterior. Para etiquetar fotos 1. Mientras está viendo las fotos, pulse la tecla Opciones > Etiqueta. 2. Use las teclas de flecha para desplazarse hasta el icono de la etiqueta deseada y pulse la tecla Seleccionar. Para eliminar fotos To view the clock 1. From the main menu select Clock. 2. Press the left or right arrow keys to change from digital to analogue. 1. Para eliminar fotos de una en una, pulse la tecla Opciones > Eliminar la foto > Sí. Para eliminar todas las fotos, pulse la tecla Opciones > Eliminar todas las fotos > Sí. 2. Pulse la tecla Seleccionar. To add a time zone 1. From the main menu select Clock > Options key > Add time zone. 2. Time zones are noted by the major city that resides there. Navigate to the city located in the time zone to be added and press the Select key. To remove a time zone 1. From the main menu select Clock > Options key > Remove time zone. 2. Navigate to the time zone that is to be removed and press the Select key. To change a time zone 1. From the main menu select Clock > Options key > Change time zone > Select. 2. Navigate to the time zone to be changed and press the Select key. 3. A list of time zones appears. Select the desired time zone from the menu. Press the Select key to make the change. Declaration of conformity for IDP-100 We, Sony Ericsson Mobile Communications AB of Nya Vattentornet SE-221 88 Lund, Sweden declare under our sole responsibility that our product Sony Ericsson type DGA-0002006 and in combination with our accessories, to which this declaration relates, is in conformity with the appropriate standards EN 300 328:V1.7.1, EN 301 489-7:V1.3.1, EN 301 48917:V1.2.1 and EN 60950-1:2006 following the provisions of Radio Equipment and Telecommunication Equipment directive 1999/5/EC. Lund, March 2008 Jacob Sten, Head of Product Business Unit Accessories We fulfil the R&TTE Directive. Cumplimos con la directiva R&TTE. 我们符合 R&TTE 指令 (99/5/EC) 的要求。 我們符合 R&TTE Directive 規範的要求。 Settings The IDP-100 allows you to customize language, photo intervals, transition effects, power schedule, view mode and more. Changes can be made in the Settings menu. From the main menu select Settings. • Language — Change to your preference. • Transition effect — Set photos to appear on the screen by fading, page flipping, sliding, wave washing, or pan and zoom. • Photo interval — Adjust the time that a photo is displayed during a slideshow with the photo interval setting. • View mode — Set the view to Fill Screen or Original size. • Light sensor — Control whether the backlight of the display is automatically adjusted by the surrounding light or is on at full strength. • Power schedule — Control when the IDP-100 is turned on and off by setting the power schedule. • Time — Select a time zone and set the time and date For additional product support go to www.sonyericsson.com/support Para gestionar el reloj Para ver el reloj 1. En el menú principal, seleccione Reloj. 2. Pulse la tecla de flecha izquierda o derecha para cambiar entre los modos digital y analógico. Para añadir una zona horaria 1. En el menú principal, seleccione Reloj > tecla Opciones > Añadir zona horaria. 2. Cada zona horaria se identifica con el nombre de la ciudad más grande ubicada en ella. Desplácese hasta la ciudad que identifica la zona horaria que desea añadir y pulse la tecla Seleccionar. Para eliminar una zona horaria 1. En el menú principal, seleccione Reloj > tecla Opciones > Eliminar zona horaria. 2. Desplácese hasta la zona horaria que desea eliminar y pulse la tecla Seleccionar. Para cambiar la zona horaria 1. En el menú principal, seleccione Reloj > tecla Opciones > Cambiar zona horaria > Seleccionar. 2. Desplácese hasta la zona horaria que desea cambiar y pulse la tecla Seleccionar. 3. Aparece una lista de zonas. Seleccione en el menú la zona horaria deseada. Pulse la tecla Seleccionar para guardar el cambio. Ajustes El marco IDP-100 permite cambiar el idioma, el intervalo entre fotos, los efectos de transición, la programación de conexión, el modo de vista, etc. Los cambios se hacen en el menú Ajustes. En el menú principal, seleccione Ajustes. • Idioma: elija el idioma que usted prefiera. • Efecto de transición: establezca si las fotos deben sucederse en la pantalla en forma de fundido, de página que pasa, de topetazo, de ola o de zoom que se acerca y se aleja. • Intervalo entre fotos: use el intervalo entre fotos para ajustar el tiempo durante el que se muestra una foto en una presentación de imágenes. • Modo Vista: establezca la vista como Pantalla completa o tamaño Original. • Sensor de luz: controle si la retoiluminación de la pantalla debe ajustarse automáticamente en función de la luz del entorno o si debe tener siempre la intensidad máxima. • Programar conexión: use la programación de conexión para controlar cuándo debe apagarse y encenderse el marco IDP-100. • Hora: seleccione una zona horaria y establezca la fecha y la hora. Para solicitar asistea adicional para el producto, visite www.sonyericsson.com/support Sony Ericsson Mobile Communications AB SE-221 88 Lund, Sweden 1210-3034.1 Printed in XXXXX This is the Internet version of the User's guide. © Print only for private use. 简体中文 User guide 繁體中文 IDP-100 数码相框能够通过兼容的蓝牙设备、 USB 驱动器或记忆卡接收照片。独特的用户界 面使其成为浏览照片的绝佳工具。您可以在查看照片时对照片进行标记、旋转或复制。 IDP-100 數位相框可經相容的藍牙裝置、USB 磁盤或記憶卡接收相片。獨特的使用者介面極 為適於瀏覽相片。瀏覽相片中,您可將相片加上標記、旋轉或複製。 安装相框 安裝相框 1. 在相框背面装上支架,使 IDP-100 能够立在任何平面上 (如图 2A)。也可以选用墙壁挂钩 将 IDP-100 安装在墙壁上 (如图 2B)。 2. 将交流转换器连接至 IDP-100 背面的电源连接器上,然后将其插入电源插座。 3. 按开 / 关机按钮。 4. 首次启动时,请选择语言,设定当前日期和时间,并选择时区。 1. 按圖 2A 所示,在 IDP-100 背面插入支架,使 IDP-100 立在任何平坦的表面。您也可按圖 2B 所示,用牆勾將 IDP-100 掛在墻壁上。 2. 將交流電源轉換器插入 IDP-100 背面的電源接口,另一端插入電源插座。 3. 按開啟 / 關閉鍵。 4. 首次啟動時,選擇語言、設定日期及時間、選擇時區。 菜单导航 瀏覽目錄 某些按键可能不会显示,这取决于可用的菜单选择。 某些按鍵會因可用的目錄選項而無法使用。 导航键 方向鍵 English Español 简体中文 繁體中文 IDP-100 按此键可选择项目。 按本鍵,選擇項目。 按此键可浏览左侧内容。 按本鍵向左。 按此键可浏览右侧内容。 按本鍵向右。 按此键可返回至上一屏幕。 按本鍵返回上一個螢幕。 按此键可查看可用选项。 注意: 键和 按本鍵查看可用的選項。 键都很敏感,只需向任一方向按一下或滑动一下即可 (如图 2C)。 通过蓝牙上传照片 1. 2. 3. 4. Figure 1 MS DUO/SD 插槽 MS DUO/SD 插槽 USB 连接器 USB 接口 M2/microSD 插槽 M2/microSD 插槽 开 / 关机按钮 開啟 / 關閉鍵 桌面支架 座架 安全插槽 安全插槽 啟動要與 IDP-100 連結之裝置的藍牙功能。 在裝置中開啟相片,然後用藍牙傳送到 IDP-100。 選擇 IDP-100 為接收裝置。IDP-100 即顯示一個 4 位數的號碼。 在裝置上輸入此一號碼後,傳送就開始。 连接外部存储设备 連結外接存儲裝置 连接 USB 闪存驱动器或记忆卡 連結 USB 磁盤或記憶卡 1. 将 USB 闪存驱动器或记忆卡插入指定插槽。 2. IDP-100 将开始以幻灯片形式显示驱动器或记忆卡上的全部照片。 1. 將 USB 磁盤或記憶卡插入相應的插槽。 2. IDP-100 即連續顯示磁盤或記憶卡上的全部相片。 查看照片 檢視相片 可将照片从 USB 闪存驱动器、记忆卡或兼容的蓝牙设备等外部设备加载至 IDP-100。为了优 化空间, IDP-100 会压缩加载至内部记忆库的全部照片。 相片可經 USB 磁盤、記憶卡、或相容的藍牙裝置等外接裝置載入 IDP-100。IDP-100 會壓縮 全部存入內部記憶的相片,以盡量利用儲存空間。 查看最新照片 檢視最新的相片 1. 从主菜单中选择最新照片。 2. 按选择键可按照照片加载至 IDP-100 的日期顺序以幻灯片的形式查看照片。 1. 選擇主目錄的 Latest photo。 2. 按選擇鍵,按相片載入 IDP-100 的順序連續顯示相片。 查看相册 檢視相簿 1. 从主菜单中选择添加标签的照片。 2. 使用箭头键导航至所需的标签图标,然后按选择键。将开始以幻灯片形式显示带有所选标签 图标的照片。 复制照片 1. 要从存储设备上复制单个照片,可在以全屏或缩略图视图查看照片时按选项键 > 复制照 片到。要从存储设备上复制全部照片,可按选项键 > 复制全部照片到。 2. 选择存储这些照片的位置,然后按选择键。 旋转照片 1. 查看照片时,按选项键 > 旋转。 2. 可使用向左箭头键沿逆时针方向旋转照片,或使用向右箭头键沿顺时针方向旋转。 3. 按选择键可保存并返回至上一模式。 B 1. 2. 3. 4. 注意:您只需要在第一次與裝置連結或新增裝置時,輸入此一 4 位數的號碼。您可用大部分具 備 OPP 模式的藍牙裝置傳送圖片。 管理照片 A 鍵,會因輕按或左右滑動而有不同的反應 ( 參閱圖 2C)。 注意:您只需在首次与设备进行交互以及每次添加新设备时输入四位代码。您可以从大多数具 有 OPP 模式的蓝牙设备发送图片。 查看添加标签的照片 Figure 2 鍵及 用藍牙上傳相片 激活要与 IDP-100 交互的设备中的蓝牙功能。 打开设备中的照片,然后通过蓝牙将其发送至 IDP-100。 选择 IDP-100 作为接收设备。 IDP-100 上会显示一个四位代码。 在设备中输入此代码,传送随即开始。 1. 从主菜单中选择相册。 2. 要查看选定月份的全部照片,可使用箭头键导航,然后按选择键以选择所需的月份。 照片按照拍摄日期排序。 电源连接器 電源接口 注意: 标记照片 1. 查看照片时,按选项键 > 标签。 2. 使用箭头键导航至所需的标签图标,然后按选择键。 1. 選擇主目錄的 Photo albums。 2. 用方向鍵和選擇鍵挑選月份後,檢視該月份的全部相片。相片按拍攝日期排序。 檢視已標記的相片 1. 選擇主目錄的 Tagged photos。 2. 用方向鍵翻閱到所要的標記圖示後,按選擇鍵。以所選的標記圖示標記的相片機連續顯示。 管理相片 複製相片 1. 按選項鍵 > Copy photo to,在以全螢幕或縮圖模式檢視相片中,從儲存裝置複製單一相 片。按選項鍵 > Copy all photos to,從儲存裝置複製全部相片。 2. 選擇儲存相片的位置後,按選擇鍵。 旋轉相片 1. 檢視相片中,按選項鍵 > Rotate。 2. 按左方向鍵,將相片反時鐘方向旋轉;按右方向鍵,將相片順時鐘方向旋轉。 3. 按選擇鍵,儲存相片後返回上一個模式。 標記相片 1. 檢視相片中,按選項鍵 > Tag。 2. 用方向鍵翻閱到所要的標記圖示後,按選擇鍵。 刪除相片 删除照片 1. 要删除单个照片,请按选项键 > 删除照片 > 是。要删除全部照片,请按选项键 > 删除全部 照片 > 是。 2. 按选择键。 1. 按選項鍵 > Delete photo > 是,刪除單一相片。按選項鍵 > Delete all photos > 是,刪除全 部相片。 2. 按選擇鍵。 管理時鐘 檢視時鐘 1. 選擇主目錄的 Clock。 2. 按左或右方向鍵,切換數位或類比時鐘。 管理时钟 查看时钟 C 1. 从主菜单中选择时钟。 2. 按向左箭头键或向右箭头键可从数字时钟更改为模拟时钟。 新增時區 1. 從主目錄選擇 Clock > 選項鍵 > Add time zone。 2. 時區會以各區的主要城市代表。用方向鍵翻閱到所要新增的時區城市後,按選擇鍵。 添加时区 1. 从主菜单中选择时钟 > 选项键 > 添加时区。 2. 时区以所在地区的主要城市名称表示。导航至要添加的时区中的城市,然后按选择键。 移除時區 1. 從主目錄選擇 Clock > 選項鍵 > Remove time zone。 2. 用方向鍵翻閱到所要移除的時區城市後,按選擇鍵。 删除时区 1. 从主菜单中选择时钟 > 选项键 > 删除时区。 2. 导航至要删除的时区,然后按选择键。 變更時區 1. 從主目錄選擇 Clock > 選項鍵 > Change time zone > 選擇。 2. 用方向鍵翻閱到所要變更的時區後,按選擇鍵。 3. 多個時區即顯示出來。從目錄選擇所要的時區。按選擇鍵,進行變更。 更改时区 1. 从主菜单中选择时钟 > 选项键 > 更改时区 > 选择。 2. 导航至要更改的时区,然后按选择键。 3. 会显示时区列表。从菜单中选择所需的时区。按选择键进行更改。 设定 FCC Statement This device complies with Part 15 of the FCC rules. Operation is subject to the following two conditions: (1) This device may not cause harmful interference, and (2) This device must accept any interference received, including interference that may cause undesired operation. Any change or modification not expressly approved by Sony Ericsson may void the user's authority to operate the equipment. This equipment has been tested and found to comply with the limits for a Class B digital device, pursuant to Part 15 of the FCC Rules. These limits are designed to provide reasonable protection against harmful interference in a residential installation. This equipment generates, uses and can radiate radio frequency energy and, if not installed and used in accordance with the instructions, may cause harmful interference to radio communications. However, there is no guarantee that interference will not occur in a particular installation. If this equipment does cause harmful interference to radio or television reception, which can be determined by turning the equipment off and on, the user is encouraged to try to correct the interference by one or more of the following measures: -- Reorient or relocate the receiving antenna. -- Increase the separation between the equipment and receiver. -- Connect the equipment into an outlet on a circuit different from that to which the receiver is connected. -- Consult the dealer or an experienced radio/TV technician for help. Industry Canada Statement IDP-100 允许自定义语言、照片间隔、过渡效果、开关机时间、视图模式等等。可在 “设定” 菜单中进行更改。从主菜单中选择 “设定”。 • 语言 - 更改至您的首选语言。 • 过渡效果 - 将照片在屏幕上的显示效果设定为淡化、翻页、滑动、波浪冲击或平移和缩 放。 • 照片间隔 - 利用照片间隔设定可调整照片在幻灯片中显示的时间。 • 视图模式 - 将视图设定为全屏或原始大小。 • 光感应器 - 控制显示屏的背景光是根据周围光线自动调节还是以最强亮度显示。 • 开关机时间 - 通过设定开关机时间控制何时打开和关闭 IDP-100。 • 时间 - 选择时区并设定时间和日期。繁體中文 IDP-100 讓您設定語言、相片間隔、轉場效果、電源時程、檢視模式等多個選項。年可於設定 目錄進行變更。選擇主目錄的設定。 • • • • • • • 語言 - 變更喜好的語言。 轉場效果 - 設定相片以淡入淡出、頁面翻轉、滑動、波浪、或平移及縮放等效果出現。 相片間隔 - 調整連續顯示相片中,相片顯示的間隔時間。 檢視模式 - 設定以全螢幕或原尺寸檢視。 光線感測器 - 設定螢幕背光是按周周亮度自動調整或隨時以最大亮度開啟。 電源時程 - 控制 IDP-100 開啟關閉的時間。 時間 - 設定時區和日期及時間。 其他產品支援訊息,請瀏覽 www.sonyericsson.com/support 網站。 有关其他产品支持信息,请访问 www.sonyericsson.com/support。 ᆶ۾ᆶ࡞ዊຫ ℷᐌՓ⫼ᴵӊϟˈ៥Ӏⱘ⦃ֱՓ⫼ᳳ䰤ᰃ 20 ᑈDŽ This device complies with RSS-210 of Industry Canada. Operation is subject to the following two conditions: (1) this device may not cause interference, and (2) this device must accept any interference, including interference that may cause undesired operation of the device. This Class B digital apparatus complies with Canadian ICES-003. Cet appareil numérique de la classe B est conforme à la norme NMB-003 du Canada. 設定 ᆶ۾ᆶ࡞ዊईᇮ໎ 䚼ӊ ৡ⿄ 䪙 (Pb) ∲ (Hg) 䬝 (Cd) ݁Ӌ䫀 (Cr6+) ⒈ ⒈ 㘨㣃 Ѡ㣃䝮 (PBB) (PBDE) 䜡ӊ X O O O O O ఼⬉ܙ ˄བ䳔㽕˅ X O O O O O O: 㸼⼎䆹᳝↦᳝ᆇ⠽䋼䚼ӊ᠔᳝ഛ䋼ᴤ᭭Ёⱘ䞣ഛ SJ/T 11363-2006 㾘ᅮⱘ䰤䞣㽕∖ҹϟDŽ X: 㸼⼎䆹᳝↦᳝ᆇ⠽䋼㟇ᇥ䆹䚼ӊⱘᶤϔഛ䋼ᴤ᭭Ё ⱘ䞣䍙ߎ SJ/T 11363-2006 㾘ᅮⱘ䰤䞣㽕∖DŽ˄ᠧ ĀXāⱘᡔᴃॳᰃЎⳂࠡЎℶ≵᳝ৃ᳓ᤶᡔᴃDŽ˅ This is the Internet version of the User's guide. © Print only for private use.