1
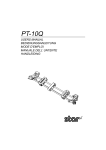
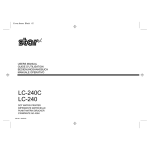
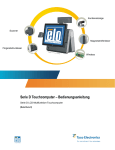
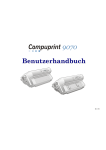
PT-10Y USERS MANUAL BEDIENUNGSANLEITUNG MODE D’EMPLOI MANUALE UTENTE 80825721 This document was created with FrameMaker 4.0.4 NOTICE ● All rights reserved. Reproduction of any part of this manual in any form whatsoever without STAR’s express permission is forbidden. ● The contents of this manual are subject to change without notice. ● All efforts have been made to ensure the accuracy of the contents of this manual at the time of press. However, should any errors be detected, STAR would greatly appreciate being informed of them. ● The above notwithstanding, STAR can assume no responsibility for any errors in this manual. ANMERKUNGEN ● Alle Rechte vorbehalten. Die Wiedergabe von Teilen dieser Anleitung in jedweder Form bedarf der schriftlichen Genehmigung durch STAR. ● Inhaltliche Änderungen vorbehalten. ● Diese Bedienungsanleitung wurde vor Drucklegung mit gebührender Sorgfalt überprüft. Sollten sich dennoch Fehler eingeschlichen haben, bittet STAR um Benachrichtigung. ● STAR übernimmt keine Gewähr für Betriebsstörungen, die sich aus etwaigen Fehlern in dieser Bedienungsanleitung ergeben. REMARQUE ● Tous droits réservés. La reproduction de toute partie de ce mode d’emploi, sous quelque forme que ce soit, est strictement interdite sans l’autorisation expresse de STAR. ● Le contenu de ce mode d’emploi est sujet à modification sans préavis. ● Tous les efforts ont été faits pour assurer la précision du contenu de ce manuel au moment de l’impression. STAR serait très heureux d’être informé des erreurs qui pourraient y être découvertes. ● En dépit de la remarque ci-dessus, STAR n’assume aucune responsabilité pour les erreurs de ce manuel. AVVERTENZA ● Tutti i diritti sono riservati. La riproduzione di questo manuale, anche parziale, in qualsiasi forma e senza preventiva autorizzazione scritta della STAR, è proibita. ● La STAR si riserva il diritto di apportare modifiche in qualunque momento, senza specificarne i motivi. ● È stato fatto il possibile per assicurare l'accuratezza del contenuto di questo manuale, fino al momento della stampa. Si prega di communicare eventuali errori alla STAR. ● La STAR non si assume alcuna responsabilità per possibili errori riscontrati in questo manuale. Copyright 1994 Star Micronics Co., Ltd. TABLE OF CONTENTS PT-10Y Push Tractor Unit Installing the push tractor unit Removing the push tractor unit from the printer Loading fanfold paper Printing on fanfold paper Parking paper Reloading parked paper Using the tear-off function 2 3 4 7 8 8 8 INHALTSVERZEICHNIS Der PT-10Y-Schubtraktor Installieren des Schubtraktors Den Schubtraktor vom Drucker abmontieren Einlegen von Endlospapier Bedrucken von Endlospapier Endlospapier parken Entparken von Endlospapier Benutzung der Trennfunktion für Endlospapier 9 10 11 14 15 15 15 TABLE DES MATIERES Mécanisme tracteur poussant PT-10Y Installation du mécanisme tracteur poussant Dépose du mécanisme tracteur poussant Chargement de papier en continu Impression sur papier en continu Mise en attente du papier Rechargement du papier mis en attente Fonction de découpe rapide 16 17 18 21 22 22 22 INDICE Unità di trascinamento PT-10Y Installazione dell’unità di trascinamento Rimozione dell’unità di trascinamento Caricamento della carta a modulo continuo Stampa su modulo continuo Parcheggio della carta a modulo continuo Ripristino del modulo continuo parcheggiato Utilizzo della funzione tear-off (strappo) 23 24 25 28 29 29 29 2 PT-10Y Push Tractor Unit The PT-10Y Push Tractor Unit allows you to print on continuous fanfold paper up to 10 inches wide. This manual describes the operational procedures for using the PT-10Y. Installing the push tractor unit ❏ Make sure that the printer is unplugged from its AC power source. ❏ Open the front cover of the printer as described in the printer’s Users Manual. ❏ Detach the automatic sheet feeder as described in the printer’s Users ❏ Manual. Remove the two covers on the back of the printer that conceal the tractor feeder hooks. covers Important! Make sure that you keep these two covers in a safe place so you can replace them if you ever remove the tractor feeder from the printer. This document was created with FrameMaker 4.0.4 Removing the push tractor unit from the printer 3 ❏ Making sure that the release lever on the PT-10Y Tractor Feeder is pressed English down, position the tractor feeder so that the two U-shaped pieces on the tractor feeder come into contact with the round tabs inside the printer. Release lever ❏ Lower the back of the tractor feeder down so that its two tabs smoothly ❏ ❏ ❏ enter into the tractor feeder hooks and snap into place. Raise the release lever so that it locks the tractor feeder onto the printer. Re-install the automatic sheet feeder as described in the printer’s Users Manual. Close the front cover of the printer. Removing the push tractor unit from the printer ❏ Make sure that the printer is unplugged from its AC power source. ❏ Open the front cover. ❏ Detach the automatic sheet feeder. ❏ Press the release lever down to unlock the tractor feeder. 4 PT-10Y Push Tractor Unit ❏ Pressing down on the two hook releases on the left and right of the tractor feeder, lift it up and away from the printer. hook release ❏ Replace the tractor feeder hook covers. ❏ Re-install the automatic sheet feeder. Loading fanfold paper ❏ Position the stack of paper behind the printer. ❏ Unplug the printer from its AC power supply. ❏ Pull the release lever toward the front of the printer. ❏ If there is already paper in the printer, remove it. ❏ Open the front cover of the printer. ❏ Remove the automatic sheet feeder. Loading fanfold paper 5 ❏ Pull the gray levers on the tractors up to unlock the tractors, and slide the English tractors into position so that they are aligned with the holes in the fanfold paper. ❏ Once the tractors are aligned the way you want, push the gray levers back down to their original positions to lock them in place. ❏ Open the covers of the tractors and align the paper so that the pins on the tractors are inserted into the holes of the paper. 6 PT-10Y Push Tractor Unit Important! Make sure that the paper is aligned properly on the tractor pins. Otherwise, it may tear or jam. ❏ Close the tractor covers. At this point you can make final adjustments to the ❏ ❏ paper position by releasing the gray levers and moving the tractors. After making these adjustments, be sure that you re-lock the tractors by pushing the gray levers back into their original positions. Carefully lower the automatic sheet feeder into the printer, making sure that the two round tabs on either end of it enter into the slots inside the printer. You should have the automatic sheet feeder angled towards the front of the printer (at about the same angle that it was when you pulled the feeder forward while detaching it). Lower the automatic sheet feeder all the way down. When you do, it should naturally slip into place, with the part that holds the paper angled slightly towards the back of the printer. ❏ Close the front cover of the printer. Important! If you leave the paper support installed on the printer while there is no paper in the automatic sheet feeder, it will catch on the fanfold paper that is fed from the printer and cause paper jams. Detach the paper support from the printer when there is no paper in the automatic sheet feeder. Printing on fanfold paper 7 ❏ Plug the printer back into its AC power source. The printer will beep to indicate that paper is not loaded properly. ❏ Press the control panel’s PAPER button and the paper will feed to the Printing on fanfold paper When printing on fanfold paper, take care not to print too close to the perforations that separate each sheet. The following shows the recommended print area for fanfold paper. 5mm 18mm 18mm Perforation 25.4mm 25.4mm Bottom of Form 75mm Also note the following important points whenever using fanfold paper and continuous forms. ✓ You can use the same line feed and form feed operations as you use with ✓ ✓ single-sheet paper. When using continuous multi-part forms, do not use forms with more than three parts. Be sure to adjust the printer for the proper paper thickness before printing. Important! Keep the release lever in the forward position while printing on fanfold paper. English starting position. 8 PT-10Y Push Tractor Unit Parking paper It is not necessary to remove fanfold paper currently loaded in the printer in order to print on single-sheet paper fed by the automatic sheet feeder. Instead, simply use the following procedure to park the fanfold paper. ❏ Tear off the paper at a perforation so there is no more than half a page ❏ ❏ ❏ sticking out past the printer cover. If necessary, you can press the control panel’s Power button to put the printer into the Not-Ready Mode. and then use the PAPER button to feed the paper until a perforation is just past the printer cover. Check to make sure that the printer is in the Ready Mode. Press the control panel’s PAPER button. The printer automatically reverse feeds the fanfold paper until it is no longer in contact with the platen. Push the release lever back towards the back of the printer. The paper is now parked, and you can load single sheet paper into the automatic sheet feeder and use it for printing. Reloading parked paper After you are finished printing on single-sheet paper, use the following procedure to reload the parked fanfold paper and make it available for printing. ❏ If any single-sheet paper is still in the printer, press the control panel’s PAPER button to eject it. ❏ Pull the release lever forward toward the front of the printer. ❏ Press the control panel’s PAPER button. The printer automatically feeds the fanfold paper back into position, ready for printing. Note: You can reload parked paper either while the printer is in the Ready Mode or Not-Ready Mode. Using the tear-off function The following procedure makes it easy to tear off paper without disturbing the current position of the paper. ❏ Check to make sure that the tear-off function has been switched on using ❏ ❏ ❏ ❏ User Setup Utility. Check to make sure that the printer is in the Not-Ready Mode. Hold down the control panel’s PAPER button. The printer feeds the perforation of the fanfold paper to the tear-off edge of the printer cover. Tear off the paper. Press the control panel’s Power button to enter the Ready Mode. When you resume printing, the printer reverse feeds the paper to its former position. 9 Der PT-10Y-Schubtraktor Installieren des Schubtraktors ❏ Vergewissern, daß das Druckerstromkabel ganz aus der Netzsteckdose ❏ ❏ ❏ herausgezogen ist. Vordere Druckerabdeckung nach Bedienungsanleitung des Druckers öffnen. Die automatische Papierzuführung nach Bedienungsanleitung des Druckers abnehmen. Hinten am Drucker die beiden Schutzkappen entfernen, die als Abdeckung der Aufnahmen für den Schubtraktor dienen. Schutzkappen Wichtig! Sicherstellen, daß beide Schutzkappen bestens aufbewahrt sind, damit sie auch wieder gefunden und aufgesetzt werden können, wenn Sie den Schubtraktor jemals wieder abmontieren möchten. This document was created with FrameMaker 4.0.4 Deutsch Der PT-10Y-Schubtraktor ermöglicht Ihnen, Endlospapier von bis zu 25,4 mm Breite zu bedrucken. Im vorliegenden Handbuch finden Sie den Umgang mit dem PT-10Y und die allgemeine Betriebspraxis beschrieben. 10 Der PT-10Y-Schubtraktor ❏ Nach Überprüfen, daß der Freigabehebel am PT-10Y-Schubtraktor angedrückt ist, den Schubtraktor so ausrichten, daß seine beide Klauenfüße mit den entsprechenden Rundstiften im Drucker in Berührung kommen. Freigabehebel ❏ Nun den abstehenden Teil des Schubtraktors hinten absenken, damit seine beiden Klauen im Drucker in die Rundstifte für den Schubtraktor gleiten und dort einrasten können. ❏ Den Freigabehebel so anheben, daß Schubtraktor und Drucker miteinander ❏ ❏ verriegelt werden. Die automatische Papierzuführung nach Bedienungsanleitung des Druckers installieren. Vordere Druckerabdeckung verschließen. Den Schubtraktor vom Drucker abmontieren ❏ Vergewissern, daß das Druckerstromkabel ganz aus der Netzsteckdose ❏ ❏ ❏ herausgezogen ist. Vordere Druckerabdeckung öffnen. Die automatische Papierzuführung abnehmen. Den Freigabehebel am Schubtraktor andrücken, um den Schubtraktor zu entriegeln. Einlegen von Endlospapier 11 ❏ Links und rechts die beiden Aufnahme-Freigabehebel am Schubtraktor drücken, worauf er sich vom Drucker ganz abheben läßt. Deutsch Aufnahme-Freigabehebel ❏ Die beiden, als Abdeckung der Aufnahmen für den Schubtraktor dienenden Schutzkappen wieder anbringen. ❏ Die automatische Papierzuführung wieder installieren. Einlegen von Endlospapier ❏ Den Papierstapel hinter den Drucker legen. ❏ Druckerstromkabel ganz aus der Netzsteckdose herausziehen. ❏ Den Freigabehebel (zur Drucker-Vorderseite hin) vorziehen. ❏ Sollte sich bereits Papier im Drucker befinden, dieses herausnehmen. ❏ Vordere Druckerabdeckung öffnen. ❏ Die automatische Papierzuführung abnehmen. 12 Der PT-10Y-Schubtraktor ❏ Die grauen Hebel an den Traktoren nach oben ziehen, was sie entriegelt. Nun die Traktoren durch seitliches Verschieben so einstellen, daß sie auf die Randlöcher im Endlospapier ausgerichtet sind. ❏ Die ausgerichteten Traktoren in der gewünschten Stellung durch Zurückklappen der grauen Hebel nach unten fixieren. ❏ Die Abdeckungen der beiden Traktoren öffnen und das Papier so ausrichten, daß die Traktorstacheln beidseitig in seine Randlöcher eingreifen können. Einlegen von Endlospapier 13 Wichtig! Sicherstellen, daß das Endlospapier einwandfrei auf den Traktorstacheln sitzt. Es kann sonst reißen oder stauen. ❏ ❏ noch einmal korrigiert werden. Dazu die grauen Hebel freigeben, dann die Traktoren verschieben, aber danach die Traktoren durch Zurückklappen der grauen Hebel nach unten unbedingt auch wieder richtig fixieren. Die automatische Papierzuführung langsam in den Drucker absenken. Sich vergewissern, daß die beiden Rundstifte an deren Enden gut in die vorgesehenen Vertiefungen im Drucker passen. Dazu die automatische Papierzuführung (zur Drucker-Vorderseite hin) ankippen, und zwar etwa im gleichen Winkel, in dem sie beim Abnehmen vorgezogen wurde. Nun die automatische Papierzuführung ganz absenken, wobei sie wie von selbst einrasten soll und die Papierstützen leicht zur Drucker-Rückseite hin geneigt werden. ❏ Vordere Druckerabdeckung verschließen. Wichtig! Wenn das Papier der automatischen Papierzuführung aufgebraucht ist, der Papierhalter aber anmontiert bleibt, verklemmt sich das vom Drucker transportierte Endlospapier leicht daran und verursacht Papierstau. Ist die automatische Papierzuführung leer, ist der Papierhalter vom Drucker abzunehmen. Deutsch ❏ Die Traktorabdeckungen schließen. Die Papierposition muß jetzt eventuell 14 Der PT-10Y-Schubtraktor ❏ Das Druckerstromkabel in die Netzsteckdose zurückstecken. Der Drucker ❏ gibt ein Tonsignal, um anzuzeigen, daß das Papier noch nicht richtig eingelegt ist. Auf dem Bedienungsfeld die [PAPER]-Taste drücken und das Papier wird in die Druckstartposition transportiert. Bedrucken von Endlospapier Beim Bedrucken von Endlospapier dafür sorgen, daß Sie nicht zu eng an die Perforation, welche die Blätter voneinander trennt, drucken. Der empfohlene Druckbereich für Endlospapier ist in der folgenden Abbildung dargestellt: 5mm 18mm 18mm Perforation 25,4mm 25,4mm Unterer Blattrand 75mm Jedesmal, wenn Endlospapier und -formulare verwendet wird, sollte man auch die folgenden Gesichtspunkte beachten: ✓ Sie können die gleichen Techniken für Zeilen- und Seitenvorschub ✓ ✓ verwenden, die Sie vom Einsatz mit Einzelblättern her kennen. Wenn Endlosformularsätze verwendet werden, benutzen Sie nur solche mit einer Durchschlage-/Kopienanzahl bis zu drei. Vor dem Drucken unbedingt erst die richtige Papierstärke am Drucker einstellen. Wichtig! Beim Bedrucken von Endlospapier den Freigabehebel in vorgezogener Stellung lassen. Endlospapier parken 15 Das eingelegte Endlospapier darf auch im Drucker bleiben, wenn Sie zwischenzeitlich auf Einzelblattpapier aus der automatischen Papierzuführung drucken möchten, denn man kann das Endlospapier ganz einfach “parken”. Dies geschieht wie folgt: ❏ Das Endlospapier so an einer Perforation abtrennen, daß nicht mehr als eine halbe Seite über der Druckerabdeckung verbleibt. Gegebenenfalls auf dem Bedienungsfeld die [POWER]-Taste betätigen, um den Drucker in den OFFLINE-Betrieb zu versetzen, und dann das Papier mit der [PAPER]-Taste vorschieben, bis eine Perforation eben über die Druckerabdeckung ragt. ❏ Kontrollieren bzw. veranlassen, daß sich der Drucker im ONLINE-Betrieb befindet. ❏ Auf dem Bedienungsfeld die [PAPER]-Taste drücken. Der Drucker fördert das Endlospapier nun automatisch rückwärts, bis es nicht länger Kontakt mit der Druckwalze hat. ❏ Den Freigabehebel (zur Drucker-Rückseite hin) zurückschieben. Damit ist das Endlospapier “geparkt”. Nun können Sie Papier in die automatische Papierzuführung einlegen und Einzelblätter bedrucken. Entparken von Endlospapier Nachdem die Arbeit auf Einzelblättern erledigt ist, läßt sich das geparkte Endlospapier wieder laden, damit der Druck auf Endlospapier weitergehen kann. Dies geschieht wie folgt: ❏ Auf dem Bedienungsfeld die [PAPER]-Taste betätigen, um alle noch vorhandenen Einzelblätter aus dem Drucker auszuwerfen. ❏ Den Freigabehebel (zur Drucker-Vorderseite hin) vorziehen. ❏ Auf dem Bedienungsfeld die [PAPER]-Taste drücken. Der Drucker transportiert das geparkte Endlospapier automatisch in die druckbereite Lage zurück. Hinweis: Sie können geparktes Endlospapier laden, gleichgültig ob sich der Drucker im ONLINE-Betrieb oder im OFFLINE-Betrieb befindet. Benutzung der Trennfunktion für Endlospapier Endlospapierblätter lassen sich problemlos abtrennen, ohne die aktuelle Papierposition zu stören. Dazu geht man wie folgt vor: ❏ Kontrollieren bzw. veranlassen, daß beim Aufruf vom Drucker-SetupProgramm die Trennfunktion aktiviert worden ist. ❏ Kontrollieren bzw. veranlassen, daß sich der Drucker im OFFLINE-Betrieb befindet. ❏ Auf dem Bedienungsfeld die [PAPER]-Taste gedrückt halten, bis der Drucker die Papierperforation zur Trennkante an der Druckerabdeckung vorgeschoben hat. ❏ Das Papier abtrennen. ❏ Auf dem Bedienungsfeld die [POWER]-Taste betätigen, um den [READY]-Betrieb aufzurufen. Bei Wiederaufnahme des Druckbetriebs wird das Endlospapier in die frühere Lage zurückgezogen. Deutsch Endlospapier parken 16 Mécanisme tracteur poussant PT-10Y Le mécanisme tracteur poussant vous permet d'imprimer sur du papier en continu d'une largeur pouvant aller jusqu'à 10 pouces. Ce manuel explique comment installer et utiliser le PT-10Y. Installation du mécanisme tracteur poussant ❏ Assurez-vous que l'imprimante est débranchée du secteur. ❏ Ouvrez le capot avant de l'imprimante en suivant les instructions du manuel de l'utilisateur de l'imprimante. ❏ Retirez le chargeur automatique en suivant les instructions du manuel de ❏ l'utilisateur de l'imprimante. Retirez les deux caches de protection des crochets du mécanisme tracteur, situés à l'arrière de l'imprimante. Caches de protection Important ! Conservez les caches de sorte à pouvoir les replacer sur l'imprimante si vous désirez retirer le mécanisme tracteur. This document was created with FrameMaker 4.0.4 Dépose du mécanisme tracteur poussant 17 ❏ Assurez-vous que le levier de dégagement du mécanisme tracteur PT-10Y Levier de dégagement ❏ Abaissez l'arrière du mécanisme tracteur de sorte que ses crochets ❏ ❏ ❏ s'encliquètent plus facilement dans les rouleaux. Relevez le levier de dégagement afin de verrouiller le mécanisme tracteur. Réinstallez le chargeur automatique en suivant les instructions du manuel de l'utilisateur de l'imprimante. Refermez le capot avant de l'imprimante. Dépose du mécanisme tracteur poussant ❏ Assurez-vous que l'imprimante est débranchée du secteur. ❏ Ouvrez le capot avant de l'imprimante. ❏ Retirez le chargeur automatique. ❏ Appuyez sur le levier de dégagement de façon à déverrouiller le mécanisme tracteur. Français est abaissé et placez le mécanisme tracteur de sorte que ses deux pièces en U touchent les rouleaux, situés à l'intérieur du corps de l'imprimante. 18 Mécanisme tracteur poussant PT-10Y ❏ Tout en appuyant sur les deux boutons de dégagement de crochet, situés de part et d'autre du mécanisme tracteur, soulevez celui-ci et retirez-le. Boutons de dégagement de crochet ❏ Replacez les deux caches de protection de crochet. ❏ Réinstallez le chargeur automatique. Chargement de papier en continu ❏ Placez la rame de papier en continu derrière l'imprimante. ❏ Débranchez l'imprimante du secteur. ❏ Tirez le levier de dégagement vers l'avant de l'imprimante. ❏ S'il y a du papier dans l'imprimante, retirez-le. ❏ Ouvrez le capot avant de l'imprimante. ❏ Retirez le chargeur automatique. Chargement de papier en continu 19 ❏ Relevez les leviers gris des tracteurs afin de les déverrouiller. Faire glisser Français les tracteurs de façon à les aligner sur les perforations du papier en continu. ❏ Une fois les tracteurs à la bonne position, abaisser les leviers gris afin de les bloquer. ❏ Ouvrez les volets situés sur les deux tracteurs et placez le papier de façon à ce que les picots des tracteurs s'insèrent dans les perforations du papier. 20 Mécanisme tracteur poussant PT-10Y Important ! Les picots de tracteur doivent être placés correctement dans les perforations du papier sinon celui-ci risque de se déchirer ou de provoquer un bourrage. ❏ Refermez les volets de tracteur. Si nécessaire, ajustez une dernière fois la ❏ ❏ position du papier en relevant les leviers gris et en déplaçant les tracteurs. Bien veiller à verrouiller les tracteurs en replaçant les leviers gris à leur position d'origine. Réinstallez avec soin le chargeur automatique en veillant à ce que les deux rouleaux, situés à ses extrémités, s'insèrent correctement dans les fentes de l'imprimante, prévues à cet effet. Positionnez le chargeur automatique au même angle que pour sa dépose, c.-à-d. en le relevant vers l'avant de l'imprimante. Abaissez tout à fait le chargeur automatique. Celui-ci devrait se remettre automatiquement en place ; la pièce maintenant le papier est légèrement dirigée vers l'arrière de l'imprimante. ❏ Refermez le capot avant de l'imprimante. Important ! Si vous laissez le support du papier sur l'imprimante alors qu'il n'y a pas de papier dans le chargeur automatique, il entravera l'avance du papier en continu et risque de causer des bourrages de papier. Retirez le support de papier si le chargeur automatique est vide. Impression sur papier en continu 21 ❏ Branchez la prise de l'imprimante au secteur. L'imprimante émet un bip sonore indiquant que le papier n'est pas encore complètement chargé. ❏ Appuyez sur la touche PAPER du panneau de commandes. Le papier avance jusqu'à la position de départ. Impression sur papier en continu Veillez, lors de l'impression sur papier en continu, à ne pas imprimer trop près des perforations de pré-découpe des feuilles. L'illustration ci-dessous indique la zone imprimable recommandée : 5mm 18mm Français 18mm Perforations 25,4mm 25,4mm Bas de page 75mm Veuillez également tenir compte des points importants suivants lors de l'impression sur papier en continu et sur formulaires à multi-feuillets. ✓ Vous pouvez régler l'interligne et l'avance du papier de la même façon que ✓ ✓ pour l'impression feuille à feuille. Lors de l'impression sur formulaires à multi-feuillets, ne pas utiliser de formulaires de plus de trois volets. Assurez-vous de régler la tête d'impression à l'écartement correct pour l'épaisseur de papier utilisé. Important ! Le levier de dégagement doit resté relevé pendant l'impression sur papier en continu. 22 Mécanisme tracteur poussant PT-10Y Mise en attente du papier Il n'est pas nécessaire de retirer le papier en continu chargé sur l'imprimante avant d'effectuer une impression feuille à feuille. Il suffit de mettre le papier en attente en suivant le procédé ci-après : ❏ Détachez le papier au niveau de la pré-découpe, de sorte qu'au moins une demi-page dépasse le capot de l'imprimante. Si nécessaire, appuyez sur la touche de mise sous tension Power du panneau de configuration afin de mettre l'imprimante en mode hors ligne, puis appuyez sur la touche PAPER pour faire avancer le papier jusqu'à ce qu'une ligne de perforations dépasse le capot de l'imprimante. ❏ Assurez-vous que l'imprimante soit en ligne. ❏ Appuyez sur la touche PAPER du panneau de configuration. L'imprimante recule automatiquement le papier jusqu'au-delà du cylindre. ❏ Poussez le levier de dégagement vers l'arrière de l'imprimante. Le papier est mis en attente et vous pouvez déposer des feuilles simples dans le chargeur automatique et démarrer l'impression. Rechargement du papier mis en attente Après avoir terminé l'impression feuille à feuille, rechargez le papier mis en attente en suivant les instructions suivantes : ❏ Si une feuille de papier se trouve toujours dans l'imprimante, appuyez sur la touche PAPER du panneau de configuration afin de l'éjecter. ❏ Placez le levier de dégagement vers l'avant de l'imprimante. ❏ Appuyez sur la touche PAPER du panneau de configuration. Le papier avance dans l'imprimante et se met automatiquement en place. L'impression sur papier en continu peut démarrer. N.B. : Vous pouvez recharger le papier mis en attente, que l'imprimante soit en mode hors ou en ligne. Fonction de découpe rapide Le procédé suivant facilite la découpe du papier en évitant de modifier la position de celui-ci : ❏ Activez la fonction de découpe du papier à l'aide du mode Utilitaire de Configuration. ❏ Assurez-vous que l'imprimante soit en mode hors ligne. ❏ Maintenez la touche PAPER enfoncée. L'imprimante fait avancer la perforation de pré-découpe du papier en continu vers la barre de découpe, située sur le capot de l'imprimante. ❏ Détachez le papier. ❏ Appuyez sur la touche de mise sous tension Power pour activer le mode en ligne. Quand vous relancez l'impression, le papier retourne à sa position d'origine. 23 Unità di trascinamento PT-10Y L’unità di trascinamento PT-10Y vi consente di stampare su moduli continui di larghezza massima di 10 pollici. Questo manuale illustra le procedure necessarie per l’utilizzo di questo dispositivo. Installazione dell’unità di trascinamento ❏ Accertatevi che l’alimentazione elettrica della stampante sia scollegata. ❏ Aprite il coperchio frontale della stampante come indicato nel Manuale dell’Utente della stampante. ❏ Estraete l’alimentatore automatico a fogli singoli come indicato nel Italiano ❏ Manuale dell’Utente della stampante. Rimuovete i due coperchi situati sul retro della stampante per scoprire i ganci su cui va montato l’alimentatore a trattori. coperchi Importante! Vi consigliamo di conservare questi due coperchi per poterli riapplicare quando rimuoverete l’alimentatore a trattori dalla stampante. This document was created with FrameMaker 4.0.4 24 Unità di trascinamento PT-10Y ❏ Spingete indietro la leva di bloccaggio posta sull’unità di trascinamento PT10Y e posizionate l’alimentatore a trattori in modo che i due ganci ad U tocchino i perni rotondi all’interno della stampante. leva di bloccaggio ❏ Abbassate la parte posteriore dell’alimentatore a trattori in modo che i due ❏ ❏ ❏ perni entrino con facilità nei ganci dell’unità di trascinamento e scattino in posizione. Tirate in avanti la leva di bloccaggio in modo da bloccare l’alimentatore a trattori sulla stampante. Estraete l’alimentatore automatico a fogli singoli come indicato nel Manuale dell’Utente della stampante. Chiudete il coperchio frontale della stampante. Rimozione dell’unità di trascinamento dalla stampante ❏ Accertatevi che l’alimentazione elettrica della stampante sia scollegata. ❏ Aprite il coperchio frontale della stampante. ❏ Estraete l’alimentatore automatico a fogli singoli. ❏ Spingete indietro la leva di bloccaggio per sbloccare l’alimentatore a trattori. Caricamento della carta a modulo continuo 25 ❏ Premete le due levette di sgancio situate a sinistra e a destra dell’unità di trascinamento ed estraete quest’ultima dalla stampante tirandola verso l’alto. Italiano leve di sgancio ❏ Riapplicate i coperchi dei ganci dell’unità di trascinamento. ❏ Reinstallate l’alimentatore automatico a fogli singoli. Caricamento della carta a modulo continuo ❏ Posizionate la carta a modulo continuo dietro la stampante. ❏ Scollegate l’alimentazione elettrica della stampante. ❏ Tirate la leva del selettore di consegna carta verso la parte anteriore della ❏ ❏ ❏ stampante. Se nella stampante si trova già un foglio, toglietelo. Aprite il coperchio frontale della stampante. Rimuovete l’alimentatore automatico a fogli singoli. 26 Unità di trascinamento PT-10Y ❏ Sbloccate i trattori tirando in avanti le levette grigie di bloccaggio e fateli scorrere nella posizione corretta in modo da allinearli ai fori del modulo continuo. ❏ Quando i trattori sono allineati nella posizione voluta, bloccateli spingendo le levette grigie nella posizione originaria. ❏ Aprite i coperchi sui trattori e allineate la carta in modo che i perni dei trattori entrino nei fori del modulo continuo. Caricamento della carta a modulo continuo 27 Importante! Accertarsi che la carta sia ben allineata sui perni dei trattori; in caso contrario potrebbe strapparsi o incepparsi. ❏ Chiudete i coperchi sui trattori. A questo punto potete eseguire le ultime regolazioni per il posizionamento della carta sbloccando le levette grigie e facendo scorrere i trattori. Terminate queste regolazioni, ricordate di bloccare di nuovo i trattori spingendo le levette grigie nella loro posizione originaria. ❏ Abbassate con cura l’alimentatore automatico a fogli singoli nella Italiano ❏ stampante, facendo attenzione a che i due perni rotondi alle estremità entrino nelle scanalature all’interno della stampante. L’alimentatore a fogli singoli dovrà essere inclinato verso la parte anteriore della stampante (alla stessa angolazione in cui si trovava nel momento in cui è stato tirato in avanti per estrarlo). Continuate ad abbassare fino in fondo l’alimentatore a fogli singoli, facendolo scivolare in posizione, con il lato che regge la carta leggermente inclinato verso il retro della stampante. ❏ Chiudete il coperchio frontale della stampante. Importante! Se lasciate montato il supporto della carta sulla stampante mentre non vi sono più fogli nell’alimentatore automatico a fogli singoli, il modulo continuo si incastrerà con il supporto della carta mentre viene alimentato dalla stampante con conseguente inceppamento della carta. Si raccomanda di togliere il supporto della carta dalla stampante quando nell’alimentatore automatico a fogli singoli non vi è più carta. 28 Unità di trascinamento PT-10Y ❏ Collegate la stampante alla presa elettrica. La stampante emetterà un segnale acustico per indicare che la carta non è caricata correttamente. ❏ Premete il tasto PAPER sul pannello di controllo, e il modulo continuo verrà trascinato in posizione iniziale. Stampa su modulo continuo Quando stampate su fogli a modulo continuo, fate attenzione a non stampare troppo in prossimità delle perforazioni che separano ciascun foglio. Di seguito è indicata l’area di stampa raccomandata per i fogli a modulo continuo. 5mm 18mm 18mm Perforazione 25,4mm 25,4mm Parte inferiore del modulo 75mm Utilizzando carta a modulo continuo, tenete presente le seguenti importanti note. ✓ Potete utilizzare le funzioni di avanzamento riga e avanzamento pagina ✓ ✓ come per il foglio singolo. Se dovete stampare su moduli continui a copia multipla, evitate di usare moduli costituiti da più di tre fogli. Ricordate di regolare la distanza della testina dal rullo della stampante in base allo spessore della carta adeguato prima di iniziare la stampa. Importante! Tenete la leva di bloccaggio nella posizione in avanti durante la stampa su fogli a modulo continuo. Parcheggio della carta a modulo continuo 29 Parcheggio della carta a modulo continuo Per stampare su fogli singoli caricati nell’alimentatore automatico non è necessario togliere il modulo continuo caricato in quel momento nella stampante, bensì è sufficiente eseguire le seguenti operazioni per parcheggiare il modulo continuo. ❏ Strappate il foglio lungo la linea di perforazione in modo che non più di mezza pagina sporga dal coperchio della stampante. Se necessario, premete il tasto Power sul pannello di controllo per mettere la stampante nel modo Not-Ready, e poi premete il tasto PAPER per far avanzare la carta fino a quando la linea di perforazione non ha oltrepassato il coperchio della stampante. ❏ Accertatevi che la stampante sia nel modo Ready. ❏ Premete il tasto PAPER sul pannello di controllo. La stampante trascinerà indietro il modulo continuo nella posizione di parcheggio, lasciando libero il rullo di stampa. ❏ Spingete la leva del selettore di consegna carta verso il retro della stampante. Ora il modulo continuo è parcheggiato e potete caricare l’alimentatore automatico e stampare su fogli singoli. Quando avete terminato di stampare sul foglio singolo, eseguite le seguenti operazioni per ricaricare il modulo continuo parcheggiato e renderlo disponibile per la stampa. ❏ Se nella stampante è rimasto un foglio singolo, premete il tasto PAPER sul pannello di controllo per farlo uscire. ❏ Tirate la leva del selettore di consegna carta verso la parte anteriore della stampante. ❏ Premete il tasto PAPER sul pannello di controllo. La stampante riporterà nella sua posizione il modulo continuo, pronto per la stampa. Nota: Potete ricaricare il modulo continuo parcheggiato mentre la stampante è sia in modo Ready che Not-Ready. Utilizzo della funzione tear-off (strappo) Eseguendo le seguenti operazioni potrete staccare facilmente il foglio dal modulo continuo senza modificare la posizione corrente della carta rimanente. ❏ Accertatevi che la funzione tear-off sia stata abilitata durante l’impostazione della stampante. ❏ Accertatevi che la stampante sia nel modo Not-Ready. ❏ Tenete premuto il tasto PAPER sul pannello di controllo. La stampante farà avanzare la carta fino a far coincidere la linea di perforazione con il bordo di strappo del coperchio della stampante. ❏ Staccate il foglio. ❏ Premete il tasto Power sul pannello di controllo per passare al modo Ready. Quando riprenderete a stampare, la stampante trascinerà indietro il modulo continuo nella sua posizione precedente. Italiano Ripristino del modulo continuo parcheggiato Customer service information Star Micronics Technical Hotline: North America: 1-908-572-3300 Hong Kong: 852-2795-2335 Australia: 61-2-748-4300 New Zealand: 64-9-570-1470 Star Micronics FaxBack (Document Retrieval) System: Requires access to a facsimile machine or board with receive capability North America: 1-908-572-4004 Star Micronics Bulletin Board Service: Requires a computer modem North America: 1-908-572-5010 United Kingdom: 44-494-461395 France: 33-1-305807 Germany: 49-69-780929 Netherlands: 31-73-424485 Australia and New Zealand: 61-2-748-2960 Customer response Worldwide Headquarters STAR MICRONICS CO., LTD. 536 Nanatsushinya, Shimizu, Shizuoka, 424, Japan North and South America Markets STAR MICRONICS AMERICA, INC. 70- D Ethel Road West Piscataway, NJ 08854 European Market STAR MICRONICS DEUTSCHLAND GMBH Westerbachstraße 59 D-60489 Frankfurt F.R. of Germany U.K. Market STAR MICRONICS U.K. LTD. Star House Peregrine Business Park Gomm Road, High Wycombe Bucks. HP13 7DL, U.K. Australian Market STAR MICRONICS PTY. LTD. Unit A/107-115 Asquith Street, Silverwater, NSW 2141 Australia New Zealand Market STAR MICRONICS (N.Z.) LTD. 64 Lunn Ave. Mount Wellington P.O. Box 6255, Wellesley St., Auckland, New Zealand. Asian Market STAR MICRONICS ASIA LTD. 18/F Tower 2, Enterprise Square 9 Sheung Yuet Road, Kowloon Bay, HONG KONG