1
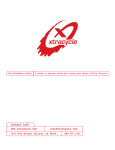
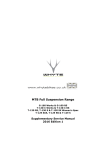
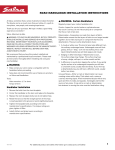
INSTALLATION GUIDE
SUBJECT: Rockhopper Adjustable Dropout Installation
FROM: Engineering Department
DATE: 06/21/07
To ensure correct installation of the adjustable dropouts, please read and familiarize yourself
with the following steps:
Please read the following instructions. If you have any doubt regarding your mechanical ability and/or installation of
this product, visit your local authorized dealer. Specialized recommends that the dropouts be installed using a torque
wrench, by a qualified mechanic.
1
ASE
2
Rockhopper
Left Dropout
9898-4240
GRE
GREA
SE
Rockhopper
Right Dropout
9898-4245
Rockhopper models are equipped with a right dropout with
an integrated derailleur hanger and a left dropout.
Install the left and right dropouts. Do not tighten the dropout
bolts yet, leave them 1/4 turn loose.
Centrum models are equipped with a right dropout without an
integrated derailleur hanger and a left dropout.
NOTE: Make sure the bolt threads and washers are greased.
After-Market dropouts are offered with the built-in derailleur hanger
only and can be used with gears or as a single-speed dropout.
3
Install the disc brake.
4
Install the rear wheel in the loose dropouts. Tightening the
quick-release will self-align the wheel and dropouts.
INSTALLATION GUIDE
5
6
Derail
leur
Single
-Spee
d
Single-Speed style: Pull the wheel backward, so that the chain
is properly tensioned.
Tighten the two drive side bolts so that they’re fixed, but not
torqued to specification yet.
Derailleur style: Push the wheel all the way forward.
Make sure the tire is centered between the chainstays.
7
8
1
2
250 in-lbf
3
4
Apply downward force with body weight on the saddle and
apply the rear brake, then roll the bike forward slightly. This
will rotate the dropout as far forward as possible, so that the
dropout won’t be able to rotate under braking while riding.
Once the brake and dropout are rotated, make sure the wheel
is still centered, then tighten the left dropout so that it’s fixed.
SPECIALIZED BICYCLE COMPONENTS
15130 Concord Circle, Morgan Hill, CA 95037
(408) 779-6229
Torque the drive side and non-drive side bolts to 250 in-lbf.
NOTE: Do not use a multi-tool or 3-way Allen key to torque
the bolts, they will not apply a high enough torque. Only use a
torque wrench, or a long handle Allen key that can apply the
same torque as a torque wrench.
WARNING! Insufficient torque may damage the dropouts/frame
and can result in serious personal injury or death.
Please note all instructions are subject to change for improvement without notice.
Please visit www.specialized.com/bc/SBCDownloads.jsp for periodic tech updates.
Rev.1, June 2007