1
3-242-048-21 (1)
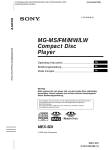
MG-MS/FM/MW/LW
Compact Disc
Player
Operating Instructions
GB
CT
For installation and connections, see the supplied installation/connections manual.
MEX-5DI
© 2002 Sony Corporation
Welcome !
Thank you for purchasing this Sony Compact
Disc Player.
FEATURING:
• “Memory Stick” slot equipped.
• “MagicGate Memory Stick” (“MG Memory
Stick” in the pages that follow.) and “Memory
Stick” compatibility.
• ATRAC3 file playback recorded on an “MG
Memory Stick” is possible.
• MP3 file playback recorded on a disc is
possible.
• CD-R/CD-RW which can have a session added
can be played (page 50).
• Discs recorded in Multi Session (CD-Extra,
Mixed CD, etc.) can be played, depending on
the recording method (page 50).
• Car G-PROTECTON.
• Optional CD/MD units (both changers and
players)*1.
• ID3 tag*2 version 1 information (displayed
when an MP3 file is played).
• CD TEXT information (displayed when a CD
TEXT disc*3 is played).
• Supplied controller accessory
Card remote commander RM-X132
• Optional controller accessory
Wireless rotary commander RM-X6S
*1 This unit works with Sony products only.
*2 ID3 tag is an MP3 file that contains information
about album name, artist name, track name, etc.
*3 A CD TEXT disc is an audio CD that includes
information such as the disc name, artist name,
and track names. This information is recorded on
the disc.
This manual explains how to operate the supplied
card remote commander.
Illustrations in this manual may differ from the
actual device.
2
Car G-PROTECTION
G-PROTECTION is originally developed for
Walkman and performs supreme skip-free
against shocks. Car G-PROTECTION is
designed and tuned for car audio based on the
technology of original G-PROTECTION. Car GPROTECTION creates comfortable audio
reproduction with supreme skip-free and the
same time, it extends the concept and the value of
G-PROTECTION from Walkman to car audio.
Specification of Car G-PROTECTION
Car G-PROTECTION has following
specification.
(a) Re-focus within 0.5 sec., if there is a missed
data.
(b) Read data with double speed or more.
Limitation of Car G-PROTECTION
Car G-PROTECTION performs supreme skipfree but it doesn’t mean that it can guarantee the
perfect skip-free. Some skips may occur by
continuous vibration and/or the installation
condition of the master unit.
• “MagicGate Memory Stick,”
, “Memory
Stick,”
, are trademarks of Sony
Corporation.
• “MagicGate” and
are
trademarks of Sony Corporation.
• “Cyber-shot” is a trademark of Sony
Corporation.
• “Walkman” is a trademark of Sony
Corporation.
• “OpenMG Jukebox” is a trademark of Sony
Corporation.
• “SonicStage” is a trademark of Sony
Corporation.
• All other trademarks and registered trademarks
are trademarks or registered trademarks of their
respective holders.
Table of Contents
Location of controls . . . . . . . . . . . . . . . . . . . .4
General top menu display. . . . . . . . . . . . . . . .7
Basic operations
Listening to a CD . . . . . . . . . . . . . . . . . . . . . .8
Listening to ATRAC3 files in
“MG Memory Stick” . . . . . . . . . . . . . . . .10
Listening to radio . . . . . . . . . . . . . . . . . . . . .12
Selecting the display mode
and display pattern. . . . . . . . . . . . . . . . . .13
Displaying/storing a static image from a
“Memory Stick”. . . . . . . . . . . . . . . . . . . .16
Getting Started
Resetting the unit . . . . . . . . . . . . . . . . . . . . .18
Setting the clock and the calendar . . . . . . . .18
CD/MG-MS Player
CD/MD Unit (optional)
Playing a disc . . . . . . . . . . . . . . . . . . . . . . . .19
Playing an “MG Memory Stick” . . . . . . . . .20
Playing the tracks in “MG Memory Stick”
automatically . . . . . . . . . . . . . . . . . . . . . .20
Display items . . . . . . . . . . . . . . . . . . . . . . . .21
Playing tracks repeatedly
— Repeat Play. . . . . . . . . . . . . . . . . . . . .22
Playing tracks in random order
— Shuffle Play . . . . . . . . . . . . . . . . . . . .22
Labelling a CD
— Disc Memo* . . . . . . . . . . . . . . . . . . . .23
Locating a track/disc by name
— List-up*. . . . . . . . . . . . . . . . . . . . . . . .24
* Functions available with optional CD/MD unit
Radio
Storing stations automatically
— Best Tuning Memory (BTM) . . . . . . .24
Display items . . . . . . . . . . . . . . . . . . . . . . . .25
Receiving the stored stations . . . . . . . . . . . .25
Storing only desired stations . . . . . . . . . . . .26
Tuning in a station through a list
— List-up. . . . . . . . . . . . . . . . . . . . . . . . .26
Image Settings
Customising a wall paper
— Wall Paper . . . . . . . . . . . . . . . . . . . . . 31
Setting a panorama image
— Panorama . . . . . . . . . . . . . . . . . . . . . . 34
Setting a jacket picture
— Jacket Pic . . . . . . . . . . . . . . . . . . . . . . 35
Setting a clip motion
— ClipMotion. . . . . . . . . . . . . . . . . . . . . 37
Displaying an image as a slide show
— Slide Show . . . . . . . . . . . . . . . . . . . . . 38
Deleting the picture data
— Picture Del . . . . . . . . . . . . . . . . . . . . . 39
Setting the display characters
— Char Setup . . . . . . . . . . . . . . . . . . . . . 40
Other Functions
Adjusting the sound characteristics. . . . . . . 41
Quickly attenuating the sound . . . . . . . . . . . 41
Changing the sound and display settings
— Menu . . . . . . . . . . . . . . . . . . . . . . . . . 41
Setting the Dynamic Soundstage Organiser
(DSO) . . . . . . . . . . . . . . . . . . . . . . . . . . . 42
Setting the equaliser (EQ7) . . . . . . . . . . . . . 43
Adjusting the front and rear volume . . . . . . 44
Adjusting the volume of
the subwoofer(s) . . . . . . . . . . . . . . . . . . . 44
Connecting auxiliary audio equipment . . . . 45
Setting the security code . . . . . . . . . . . . . . . 46
Additional Information
Maintenance . . . . . . . . . . . . . . . . . . . . . . . . 47
Removing the unit . . . . . . . . . . . . . . . . . . . . 48
Precautions . . . . . . . . . . . . . . . . . . . . . . . . . 49
Notes on discs . . . . . . . . . . . . . . . . . . . . . . . 49
About MP3 files . . . . . . . . . . . . . . . . . . . . . 50
On “Memory Stick”. . . . . . . . . . . . . . . . . . . 52
Specifications . . . . . . . . . . . . . . . . . . . . . . . 54
Troubleshooting. . . . . . . . . . . . . . . . . . . . . . 55
Error displays/Messages . . . . . . . . . . . . . . . 56
Index . . . . . . . . . . . . . . . . . . . . . . . . . . . . . . 58
RDS
Overview of RDS. . . . . . . . . . . . . . . . . . . . .27
Automatic retuning for best reception results
— AF function. . . . . . . . . . . . . . . . . . . . .28
Receiving traffic announcements
— TA/TP. . . . . . . . . . . . . . . . . . . . . . . . .29
Presetting RDS stations with AF and TA
setting . . . . . . . . . . . . . . . . . . . . . . . . . . .29
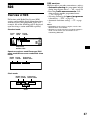
Tuning in stations by programme type
— PTY. . . . . . . . . . . . . . . . . . . . . . . . . . .30
Setting the clock automatically
— CT. . . . . . . . . . . . . . . . . . . . . . . . . . . .31
3
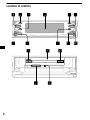
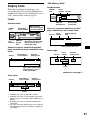
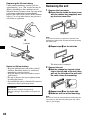
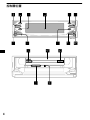
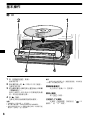
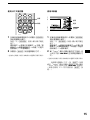
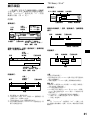
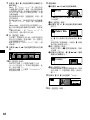
Location of controls
OPEN
/CLOSE
OFF
SOURCE
SCREEN
MODE
VOL
.>
SHIFT
MEX-5DI
4
Refer to the pages listed for details.
a SOURCE (Power on/Radio/CD/MGMS/MD/AUX*1) button
To select the source.
b OFF (Stop/Power off) button*2 8, 11,
12, 19, 20, 46
c MODE button
To change the operation.
d Display window
e OPEN/CLOSE button 8, 9, 10, 11, 19
Tap to:
Open/close the front panel.
Press and hold to:
Open the front panel and the disc tray.
f SCREEN button
To select the display mode.
g VOL (volume) control lever
h Reset button 18
i Receptor for the card remote
commander and wireless rotary
commander
j SHIFT (switching shift 1-3) button
To change the function of the . >
lever (qa).
k . > lever
Selecting radio stations, the items to be
adjusted, the desired image.
l Z (eject) OPEN/CLOSE button 8, 9,
19
To eject a disc, open/close the disc tray.
m Disc tray
n N (play) button 8, 19
o “Memory Stick” slot
p “Memory Stick” access lamp
*1 When an optional CD/MD unit is connected,
“AUX” is not displayed.
*2 Warning
when installing in a car without an
ACC (accessory) position on the
ignition switch
After turning off the ignition, be sure to
press (OFF) on the unit for 2 seconds to
turn off the clock display.
Otherwise, the clock display does not turn off
and causes battery drain.
continue to next page t
5
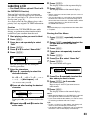
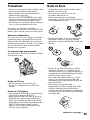
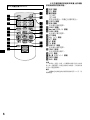
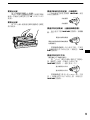
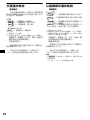
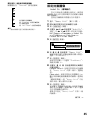
Card remote commander RM-X132
ATT
MODE
PTY
AF
REP
SHUF
1
2
3
4
5
6
SCREEN
GRAPHIC
IMAGE
MENU
DISC +
LIST
SOURCE
SEEK–
SOUN
OFF
D
DISC –
+
VOL
–
TA
SEEK+
ENTE
R
BACK
The corresponding buttons of the card
remote commander control the same
functions as those on this unit.
a MODE button
b PTY button
c Number buttons
(1) REP
(2) SHUF
To store stations, receive stored stations.
d SCREEN button
e MENU button
To display the general menus.
f SOURCE button
g </, (SEEK –/+) buttons
h SOUND button
To display the sound menus.
i OFF button
j VOL (+/–) buttons
k ATT button
l AF button
m TA button
n GRAPHIC button
To display the graphic menus.
o IMAGE button
To switch the display patterns.
p LIST button
q M/m (DISC +/–) buttons
r ENTER button
s BACK button
Note
If the unit is turned off by pressing (OFF) for
2 seconds, it cannot be operated with the card remote
commander unless (SOURCE) on the unit is pressed
to reactivate the unit first.
Tip
See “Replacing the lithium battery” on page 48 for
details on how to replace the batteries.
6
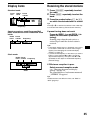
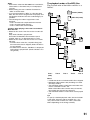
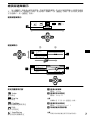
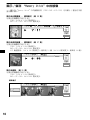
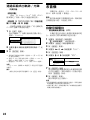
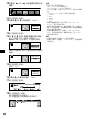
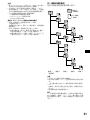
General top menu display
Press (MENU) to enter the general top menus, then select the category of menu. In the general menu
display you can select various settings. To select, press (ENTER). To return to a previous operation,
press (BACK). To complete the setting and return to the normal display, press (MENU).
General top menu display
DISC +
SEEK–
SOURCE
SEEK+
DISC –
General menu display
1
2
DISC +
SEEK–
SOURCE
SEEK+
DISC –
DISC +
SEEK–
SOURCE
SEEK+
DISC –
Setup
Basic settings
a Selected category menu
Example: Setup
b Selected item and setting
Example: Beep ON
Display
Display setting
Note
To move 1 to 2, press (ENTER).
PlayMode
Settings for playback and radio reception
c Selected item and setting
Example: Contrast Level 2
d The light moves as the level changes
Icons and the contents of settings
Edit
Display character setting
SoundTuning
Precise settings for sound quality
Note
The displayed item will differ depending on the source.
7
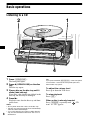
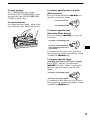
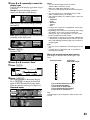
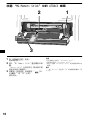
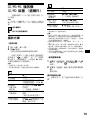
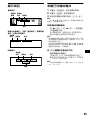
Basic operations
Listening to a CD
2
1
3
1
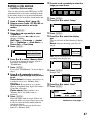
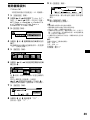
Press (OPEN/CLOSE).
The front panel opens.
2
Press Z (OPEN/CLOSE) on the disc
tray.
The disc tray opens.
3
Place a disc on the disc tray until it
clicks (label side up).
If you play a disc that has not clicked in the
disc tray, the disc may be damaged.
4
8
Press N.
Playback starts after the disc tray and front
panel closes.
Notes
• Do not place more than 1 disc on the disc tray.
• The disc tray and front panel closes automatically
after the caution alarm beeps.
• If you close the disc tray without a CD in the disc
tray, the unit will make some noise. This is not a
malfunction.
4
Tip
If you press and hold (OPEN/CLOSE) of the front panel
for more than 1 second, the front panel opens first,
then the disc tray opens.
To adjust the volume level
Press up or down the VOL lever.
To stop playback
Press (OFF).
When a disc is already inserted
Press (SOURCE) repeatedly until “
(CD
icon)” or “CD” appears.
To eject the disc
Press (OPEN/CLOSE) for 1 second.
Alternatively, press (OPEN/CLOSE) to first
open the front panel, then press Z (OPEN/
CLOSE) on the disc tray.
To locate a specific point in a track
(Manual search)
Press up or down and hold the . > lever,
and release at the desired point.
To search forward
To remove the disc
Press down the centre spindle, and lift up the
edge of the disc by the relief in the disc tray.
To search backward
To locate a specific track
(Automatic Music Sensor)
Press up or down the . > lever (once for
each track).
To locate a succeeding track
To locate a preceding track
or the beginning point of the
current track
To continuously skip tracks, press up or down
once and press up or down again within 1 second
(and hold) the . > lever.
To locate a specific album
(available only when an MP3 file is played)
Press (SHIFT), then press up or down the
. > lever while “Album” is displayed in
the lower right of the display (once for each
album).
To locate a succeeding album
To locate a preceding album
To continuously skip albums, press up or down
once and press up or down again within 1 second
(and hold) the . > lever.
9
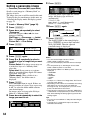
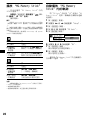
Listening to ATRAC3 files in “MG Memory Stick”
2
1
3
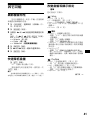
1
Press (OPEN/CLOSE).
The front panel opens.
2
Insert an “MG Memory Stick” until it
clicks.
The “Memory Stick” access lamp lights up,
then the front panel closes automatically after
the caution alarm beeps.
3
10
Press (SOURCE) repeatedly until “
(MG-MS icon)” or “MS” appears.
Playback starts.
Notes
• Insert the “MG Memory Stick” in the correct
direction.
• Do not forcefully remove the “MG Memory Stick.”
• Be careful that the “MG Memory Stick” does not
spring out from the unit and drop.
Tip
When “MS Auto” is set to “ON,” playback starts
automatically (page 20).
To adjust the volume level
Press up or down the VOL lever.
To stop playback
Press (OFF).
When an “MG Memory Stick” is already
inserted
Press (SOURCE) repeatedly until “
(MGMS icon)” or “MS” appears.
To eject the “MG Memory Stick”
Press (OPEN/CLOSE) to open the front panel.
Push in the “MG Memory Stick” momentarily,
then remove it.
To locate a specific point in a track
(Manual search)
Press up or down and hold the . > lever,
and release at the desired point.
To search forward
To search backward
To locate a specific track
(Automatic Music Sensor)
Press up or down the . > lever (once for
each track).
To locate the next track
To locate the previous track
or the beginning point of the
current track
To continuously skip tracks, press up or down
once and press up or down again within 1 second
(and hold) the . > lever.
Note
Do not leave an “MG Memory Stick” protruding out.
11
Listening to radio
1
2
1
Press (SOURCE) repeatedly until
“ (tuner icon)” or the band (FM1,
FM2, FM3, MW, or LW) appears.
2
Press (MODE) repeatedly to select the
band.
3
Press (SHIFT), then press up or down
the . > lever while “Preset” is
displayed in the lower right of the
display to select the desired station.
The station can be selected when the desired
station is stored (page 26).
The number button ((1) to (6)) on the card
remote commander can also be selected.
To adjust the volume level
Press up or down the VOL lever.
To stop radio reception
Press (OFF).
12
3
To receive a station automatically
(Automatic tuning)
Press up or down the . > lever.
To search for succeeding
stations
To search for preceding
stations
To receive a desired frequency
(Manual tuning)
Press up or down and hold the . > lever,
and release at the desired frequency.
To search for a higher
frequency
To search for a lower
frequency
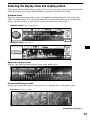
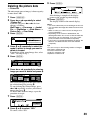
Selecting the display mode and display pattern
You can select from 5 different display modes. You can also select various display patterns in Standard
mode, Spectrum analyzer mode, Panorama/Wall paper mode, and Screen Saver mode.
Standard mode
Displays various information such as source, track number, elapsed playing time, disc name, track
name, and sound settings. You can display items such as an icon of the source on the left side of the
display, spectrum analyser or wall paper in smaller size in the centre of the display.
Standard mode 1 (Spectrum analyser)
Standard mode 2 (Wall paper)
Spectrum analyser mode
Displays a pre-stored spectrum analyser setting on the whole screen.
Panorama/Wall paper mode
Displays pre-stored static images or static pictures in a “Memory Stick” on the whole screen.
Panorama (An image scrolls)
continue to next page t
13
Wall paper (Displays a wall paper on the whole screen)
Screen saver mode
Plays back a pre-stored animation.
Clock/Slide show mode
The display changes to the Slide show mode only when the slide show is set. The display usually
changes to the Clock mode without the slide show setting.
Clock
Displays playback or radio reception information and clock.
Slide show
Displays as a slide show the pictures in a “Memory Stick.”
14
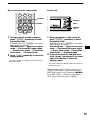
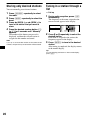
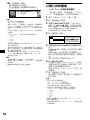
By the card remote commander
REP
SHUF
1
2
3
4
5
6
SCREEN
GRAPHIC
IMAGE
By the unit
SCREEN
MENU
SOURCE
SEEK–
SOUN
DISC +
D
DISC –
OPEN
/CLOSE
SCREEN
IMAGE
LIST
SHIFT
SHIFT
SEEK+
ENTE
SCREEN
.>
lever
R
1
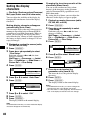
During playback or radio reception,
press (SCREEN) repeatedly to select
the display mode.
Each time you press (SCREEN), the display
mode changes as follows:
Standard mode t Spectrum analyser
mode t Panorama/Wall paper mode
t Screen saver mode t Clock/Slide
show mode* t Standard mode
1
During playback or radio reception,
press (SCREEN) repeatedly to select
the display mode.
Each time you press (SCREEN), the display
mode changes as follows:
Standard mode t Spectrum analyser
mode t Panorama/Wall paper mode
t Screen saver mode t Clock/Slide
show mode* t Standard mode
2
Press (IMAGE) repeatedly to select the
display pattern.
2
Press up or down the . > lever
while “Image” is displayed in the lower
right of the display to select the
display pattern.
* You cannot select any display pattern in the Clock/
Slide show mode.
* You cannot select any display pattern in the Clock/
Slide show mode.
When switching only the display pattern, press
(SHIFT) until “Image” appears on the display
lower right, and press up or down the . >
lever while “Image” is displayed. (If source is
AUX, you do not need to press (SHIFT).)
15
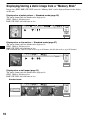
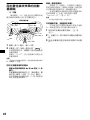
Displaying/storing a static image from a “Memory Stick”
Image data (JPEG, BMP, GIF, PNG) stored in “Memory Stick” can be displayed/stored in the display
of this unit.
Displayed as a jacket picture — Standard mode (page 35)
The image format and size which can be displayed is:
JPEG: 1,600 ×1,200 dots or less
BMP, GIF, PNG: 640 ×480 dots or less
Displayed as a clip motion — Standard mode (page 37)
The image format and size which can be displayed is:
JPEG: 1,600 ×1,200 dots or less
BMP, GIF, PNG: 640 ×480 dots or less
GIF animation file: 160 ×120 dots or less, up to 10 frames (84 ×84 dots or less, up to 20 frames)
Displayed as a wall paper (page 31)
The image format and size which can be displayed is:
JPEG: 1,600 ×1,200 dots or less
BMP, GIF, PNG: 640 ×480 dots or less
Standard mode
16
Panorama/Wall paper mode
Scrolls the picture horizontally on the whole screen — Panorama/Wall paper mode
(page 34)
The image format and size which can be displayed is:
JPEG: 1,600 ×1,200 dots or less
Displayed as a slide show — Clock/Slide show mode (page 38)
JPEG: 1,600 ×1,200 dots or less
BMP, GIF, PNG: 640 ×480 dots or less
Note
Images you processed on your computer may not be displayed.
17
Getting Started
Setting the clock and the
calendar
Resetting the unit
The clock uses a 24-hour digital indication (Day/
Month/Year Time).
The factory setting is “01/01/2002 01:00.”
Before operating the unit for the first time, or
after replacing the car battery or changing the
connections, you must reset the unit.
Press the reset button with a pointed object, such
as a ballpoint pen.
After the reset is complete, the pre-stored images
are displayed. Press (IMAGE) on the card remote
commander to show the clock display and set the
clock and calendar.
1
2
Press (MENU).
3
4
Press (ENTER).
5
Press (ENTER).
Press < or , repeatedly to select
“Setup.”
Press M or m repeatedly to select
“Clock.”
Reset button
Notes
• Pressing the reset button will erase the clock/
calendar setting and some stored contents.
• The unit starts to perform initial setting for 10
seconds after you press the reset button. During
this, do not insert a disc or “Memory Stick,”
otherwise the unit may not be reset. Should this
occur, press the reset button again.
• The unit makes some noise during the initial
settings, this is not a malfunction.
1Press M or m repeatedly to set the
day.
Each time you press M, the number of the
day increases.
Each time you press m, the number of the
day decreases.
2Press , to move to the month,
then press M or m repeatedly to set
the month.
3Repeat step 2 to set the year, the
hour, and the minute.
6
Press (ENTER).
The settings for clock and calendar are stored,
and the display returns to the normal display.
Note
If your car has no ACC position, turn on the power of
this unit first, then set the clock and the calendar.
Tip
You can set the year from 2000 to 2099.
18
CD/MG-MS Player
CD/MD Unit (optional)
In addition to playing a CD with this unit, you
can also control external CD/MD units.
Note
If you connect an optional CD unit with the CD TEXT
function, the CD TEXT information will appear in the
display when you play a CD TEXT disc.
: Operation by this unit
To
Press
Stop playback
(OFF)
Skip tracks
– Automatic
Music Sensor
Fast-forward/
reverse
– Manual Search
</, (./>)
[once for each track]
</, (m/M)
[hold until the desired point]
Skip albums*
M/m (+/–)
– Album selection [once for each album]
: Operation by card remote commander
* Available only when an MP3 file is played.
Playing a disc
(With this unit)
1
2
Insert a disc (page 8).
Press N.
Playback starts after the disc tray and front
panel closes.
If a disc is already inserted, press (SOURCE)
repeatedly until “
(CD icon)”or “CD”
appears in the display, and playback starts. (If
you press Z, the disc tray closes but playback
does not start.)
Notes
• Do not place more than 1 disc on the disc tray.
• The disc tray and front panel closes automatically
after the caution alarm beeps.
To
Press
Stop playback
Eject the disc
(OFF)
(OPEN/CLOSE) for 1
second
(OPEN/CLOSE), then Z
Skip tracks
– Automatic Music
Sensor
Fast-forward/
reverse
– Manual Search
. > lever up/down
Notes
• There is a delay for a few seconds after pressing
(OPEN/CLOSE) or Z before the disc tray is ejected,
while the data in the disc is being read.
• Depending on the recording method used on the
disc, it may take a minute or more before playing the
first track.
• Depending on the condition of the disc, it may not
play back (page 49, 50).
• While the first/last track on the disc is playing, if m or
M is pressed, playback skips to the last/first track of
the disc.
• When the last track on the disc has finished,
playback restarts from the first track of the disc.
• With the optional unit connected, playback of the
same source will continue on to the optional CD/MD
unit.
(With optional unit)
1
Press (SOURCE) repeatedly until “
(CD icon),” “CD,” or “
(MD icon),”
“MD” appears.
2
Press (MODE) repeatedly until the
desired unit appears.
Playback starts.
Locating a track and disc
See “Locating a track/disc by name” on page 24.
[once for each track]
. > lever up/down
[hold until the desired point]
Skip albums*
(SHIFT), then . >
– Album selection lever up/down [once for
each album]
19
Playing an “MG Memory
Stick”
Playing the tracks in “MG
Memory Stick” automatically
You can playback ATRAC3 files in “MG
Memory Stick.”
Press (SOURCE) repeatedly until
“
(MG-MS icon)” or “MS” appears.
Playback starts.
Set “MS Auto” to “ON” and insert the “MG
Memory Stick” to playback sequentially from
the first track automatically.
Tip
When you check out an ATRAC3 file using SonicStage
or OpenMG Jukebox ver.2.2 (or later), you can attach
an image to the file.
If you play this ATRAC3 file on this unit, the image you
have attached is shown in the source area of the
display. Images you processed on your computer may
not be displayed.
For further details, refer to the operation manual of
SonicStage or OpenMG Jukebox.
To
Press
Stop playback
(OFF)
. > lever up/down
Skip tracks
– Automatic Music [once for each track]
Sensor
Fast-forward/
reverse
– Manual Search
. > lever up/down
[hold until the desired point]
To
press
Stop playback
(OFF)
Skip tracks
– Automatic
Music Sensor
Fast-forward/
reverse
– Manual Search
</, (./>)
[once for each track]
</, (m/M)
[hold until the desired point]
Note
This unit cannot play back the following data in “MG
Memory Stick.”
– Data other than ATRAC3.
– Data that has playback restrictions.
– Data that has a playback time restriction outside the
designated period.
20
1
2
Press (MENU).
3
4
5
Press (ENTER).
6
7
Press M or m to select “ON.”
8
Press (MENU).
The display returns to the normal display.
Press < or , repeatedly to select
“Setup.”
Press M or m to select “MS Auto.”
Press (ENTER).
Press (ENTER).
The display returns to the top menu display.
To cancel automatic playback of “MG Memory
Stick,” select “OFF” in step 6.
“MG Memory Stick”
Display items
Standard mode:
When the disc/album*1/track changes, any
prerecorded title of the new disc/album/track is
automatically displayed. If “AutoScroll” is set to
“ON,” names will be scrolled (page 41).
MG-MS
icon
Track
number
Bit rate
CD/MD
Elapsed
playing time
Standard mode:
Artist name/
Track name
display*2
CD/MD
icon
Disc/Album*1/
Track number
MDLP
LP2: LP2 playback
LP4: LP4 playback
Spectrum analyser mode/Panorama/Wall
paper mode/Screen saver mode mode:
Track
Source number
Elapsed
Unit
number*3 playing
time
Disc name*4/Artist name/
Album (folder) name*1/
Track (file) name
Spectrum analyser mode/Panorama/Wall
paper mode/Screen saver mode/Slide show
mode:
Source
Elapsed playing
time
Disc/Album*1/
Track number
Elapsed
playing time
Disc name*4/Artist name/
Album (folder) name*1/
Track (file) name*1
Artist name/Track name
Clock mode:
Source
Track
number
Elapsed
playing time
Clock
continue to next page t
Clock mode:
Source
Disc/Album*1/
Track number
Elapsed
playing time
Clock
*1 Available only when an MP3 file is played.
*2 Available only when an optional MD unit with the
MDLP function is connected, and an MDLP disc is
played.
*3 Available only when an optional CD/MD unit is
connected.
*4 If the disc has been labelled by this unit using the
CUSTOM FILE function, Disc Memo is displayed
accordingly.
21
Notes
• Some characters cannot be displayed.
• For some CD TEXT discs with very many
characters, some characters may not be displayed
nor scroll.
• This unit cannot display the artist name for each
track of a CD TEXT disc.
Notes on MP3
• When playing MP3 with ID3 tag, ID3 tag (artist
name/album name/track name) is displayed.
• ID3 tag applies only to version 1.
• The ID3 tag character codes comply with ASCII and
ISO 8859-1 standards. Joliet format discs can only
be displayed in ASCII. Incompatible characters will
be displayed as “ *.”
• In the following cases, elapsed playing time may not
be displayed accurately.
– when an MP3 file of VBR (variable bit rate) is
played.
– during fast-forward/reverse.
Tip
When “AutoScroll” is set to “OFF” and the disc/album/
track name is changed, the disc/album/track name
does not scroll.
Playing tracks repeatedly
— Repeat Play
The disc in the main unit will repeat a track, the
entire album, or the entire disc when it reaches
the end. For repeat play, you can select:
CD/MD
•
•
•
REP
REP
REP
— to repeat a track.
*1 — to repeat an album.
*2 — to repeat a disc.
“MG Memory Stick”
REP
— to repeat a track.
*1 Available only for MP3 files.
*2 Available only when one or more optional CD/MD
units are connected.
During playback, press (1) (REP)
repeatedly until the desired setting
appears in the display.
Repeat Play starts.
In a display mode other than the Standard mode,
the icon will disappear a short time after you
adjust the setting.
To return to normal play mode, press (1) (REP)
repeatedly until the icon disappears from the
display.
22
Playing tracks in random
order
— Shuffle Play
You can select:
• SHUF *1 — to play the tracks in the current
album in random order.
• SHUF — to play the tracks on the current
disc in random order.
• SHUF *2 — to play the tracks in the current
optional CD (MD) unit in random order.
• SHUF All *3 — to play all the tracks in all the
connected CD (MD) units (including this unit)
in random order.
*1 Available only for MP3 files.
*2 Available only when one or more optional CD (MD)
units are connected.
*3 Available only when one or more optional CD units,
or two or more optional MD units are connected.
During playback, press (2) (SHUF)
repeatedly until the desired setting
appears in the display.
Shuffle Play starts.
In a display mode other than the Standard mode,
the icon will disappear a short time after you
adjust the setting.
To return to normal play mode, press (2)
(SHUF) repeatedly until the icon disappears
from the display.
Notes
• “ SHUF All ” will not shuffle tracks between CD units
and MD units.
• The tracks in an “MG Memory Stick” cannot shuffle.
Labelling a CD
— Disc Memo (With an optional CD unit with
the CUSTOM FILE function)
You can label each disc with a custom name
(Disc Memo). You can enter up to 8 characters
for a disc. If you label a CD, you can locate the
disc by name (page 24).
As a display item, the Disc Memo always takes
priority over any original CD TEXT information.
Caution
Do not use the CUSTOM FILE feature while
driving, or perform any other function which
could divert your attention from the road.
1
2
3
Start playing a disc you want to label.
4
5
6
Press (ENTER).
8
Press (ENTER).
The display returns to the top menu display.
9
Press (MENU).
The display returns to the normal display.
Tips
• Simply overwrite or enter a blank space to correct or
erase a name.
• You can label CDs on a unit without the CUSTOM
FILE function if that unit is connected along with a
CD unit that has the function. The Disc Memo will be
stored in the memory of the CD unit with the
CUSTOM FILE function.
Note
Repeat/shuffle play is suspended until the Name Edit
is complete.
Erasing the Disc Memo
1
Press (SOURCE) repeatedly to select
“CD.”
2
Press (MODE) repeatedly to select the
CD unit with the CUSTOM FILE
function.
3
4
Press (MENU).
5
6
7
Press (ENTER).
8
Press M or m repeatedly to select the
disc name you want to erase.
9
Press (ENTER) for 2 seconds.
The name is erased.
Repeat steps 8 and 9 if you want to erase
other names.
Press (MENU).
Press < or , repeatedly to select
“Edit.”
Press M or m to select “Name Edit.”
Press (ENTER).
The unit will repeat the disc during the
labelling procedure.
7
Press < or , repeatedly to select
“Edit.”
Press M or m to select “Name Del.”
Press (ENTER).
The stored names will appear.
Enter the characters.
1Press M* repeatedly to select the
desired character.
A t B t C ... t 0 t 1 t 2 ... t + t
– t ... t (blank space) t A
*
*For reverse order, press m.
2Press , after locating the desired
character.
10 Press (MENU).
The display returns to the normal display.
If you press <, you can move back to the
left.
3Repeat steps 1 and 2 to enter the
entire name.
Notes
• When the Disc Memo for a CD TEXT disc is erased,
the original CD TEXT information is displayed.
• If you cannot find the Disc Memo you want to erase,
try selecting a different CD unit in step 2.
Tips
• In step 7, if there is no Disc Memo, the display will
return to the normal display automatically.
• If all the Disc Memo is deleted in step 9, the display
will return to the normal display automatically.
23
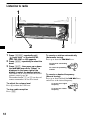
Locating a track/disc by
name
Radio
— List-up
The unit can store up to 6 stations per band
(FM1, FM2, FM3, MW, and LW).
(With this unit)
When a name is assigned to an ATRAC3 file in
an “MG Memory Stick,” you can locate it by
name.
Caution
(With an optional CD unit with the CD TEXT/
CUSTOM FILE function, or an MD unit)
You can use this function for discs that have been
assigned custom names*1 or for CD TEXT
discs*2.
1
Press (LIST).
The assigned track*3/disc name appears in the
display.
Example: TrackList
2
Press M or m repeatedly to select the
desired track*3/disc.
3
Press (ENTER).
*1 Locating a disc by its custom name: when you
assign a name for a CD (page 23) or an MD.
*2 Locating discs by the CD TEXT information: when
you play a CD TEXT disc on a CD unit with the CD
TEXT function.
*3 Available only for ATRAC3 files in an “MG Memory
Stick.”
Note
In the case of CD TEXT discs and MDs, some letters
cannot be displayed.
When tuning in stations while driving, use Best
Tuning Memory to prevent accidents.
Storing stations
automatically
— Best Tuning Memory (BTM)
The unit selects the stations with the strongest
signals within the selected band, and stores them
in the order of their frequency.
1
Press (SOURCE) repeatedly until
“ (tuner icon)” or the band appears.
2
Press (MODE) repeatedly to select the
band.
3
4
Press (MENU).
5
6
Press (ENTER).
7
Press (ENTER).
The stations with the strongest signals within
the selected band are stored in order of
frequency in the memory. To cancel storing,
press (ENTER) while storing the stations.
8
Press (MENU).
The display returns to the normal display.
Tip
To stop selecting and return to the normal display,
press (LIST).
Press < or , repeatedly to select
“Edit.”
Press M or m repeatedly to select
“BTM.”
Notes
• If only a few stations can be received due to weak
signals, some stored preset numbers will retain their
former settings.
• When a preset number is indicated in the display,
the unit starts storing stations from the one currently
displayed.
24
Display items
Receiving the stored stations
Standard mode:
1
Press (SOURCE) repeatedly to select
the radio.
2
Press (MODE) repeatedly to select the
band.
3
Press the number button ((1) to (6))
on which the desired station is stored.
Tuner
icon
Radio
band
Preset
number
Frequency
Spectrum analyser mode/Panorama/Wall
paper mode/Screen saver mode/Slide show
mode:
Radio
band
Preset
number
Frequency
Clock mode:
Radio Preset
band number Frequency
Tip
Press M or m to receive the stations in the order they
are stored in the memory (Preset Search function).
If preset tuning does not work
Press < (SEEK –) or , (SEEK +) to
search for the station (automatic
tuning).
Scanning stops when the unit receives a
station. Repeat until the desired station is
received.
Tips
• If automatic tuning stops too frequently, turn on the
Local Seek to limit seek to stations with stronger
signals (see “Changing the sound and display
settings” on page 41).
• If you know the frequency of the station you want to
listen to, press and hold < or , to locate the
approximate frequency, then press the < or ,
repeatedly to fine adjust to the desired frequency
(manual tuning).
If FM stereo reception is poor
Clock
Select monaural reception mode
(see “Changing the sound and display
settings” on page 41).
The sound improves, but becomes monaural
(“STEREO” disappears).
Tip
If FM broadcasts are difficult to hear, set “DSO” to
“OFF” (page 42).
25
Storing only desired stations
You can manually preset desired stations.
1
Press (SOURCE) repeatedly to select
the radio.
2
Press (MODE) repeatedly to select the
band.
3
Press < (SEEK –) or , (SEEK +) to
tune in the station that you want to
store.
4
Tuning in a station through a
list
— List-up
1
During radio reception, press (LIST)
momentarily.
The frequency or the name assigned to the
current station appears in the display.
Press the desired number button ((1)
to (6)) for 2 seconds until “Memory”
appears.
The number of the button you pressed is
displayed, and then the selected station is
assigned to this number and stored.
2
Note
If you try to store another station on the same stored
number, the previously stored station will be erased.
Press M or m repeatedly to select the
desired station.
If no name is assigned to the station, the
frequency appears in the display.
3
Press (ENTER) to tune in the desired
station.
After tuning is completed, the display returns
to the normal display.
Tip
To stop selecting and return to the normal display,
press (LIST).
26
RDS
Overview of RDS
FM stations with Radio Data System (RDS)
service send inaudible digital information along
with the regular radio programme signal. For
example, one of the following will be displayed
upon receiving a station with RDS capability.
Standard mode:
Tuner
icon
Radio
band
Preset
number
RDS services
RDS data offers you other conveniences, such as:
• Automatic retuning of a programme, helpful
during long-distance drives. — AF t page 28
• Receiving traffic announcements, even
when enjoying another programme/source.
— TA t page 29
• Selecting stations by the type of programme
it broadcasts. — PTY t page 30
• Automatic clock time setting. — CT t page
31
Notes
• Depending on the country or region, not all of the
RDS functions are available.
• RDS may not work properly if the signal strength is
weak or if the station you are tuned to is not
transmitting RDS data.
Frequency/
Station name
Spectrum analyser mode/Panorama /Wall
paper mode/Screen saver mode/Slide show
mode:
Radio
band
Preset
number
Frequency/
Station name
Clock mode:
Radio Preset
Frequency/
band number Station name
Clock
27
Automatic retuning for best
reception results
— AF function
The alternative frequencies (AF) function allows
the radio to always tune into the area’s strongest
signal for the station you are listening to.
Frequencies change automatically.
98.5 MHz
96.0 MHz
Station
102.5 MHz
1
2
Select an FM station (page 24).
Press (AF) repeatedly until “ A F ”
appears.
The unit starts searching for an alternative
frequency with a stronger signal in the same
network.
If “NO AF” is displayed, the currently tuned
station does not have an alternative frequency.
Note
When there is no alternative frequency in the area, or
when you do not need to search for one, turn the AF
function off.
For stations without alternative
frequencies
Press < or , while the station name
is flashing (within 8 seconds).
The unit starts searching for another
frequency with the same PI (Programme
Identification) data (“PI Seek” appears).
If the unit cannot find the same PI, the unit
returns to the previously selected frequency.
28
Staying with one regional programme
When the AF function is on: this unit’s factoryset setting restricts reception to a specific region,
so you won’t be switched to another regional
station with a stronger frequency.
If you leave this regional programme’s reception
area or would like to take advantage of the whole
AF function, select “Regional OFF” from the
Menu (page 41).
Note
This function does not work in the United Kingdom
and some other areas.
Local Link function (United Kingdom
only)
This function enables you to select other local
stations in the area, even if they are not stored on
your number buttons.
1
Press a number button ((1) to (6))
that has a local station stored on it.
2
Within 5 seconds, press the number
button of the local station again.
3
Repeat this procedure until the
desired local station is received.
Receiving traffic
announcements
— TA/TP
By activating the Traffic Announcement (TA)
and Traffic Programme (TP), you can
automatically tune in an FM station broadcasting
traffic announcements. These settings function
regardless of the current FM programme, or
source (CD/MD, AUX). The unit switches back
to the original source when the bulletin is over.
Press (TA) repeatedly until “ T A ”
appears.
The unit starts searching for traffic
information stations.
“ T P ” indicates reception of such stations.
The unit will continue searching for stations
available with TP if “NO TP” appears
momentarily.
Presetting RDS stations with
AF and TA setting
When you preset RDS stations, the unit stores
each station’s AF/TA setting (on/off) as well as
its frequency. You can select a different setting
(for AF, TA, or both) for individual preset
stations, or the same setting for all preset
stations. If you preset stations with “ A F ” to
on, the unit automatically stores stations with the
strongest radio signal.
Presetting the same setting for all
preset stations
1
2
To cancel all traffic announcements, disappear
“ T A .”
To
Press
Cancel current
announcement
(TA)
Tips
• You can also cancel the current announcement by
pressing (SOURCE) or (MODE).
• TA can also be set to on/off by pressing (MODE) on
the unit for 2 seconds.
Presetting the volume of traffic
announcements
You can preset the volume level of the traffic
announcements so you won’t miss hearing them.
3
4
5
6
7
8
Select an FM band (page 24).
Press (AF) and/or (TA) to display
“ A F ” and/or “ T A .”
Note that deactivating “ A F ” and
“ T A ” applies to non-RDS stations as well
as RDS stations.
Press (MENU).
Press < or , to select “Edit.”
Press (ENTER).
Press M or m to select “BTM.”
Press (ENTER).
Press (MENU).
The display returns to the normal display.
Presetting different settings for each
preset station
1
Select an FM band, and tune in the
desired station (page 26).
1
Press (VOL) to adjust the desired
volume level.
2
Press (AF) and/or (TA) to display
“ A F ” and/or “ T A .”
2
Press (TA) for 2 seconds.
“TA” appears and the setting is stored.
3
Press the desired number button ((1)
to (6)) until “Memory” appears.
Receiving emergency announcements
If either AF or TA is on, the unit will switch to
emergency announcements, if one comes in
while listening to an FM station, CD/MD, or
AUX.
Repeat from step 1 to preset other stations.
29
Tuning in stations by
programme type
1
Press (PTY) during FM reception.
— PTY
You can tune in a station by selecting the type of
programme you would like to listen to.
Programme types
Display
News
News
Current Affairs
Information
Current Affairs
Information
Sports
Education
Sport
Education
Drama
Culture
Drama
Cultures
Science
Varied
Science
Varied Speech
Popular Music
Rock Music
Pop Music
Rock Music
Easy Listening
Light Classical
Easy Listening
Light Classics M
Classical
Other Music Type
Serious Classics
Other Music
Weather
Finance
Weather & Metr
Finance
Children’s Programmes Children’s Progs
Social Affairs
Social Affairs
Religion
Phone In
Religion
Phone In
Travel
Leisure
Travel & Touring
Leisure & Hobby
Jazz Music
Country Music
Jazz Music
Country Music
National Music
Oldies Music
National Music
Oldies Music
Folk Music
Documentary
Folk Music
Documentary
Note
You cannot use this function in some countries where
no PTY (Programme Type selection) data is available.
30
The current programme type name appears if
the station is transmitting the PTY data.
“--------” appears if the received station is not
an RDS station, or if the RDS data is not
received.
2
Press M or m repeatedly to select the
desired programme type.
The programme types appear in the order
shown in the table.
“--------” appears if the programme type is not
specified in the RDS data.
3
Press (ENTER).
The unit starts searching for a station
broadcasting the selected programme type.
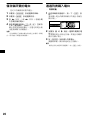
Setting the clock
automatically
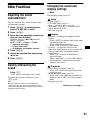
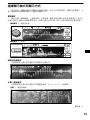
Image Settings
— CT
The CT (Clock Time) data from the RDS
transmission sets the clock automatically.
1
2
Press (MENU).
3
4
5
Press (ENTER).
Press < or , repeatedly to select
“Setup.”
Press M or m repeatedly to select “CT.”
Press (ENTER).
6
Press M or m to select “ON.”
The clock is set.
7
Press (ENTER).
The display returns to the top menu display.
8
Press (MENU).
The display returns to the normal display.
Customising a wall paper
— Wall Paper (Standard/Panorama/Wall
paper mode)
You can display the static image stored in a
“Memory Stick” as a wall paper.
The image data you set will be stored in this unit.
To display the pre-stored images in this unit, see
“Selecting the display mode and display pattern”
on page 13.
1
2
Insert a “Memory Stick” (page 10).
3
Press < or , repeatedly to select
“Wall Paper.”
Each time you press < or ,, the item
changes as follows:
Wall Paper y Panorama y Jacket
Pic y ClipMotion y Slide Show y
Picture Del y Char Setup
4
Press (ENTER).
5
Press M or m to select “Memory Stick.”
If you want to change the display type of a
previously stored image*, select
“FlashMemory.”
To cancel the CT function, select “OFF” in
step 6.
Notes
• The CT function may not work even though an RDS
station is being received.
• There might be a difference between the time set by
the CT function and the actual time.
Press (GRAPHIC).
* You can only change a whole image that you
have stored in step 11-3.
6
Press (ENTER).
If you select “FlashMemory” in step 5, skip to
step 9.
continue to next page t
31
7
Press M or m repeatedly to select a
location or type of image that you want
to set.
Save: stores all images in the first layer of a
“Memory Stick” as wall papers. In this case,
you cannot adjust images or select the display
type. If your stored images are sized 400 ×96
dots, you can store several images at once
using this function.
If you press (GRAPHIC) while storing
images, storing will be cancelled.
PictureSelect: If an image you want to set
is in the first layer of a “Memory Stick,”
select this.
Cyber-shot: If you want to set a picture
taken by an optional Sony digital still camera
Cyber-shot, select this.
(Folder name): When a folder is in a
“Memory Stick,” the folder name is
displayed.
8
Press (ENTER).
Select the folder name in step 7. If there are
images in folders of a lower layer, repeat step
7 and 8 to select the folder which contains
your desired image.
An image can be set in up to the 5th layer
folder in a “Memory Stick.”
9
Press < or , repeatedly to select the
image you want to set.
11 Adjust the image.
1Press < or , repeatedly to rotate
an image.
Press < to rotate anticlockwise and press
, to rotate clockwise.
2Press (ENTER).
3Press M or m repeatedly to decide
the size of image you want to
display.
Press M to enlarge the selected field of
image or press m to reduce it.
If you want to display the whole image,
press M repeatedly to make the selected
field of image as large as possible.
4Press (ENTER).
If you select the whole image in step
11-3, skip to step 12.
5Press the cursor button (M/m/</,)
repeatedly to select the image part
you want to display.
10 Press (ENTER).
If the size of the image you have selected in
step 9 is 400 ×96 dots or less, you cannot
adjust the image. In this case, skip to step 12.
If you select “FlashMemory” in step 5, skip to
step 12 as well.
6Press (ENTER).
If you cut and display your selected field
of image, you cannot select the display
type in step 14. Skip to step 16.
12 Press M or m to select “Setup.”
13 Press (ENTER).
32
14 Press M or m repeatedly to select the
display type.
You can select the display type from 3 types
as follows.
Center: displays the image you have
adjusted in the centre of the display.
Tile: displays the selected images lined up
horizontally.
Full: adjusts and displays the selected image
according to the display size.
15 Press (ENTER).
Example: Tile
Notes
• You can set the image format as follows:
JPEG: 1,600 ×1,200 dots or less
BMP, GIF, PNG: 640 ×480 dots or less
• You can set the display while the unit must be kept
on.
• You can preview up to 100 images from a folder
within a “Memory Stick” at one time.
• The following folders in a “Memory Stick” cannot be
displayed.
– CONTROL
– DCIM
– MSSONY
– VOICE
– HIFI
• In step 6 or 8, if there is no image data, “No Picture”
is shown in the display.
• Depending on the volume of stored data, the storing
time differs. Do not turn off the unit while the
message in step 17 is displayed. If you turn off the
power, the data will not be stored.
• If the capacity of the unit is not enough, “MEM FULL
– delete data” is displayed and you cannot store the
data. After deleting the data (page 39), perform the
settings again.
Tips
• You can store a maximum of 100 wall papers in the
unit.
• If “Cyber-shot” is selected in step 7, the folder is
selected automatically.
About the pre/user strage area capacity
The image is stored in the “Wall Paper” user
area.
16 Press M or m to select “Save.”
17 Press (ENTER).
Standard mode:
Panorama/
Wall paper mode:
A
D
E
B
B
18 Press (GRAPHIC).
The display returns to the normal display.
Press (SCREEN) to turn to the Standard
mode or the Panorama/Wall paper mode.
Then the adjusted wall paper is displayed.
Standard mode:
Panorama/Wall paper mode:
C
C
A Pre-stored spectrum analyser
B Pre-stored wall papers
C User area of “Wall Paper”
D Pre-stored panorama images
E User area of “Panorama”
Tip
Stored images may not display in order of they were
stored.
33
Setting a panorama image
9
Press (ENTER).
— Panorama (Panorama/Wall paper mode)
Scrolls a static image in a “Memory Stick” or
displays it in tile.
The image data you set will be stored in this unit.
To display the pre-stored images in this unit, see
“Selecting the display mode and display pattern”
on page 13.
1
2
3
34
Insert a “Memory Stick” (page 10).
Press (GRAPHIC).
Press < or , repeatedly to select
“Panorama.”
Each time you press < or ,, the item
changes as follows:
Wall Paper y Panorama y Jacket
Pic y ClipMotion y Slide Show y
Picture Del y Char Setup
4
Press (ENTER).
5
6
Press (ENTER) again.
7
Press (ENTER).
Select the folder name in step 6. If there are
images in folders of a lower layer, repeat step
6 and 7 to select the folder which contains
your desired image.
An image can be set in up to the 5th layer
folder in a “Memory Stick.”
8
Press < or , repeatedly to select the
image you want to set.
Press M or m repeatedly to select a
location or type of image that you want
to set.
Picture Select: If an image you want to set
is in the first layer of a “Memory Stick,”
select this.
Cyber-shot: If you want to set a picture
taken by an optional Sony digital still camera
Cyber-shot, select this.
(Folder name): When a folder is in a
“Memory Stick,” the folder name is
displayed.
Depending on the aspect ratio the selected
image, the display type will be set
automatically.
1:1 to 1:4 – tile
more than 1:4 – scroll horizontally
below 1:1 – scroll vertically
10 Press (ENTER) again.
11 Press (GRAPHIC).
The display returns to the normal display.
Press (SCREEN) to turn to the Panorama/
Wall paper mode. Then the adjusted
panorama image is displayed.
Notes
• You can set the image format as follows:
JPEG: 1,600 ×1,200 dots or less
• You can set the display while the unit must be kept
on.
• You can preview up to 100 images from a folder
within a “Memory Stick” at one time.
• The following folders in a “Memory Stick” cannot be
displayed.
– CONTROL
– DCIM
– MSSONY
– VOICE
– HIFI
• In step 5 or 7, if there is no image data, “No Picture”
is shown in the display.
• Depending on the volume of stored data, the storing
time differs. Do not turn off the unit while the
message in step 10 is displayed. If you turn off the
power, the data will not be stored.
• If the capacity of the unit is not enough, “MEM FULL
– delete data” is displayed and you cannot store the
data. After deleting the data (page 39), perform the
settings again.
Tips
• You can store a maximum of 100 panorama images
in the unit.
• If “Cyber-shot” is selected in step 6, the folder is
selected automatically.
About the pre/user strage area capacity
The image is stored in the “Panorama” user area.
— Jacket Pic (Standard mode)
A
You can store and set a favourite image for each
disc. You can also display this image in the
source display area of the Standard mode.
The image data you set will be stored in this unit.
B
C
D
Setting a jacket picture
A Pre-stored panorama images
B User area of “Panorama”
C Pre-stored wall papers
D User area of “Wall Paper”
Tip
Stored images may not display in order of they were
stored.
1
2
Insert a “Memory Stick” (page 10).
3
4
Press (GRAPHIC).
5
Press (ENTER).
6
Press M or m to select “Memory Stick.”
If you want to change the display type of a
previously stored image, select
“FlashMemory.”
7
Press (ENTER).
If you select “FlashMemory” in step 6, skip to
step 10.
8
Press M or m repeatedly to select a
location or type of image that you want
to set.
Picture Select: If an image you want to set
is in the first layer of a “Memory Stick,”
select this.
Cyber-shot: If you want to set a picture
taken by an optional Sony digital still camera
Cyber-shot, select this.
(Folder name): When a folder is in a
“Memory Stick,” the folder name is
displayed.
9
Press (ENTER).
Select the folder name in step 8. If there are
images in folders of a lower layer, repeat step
8 and 9 to select the folder which contains
your desired image.
An image can be set in up to the 5th layer
folder in a “Memory Stick.”
Start playing the disc for which you
want to set a jacket picture.
Press < or , repeatedly to select
“Jacket Pic.”
Each time you press < or ,, the item
changes as follows:
Wall Paper y Panorama y Jacket
Pic y ClipMotion y Slide Show y
Picture Del y Char Setup
continue to next page t
35
10 Press < or , repeatedly to select the
image you want to set.
11 Press (ENTER).
12 Press M or m to select “Setup.”
13 Press (ENTER).
14 Press M or m to select the display
type.
You can select one of the following 2 display
types.
Normal: displays the image you select in
step 10.
Just: adjusts and displays the selected image
according to the display size.
15 Press (ENTER).
Example: Just
16 Press M or m to select “Save.”
17 Press (ENTER).
18 Press (GRAPHIC).
The display returns to the normal display.
Press (SCREEN) to turn to the Standard
mode.
36
Notes
• You can set the image format as follows:
JPEG: 1,600 ×1,200 dots or less
BMP, GIF, PNG: 640 ×480 dots or less
• You can preview up to 100 images from a folder
within a “Memory Stick” at one time.
• The following folders in a “Memory Stick” cannot be
displayed.
– CONTROL
– DCIM
– MSSONY
– VOICE
– HIFI
• In step 7 or 9, if there is no image data, “No Picture”
is shown in the display.
• Depending on the volume of stored data, the storing
time differs. Do not turn off the unit while the
message in step 17 is displayed. If you turn off the
power, the data will not be stored.
• If the capacity of the unit is not enough, “MEM FULL
– delete data” is displayed and you cannot store the
data. After deleting the data (page 39), perform the
settings again.
Tips
• You can store a maximum of 100 jacket pictures in
the unit.
• If “Cyber-shot” is selected in step 8, the folder is
selected automatically.
Setting a clip motion
10 Press < or , repeatedly to select the
image you want to set.
— ClipMotion (Standard mode)
You can store your favourite GIF image or GIF
animation file for each source and display them
in the source display area in the Standard mode.
The image data you set will be stored in this unit.
1
2
Insert a “Memory Stick” (page 10).
3
4
Press (GRAPHIC).
Select a source (radio, CD, MD, MS, or
AUX) that you want to set a clip
motion.
Press < or , repeatedly to select
“ClipMotion.”
Each time you press < or ,, the item
changes as follows:
Wall Paper y Panorama y Jacket
Pic y ClipMotion y Slide Show y
Picture Del y Char Setup
5
Press (ENTER).
6
Press M or m to select “Memory Stick.”
If you want to change the display type of a
previously stored image, select
“FlashMemory.”
7
Press (ENTER).
If you select “FlashMemory” in step 6, skip to
step 8.
8
9
11 Press (ENTER).
12 Press M or m to select “Setup.”
Press M or m repeatedly to select a
location or type of image that you want
to set.
Picture Select: If an image you want to set
is in the first layer of a “Memory Stick,”
select this.
Cyber-shot: If you want to set a picture
taken by an optional Sony digital still camera
Cyber-shot, select this.
(Folder name): When a folder is in a
“Memory Stick,” the folder name is
displayed.
Press (ENTER).
Select the folder name in step 8. If there are
images in folders of a lower layer, repeat step
8 and 9 to select the folder which contains
your desired image.
An image can be set in up to the 5th layer
folder in a “Memory Stick.”
13 Press (ENTER).
14 Press M or m to select the display
type.
You can select one of the following 2 display
types.
Normal: displays the image you select in
step 10.
Just: adjusts and displays the selected image
according to the display size.
15 Press (ENTER).
Example: Just
16 Press M or m to select “Save.”
17 Press (ENTER).
continue to next page t
37
18 Press (GRAPHIC).
The display returns to the normal display.
Press (SCREEN) to turn to the Standard
mode.
Displaying an image as a
slide show
— Slide Show (Slide show mode)
Scroll static images in a “Memory Stick” as a
slide show. (This data will not be stored.)
Notes
• You can set the image format as follows:
GIF: 160 ×120 dots or less
• Up to 10 frames (or if image size is 84 ×84 dots or
less, up to 20 frames) of GIF animation will be
displayed.
• If a jacket picture (page 35) is set, the clip motion is
not displayed.
• You can preview up to 100 images from a folder
within a “Memory Stick” at one time.
• The following folders in a “Memory Stick” cannot be
displayed.
– CONTROL
– DCIM
– MSSONY
– VOICE
– HIFI
• In step 7 or 9, if there is no image data, “No Picture”
is shown in the display.
• Depending on the volume of stored data, the storing
time differs. Do not turn off the unit while the
message in step 17 is displayed. If you turn off the
power, the data will not be stored.
• If the capacity of the unit is not enough, “MEM FULL
– delete data” is displayed and you cannot store the
data. After deleting the data (page 39), perform the
settings again.
Tips
• You can store a maximum of 16 clip motions in the
unit.
• If “Cyber-shot” is selected in step 8, the folder is
selected automatically.
• Delete your stored image to display the default
source icon.
38
1
2
3
Insert a “Memory Stick” (page 10).
4
Press (ENTER).
5
Press M or m repeatedly to select a
folder for images that you want to set.
FolderSelect: Selects the folder that
contains the image you want to set.
Cyber-shot: If you want to set a picture
taken by an optional Sony digital still camera
Cyber-shot, select this.
OFF: Turns Slide show mode OFF.
6
Press (ENTER).
Select “FolderSelect” in step 5. If there are
images in folders of a lower layer, repeat step
5 and 6 to select the folder which contains
your desired image.
An image can be set in up to the 5th layer
folder in a “Memory Stick.”
7
Press (GRAPHIC).
The display enters the Slide show mode, then
slide show starts.
Press (GRAPHIC).
Press < or , repeatedly to select
“Slide Show.”
Each time you press < or ,, the item
changes as follows:
Wall Paper y Panorama y Jacket
Pic y ClipMotion y Slide Show y
Picture Del y Char Setup
Notes
• You can set the image format as follows:
JPEG: 1,600 ×1,200 dots or less
BMP, GIF, PNG: 640 ×480 dots or less
• You can set the display while playing back or
receiving a source only.
• You can select up to 100 images for each folder.
• The following folders in a “Memory Stick” cannot be
displayed.
– CONTROL
– DCIM
– MSSONY
– VOICE
– HIFI
• In step 6, if there is no image data, “No Picture” is
shown in the display.
• If you take out a “Memory Stick” after setting is
complete, display turns to the Clock mode.
Deleting the picture data
9
Press (ENTER).
— Picture Del
The unit cannot store an image(s) whose capacity
is more than 2 MB.
1
2
Press (GRAPHIC).
Press < or , repeatedly to select
“Picture Del.”
Each time you press < or ,, the item
changes as follows:
Wall Paper y Panorama y Jacket
Pic y ClipMotion y Slide Show y
Picture Del y Char Setup
After deleting is completed, the display
returns to the graphic top menu display.
10 Press (GRAPHIC).
The display returns to the normal display.
3
Press (ENTER).
Notes
• You cannot delete the pre-stored images in this unit.
• You can delete the image data while the unit must be
kept on.
• Make sure that you cannot restore an image once
you have deleted it.
• Depending on the volume of deleted data, the
deleting time differs. Do not turn off the unit while the
message in step 9 is displayed. If you turn off the
power, the data will not be deleted completely.
• If any button is pressed while deleting an image, the
delete is cancelled and data will not be deleted
completely.
4
Press M or m repeatedly to select the
mode in which an image you want to
delete is located.
If you delete all the stored image data, select
“ALL” and skip to step 7.
Tip
You can store up to the following number of images:
Wall Paper: maximum 100
Panorama: maximum 100
Jacket Pic: maximum 100
ClipMotion: maximum 16
5
Press (ENTER).
6
Press < or , repeatedly to select an
image you want to delete and press m.
The recycle bin appears at the lower side of
the selected image by pressing m.
To stop deleting the selected image, press
< or , repeatedly to select your desired
image, then press M.
To delete more than one image, repeat the
procedure in step 6.
7
Press (ENTER).
8
Press M or m to select “YES.”
To cancel, select “NO.”
39
Setting the display
characters
— Char Setup (Spectrum analyser/Panorama/
Wall paper/Screen saver/Slide show mode)
You can adjust the visibility of the display by
changing the translucence ratio of the display
characters.
Making display characters disappear
automatically (Auto Clear)
You can make display characters disappear for a
moment in Spectrum analyser/Panorama/Wall
paper/Screen saver/Slide show mode. When set
to ON, you can display the display characters
only when the disc, album, or track is changed or
the source or display mode is changed. You can
enjoy full images.
1
Playback or receive the source (radio,
CD, MS, MD, or AUX).
2
3
Press (GRAPHIC).
4
5
6
7
8
9
Press < or , repeatedly to select
“Char Setup.”
Each time you press < or ,, the item
changes as follows:
Wall Paper y Panorama y Jacket
Pic y ClipMotion y Slide Show y
Picture Del y Char Setup
1
Playback or receive the source (radio,
CD, MS, MD, or AUX).
2
3
Press (GRAPHIC).
4
Press (ENTER).
5
6
Press M or m to select “Blend Level.”
7
Press < or , to select the
permeation ratio (Level 0-15).
The lower the level, the paler the display
characters.
8
9
Press (ENTER).
Press < or , repeatedly to select
“Char Setup.”
Each time you press < or ,, the item
changes as follows:
Wall Paper y Panorama y Jacket
Pic y ClipMotion y Slide Show y
Picture Del y Char Setup
Press (ENTER).
Press (ENTER).
Press M or m to select “Auto Clear.”
Press (ENTER).
Press (GRAPHIC).
The display returns to the normal display.
Notes
• In Standard/Clock mode, you cannot change the
translucence ratio of the display characters.
• Set “Auto Clear” to “ON” (page 40), the translucence
ratio of the display characters does not change.
Press M or m to select “ON.”
Press (ENTER).
Press (GRAPHIC).
The display returns to the normal display.
Note
In Standard/Clock mode, you cannot make the display
characters disappear automatically.
40
Changing the translucence ratio of the
characters (Blend Level)
You can set the translucence ratio (colour
density) of the characters in the Spectrum
analyser/Panorama/Wall paper/Screen saver/
Slide show mode.
By setting this level down, you can adjust the
characters in the display to appear opaque.
Other Functions
Changing the sound and
display settings
— Menu
Adjusting the sound
characteristics
You can adjust the bass, treble, balance, fader,
and subwoofer volume.
1
Press (SOURCE) to select a source
(radio, CD, MD, MS, or AUX).
2
3
Press (SOUND).
Press < or , repeatedly to select the
item you want to adjust.
Each time you press < or ,, the item
changes as follows:
DSO y EQ7 y Bass y Treble
y Balance (left-right)
y Fader (front-rear)
y SubWoofer (subwoofer volume)
4
5
Press (ENTER).
6
Press (ENTER).
Adjust the selected item by pressing
< or ,.
Quickly attenuating the
sound
Press (ATT).
“ATT” appears in the display for a while.
To restore the previous volume level, press
(ATT) again.
Tip
When the interface cable of a car telephone is
connected to the ATT lead, the unit decreases the
volume automatically when a telephone call comes in
(Telephone ATT function).
The following items can be set:
Setup
• Clock (page 18)
• CT (Clock Time) (page 31)
• Beep — to turn the beeps on or off.
• AUX Skip*1 (page 46) — to turn the AUX
source display on or off.
• MS Auto (page 20)
Display
• Dimmer — to change the brightness of the
display.
– Select “AUTO” to dim the display only when
you turn the lights on.
– Select “ON” to dim the display.
– Select “OFF” to deactivate the Dimmer.
• Contrast — to adjust the contrast if the
indications on the display are not recognizable
because of the unit’s installation position.
• AutoScroll*2
– Select “ON” to scroll all automatically
displayed names.
– When “AutoScroll” is set to “OFF” and the
disc/track name is changed, the disc/track
name does not scroll.
PlayMode
• Local (Local seek mode) (page 25)
– Select “ON” to only tune into stations with
stronger signals.
• Mono (Monaural mode) (page 25)
– Select “ON” to hear FM stereo broadcast in
monaural. Select “OFF” to return to normal
mode.
• Regional (page 28)
continue to next page t
41
SoundTuning
• EQ7 Tune (page 43) — to adjust the equaliser
curve.
• HPF (High pass filter) (page 44)
• LPF (Low pass filter) (page 45)
• Loudness — to enjoy bass and treble even at
low volumes. The bass and treble will be
reinforced.
• AUX Level*3 (page 45) — to adjust the volume
level of connected auxiliary equipment.
*1 Displayed only when the clock is displayed by
pressing (OFF).
*2 Displayed only when CD, MS, or MD are playing
back.
*3 Displayed only when the source is AUX.
Setting the Dynamic
Soundstage Organiser (DSO)
If your speakers are installed into the lower part
of the doors, the sound will come from below
and may not be clear.
The DSO (Dynamic Soundstage Organiser)
function creates a more ambient sound as if there
were speakers above the dashboard (virtual
speakers).
You can store the DSO setting for each source.
DSO mode and image of virtual speakers
1
Press (MENU).
To set “AutoScroll,” press (MENU) during
CD/MD/MS playback.
2
Press < or , repeatedly to select the
desired item.
3
4
Press (ENTER).
5
6
Press (ENTER).
*3
*3
Note
Only when an optional CD/MD unit is not connected,
“AUX Skip” and “AUX Level” are displayed.
*1
*1
*2
*4
*2
*4
*1
*2
*3
*4
DSO 1
DSO 2
DSO 3
DSO OFF
1
Press (SOURCE) to select a source
(radio, CD, MD, MS, or AUX).
Press M or m repeatedly to select the
desired setting (Example: “ON” or
“OFF”).
2
3
Press (SOUND).
7
Press (ENTER).
The display returns to the top menu display.
4
Press (ENTER).
8
Press (MENU).
The display returns to the normal display.
5
Press < or , repeatedly to select the
DSO mode (DSO 1-3).
To cancel the DSO function, select “OFF.”
6
Press (ENTER).
Press M or m repeatedly to select your
desired items to be adjusted.
Press < or , repeatedly to select
“DSO.”
Note
The displayed item will differ depending on the source.
Notes
• Depending on the type of car interior or type of
music, DSO may not have a desirable affect.
• If FM broadcasts are difficult to hear, set “DSO” to
“OFF.”
Tip
The sound effect of the DSO mode increases as the
number increases.
42
Setting the equaliser (EQ7)
You can select an equaliser curve for 7 music
types (Xplod, Vocal, Club, Jazz, New Age, Rock,
and Custom).
You can adjust a different equaliser setting for
each source.
Selecting the equaliser curve
1
Press (SOURCE) to select a source
(radio, CD, MD, MS, or AUX).
2
3
Press (SOUND).
4
Press (ENTER).
5
Press < or , repeatedly to select the
Equaliser mode.
To cancel the equalising effect, select “OFF.”
6
Press (ENTER).
7
Press M or m repeatedly to select the
desired equaliser curve.
8
9
Press (ENTER).
Select the desired frequency and level.
1Press < or , repeatedly to select
the desired frequency.
Each time you press < or ,, the
frequency changes.
62 Hz y 157 Hz y 396 Hz
y 1000 Hz y 2510 Hz
y 6340 Hz y 16000 Hz
Press < or , repeatedly to select
“EQ7.”
Note
While DSO is active, equaliser settings are
automatically adjusted for best overall effect.
Adjusting the equaliser curve
You can store and adjust the equaliser settings for
frequency and level.
1
Press (SOURCE) to select a source
(radio, CD, MD, MS, or AUX).
2
3
Press (MENU).
4
5
Press (ENTER).
6
Press (ENTER).
2Press M or m repeatedly to adjust
the desired level.
The level is adjustable by 1 dB steps from
–10 dB to +10 dB.
To restore the factory-set equaliser curve,
press (ENTER) for 2 seconds.
3Repeat steps 1 and 2 to adjust the
equaliser curve.
10 Press (ENTER).
After the effect setting is completed, the
display returns to the normal display.
Press < or , repeatedly to select
“SoundTuning.”
Press M or m repeatedly to select “EQ7
Tune.”
Example: EQ7 Tune “Xplod”
43
Adjusting the front and rear
volume
1
Press (SOURCE) to select a source
(radio, CD, MD, MS, or AUX).
2
3
Press (SOUND).
4
Press (ENTER).
6
Press M or m repeatedly to select the
cut-off frequency.
Each time you press M or m, the frequency
changes as follows:
OFF (default setting) y 78 Hz y 125 Hz
7
Press (MENU).
After the frequency setting is complete, the
display returns to the normal display.
Press < or , repeatedly to select
“Fader.”
Adjusting the volume of the
subwoofer(s)
1
Press (SOURCE) to select a source
(radio, CD, MD, MS, or AUX).
Press < or , repeatedly to adjust
the volume of front/rear speakers.
2
3
Press (SOUND).
6
Press (ENTER).
The display returns to the normal display.
4
Press (ENTER).
Adjusting the cut-off frequency for the
front/rear speakers
To match the characteristics of the installed
speaker system, you can select the cut-off
frequency of the speakers.
5
Press < or , repeatedly to adjust
the volume.
6
Press (ENTER).
The display returns to the normal display.
Level
5
Cut-off frequency
off
Press < or , repeatedly to select
“SubWoofer.”
Tip
The volume level is adjustable from –10 dB to +10 dB.
(Below –10 dB, “– ∞ dB” is displayed.)
Frequency (Hz)
44
1
During playback or radio reception,
press (MENU).
2
Press < or , repeatedly to select
“SoundTuning.”
3
4
Press (ENTER).
5
Press (ENTER).
Press M or m repeatedly to select
“HPF.”
Level
Adjusting the cut-off frequency for the
subwoofer(s)
To match the characteristics of the connected
subwoofer(s), you can cut out the unwanted high
and middle frequency signals entering the
subwoofer(s). By setting the cut-off frequency
(see the diagram below), the subwoofer(s) will
output only low frequency signals for a clearer
sound.
Cut-off frequency
off
Connecting auxiliary audio
equipment
The unit’s AUX IN (external audio input)
terminal on this unit is also used as the BUS
AUDIO IN (audio input) terminal.
You can listen to the sound from your car
speakers by connecting optional Sony portable
devices.
Note
If you connect an optional Sony CD/MD unit, you
cannot connect any portable devices and cannot
select “AUX.”
Selecting auxiliary equipment
Press (SOURCE) repeatedly to select
“AUX.”
Frequency (Hz)
1
During playback or radio reception,
press (MENU).
2
Press < or , repeatedly to select
“SoundTuning.”
3
4
Press (ENTER).
5
Press (ENTER).
6
7
Press M or m repeatedly to select
“LPF.”
Press M or m repeatedly to select the
cut-off frequency.
Each time you press M or m, the frequency
changes as follows:
OFF (default setting) y 125 Hz y 78 Hz
Press (MENU).
After the frequency setting is complete, the
display returns to the normal display.
Adjusting the volume level
You can adjust the volume for each connected
audio equipment.
1
2
Press (MENU).
3
4
Press (ENTER).
5
6
Press (ENTER).
7
Press (ENTER).
The display returns to the top menu display.
8
Press (MENU).
The display returns to the normal display.
Press < or , repeatedly to select
“SoundTuning.”
Press M or m repeatedly to select
“AUX Level.”
Press < or , repeatedly to adjust
the volume level.
The volume level is adjustable in 1 dB steps
from –6 dB to +6 dB.
continue to next page t
45
To deactivate auxiliary equipment in
the music source display
1
Press (OFF).
CD/MS/MD playback or radio reception
stops (the key illumination and display
remain on).
2
3
Press (MENU).
4
5
Press (ENTER).
6
7
8
Press (ENTER).
Press < or , repeatedly to select
“Setup.”
Press M or m repeatedly to select
“AUX Skip.”
Press m to select “ON.”
Press (MENU).
Setting the security code
This unit has a security function to discourage
theft. Input a four-digit number as your security
code.
If you set it, you need to input the stored code to
turn on the unit should you re-install the unit in
another car or after changing the battery.
1
2
Press (MENU).
3
4
Press (ENTER).
5
Press (ENTER).
Code Set display is displayed.
Press < or , repeatedly to select
“Setup.”
Press M or m repeatedly to select
“Security.”
To restore the indication, select “AUX Skip
OFF.”
1Press M or m repeatedly to enter the
first digit (0-9).
2Press , to move the cursor to the
2nd digit, then press M or m
repeatedly to enter the 2nd digit.
Each time you press M, a digit goes
up and each time you press m, a
digit falls.
3Repeat step 2 to enter the 3rd digit
and the 4th digit.
6
Press (ENTER).
Check Code display appears.
7
Press M or m repeatedly to select
“YES.”
8
Press (ENTER).
The display returns to the normal display.
Notes
• The security code cannot be entered by the number
buttons (1-6).
• Make sure not to forget your security code.
• If you select “NO” in step 7 and press (ENTER), the
display returns to the Code Set display in step 5.
46
After the security code setup is
completed
Should you re-install the unit in another car or
change the battery, the Check Code display
appears after turning on the unit. Enter your
stored 4-digit code with the cursor buttons
(M/m/,), and press (ENTER).
Code Input display
OK: returns to the calendar/clock display.
NG: “CODE ERROR” message appears.
Input the correct code using the cursor buttons.
Additional Information
Maintenance
Fuse replacement
When replacing the fuse, be sure to use one
matching the amperage rating stated on the
original fuse. If the fuse blows, check the power
connection and replace the fuse. If the fuse blows
again after replacement, there may be an internal
malfunction. In such a case, consult your nearest
Sony dealer.
Cancelling the security code
Repeat step 1 to 4 in “Setting the security code”
(Code Del display appears). Enter your stored
code with the cursor buttons (M/m/,), and
press (ENTER).
Fuse (10 A)
Code Del display
Warning
OK: returns to a normal display.
NG: the “CODE ERROR” message appears.
Input the correct code using the cursor buttons.
Note
You cannot change the security code unless you
delete your stored code.
Never use a fuse with an amperage rating
exceeding the one supplied with the unit as this
could damage the unit.
continue to next page t
Tip
If the security code is not stored, the Code Del display
does not appear.
47
Replacing the lithium battery
Under normal conditions, batteries will last
approximately 1 year. (The service life may be
shorter, depending on the conditions of use.)
When the battery becomes weak, the range of the
card remote commander becomes shorter.
Replace the battery with a new CR2025 lithium
battery. Use of any other battery may present a
risk of fire or explosion.
Removing the unit
1
Remove the front cover
1Press the clip inside the front cover
with the release key (supplied), and
pry the front cover free.
Release key
(supplied)
x
Note
To protect the surface of the unit, insert thin cloth
between the release key and the unit when inserting
the release key.
+ side up
2Repeat step 1 on the left side.
The front cover is removed.
Notes on lithium battery
• Keep the lithium battery out of the reach of
children. Should the battery be swallowed,
immediately consult a doctor.
• Wipe the battery with a dry cloth to assure a
good contact.
• Be sure to observe the correct polarity when
installing the battery.
• Do not hold the battery with metallic tweezers,
otherwise a short-circuit may occur.
2
Remove the unit
1Use the release key to push in the
clip on the left side of the unit, then
pull out the left side of the unit until
the catch clears the mounting.
WARNING
Battery may explode if mistreated.
Do not recharge, disassemble, or dispose of
in fire.
2Repeat step 1 on the right side.
3Slide the unit out of the mounting.
Note
Be sure to close the front panel before removing the
unit. Doing so with the front panel open may cause
injury to your fingers.
48
Precautions
Notes on discs
• If your car was parked in direct sunlight, allow
the unit to cool off before operating it.
• Power antennas will extend automatically
while the unit is operating.
• Do not use the CUSTOM FILE feature while
driving, or perform any other function which
could divert your attention from the road.
• Do not drop water or foreign objects on the disc
tray as a fire or malfunction can occur.
• To keep discs clean, do not touch the surface.
Handle a disc by its edge.
• Keep your discs in their cases or disc
magazines when not in use.
Do not subject the discs to heat/high
temperature. Avoid leaving them in parked cars
or on dashboards/rear trays.
If you have any questions or problems
concerning your unit that are not covered in this
manual, please consult your nearest Sony dealer.
Moisture condensation
On a rainy day or in a very damp area, moisture
condensation may occur inside the lenses and
display of the unit. Should this occur, the unit
will not operate properly. In such a case, remove
the disc and wait for about an hour until the
moisture has evaporated.
• Do not attach labels, or use discs with sticky
ink/residue. Such discs may stop spinning
when used, causing a malfunction, or may ruin
the disc.
To maintain high sound quality
Be careful not to splash juice or other soft drinks
onto the unit or discs.
Notes on CD lens
• Do not touch the lens in the disc tray.
• Do not use a commercially available lens
cleaner.
Notes on LCD display
• Do not push the LCD display strongly. It may
cause injury or damage the display.
• Bright points of light (red, blue, or green) or
black dots may appear on the LCD display.
This is not a malfunction. The LCD is made
with high-precision technology and more than
99.99 % of the picture element is intact.
However, tiny elements of the picture may
show the above symptoms.
• Do not use any discs with labels or stickers
attached as this may cause inability to read
audio data correctly (e.g., playback skipping, or
no playback) due to heat shrinking of a sticker
or label causing a disc to warp.
• Discs with non-standard shapes (e.g., heart,
square, star) cannot be played on this unit.
Attempting to do so may damage the unit. Do
not use such discs.
• Before playing, clean discs with a
commercially available cleaning cloth. Wipe
each disc from the centre out. Do not use
solvents such as benzine, thinner, commercially
available cleaners, or antistatic spray intended
for analog discs.
continue to next page t
49
Notes on CD-Rs (recordable CDs)/CDRWs (rewritable CDs)
This unit can play the following discs:
Type of discs
Label on the disc
Audio CD
MP3 files
• Some CD-Rs/CD-RWs (depending on the
equipment used for its recording or the
condition of the disc) may not play on this unit.
• You cannot play a CD-R/CD-RW that is not
finalized*.
• You can play MP3 files recorded on CDROMs, CD-Rs, and CD-RWs.
• A CD-R/CD-RW to which a session can be
added can be played.
* A process necessary for a recorded CD-R/CD-RW
disc to be played on the audio CD player.
About MP3 files
MP3 (MPEG 1 Audio Layer-3) is a standard
technology and format for compressing a sound
sequence. The file is compressed to about 1/10 of
its original size. Sounds outside the range of
human hearing are compressed while the sounds
we can hear are not compressed.
Notes on discs
You can play MP3 files recorded on CD-ROMs,
CD-Rs, and CD-RWs.
The disc must be in the ISO 9660*1 level 1 or
level 2 format, or Joliet or Romeo in the
expansion format.
You can use a disc recorded in Multi Session*2.
*1 ISO 9660 Format
The most common international standard for
the logical format of files and folders on a
CD-ROM.
There are several specification levels. In
Level 1, file names must be in the 8.3 format
(no more than 8 characters in the name, no
more than 3 characters in the extension
“.MP3”) and in capital letters. Folder names
can be no longer than 8 characters. There can
be no more than 8 nested folder levels. Level
2 specifications allow file names up to 31
characters long.
Each folder can have up to 8 trees.
For Joliet or Romeo in the expansion format,
make sure of the contents of the writing
software, etc.
*2 Multi Session
This is a recording method that enables
adding of data using the Track-At-Once
method. Conventional CDs begin at a CD
control area called the Lead-in and end at an
area called Lead-out. A Multi Session CD is a
CD having multiple sessions, with each
segment from Lead-in to Lead-out regarded
as a single session.
CD-Extra: The format which records audio
(audio CD data) as tracks on session 1, and
records data as tracks on session 2.
Mixed CD: In this format, data is recorded as
track 1, and audio (audio CD data) is recorded
as track 2.
50
Notes
• With formats other than ISO 9660 level 1 and level 2,
folder names or file names may not be displayed
correctly.
• When naming, be sure to add the file extension
“.MP3” to the file name.
• If you put the extension “.MP3” to a file other than
MP3, the unit cannot recognize the file properly and
will generate random noise that could damage your
speakers.
• The following discs take a longer time to start
playback.
–a disc recorded with complicated tree structure.
–a disc recorded in Multi Session.
–a disc to which data can be added.
The playback order of the MP3 files
The playback order of the folders and files is as
follows:
Folder (album)
1
1
MP3 file (track)
2
2
3
Cautions when playing a disc that is recorded in
Multi Session
• When the first track of the first session is audio CD
data:
Only audio CD data is played back.
Non-audio CD data/MP3 file information (track
number, time, etc.) is displayed with no sound.
• When the first track of the first session is not audio
CD data:
–If an MP3 file is in the disc, only MP3 file(s) play
back and other data is skipped. (Audio CD data is
not recognized.)
–If no MP3 file is in the disc, “NO Music” is displayed
and nothing is played back. (Audio CD data is not
recognized.)
3
4
5
4
5
6
6
7
7
8
8
9
Tree 1
(root)
Tree 2
Tree 3
Tree 4
Tree 5
Notes
• A folder that does not include an MP3 file is skipped.
• Maximum folder number: 255 (including root folder
and empty folders)
• The maximum number of MP3 files and folders that
can be contained in a disc: 512
When a file/folder name contains many characters,
this number may become less than 512.
• The maximum number of trees which can be played
is 8.
Tip
To specify a desired playback order, before the folder
or file name, input the order by number (e.g., “01,”
“02”), then record contents onto a disc. (The order
differs depending on the writing software.)
51
On “Memory Stick”
What is a “Memory Stick”?
“Memory Stick” is a compact, portable and
versatile Integrated Circuit recording medium
with a data capacity that exceeds a floppy disk.
“Memory Stick” is specially designed for
exchanging and sharing digital data among
“Memory Stick” compatible products. Because it
is removable, the “Memory Stick” can also be
used for external data storage.
Types of “Memory Stick”
There are two types of “Memory Stick.”
“MagicGate Memory Stick (White)”
– is equipped with “MagicGate” copyright
protection technology.
– MS Auto play is possible.
– You can also access the image data.
“Memory Stick (Blue)”
– “Memory Stick” that is not equipped with
“MagicGate” copyright protection
technology.
– MS Auto play is not possible.
– You can access only the image data.
When you purchase a “Memory Stick” note the
following:
– For recording music data for MagicGate
compatible devices, be sure to ask for a
“MagicGate Memory Stick” which is
distinguished by the “MG Memory Stick”
logo (number 1 below).
– For recording other data, ask for a general
“Memory Stick” which is distinguished by
the “Memory Stick” logo (number 2 below).
1
2
Note
The Memory capacity of an “MG Memory stick” and a
“Memory Stick” supported by this product is as
follows;
MG Memory stick: maximum. 128MB
Memory stick: maximum. 128MB
52
What is “MagicGate”?
“MagicGate” is a copyright protection
technology for “MagicGate Memory Stick” and
compliant products, such as Network Walkman.
Authentication ensures that protected content is
transferred only between compliant devices and
“MagicGate Memory Stick,” and that protected
content is recorded and transferred in an
encrypted format to prevent unauthorized
copying or playback.
Notes on use
To avoid damaging data, do not
– release the “Memory Stick” during reading or
writing of data.
– use the “Memory Stick” in a location subject
to static electricity or electric noise.
On formatting the “Memory Stick”
The “Memory Stick” is shipped with a FAT
format as the standard format.
When formatting the “Memory Stick,” do not use
the format function on the Windows Explorer.
On handling the “Memory Stick”
A B
LOCK
C
D
• When the “Memory Stick” erasure prevention
switch is set to “LOCK,” data cannot be
recorded, erased or edited.(B)
• The tactile protrusion on the rear surface of
“MagicGate Memory Stick” distinguishes it
from a general “Memory Stick.”(C)
• Do not attach any other material than the
supplied label on the label space.(D)
• Attach the label so that it does not stick out
from the proper attachment location.
• Do not touch the “Memory Stick” connector
with your finger or metallic objects.(A)
• Do not bend, drop or apply strong shock to the
“Memory Stick.”
• Do not disassemble or modify the “Memory
Stick.”
• Do not allow the “Memory Stick” to get wet.
• Do not use or store the “Memory Stick” in a
location that is subject to:
– Extremely high temperature, such as in a car
parked in the sun
– Direct sunlight
– High humidity or places with corrosive
substances
• To prolong the life of the “Memory Stick,” use
the supplied storage case.
On cleaning
Clean the player casing with a soft cloth slightly
moistened with water or a mild detergent
solution. Do not use any type of abrasive pad,
scouring powder or solvent such as alcohol or
benzene as it may mar the finish of the casing.
53
Specifications
General
CD Player section
Signal-to-noise ratio
Frequency response
Wow and flutter
95 dB
10 – 20,000 Hz
Below measurable limit
Outputs
90 dB
10 – 20,000 Hz
Inputs
MS section
Signal-to-noise ratio
Frequency response
Tuner section
FM
Tuning range
Aerial terminal
Intermediate frequency
Usable sensitivity
Selectivity
Signal-to-noise ratio
87.5 – 108 MHz
External aerial connector
10.7 MHz/450 kHz
8 dBf
75 dB at 400 kHz
66 dB (stereo),
72 dB (mono)
Harmonic distortion at 1 kHz
0.6 % (stereo),
0.3 % (mono)
Separation
35 dB at 1 kHz
Frequency response
30 – 15,000 Hz
MW/LW
Tuning range
Aerial terminal
Intermediate frequency
Sensitivity
MW: 531 – 1,602 kHz
LW: 153 – 279 kHz
External aerial connector
10.7 MHz/450 kHz
MW: 30 µV
LW: 40 µV
Tone controls
Loudness
Power requirements
Dimensions
Mounting dimensions
Mass
Supplied accessories
Optional accessories
Optional equipment
Audio outputs (front/rear)
Subwoofer output (mono)
Power aerial relay control
terminal
Power amplifier control
terminal
Telephone ATT control
terminal
Illumination control
terminal
BUS control input terminal
BUS audio input/AUX IN
terminal
Aerial input terminal
Bass ±8 dB at 100 Hz
Treble ±8 dB at 10 kHz
+8 dB at 100 Hz
+2 dB at 10 kHz
12 V DC car battery
(negative earth)
Approx. 178 × 50 × 178 mm
(w/h/d)
Approx. 182 × 53 × 157 mm
(w/h/d)
Approx. 1.7 kg
Card remote commander
RM-X132 (1)
Parts for installation and
connections (1 set)
Front panel cover (1)
Wireless rotary commander
RM-X6S
BUS cable (supplied with
an RCA pin cord)
RC-61 (1 m), RC-62 (2 m)
CD changer (10 discs)
CDX-757MX, CDX-656X
CD changer (6 discs)
CDX-T70MX, CDX-T69X
MD changer (6 discs)
MDX-66XLP
Source selector
XA-C30
US and foreign patents licensed from Dolby
Laboratories.
Note
This unit cannot be connected to a digital preamplifier
or an equaliser.
Design and specifications are subject to change
without notice.
54
Troubleshooting
The following checklist will help you remedy
problems you may encounter with your unit.
Before going through the checklist below, check
the connection and operating procedures.
General
The operation buttons do not function.
Press the reset button.
No sound.
• Press up the VOL control lever to adjust the
volume.
• Cancel the ATT function.
• Set the fader control to the centre position for
a 2-speaker system.
The contents of the memory have been
erased.
• The reset button has been pressed.
tStore again into the memory.
• The power cord or battery has been
disconnected.
• The power connecting cord is not connected
properly.
No beep sound.
The beep sound is cancelled (page 41).
Indications disappear from/do not appear in
the display.
The clock display disappears if you press
(OFF) for 2 seconds.
tPress (OFF) again for 2 seconds to display
the clock.
Stored stations and correct time are erased.
The fuse has blown.
Makes noise when the ignition key is in the
ON, ACC, or OFF position.
The leads are not matched correctly with the
car’s accessory power connector.
No power is being supplied to the unit.
• Check the connection. If everything is in
order, check the fuse.
• The car does not have an ACC position.
tPress (SOURCE) to turn on the unit.
The power is continuously supplied to the
unit.
CD/MD playback
Playback does not begin.
• Defective MD or dirty CD.
• Some CD-Rs/CD-RWs may not play due to
its recording equipment or the disc
condition.
MP3 files cannot be played back.
• Recording was not performed according to
the ISO 9660 level 1 or level 2 format, or the
Joliet or Romeo in the expansion format.
• The file extension “.MP3” is not added to the
file name.
• Files are not stored in MP3 format.
Album name/track name/ID3 tag is not
displayed correctly.
• A disc is not compliant with ISO 9660 level
1.
tUse a compliant disc.
• The unit can only display the letter codes,
such as ASCII, half sized European letters
(ASCII only for Joliet), and Shift-JIS. Letter
codes other than the above will not display
correctly.
MP3 files take longer to play back than
others.
The following discs take a longer time to start
playback.
–a disc recorded with complicated tree
structure.
–a disc recorded in Multi Session.
–a disc to which data can be added.
The sound skips from vibration.
• The unit is installed at an angle of more than
30°.
• The unit is not installed in a sturdy part of
the car.
The sound skips.
• Defective or dirty disc.
• The CD-R/CD-RW has been damaged.
If you close the disc tray or reset the setting,
the unit will make some noise.
This is just the noise of the unit checking a
disc, this is not a malfunction.
continue to next page t
The car does not have an ACC position.
tPress (OFF) for 2 seconds.
The power aerial does not extend.
The power aerial does not have a relay box.
55
Radio reception
Preset tuning is not possible.
• Store the correct frequency in the memory.
• The broadcast signal is too weak.
The stations cannot be received.
The sound is hampered by noises.
• Connect a power aerial control lead (blue) or
accessory power supply lead (red) to the
power supply lead of a car’s aerial booster.
(Only if your car has a built-in FM/MW/LW
aerial in the rear/side glass.)
• Check the connection of the car aerial.
• The auto aerial will not go up.
tCheck the connection of the power aerial
control lead.
• Check the frequency.
• When the DSO mode is on, the sound is
sometimes hampered by noises.
tSet the DSO mode to “OFF” (page 42).
Automatic tuning is not possible.
• The local seek mode is set to “ON.”
tSet the local seek mode to “OFF” (page
41).
• The broadcast signal is too weak.
tPerform manual tuning.
The “STEREO” indication flashes.
• Tune in the frequency accurately.
• The broadcast signal is too weak.
tSet to the monaural reception mode (page
41).
A programme broadcast in stereo is heard
in monaural.
The unit is in monaural reception mode.
tCancel monaural reception mode (page
41).
RDS
Seek starts after a few seconds of listening.
The station is non-TP or has weak signal.
tPress (AF) or (TA) repeatedly until
“ A F ” or “ T A ” disappears.
No traffic announcements.
• Activate TA function.
• The station does not broadcast any traffic
announcements despite being TP.
tTune in another station.
PTY displays “--------.”
• The current station is not an RDS station.
• RDS data has not been received.
• The station does not specify the programme
type.
56
Error displays/Messages
Error displays
(For this unit and optional CD/MD changers)
The following indications will flash for about
5 seconds, and an alarm sound will be heard.
Blank*1
No tracks have been recorded on an MD.*2
tPlay an MD with recorded tracks on it.
Cannot Play
• The unit cannot playback certain files due to
a difference in format.
• Try to playback audio data with data limits
that are not compatible with the unit.
tYou can erase data from the “Memory
Stick” using a device that is compatible
with “Memory Stick.”
Error*1
• A CD is dirty or inserted upside down.*2
tClean or insert the CD correctly.
• A CD/MD cannot play because of some
problem.*2
tInsert another CD/MD.
Expired
• Try to playback audio data with expired data
limits.
• Try to playback audio data with data limits,
but the clock has not been set.
tYou must set the date in the menu.
File Error
• Cannot read the data.
• The data is damaged or corrupted.
tCheck-in data to your computer, then
reformat the “Memory Stick” using other
device that is compatible with “Memory
Stick.”
High Temp
The ambient temperature is more than 50°C.
tWait until the temperature goes down
below 50°C.
Locked
The “Memory Stick” erasure prevention
switch is set to “LOCK.”
tSet the “Memory Stick” erasure prevention
switch to off.
Memory Stick Error
• Cannot access a “Memory Stick.”
• Something is wrong with the “Memory
Stick.”
• A “Memory Stick” that cannot be played on
this unit is inserted.
• A “Memory Stick” that is not compatible
with this unit is inserted.
tRemove and reinsert a “Memory Stick.”
Should the problem persist, check-in data
to your computer, then reformat the
“Memory Stick” using other device that
is compatible with “Memory Stick.”
Should the problem still persist, take both
this unit and “Memory Stick” to the
nearest Sony dealer.
MG Error
• The “Memory Stick” is recognized as
unauthorized for copyright protection.
• An authorized distribution file is detected for
copyright protection.
tRemove and reinsert a “Memory Stick.”
Should the problem persist, check-in data
to your computer, then reformat the
“Memory Stick” using other device that
is compatible with “Memory Stick.”
Should the problem still persist, take both
this unit and “Memory Stick” to the
nearest Sony dealer.
MS System Error
Something is wrong with the unit.
tPress the reset button on the unit.
*1 When the CD/MD changer is connected to the unit,
the disc number of the CD or MD appears in the
display.
*2 The disc number of the disc causing the error
appears in the display.
If these solutions do not help improve the
situation, consult your nearest Sony dealer.
Messages
Local Seek up/Local Seek down
The Local Seek mode is on during automatic
tuning (page 25).
About ID3 tag version 2
Although not a malfunction, the following occurs
when an MP3 file containing ID3 tag ver.2 is
played:
– When skipping a portion of ID3 tag ver.2 (at the
beginning of the track), sound is not output.
Skip time changes depending ID3 tag ver.2
capacity.
Example: At 64 kbytes, it is about 2 seconds
(with RealJukebox).
– The displayed elapsed playing time when
skipping a portion of ID3 tag ver.2 is inaccurate.
For MP3 files of a bit rate other than 128 kbps,
time is not displayed accurately during playback.
– When an MP3 file is created with MP3
conversion software (ex. RealJukebox *), ID3 tag
ver.2 will automatically be written.
* “RealJukebox is a registered trademark of
RealNetworks, Inc.”
As of December, 2001
NO Audio
“Memory Stick” without playable audio data
is inserted.
tCheck-out the audio data using SonicStage
or OpenMG Jukebox.
NO Disc
No disc is inserted in the CD/MD unit.
tInsert discs in the CD/MD unit.
NO Magazine
The disc magazine is not inserted in the CD/
MD unit.
tInsert the magazine in the CD/MD unit.
NO Music*1
A CD which is not a music file is inserted.
tInsert a music CD.
Not Ready
The lid of the MD unit (MDX-40) is open or
the MDs are not inserted properly.
tClose the lid or insert the MDs properly.
Push Reset
The CD/MD unit cannot be operated because
of some problem.
tPress the reset button on the unit.
57
Index
A
L
AF 28, 29
ATRAC3 10, 20, 24
ATT 41
Auto Clear 40
AutoScroll 21, 41
AUX 45
AUX Level 42, 45
AUX Skip 41, 46
List-up 24, 26
Lithium battery 48
Local 25, 41
Loudness 42
LPF 42, 45
B
Balance 41
Bass 41
Beep 41
Blend Level 40
BTM 24, 29
C
CD TEXT 19, 23, 24
Char Setup 40
ClipMotion 16, 37
Clock 18, 41
Clock/Slide show mode 14, 21, 25, 27
Contrast 41
CT 31, 41
CUSTOM FILE 23, 24
“MagicGate” 52
MDLP 21
“Memory Stick” 16, 31, 34, 35, 37, 38, 52
“MG Memory Stick” 10, 20, 21, 52
Mono 25, 41
MP3 50, 51
MS Auto 20
N
Name Del 23
Name Edit 23
P
Panorama 17, 34
Panorama/Wall paper mode 13, 21, 25, 27
Picture Del 39
PlayMode 7
PTY 30
D
R
Dimmer 41
Disc Memo 21, 23
Display 7
DSO 41, 42
Regional 28, 41
REP (Repeat) 22
Reset 18
S
E
Screen saver mode 14, 21, 25, 27
Security 46
Setup 7, 18, 20, 31, 46
SHUF (Shuffle) 22
Slide Show 17, 38
SoundTuning 7, 43, 44, 45
Spectrum analyser mode 13, 21, 25, 27
Standard mode 13, 21, 25, 27
SubWoofer 41, 44
Edit 7, 23, 24, 29
EQ7 41, 43
EQ7 Tune 42, 43
F
Fader 41, 44
Fuse 47
H
HPF 42, 44
T
I
TA 29
TP 29
Treble 41
ID3 tag 22, 57
Image 15
J
Jacket Pic 16, 35
58
M
W
Wall Paper 16, 31
• !
• "#$ %&'% ()
*+,'-.
• /0123 ' 45
67869:;
• /0123<=45>9:;
• /0?@ABC5 D8ED8F(G HI
J• KL12MNOPQ/00
RS TT
(DUV%WVX Y125<= (G HI J-
• %'D>8Z7U7Z[
• \5 E ]^ (_=.`3
a- *1
• b9cd *2efghi (>9:;
jkl-
• 7Um7 hi(3 7Um7 <= *3 jk
l-
• noNpqr8Dmg9s
• tuvwNqxr8Dmy
*1 *2 !"#$%&'
()*+,-'(./0
*3 1234256781 !"#56'
(9)*+:,-'(;<=/0>?/0@A
B56C
fz{|}~
5noN
pqr
fz{|5l/?5
2
'D>8Z7U7bZ[F%S%
Q
3jt%'D>8Z7U7bZ[0
5'D>8Z7U7bZ[ ,. ¡¢%'D>8Z7U7bZ[£¤¥¦5t§
¨©ª5«¡¬Qj®'D>8Z7U7bZ[
5¯°.±²³F%S%
´µ¶ ¡¢
4
%'D>8Z7U7bZ[0)·¸
¹%º »¼L½¾Q3 I¿H ÀaÁÂÃÄ
¹Åº 0ÆÇÈÉÊ5ËÌͼL
%'D>8Z7U7bZ[?ÎÏÌt
¡ÐÑQÒÓÔÕÖ×?ØÙÚÛÜt
¡ÝÞ. E Èß5à]áâã/?ä
åæç¡
• %&'%Q Q
Q Q`,
èé5
êc
, • %&'%.
èé5êc
• ÅDTë
èé5êc
• F%S%
èé5êc
• Zì
'íRÅV
èé5êc
• %&
èé5êc
• îïð5êc.ñòêc`,ðóôõî
ö5êcÈñòêc
qxr÷^ ¿¿¿¿¿¿¿¿¿¿¿¿¿¿¿¿¿¿¿¿¿¿¿¿¿ ø
ùúû\ükl ¿¿¿¿¿¿¿¿¿¿¿¿¿¿¿¿¿¿¿¿¿ ý
þ ¿¿¿¿¿¿¿¿¿¿¿¿¿¿¿¿¿¿¿¿¿¿¿¿¿¿¿¿¿¿ þ '
567869:; ¿¿¿¿¿¿¿¿¿¿¿¿¿¿¿¿ gI
þ¡ ¿¿¿¿¿¿¿¿¿¿¿¿¿¿¿¿¿¿¿¿¿¿¿¿¿¿ gs
\klN.klMN ¿¿¿¿¿¿¿¿¿¿¿¿ g9
kl E 5 ¿¿¿¿¿¿¿¿¿¿¿¿¿¿¿¿¿¿¿¿¿¿¿¿ gy
f ¿¿¿¿¿¿¿¿¿¿¿¿¿¿¿¿¿¿¿¿¿¿¿¿¿¿ g
Pj. ¿¿¿¿¿¿¿¿¿¿¿¿¿¿¿¿¿¿¿¿ g
<= ¿¿¿¿¿¿¿¿¿¿¿¿¿¿¿¿¿¿¿¿¿¿¿¿¿¿
'¿¿¿¿¿¿¿¿¿¿¿
õ '
a5 ¿¿¿¿¿¿¿¿¿¿¿¿¿¿¿¿¿¿¿¿¿¿¿¿
kl ¿¿¿¿¿¿¿¿¿¿¿¿¿¿¿¿¿¿¿¿¿¿¿¿¿¿
Á ¿¿¿¿¿¿¿¿¿¿¿¿¿¿¿¿¿¿¿¿¿
0
¿¿¿¿¿¿¿¿¿¿¿¿¿¿¿¿¿¿¿¿¿
cñ
<=? ¿¿¿¿¿¿¿¿¿¿¿¿¿¿¿
£¤+ E <=
!"? ¿¿¿¿¿¿¿¿¿¿¿¿¿¿¿¿¿¿¿
* DEFG% 1H IJ=KL
$%&'
g
sI
sI
sg
ss
ss
s9
sø
õ#$
%&? ('7-¿¿¿¿¿¿
kl ¿¿¿¿¿¿¿¿¿¿¿¿¿¿¿¿¿¿¿¿¿¿¿¿¿¿
þ(5#$ ¿¿¿¿¿¿¿¿¿¿¿¿¿¿¿¿¿¿
)î*5#$ ¿¿¿¿¿¿¿¿¿¿¿¿¿¿¿¿¿¿
£¤!"+#$
!"? ¿¿¿¿¿¿¿¿¿¿¿¿¿¿¿¿¿¿¿¿¿
8 ¯,¿¿¿¿¿¿¿¿¿¿¿¿¿¿¿¿¿¿¿¿¿¿¿¿¿¿¿
%-.»5õÁ&
6/? ¿¿¿¿¿¿¿¿¿¿¿¿¿¿¿¿¿¿¿¿¿¿
-0££1
76E7> ¿¿¿¿¿¿¿¿¿¿¿¿¿¿¿¿¿¿¿¿¿¿¿¿
6/.76P28 #$¿¿¿¿¿¿
£¤345+#$
>76 ¿¿¿¿¿¿¿¿¿¿¿¿¿¿¿¿¿¿¿¿¿¿¿¿¿¿
õPj
7 ¿¿¿¿¿¿¿¿¿¿¿¿¿¿¿¿¿¿¿¿¿¿¿¿¿¿¿
!"#
õ789
F%SS>%ì ¿¿¿¿¿¿¿¿¿¿¿¿¿¿¿¿¿¿¿9g
PÜ:
>%
%% ¿¿¿¿¿¿¿¿¿¿¿¿¿¿¿¿¿¿¿¿¿9ø
P;<
í%> ¿¿¿¿¿¿¿¿¿¿¿¿¿¿¿¿¿¿¿9H
P=>?
Sì
¿¿¿¿¿¿¿¿¿¿¿¿¿¿¿¿¿¿¿9ý
@AoB
SXëC ¿¿¿¿¿¿¿¿¿¿¿¿¿¿¿¿¿¿¿9
DEhF
>RS ¿¿¿¿¿¿¿¿¿¿¿¿¿¿¿¿¿¿9
PklGH
ë%Rì ¿¿¿¿¿¿¿¿¿¿¿¿¿¿¿¿¿¿¿øI
sø
sH
sH
sy
sy
3«¡$ ¿¿¿¿¿¿¿¿¿¿¿¿¿¿¿¿¿¿¿¿¿¿¿øg
ÊËIJ¡K ¿¿¿¿¿¿¿¿¿¿¿¿¿¿¿¿¿¿¿¿¿¿¿øg
LM¡¢.klP
\ü ¿¿¿¿¿¿¿¿¿¿¿¿¿¿¿¿¿¿¿¿¿¿¿¿¿øg
PNOPQRSr
(Z- ¿¿¿¿¿¿¿¿¿¿¿¿¿¿¿¿¿¿¿¿¿¿¿¿¿¿øs
P`Tr (UUý-¿¿¿¿¿¿¿¿¿¿¿¿¿¿¿¿¿¿ø9
3V^.W^X«r¡K ¿¿¿¿¿¿¿¿¿¿¿øø
3YJ¡X«r¡K ¿¿¿¿¿¿¿¿¿¿¿¿¿¿¿øø
Z-[\¡¢ ¿¿¿¿¿¿¿¿¿¿¿¿¿¿¿¿¿¿¿øH
PàÜ]^ ¿¿¿¿¿¿¿¿¿¿¿¿¿¿¿¿¿¿¿¿¿¿¿øy
()*+
Ú_ ¿¿¿¿¿¿¿¿¿¿¿¿¿¿¿¿¿¿¿¿¿¿¿¿¿¿¿¿¿¿¿øý
`af ¿¿¿¿¿¿¿¿¿¿¿¿¿¿¿¿¿¿¿¿¿¿¿¿¿¿¿ø
bVcÕd ¿¿¿¿¿¿¿¿¿¿¿¿¿¿¿¿¿¿¿¿¿ø
<=cÕd ¿¿¿¿¿¿¿¿¿¿¿¿¿¿¿¿¿¿¿¿¿¿¿ø
e >9:; ¿¿¿¿¿¿¿¿¿¿¿¿¿¿¿¿¿¿¿¿¿¿HI
e ¿¿¿¿¿¿¿¿¿¿¿¿¿¿¿Hs
·¸ ¿¿¿¿¿¿¿¿¿¿¿¿¿¿¿¿¿¿¿¿¿¿¿¿¿¿¿¿¿¿¿H9
fghE ¿¿¿¿¿¿¿¿¿¿¿¿¿¿¿¿¿¿¿¿¿¿¿¿¿¿¿Hø
ikl E hi ¿¿¿¿¿¿¿¿¿¿¿¿¿¿¿¿¿¿¿¿¿HH
jk ¿¿¿¿¿¿¿¿¿¿¿¿¿¿¿¿¿¿¿¿¿¿¿¿¿¿¿¿¿¿¿Hý
sý
s
s
s
9I
9g
3
OPEN
/CLOSE
OFF
SOURCE
SCREEN
MODE
VOL
.>
SHIFT
MEX-5DI
4
z{QJ
*1 "#\5E]^jQkl
a *
*2 bc
\
¡
b * !
"!#$%
c
d &'(
e )*+" # "
æ)/0
E 4
/0
.<=
f *
\
klN
g ,+ -./0
h 1234 i 56789:.;<=>?@9./;A
BC;
j DEF G HI
. > qx¹qaº 5?
k . >./0
\
tuWWî5
l Z JK)*+" "
<=Q E !<=
m LMNO
"
n N PQ
PQ
o RSTUVWXYZ[\]^
p RSTUVWXYZ[\_`a
6$m
defghij
klmno
pqArskt
% &'()Q*+f]^45
(OFF) ,ÝÞsÀ-0!j-kl
./Qj-kl®æ0׳O12
3
t
5
uu789:.;AvegqkAwC
mwxA./yz{
ATT
MODE
45Q6þ7455
PTY
AF
REP
SHUF
1
2
3
4
5
6
SCREEN
GRAPHIC
IMAGE
MENU
DISC +
LIST
SOURCE
SEEK–
SOUN
OFF
D
DISC –
+
a b )F|
c }~
(1) )
(2) D
TA
d *
e * klù5\ü
SEEK+
ENTE
R
BACK
f g <, h *
i
j
k
l
m
n
VOL
–
o
p
q
r
s
kl«¡\ü
,+ FF
F
)DE
kl8\ü
E
9_klN
+EF
MmE
*F
MM#NO(OFF)OPQ RSTUVWXO
C= (SOURCE)OPYZ[\U]^_`
abcdefgh
MMiS#jklmn=op/0qrstuvwxk
lymnz
6
(MENU),:;ùúû\üQ<)\
\ü=>/03ù\ükl?\
ô=
P@A\
Q(ENTER),ABCæDQ(BACK),AÛEPÔBC
FG£klQ(MENU),
DISC +
SEEK–
SOURCE
SEEK+
DISC –
1
2
DISC +
SEEK–
SOURCE
SEEK+
DISC –
DISC +
SEEK–
SOURCE
SEEK+
DISC –
!"#$%&'
a
LRì
SX
fP
b A<34
Y
W
klP
MM{|}1~2O(ENTER)OP
)WUS
.tu#6P
c A<34
YX
klHIP
d ti
UFY
«¡J¦5KÙP
MM=
7i
LMìZ[
L
%TNOSs
7
2
1
3
1
(OPEN/CLOSE)
2
Z <=
3
!"#$%&'
()*+,-
»<= ; j P n Q« R S Q//?TUV<=
4
N
<=.!)S
• 56CL56
• 756:}ST
• #N56_1ST56IUJL
? 7>¡¢
8
4
MM#N£O¤C=(OPEN/CLOSE)OP¥
¦R§^56¨©
()*+,-.
W4ÈW)XYZNqx
(/012
(OFF),
3456789:
Z[ (SOURCE) ,0F c-È
(
(;<89
(OPEN/CLOSE)gÀ-
ÈöQ\(OPEN/CLOSE),
Q<)<=45Z¹Z>U[ENZUº
(>?@A&"B!C DEFGHI
W4ÈW)qx. >QÔ3
î÷^c
,
(=<89
)?]^QÔ_`<=5ab³<=
aÍ
(>?B!"@A DJF+KLMI
W4ÈW) . > qx(dDe
fæg-
!
A"Þ¤efQW4ÈW)æ)Ô3
gÀ-a¬gW)ÈW4 (.- .
> qx
(>?B!"NOP
h 6SÅRkl3klr5i)jjQ
(SHIFT),Q<)W4ÈW)
. > qx (æD*âkæg-
"#$
"#$
A"Þ¤*âkQW4ÈW)æ)Ô
3g À-a¬ g W )ÈW 4 (. . > qx
9
!"#$%&'()*+),-.
2
1
3
1
(OPEN/CLOSE)
2
./ 012 134567 89:;<!"=>%&
'
4ÍlmnQop«¡¢
¤)õ!
3
10
?@
(SOURCE)
!" 0
1 B)-<C 01<$D
S
(12A
• Oª«=¬®¯ x°±²³
´µ¶·z
• q¸¹º» x°±²³
´µ¶·z
• q¼½¸¾ x° ±²³
´µ¶·z¿UÀÁÂ
ÃÄ
MMÅ xÆÇ´zÈÉÊ xËÌzI}©ÍÎ Ït
QÐwÑ
()*+,-.
W4ÈW)YZNqx
(/012
(OFF),
(>?@A&"B!C DEFGHI
W4ÈW) . > qxQÔ
3î÷^c
34Q67 RSTUVWXYZ[\:
Z[ (SOURCE) ,0F
('D
c-È
(;< RSTUVWXYZ[\
(OPEN/CLOSE),
Xæ) 'Q<)®ï
Í
(>?B!"@A DJF+KLMI
W4ÈW) . >qx (dD
efæg-
%&'
&'
!
A"Þ¤efQW4ÈW)æ)Ô3
gÀ-a¬gW)ÈW4 (.- .
>qx
MMq¸¾ x°±²³
´µ¶·zÒ
11
/0
1
2
1
?@
(SOURCE) !"$D0 (E
FGB)-<CHI (J1KLJ1MLJ1NL1O
CO-
2
3
?@
(MODE)
PHI
&'()
Q 063R38<ST STGUVWXY
(SHIFT) YZ [ \ C \ V . > ]^_P`abc
/0\
7545 (GsyJ-
ã/0noNpqr45¼H,
((1)F(6)-\
&'()
()*+,-.
12
3
(JF_`-a DJF)bI
W4ÈW). >qx
(`cde"fg DEF)bI
W4ÈW) . > qxQÔ
3îqrsc
W4ÈW)YZN qx
*+,-
(/0]^-"_`
(OFF),
*.,-
123453
/0³H=klN?\
5kltNã/03cuNWqvwxyNWÜ
z E {|N.}~?N?\
ô=klMN
$hi
kl¡WefW7jW<=+Wef+.«¡PYô=hi/0
3klr5akl¡cYQ3klr5?0
5klqvwxyÈ{|
fjklmi
3D}~4kl\545qvwxyP
no p qri
3D}~4kl\545È a5
t
13
st*ui
\545
:v p wx2yi
hPlojQkl,loNPPlojkl
£,j-N
klÈtu#6hi.j-
!"#
loætkl ?5
14
z{
z{|5}
REP
SHUF
1
2
3
4
5
6
SCREEN
GRAPHIC
IMAGE
MENU
SOURCE
SEEK–
SOUN
DISC +
D
DISC –
/0
OPEN
/CLOSE
SCREEN
12
LIST
34
SHIFT
SEEK+
EN TE
/0
.>
567
R
1
dCefbghiY?@
(SCREEN)
PSTjk
dæg(SCREEN),QklN
)
)ljk t mnopqjk t rs t
ujk t vwxyjk t Xz {|}
~jk *t )ljk
1
dCefbghiY?@
(SCREEN)
PSTjk
dæg(SCREEN),QklN
)
)ljk t mnopqjk t rs t
ujk t vwxyjk t Xz {|}
~jk *t )ljk
2
?@
(IMAGE)
PSTk
2
Q043<ST STGUVWXY\
C\V
. >]^_PST
k
* £_`BI§HÓÔbÕÖcÀF×ØjÖc
* £_`BI§HÓÔbÕÖcÀF×ØjÖc
»9_klMNQ (SHIFT),
0F b%&kl3kl~5i)Qkl
b%&jW4ÈW). >qx
(»¡,6$mQ/A (SHIFT)
,-
15
6 78 !"#$%&'(9:
543 ?5h (í>U'QM>Q'bQ>['-/0kl E 543f]
^5kl~?
~#$hi D
I
/kl5¸N.,
í>U'gyII gsIImÈÉ
M>Q'bQ>['yøI øImÈÉ
~F$hi D
I
/kl5¸N.,
í>U'gyII gsIImÈÉ
M>Q'bQ>['yøI øImÈÉ
'b:;gyI gsImÈÉQ,gI (ø ø mÈÉQ,sI -
~qr D
I
/kl5¸N.,
í>U'gyII gsIImÈÉ
M>Q'bQ>['yøI øImÈÉ
16
st.F#no p qri D
I
/kl5¸N.,
í>U'gyII gsIImÈÉ
~wx2y:v p wx2yi D
I
í>U'gyII gsIImÈÉ
M>Q'bQ>['yøI øImÈÉ
MMBmÙCÚÛ=ÜÝJL_`
17
;<=0
3Gæg¡fQÈÉ_ 3È
"#)Q*+¡f¢£
£¤¥Y¦§¨©ÁÂP,
ÁÂP)Qkl\545n
oNpqr45 (IMAGE) ,klj-k
lÔPj-.ª«
>?@A4BC
j-¬søj¼Hl(ª E ® E ¯
j-
°±P, IgEIgEsIIsIgII
1
2
(MENU)
3
4
5
(ENTER)
?@
< C , P 038<
?@
M C m P 0
5:;<
(ENTER)
• OYZÈÉOPÞßVI§HàáÈÉ:â?ãäå
=æ
• OYZÈÉOPU©Í约ÐR§èé=
ÈÉ>Iq¸®¯56ê x±²³
´µ¶·z]
^JL_`YZÈÉU#Në>ìíq
îïOYZÈÉOP
• ÚðèéÈÉIU 7>¡¢
1 ?@
M C m
dæg M ,Qª²¼H³Î
dæg m ,Qª²¼H´
2 , "YZ[?@
M C
m
3 2 YXoz
6
(ENTER)
P5j-.ª«µ54QklBCF
G£kl
MM#N£=ñòóiÆ11ôX¨©U=m
õÈÉI§:àá
MM£JEÞö÷ÈÉBQÐÐÐ~QÐøø
18
.
/
»¼
(OFF)
f¶·Q¸/qx·#5E
]^
¤ef
– õ¡½
¾r
<E,¹.E>º
Ê: E )
– ÁÂÃ
<E,¹mEMº
¤*âk *
– *âk\
MEm ¹+/–º
¿ æg¤æD*âk À
MMùúûüFG=ý12342KL=1Å
Î1234256Iþ12342/0ÞB
C
$ %&'()
$ %*!+,-()
DEFG
Dz{|I
1
2
./ (-
N <=.!)S
»7¹ ;<=QZ[ (SOURCE)
,0F (c-È 3
kl~4QÔS(» Z,Q
<=!ÒS-
¿ æg¤æDef À
¿ 0Fî÷^ À
* BÎI
• #NªB»56C=/O(OPEN/CLOSE)ê
Z OPB56iR§=
•
56C=A¬cÉJL{¦§ê
kI©ÍÎt,-
•
56=ìíÉJLÎ Ït uø w Ð
wÑ
• Î56C=t H è,-I#NOmê
M OP^Á56=è H t,-Î
• Å56è,-^¿56=t,YZ©ÍÎ
• ÅúûiFGI7=ÎBFG=
1HCE
Dz{5}I
1
• 56CL56
• 756:}ST
?@
(SOURCE)
!"0 (B
)-<Y0<C0 (1B)-<Y01<
$D
2
?@
(MODE)
Y!"$D`
S
.
/
>?@A%89
»¼
(OFF)
<=
(OPEN/CLOSE)gÀ(OPEN/CLOSE)Q<)Z
¤ef
– õ¡½
¾r
W4ÈW) . >
qx
¿ æg¤æDef À
Ê: E )
– ÁÂÃ
W4ÈW) . > q
x
¿ 0Fî÷^ À
¤*âk *
– *âk\
(SHIFT)Q<)W4ÈW)
GsøJ£¤+ºef E <
=
. > qx ¿ æg
¤æD*âk À
19
DE !"#$%&
/ 0 ' ? 5
67869 :;
uu(SOURCE) R
\ R\K¡{
S
MMÅ£µ¶´±ê˱°Ç·±Q Q!U
ÏêkZÑ"#Æ2$Æ1IJEÞÜÝ%B
C
MM#NBU&CÎÆ2$Æ1£%C=ÜÝÞ
B=7BmÙCÚÛ=ÜÝJL_
`
MMi S o p / 0q r ' µ¶´± ê ˱°
Ç·±=()*
.
/
»¼
(OFF)
¤ef
– õ¡½
¾r
. >q
x ¿ æg¤æDef À
Ê: E )
– ÁÂÃ
W4ÈW) . > q
x ¿ 0Fî÷^ À
.
/
»¼
(OFF)
¤ef
– õ¡½
¾r
<E,¹.E>º
Ê: E )
– ÁÂÃ
<E,¹mEMº
¿ æg¤æDef À
¿ 0FîA5÷^ À
MMU&_`Îx°±²³
´µ¶·z=E/
– Æ2$Æ1E+=/
– iÎ,-=/
– iÎI,-Âã¥.Éà/=/
20
HIDE !"#$%&J(KL
® 6RP, Z[Ô ; '
³GæDefõS"Þ
Ä
1
2
3
4
5
(MENU)
6
7
?@
MCm
P 0<
8
(MENU)
klBCFÅkl
?@
<C,
P 038<
(ENTER)
MCm
P 0185<
(ENTER) (ENTER)
kl~BCFúû\ükl
AÍ1'5õQ
3ÆÇy\
Z
RSTUVWXYZ[\
M
0
h<= E *âk *1E efjQõk
lÂ<= E *âk E ef5\125cÈ
» 6RSSµ P , Z[Q®É
kl+ (GøgJ-
=>?./
!8)
9:;<
p
$%&'(
0
,--
./
*1
!)
-0 1 *2
02302%&
04304%&
!
12345 6 6 6789:
0
56
!8)
$%&'(
*+) *3 $%&'( *4 *1
! "#
12345 6 6 6789:
6 !"#0
56
*1
!)
$%&'(
*4 *1
! "# *1
0
56
*18
!)
$%&'(
'7
*1 BÎI
*2 iÅúû!0i 1 KL= FG
2Î156I3i4
*3 iÅúûi1HFGIi4
*4 ù565U162Ë713KL8^
56@9æ
!
0
56
!8)
$%&'(
'7
• i?:;_`
• <ðýi=>:;1234256â?:;JL_`
?@}
• U&L1234256CA,-=)*+
• Îý @=I@Ï)*+ H
$%&'( H ,-'(Ñ
• @ð!U¦
• @:;BC;DÆ1:ËvvøE¦F
Gµ±´Hc56LEÆ1æ=:;
ÞÊ x*z
• BIìíãÎIJL_`F«
– ÎJK$ ÏJLMNOPÑ=I
– QR H I
MMÅ xÆÇ´¶³GGzKLÈÊ xË77z56 H $%
& H ,-'(SLI56 H $%& H ,-'(@
}
21
NODEKL
PQ0RSDEKL
12
12
h¶ÊËmjQß?5<=®ÁÌ
æDefWD*âkÈÍ<=/
0\
0)ÁÌ
/0\
• SHUF *1 — 0ÏÐÑh*âk?
5ef
• SHUF — 0ÏÐÑh<=45e
f
• SHUF *2— 0ÏÐÑh\5
(-]^45ef
• SHUF All *3—0ÏÐÑî"#5
(-]^ (ÒÓf-?5Üûef
;6<;
•
•
•
REP
REP
REP
— ÁÌæDef
*1— ÁÌæD*âk
*2— ÁÌæÍ<=
=<<>?@ABCDEFG
— ÁÌæDef
*1 ð
*2 ðÅúûüê>üFG=1HI
*1 ð
*2 ðÅúûüê>üFG=1ÏÑI
*3 ðúûüê>üFG= 1 êTü
?TüECFG=
diY?@
(1) Y!"`
$D STw
ÁÌS
diY?@
(2)J Y!
"`$D STw
ÏS
cuN·5ïðklN?QP
)c®1¾oÎ
cuN·5ïðklN?QP
)c®1¾oÎ
ABCFG£NQZ[ (1)
¹8U>º,0Fc³kl~41¾
ABCFG£NQZ[(2)
¹Ô$º,0Fc³kl~41¾
REP
• x SHUF All z¨U1:V;
=,-WX
• x°±²³
´µ¶·zÀ=,-_`¨U
22
TU
89uD{ W
u"5}I
?õÕ+cñdÍ<= (<=Ö
×?-?ØdÍ<=Ù;DH
I@cñQ//£¤+º<=(G
søJ-
<=Ö×a#,kl(æQïklù
¥\<=?£57Um7 hi
(ENTER)
kl~BCFúû\ükl
9
(MENU)
kl~BCFÅkl
• {kªêßV'(Z[\ê]¯^H
• #úû!ý162Ë713KL=1^JEB
óiKL=À<1Rº856@9æ
ÞäåB0i 162Ë713 KL=1@9_À
MMY`Î H a&ÎbIÀcd~'(efgh
£¤89&'
¡¢
3ÚÛ?Q9Ü¡$7ZbNU?
ÈÝïð/?wÞßCàáÕâ5?
1
2
3
4
5
6
8
d¡¢)£
(MENU)
?@
<C,
P 0¤98<
(ENTER)
?@
MCm
P043¤98<
(ENTER)
1
2
?@
(SOURCE)
YP 0<
3
4
5
6
7
(MENU)
8
?@
M C m P¢¶·
¯°
9
¸(ENTER)
M ¹z
+äµå¶
@Aå¶ïæ+QÁÌÆÇ.ç5
?@
(MODE) P±²³ ´1
Jµy
?@
<C,
P 0¤98<
(ENTER)
?@
MCm
P0433
<
(ENTER) 455+
3cñ¤ã?Qf®Z[<=
7
¥/¦§
1 ?@
M* YP`a¦§
)t*t+...ttt ... t
¨tAt ...t (©ª- t)
*
*<ðY=WXOm
2 «>`a¦§[
,
»<,Q/®BC¶aHI
3 12¬¥/®¯°
10 (MENU)
kl~BCFÅkl
• Å1234256=56@9æijV^Þ
ki=12342/0
• #Nlm£n{jV=56@9æqopBq
rQÀF×s1
• #Nói56@9æBqrtÀÞ}u
v~ªw
• #NBqrøÀjV!i=56@9æ
Þ}uv~ªw
23
VWXYZ[KL 6 FG
¥¦u
Dz{|I
h Ø 'a 567869
:;èP+Q//0£¤+éº
Dz{
pW
u"
5}§¨5}I
?ß7µêëõÕ+ *1 5<=Èß
7Um7 <= *2 ¡ì?
1
(LIST)
èP5ef *3E <=+3kl~4
L7%NT
2
?@
M C m P¢º» *3 3
(ENTER)
*1 xy'(zm56{Å£|1ÏtQwÑê
}É'(I
*2 x12342/0zm56{Býi12342K
L=1CÎ1234256I
*3 ð x°±²³
´µ¶·z=Æ2$Æ1
MMB1234256: =ìíâ?:;JL_
`
MM{~ÈÉÂuv~xO(LIST)OP
f3dæíî4 (gQsQ9QF
. NF-/45yD
HI
h3Ú ¤ã?AïjQ+¡
ðïÖ×?Q0ñòóô
HI87\]
©ª)bu D«
I
f3\P5íî4õ\ö÷5
QÔøæó5qrÐÑ:Ñ45
1
?@
(SOURCE)
!"
0 (EFGB)-<CHI$D
2
3
4
5
6
?@
(MODE)
PHI
7
(ENTER)
\Píîaö÷5qrÐÑ5
43Öש?AÍ154Q354
j(ENTER),
8
(MENU)
kl~BCFÅkl
(MENU)
?@
<C,
P 0¤98<
(ENTER)
?@
MCm
P 0¼´1<
• ù
;¡Lûmü^â?åä
=È:ÞE=ÈÉ
• ÅCÈ:IU&¿Å
=:©Íäåmü
24
M
^87(\]
¢
1
2
3
GHI
./
@AB
E)
CD
?@
(SOURCE)
Ph½¾
?@
(MODE)
PHI
±³`bc¿¦
((1)"(6)-
MMOMêmOPOãä¯@9_À=WXû
mü ÏÈKLÑ
¬® ")b]¯
F<
12345 6 6 6789:
6 !"#0
@AB
E)
CD
< ÀA C,À¨ ÁÂbc
(ÃEFµy-
hf#6¶æDjQùú仼
ìZ[0F#6¶îA5
• #}Àc8^©UKL
,-B¹=müÏqrstu¦wxS
L7:ÈÉzÑ
• ù£{=mü8PqO¤<ê,O
Pm8PõY[O<ê,OP«
{=8P Ï¡}Ñ
F<
0
°±²³"`+´µ¶·
@AB
E)
CD
'7
F<
PÄ'Åh=jk
¹ GøgJ¡¢.klPº
« ¡ û à ü ¶ ýQÒ E ü « þ
(7U8UZkl1¾-
MM# N ¢ 7 £Îq Þ xËzÈ É ð
xË77zÏtuQwÑ
25
_87`a(\]
/0ÁîA5
1
2
3
4
?@
(SOURCE)
Ph½¾
VWbcde\]
¥¦u
1
h½¾ghÊËiY
ÌV (LIST) h;5qr.êë5+3
kl~4
2
?@
M C m YP`ab
c
@\
5PèP+Q/5qr
kl3kl~4
3
(ENTER)
E/`bc
ï)Qkl~BCFÅkl
?@
(MODE)
PHI
<ÀA C,À¨ YE
/¢±Æbc
`¿¦
((1)"(6)-ÇÈÉ
M¹Y!"ST 0134567<
klî,5¼HQ\P5µ
wؼHԵ54
MMù£pÜBãäåimü=OPCäåsm
ü^Eä¯=müÞißV
MM{~ÈÉÂuv~xO(LIST)OP
26
W¸¹
+! fg
6¡h (8-5
3·56¡ö5j¸
t«5¼hiLQ#6
8
?5jQ®kl)hi(æ
8h¸/,_
ïðMQL
• 5ÃEFY3Ú j
—6tGsJ
• 3ïð5 E ¡j#6 ÍÎÎÏ
—76tGsçJ
• £¤xÐÑÒ\
—>7 tG9I
J
• õPj-—7tG9gJ
•
¤¥êÉÂWi=$KL¦J
• #N¹§
ê+#N£¯=mü¨$
/^$_`ªw©h
¢
GHI @AB
./
E)
CD
F< BJ
12345 6 6 6789:
6 !"#0
@AB
CD
E)
F< BJ
0
@ABCD E)
F< BJ
'7
27
hijklmn(HI
odp
ºu
qr (6-?6¡®Ä
5÷ö;Å36þ5
F<KLMNO
PXRWTU
PQRSTU
BJ
VW2RSTU
1
2
PÌ®J1bc (MÓ-
?@
(AF)
Y!"$D0 A F <
f]^S3æDC?ÂÃöÉ÷
5qr
@kl [Z6Qlh;5
qr
MMÅþóiª8PIêÅ_Zª8P
IqSTÆ7KL
»¼½¾{fg"-a
£¤¥¦§¨t < , ©
ª«{
Ô Á³ÕÖ(xÐ)T-×
ØÙÌmÚ ($D 033;<ST-
@f]^tº¶"5>bQ/f]^B
CF\\
5qr
28
¿ÀÁÂÃ*Ä
h6?jf]^5°±P
®#6Ïx3æDèP5ÄQìt
9_FqrÉ÷5æDÄ5
»Ä5#6È
D6?Q³\ü?\
8&
%SZ(GøgJ-
MMUKLB«¤?¬?_4
|ÂÅ_u DÆÇ{ÈÉI
f?\
f!?ïðfÄ
Qä¡ÓçP453¼H,4
1
±³ÔÛbc¿¦
((1)"
(6)-
2
Ü ¹zÝÞYßà
áÔÛbc¿¦
3
âã ? @ ! " g h> ` Ô Û b
c
lqVVr
ºp
£ ¤ " £ £ # (76-. " £ (7>-Q/0õ;Å$"££#5
ÓçP?hÈ¡
(EQ6$m-t£#)f]^
BC£
?@
(TA) Y!"$D 0 T A <
f]^SÂÃ"£hi
0 T P <lì>5#6@kl
[Z7>Qf]^®%ÞÂÃ7>5
AÍ1î5"££#Q¡ T A 1¾
.
/
Í1h£#
(TA)
• £JExO (SOURCE) ê (MODE) OP»ß
Åx
• O¤UC=(MODE)OPQ R§JE¨© H
ST2ÆKL
® ÊËË¢"+,
/0"££#5¡&'Qì
T(þ
1
2
h)s4*)>?t>+!
\]
8jQf]^®Ú4dD
56E76P ( E !-+ïqr
/ 0 , ü, 5 \ 5 P
(6Q76È-ö-QÈö,î5\
"5P» A F
Qf]^®õ45tuö÷5
~d½"® -a® ÎÏ" !
1
2
3
4
5
6
7
8
PÌ®J1HI (MÓ-
(AF) C(TA)ST0 A F < C 0 T A <
áÕQ\
A F . T A ®
ª.8Qãª8
(MENU)
<C,
P 0¤98<
(ENTER)
MCm
P 0¼´1<
(ENTER)
(MENU)
kl~BCFÅkl
(VOL)Ex¢½äbå
~Ю -a® ¶Ï" !
¸(TA)M¹z
76klPµÚ4
1
PÌ®J1HIYÇE/`bc(
Mæ-
2
(AF) C(TA)ST0 A F < C 0 T A <
3
`¿¦
((1)" (6)-Y!"
ST 0134567<
`cÌÍË¢
@6È76Q36þQE
È6$mjQ@)*£#f]^®9_F
)*£#
³ÆÇgÁÌïð
29
VWuvwde\]
1
ghJ1X
(PTY)
Ñ
/0£¤\
/A6þ5>0
;
9JKL
MN
Â1
[2T
hóâ
R
633%T
hi
b
3%
Ð
ì
45
UXR%
67
%%
*
RSRT
89
5
Y%Xìë
:Ñ¡½
>ìRT
;ɽ
8RT
<cÄ6þ
U%TNT
&
<c5=>¡½
N&ëS%TTT
=>5
RTS%TTT
ïð¡½>0
ZëRT
?@
F%ëA
BC
%
DE
ëSX
F
T >&T
GTóâ
%S633%T
H4
8S&
I;
>ë
b
JK
7%OSA7R
&
LM
NTRAÔÅÅ
NO½
í%PPRT
QR¡½
R
RT
ST¡½
[%
%SRT
UV
ZSXTRT
S¡½
SRT
Ö1o
R
%
MMBâ?óiJ=2®Ï¯<°F×Ñ/=
¤¥_`KL
30
ȁ3>7hQ/klh
5>0+
»#65,.8QÈP#6
¶8hQ/ --------kl
2
?@
MCm
YP`axÐ
ÑÒ
>004îl5ÐÑkl
»8hPèP>0Q/kl
--------
3
(ENTER)
f]^SÂÃÅ3$\P>05
HI>?@A
!"#
³8¾57 (j-j-hõ
Pj-
1
2
3
4
5
(MENU)
?@
<C,
P 038<
(ENTER)
?@
MCm
P 0´<
(ENTER)
6
?@
MCm
P 0<
j-µP
7
(ENTER)
kl~BCFúl\ükl
8
(MENU)
kl~BCFÅkl
AÍ17?Q3ÆÇm\
Z
• ±ªB$mü12KLJLh
• 12KLÈÉ=IJL²³Ii´µ
Hxyz
ÒÓÓÔS D$h p no p qriI
/0®543 5
Nn89kl
P5nh®543f]^
A3f]^klo545nQp
qrgst \
klu.klvu
1
2
./ 013456789:;<(Kç-
3
?@
<C,
P 0O
36<
dwxy<È,wzQ{L|
¬)
SV y )UVT y Z[SX)YZ
y Y
UXYU y YS®U¯ y
)YZXVSS y ®VSX
4
(ENTER)
5
MCm
P 013456789:;<
»/ALo54n * 5kl>0Q
\
S%Të
(GRAPHIC)
* £LSLBqr ¦¦
3 Àåä= ÜÝ
6
(ENTER)
»3ÆÇ}\
S%TëQ
/~¶ÆÇ
t
31
7
8
9
?@
M Cm
PBèé
CÑÒ
°Sê® GæW?5î
54,{|ìjQt
È\
kl>0»545,
øII × çymQ//0¡ì?æg5
4¼Í
54j» (GRAPHIC),Q5
4®µÍ1
)YZXVSSSZXê »/AP5
3 5GæWQ\
ì
W±SV®UXê»/P\5 ¼Hø"XYZ[ü5Q\
ì
×Ø믰 êh ?
hkjQklhk+
(ENTER)
3ÆÇ ý \
hk+ȃ\W5
hk?QÁÌÆÇ ý . \
Ò
]/A5hk
/0P?GHW
5
?@
< C , P¡B
è
11 EBè
1 ?@
<C , ìíBè
< ^_j`MWvwQ, ^Ðj`
MWvw
2 (ENTER) 3 ?@
M C m îSTBè
ïð
M Î5\P!È m a
»AklDQZ[ M¡
5\P!b/?Î
4 (ENTER)
»3ÆÇ gg
3 \
DQ/
¶ÆÇgs
5 ?@
)
(Mm<,-P
STBèño
10 (ENTER) »3ÆÇç?\
5,
øII × çymÈÉQ/tì
jQFÆÇgs
»3ÆÇH?\
S%TëQ
/ã¶ÆÇgs
6 (ENTER)
»c9Èkl\
5!Q/t
3ÆÇgø?\
kl>0¶Æ
Çgy
12 ?@
MCm
P 038<
13 (ENTER)
32
14 ?@
MCm
YP`aST
ÑÒ
/0\
0)9=kl>0(æ
SXSVò3kl~5?dkl7¹
5
FYSòe'Äkl\
5
òKLkl~Ôkl\
5
• £JE#ÈÉÜÝHc{
3°¶¦·¸ÐÐצ·QÐйêk
K°7Ì°¶¸uÐ×uvйêk
• ÈÉIU&º»¼©½¾
• ïJE¿ ¦ÐÐ À x±²³
´µ¶·z/&À=
ÜÝ
• x±²³
´µ¶·zÀ=E/&_`
–1ËÌ2$Ë1
–1
–ËÌ®
–JË13
–Á7
• #NóiÜÝ/^Bqr¸êvÀxÌ
µ¶´Ç³±zBÀ
• Âåä/=æÃÉåäIÞBq
r ¦t À=/0IĸSTU#N£STm
Þ_`åä/
• #NU&=æÃÅÞ x37611EƱG±´±
Æ´z2_`åä/jV/ÏtøwÑ
qîïRºÈÉ
• UÀè>JEåä¦ÐÐÇÈ
• #NBqrtÀF×!x1
±³EÉÊ´z^}F×
þ/&
15 (ENTER)
L7S
OPQR 6 S%TRUVWXY
543 F%SS>%ì¡ö!
9:;<=
>? 8
@A;<=
A
16 ?@
MCm
P 0ó3<
17 (ENTER)
D
E
B
B
C
C
18 (GRAPHIC)
kl~BCFÅkl
(SCREEN),w_,cuNÈÜz
E {|N<)kl7{|
²³9¢
ABCD,E!FG
BBCD@A
C HIJKKJLMNOPQRS
DBCD>?12
E HJTUNJVJOPQRS
MMåä=ÜÝJLOåäWX
´µ ¶·³9¢
33
>?{|}:
9
(ENTER)
ÕUT Dno p qriI
Ékl ?5
È3Ôkl
P5h®543f]^?
A3f]^?kl\545Q
Gg9J \
klN.klMN
1
2
3
34
./ 013456789:;<(Kç-
(GRAPHIC) ?@
<C,
P0ô564<
dæg<È,,Q)
¬)
SV y )UVT y Z[SX)YZ
y Y
UXYU y YS®U¯ y
)YZXVSS y ®VSX
4
(ENTER) 5
6
ßà
(ENTER) ?@
MCm
PBèé
CÑÒ
)YZXVSSSZXê»/AP5
3 5GæW?Q\
ì
W±SV®UXò»/P\5 ¼Hø"XYZ[ü5Q\
ì
×Ø믰 êh ?
hkjQklhk+
7
(ENTER)
3ÆÇy\
hk+ȃ\W5
hk?QÁÌÆÇy.ý\
Ò]/A5hk
/0P?GHW
5
8
?@
< C , P¡B
è
kl > 0 KL \ P 5 f g hõ
P
gg Fgø–Ôkl
i¤ gø–e'É
\ gg–j0É
10 ßà
(ENTER)
11 (GRAPHIC)
kl~BCFÅkl
(SCREEN),w_,Üz E {|
N<)kl)5Üz
• £JE#ÈÉÜÝHc{
3°¶¦·¸ÐÐצ·QÐйêk
• ÈÉIU&º»¼©½¾
• ïJE¿ ¦ÐÐ À x±²³
´µ¶·z/&À=
ÜÝ
• x±²³
´µ¶·zÀ=E/&_`
–1ËÌ2$Ë1
–1
–ËÌ®
–JË13
–Á7
• #NóiÜÝ/^BqrêtÀxÌ
µ¶´Ç³±zBÀ
• Âåä/=æÃÉåäIÞBq
r¦ÐÀ=/0IĸSTU#N£STm
Þ_`åä/
• #NU&=æÃÅÞ x37611EƱG±´±
Æ´z2_`åä/jV/ ÏtøwÑ
qîïRºÈÉ
• UÀè>JEåä¦ÐÐËÌÜÝ
• #NBqr¸ÀF×!x1
±³EÉÊ´z^}F×
þ/&
OPQR 6 S%TRUVWXY
543 >%
%%¡ö!
ÖZ[SXYZ D$hiI
A
/0,dÍ<=54.PæDkl
5ã/03cuN5¡kl!
klì
P5h®543f]^?
B
C
D
>?~}:
A BCD>?12
B HJTUNJVJOPQRS
CBCD@A
D HIJKKJLMNOPQRS
MMåä=ÜÝJLOåäWX
1
2
3
4
./ 013456789:;<(Kç-
d¢õöBè
(GRAPHIC)
?@
< C, P0÷:;389:<
dæg <È , ,Q)
¬)
SV y )UVT y Z[SX)YZ
y Y
UXYU y YS®U¯ y
)YZXVSS y ®VSX
5
(ENTER) 6
MCm
P 013456789:;<
»/A\545kl>0Q
\
S%Të
7
(ENTER)
»3ÆÇy?\
S%TëQ
/¶ÆÇgI
8
?@
M C m PBè
éCÑÒ
)YZXVSSSZXê»/AP5
3 5GæW?Q\
ì
W±SV®UXò»/P\5 ¼Hø"XYZ[ü5Q\
ì
×Ø믰 êh ?
hkjQklhk+
9
(ENTER)
3ÆÇ\
hk+ȃ\W5
hk?QÁÌÆÇ.ç\
Ò]/A5hk
/0P?GHW
5
t
35
10 ?@
< C , P¡
Bè
11 (ENTER) 12 ?@
MCm
P 038<
13 (ENTER) 14 MCm
YP`aSTÑÒ
/0\
)s=kl>0(æ
*UVTêkl3ÆÇgI?\
5
XêKLkl~Ôkl\
5
15 (ENTER) LíRT
16 ?@
MC m P 0ó3<
17 (ENTER) 18 (GRAPHIC) kl~BCFÅkl
(SCREEN) ,w_,cuN
36
• £JE#ÈÉÜÝHc{
3°¶¦·¸ÐÐ × ¦·QÐйêk
K°7Ì°¶¸uÐ × uvйêk
• ïJE¿¦ÐÐ Àx±²³
´µ¶·z/&À=Ü
Ý
• x±²³
´µ¶·zÀ=E/&_`
–1ËÌ2$Ë1
–1
–ËÌ®
–JË13
–Á7
• #NóiÜÝ/^BqrtêøÀxÌ
µ¶´Ç³±zBÀ
• Âåä/=æÃÉåäIÞBq
r ¦t À=/0IĸSTU#N£STm
Þ_`åä/
• #NU&=æÃÅÞ x37611EƱG±´±
Æ´z2_`åä/jV/ ÏtøwÑ
qîïRºÈÉ
• UÀè>JEåä¦ÐÐÍÎÏ
• #NBqrvÀF×!x1
±³EÉÊ´z^}F×
þ/&
>?I
10 ?@
< C , P¡B
è
ÓYÔUXYUÕ D$hiI
/0,dD¡54kl5 'b
È 'b :;QÔ3cuN?5¡kl
!kl
P5h®543f]^?
1
2
./ 013456789:;<(Kç-
3
4
(GRAPHIC) 5
Pøùú½û(h½¾LL
1L1 C ü-
?@
< C , P0
915895ô<
dæg <È , ,Q)
¬)
SV y )UVT y Z[SX)YZ
y Y
UXYU y YS®U¯ y
)YZXVSS y ®VSX
(ENTER) 6
M Cm P 013456789:;<
»/A\545kl>0Q
\
S%Të
7
(ENTER) »3ÆÇ y ?\
S%TëQ
/¶ÆÇ 8
?@
M C m PBèé
CÑÒ
)YZXVSSSZXê»/AP5
3 5GæW?Q\
ì
W±SV®UXò»/P\5 ¼Hø"XYZ[ü5Q\
ì
×Ø믰 êh?
hkjQklhk+
9
11 (ENTER) 12 ?@
MC m P 038<
(ENTER) 3ÆÇ\
hk+ȃ\W5
hk?QÁÌÆÇ.ç\
Ò]/A5hk
/0P?GHW
5
13 (ENTER) 14 M C m YP`aSTÑÒ
/0\
)s=kl>0(æ
*UVTêkl3ÆÇgI?\
5
XêKLkl~Ôkl\
5
15 (ENTER) LíRT
16 ?@
M C m P 0ó3<
17 (ENTER) t
37
18 (GRAPHIC) kl~BCFÅkl
(SCREEN) ,w_,cuN
E}:
WÓY×SWØUÙ Dwx2yiI
l o æ t É k l ?5(h®µ54-
• £JE#ÈÉÜÝHc{
°7¶¦¸Ð × ¦Qйêk
• è>JE°7 }Ï=¦ÐÀÏ Ï#NÜÝÐ
ÑÊvu × vu¹êkè>JEQÐÀÑ
• #NÈÉ!ÍÎÏ ÏtwÑ^ÒÄÏ
• ïJE¿ ¦ÐÐ À x±²³
´µ¶·z=/&À
=ÜÝ
• x±²³
´µ¶·zÀ=E/&_`
–1ËÌ2$Ë1
–1
–ËÌ®
–JË13
–Á7
• #NóiÜÝ/^Bqr t ê ø À
x̵¶´Ç³±z
BÀ
• Âåä/=æÃÉåäIÞBq
r ¦t À=/0IĸSTU#N£STm
Þ_`åä/
• #NU&=æÃÅÞ x37611EƱG±´±
Æ´z2_`åä/jV/ ÏtøwÑ
qîïRºÈÉ
• UÀè>JEå䦸ÒÄÏ
• #NBqrvÀF×!x1
±³EÉÊ´z^}F×
þ/&
• jVåä=ÜÝÈ7Ü
1
2
3
./ 013456789:;<(Kç-
4
(ENTER)
5
?@
M C m PBè×Ø
ë
USVSSZXò \
Ò]/AP
5hk
W±SV®UXò »/P\5
¼Hø"XYZ[ü5Q\
ì
ò ®loN,Z
6
(ENTER)
3ÆÇH\
SXSȃ
\W5hk?QÁÌÆÇH. y
\
Ò]/A5hk
/0P?GHW
5
7
(GRAPHIC)
kl~:;loNQ<)S
lo
(GRAPHIC)
?@
< C , P0
9¤3ý5þ<
dæg <È , ,Q)
¬)
SVy )UVT y Z[SX)YZ
y Y
UXYU y YS®U¯ y
)YZXVSS y ®VSX
• £JE#ÈÉÜÝHc{
3°¶¦·¸ÐÐ × ¦·QÐйêk
K°7Ì°¶¸uÐ × uvйêk
• LBÎêû7IÈÉþ
• £è>JEÊA/&FצÐÐÀÏ
• x±²³
´µ¶·zÀ=E/&_`
–1ËÌ2$Ë1
–1
–ËÌ®
–JË13
–Á7
• #NóiÜÝ/^Bqr¸Àx̵¶´Ç³±z
BÀ
• ÈÉ#N» x±²³
´µ¶·z^uv
~I§Öc
38
}:
9
(ENTER)
YZXÚSSÓ
f]^t54#&i¤sM5
1
2
(GRAPHIC)
?@
<C,
P09:8633
<
dæg < È , ,Q)
¬)
SV y )UVT yZ[SX)YZ
y Y
UXYU y YS®U¯ y
)YZXVSS y ®VSX
3
(ENTER) 4
?@
M C m P¶·Bè` jk
» å ¶ î 5 4 5 h Q \ 6NNÔ¶ÆÇý
5
(ENTER)
6
?@
< C , P¡¶·B
èÇ
m
å¶)Qkl~BCF8úû\ü
kl
10 (GRAPHIC)
kl~BCFÅkl
• _`jVUÀXåä=ÜÝ
• jVÜÝ/IU&º»¼©½¾
• qÓÔ{ÜÝÕjVÖ_`×Ø
• ÂjV/=æÃÉjVIÞBq
røÀ=/0IĸSTU#N£STm
Þ_`gËjV/
• BjV/À#NOØjOP^jVi»ß2/
Þ_`gËjV
£è>JåäIÃ=ÜÝ{
ÇÈ{è>¦ÐÐ
ËÌ{è>¦ÐÐ
ÍÎÜÝ{è>¦ÐÐ
ÒÄ}Ï{è>¦¸
m ,QhC6mkl3\P5
no
A»¼å¶\P5QZ[
< È, \
/A5Q<)M
Aå¶É5QÁÌÆÇ y ?5
7
(ENTER)
8
?@
MCm P 0<
AÍ1Q\
[Z
39
>?
ØWSXÚÔDfjklm p no p qr p
st*u p wx2yiI
klHI5pq{hr/kl
~5/Ì
zÛÜJFÝÞ DºÚXUÓSI
3qvwxy E Üz E {| E }~? E
loN?/0¡klHI1¾oÎ
hP,Z[jQh<=W*âkÈef
Èö¡ÈklNjklkl
HI/0Ür
1
dCgh½û (h½¾LL1L1 C
ü-
2
3
(GRAPHIC) ?@
< C , P0ý638<
dæg<È, ,Q)
¬)
SV y )UVT y Z[SX)YZ
y Y
UXYU y YS®U¯ y
)YZXVSS y ®VSX
4
(ENTER) 5
6
MCm P 085
36<
7
8
9
(ENTER) ?@
MCm P 0<
(ENTER)
(GRAPHIC)
kl~BCFÅkl
MMBF H I§ÖcÀ£_`¾:;}ßÙ
40
ßàÛÜ"áâãäg D«ÓSÕ×
SåSÓI
/03qvwxy E Üz E {| E }~
? E loN=PHI5pq{h
r (stÌ-
u\ìYvQ/0kl~?5HI¡
(w
1
dCgh½û (h½¾LL1L1 C
ü-
2
3
(GRAPHIC)
?@
< C , P0ý638<
dæg <È , ,Q)
¬)
SV y )UVT y Z[SX)YZ
y Y
UXYU y YS®U¯ y
)YZXVSS y ®VSX
4
(ENTER)
5
6
M Cm P 0¼
3ô¤3ó3
<
7
< C ,PÚ(3ó3
çAKÜ-
Yvx\QklHIxyz
8
9
(ENTER)
(ENTER)
(GRAPHIC)
kl~BCFÅkl
• BFHI§ÖcÀ£_`SL:;=ÚÛ)M
P
• Þ xÆÇ´1G±³zÈÉÊ xËÌzÏtuÐwÑ^_
`SL:;=ÚÛ)MP
$%&'
/4>?
/P0)
du/
/0\¡W{¡W'|W¡&}´
.i\¡~«r5¡&
1
2
3
4
5
6
(SOURCE) P½û (h½¾LL
1L1 C ü-
(SOUND)
?@
< C , P¡E
Ð
dæg< È, ,Q)
;ByZ[y\]]y
>^_>
y\_`E> abcde
ySV ¸¹º
y±¬UU»SV ¼½¾;-
(ENTER)
< C, YEx`PÐ
(ENTER)
/
(ATT)
6773kl~4kloÎ
A¢£\5¡&'jQ¬æg
(ATT),
MMÅòÜmÝ=úûmÞúûBÆ22ßàC^B
imݨ¯IU&}á¼7ÃÏmÝÆ22KLÑ
WSXÚÔ
• S (GgJ• 7 (j-j-(G9gJ• MìDD È! o#«
• 6$mì*¹ GøyJ º È!6$m¡
kl
• 6R (GsIJ
• kl~nÌ
– \
6$7ZQ3 ø{j¡k
l~w
– \
Z[¡kl~w
– \
Z!´<r
• %T »f]^5à]÷^O
äåkl~45èltQ/
ßhÌ
• 6RSS*2
– \
Z[Éîõkl5+
– h 6RSS?, ZQ<= E
ef+jQ<= E ef+TÉ
kl
ÓVU×S
• N%S (fÄÂÃN-¹ GsHJ º
– \ Z[/;ö
÷5
• (ü«þN-¹ GsHJ º
– \ Z[/0ü«þ6þ
©«$
\
Z/BCÅN
• 8&
%S¹ GsJ º
t
41
WUÚÕ×
ÚÕYÕæ
• Uý7R
(Gø9J-`|ru
• Ô> ({£ír-(GøøJ• N> (\£ír-(GøHJ• NRX
TT 3s\¡&j?¶\
¡.{¡\¡.{¡®µ³÷
• 6$mNOS*3¹ GøHJ º "#5
5¡&'
*1 iÅO(OFF)I§I
*2 iÅÎ199ê I
*3 7Ê Æ64 I
MMilúûFG= 1H I3 xÆ64
·µz: xÆ641±â±Gz
1
>?I
! @5~«r]3 5
\û÷Q/«
¡®³)¾Q/?
Z (Zr-?§¨É
A5«¡Q3ya]D~«
r (~«r-
/0,dD¡45ZP
;B fghij-kl
*1
(MENU) AP6RSSQ/3EE
¤ã?(MENU),
2
3
4
<C , YP`aÐ
5
6
*3
*3
*1
*2
*4
*2
*4
(ENTER)
?@
M C m YPaE
Ð
(ENTER)
*1
*2
*3
*4
˦
ËQ
Ë
ËË77
?@
M C m YP`a
(âê0<C 0JJ<-
1
(SOURCE)P½û(h½¾LL1L
1Cü-
2
3
4
(SOUND)
5
?@
<C,Pjk(KA
N-
@AÍ1Z?Q\
Z
6
(ENTER)
7
(ENTER)
kl~BCFúû\ükl
8
(MENU)
kl~BCFÅkl
?@
<C,
P 0<
(ENTER)
MM=
7i
•
=ñòã<°ê7ä<°ËKL
ÉLåÔ=4N
• #N¢7£ÎqÞxËzÈÉðxË77z
MMËÖc=74Na:=æçæç
42
>?¡¢
£¤¥ /0,ý=¡½>0(mìSXLY%SL
SRÅLí%PPL[26&L8 . RT-\
`|u
/0,dD¡5`|r
P
çèéê^
1
(SOURCE)P½û(h½¾LL1L
1 C ü-
2
3
4
(SOUND)
5
<C , YP
Gjk
@AÍ1`|»Q\
Z
6
(ENTER) 7
?@
M C m YP`a
G
f
8
9
(ENTER)
P¡`mÚbå
1 <C , YP`amÚ
dæg < È , ,Qqr
qrsyt[rsyuvqrs
ywwwrsytwrs
yquxwrsyqwwwrs
?@
< C , P 0<
(ENTER) MMË ©IèéfÈÉ} Eêèë= _4N
2 ?@
M Cm YE`bå
'0gXM,vQ³ DgIXMF
gIXM :Ñ
A¢£F±P5`|uQ
(ENTER),ÝÞsÀ-
3 1 2 E
Gf
10 (ENTER)
»P)Qkl~BCFÅkl
)*èéê^
/045.`|rP5qr.
'
1
(SOURCE)P½û(h½¾LL1L
1 C ü-
2
3
(MENU)
4
5
6
?@
< C , P
05ô¤´ô9ô<
(ENTER)
?@
MCm
P 0´ô3<
(ENTER)
Z[
m`> =no_@pG
43
du¦4§¨
/
1
(SOURCE)P½û(h½¾LL1L
1 C ü-
2
3
4
(SOUND)
?@
< C, P 0J¤36<
(ENTER)
5
?@
<C, YEx [
'G½ä
6
(ENTER)
kl~BCFÅkl
6
?@
M Cm YPmÚ
dægMÈm ,Qqr)
¹ P ºy¿DÀy !ÁDÀ
7
(MENU)
qrP)Qkl~BCFÅkl
du©/¨
/
1
(SOURCE)P½û(h½¾LL1L
1 C ü-
2
3
4
(SOUND)
5
6
?@
< C , Ex½ä
?@
< C, P0O5536<
(ENTER)
)*ë} p ì}í³"î0fg
B[
,îà]5~«r$"Q
/0\
~«r5¼qr
YZF<
\
MM7ÃmìB –¦ÐÆK ~ í¦ÐÆK ;JÏîð
–¦ÐÆK I x– ∞ÆKzÑ
F< TU
44
(ENTER)
kl~BCFÅkl
1
diCefbghXY
(MENU)
2
?@
< C , P
05ô¤´ô9ô<
3
4
5
(ENTER) ?@
M Cm P 0J<
(ENTER)
)*ïð+í³î0fg
([
,î"#5i\¡~«r$"
Q/0A5{q.?qi:;
i\¡~«r£¤P¼qr()-Q
i\¡~«r®Ù\qiQ0[üÉ
5«¡
WX,\]
ªl«¬/>
f56$mb[ (·û¡qÙ;-j¤ã
M$6$bZb[ (¡qÙ;-j¤
£¤"#æD\5
N]^Q
/0³ ~«r6þ«¡
MM#Núû!FG=
1H^£
LîúûØjïðcÂ2LF× xÆ64z
çñò ¾
(SOURCE) R\{
,- YZ
1
diCefbghXY
(MENU)
2
?@
< C , P
05ô¤´ô9ô<
3
4
5
(ENTER) /0,"#5ô¡¢¡&
?@
M Cm P 0J<
1
2
6
(ENTER)
?@
M Cm YPmÚ
dægM Èm ,Qqr)
¹ P ºy !ÁDÀy¿DÀ
7
(MENU)
qrP)Qkl~BCFÅkl
)*+,-.
(MENU)
?@
< C , P
05ô¤´ô9ô<
3
4
5
6
(ENTER)
7
(ENTER)
kl~BCFúû\ükl
8
(MENU)
kl~BCFÅkl
?@
MCm P0ü3ó3
<
(ENTER)
?@
<C , Ex½äbå
¡&'0gXM,vQ³ DyXMF
yXM :Ñ
t
45
(óô+Kõö"ñò5}
1
2
3
4
5
6
7
8
(OFF)
EE Ètu#6»¼(,ø
{.klÚ-
(MENU)
?@
<C,
P 038<
(ENTER)
?@
MCm P 0ü ;9<
(ENTER)
m P 0<
(MENU)
>?®{¯°
f]^æDàÜ?0µ ¡Ù;
æD¢÷¼,àÜ£
»PàÜ£Q3·æ¤ 4
ÁÂà]ÈÉ_3)Ù;54£
f]^
1
2
3
4
5
A¢èlQ\
6$mìZ
(MENU)
?@
< C, P 038<
(ENTER) ?@
M Cm P 03:6987<
(ENTER)
klX
1 ?@
M C m ¥/Ì鿦 (çA
-
2 , )"鿦Y
Z[?@
M Cm ¥/é¿
¦
Ìà M ¿¦Y
Ìà
m ¿¦
3 2¥/é鿦
6
(ENTER)
klëX
7
?@
M Cm P 0<
8
(ENTER)
kl~BCFÅkl
• _`:OPñ¦E¸ò ]¯óËBC
• ĸô@£=óËBC
• #NBqr t ÀF× xÌËzÂO (ENTER) OP
^uvqrÀ= 1Ʊ±´
46
÷nøù !úûì
»3æ¤ 4ÁÂà]f]^È
É_3Qf]^)®ë
X kl<c, (MEmE,-Ù;
5ø÷¼£Q<)(ENTER) ,
()*+
MN@p>`omC
±²
üý¿þ
êBCFª« E j-kl
*êkl ZUU88Z8i¥
<c,Ù;ÅÙ5£
É_Ú¦§jQ*+ÙÚî¡5Ú¦§
£Ú¦§5਼"@Ú¦§©Q
ªé"#Ô¬É_Ú¦§@Ú¦§É_
)«µ©Q//?aûô¬ìjQW
5 ¹®ê¯°
=Ý÷nøù
ÁÌÆÇgFø PàÜ£(
XSkl<c,(MEmE,Ù;545£QÔ(ENTER) ,
@p>;>_ MN
^_` abcde
HI
êBCFÅkl
*êkl ZUU88Z8i¥
<c,Ù;ÅÙ5£
MMV!jVåä=BC+£_`SLóËBC
9Ü¡±P਼i¤f
Ú¦
§à¨¼5Ú¦§Q./TUVf
t
MM#NlåäóËBC^1Ʊ±G
47
üý-
æ²³à)Q3?´Ýε g ¯5j
(KL¡ûàQ¡¶·/?T¸æ
ç-h35â¹jQnoNpqr5
®¸_4Â58sIsHº3
¡ïð3/?&`»¼È½¾5¿¦
³´=0
1
1 (!-
VÞë}Y
Ç""Û#
jkl
mn
x
fghi
MMÊ!õU=öÅ®¯÷øùIqB÷
øù:;®¯úûü
2 $%& 1
-"
• º3À3DEÁÂ+5ÄMÃæÄ
Å3Q
äºÆò
• ÇÈÉÊ3Q0ÚÝ#ÂË
• à]3jQ*+ÚÌÍ$ÅÙ
• BÎϤÐk3Q./T&`¸C
ѵÒ)
2
Ô¾
1 ' (/Ô ¾%& ) *+
,YZ[-$Ô¾%&Y!")*+,
./0é
HI
!"#$%&'
()*+,-./012'
2 $U&1
3 Ô¾10é2$
MMýþU;qºST#N¨
©^JL£=¡}
48
µh¦¶·¸M
FG¶·¸M
• Ó@5 »30ÔÕ<)Q/3
• ,ÚÝ<=òQ9ÜÂïÍ<=
+\¡fÖw×Ø
• fÐÑj?u®õÙ
• 3ÚÛ?Q9Ü¡$7ZbNU?ÈÝ
ïð/?wÞßCàáÕâ5?
• ÜÚeÛ;ÈïðܨÝ;<=Q.
/®&`»¼Èô¬
jÝïab
• ¡j®<=];<=È<=a
9Ü¡<=¶ E {5¢
ñ®
<=3»5 aÈy E )
4
@Þßf5àÈÈáâQOf
z{|_+QW5
¹®ê
¯°
ú
3ã?È.äå5ÄQf5qæ.
kl~aTçòå@èæéìQf®
tÅÐÑìjQ®<=ÍQÔYê
µæjQ0Få@ë
• 9ÜcdQÈ¡
$eE¨5
<=Ó><=3¡jT»¼wQ³O
¨ô¬ÈV<=
~¿³+
jÎh]Q9Ü®»ìÈïæíî3f
È<=4
• Ü¡Ý
cdÈ95<=Q,
óâ
• ÜÂï<=a5qæ
• Ü¡ðñ5qæòó
ó
• Üâôõöklr.//?äå÷
9Ècd5×&`<=M/?ä
åtÅ
ÄÍ (Q~
È-
• f?.c5<= (Q]
5QÅvQ5-@nì><=Q
//?UVf9Ü¡ì><=
• 3Qðñòò<=³
<=5?]W9Ü¡K
óð®ñ5òó0+
5 ¡óY¢ó
øÈUVkl~
• õöklr4/?Tnm (ùsQús
Èûs-ÈümÓô¬fõökl
r¬{KÌýþ2¨Qçç¿çç045
Û5ÒQ5/?Tkl
4
t
49
ó DIpÒ D
I
f]^?Ø0)<=
yzKL
yz{|
}1 ;
¹i º,-.
>9 (>U'g6RXN%D9-æ
ôa«¡ÐÑ5cuýþ.¸N/®:;
ôa¶µ,£Î5 gEgIi5þ
5«¡µôaQOó?þ¶5«¡Pµô
a
89
<u~
/0123D8ZQD8Q.D
8F45>9:;
<=*+ bZçyyI* 1SOSg È SOS
s¸NQÈ´µ¸N?5íS È 8
/0¡0RSTT
*2 125<=
*1 E"%%#Â9
• f/?tçD8ED8F<=
(<=12jîÈ<=ûàOP-
• ftPË * 5D8ED8F
<=
• /0123 D8ZQD8.D8F
45>9:;
• /0?@ABC5D8ED8F
* ÊA=1E$H1E$56LB781Î&C
κZ=ÚÛ
D8Z45:;.hk¸N
5G£cu
D·¸Yv3NOSg?Q:;
+*+¿9¸N(+?i¤ DH
IQ´µ¿>9??i¤ 9 DHI,ÎHhk+?i¤ D
HI?i¤ Dhk Yv
NOSs·¸:;+,9gD
HI
dDhk?!"v
ß´µ¸N?5íS È8 ¸
NQÙ#;$©Y5#&
*2 XYSYU
Óæ=¬7%D6DZ
MQ³A
h512MG£³+,N%XD
5qxSQÔ3+,N%XDR
5qxRSTT
æ=
%BC5Q³N%XD
¶N%XD
R5dDwîµ,ü,5BC
DUV%æ=¸NQ®¡q(¡q
h-,ef123BCg?Q®h
,ef123BCs?
VX3Ó=¸N?Qhµ12,
efgQ¡q (¡qh-µ12
,efs
50
• V! Ëø¸¸ÐG±â±G¦:G±â±GQHcHc
=/&'(ê'(JL_`ª«
• B'Iº»B'(çC' x z
• #NÞ' x zçBW CU&^
_`ª«þÂÞëL
f=7
• E56{I3L©ÍÎ
– E`=A=56
– E ÇG´µ±ÉɵA=56
– JEç¯/=56
%&]^_`a?bccadefgh'hi
• ÅtÝ=t,-781/{
LÎ781
_W781/ H /0 Ï,-C
:I.Ñ
• ÅtÝ=t,-781/{
– #N56Ài^Î
¬/iÁÏ781/liÑ
– #N56Àói^xÌË61z2
ÎØjæÏ781/liÑ
"12
hk.:;5ÐÑkl)
op$
qrs
1
1
qr
2
2
3
3
4
5
4
5
6
6
7
7
8
8
9
tuy
tub
vwx
tu
tuz
tu{
• i=/&iÁ
• è/&Ã{Q ÏA/&:^/
&Ñ
• 56ÀL =:/&=èÃ{
¦Q
Å H /&'( =>:;IþÃJL¼
ð¦Q
• LÎ=èÃÊv
MMù{.ÉZ{ÎWXB/&ê'(;
O: Ï#{xЦzxÐQzÑ]¯WXõ
ÞæAB56Cϯ_ÉWXÞi
Ñ
51
¹i !"#$%&
~ RSTUVWXYZ[\
æ=<&QÒ
#&h$Î55? b Ö1'©
( 3 "#çJ("_.w)¼Hh
,/*ÍQã/·û
¼L45
RSTUVWXYZ[\"
-=>05 %&'% (+s-
– % %&'%e,Ú-ýþ
– /:Ñõ
– ã/04Íh
(ús-
– % %&'%e , Ú - ý þ 5
– /:Ñõ
– ?4Íh
. jáÕ0)ó
– %&'%"#O12¡½h
Q*.% '
cl (0) g-5 %&'%
– 12ïðhQ.%
cl (0) s-5G£
b
y
MMU ¼ = x° ±²³
É´µ¶·z: x±²³
´µ¶·z=@9_æÃ#{
' ÎgsM
ÎgsM
~ RæYZXS\
%&'%%&'%
. " # ç J 5 e , Ú - ý þQL
[2F%S%
ÙÚÚ-5a#3"
#.%&'%¾Q
0A/¸N12.¾Ú-5a#Q¼
P¹/501È
óz{
,
ñUVhQ9Ü
– 3ÍÈ;hjÍ
– 3 È 2 3 5 4î ¡ RSTUVWXYZ[\" !
3±j:Ñ 67¸
NQ,ïcu¸N8N
¸N jQÜ3
F
X2TUVìS 4¡¸N?
RSTUVWXYZ[\""#
A B
LOCK
C
D
• h 5µP
NZ6÷^jQ/t12Wå¶È
h(M• %&'% )57Â
m¡ïG£5 (• Ü3cds¶cd·5ïð
89(• ÅÙÄ4cdQÜ¡ïÙ÷^
• Ü Á è È B Î ¨ © #  5"#r(6• Ü¡ :W;Ýȶ
÷<5=>
• ÜÒ?Ȩ • Ü@å • ñ 3 0 ) 4 î ¡ È Ú 4 – {Q£3¤¥)5¦§a
– ¤¥¨©s
– {åªÈ«¬¨®54î
• ,¯° 5¡±²Q
54³
ó$%
´µÈ¶·¸5$
¹·ºÜ¡/?»UV¹º¥·ª5¼
½>05¾¿¸WÀÁÈÂÃÈÄÅ¢
¸
52
PQ
P^
FM
$%&'
,
01234
674
/8CDE
HI4
MW/LW
$%&'
,
234
!" #
()$%*)+
"!#-./
5
./89!
:: ;<=>?@
! ;A>B?
":F ;<=>?@
"GF ;A>B?
/8 G
G
#JKG:/
LJKG!/
()$%*)+
"!#-./
#JKG MN
LJO. MN
RZ
4
Wlmn
vw
|}vw
~
6
6}
RPQ ;S - T?
URV>+PQ
;A>B?
WX$%YWZ&'
[
\]+Z&'
W_`aaZ&'
bcZ&'
deZP^&'
deRP^ `dfgh &'
$%P^&'
8Ri /8jRi 8 k /8 k
NopqrWs
;t)u?
x ! × × ! yy
;z - j - {?
x × G × !yy
;z - j - {?
x"!/
Z+
#fG ;?
|}*)
;?
S ;?
%Z+
#f:e
de W ; p`
%?
p:; y?
@p:; y?
po ;?
pof!!#f@pof::f
po ;:?
pofa!#f@pofa:f
#o ;:?
#of::fL¡
Rl67+
f`pG
¢¢£¤(¤¥¦§¨©ª«¬®¯
!
53
½¾¿
)ªé}A¡fj/
?B¶5àÈ
3¡)5ªé(Qªé"#.
ÆÇ.ÅÙ
Á&'µ
()/
ÁÂP,
j
• YZN qx¡&
• Í1677?
• ®ÆC~«r5}´qxP3?]
÷^
X
• 7)ÁÂP,
t ¬®P4;Ö×?
• uÈ37µ
• "#uPµÅÙ"#
=Gj
«?µÍ1 (GøgJ-
NMN8{ 6 MN8{
» (OFF),ÝÞsÀ-Qjkl®1¾
t ¬g(OFF),ÝÞsÀ-klj
-
UR
¡¢
£¤¥¦§P¨©ª«¬®¬¯
°±²j
äu "#rPÅÙ
®¬³
• ªé5"#@æ9ÅQ/ªé
Ú¦§
• %6÷^
t (SOURCE),f
&'´µ§P¶·¸
%6÷^
t (OFF),s À-
¹º»¼½º
Ùa?uP]%r
54
p12
¾¿´À"
• CDÈE
• 12È<=ûà5£Qç
D8ED8F/?t
¾À"<u~
• 0bZçyyISOSg È SOSs ¸
NQÈö´µ¸N?5 íSÈ 8
125
• :;´µ ¿>9PA3:;+)
• :;0>9¸N45
¾ÁMNÂÃÄÅÆ6ÇÈÅÆ6;u
|
• <=bZçyyISOSg"#
t ¡"#<=
• f?klH£Q6bbWFG
H5æp (6bbßíS-.
ë3DíbtÅÙkl4H£·
5ïð£
<u~.ÉÊËÌÍ¿´À"
0)<=AH
5jS
– 0ÌI5"8J125<=
– 0RSTT
125<=
– /0@Ah5<=
j}ι°±Ï}
• fà]ÌÎ9IK
• fPà]3 4
LM5÷^
Ï}
• CDÈNE5<=
• D8ED8F7µUV
&'OÐyzÑÒªÓÔÕÖײ}
Ófªé<=5«¡Qô¬
]^-_`
Ø:QÕÙÚ
• ®ÅÙ5qr453Öשa
• $iO¹
¾ÛÜ
ݲ}Þß
• ®?uqxäu (ús-È5
äu (Æs-"#¶ ?uÇÈr
5äu(É5 3) E Ê
ËÌaa^/EFENF?uj• ªé ?u5"#
• Í?u?4Ç
t ªé?uqxäu5"#
• ªéqr
• ZNÎjQ«¡j»Ï¶Ð¡5
PÑ
t ®ZNPÒ Z//
(GøsJØ:à¹ÙÚ
• fÓÔÕNP3 ZÖ
t ®fÓÔjNPÒ Z//
(GøgJ-
• $iO¹
t ×ØÙ&
=B
GNáâ
• ÃÙÓ&$qr
• $iO¹
t PÚÛ«Ü#N (GøgJ-
ÜãäåæjçÀ9Jèéjê
fÝ3Û«Ü#N
t Í1Û«Ü#N (GøgJ-
W
Üãëìí¿´îï
Þ$Òß7>$Èàá¹
t (AF)È(TA)¨Ú A F È T A 1¾
ð¶¶I
• Î76?
• Þ$âRÒ7>$ã$0ää1
t ;åææ$
ñMNò =--------G
[À 6 Á
<(
a%P&'fóô;6<;õz'e
)çl®èé} À-êëQ(®ì¶í
1«
\_`F * 1
4î12*2
t 125
``@C_A
• ¸Nïðftñç:;
• nòf"#5Q%óô
õx5¡qh
t ¡ ö÷ øù"#5
/0DE ö÷ øù?5h
@*1
• EÈ4)]*2
t ®úûÈÅÙÓ];
• ñç£QE?*2
t ];åæüE
öoD>p
• nòýþhõx5¡qh
• nòhõx5¡qhQãî
Pj-
t 3Û?Pþ
D_>@
• tÍh
• hµUVÈV
t ®hä;aQ)ö÷
øù" # 5 ï ð Á Â ¸ N ö÷øù
rD÷ø
>?o
Ì}I
t Åf
ÌJ}I
@EF>p
ö÷ øù5 e µ P
NZ
t ® ö÷ øù5ePÒ
e
t
• É$Òß8$
• P#¶8h
• f$PçP45
55
<>?@ABCDEF@
• t4Í • ô¬
• f ;t5
• ;5 f"#
t ÍÔÁ ; »àÈQ®hä;XaQ<
) "#5ïð
Á¸N » à È < 4 3Q ® f .
¶5 ¹
®ês
<@
• µ,P¹e,Ú/
• ªR¶æD¹e,Ú-S,Ñ5:;
t ÍÔÁ ; »àÈQ®hä;XaQ<
) "#5ïð
Á¸N » à È < 4 3Q ® f .
¶5 ¹
®ês
<BBA]C>?@
fô¬
t )f5ÁÂP,
©mpD@
; t / ¡ q h 5 t ¡
%&ÈZì
'íRÅVä
¡qh
;D]E
E]^?P];<=
t ®<=];E]^
<÷sD`>
<=P];E]^
t ®<=];E]^
<m]DE*1
;.¡½:;5
t ;¡½
@C>pA
]^ (mDøI-5ѤµÈP
µÅÙÄ];
t 4ѤÈÅÙÄ];
m]ø>]>C
ç£Et
t )f5ÁÂP,
*1 Å1H l6&U&úûI1 ê=56
CBC
*2 h =56CBC
»Óç}Ptý³àQW
5
¹®êQ°
56
)*
ù@E_B>>Fmo6@E_B>>Fp@ú`
3õïjQN%SN,û
(GsHJ-
OP ;uû&
Î i@!UQ=Ië
Eìí!>¦¡¢{
– ŪBÁ@!UQãI Ïôð
ä"=©#Ñói7]Á$I
!UQæÃÞëL%
#{¸u &:¯=IÊ Q R§ Ï
$±GÇ·±Ñ
– ŪBÁ @!UQ=ãI
=ãÎIF«=I
<ðV¦Qv·ÉMNOP;+= Å
ÎIILF«
– Å 5 'l_Ï#{$±GÇ·±
*Ñ()@!UQÞi}¯
*x$±GÇ·± $±G̱´*³·É +,=8-.
z
QÐЦö¦Q/
ÂÃ
,
6sQsç
67869gIQsIQsø
677øg
6RS%øI
6RSSsgQøg
6$møH
6$mNOSøsQøH
6$mìøgQøy
-
M%S%
øg
M%TTøg
Mìøg
MS
XNOSøI
M7søQsç
Ú¦§øý
cuNg9QsgQsHQsý
7Um7gçQs9Qsø
ë%RìøI
Sì
gyQ9ý
%Tøg
79gQøg
$7ZbNUs9Qsø
ÁÂPg
øg
ZøgQøs
.
UXýQs9QsøQsç
UýøgQø9
Uý7R
øsQø9
/
%XøgQøø
1
b9cÖsgQHy
b%&gH
2
í%>gyQ9H
3
N%SsHQøg
NRX
TTøs
N>øsQøH
º3ø
?søQsy
%&'%Hs
N>sg
gyQ9gQ9øQ9HQ9ýQ
9QHs
'gIQsIQsgQHs
sHQøg
>9HIQHg
6RsI
4
[%Ss9
[%UXs9
5
>%
%%gýQ9ø
>RS9ç
>S%Xý
>79I
qvwxyNg9QsgQsHQsý
6
Üz E {|Ng9QsgQsHQsý
8&
%SsQøg
8U> (ÁÌ-ss
<=Ö×sgQs9
0
t
Ô>øsQøø
57
5
!
"#""$
%
&' (
)*
)* + ,-./01
%
6
#23
#43
#&
9
'545
:
67
;
89:;01
%
Sony Corporation Printed in Japan