1
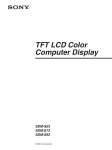
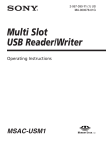
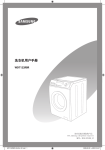
D:\Working\0602\SDM-S53_S73_S93 USFRESCS\SDM-S53_S73_S93 USFRESCS\SDMS53_S73_S93 US\01COV-UC.fm masterpage:Right 01COV-UC.fm Page 1 Monday, June 2, 2003 7:49 PM 4-096-265-21(1) TFT LCD Color Computer Display US Quick Setup Guide Setup . . . . . . . . . . . . . . . . . . . . . . . . . . . . . . . . . . . . . . . . . . . . 2 (US) Troubleshooting / Specifications . . . . . . . . . . . . . . . . . . . . . . . 5 (US) FR Guide de configuration rapide Installation . . . . . . . . . . . . . . . . . . . . . . . . . . . . . . . . . . . . . . . . 2 (FR) Dépannage / Spécifications . . . . . . . . . . . . . . . . . . . . . . . . . . 5 (FR) ES Guía de instalación rápida Instalación . . . . . . . . . . . . . . . . . . . . . . . . . . . . . . . . . . . . . . . . 2 (ES) Resolución de problemas / Especificaciones . . . . . . . . . . . . . 5 (ES) CS . . . . . . . . . . . . . . . . . . . . . . . . . . . . . . . . . . . . . . . . . . . . . 2 (CS) . . . . . . . . . . . . . . . . . . . . . . . . . . . 5 (CS) DO NOT RETURN TO PLACE OF PURCHASE NE PAS RETOURNER AU MAGASIN If you believe the product purchased in the U.S. is defective, call Sony for assistance or Advance Exchange. For assistance in the U.S. call: 1-866-357-SONY (7669) For assistance in Canada call: 1-800-961-SONY (7669) Si vous croyez que le produit achete aux E.-U. est defectueux, communiquer avec Sony pour obtenir de lfaide ou un remplacement. Pour obtenir de lfaide aux E.-U., composer le : 1-866-357-SONY (7669) Pour obtenir de lfaide au Canada, composer le :1-800-961-SONY (7669) http://www.sony.com/displays/support SDM-S53 SDM-S73 SDM-S93 © 2003 Sony Corporation SDM-S53, SDM-S73 or SDM-S93 4-096-265-21(1) \\Pc08\DATADISK08\Chen Ting\ML\European\SDM-S53_S73_S93 4 GUO\data\SDMS53_S73_S93 US FR ES CS(0530)\SDM-S53_S73_S93 US\02GB02BAS-UC.fm masterpage:Left 01COV-UC.book Page 2 Friday, May 30, 2003 6:01 PM WARNING To prevent fire or shock hazard, do not expose the unit to rain or moisture. To view the Operating Instructions on the CD-ROM Dangerously high voltages are present inside the unit. Do not open the cabinet. Refer servicing to qualified personnel only. Note To view the Operating Instructions on the CD-ROM, Macromedia Shockwave Player and Adobe Acrobat Reader (version 4.0 or later) must be installed on your computer. The “installs” folder on the CD-ROM contains the installation programs for them (for Windows only). Precautions To view the Operating Instructions Warning on power connections Load the supplied CD-ROM into the CD-ROM drive of your computer. After a while, the introductory page of the CD-ROM will open automatically. Then follow the instructions below, according to the area you live in. • Use the supplied power cord. If you use a different power cord, be sure that it is compatible with your local power supply. For the customers in the U.S.A. If you do not use the appropriate cord, this monitor will not conform to mandatory FCC standards. For the customers in the UK If you use the monitor in the UK, be sure to use the appropriate UK power cord. Example of plug types for 100 to 120 V AC for 200 to 240 V AC for 240 V AC only For customers in the USA 1 Click “North America” on the introductory page. The model page appears. 2 Point to “S MODELS” and click the model name of the unit you have purchased on the drop-down list. The page for the model you have selected appears. 3 Click “USER MANUAL:ADOBE.PDF.” The language options appear. 4 Click the desired language. The Operating Instruction file opens. To exit the procedure Click “EXIT/CD.ROM.” For customers in Asia The equipment should be installed near an easily accessible outlet. Installation Do not install or leave the monitor: • In places subject to extreme temperatures, for example near a radiator, heating vent, or in direct sunlight. Subjecting the monitor to extreme temperatures, such as in an automobile parked in direct sunlight or near a heating vent, could cause deformations of the casing or malfunctions. • In places subject to mechanical vibration or shock. • Near any equipment that generates a strong magnetic field, such as a TV or various other household appliances. • In places subject to inordinate amounts of dust, dirt, or sand, for example near an open window or an outdoor exit. If setting up temporarily in an outdoor environment, be sure to take adequate precautions against airborne dust and dirt. Otherwise irreparable malfunctions could occur. 1 Click “Asia” on the introductory page. 2 Click the “S” folder. 3 Double-click on “index.html.” The Operating Instruction file opens. To open the Operating Instruction file directly Exit the introductory page by clicking “EXIT/CD.ROM”, and click the folders and the file in the following order. CD-ROM t “S” t desired language folder t “*****.pdf” (***** is the name of the model you have purchased.) If the introductory page does not appear automatically Follow the instructions below to open that page. If you are using Windows: Double-click on the CD-ROM icon. If you are using a Macintosh computer: Double-click on the CD-ROM icon to open the window, then double-click on the “MONITOR” icon. Note on the LCD (Liquid Crystal Display) Please note that the LCD screen is made with high-precision technology. However, black points or bright points of light (red, blue, or green) may appear constantly on the LCD screen, and irregular colored stripes or brightness may appear on the LCD screen. This is not malfunction. (Effective dots: more than 99.99%) Transportation • Disconnect all cables from the monitor, and grasp both side of the LCD display firmly taking care not to scratch the screen when transporting. If you drop the monitor, you may be injured or the monitor may be damaged. • When you transport this monitor for repair or shipment, use the original carton and packing materials. 2 (US) SDM-S53, SDM-S73 or SDM-S93 4-096-265-21(1) \\Pc08\DATADISK08\Chen Ting\ML\European\SDM-S53_S73_S93 4 GUO\data\SDMS53_S73_S93 US FR ES CS(0530)\SDM-S53_S73_S93 US\02GB02BAS-UC.fm masterpage:Right 01COV-UC.book Page 3 Friday, May 30, 2003 6:01 PM Setup HD-15 Unpacking 3 Make sure your carton contains everything listed below. • LCD display • Power cord • HD15-HD15 video signal cable • CD-ROM (utility software for Windows/Macintosh, Operating Instructions, etc.) • Warranty card • This Quick Setup Guide HD15-HD15 video signal cable (analog RGB) (supplied) to AC IN 4 Connecting your monitor Connect your monitor to a computer or other equipment. • Turn off the monitor, computer, and any other equipment before connecting them. • Do not touch the pins of the video signal cable plug. 1 Slide up the back cover. 2 Tilt the display forward. 3 Connect your monitor to a computer. Connecting a Macintosh computer Connect the supplied video signal cable to a video output connector on the computer. If necessary, use an adapter (not supplied). Connect the adapter to the computer before connecting the video signal cable. 4 Connect the supplied power cord securely to the monitor’s AC IN connector. 5 Connect the other end securely to a power outlet. back cover 1 2 US 5 to power outlet power cord (supplied) Illustrations of monitor rear are the SDM-S53. The same applies for the SDM-S73 model. SDM-S93 has the AC IN connector on the left of the stand. Note For bundling the cords and cables, refer to the Operating Instructions on the supplied CD-ROM. Turning on the monitor and computer Turn on your monitor first, then a computer. 1 Press the MAIN POWER switch on the right side of the monitor in the direction of the [, if it is not already pressed. Make sure the 1 ( power) indicator is lit in red. Note The default setting of the MAIN POWER switch is in the direction of the [. 2 Press the 1 (power) switch on the front right of the monitor. The 1 (power) indicator lights up in green. 3 (US) SDM-S53, SDM-S73 or SDM-S93 4-096-265-21(1) \\Pc08\DATADISK08\Chen Ting\ML\European\SDM-S53_S73_S93 4 GUO\data\SDMS53_S73_S93 US FR ES CS(0530)\SDM-S53_S73_S93 US\02GB02BAS-UC.fm masterpage:Left 01COV-UC.book Page 4 Friday, May 30, 2003 6:01 PM 3 Turn on the computer. lights in red 1 MAIN POWER lights in green 2 4 (US) SDM-S53, SDM-S73 or SDM-S93 4-096-265-21(1) \\Pc08\DATADISK08\Chen Ting\ML\European\SDM-S53_S73_S93 4 GUO\data\SDMS53_S73_S93 US FR ES CS(0530)\SDM-S53_S73_S93 US\02GB02BAS-UC.fm masterpage:Right 01COV-UC.book Page 5 Friday, May 30, 2003 6:01 PM Troubleshooting Trouble symptoms and remedies (If no picture appears on the screen) If no picture appears on the screen, check the following table for possible solutions. Then, if the problem persists, use the self-diagnosis function (page 6 (US)). If you are experiencing difficulties not listed below, refer to the Operating Instructions on the supplied CD-ROM. For problems caused by a computer or other equipment, refer to the user’s manuals supplied with the respective items. Symptom Check these items If the 1 (power) indicator is not lit, or if the 1 (power) indicator will not light up when the 1 (power) switch is pressed, • Check that the power cord is properly connected. • Check that the monitor’s MAIN POWER switch is on (page 3 (US)). If the 1 (power) indicator turns on in red, • Check that the 1 (power) switch is on. US If the 1 (power) indicator is green, • Use the self-diagnosis function (page 6 (US)). If “CABLE DISCONNECTED” appears on the screen, • Check that the video signal cable is properly connected and all plugs are firmly seated in their sockets (page 3 (US)). • Check that the video input connector’s pins are not bent or pushed in. • A non-supplied video signal cable is connected. If you connect a non-supplied video signal cable, “CABLE DISCONNECTED” may appear on the screen before entering the power saving mode. This is not a malfunction. If “NO INPUT SIGNAL” appears on the screen, or the 1 (power) indicator is orange, • Check that the video signal cable is properly connected and all plugs are firmly seated in their sockets (page 3 (US)). • Check that the video input connector’s pins are not bent or pushed in. x Problem caused by a computer or other equipment connected, and not caused by the monitor • The computer is in the power saving mode. Try pressing any key on the keyboard or moving the mouse. • Check that your graphics board is installed properly. • Check that the computer’s power is on. • Restart the computer. If “OUT OF RANGE” appears on the screen, x Problem caused by a computer or other equipment connected, and not caused by the monitor • Check that the video frequency range is within that specified for the monitor. If you replaced an old monitor with this monitor, reconnect the old monitor and adjust the computer’s graphics board within the following ranges: Horizontal frequency: 28–61 kHz (SDM-S53), 28–80 kHz (SDM-S73/S93) Vertical frequency: 48–75 Hz Resolution: 1024 × 768 or less (SDM-S53), 1280 × 1024 or less (SDM-S73/S93) If you are using Windows and replaced an old monitor with this monitor, • If you replaced an old monitor with this monitor, reconnect the old monitor and do the following. Select “SONY” from the “Manufacturers” list and select “SDM-S53, SDMS73 or SDM-S93” from the “Models” list in the Windows device selection screen. If “SDM-S53, SDM-S73 or SDM-S93” does not appear in the “Models” list, try “Plug & Play.” If using a Macintosh system, • When connecting a Macintosh computer, use an adapter (not supplied) if necessary. Connect the adapter to the computer before connecting the video signal cable. 5 (US) SDM-S53, SDM-S73 or SDM-S93 4-096-265-21(1) \\Pc08\DATADISK08\Chen Ting\ML\European\SDM-S53_S73_S93 4 GUO\data\SDMS53_S73_S93 US FR ES CS(0530)\SDM-S53_S73_S93 US\02GB02BAS-UC.fm masterpage:Left 01COV-UC.book Page 6 Friday, May 30, 2003 6:01 PM Self-diagnosis function This monitor is equipped with a self-diagnosis function. If there is a problem with your monitor or computer(s), the screen will go blank and the 1 (power) indicator will light up in green. If the function tells you the monitor may have a potential failure, consult your authorized Sony dealer. If the picture disappears from the screen and the 1 (power) indicator is green 1 Turn off the 1 (power) switch and disconnect the video signal cables from the monitor. 2 Turn the monitor on by pressing the 1 (power) switch. If all four color bars appear (white, red, green, blue), the monitor is working properly. Reconnect the video input cables and check the condition of your computer(s). If the color bars do not appear, there is a potential monitor failure. Displaying this monitor’s information While the monitor is receiving a video signal, press and hold the MENU button for more than 5 seconds until the information box appears. Press the MENU button again to make the box disappear. Example MENU INFORMATION MODEL : SDM-S53 SER. NO : 1234567 MANUFACTURED : 2003-52 Model name Serial number Week and year of manufacturee If any problem persists, call your authorized Sony dealer and give the following information: • Model name: SDM-S53, SDM-S73 or SDM-S93 • Serial number • Detailed description of the problem • Date of purchase • Name and specifications of your computer and graphics board Specifications LCD panel Panel type: a-Si TFT Active Matrix Picture size: 15 inch (38 cm) (SDM-S53) 17 inch (43 cm) (SDM-S73) 19 inch (48 cm) (SDM-S93) Input signal format RGB operating frequency* Horizontal × Vertical: 28–61 kHz × 48-75 Hz (SDM-S53) 28–80 kHz × 48-75 Hz (SDM-S73/S93) Resolution Horizontal × Vertical: Max. 1024 dots × 768 lines (SDM-S53) 1280 dots × 1024 lines (SDM-S73/S93) Input signal levels Analog RGB video signal 0.7 Vp-p, 75 Ω, positive SYNC signal TTL level, 2.2 kΩ, positive or negative (Separate horizontal and vertical, or composite sync) 0.3 Vp-p, 75 Ω, negative (Sync on green) Power requirements 100 – 240 V, 50 – 60 Hz, Max. 0.6 A (SDM-S53) 100 – 240 V, 50 – 60 Hz, Max. 1.0 A (SDM-S73/S93) Power consumption Max. 25 W (SDM-S53) Max. 45 W (SDM-S73) Max. 50 W (SDM-S93) Operating temperature 5 – 35°C Dimensions (width/height/depth) Display (upright): SDM-S53 Approx. 339×370×186 mm (with stand) (13 3/8×14 5/8×7 3/8 inches) Approx. 339×275×53 mm (without stand) (13 3/8×10 7/8×2 1/8 inches) SDM-S73 Approx. 367×411×215 mm (with stand) (14 1/2×16 1/4×8 1/2 inches) Approx. 367×315×60 mm (without stand) (14 1/2×12 1/2×2 3/8 inches) SDM-S93 Approx. 412×445×234 mm (with stand) (16 1/4×17 5/8×9 1/4 inches) Approx. 412×350×64 mm (without stand) (16 1/4×13 7/8×2 5/8 inches) Mass SDM-S53 Approx.3.7 kg (8 lb 2 oz) (with stand) Approx.2.7 kg (5 lb 15 oz) (without stand) SDM-S73 Approx.5.4 kg (11 lb 14 oz) (with stand) Approx 4.1 kg (9 lb) (without stand) SDM-S93 Approx. 6.6 kg (14 lb 8 oz) (with stand) Approx. 5.2 kg (11 lb 7 oz) (without stand) Plug & Play DDC2B Included items See “Setup.” * Recommended horizontal and vertical timing condition • Horizontal sync width duty should be more than 4.8% of total horizontal time or 0.8 µs, whichever is larger. • Horizontal blanking width should be more than 2.5 µsec. • Vertical blanking width should be more than 450 µsec. Design and specifications are subject to change without notice. 6 (US) SDM-S53, SDM-S73 or SDM-S93 4-096-265-21(1) 02GB02BAS-UC.fm Page 7 Tuesday, June 3, 2003 7:16 PM \\Pc08\DATADISK08\Chen Ting\ML\European\SDM-S53_S73_S93 4 GUO\data\SDMS53_S73_S93 US FR ES CS(0530)\SDM-S53_S73_S93 FR\03FR02BAS-UC.fm masterpage:Left 01COV-UC.book Page 2 Friday, May 30, 2003 4:30 PM Transport AVERTISSEMENT Pour prévenir tout risque d’incendie ou d’électrocution, n’exposez jamais l’appareil à la pluie ou à l’humidité. Des tensions extrêmement élevées sont présentes à l’intérieur de l’appareil. N’ouvrez jamais le boîtier de l’appareil. Confiez l’entretien à un technicien qualifié uniquement. Précautions Avertissement sur les raccordements d’alimentation • Utilisez le cordon d’alimentation fourni. Si vous utilisez un cordon d’alimentation différent, assurez-vous qu’il est compatible avec la tension secteur locale. Pour les clients aux Etats-Unis Si vous n’utilisez pas le cordon approprié, ce moniteur ne sera pas conforme aux normes FCC obligatoires. Pour les clients au Royaume-uni Si vous utilisez le moniteur au Royaume-uni, veuillez utiliser le cordon d’alimentation adapté aux prises utilisées au Royaumeuni. Exemples de types de fiches pour 100 à 120 V CA pour 200 à 240 V CA pour 240 V CA uniquement L’appareil doit être installé à proximité d’une prise de courant facile d’accès. Installation N’installez pas et ne laissez pas le moniteur : • A des endroits exposés à des températures extrêmes, par exemple à proximité d’un radiateur, d’un conduit de chauffage ou exposés aux rayons directs du soleil. L’exposition du moniteur à des températures extrêmes, comme dans l’habitacle d’un véhicule garé en plein soleil ou à proximité d’un conduit de chauffage risque d’entraîner des déformations du boîtier ou des problèmes de fonctionnement. • A des endroits soumis à des vibrations mécaniques ou à des chocs. • A proximité d’appareils générant de puissants champs magnétiques, comme un téléviseur ou d’autres appareils électroménagers. • A des endroits soumis à des quantités inhabituelles de poussière, de saletés ou de sable, par exemple à côté d’une fenêtre ouverte ou d’une porte donnant sur l’extérieur. En cas d’installation temporaire à l’extérieur, veillez à prendre les précautions requises contre la poussière et les saletés en suspension dans l’air, faute de quoi des dommages irréparables risquent de se produire. Remarque sur l’écran à cristaux liquides (LCD Liquid Crystal Display) Veuillez noter que l’écran LCD est issu d’une technologie de haute précision. Toutefois, il est possible que des points noirs ou des points brillants de lumière (rouge, bleu ou vert) apparaissent constamment sur l’écran LCD, ainsi que des bandes de couleurs irrégulières ou une certaine luminosité. Il ne s’agit pas d’un dysfonctionnement. (Points effectifs : supérieurs à 99,99%) • Débranchez tous les câbles du moniteur, puis saisissez fermement les deux côtés de l’écran LCD en prenant soin de ne pas rayer ce dernier pendant le transport. Si vous laissez tomber le moniteur, vous risquez de vous blesser ou de l’endommager. • Pour transporter ce moniteur en vue de réparations ou de son expédition, utilisez le carton et les matériaux de conditionnement originaux. Pour lire le mode d’emploi sur le CD-ROM Remarque Pour pouvoir lire le mode d’emploi figurant sur le CD-ROM, vous devez installer Macromedia Shockwave Player et Adobe Acrobat Reader (version 4.0 ou plus récente) sur votre ordinateur. Le dossier« installs » du CD-ROM contient les programmes d’installation de ces logiciels (pour Windows uniquement). Pour lire le mode d’emploi Insérez le CD-ROM fourni dans le lecteur de CD-ROM de votre ordinateur. La page d’accueil du CD-ROM s’affiche automatiquement après quelques instants. Suivez ensuite les directives ci-dessous, en fonction de la zone géographique où vous vivez. Pour la clientèle aux Etats-Unis 1Cliquez sur« North America » dans la page d’accueil. La page des modèles s’affiche. 2Sélectionnez« S MODELS » et cliquez dans la liste déroulante sur le nom du modèle de l’appareil que vous avez acheté. La page du modèle que vous avez sélectionné s’affiche. 3Cliquez sur« USER MANUAL:ADOBE.PDF. » Les options linguistiques s’affichent. 4Cliquez sur la langue souhaitée. Le fichier du mode d’emploi s’ouvre. Pour mettre fin à la procédure Cliquez sur« EXIT/CD.ROM ». Pour la clientèle en Asie 1Cliquez sur« Asia » sur la page d’accueil. 2Cliquez sur le dossier« S ». 3Double-cliquez sur« index.html ». Le fichier du mode d’emploi s’ouvre. Pour ouvrir le fichier du mode d’emploi directement Quittez la page d’accueil en cliquant sur« EXIT/CD.ROM », puis cliquez sur les dossiers et le fichier dans l’ordre suivant. CD-ROM t« S » t dossier de la langue souhaitée t« *****.pdf » (***** correspond au nom du modèle que vous avez acheté.) Si la page d’accueil ne s’affiche pas automatiquement Suivez les directives ci-dessous pour ouvrir cette page. Si vous utilisez Windows : Double-cliquez sur l’icône du CD-ROM. Si vous utilisez un ordinateur Macintosh : Double-cliquez sur l’icône du CD-ROM pour ouvrir la fenêtre, puis double-cliquez sur l’icône« MONITOR ». 2 (FR) SDM-S53, SDM-S73 or SDM-S93 4-096-265-21(1) \\Pc08\DATADISK08\Chen Ting\ML\European\SDM-S53_S73_S93 4 GUO\data\SDMS53_S73_S93 US FR ES CS(0530)\SDM-S53_S73_S93 FR\03FR02BAS-UC.fm masterpage:Right 01COV-UC.book Page 3 Friday, May 30, 2003 4:30 PM Installation HD-15 Déballage Assurez-vous que votre emballage contient tous les éléments énumérés ci-dessous. • Ecran LCD • Cordon d’alimentation • Câble de signal vidéo HD15-HD15 • CD-ROM (logiciel utilitaire pour Windows et Macintosh, mode d’emploi, etc.) • Carte de garantie • Le présent guide de configuration rapide 3 Câble de signal vidéo HD15-HD15 (RVB analogique) (fourni) Branchement du moniteur vers AC IN 4 Raccordez votre moniteur à un ordinateur ou à un autre appareil. • Eteignez le moniteur, l’ordinateur et tout autre appareil avant d’effectuer le raccordement. • Ne touchez pas les broches de la fiche du câble de signal vidéo. 1 Faites coulisser le panneau arrière vers le haut. 2 Faites basculer l’écran vers l’avant. 3 Raccordez votre moniteur à un ordinateur. Raccordement à un ordinateur Macintosh Raccordez le câble de signal vidéo fourni à un connecteur de sortie vidéo sur l’ordinateur. Si nécessaire, utilisez un adaptateur (non fourni). Raccordez l’adaptateur à l’ordinateur avant de raccorder le câble de signal vidéo. 4 Raccordez solidement le cordon d’alimentation fourni au connecteur AC IN du moniteur. 5 Raccordez solidement l’autre extrémité du cordon à une prise secteur. Panneau arrière 1 2 vers une prise secteur 5 Cordon d’alimentation (fourni) Les illustrations représentent l’arrière du moniteur SDM-S53. Le modèle SDM-S73 est identique. Le connecteur AC IN du modèle SDM-S93 se trouve à gauche du support. Remarque Pour regrouper les cordons et les câbles, reportez-vous au mode d’emploi présent sur le CD-ROM fourni. Mise sous tension du moniteur et de l’ordinateur Mettez d’abord votre moniteur sous tension, puis l’ordinateur. 1 Si vous n’avez pas encore appuyé dessus, appuyez sur le commutmateur MAIN POWER situé sur le côté droit du moniteur vers [. Vérifiez que l’indicateur d’alimentation 1 est allumé en rouge. Remarque Le commutateur MAIN POWER est réglé par défaut vers [. 2 Appuyez sur le commutateur d’alimentation 1 situé à droite à l’avant du moniteur. Le voyant d’alimentation 1 s’allume en vert. 3 (FR) SDM-S53, SDM-S73 or SDM-S93 4-096-265-21(1) FR \\Pc08\DATADISK08\Chen Ting\ML\European\SDM-S53_S73_S93 4 GUO\data\SDMS53_S73_S93 US FR ES CS(0530)\SDM-S53_S73_S93 FR\03FR02BAS-UC.fm masterpage:Left 01COV-UC.book Page 4 Friday, May 30, 2003 4:30 PM 3 Mettez l’ordinateur sous tension. L’indicateur s’allume en rouge 1 MAIN POWER L’indicateur s’allume en vert 2 4 (FR) SDM-S53, SDM-S73 or SDM-S93 4-096-265-21(1) \\Pc08\DATADISK08\Chen Ting\ML\European\SDM-S53_S73_S93 4 GUO\data\SDMS53_S73_S93 US FR ES CS(0530)\SDM-S53_S73_S93 FR\03FR02BAS-UC.fm masterpage:Right 01COV-UC.book Page 5 Friday, May 30, 2003 4:30 PM Dépannage Problèmes et solutions (si aucune image n’apparaît à l’écran) Si aucune image n’apparaît à l’écran, recherchez une solution possible dans le tableau suivant. Si le problème persiste, utilisez la fonction d’autodiagnostic (page 6 (FR)). Si vous rencontrez des problèmes qui ne sont pas abordés ci-dessous, reportez-vous au mode d’emploi sur le CD-ROM fourni. Si les problèmes sont causés par l’ordinateur ou un autre appareil, reportez-vous au mode d’emploi fourni avec l’appareil concerné. Symptôme Vérifiez ces éléments Si l’indicateur 1 (alimentation) n’est pas allumé ou si l’indicateur 1 (alimentation) ne s’allume pas lorsque vous appuyez sur le commutateur 1 (alimentation), • Vérifiez que le cordon d’alimentation est correctement raccordé. • Vérifiez que le commutateur MAIN POWER du moniteur est activé (page 3 (FR)). Si l’indicateur 1 (alimentation) devient rouge, • Vérifiez que le commutateur 1 (alimentation) est activé. Si l’indicateur 1 (alimentation) est vert, • Utilisez la fonction d’autodiagnostic (page 6 (FR)). Si l’indication « CABLE PAS CONNECTÉ » apparaît sur l’écran, • Vérifiez que le câble de signal vidéo est correctement raccordé et que toutes les fiches sont correctement branchées dans leur prise (page 3 (FR)). • Vérifiez que les broches du connecteur d’entrée vidéo ne sont pas pliées ou enfoncées. • Un câble de signal vidéo non fourni est raccordé. Si vous raccordez un câble de signal vidéo non fourni, l’indication « CABLE PAS CONNECTÉ » peut apparaître sur l’écran avant le passage en mode d’économie d’énergie. Il ne s’agit pas d’un fonctionnement défectueux. Si l’indication « PAS ENTREE VIDEO » apparaît sur l’écran ou si l’indicateur 1 (alimentation) est orange, • Vérifiez que le câble de signal vidéo est correctement raccordé et que toutes les fiches sont correctement branchées dans leur prise (page 3 (FR)). • Vérifiez que les broches du connecteur d’entrée vidéo ne sont pas pliées ou enfoncées. x Problème causé par un ordinateur ou un autre appareil raccordé et non par le moniteur • L’ordinateur est en mode d’économie d’énergie. Appuyez sur une touche quelconque du clavier ou déplacez la souris. • Vérifiez que votre carte graphique est correctement installée. • Vérifiez que l’alimentation de l’ordinateur est activée. • Redémarrez l’ordinateur. Si l’indication « HORS PLAGE » apparaît sur l’écran, x Problème causé par un ordinateur ou un autre appareil raccordé et non par le moniteur • Vérifiez que la plage de fréquence vidéo est comprise dans la plage spécifiée pour le moniteur. Si vous avez remplacé un ancien moniteur par ce moniteur, rebranchez l’ancien, puis ajustez la carte graphique de l’ordinateur dans les plages suivantes : Fréquence horizontale : 28–61 kHz (SDM-S53), 28–80 kHz (SDM-S73/S93) Fréquence verticale : 48–75 Hz Résolution : 1024 × 768 ou moins (SDM-S53), 1280 × 1024 ou moins (SDM-S73/S93) Si vous utilisez Windows et que vous remplacez un ancien moniteur par celui-ci, • Si vous avez remplacé votre ancien moniteur par ce moniteur, rebranchez l’ancien moniteur et suivez la procédure suivante. Sélectionnez « SONY » dans la liste « Fabricants » et sélectionnez « SDM-S53, SDM-S73 ou SDM-S93 » dans la liste « Modèles » dans l’écran de sélection de périphériques Windows. Si « SDM-S53, SDMS73 ou SDM-S93 » n’apparaît pas dans la liste « Modèles », essayez « Plug & Play ». Si vous utilisez un système Macintosh, • En cas de raccordement d’un ordinateur Macintosh, utilisez si nécessaire un adaptateur (non fourni). Raccordez l’adaptateur à l’ordinateur avant de raccorder le câble du signal vidéo. FR 5 (FR) SDM-S53, SDM-S73 or SDM-S93 4-096-265-21(1) \\Pc08\DATADISK08\Chen Ting\ML\European\SDM-S53_S73_S93 4 GUO\data\SDMS53_S73_S93 US FR ES CS(0530)\SDM-S53_S73_S93 FR\03FR02BAS-UC.fm masterpage:Left 01COV-UC.book Page 6 Friday, May 30, 2003 4:30 PM Fonction d’autodiagnostic Ce moniteur est équipé d’une fonction d’autodiagnostic. En cas de problème avec votre moniteur ou votre (vos) ordinateur(s), l’écran se vide et l’indicateur 1 (alimentation) s’allume en vert. Si la fonction d’autodiagnostic indique que le moniteur est peutêtre en panne, consultez votre revendeur Sony. Si l’image disparaît de l’écran et que l’indicateur 1 (alimentation) est vert 1 Désactivez le commutateur d’alimentation 1 et débranchez les câbles de signaux vidéo du moniteur. 2 Mettez le moniteur sous tension en appuyant sur le commutateur d’alimentation 1. Si les quatre barres de couleur apparaissent (blanche, rouge, verte et bleue), le moniteur fonctionne correctement. Rebranchez les câbles d’entrée vidéo et contrôlez le statut de votre/vos ordinateur(s). Si les barres de couleurs n’apparaissent pas, le moniteur est peutêtre en panne. Affichage des informations du moniteur Lorsque le moniteur reçoit un signal vidéo, appuyez sur la touche MENU et maintenez-la enfoncée pendant plus de 5 secondes jusqu’à ce que la boîte de dialogue d’informations s’affiche. Appuyez de nouveau sur la touche MENU pour faire disparaître la boîte de dialogue. Exemple MENU INFORMATIONS MODEL : SDM-S53 SER. NO : 1234567 MANUFACTURED : 2003-52 Désignation Numéro de série Semaine et année de fabrication Si le problème persiste, contactez votre revendeur Sony agréé et fournissez-lui les informations suivantes : • Désignation : SDM-S53, SDM-S73 ou SDM-S93 • Numéro de série • Description détaillée du problème • Date d’achat • Nom et spécifications de votre ordinateur et de votre carte graphique Spécifications Panneau LCD Type de panneau : a-Si TFT à matrice active Taille de l’image : 15 pouces (38 cm) (SDM-S53) 17 pouces (43 cm) (SDM-S73) 19 pouces (48 cm) (SDM-S93) Format du signal d’entrée Fréquence opérationnelle RVB* Horizontale × Verticale : 28–61 kHz × 48–75 Hz (SDM-S53) 28–80 kHz × 48–75 Hz (SDM-S73/S93) Résolution Horizontale × Verticale : max. 1024 points × 768 lignes (SDM-S53) 1280 points × 1024 lignes (SDM-S73/S93) Niveaux des signaux d’entrée Signal vidéo RVB analogique : 0,7 Vc-c, 75 Ω , positif Signal SYNC : Niveau TTL, 2,2 kΩ , positif ou négatif (horizontal et vertical séparément, ou synchro composite) 0,3 Vc-c, 75 Ω , négatif (synchro sur le vert) Puissance de raccordement 100–240 V, 50–60 Hz, Max. 0,6 A (SDM-S53) 100–240 V, 50–60 Hz, Max. 1,0 A (SDM-S73/S93) Consommation électrique Max. 25 W (SDM-S53) Max. 45 W (SDM-S73) Max. 50 W (SDM-S93) Température de fonctionnement 5–35°C Dimensions (largeur/hauteur/profondeur) Ecran (verticalement) : SDM-S53 environ 339×370×186 mm (avec support) (13 3/8×14 5/8×7 3/8 pouces) environ 339×275×53 mm (sans support) (13 3/8×10 7/8×2 1/8 pouces) SDM-S73 environ 367×411×215 mm (avec support) (14 1/2×161/4×8 1/2 pouces) environ 367×315×60 mm (sans support) (14 1/2×12 1/2×2 3/8 pouces) SDM-S93 environ 412×445×234 mm (avec support) (16 1/4×17 5/8×9 1/4 pouces) environ 412×350×64 mm (sans support) (16 1/4×13 7/8×2 5/8 pouces) Poids SDM-S53 environ 3,7 kg (8 lb. 2 oz.) (avec support) environ 2,7 kg (5 lb. 15 oz.) (sans support) SDM-S73 environ 5,4 kg (11 lb. 14 oz.) (avec support) environ 4,1 kg (9 lb.) (sans support) SDM-S93 environ 6,6 kg (14 lb. 8 oz.) (avec support) environ 5,2 kg (11 lb. 7 oz.) (sans support) Plug & Play DDC2B Accessoires fournis Voir « Installation ». * Condition de synchronisation horizontale et verticale recommandée • La largeur de synchronisation horizontale doit être supérieure à 4,8 % de la durée horizontale totale ou 0,8 µs, suivant la plus grande valeur. • La largeur de suppression horizontale doit être supérieure à 2,5 µsec. • La largeur de suppression verticale doit être supérieure à 450 µsec. La conception et les spécifications sont sujettes à modifications sans préavis. 6 (FR) SDM-S53, SDM-S73 or SDM-S93 4-096-265-21(1) 02GB02BAS-UC.fm Page 7 Tuesday, June 3, 2003 7:16 PM \\Pc08\DATADISK08\Chen Ting\ML\European\SDM-S53_S73_S93 4 GUO\data\SDMS53_S73_S93 US FR ES CS(0530)\SDM-S53_S73_S93 ES\04ES02BAS-UC.fm masterpage:Left 01COV-UC.book Page 2 Friday, May 30, 2003 4:35 PM Transporte ADVERTENCIA Para evitar el riesgo de incendios o de electrocución, no exponga la unidad a la lluvia ni a la humedad. La tensión existente dentro de la unidad es muy elevada y puede resultar peligrosa. No abra el aparato. Solicite asistencia técnica únicamente a personal cualificado. • Desconecte todos los cables del monitor y sujete firmemente ambos lados de la pantalla LCD procurando no rayar la pantalla durante el transporte. Si deja caer el monitor, pueden producirse daños físicos o dañarse el monitor. • Cuando transporte este monitor para su reparación o desplazamiento, utilice la caja de cartón y los materiales de embalaje originales. Visualizar el manual de instrucciones del CD-ROM Precauciones Advertencia sobre la conexión de la alimentación • Utilice el cable de alimentación suministrado. En caso de utilizar un cable de alimentación distinto, asegúrese de que sea compatible con el suministro eléctrico local. Para los clientes en los EE.UU. Si no utiliza el cable adecuado, este monitor no cumplirá con las normas obligatorias de la FCC. Para los clientes en el Reino Unido Si utiliza el monitor en el Reino Unido, asegúrese de utilizar el cable de alimentación adecuado para este país. Ejemplo de tipos de enchufe Nota Para ver el manual de instrucciones del CD-ROM, Macromedia Shockwave Player y Adobe Acrobat Reader (versión 4.0 o posterior) deben estar instalados en su PC. La carpeta “installs” del CD-ROM contiene los programas de instalación de los mismos (únicamente para Windows). Para ver el manual de instrucciones Coloque el CD-ROM suministrado en la unidad de CD-ROM del PC. Unos instantes después, se abrirá automáticamente la página de introducción del CD-ROM. Siga las instrucciones que aparecen a continuación en función de la zona en la que viva. Para clientes en EE.UU. para CA de 100 a 120 V para CA de 200 a 240 V sólo para CA de 240 V El equipo debe instalarse cerca de una toma de corriente de fácil acceso. Instalación No instale ni deje el monitor: • En lugares expuestos a temperaturas extremas, por ejemplo cerca de un radiador, una salida de aire caliente o bajo la luz solar directa. Si lo expone a temperaturas extremas, como en un automóvil bajo la luz solar directa o cerca de una salida de aire caliente, pueden producirse deformaciones del exterior o fallos de funcionamiento. • En lugares expuestos a vibraciones mecánicas o golpes. • Cerca de equipos que generan un campo magnético intenso, como un televisor o demás electrodomésticos. • En lugares expuestos a grandes cantidades de polvo, suciedad o arena, como cerca de una ventana abierta o de una salida al exterior. Si lo coloca temporalmente en el exterior, asegúrese de tomar las precauciones adecuadas contra el polvo y la suciedad, ya que de lo contrario podrían producirse fallos irreparables en el funcionamiento. Nota sobre la pantalla LCD (Pantalla de cristal líquido) Tenga en cuenta que la pantalla LCD está fabricada con tecnología de alta precisión. No obstante, es posible que aparezcan puntos negros o brillantes de luz (rojos, azules o verdes) de forma constante y ocasionalmente brillos o rayas de color irregular. Esto no es un fallo de funcionamiento. (Puntos efectivos: más del 99,99%) 1Haga clic en “North America” en la página de introducción. Aparecerá la página del modelo. 2Señale “S MODELS” y haga clic en el nombre del modelo de la unidad que adquirió en la lista desplegable. Aparecerá la página del modelo seleccionado. 3Haga clic en “USER MANUAL:ADOBE.PDF.” Aparecerán las opciones de idioma. 4Haga clic en el idioma que desee. Se abrirá el archivo del manual de instrucciones. Para terminar el procedimiento Haga clic en “EXIT/CD.ROM.” Para los clientes de Asia 1Haga clic en “Asia” en la página de introducción. 2Haga clic en la carpeta “S”. 3Haga doble clic en “index.html.” Se abrirá el archivo del manual de instrucciones. Para abrir directamente el archivo del manual de instrucciones Salga de la página de introducción haciendo clic en “EXIT/CD.ROM” y, a continuación, haga clic en las carpetas y el archivo en el orden siguiente. CD-ROM t “S” t carpeta del idioma deseado t “*****.pdf” (***** corresponde al nombre del modelo adquirido.) Si la página de introducción no aparece automáticamente Siga las instrucciones que aparecen a continuación para abrirla. Si utiliza Windows: Haga doble clic en el icono del CD-ROM. Si utiliza un Macintosh: Haga doble clic en el icono del CD-ROM para abrir la ventana y, a continuación, haga doble clic en el icono “MONITOR”. 2 (ES) SDM-S53, SDM-S73 or SDM-S93 4-096-265-21(1) \\Pc08\DATADISK08\Chen Ting\ML\European\SDM-S53_S73_S93 4 GUO\data\SDMS53_S73_S93 US FR ES CS(0530)\SDM-S53_S73_S93 ES\04ES02BAS-UC.fm masterpage:Right 01COV-UC.book Page 3 Friday, May 30, 2003 4:35 PM Instalación HD-15 Desembalaje Asegúrese de que los siguientes artículos se incluyen en la caja. • Pantalla LCD • Cable de alimentación • Cable de señal de vídeo HD15-HD15 • CD-ROM (software de utilidades para Windows/Macintosh, Manual de instrucciones, etc.) • Tarjeta de garantía • Esta Guía de instalación rápida cable de señal de vídeo HD15-HD15 (RGB analógico) (suministrado) Conexión del monitor a AC IN 3 4 Conecte el monitor a un ordenador o a otro equipo. • Apague el monitor, el ordenador y cualquier otro equipo antes de conectarlos. • No toque los terminales del conector del cable de señal de vídeo. 1 Deslice la cubierta posterior hacia arriba. 2 Incline la pantalla hacia adelante. 3 Conecte el monitor al ordenador. Conexión de un ordenador Macintosh Conecte el cable de señal de vídeo suministrado a un conector de salida de vídeo del ordenador. En caso necesario, utilice un adaptador (no suministrado) y conéctelo al ordenador antes de conectar el cable de señal de vídeo. 4 Conecte firmemente el cable de alimentación suministrado al conector AC IN del monitor. 5 Conecte firmemente el otro extremo a una toma de corriente. cubierta posterior 1 2 a la toma de corriente 5 cable de alimentación (suministrado) Las ilustraciones de la parte posterior del monitor corresponden al modelo SDM-S53. Esto también se aplica al modelo SDM-S73. El modelo SDM-S93 tiene el conector CA IN en la parte izquierda del soporte. ES Nota Para agrupar los cables, consulte el manual de instrucciones en el CDROM suministrado. Encendido del monitor y el ordenador Primero, encienda el monitor y, a continuación, el ordenador. 1 Pulse el interruptor MAIN POWER situado en el lateral derecho del monitor en el sentido de [, si no lo había pulsado. Compruebe que el indicador 1 (alimentación) se ilumina en rojo. Nota El interruptor MAIN POWER se ajusta de forma predeterminada en el sentido de [. 2 Pulse el interruptor 1 (alimentación) situado en la parte frontal derecha del monitor. El indicador 1 (alimentación) se ilumina en verde. 3 (ES) SDM-S53, SDM-S73 or SDM-S93 4-096-265-21(1) \\Pc08\DATADISK08\Chen Ting\ML\European\SDM-S53_S73_S93 4 GUO\data\SDMS53_S73_S93 US FR ES CS(0530)\SDM-S53_S73_S93 ES\04ES02BAS-UC.fm masterpage:Left 01COV-UC.book Page 4 Friday, May 30, 2003 4:35 PM 3 Encienda el ordenador. Se ilumina en rojo 1 MAIN POWER Se ilumina en verde 2 4 (ES) SDM-S53, SDM-S73 or SDM-S93 4-096-265-21(1) \\Pc08\DATADISK08\Chen Ting\ML\European\SDM-S53_S73_S93 4 GUO\data\SDMS53_S73_S93 US FR ES CS(0530)\SDM-S53_S73_S93 ES\04ES02BAS-UC.fm masterpage:Right 01COV-UC.book Page 5 Friday, May 30, 2003 4:35 PM Resolución de problemas Problemas y soluciones (Si no aparece ninguna imagen en la pantalla) Si no aparece ninguna imagen en la pantalla, compruebe la tabla siguiente para obtener posibles soluciones. Si el problema persiste, utilice la función de autodiagnóstico (página 6 (ES)). Si el problema no aparece en la lista, consulte el manual de instrucciones en el CD-ROM suministrado. Para aquellos problemas causados por el ordenador u otro equipo, consulte los manuales de usuario suministrados con los artículos correspondientes. Problema Si el indicador 1 (alimentación) no está encendido o si el indicador 1 (alimentación) no se enciende cuando se pulsa el interruptor 1 (alimentación) Si el indicador 1 (alimentación) se ilumina en rojo Si el indicador 1 (alimentación) está encendido en verde Si “CABLE DESCONECTADO” aparece en pantalla Si “NO SEÑAL” aparece en pantalla o el indicador 1 (alimentación) se ilumina en naranja Si “FUERA ALCANCE” aparece en pantalla Si utiliza Windows y ha sustituido un monitor antiguo por éste Si utiliza un sistema Macintosh Compruebe lo siguiente • Compruebe que el cable de alimentación está correctamente conectado. • Compruebe que el interruptor MAIN POWER del monitor está encendido (página 3 (ES)). • Compruebe que el interruptor 1 (alimentación) está activado. • Utilice la función de autodiagnóstico (página 6 (ES)). • Compruebe que el cable de señal de vídeo está conectado correctamente y que los enchufes están perfectamente insertados en sus receptáculos (página 3 (ES)). • Compruebe que los terminales del conector de entrada de vídeo no están doblados ni aplastados. • Ha conectado un cable de señal de vídeo no suministrado. En consecuencia, puede que aparezca el mensaje “CABLE DESCONECTADO” en pantalla antes de que el monitor entre en modo de ahorro de energía. No se trata de un mal funcionamiento. • Compruebe que el cable de señal de vídeo está conectado correctamente y que los enchufes están perfectamente insertados en sus receptáculos (página 3 (ES)). • Compruebe que los terminales del conector de entrada de vídeo no están doblados ni aplastados. • Compruebe que el ajuste de selección de entrada es correcto (Para obtener más detalles, consulte el Manual de instrucciones en el CD-ROM suministrado). x Problema causado por un ordenador u otro equipo conectado y no por el monitor • El ordenador se encuentra en el modo de ahorro de energía. Pulse una tecla del teclado o mueva el ratón. • Compruebe que la tarjeta gráfica está instalada correctamente. • Compruebe que la alimentación del ordenador está activada. • Reinicie el ordenador. x Problema causado por un ordenador u otro equipo conectado y no por el monitor • Compruebe que el rango de frecuencia de vídeo se encuentra dentro del especificado para el monitor. Si ha sustituido un monitor antiguo por este monitor, vuelva a conectar el monitor antiguo y ajuste la tarjeta gráfica del ordenador en los siguientes rangos. Frecuencia horizontal: 28–61 kHz (SDM-S53), 28–80 kHz (SDM-S73/S93) Frecuencia vertical: 48–75 Hz Resolución: 1024 × 768 o inferior (SDM-S53), 1280 × 1024 o inferior (SDM-S73/S93) • Si ha sustituido un monitor antiguo por éste, vuelva a conectar el antiguo y realice lo siguiente. Seleccione “SONY” en la lista “Fabricantes” y elija “SDM-S53, SDM-S73 o SDM-S93” en la lista “Modelos” de la pantalla de selección de dispositivos de Windows. Si “SDM-S53, SDM-S73 o SDM-S93” no aparece en la lista “Modelos”, inténtelo con “Plug & Play”. • Si conecta un ordenador Macintosh, utilice un adaptador (no suministrado) si es necesario. Conecte el adaptador al ordenador antes de conectar el cable de señal de vídeo. 5 (ES) SDM-S53, SDM-S73 or SDM-S93 4-096-265-21(1) ES \\Pc08\DATADISK08\Chen Ting\ML\European\SDM-S53_S73_S93 4 GUO\data\SDMS53_S73_S93 US FR ES CS(0530)\SDM-S53_S73_S93 ES\04ES02BAS-UC.fm masterpage:Left 01COV-UC.book Page 6 Friday, May 30, 2003 4:35 PM Función de autodiagnóstico Este monitor dispone de una función de autodiagnóstico. Si se produce algún problema con el monitor o el ordenador, la pantalla se quedará en blanco y el indicador 1 (alimentación) se iluminará en verde. Si la función detecta un posible fallo en el monitor, póngase en contacto con su distribuidor Sony autorizado. Si la imagen desaparece de la pantalla y el indicador 1 (alimentación) se ilumina en verde 1 Apague el interruptor 1 (alimentación) y desconecte los cables de señal de vídeo del monitor. 2 Encienda el monitor pulsando el interruptor 1 (alimentación). Si aparecen cuatro barras de color (blanco, rojo, verde y azul), el monitor funciona correctamente. Vuelva a conectar los cables de entrada de vídeo y compruebe el estado del ordenador. Si no aparecen las barras de colores, es posible que exista un fallo en el monitor. Visualización de la información del monitor Mientras el monitor recibe una señal de vídeo, mantenga pulsado el botón MENU durante más de 5 segundos hasta que aparezca el cuadro de información. Pulse el botón MENU de nuevo para cerrar el cuadro. Ejemplo MENU INFORMACIÓN MODEL : SDM-S53 SER. NO : 1234567 MANUFACTURED : 2003-52 Nombre del modelo Número de serie Semana y año de fabricación Si el problema persiste, llame a su distribuidor Sony autorizado y proporciónele la siguiente información: • Nombre del modelo: SDM-S53, SDM-S73 o SDM-S93 • Número de serie • Descripción detallada del problema • Fecha de compra • Nombre y especificaciones del ordenador y la tarjeta gráfica Especificaciones Panel LCD Tipo de panel: Matriz activa a-Si TFT Tamaño de imagen: 15 pulg (38 cm) (SDM-S53) 17 pulg (43 cm) (SDM-S73) 19 pulg (48 cm) (SDM-S93) Formato de la señal de entrada Frecuencia de funcionamiento RGB* Horizontal × Vertical: 28–61 kHz × 48–75 Hz (SDM-S53) 28–80 kHz × 48–75 Hz (SDM-S73/S93) Resolución Horizontal × Vertical: Máx. 1024 puntos × 768 líneas (SDM-S53) 1280 puntos × 1024 líneas (SDM-S73/S93) Niveles de señal de entrada Señal de vídeo RGB analógica: 0,7 Vp-p, 75 Ω , positiva Señal SYNC: Nivel TTL, 2,2 kΩ , positiva o negativa (Horizontal y vertical independiente o sincronización compuesta) 0,3 Vp-p, 75Ω , negativa (Sincronización en verde) Requisitos de alimentación 100–240 V, 50–60 Hz, Máx. 0,6 A (SDM-S53) 100–240 V, 50–60 Hz, Máx. 1,0 A (SDM-S73/S93) Consumo de energía Máx. 25 W (SDM-S53) Máx. 45 W (SDM-S73) Máx. 50 W (SDM-S93) Temperatura de funcionamiento 5–35°C Dimensiones (ancho/alto/profundo) Pantalla (vertical): SDM-S53 Aprox. 339×370×186 mm (con soporte) (13 3/8×14 5/8×7 3/8 pulgadas) Aprox. 339×275×53 mm (sin soporte) (13 3/8×10 7/8×2 1/8 pulgadas) SDM-S73 Aprox. 367×411×215 mm (con soporte) (14 1/2×16 1/4×8 1/2 pulgadas) Aprox. 367×315×60 mm (sin soporte) (14 1/2×12 1/2×2 3/8 pulgadas) SDM-S93 Aprox. 412×445×234 mm (con soporte) (16 1/4×17 5/8×9 1/4 pulgadas) Aprox. 412×350×64 mm (sin soporte) (16 1/4×13 7/8×2 5/8 pulgadas) Peso SDM-S53 Aprox. 3,7 kg (8 lb. 2 oz.) (con soporte) Aprox. 2,7 kg (5 lb. 15 oz.) (sin soporte) SDM-S73 Aprox. 5,4 kg (11 lb. 14 oz.) (con soporte) Aprox. 4,1 kg (9 lb.) (sin soporte) SDM-S93 Aprox. 6,6 kg (14 lb. 8 oz.) (con soporte) Aprox. 5,2 kg (11 lb. 7 oz.) (sin soporte) Plug & Play DDC2B Accesorios Consulte “Instalación”. * Condición de sincronización horizontal y vertical recomendada • La anchura de sincronización horizontal debe ser superior al 4,8% del tiempo horizontal total o 0,8 µs, según el que sea mayor. • La anchura de supresión horizontal debe ser superior a 2,5 µs. • La anchura de supresión vertical debe ser superior a 450 µs. El diseño y las especificaciones están sujetos a cambios sin previo aviso. 6 (ES) SDM-S53, SDM-S73 or SDM-S93 4-096-265-21(1) 02GB02BAS-UC.fm Page 7 Tuesday, June 3, 2003 7:16 PM (?&KHQ7LQJ?0/?(XURSHDQ?6'06B6B6*82?GDWD?6'06B6B686)5(6 &6?6'06B6B6&6?&6%$6$(3IP 01COV-UC.book Page 2 Friday, May 30, 2003 5:51 PM 搬运 警告 为避免火灾或电击的危险 潮湿之处 本装置内部有高压 进行维修 切勿将本机放置在下雨或 切勿打开外壳 若要查阅 CD-ROM 上的操作说明 有关电源连接的警告事项 请使用附带的电源线 如果使用其它电源线 则必须与当 地的电源相匹配 对于美国用户 如果没有使用合适的电源线 该监视器将无法遵循 FCC 的 强制性标准 对于英国用户 如果在英国使用本监视器 则必须使用合适的英国电源 线 插头类型范例 用于 200V-240V 交流电 仅限于 240V 交流电 设备必须安装在容易插拔的电源插座附近 注意 若要阅读 CD-ROM 上的操作说明 您的计算机必须安装 Macromedia Shockwave Player 和 Adobe Acrobat Reader 4.0 版本或更新版 本 CD-ROM 上的 installs 文件夹包含这两个软件的安装程 序 仅用于 Windows 若要阅读操作说明 将附带的 CD-ROM 插入计算机的 CD-ROM 驱动器 稍等片刻 CD-ROM 的引言将自动打开 然后根据您生活的地域 按下列指示进行操作 对于美国的用户 1 单击引言中的 North America 显示机型 2 鼠标指向 S MODELS 并在下拉列表中单击您购买装置的机型 名 显示您选择的机型 3 单击 USER MANUAL ADOBE.PDF. 出现语言选项 4 单击想要的语言 操作说明文件打开 若要退出程序 单击 安装 切勿在下列场所安装或放置监视器 受高温影响的地方 例如靠近暖气管 热气管道或直射阳 光下 监视器若受到高温影响 如放置在阳光下的汽车内 或靠近热气管道 会引起机壳变形或故障 受到机械振动或冲击的地方 靠近会产生强磁场的设备 如电视机或各种其它家用电 器 受大量灰尘 垃圾或沙尘影响的地方 例如靠近开着的窗 或门等等 如果临时放置在户外 则必须采取足够的预防 措施防止空气中的灰尘和垃圾 否则会产生不可修复的故 障 液晶显示注意事项 当搬运监视器时 请先断开监视器上的所有电缆 然后紧 紧抓住显示屏的两侧 注意不要擦伤显示屏的屏幕 如果 监视器掉落 您可能受伤 监视器可能损坏 送维修或搬运本监视器时 请使用原纸箱和包装材料 只能由专业人员 使用前注意事项 用于 100V-120V 交流电 PDVWHUSDJH/HIW Liquid Crystal Display 请注意 液晶显示屏是由高精密技术制成 但在液晶显示屏 还 上可能经常出现黑点或发光亮点 红色 蓝色或绿色 可能出现不规则的彩色条纹或亮点 这并不是故障 有效点 99.99% 以上 EXIT/CD.ROM. 对于亚洲用户 1 单击引言中的 Asia 2 单击 S 文件夹 3 双击 index.html 操作说明文件打开 若要直接打开操作说明文件 单击 EXIT/CD.ROM. 退出引言 然后按以下顺序单击文件夹和 文件 CD-ROM S 想要的语言文件夹 *****.pdf ***** 是您购买的机型名 如果引言无法自动显示 按下列说明打开此引言 如果您正在使用 Windows 双击 CD-ROM 图标 如果您正在使用 Macintosh 计算机 双击 CD-ROM 图标打开窗口 然后双击 MONITOR 图标 &6 6'066'06RU6'06 (?&KHQ7LQJ?0/?(XURSHDQ?6'06B6B6*82?GDWD?6'06B6B686)5(6 &6?6'06B6B6&6?&6%$6$(3IP 01COV-UC.book Page 3 Friday, May 30, 2003 PDVWHUSDJH5LJKW 5:51 PM 安装 HD-15 打开包装 确保包装箱内含有下列物品 液晶显示器 电源线 HD15-HD15 视频信号电缆 CD-ROM Windows/Macintosh 实用软件 保修卡 快速安装指南 HD15-HD15 视频信号电缆 模拟 RGB 附带 操作说明等 连接您的监视器 交流输入 将您的监视器连接到计算机或其他设备 连接前 请关闭监视器 计算机和其他设备 切勿触摸视频信号电缆插头的针 抽出后盖 向前倾斜显示屏 将您的监视器连接到计算机 器 这是 SDM-S53 显示器的 后部 同样适用于 SDM-S73 机 型 SDM-S93 的交流输入插 口在支架的左侧 附带 注意 若要捆扎导线和电缆线 请参阅随机提供 CD-ROM 中的使用说明 若有必 请将适 将附带的电源线安全地连接到监视器的交流输入连接 打开监视器和计算机 先打开您的监视器 然后打开计算机 如果还没有打开 将另一端安全地连接到电源插座 请朝[方向按压位于监视器右侧的MAIN POWER 开关 确保 1 电源 指示灯以红色点亮 后盖 至电源插座 电源线 连接 Macintosh 计算机 将附带的视频信号电缆连接到计算机视频输出连接器 连接视频信号电缆前 要 请使用适配器 不附带 配器连接到计算机 &6 注意 监视器的 MAIN POWER 开关出厂设置为开 ([ 按下监视器右前方的 1 1 电源 电源 指示灯以绿色点亮 开关 &6 6'066'06RU6'06 (?&KHQ7LQJ?0/?(XURSHDQ?6'06B6B6*82?GDWD?6'06B6B686)5(6 &6?6'06B6B6&6?&6%$6$(3IP 01COV-UC.book Page 4 Friday, May 30, 2003 PDVWHUSDJH/HIW 5:51 PM 打开计算机 呈红色点亮 MAIN POWER 呈绿色点亮 &6 6'066'06RU6'06 (?&KHQ7LQJ?0/?(XURSHDQ?6'06B6B6*82?GDWD?6'06B6B686)5(6 &6?6'06B6B6&6?&6%$6$(3IP 01COV-UC.book Page 5 Friday, May 30, 2003 PDVWHUSDJH5LJKW 5:51 PM 故障现象和排除方法 故障现象和排除方法 如果屏幕上未出现图像 如果屏幕上未出现图像 请查阅下表格寻找解决方法 如果故障仍然存在 请使用自检功能 第 6 页 CS 如果您遇到的 故障不在列表中 请查阅附带的 CD-ROM 操作说明 对于由计算机或其他设备引起的故障 请查阅各个产品附带的使用说明书 现象 检查项目 如果 1 电源 指示灯不亮 或 当 1 电源 开关按下后 1 电源 指示灯点不亮 检查电源线的连接是否正确 检查监视器的 MAIN POWER 开关是否打开 如果 1 电源 指示灯呈红色 检查 1 如果 1 电源 指示灯呈绿色 使用自检功能 如果屏幕上出现 线 未连接信号 电源 第3页 CS 开关是否打开 第6页 CS 检查视频信号电缆是否连接正确 所有插头是否牢固地插在各自的插孔内 第 3 页 CS 检查视频输入连接器的针是否被弯曲或被挤入 连接了非附带的视频信号电缆 如果您连接了非附带的视频信号电缆 在进入省 电模式之前 屏幕上可能出现 未连接信号线 这并不是故障 如果屏幕上出现 没有输入信 号 或 1 电源 指示灯为橙 色 检查视频信号电缆是否连接正确 所有插头是否牢固地插在各自的插孔内 第 3 页 CS 检查视频输入连接器的针是否被弯曲或被挤入 x 由所连接的计算机或其他设备引起的问题 不是由监视器引起的问题 计算机进入节电模式 试着按键盘上任意键或移动鼠标 检查显示卡是否正确安装 检查计算机电源是否打开 重新启动计算机 如果屏幕上出现 x 由所连接的计算机或其他设备引起的问题 ( 不是由监视器引起的问题 ) 检查视频范围是否在监视器制定的范围内 如果用本监视器更换旧监视器 请重 新连接旧监视器 并把计算机显示卡调整到如下范围内 水平频率 28-61 kHz SDM-S53 28-80 kHz SDM-S73/S93 垂直频率 48-75 Hz 768 或更低 SDM-S53 1280 1024 或更低 SDM-S73/S93 分辨率 1024 超出范围 如果您正在使用 Windows 并且用 本监视器代替旧监视器 如果您用本监视器更换旧监视器 请重新连接旧监视器并进行以下操作 在 从 型号 列表中 Windows 设备选择画面中 从 厂家 列表中选择 SONY 如果 SDM-S53 SDM-S73 或 SDM-S93 选择 SDM-S53 SDM-S73 或 SDM-S93 未出现在 型号 列表中 请尝试使用 即插即用 如果使用 Macintosh 系统 当连接 Macintosh 计算机时 如有必要请使用适配器 缆之前 请将适配器连接到计算机 不附带 &6 连接视频信号电 &6 6'066'06RU6'06 (?&KHQ7LQJ?0/?(XURSHDQ?6'06B6B6*82?GDWD?6'06B6B686)5(6 &6?6'06B6B6&6?&6%$6$(3IP 01COV-UC.book Page 6 Friday, May 30, 2003 5:51 PM 自检功能 本监视器具有自检功能 如果监视器或计算机发生问题 屏幕画面即呈空白 而 1 电源 指示灯将呈绿色亮起 如果本功能告诉您监视器可能有潜在的故障 请联系 Sony 授权经销商 如果图像从屏幕上消失并且 1 请关闭 1 电源 指示灯呈绿色 电源 开关并断开视频信息电缆与监视器的 连接 按1 电源 PDVWHUSDJH/HIW 开关打开监视器 如果出现四个色彩条 白 红 绿 蓝 即表示监视器 工作正常 请重新连接视频输入电缆 并检查计算机的状 况 如果彩色条不出现 则可能是监视器有故障 显示监视器信息 当监视器正在接收视频信号时 按住 MENU 按钮 5 秒钟以上 直至信息框出现 再次按 MENU 按钮信息框消失 例如 MENU 型号名 : SDM-S53 : 1234567 : 2003-52 序列号 生产周和年份 如果问题仍然存在 请致电授权的 Sony 经销商 并提供下 列信息 型号名 SDM-S53 SDM-S73 或 SDM-S93 序列号 故障的详细说明 购买日期 您的计算机和显示卡的名称和规格 规格 液晶显示器面板 面板种类 a-Si TFT 有效矩阵 画面尺寸 15 英寸 (38cm)(SDM-S53) 17 英寸 (43cm)(SDM-S73) 19 英寸 (48cm)(SDM-S93) 输入信号格式 RGB 操作频率 * 水平 × 垂直 : 28-61kHz × 48-75Hz(SDM-S53) 28-80kHz × 48-75Hz(SDM-S73/S93) 分辨率 水平 × 垂直 : 最大 1024 点 × 768 线 (SDM-S53) 1280 点 × 1024 线 (SDM-S73/S93) 输入信号等级 模拟 RGB 视频信号 0.7 Vp-p, 75Ω, 正极 SYNC 信号 TTL 等级 2.2kΩ 正极或负极 独立水平和垂直 或合成同步 0.3 Vp-p, 75Ω, 负极 绿色同步 电源规格 100-240V, 50-60Hz, 最大 0.6A(SDM-S53) 100-240V, 50-60Hz, 最大 1.0A(SDM-S73/S93) 功率消耗 最大 25W (SDM-S53) 最大 45W (SDM-S73) 最大 50W (SDM-S93) 操作温度 5-35C 尺寸 宽 / 高 / 深 显示 垂直 SDM-S53 大约 339 × 370×186mm 带支架 大约 339 × 275 × 53mm 不带支架 SDM-S73 大约 367 × 411 × 215mm ( 带支架 ) 大约 367 × 315 × 60mm ( 不带支架 ) SDM-S93 大约 412 × 445× 234mm ( 带支架 ) 大约 412 × 350 × 64mm ( 不带支架 ) 质量 SDM-S53 大约 3.7kg( 带支架 ) 大约 2.7kg( 不带支架 ) SDM-S73 大约 5.4kg( 带支架 ) 大约 4.1kg( 不带支架 ) SDM-S93 大约 6.6kg( 带支架 ) 大约 5.2kg( 不带支架 ) 即插即用 DDC2B 所含物品 见 安装 建议的水平和垂直计时条件 水平同步频宽比应该大于总水平计时的 4.8% 或 0.8V 取最大的一个 水平空白宽度应该大于 2.5VHF 垂直空白宽度应该大于 450VHF 设计和规格如有变动 恕不另行通知 &6 6'066'06RU6'06 01COV-UC.book Page 1 Friday, May 30, 2003 6:01 PM 01COV-UC.book Page 2 Friday, May 30, 2003 6:01 PM 02GB02BAS-UC.fm Page 7 Tuesday, June 3, 2003 7:16 PM 01COV-UC.book Page 3 Monday, June 2, 2003 7:21 PM Sony Corporation Printed in Korea