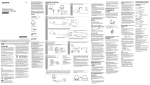
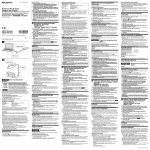
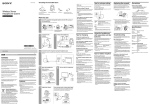
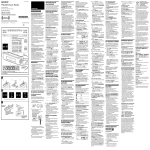
1
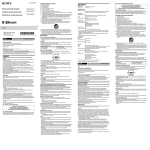
4-422-539-01 (1) < Notice for the customers in the countries applying EU Directives > The manufacturer of this product is Sony Corporation, 1-7-1 Konan Minato-ku Tokyo, 108-0075 Japan. The Authorized Representative for EMC and product safety is Sony Deutschland GmbH, Hedelfinger Strasse 61, 70327 Stuttgart, Germany. For any service or guarantee matters please refer to the addresses given in separate service or guarantee documents. ˎ ˎ ˎ TV TV Portable Speaker Haut-parleur portable 15 30 8 Features /Operating Instructions/ Mode d’emploi/Manual de instrucciones/Bedienungsanleitung/ Gebruiksaanwijzing/Istruzioni per l’uso ˎ ˎ ˎ ˎˎ This unit is an omni-directional speaker with built-in amplifier that is compatible with an active interface shoe and can be used with a Sony video camera with a projector function. ˎˎ This unit is powered via the video camera to which it is connected and therefore does not require its own power supply. RDP-CA1 Precautions VOLUME VOLUME On safety 30 mm * POWER When not in use for a long time 6 When this unit is connected via a shoe to a video camera, turning off the power of the video camera does not completely turn off the power to this unit. When not using this unit for a long time, always disconnect it from the video camera. RDP-CA1 * ( 2W JEITA* ) ©2012 Sony Corporation Printed in China 57 mm 80g 1 2 ˎ ˎ RDP-CA1 1 3 ˎ 10 1 kHz 6 Foreign objects 86 mm 1 1 *JEITA 4 5 POWER ˎ ˎ ˋ ˋ Before operating this unit, please read this manual thoroughly and retain it for future reference. VOLUME ˎ VOLUME WARNING To reduce fire or shock hazard, do not expose the unit to rain or moisture. ˎ ˎ ˎ For the customers in the U.S.A. VOLUME This device complies with Part 15 of the FCC Rules. Operation is subject to the following two conditions: (1) This device may not cause harmful interference, and (2) this device must accept any interference received, including interference that may cause undesired operation. HDMI ˎ ˎ ˎ 2, 3, 4 CAUTION You are cautioned that any changes or modifications not expressly approved in this manual could void your authority to operate this equipment. NOTE: This equipment has been tested and found to comply with the limits for a Class B digital device, pursuant to Part 15 of the FCC Rules. These limits are designed to provide reasonable protection against harmful interference in a residential installation. This equipment generates, uses, and can radiate radio frequency energy and, if not installed and used in accordance with the instructions, may cause harmful interference to radio communications. ˎ ˎ 1 ˎ 5 VOLUME ˎ ˎ A/V TV TV ˎ ˎ ˎ VOLUME ˎ ˎ A/V HDMI ˎ HDMI This Class B digital apparatus complies with Canadian ICES-003. For the Customers in Europe POWER POWER ˎ ˎ VOLUME ˎ ˎ ˎ ˎ ˎ ˎ ˋ ˋ ˋ ˋ ˋ ˎ ˎ ˎ However, there is no guarantee that interference will not occur a particular installation. If this equipment does cause harmful interference to radio or television reception, which can be determined by turning the equipment off and on, the user is encouraged to try to correct the interference by one or more of following measures: ˋˋReorient or relocate the receiving antenna. ˋˋIncrease the separation between the equipment and receiver. ˋˋConnect the equipment into an outlet on a circuit different from that to which the receiver is connected. ˋˋConsult the dealer or an experienced radio/TV technician for help. The supplied interface cable must be used with the equipment in order to comply with the limits for a digital device pursuant to Subpart B of Part 15 of FCC Rules. For the customers in Canada ˎ If there is a malfunction or failure In the unlikely event of a malfunction or failure or if a foreign object gets inside, immediately disconnect this unit from the video camera and contact your nearest Sony dealer. On handling A/V ˎ Do not allow any foreign object to get into the terminals. Doing so can cause breakdown or an accident. Do not allow any foreign object to get into the speaker opening. 1 Disposal of Old Electrical & Electronic Equipment (Applicable in the European Union and other European countries with separate collection systems) This symbol on the product or on its packaging indicates that this product shall not be treated as household waste. Instead it shall be handed over to the applicable collection point for the recycling of electrical and electronic equipment. By ensuring this product is disposed of correctly, you will help prevent potential negative consequences for the environment and human health, which could otherwise be caused by inappropriate waste handling of this product. The recycling of materials will help to conserve natural resources. For more detailed information about recycling of this product, please contact your local Civic Office, your household waste disposal service or the shop where you purchased the product. ˎˎ The speaker unit, built-in amplifier and cabinet are precisely aligned with one another. Do not disassemble or modify them. ˎˎ If the cabinet becomes dirty, wipe it using a soft cloth with a little mild detergent. Do not use thinners, benzene, alcohol etc. because they will damage the finish of the cabinet surface. ˎˎ Keep this unit away from the following places. ˋˋHigh temperature places such as in direct sunlight or near a heater. ˋˋInside a car with the windows shut (especially in summer). ˋˋHumid places such as a bathroom. ˋˋIn dusty places or on sand. ˋˋNear a watch, credit card, etc. (Although this unit is magnetically shielded, do not leave recorded tapes, watches, credit cards or floppy disks in front of the speaker.) ˎˎ Place this unit on an even surface. ˎˎ This unit may topple over or drop if installed in certain conditions. Place this unit on the stable and flat space. ˎˎ When moving this unit, do not place magnetic items such as floppy disks or credit cards near it. ˎˎ When moving this unit, do not hold it when attached to a video camera. ˎˎ Do not use this unit near a TV, radio or tuner. It may cause noise to enter the TV, radio or tuner. If color unevenness occurs on the monitor screen If color unevenness occurs, turn off the power to the monitor and wait 15 to 30 minutes before turning it back on. If color unevenness remains Disconnect this unit from the monitor. If it still remains ˎˎ In the following cases, the volume setting of this unit returns to the default value and output is at a rather low volume. Adjust the volume as required. ˋˋWhen this unit is attached to a video camera ˋˋWhen the power to the video camera is turned off and back on Changing the volume You can change the volume by pressing the + or – volume buttons on this unit. ˎˎ You can change the volume smoothly by holding either volume button down. Note ˎˎ Do not place this unit close to your ear. ˎˎ Detach this unit before recording. If attached, it can cause noise. ˎˎ Hold this unit steady when you press the volume buttons. ˎˎ When another device is connected to the HDMI jack or headphone jack of the video camera, the output to that device has priority so no sound comes out of this unit. ˎˎ When this unit is attached, the volume control on the video camera does not work and no sound comes from the internal speaker of the video camera. ˎˎ Do not lift up this unit when attached to the video camera. Storing When carrying this unit around, always remove it from the video camera and store it in the provided pouch. Note ˎˎ When storing, remove the connecting cord from this unit. This unit may be damaged if stored in the pouch with the connecting cord attached. ˎˎ Store the connecting cord and this unit separately in the divided sections inside the pouch. Troubleshooting Carry out the following checks before requesting repairs. If the problem persists, contact your nearest Sony dealer. Sound is cracked or broken up, or there is noise ˎˎ The volume of this unit is set too high. Reduce the volume with the - volume button on this unit. ˎˎ The connecting cord is not properly connected. Remove the connecting cord and then reconnect it. Make sure the plugs of the connecting cord are firmly inserted into the A/V remote jack of the video camera and the stereo mini jack of this unit. ˎˎ This unit is positioned too close to a TV. Place it further from the TV. The sound is low or there is no sound ˎˎ The power of the video camera is turned off. Turn on the power of the video camera. ˎˎ This unit is set to the minimum volume. Increase the volume with the + volume button on this unit. ˎˎ The connecting cord is not properly connected. Remove the connecting cord and then reconnect it. Make sure the plugs of the connecting cord are firmly inserted into the A/V remote jack of the video camera and the stereo mini jack of this unit. ˎˎ A headphone cable or HDMI cable is connected to the video camera. Remove the headphone cable or HDMI cable. Sound is distorted ˎˎ The video camera battery has insufficient remaining power. Replace the video camera battery with a spare charged battery. Make sure there is no magnetic source close to this unit. If there is, it can interact with this unit and cause color unevenness. The POWER lamp is flickering Magnets fitted to the doors of a rack or stand, health appliances, magnets used in toys, etc. The power to the video camera turns off Magnetic sources Identifying parts Volume button (-) Volume button (+)* POWER lamp Stereo mini jack Shoe connector *There is a bump on the button surface. Use it as a guide when operating. Attaching this unit to the video camera 1 Turn off the power of the video camera. 2 Align the arrow on the bottom of this unit with the arrow on the active interface shoe of the video camera. 3 Insert the shoe connecter of this unit into slot of the video camera. Hold the shoe cover of the video camera with your hand to make it easier to attach. 4 Slide this unit towards the lens of the video camera until it is firmly in place. 5 While supporting this unit, connect its stereo mini jack to the A/V remote jack of the video camera with the provided connecting cord. ˎˎ When you turn on the power of the video camera with this unit attached to it, the POWER lamp on this unit lights up. To detach this unit, turn off the power to the video camera and then do the attaching steps in reverse. When sliding this unit to detach, slide this unit while holding the shoe cover of the video camera with your hand. Using this unit When this unit is attached to a video camera, it outputs the sound of video being projected by the projector function. ˎˎ For details on the projector function, refer to the operating instructions supplied with your video camera. ˎˎ The POWER lamp can sometimes flicker when the volume is high. ˎˎ The volume of this unit is set too high. Reduce the volume with the - volume button on this unit. ˎˎ The video camera battery has insufficient remaining power. Replace with a charged battery. Specifications Speaker Type Speaker used Enclosure type Impedance Full range 30 mm diameter Sealed 6Ω Amplifier Maximum output 2 W (10 % THD, 1 kHz, 6 Ω) General Maximum dimensions (maximum diameter × height) Mass Approx. Ø57 mm × 86 mm (2 1/4 in. × 3 1/2 in.) Approx. 80 g (2.8 oz) Included items Portable speaker RDP-CA1 (1), connecting cord (1), pouch (1), set of printed documentation Design and specifications are subject to change without notice. This mark indicates the Active Interface Shoe System for use with Sony video products. Video components and accessories equipped with this system are designed to make effective recording simple. Avant d’utiliser ce produit, prière de lire attentivement ce mode d’emploi et de le conserver pour toute référence future. AVERTISSEMENT Afin de réduire les risques d’incendie ou de décharge électrique, n’exposez pas cet appareil à la pluie ou à l’humidité. À l’intention des clients aux É.-U. Cet appareil est conforme à la Partie 15 de la réglementation de la FCC des États-Unis. Son utilisation est sujette aux deux conditions suivantes : (1) Cet appareil ne doit pas générer d’interférences nuisibles et (2) il doit être en mesure d’accepter toute interférence reçue, y compris les interférences pouvant générer un fonctionnement indésirable. AVERTISSEMENT Par la présente, vous êtes avisé du fait que tout changement ou toute modification ne faisant pas l’objet d’une autorisation expresse dans le présent manuel pourrait annuler votre droit d’utiliser l’appareil. Note L’appareil a été testé et est conforme aux exigences d’un appareil numérique de Classe B, conformément à la Partie 15 de la réglementation de la FCC. Ces critères sont conçus pour fournir une protection raisonnable contre les interférences nuisibles dans un environnement résidentiel. L’appareil génère, utilise et peut émettre des fréquences radio; s’il n’est pas installé et utilisé conformément aux instructions, il pourrait provoquer des interférences nuisibles aux communications radio. Cependant, il n’est pas possible de garantir que des interférences ne seront pas provoquées dans certaines conditions particulières. Si l’appareil devait provoquer des interférences nuisibles à la réception radio ou à la télévision, ce qui peut être démontré en allumant et éteignant l’appareil, il est recommandé à l’utilisateur d’essayer de corriger cette situation par l’une ou l’autre des mesures suivantes : ˋˋRéorienter ou déplacer l’antenne réceptrice. ˋˋAugmenter la distance entre l’appareil et le récepteur. ˋˋBrancher l’appareil dans une prise ou sur un circuit différent de celui sur lequel le récepteur est branché. ˋˋConsulter le détaillant ou un technicien expérimenté en radio/téléviseurs. Le câble d’interface fourni doit être utilizé avec l’appareil pour que celui-ci soit conforme aux critères régissant les appareils numériques, conformément à la sous-partie B de la Partie 15 de la réglementation de la FCC. Pour les clients au Canada Cet appareil numérique de la classe B est conforme à la norme NMB-003 du Canada. Pour les clients en Europe Traitement des appareils électriques et électroniques en fin de vie (Applicable dans les pays de l’Union Européenne et aux autres pays européens disposant de systèmes de collecte sélective) Ce symbole, apposé sur le produit ou sur son emballage, indique que ce produit ne doit pas être traité avec les déchets ménagers. Il doit être remis à un point de collecte approprié pour le recyclage des équipements électriques et électroniques. En vous assurant que ce produit sont mis au rebut de façon appropriée, vous participez activement à la prévention des conséquences négatives que leur mauvais traitement pourrait provoquer sur l’environnement et sur la santé humaine. Le recyclage des matériaux contribue par ailleurs à la préservation des ressources naturelles. Pour toute information complémentaire au sujet du recyclage de ce produit, vous pouvez contacter votre municipalité, votre déchetterie locale ou le point de vente où vous avez acheté le produit. < Avis aux consommateurs des pays appliquant les Directives UE > Le fabricant de ce produit est Sony Corporation, 1-7-1 Konan Minato-ku Tokyo, 108-0075 Japon. Le représentant autorisé pour les questions de compatibilité électromagnétique (EMC) et la sécurité des produits est Sony Deutschland GmbH, Hedelfinger Strasse 61, 70327 Stuttgart, Allemagne. Pour toute question relative au SAV ou à la garantie, merci de bien vouloir vous référer aux coordonnées contenues dans les documents relatifs au SAV ou la garantie. Caractéristiques ˎˎ Cet appareil est un haut-parleur omnidirectionnel amplifié compatible avec une griffe active et peut donc être utilisé avec un caméscope Sony à projecteur intégré. ˎˎ Cet appareil est alimenté par le caméscope auquel il est raccordé et n’a par conséquent pas besoin d’être alimenté. Précautions Sécurité Si cet appareil n’est pas utilisé pendant longtemps Lorsque cet appareil est branché sur un caméscope par la griffe, son alimentation n’est pas complètement coupée lorsque le caméscope est mis hors tension. Si vous prévoyez de ne pas utiliser cet appareil pendant un certain temps, débranchez-le toujours du caméscope. Objets étrangers Ne laissez pas tomber d’objet étranger dans les bornes. Ceci pourrait causer une panne ou un accident. Ne laissez pas tomber d’objet étranger dans l’ouverture du haut-parleur. En cas de dysfonctionnement ou de panne En cas de dysfonctionnement ou de panne, ou si un objet étranger devait pénétrer à l’intérieur, débranchez immédiatement cet appareil du caméscope et contactez votre revendeur Sony le plus proche. Maniement ˎˎ Le haut-parleur, l’amplificateur intégré et le coffret sont emboîtés de manière très précise l’un dans l’autre. N’essayez pas de les démonter ou d’apporter des modifications. ˎˎ Si le coffret se salit, essuyez-le avec un chiffon doux imprégné d’un peu de détergent léger. N’utilisez pas de diluants, benzène, alcool, etc. qui risqueraient d’endommager la finition du coffret. ˎˎ Rangez cet appareil à l’écart des endroits suivants. ˋˋEndroits exposés à de hautes températures, comme en plein soleil ou près d’un appareil de chauffage. ˋˋÀ l’intérieur d’une voiture toutes vitres closes (en particulier en été). ˋˋEndroits humides, comme dans une salle de bains. ˋˋEndroits poussiéreux ou sur le sable. ˋˋPrès d’une montre, d’une carte de crédit, etc. (Bien que cet appareil ait un blindage antimagnétisme, ne laissez pas de bandes enregistrées, montres, cartes de crédit ou disquettes devant le haut-parleur.) ˎˎ Posez cet appareil sur une surface horizontale. ˎˎ Cet appareil peut se renverser ou tomber dans certaines situations. Posez cet appareil sur une surface stable et plane. ˎˎ Lorsque vous déplacez cet appareil, ne posez pas d’objets magnétiques, comme des disquettes ou cartes de crédit, à proximité. ˎˎ Avant de déplacer cet appareil, détachez-le du caméscope. ˎˎ N’utilisez pas cet appareil près d’un téléviseur, d’une radio ou d’un tuner. Il peut causer du bruit sur le téléviseur, la radio ou le tuner. Si les couleurs sont anormales sur l’écran de contrôle Si les couleurs deviennent anormales, éteignez l’écran et attendez 15 à 30 minutes avant de le rallumer. Si les couleurs restent anormales Éloignez cet appareil de l’écran. S’il n’y a aucun changement Assurez-vous qu’il n’y a pas de source de magnétisme à proximité de l’appareil. Le cas échéant, il se peut que celle-ci interfère avec l’appareil et cause des anomalies de couleurs. Sources de magnétisme Aimants de portes de meubles ou support, d’appareils de santé, de jouets, etc. Identification des éléments Bouton de volume (-) Bouton de volume (+)* Témoin POWER Minijack stéréo Connecteur de griffe * Il y a une pointe saillante sur la surface du bouton. Utilisez-la comme guide lors du réglage du volume. Fixation de cet appareil au caméscope 1 Mettez le caméscope hors tension. 2 Alignez la flèche sous cet appareil et la flèche sur la griffe active du caméscope. 3 Insérez le connecteur de griffe de cet appareil dans la fente du caméscope. Retenez le cache-griffe du caméscope avec la main pour pouvoir mieux rattacher le connecteur. 4 Faites glisser cet appareil dans le sens de l’objectif du caméscope de sorte qu’il se mette bien en place. 5 Tout en tenant cet appareil, branchez son minijack stéréo sur la prise de télécommande A/V du caméscope avec le cordon de liaison fourni. ˎˎ Lorsque vous mettez le caméscope sous tension avec cet appareil rattaché, le témoin POWER s’allume sur cet appareil. Pour détacher cet appareil, mettez le caméscope hors tension puis procédez en sens inverse du montage. Lorsque vous faites glisser cet appareil pour le détacher, faites-le en tenant le cache-griffe du caméscope avec la main. Utilisation de cet appareil Lorsque cet appareil est rattaché à un caméscope, il restitue le son du film projeté par le projecteur intégré. ˎˎ Pour le détail sur le projecteur intégré, reportez-vous au mode d’emploi fourni avec votre caméscope. ˎˎ Dans les cas suivants, le réglage de volume de cet appareil revient à sa valeur par défaut et restitue un son plutôt faible. Dans ce cas, ajustez le volume au niveau souhaité. ˋˋLorsque cet appareil est rattaché au caméscope. ˋˋLorsque le caméscope est mis hors tension puis de nouveau sous tension. Changement du volume Vous pouvez changer le volume en appuyant sur les boutons de volume + ou – de cet appareil. ˎˎ Vous pouvez changer lentement le volume en tenant l’un ou l’autre bouton enfoncé. Remarque ˎˎ Ne placez pas cet appareil près de l’oreille. ˎˎ Détachez cet appareil avant de filmer. S’il reste rattaché, il peut causer du bruit. ˎˎ Tenez cet appareil sans bouger lorsque vous appuyez sur les boutons de volume. ˎˎ Lorsqu’un autre dispositif est raccordé à la prise HDMI ou à la prise de casque d’écoute du caméscope, la sortie de ce dispositif est prioritaire et aucun son ne sort de cet appareil. ˎˎ Lorsque cet appareil est rattaché, la commande de volume du caméscope n’agit pas et aucun son ne sort du haut-parleur interne du caméscope. ˎˎ Ne soulevez pas cet appareil lorsqu’il est rattaché au caméscope. Rangement Avant d’emporter cet appareil, détachez-le toujours du caméscope et rangez-le dans la pochette fournie. Remarque ˎˎ Avant de le ranger, débranchez le cordon de liaison de cet appareil. Cet appareil peut être endommagé s’il est rangé dans la pochette avec le cordon de liaison rattaché. ˎˎ Rangez le cordon de liaison et cet appareil séparément dans les différentes sections de la pochette. En cas de problème Effectuez les contrôles suivants avant de faire appel à un réparateur. Si le problème persiste, contactez votre revendeur Sony. Le son présente des craquements ou coupures, ou bien encore du bruit. ˎˎ Le volume de cet appareil est réglé trop haut. Réduisez le volume avec le bouton de volume de cet appareil. ˎˎ Le cordon de liaison n’est pas raccordé correctement. Débranchez le cordon de liaison et rebranchezle. Assurez-vous que les fiches des cordons de liaison sont bien insérées dans la prise de télécommande A/V du caméscope et le minijack stéréo de cet appareil. ˎˎ Cet appareil est trop rapproché d’un téléviseur. Éloignez-le du téléviseur. Le son est faible ou il n’y a pas de son ˎˎ L’alimentation du caméscope est coupée. Mettez le caméscope sous tension. ˎˎ Cet appareil est réglé au volume minimal. Augmentez le volume avec le bouton de volume + de cet appareil. ˎˎ Le cordon de liaison n’est pas raccordé correctement. Débranchez le cordon de liaison et rebranchezle. Assurez-vous que les fiches des cordons de liaison sont bien insérées dans la prise de télécommande A/V du caméscope et le minijack stéréo de cet appareil. ˎˎ Un câble de casque d’écoute ou un câble HDMI est branché sur le caméscope. Débranchez le câble de casque d’écoute ou le câble HDMI. Distorsion du son ˎˎ La batterie du caméscope n’est pas suffisamment chargée. Remplacez la batterie du caméscope par une batterie de rechange chargée. Le témoin POWER clignote. ˎˎ Le témoin POWER peut clignoter parfois lorsque le volume est élevé. L’alimentation du caméscope est coupée. ˎˎ Le volume de cet appareil est réglé trop haut. Réduisez le volume avec le bouton de volume de cet appareil. ˎˎ La batterie du caméscope n’est pas suffisamment chargée. Remplacez-la par une batterie chargée. Spécifications Haut-parleur Type Haut-parleur utilisé Type de coffret Impédance Pleine gamme 30 mm de diamètre Scellé 6Ω Amplificateur Sortie maximale 2 W (10 % DHT, 1 kHz, 6 Ω) Caractéristiques générales Dimensions Environ Ø57 mm × 86 mm maximales (diamètre (2 1/4 pouces × 3 1/2 pouces) maximal × hauteur) Poids Environ 80 g (2,8 oz) Articles inclus Haut-parleur portable RDP-CA1 (1), cordon de liaison (1), pochette (1), jeu de documents imprimés La conception et les spécifications peuvent être modifiées sans préavis. Ce label indique le système de griffe Active Interface Shoe conçu pour les produits vidéo Sony. Les composants vidéo et accessoires dotés de ce système permettent une prise de vue simple et efficace. Nombre del producto: Altavoz portátil Modelo: RDP-CA1 Antes de poner en funcionamiento esta unidad, lea detalladamente todo este manual y guárdelo para poderlo consultar en el futuro. POR FAVOR LEA DETALLADAMENTE ESTE MANUAL DE INSTRUCCIONES ANTES DE CONECTAR Y OPERAR ESTE EQUIPO. RECUERDE QUE UN MAL USO DE SU APARATO PODRÍA ANULAR LA GARANTÍA. Precauciones Acerca de la seguridad Cuando no se utilice durante mucho tiempo Cuando esta unidad se conecte a través de una zapata a una videocámara, al desconectar la alimentación de la videocámara no se desconectará completamente la alimentación de esta unidad. Cuando no vaya a utilizar esta unidad durante mucho tiempo, desconéctela de la videocámara. Objetos extraños No permita que entre ningún objeto extraño en los terminales. Si lo hiciese, podría causar averías o un accidente. No permita que entre ningún objeto extraño en la abertura del altavoz. Si hay un mal funcionamiento o fallo En el improbable caso de mal funcionamiento o fallo, o si entra un objeto extraño en el interior, desconecte inmediatamente esta unidad de la videocámara y póngase en contacto con su proveedor Sony más cercano. Acerca del manejo ˎˎ La unidad altavoz, el amplificador incorporado, y la caja están alineados con precisión entre sí. No los desarme ni modifique. ˎˎ Si la superficie de la caja se ensucia, límpiela con un paño suave con un poco de detergente poco concentrado. No utilice nunca disolventes de pintura, benceno, alcohol, etc., porque podrían dañar el acabado de la superficie de la caja. ˎˎ Mantenga esta unidad alejada de los lugares siguientes. ˋˋLugares de alta temperatura, como a la luz solar directa o cerca de un aparato de calefacción. ˋˋEn el interior de un automóvil con las ventanillas cerradas (especialmente en verano). ˋˋLugares húmedos, como un cuarto de baño. ˋˋEn lugares polvorientos o sobre arena. ˋˋCerca de un reloj, una tarjeta de crédito, etc. (Aunque esta unidad está magnéticamente blindada, no deje cintas grabadas, relojes, tarjetas de crédito, ni discos floppy, frente al altavoz.) ˎˎ Coloque esta unidad sobre una superficie nivelada. ˎˎ Esta unidad puede volcar o caerse si se instala en ciertas condiciones. Coloque esta unidad sobre un espacio estable y plano. ˎˎ Cuando traslade esta unidad, no coloque elementos magnéticos, como discos floppy o tarjetas de crédito cerca de ella. ˎˎ Cuando traslade esta unidad, no la sujete cuando esté fijada a una videocámara. ˎˎ No utilice esta unidad cerca de un televisor, una radio, ni un sintonizador. Podría hacer que entrase ruido en el televisor, la radio, o el sintonizador. Si se produce desigualdad de color en la pantalla del monitor. Si se produce desigualdad de color, desconecte la alimentación del monitor y espere de 15 a 30 minutos antes de volver a conectarla. Si la desigualdad de color permanece Desconecte esta unidad del monitor. Si todavía permanece Cerciórese de que no haya una fuente magnética cerca de esta unidad. Si la hubiese, podría interactuar con esta unidad y causar desigualdad de color. Fuentes magnéticas Imanes fijados a las puertas de un bastidor o pedestal, aparatos médicos, imanes utilizados en juguetes, etc. Identificación de partes Botón de volumen (-) Botón de volumen (+)* Lámpara POWER Minitoma estéreo Conector para zapata * En la superficie inferior hay una abolladura. Utilícela como guía cuando realice operaciones. AVISO Fijación de esta unidad a la videocámara Para los clientes de Europa 1 Desconecte la alimentación de la videocámara. 2 Alinee la flecha de la parte inferior de esta unidad con la flecha de la zapata de interfaz activa de la videocámara. 3 Inserte el conector de zapata de esta unidad en la ranura de la videocámara. Para reducir el riesgo de incendio o descarga eléctrica, no exponga la unidad a la lluvia ni a la humedad. Tratamiento de los equipos eléctricos y electrónicos al final de su vida útil (aplicable en la Unión Europea y en países europeos con sistemas de tratamiento selectivode residuos) Este símbolo en el equipo o en su embalaje indica que el presente producto no puede ser tratado como residuos doméstico normal. Debe entregarse en el correspondiente punto de recogida de equipos eléctricos y electrónicos. Al asegurarse de que este producto se desecha correctamente, usted ayuda a prevenir las consecuencias potencialmente negativas para el medio ambiente y la salud humana que podrían derivarse de la incorrecta manipulación en el momento de deshacerse de este producto. El reciclaje de materiales ayuda a conservar los recursos naturales. Para recibir información detallada sobre el reciclaje de este producto, póngase en contacto con el ayuntamiento, el punto de recogida más cercano o el establecimiento donde ha adquirido el producto. < Aviso para los clientes de países en los que se aplican las directivas de la UE > El fabricante de este producto es Sony Corporation, 1-7-1 Konan Minato-ku Tokyo, 108-0075 Japón. El representante autorizado para EMC y seguridad en el producto es Sony Deutschland GmbH, Hedelfinger Strasse 61, 70327 Stuttgart,Alemania. Para cualquier asunto relacionado con servicio o garantía por favor diríjase a la dirección indicada en los documentos de servicio o garantía adjuntados con el producto. Características ˎˎ Esta unidad es un altavoz unidireccional con amplificador incorporado que es compatible con una zapata de interfaz activa y puede utilizarse con una videocámara Sony con función de proyector. ˎˎ Esta unidad se alimenta a través de la videocámara a la que se conecte y, por lo tanto, no requiere su propio suministro de alimentación. Sujete la cubierta de la zapata de la videocámara con su mano para facilitar la fijación. 4 Deslice esta unidad hacia el objetivo de la videocámara hasta que quede firmemente colocada en su lugar. 5 Sujetando esta unidad, conecte su minitoma estéreo a la toma para mando a distancia de A/V de la videocámara con el cable conector suministrado. ˎˎ Cuando conecte la alimentación de la videocámara con esta unidad fijada a la misma, se encenderá la lámpara POWER de esta unidad. Para desmontar esta unidad, desconecte la alimentación de la videocámara y después realice los pasos de fijación en sentido contrario. Cuando deslice esta unidad para desmontarla, hágalo mientras sujete la cubierta de la zapata de la videocámara con su mano. Utilización de esta unidad Cuando esta unidad esté fijada a una videocámara, dará salida al sonido del vídeo que esté proyectándose con la función de proyector. ˎˎ Con respecto a los detalles sobre la función de proyector, consulte el manual de instrucciones suministrado con su videocámara. ˎˎ En los casos siguientes, el ajuste del volumen de esta unidad volverá al valor predeterminado y la salida será a un volumen bastante bajo. Ajuste el volumen en la forma requerida. (Continúa en el reverso) Wenn sie weiter bestehen (Continúa del anverso.) ˋˋCuando esta unidad esté fijada a una videocámara. ˋˋCuando desconecte y vuelva a conectar la alimentación de la videocámara. 2, 3, 4 Cambio del volumen Podrá cambiar el volumen pulsando los botones de volumen + o – de esta unidad. ˎˎ Podrá cambiar el volumen uniformemente manteniendo pulsado cualquier botón de volumen. Nota ˎˎ No coloque esta unidad cerca de su oído. ˎˎ Desmonte esta unidad antes de grabar. Si estuviese fijada, podría causar ruido. ˎˎ Mantenga esta unidad estable cuando pulse los botones de volumen. ˎˎ Cuando conecte otro dispositivo a la toma HDMI o a la toma de auriculares de esta videocámara, la salida de tal dispositivo tendrá prioridad, y no saldrá sonido de esta unidad. ˎˎ Cuando fije esta unidad, el control de volumen de la videocámara no trabajará y no saldrá sonido a través del altavoz interno de la videocámara. ˎˎ No levante esta unidad cuando esté fijada a la videocámara. Almacenamiento 5 Cuando transporte esta unidad, retírela siempre de la videocámara y guárdela en la funda suministrada. Nota ˎˎ Cuando almacene la unidad, desconecte el cable conector de la misma. Esta unidad podría dañarse si la almacenase en la funda con el cable conector fijado. ˎˎ Almacene el cable conector y esta unidad por separado en las secciones divididas de la funda. Solución de problemas Realice las comprobaciones siguientes antes de solicitar reparaciones. Si el problema persiste, póngase en contacto con su proveedor Sony más cercano. El sonido está rajado o quebrado, o hay ruido. ˎˎ El volumen de esta unidad está ajustado demasiado alto. Reduzca el volumen con el botón de volumen de esta unidad. ˎˎ El cable conector no está apropiadamente conectado. Desconecte y vuelva a conectar el cable conector. Cerciórese de que las clavijas del cable conector estén firmemente insertadas en la toma para mando a distancia de A/V de la videocámara y la minitoma estéreo de esta unidad. ˎˎ Esta unidad está colocada demasiado cerca de un televisor. Aléjela del televisor. El sonido es bajo o no hay sonido. ˎˎ La alimentación de la videocámara está desconectada. Conecte la alimentación de la videocámara. ˎˎ Esta unidad está ajustada al volumen mínimo. Aumente el volumen con el botón de volumen + de esta unidad. ˎˎ El cable conector no está apropiadamente conectado. Desconecte y vuelva a conectar el cable conector. Cerciórese de que las clavijas del cable conector estén firmemente insertadas en la toma para mando a distancia de A/V de la videocámara y en la minitoma estéreo de esta unidad. ˎˎ El cable de unos auriculares o el cable HDMI está conectado a la videocámara. Desconecte el cable de auriculares o el cable HDMI. El sonido está distorsionado ˎˎ La energía restante de la batería de la videocámara es insuficiente. Reemplace la batería de la videocámara por otra de repuesto cargada. La lámpara POWER está parpadeando. ˎˎ La lámpara POWER puede parpadear a veces cuando el volumen esté alto. La alimentación de la videocámara se desconecta. ˎˎ El volumen de esta unidad está ajustado demasiado alto. Reduzca el volumen con el botón de volumen de esta unidad. ˎˎ La energía restante de la batería de la videocámara es insuficiente. Reemplace la batería por otra cargada. Especificaciones Altavoz Tipo Altavoz utilizado Tipo de caja acústica Impedancia Amplificador Salida Gama completa Diámetro de 30 mm Sellada 6Ω máxima de 2 W (10 % de distorsión armónica total, 1 kHz, 6 Ω) General Requisitos de alimentación 6,8 V Consumo de potencia. 0,68 W Dimensiones máximas Aprox. Ø57 mm × 86 mm (diámetro × altura máximos) Peso Aprox. 80 g Elementos incluidos Altavoz portátil RDP-CA1 (1), cable conector (1), funda (1), juego de documentación impresa El diseño y las especificaciones están sujetos a cambio sin previo aviso. Esta marca indica el sistema Active Interface Shoe, que deberá utilizarse con productos de vídeo Sony. Los componentes y los accesorios de vídeo provistos de este sistema se han diseñado para facilitar la grabación efectiva. Vor dem Betrieb dieses Geräts lesen Sie bitte diese Anleitung gründlich durch und bewahren sie zum Nachschlagen auf. WARNUNG Um Feuergefahr und die Gefahr eines elektrischen Schlags zu verringern, setzen Sie das Gerät weder Regen noch Feuchtigkeit aus. Für Kunden in Europa Entsorgung von gebrauchten elektrischen und elektronischen Geräten (anzuwenden in den Ländern der Europäischen Union und anderen europäischen Ländern mit einem separaten Sammelsystem für diese Geräte) Das Symbol auf dem Produkt oder seiner Verpackung weist darauf hin, dass dieses Produkt nicht als normaler Haushaltsabfall zu behandeln ist, sondern an einer Annahmestelle für das Recycling von elektrischen und elektronischen Geräten abgegeben werden muss. Durch Ihren Beitrag zum korrekten Entsorgen dieses Produkts schützen Sie die Umwelt und die Gesundheit Ihrer Mitmenschen. Umwelt und Gesundheit werden durch falsches Entsorgen gefährdet. Materialrecycling hilft, den Verbrauch von Rohstoffen zu verringern. Weitere Informationen zum Recycling dieses Produkts erhalten Sie bei Ihrer Gemeindeverwaltung, den kommunalen Entsorgungsbetrieben oder dem Geschäft, in dem Sie das Produkt gekauft haben. < Hinweis für Kunden in Ländern, in denen EURichtlinien gelten > Der Hersteller dieses Produktes ist Sony Corporation, 1-7-1 Konan Minato-ku Tokio, 108-0075 Japan. Bevollmächtigter für EMV und Produktsicherheit ist Sony Deutschland GmbH, Hedelfinger Strasse 61, 70327 Stuttgart, Deutschland. Für Kundendienstoder Garantieangelegenheiten wenden Sie sich bitte an die in Kundendienst- oder Garantiedokumenten genannten Adressen. Merkmale ˎˎ Diese Gerät ist ein Rundumlautsprecher mit eingebautem Verstärker, der mit einem ActiveInterface-Schuh kompatibel ist und mit einer Sony-Videokamera mit Projektorfunktion verwendet werden kann. ˎˎ Dieses Gerät wird über die Videokamera, an die es angeschlossen ist, mit Strom versorgt und erfordert deshalb keine eigene Stromversorgung. Vorsichtsmaßregeln Betriebssicherheit Bei Nichtgebrauch über längere Zeit Wenn dieses Gerät über einen Kontaktschuh an eine Videokamera angeschlossen ist, wird durch Ausschalten der Videokamera die Stromversorgung dieses Geräts nicht vollständig ausgeschaltet. Wenn Sie dieses Gerät längere Zeit nicht verwenden, trennen Sie es immer von der Videokamera ab. Fremdkörper Lassen Sie keine Fremdkörper in die Anschlüsse geraten. Dadurch kann Geräteversagen oder ein Unfall bewirkt werden. Lassen Sie keine Fremdkörper in die Lautsprecheröffnung geraten. Wenn eine Fehlfunktion oder ein Versagen auftritt In dem unwahrscheinlichen Fall einer Fehlfunktion oder eines Versagens oder bei Eindringen eines Fremdkörpers trennen Sie dieses Gerät sofort von der Videokamera und wenden sich an Ihren Sony-Fachhändler. Richtige Handhabung ˎˎ Die Lautsprechereinheit, der eingebaute Lautsprecher und das Gehäuse sind präzise miteinander ausgerichtet. Zerlegen oder modifizieren Sie diese Teile nicht. ˎˎ Wenn das Gehäuse schmutzig wird, wischen Sie es mit einem weichen, mit milder Reinigungslösung befeuchteten Tuch sauber. Verwenden Sie nicht Terpentin, Benzol, Alkohol und ähnliche organische Lösungsmittel, da diese die Oberfläche des Gehäuses angreifen. ˎˎ Halten Sie dieses Gerät von den folgenden Orten fern. ˋˋOrte mit hohen Temperaturen wie im direkten Sonnenlicht oder in der Nähe von Heizkörpern. ˋˋIm Inneren eines Autos mit geschlossenen Fenstern (besonders im Sommer). ˋˋFeuchte Orte wie Badezimmer. ˋˋAn staubigen oder sandigen Orten. ˋˋ(Obwohl diese Einheit magnetisch abgeschirmt ist, sollten Sie keine bespielten Magnetbänder, Armbanduhren, Kreditkarten oder Disketten vor dem Lautsprecher ablegen.) ˎˎ Stellen Sie dieses Gerät auf einer ebenen Oberfläche auf. ˎˎ Dieses Gerät kann unter bestimmten Umständen umkippen oder fallen. Stellen Sie dieses Gerät auf einer stabilen und ebenen Fläche auf. ˎˎ Beim Transport dieses Gerätes legen Sie keine magnetischen Artikel wie Disketten oder Kreditkarten in seine Nähe. ˎˎ Transportieren Sie dieses Gerät nicht, indem Sie es greifen, wenn es an einer Videokamera angebracht ist. ˎˎ Verwenden Sie dieses Gerät nicht in der Nähe eines Fernsehgeräts, Radios oder Tuners. Es kann Rauschen im Fernsehgerät, Radio oder Tuner verursachen. Falls Farbungleichmäßigkeiten auf dem Monitorbildschirm auftreten Falls Farbungleichmäßigkeiten erscheinen, schalten Sie die Stromversorgung des Monitors aus und warten 15 bis 30 Minuten, bevor Sie sie wieder einschalten. Wenn Farbungleichmäßigkeiten verbleiben Trennen Sie dieses Gerät vom Monitor ab. Stellen sie sicher, dass sich keine Magnetfeldquelle in der Nähe befindet. Wenn dies der Fall ist, können Störungen an diesem Gerät verursacht und Farbungleichmäßigkeiten erzeugt werden. Magnetfeldquellen Magneten die an den Türen eines Racks oder Ständers angebracht sind, Gesundheitsgeräte, Magnete in Spielzeugen usw. Identifikation der Teile Lautstärketaste (-) Lautstärketaste (+)* POWER -Lämpchen Stereo-Minibuchse Schuh-Anschluss * Auf der Tastenoberfläche befindet sich eine Erhöhung. Verwenden Sie diese zur Hilfe bei der Bedienung. Anbringen des Geräts an der Videokamera 1 Schalten Sie die Stromversorgung der Videokamera aus. 2 Richten Sie den Pfeil an der Unterseite dieses Geräts mit dem Pfeil auf dem ActiveInterface-Schuh an der Videokamera aus. 3 Setzen Sie den Schuh-Anschluss dieses Geräts in den Schlitz der Videokamera. Halten Sie die Schuhabdeckung der Videokamera mit der Hand, um das Anbringen zu erleichtern. 4 Schieben Sie dieses Gerät zum Objektiv der Videokamera, bis es fest ansitzt. 5 Während Sie dieses Gerät abstützen, verbinden Sie dessen Stereo-Minibuchse über das mitgelieferte Verbindungskabel mit der A/V-Fernbedienungsbuchse der Videokamera. ˎˎ Wenn Sie die Videokamera einschalten, während dieses Gerät daran angebracht ist, leuchtet das POWER-Lämpchen an diesem Gerät auf. Zum Abnehmen dieses Geräts schalten Sie die Videokamera aus und führen dann die Schritte zum Anbringen in umgekehrter Reihenfolge aus. Beim Schieben dieses Geräts zum Abnehmen halten Sie die Schuhabdeckung der Videokamera mit der Hand, während Sie das Gerät schieben. Verwendung dieses Geräts Wenn dieses Gerät an einer Videokamera angebracht ist, gibt es den Ton des mit der Projektorfunktion projizierten Videos aus. ˎˎ Einzelheiten über die Projektorfunktion schlagen Sie bitte in der mit der Videokamera gelieferten Bedienungsanleitung nach. ˎˎ In den folgenden Fällen schaltet die Lautstärkeeinstellung dieses Geräts auf den Standardwert zurück, und die Ausgabe geschieht mit niedriger Lautstärke. Passen Sie die Lautstärke nach Bedarf an. ˋˋWenn dieses Gerät an einer Videokamera angebracht ist ˋˋWenn die Stromversorgung der Videokamera ausund wieder eingeschaltet wird Ändern der Lautstärke Sie können die Lautstärke durch Drücken der Lautstärketasten + oder - an diesem Gerät ändern. ˎˎ Sie können die Lautstärke kontinuierlich ändern, indem Sie eine der Lautstärketasten gedrückt halten. Hinweis ˎˎ Platzieren Sie dieses Gerät nicht sehr nahe an Ihrem Ohr. ˎˎ Nehmen Sie dieses Gerät vor der Aufnahme ab. Wenn es angebracht ist, kann es Rauschen verursachen. ˎˎ Halten Sie dieses Gerät stetig, wenn Sie die Lautstärketasten betätigen. ˎˎ Wenn ein anderes Gerät an die HDMI-Buchse oder Kopfhörerbuchse der Videokamera angeschlossen ist, hat die Ausgabe zu diesem Gerät Priorität, so dass kein Ton von diesem Gerät kommt. ˎˎ Wenn dieses Gerät angebracht ist, arbeitet die Lautstärkeregelung an der Videokamera nicht, und es kommt kein Ton vom eingebauten Lautsprecher der Videokamera. ˎˎ Heben Sie dieses Gerät nicht an, wenn es an der Videokamera angebracht ist. Aufbewahren Nehmen Sie dieses Teil zum Tragen immer von der Kamera ab und setzen es in den mitgelieferten Beutel. Hinweis ˎˎ Nehmen Sie beim Aufbewahren das Verbindungskabel von diesem Gerät ab. Dieses Gerät kann beschädigt werden, wenn es im Beutel mit angebrachtem Verbindungskabel abgelegt wird. ˎˎ Legen Sie das Verbindungskabel und dieses Teil separat in den Unterteilungen im Beutel ab. Fehlersuche Führen Sie die folgenden Prüfungen aus, bevor Sie das Gerät zur Reparatur einreichen. Wenn das Problem weiter besteht, wenden Sie sich an Ihren Sony-Fachhändler. Ton mit Verzerrungen, Aussetzern oder Rauschen ˎˎ Die Lautstärke dieses Geräts ist zu hoch gestellt. Verringern Sie die Lautstärke mit der Taste - an diesem Gerät. ˎˎ Das Verbindungskabel ist nicht richtig angeschlossen. Nehmen Sie das Verbindungskabel ab und schließen es dann wieder an. Stellen Sie sicher, dass die Stecker des Verbindungskabels fest in die A/V-Fernbedienungsbuchse der Videokamera und in die Stereo-Minibuchse dieses Geräts eingesteckt sind. ˎˎ Dieses Gerät ist zu nahe an einem Fernsehgerät aufgestellt. Stellen Sie es weiter vom Fernsehgerät entfernt auf. Der Ton ist zu niedrig, oder es kommt kein Ton ˎˎ Die Stromversorgung der Videokamera ist ausgeschaltet. Schalten Sie die Stromversorgung der Videokamera ein. ˎˎ Die Lautstärke dieses Geräts ist auf Minimum gestellt. Steigern Sie die Lautstärke mit der Taste + an diesem Gerät. ˎˎ Das Verbindungskabel ist nicht richtig angeschlossen. Nehmen Sie das Verbindungskabel ab und schließen es dann wieder an. Stellen Sie sicher, dass die Stecker des Verbindungskabels fest in die A/V-Fernbedienungsbuchse der Videokamera und in die Stereo-Minibuchse dieses Geräts eingesteckt sind. ˎˎ Ein Kopfhörerkabel oder HDMI-Kabel ist an der Videokamera angeschlossen. Nehmen Sie das Kopfhörerkabel oder HDMIKabel ab. In geval van een storing of defect In het onwaarschijnlijke geval van een storing of een defect, of als er een vreemd voorwerp in het apparaat terecht komt, dient u het apparaat direct los te koppelen van de videocamera en contact op te nemen met de dichtstbijzijnde Sony-dealer. Hanteren Ca. Ø57 mm × 86 mm Bij kleurongelijkheden op het monitorscherm Das POWER-Lämpchen flackert ˎˎ Das POWER-Lämpchen kann manchmal flackern, wenn die Lautstärke hoch ist. Die Stromversorgung der Videokamera schaltet aus ˎˎ Die Lautstärke dieses Geräts ist zu hoch gestellt. Verringern Sie die Lautstärke mit der Taste - an diesem Gerät. ˎˎ Der Akku der Videokamera ist nicht mehr ausreichend geladen. Ersetzen Sie ihn durch einen geladenen Akku. Technische Daten Allgemeines Maximale Abmessungen (maximaler Durchmesser × Höhe) Gewicht Laat geen vreemd voorwerp in de openingen terecht komen. Hierdoor kan een storing of een ongeluk optreden. Laat geen vreemd voorwerp in de opening van de luidspreker terecht komen. 2 W (10 % Klirrfaktor, 1 kHz, 6 Ω) ˎˎ Der Akku der Videokamera ist nicht mehr ausreichend geladen. Ersetzen Sie den Akku der Videokamera mit einem voll geladenen Akku. Verstärker Maximaler Ausgang Vreemde voorwerpen ˎˎ De luidsprekereenheid, ingebouwde versterker en behuizing zijn precies met elkaar uitgelijnd. Haal deze niet uit elkaar en verander ze niet. ˎˎ Indien de behuizing vuil wordt, kunt u deze afvegen met een zachte doek met een mild reinigingsmiddel. Gebruik geen verdunners, benzeen, alcohol etc. omdat deze de afwerkingslaag van de behuizing zullen beschadigen. ˎˎ Houd dit apparaat uit de buurt van de volgende plaatsen. ˋˋPlaatsen met een hoge temperatuur zoals in direct zonlicht of in de buurt van een verwarmingsbron. ˋˋIn een auto met gesloten ramen (vooral in de zomer). ˋˋVochtige plaatsen zoals een badkamer. ˋˋOp stoffige plaatsen of bij zand. ˋˋIn de buurt van een horloge, creditcard, etc. (Hoewel dit apparaat magnetisch is beschermd, dient u geen bandjes met opnamen, horloges, creditcards of floppydisks voor de luidspreker te houden). ˎˎ Plaats dit apparaat op een effen ondergrond. ˎˎ Dit apparaat kan kantelen of omvallen indien u het in bepaalde omstandigheden installeert. Plaats dit apparaat op een stabiele en effen ruimte. ˎˎ Wanneer u dit apparaat verplaatst, dient u er geen magnetische items zoals floppydisks of creditcards bij in de buurt te houden. ˎˎ Wanneer u dit apparaat verplaatst, dient u hem niet vast te houden als het is aangesloten op een videocamera. ˎˎ Gebruik dit apparaat niet in de buurt van een TV, radio of tuner. Het kan ruis veroorzaken in de buurt van de TV, radio of tuner. Klang ist verzerrt Lautsprecher Typ Verwendeter Lautsprecher Geschlossener Typ Impedanz Wanneer u dit apparaat gedurende langere tijd niet gebruikt, dient u deze altijd los te koppelen van de videocamera. Vollbereich 30 mm Durchmesser Abgedichtet 6Ω Ca. 80 g Indien kleurongelijkheden optreden, dient u de monitor uit te zetten en 15 tot 30 minuten te wachten voordat u hem weer aan zet. Mitgeliefertes Zubehör Tragbarer Lautsprecher RDP-CA1 (1), Verbindungskabel (1), Beutel (1), Anleitungen Indien kleurongelijkheden blijven bestaan Änderungen bei Design und technischen Daten bleiben ohne vorherige Ankündigung vorbehalten. Zorg ervoor dat er zich geen magnetische bron in de buurt van dit apparaat bevindt. Indien dit er is kan het leiden tot interactie met dit apparaat en zorgen voor kleurongelijkheid. Dieses Logo kennzeichnet das Active Interface ShoeSystem für Videoprodukte von Sony. Mit diesem System ausgestattete Videogeräte und Zubehörteile machen effektive Aufnahmen denkbar einfach. Voordat u dit apparaat bedient, dient u eerst deze handleiding aandachtig door te lezen en hem te bewaren voor toekomstige naslag. WAARSCHUWING Om het gevaar van brand of elektrische schokken te verkleinen, mag het apparaat niet worden blootgesteld aan regen of vocht. Voor klanten in Europa Verwijdering van oude elektrische en elektronische apparaten (van toepassing in de Europese Unie en andere Europese landen met gescheiden inzamelingssystemen) Dit symbool op het product of op de verpakking wijst erop dat dit product niet als huishoudelijk afval mag worden behandeld. Het moet echter naar een inzamelingspunt worden gebracht waar elektrische en elektronische apparatuur wordt gerecycled. Als u ervoor zorgt dat dit product op de correcte manier wordt verwerkt, helpt u mogelijke negatieve gevolgen voor mens en milieu die zouden kunnen veroorzaakt worden in geval van verkeerde afvalbehandeling te voorkomen. Het recycleren van materialen draagt bij tot het behoud van natuurlijke bronnen. Voor meer details in verband met het recyclen van dit product, kan u contact opnemen met de gemeentelijke instanties, de organisatie belast met de verwijdering van huishoudelijk afval of de winkel waar u het product hebt gekocht. < Kennisgeving voor klanten in de landen waar EUrichtlijnen van toepassing zijn > De fabricant van dit product is Sony Corporation, 1-7-1 Konan Minato-ku Tokyo, 108-0075 Japan. De geauthoriseerde vertegenwoordiging voor EMC en produkt veiligheid is Sony Deutschland GmbH, Hedelfinger Strasse 61, 70327 Stuttgart, Duitsland. Voor service- of garantiezaken verwijzen wij u graag naar de addressen in de afzonderlijke service/garantie documenten. Kenmerken ˎˎ Dit apparaat is een omni-directionele luidspreker met ingebouwde versterker die compatibel is met een actieve interfaceschoen en die kan worden gebruikt met een Sony-videocamera met projectorfunctie. ˎˎ Dit apparaat wordt gevoed via de videocamera waarop het is aangesloten en waardoor het geen eigen stroomvoorziening nodig heeft. Voorzorgsmaatregelen Over veiligheid Wanneer lange tijd niet gebruikt Wanneer dit apparaat is aangesloten op een videocamera via een schoen, dan wordt het apparaat niet geheel uitgezet door het uitzetten van de videocamera. Koppel dit apparaat los van de monitor. Indien het blijft bestaan Magnetische bronnen Magneten die zijn bevestigd aan deuren een rek of standaard, fitnessapparaten, magneten gebruikt in speelgoed, etc. Overzicht van de onderdelen Volumeregeltoets (-) Volumeregeltoets (+)* POWER-lampje Stereomini-aansluiting Schoenconnector Het volume wijzigen U kunt het volume wijzigen door te drukken op de volumetoetsen + of - op dit apparaat. ˎˎ U kunt het volume soepeltjes veranderen door een van de volumetoetsen omlaag te houden. Let op ˎˎ Plaats dit apparaat niet vlak bij uw oor. ˎˎ Koppel dit apparaat los voordat u opnamen gaat maken. Het kan ruis veroorzaken als het nog bevestigd is. ˎˎ Houd dit apparaat stevig vast als u op de volumetoetsen drukt. ˎˎ Wanneer een ander toestel is aangesloten op de HDMI-aansluiting of de hoofdtelefoonaansluiting van de videocamera, dan heeft de weergave naar dat toestel prioriteit waardoor er geen geluid uit dit apparaat komt. ˎˎ Wanneer dit toestel is aangesloten, werkt de volumebediening op de videocamera niet en komt er geen geluid uit de interne luidspreker van de videocamera. ˎˎ Til dit apparaat niet op als deze is bevestigd aan de videocamera. Opslag Wanneer u dit apparaat draagt, dient u deze altijd los te koppelen van de videocamera en op te bergen in het meegeleverde tasje. Let op ˎˎ Haal het aansluitsnoer uit dit apparaat als u het opbergt. Dit apparaat kan beschadigd raken als u deze bewaart in het tasje met het aansluitsnoer eraan bevestigd. ˎˎ Bewaar het aansluitsnoer en dit apparaat apart van elkaar in de aparte gedeeltes binnenin het tasje. Problemen oplossen Voer een van de volgende controles uit voordat u om een reparatie verzoekt. Neem contact op met uw dichtstbijzijnde Sony-dealer als het probleem aanhoudt. Het geluid klinkt krakend of wordt onderbroken of er is ruis ˎˎ Het volume van het apparaat is te hoog ingesteld. Verlaag het volume met de - volumetoets op dit apparaat. ˎˎ Het aansluitsnoer is niet goed aangesloten. Maak het aansluitsnoer los en bevestig het opnieuw. Zorg dat de stekkers van het aansluitsnoer stevig zijn ingestoken in de A/Vremote-aansluiting van de videocamera en de stereomini-aansluiting van dit apparaat. ˎˎ Dit toestel is te dicht bij een TV geplaatst. Plaats het verder weg van de TV. Het geluid is te zacht of er is geen geluid ˎˎ De videocamera staat uit. Zet de videocamera uit. ˎˎ Dit apparaat is ingesteld op het minimum volume. Verhoog het volume met de + volumetoets op dit apparaat. ˎˎ Het aansluitsnoer is niet goed aangesloten. Maak het aansluitsnoer los en bevestig het opnieuw. Zorg dat de stekkers van het aansluitsnoer stevig zijn ingestoken in de A/Vremote-aansluiting van de videocamera en de stereomini-aansluiting van dit apparaat. ˎˎ Een hoofdtelefoonkabel of een HDMI-kabel is aangesloten op de videocamera. Haal de hoofdtelefoonkabel of de HDMI-kabel los. Het geluid klinkt verstoord ˎˎ De batterij van de videocamera heeft onvoldoende resterend vermogen. Vervang de batterij van de videocamera voor een reservebatterij. * Er is een buts op het toetsoppervlak. Gebruik het als richtlijn bij de bediening. Het POWER-lampje knippert Dit apparaat aansluiten op de videocamera De videocamera gaat uit 1 Zet de videocamera uit. 2 Lijn de pijl aan de onderkant van dit apparaat uit met de pijl op de actieve interfaceschoen van de videocamera. 3 Plaats de schoenconnector van dit apparaat in de sleuf van de videocamera. Houd de schoenkap van de videocamera vast met uw hand om het bevestigen te vergemakkelijken. 4 Schuif dit apparaat naar de lens van de videocamera tot deze stevig op zijn plaats klikt. 5 Sluit de stereomini-aansluiting van het apparaat, terwijl u het ondersteunt, aan op de A/V-remote-aansluiting van de videocamera met het meegeleverde aansluitsnoer. ˎˎ Wanneer u de videocamera aanzet als dit apparaat eraan is bevestigd, dan gaat de POWER-lamp op dit apparaat branden. Om dit apparaat los te koppelen zet u de videocamera uit en voert u de bevestigingsstappen in omgekeerde volgorde uit. Wanneer u dit apparaat schuift om los te koppelen, dient u het apparaat te schuiven terwijl u de schoenkap van de videocamera vasthoudt met uw hand. Dit apparaat gebruiken Wanneer dit apparaat is bevestigd aan een videocamera dan wordt het geluid weergegeven van de video die wordt geprojecteerd door de projectorfunctie. ˎˎ Nadere bijzonderheden over de projectorfunctie vindt u in de gebruiksaanwijzing van uw videocamera. ˎˎ In de volgende gevallen keert de volume-instelling van dit apparaat terug naar de standaard waarde en is de weergave op een laag volume. Stel het volume zo nodig af. ˋˋWanneer dit apparaat is aangesloten op een videocamera ˋˋWanneer de videocamera is uitgezet en weer aangezet ˎˎ Het POWER-lampje kan soms knipperen als het volume hoog is. ˎˎ Het volume van het apparaat is te hoog ingesteld. Verlaag het volume met de - volumetoets op dit apparaat. ˎˎ De batterij van de videocamera heeft onvoldoende resterend vermogen. Vervang voor een opgeladen batterij. Technische gegevens Luidspreker Type Luidspreker in gebruik Omsluitingstype Impedantie Volledig bereik 30 mm doorsnede Verzegeld 6Ω Versterker Maximale weergave 2 W (10 % THD, 1 kHz, 6 Ω) Algemeen Maximale afmetingen (maximale doorsnede × hoogte) Gewicht Ongeveer Ø57 mm × 86 mm Ongeveer 80 g Bijgeleverde toebehoren Draagbare luidspreker RDP-CA1 (1), aansluitsnoer (1), tasje (1), handleiding en documentatie Wijzigingen in ontwerp en technische gegevens voorbehouden, zonder kennisgeving. Per i clienti in Europa Trattamento del dispositivo elettrico o elettronico a fine vita (applicabile in tutti i paesi dell’Unione Europea e in altri paesi europei con sistema di raccolta differenziata) Questo simbolo sul prodotto o sulla confezione indica che il prodotto non deve essere considerato come un normale rifiuto domestico, ma deve invece essere consegnato ad un punto di raccolta appropriato per il riciclo di apparecchi elettrici ed elettronici. Assicurandovi che questo prodotto sia smaltito correttamente, voi contribuirete a prevenire potenziali conseguenze negative per l’ambiente e per la salute che potrebbero altrimenti essere causate dal suo smaltimento inadeguato. Il riciclaggio dei materiali aiuta a conservare le risorse naturali. Per informazioni più dettagliate circa il riciclaggio di questo prodotto, potete contattare l’ufficio comunale, il servizio locale di smaltimento rifiuti oppure il negozio dove l’avete acquistato. In caso di smaltimento abusivo di apparecchiature elettriche e/o elettroniche potrebbero essere applicate le sanzioni previste dalla normativa applicabile (valido solo per l’Italia). < Avviso per i clienti residenti nei paesi che applicano le direttive UE > Il fabbricante di questo prodotto è Sony Corporation, 1-7-1 Konan Minato-ku Tokyo, 108-0075, Giappone. Il rappresentante autorizzato ai fini della Compatibilità Elettromagnetica e della sicurezza del prodotto è Sony Deutschland GmbH, Hedelfinger Strasse 61, 70327, Stoccarda Germania. Per qualsiasi problema relativo all’assistenza o alla garanzia, si prega di fare riferimento agli indirizzi indicati nei documenti di assistenza e garanzia forniti con il prodotto. Caratteristiche ˎˎ Questa unità è un altoparlante omnidirezionale con amplificatore incorporato, compatibile con una slitta ad interfaccia attiva, e può essere utilizzato con una videocamera Sony con funzione di proiettore. ˎˎ L’unità è alimentata tramite la videocamera a cui è collegata e non necessita pertanto di un alimentatore proprio. Precauzioni Sicurezza Inutilizzo per lunghi periodi Quando l’unità è collegata tramite la slitta a una videocamera, anche se si spegne l’alimentazione della videocamera non si disattiva completamente l’alimentazione all’unità. Quando non si usa l’unità per lunghi periodi, scollegarla sempre dalla videocamera. Corpi estranei Evitare che corpi estranei penetrino nei connettori. In caso contrario si possono provocare rotture o incidenti. Evitare che corpi estranei penetrino nell’apertura dell’altoparlante. In caso di malfunzionamento o guasto Nell’evento improbabile di malfunzionamento o guasto o se un corpo estraneo penetra all’interno, scollegare immediatamente l’unità dalla videocamera e rivolgersi al rivenditore Sony più vicino. Uso ˎˎ L’unità dell’altoparlante, l’amplificatore incorporato e la cassa sono allineati con precisione l’uno rispetto all’altro. Non smontarli né modificarli. ˎˎ Se la cassa si sporca, passare sulla sua superficie un panno morbido inumidito con un detergente blando. Non utilizzare solventi, benzina, alcol, ecc. che danneggerebbero la finitura della superficie della cassa. ˎˎ Tenere l’unità lontana dai luoghi indicati di seguito. ˋˋLuoghi con temperature elevate, come alla luce solare diretta o nelle vicinanze di un termosifone. ˋˋIn un’automobile con i finestrini chiusi, specialmente in estate. ˋˋLuoghi molto umidi, come ad esempio il bagno. ˋˋLuoghi polverosi o sulla sabbia. ˋˋVicino a un orologio, una carta di credito, ecc. (Anche se l’unità è schermata magneticamente, non lasciare nastri registrati, orologi, carte di credito o dischi floppy davanti all’altoparlante.) ˎˎ Collocare l’unità su una superficie piana. ˎˎ L’unità potrebbe ribaltarsi o cadere se montata in determinate condizioni. Collocare l’unità su una superficie piatta e stabile. ˎˎ Quando si sposta l’unità, non collocare oggetti magnetici quali dischi floppy o carte di credito nelle vicinanze. ˎˎ Quando si sposta l’unità, non fare presa sulla stessa se questa è applicata a una videocamera. ˎˎ Non utilizzare l’unità vicino a un televisore, una radio o un sintonizzatore. Potrebbe causare interferenza con il televisore, la radio o il sintonizzatore. In caso di distorsione dei colori sullo schermo del monitor Nel caso in cui si verifichi distorsione dei colori, spegnere il monitor e attendere da 15 a 30 minuti prima di riaccenderlo. Se la distorsione dei colori persiste Scollegare l’unità dal monitor. Se persiste ancora Accertarsi che non vi siano sorgenti magnetiche vicino all’unità. In tal caso, queste potrebbero interferire con l’unità e causare la distorsione del colore. Sorgenti magnetiche Dit teken duidt het systeem Active Interface Shoe aan dat wordt gebruikt voor Sony-videoproducten. Videocomponenten en accessoires die zijn uitgerust met dit systeem, zijn ontworpen om effectief opnemen te vereenvoudigen. Prima di usare l’unità si raccomanda di leggere con attenzione il presente manuale e di conservarlo quindi per ogni futura necessità. AVVERTENZA Per ridurre il pericolo di incendi o scosse elettriche, non esporre l’apparecchio alla pioggia o all’umidità. Calamite montate sulle porte di una scaffalatura o un mobile, apparecchiature medico sanitarie, magneti usati nei giocattoli, ecc. Identificazione delle parti Tasto del volume (-) Tasto del volume (+)* Spia POWER Presa mini stereo Connettore a slitta * La superficie del tasto presenta un rilievo. Utilizzarlo come guida durante l’uso. Applicazione dell’unità alla videocamera 1 Spegnere l’alimentazione della videocamera. 2 Allineare la freccia sul fondo dell’unità con la freccia sulla slitta a interfaccia attiva della videocamera. 3 Inserire il connettore a slitta dell’unità nella fessura della videocamera. Tenere il coperchio della slitta sulla videocamera con la mano per facilitare l’applicazione. 4 Far scivolare l’unità verso l’obiettivo della videocamera fino a quando è saldamente inserita in sede. 5 Sostenendo l’unità, utilizzare il cavo in dotazione per collegare la presa mini stereo dell’unità alla presa per telecomando A/V della videocamera. ˎˎ Quando si accende l’alimentazione della videocamera con l’unità applicata ad essa, la spia POWER dell’unità si accende. Per rimuovere l’unità, spegnere l’alimentazione della videocamera ed eseguire la procedura di applicazione al contrario. Quando si fa scorrere l’unità per rimuoverla, far presa con la mano sul coperchio della slitta sulla videocamera. Uso dell’unità Quando l’unità è applicata a una videocamera, riproduce l’audio del video che viene proiettato con la funzione di proiettore. ˎˎ Per informazioni particolareggiate sulla funzione di proiettore, si prega di consultare le istruzioni per l’uso fornite con la videocamera. ˎˎ Nei casi indicati di seguito, l’impostazione del volume dell’unità torna al valore predefinito e la riproduzione dell’audio avviene a un volume piuttosto basso. Regolare il volume in base alle proprie esigenze. ˋˋQuando l’unità viene applicata a una videocamera ˋˋQuando si spegne e poi si riaccende l’alimentazione della videocamera Modifica del volume È possibile modificare il volume premendo i tasti del volume + o - sull’unità. ˎˎ Si può regolare il volume in maniera continua tenendo premuto uno dei tasti del volume. Nota ˎˎ Non avvicinare l’altoparlante all’orecchio. ˎˎ Rimuovere l’unità prima di effettuare registrazioni. Se rimane applicata può causare interferenze sonore. ˎˎ Mantenere stabile l’unità quando si premono i tasti del volume. ˎˎ Se si collega un altro dispositivo alla presa HDMI o alla presa delle cuffie della videocamera, l’uscita di tale dispositivo avrà priorità e dall’unità non uscirà alcun suono. ˎˎ Quando l’unità è collegata, i comandi del volume della videocamera non funzionano e dall’altoparlante interno della videocamera non proviene alcun suono. ˎˎ Non sollevare l’unità quando è applicata alla videocamera. Conservazione Quando si trasporta l’unità, rimuoverla sempre dalla videocamera e riporla nell’astuccio in dotazione. Nota ˎˎ Quando si ripone l’unità, staccare il cavo di collegamento. L’unità potrebbe danneggiarsi se viene riposta nell’astuccio con il cavo di collegamento applicato. ˎˎ Riporre il cavo di connessione e l’unità separatamente, nei due scomparti dell’astuccio. Guida alla risoluzione dei problemi Prima di richiedere interventi di riparazione, eseguire i seguenti controlli. Se il problema persiste, rivolgersi al proprio rivenditore Sony. L’audio è a spezzoni o interrotto, oppure ci sono interferenze ˎˎ Il volume dell’unità è troppo alto. Abbassare il volume con il tasto del volume dell’unità. ˎˎ Il cavo di collegamento non è connesso correttamente. Rimuovere il cavo di collegamento e riconnetterlo. Assicurarsi che le spine del cavo di collegamento siano inserite saldamente nella presa per telecomando A/V della videocamera e nella presa mini stereo dell’unità. ˎˎ L’unità è stata collocata troppo vicino a un televisore. Posizionarla più lontana dal televisore. L’audio è basso oppure non vi è audio ˎˎ L’alimentazione della videocamera è spenta. Accendere l’alimentazione della videocamera. ˎˎ Il volume dell’unità è impostato al minimo. Alzare il volume con il tasto del volume + dell’unità. ˎˎ Il cavo di collegamento non è connesso correttamente. Rimuovere il cavo di collegamento e riconnetterlo. Assicurarsi che le spine del cavo di collegamento siano inserite saldamente nella presa per telecomando A/V della videocamera e nella presa mini stereo dell’unità. ˎˎ Alla videocamera è collegato un cavo per cuffie o HDMI. Rimuovere il cavo per cuffie o il cavo HDMI. Il suono è distorto ˎˎ La batteria della videocamera ha carica rimanente insufficiente. Sostituire la batteria della videocamera con una batteria di ricambio carica. La spia POWER lampeggia ˎˎ La spia POWER a volte lampeggia se il volume è alto. L’alimentazione della videocamera si spegne ˎˎ Il volume dell’unità è troppo alto. Abbassare il volume con il tasto del volume dell’unità. ˎˎ La batteria della videocamera ha carica rimanente insufficiente. Sostituirla con una batteria carica. Caratteristiche tecniche Altoparlante Tipo Altoparlante usato Tipo di cassa Impedenza Full range Diametro 30 mm Sigillata 6Ω Amplificatore Uscita massima 2 W (THD 10%, 1 kHz, 6 Ω) Caratteristiche generali Dimensioni massime Circa Ø57 mm × 86 mm (diametro massimo × altezza) Peso Circa 80 g Accessori inclusi Altoparlante portatile RDP-CA1 (1), cavo di collegamento (1), astuccio (1), corredo di documentazione stampata Disegno e caratteristiche tecniche sono soggetti a modifiche senza preavviso. Questo simbolo indica il sistema Active Interface Shoe System progettato per essere utilizzato con i prodotti video Sony. Gli apparecchi video e gli accessori dotati di questo sistema sono stati appositamente ideati per semplificare la realizzazione di registrazioni di qualità.