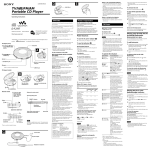
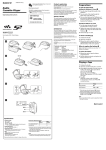
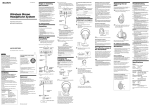
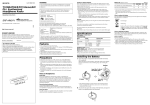
1
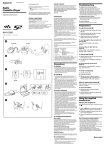
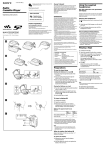
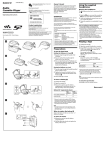
4-253-038-31(1)
Portable Solid
Memory Player
Operating Instructions
UZ-PS128
©2004 Sony Corporation
WARNING
To prevent fire or shock
hazard, do not expose the unit
to rain or moisture.
To prevent fire, do not cover the ventilation
of the apparatus with news papers, table
cloths, curtains, etc. And don’t place lighted
candles on the apparatus.
Certain countries may regulate disposal of
the battery used to power this product. Please
consult with your local authority.
For the customers in the
United States
Owner’s Record
The model number is located on the inner rim of
the left ear side of the headphones, and the serial
number is located on the inner rim of the right ear
side of the headphones. Record the serial number in
the space provided below.
Refer to them whenever you call your Aiwa dealer
regarding this product.
Model No. UZ-PS128
Serial No.
NOTE
This equipment has been tested and found to
comply with the limits for a Class B digital device,
pursuant to Part 15 of the FCC Rules. These limits
are designed to provide reasonable protection
against harmful interference in a residential
installation. This equipment generates, uses, and
can radiate radio frequency energy and, if not
installed and used in accordance with the
instructions, may cause harmful interference to
radio communications.
However, there is no guarantee that interference
will not occur in a particular installation. If this
equipment does cause harmful interference to radio
or television reception, which can be determined by
turning the equipment off and on, the user is
encouraged to try to correct the interference using
one or more of the following measures:
2
– Reorient or relocate the receiving antenna.
– Increase the separation between the equipment
and receiver.
– Connect the equipment into an outlet on a circuit
different from that to which the receiver is
connected.
– Consult the dealer or an experienced radio/TV
technician for help.
CAUTION
You are cautioned that any changes or
modifications not expressly approved in this
manual could void your authority to operate this
equipment.
The shielded interface cable recommended in this
manual must be used with this equipment in order
to comply with the limits for a digital device
pursuant to Subpart B of Part 15 of FCC Rules.
If you have any questions about this product,
you may call;
Aiwa Customer Information Service Center
1-800-289-2492 or
http://www.us.aiwa.com/.
Declaration of Conformity
Trade Name:
Model:
Responsible Party:
Address:
AIWA
UZ-PS128
Sony Electronics Inc.
680 Kinderkamack Road,
Oradell, NJ 07649 U.S.A.
Telephone Number:
201-930-6973
This device complies with Part 15 of the FCC Rules.
Operation is subject to the following two conditions:
(1) This device may not cause harmful interference,
and (2) this device must accept any interference
received, including interference that may cause
undesired operation.
Before using this player, install
the application software on
your computer using the
supplied CD-ROM, and send
some music data to the player.
Table of Contents
Overview
What you can do with your player ............. 4
Main features .............................................. 5
Getting started
Step 1: Check the package contents ........... 6
Step 2: Insert a battery ................................ 7
Locating controls ........................................ 8
Basic operations
Listening to music stored in your player .... 9
1. Put the player on your ears. .................... 9
2. Start playback. ...................................... 10
Recording from another audio device ...... 12
Erasing tracks one by one ......................... 13
B Advanced operations
Changing the sound quality (M.D.S.E) .... 14
Playing a track repeatedly
(Repeat Play) ........................................ 14
Using the player as stereo headphones ..... 15
B Additional information
Precautions ...............................................
Cleaning ....................................................
Troubleshooting ........................................
Specifications ...........................................
Index .........................................................
16
16
17
18
19
3
Overview
What you can do with your player
Your UZ-PS128 is a portable player with built-in solid memory. You can play back MP3 files
transferred to the player from your personal computer using the supplied software and the
dedicated USB cable.
You can also record and listen to the sound from another audio device connected to the player
with the supplied analog connection cord.
Once you have stored your favorite songs in the player, take it with you and enjoy music
wherever you go!
1 Record music
to your player.
There are two ways to store
audio data into your player’s
built-in memory:
• Transfer audio data (MP3
files) from your computer,
using the supplied software
“Music Transfer Solid Memory
Edition.”
See the separate manual for the Music
Transfer software for details.
• Record from another audio
device.
See page 12 for details.
4
2 Enjoy music
anywhere with
your player!
Main features
Overview
• Headphone-style solid memory player
- Highly portable with the player built into the headphones
- Skip-proof using flash memory
• Approximately 11 hours of continuous playback with a single LR03 (size AAA) alkaline
battery
• Up to 120 minutes* of music can be stored in the built-in memory.
• MP3 files on your computer are transferred to the player by simple and easy operations using
the supplied software and the dedicated USB cable.
• You can connect another audio device to the player and record the sound from the connected
device in MP3 format while listening to the sound.
* The time length varies according to the bit rate used when encoding MP3 files. The time indicated here is for
128-kbps MP3 files.
Notes
• Music you record is limited to private use only. Any other use requires the permission of the copyright
holders.
• Sony is not liable for failure in recording and damage to or erasure of recorded contents caused by
incomplete data transfer or data destruction due to problems with this product or your computer.
• Always make a trial recording before performing important recording.
5
Getting started
Step 1: Check the package contents
Check the accessories enclosed in the package.
• Portable solid memory player (1)
• Dedicated USB cable (1)
• Analog connection cord (1)
• CD-ROM* (“Music Transfer Solid Memory Edition”) (1)
• Operating instructions for the application software “Music Transfer Solid Memory Edition” (1)
• Quick start guide (1)
About the serial number
The serial number provided for your player is printed on the inner rim of the right ear side of the
headphones.
* Do not play the CD-ROM on an audio CD player.
6
Step 2: Insert a battery
The battery compartment is provided on the left ear side.
Insert one LR03 (size AAA) alkaline battery into the battery compartment as illustrated below.
e
Insert with the e
side upward
Getting started
E
Battery duration
Approximately 11 hours (continuous playback, with a Sony LR03 (size AAA) alkaline battery)
When to replace the battery
When the battery power becomes low, playback stops, the OPE indicator flashes red for about 10
seconds, and then the power is turned off automatically. Replace the battery with a new one.
Notes on dry batteries
• Do not throw batteries into fire.
• Do not carry batteries with coins or other metallic objects. It can generate heat if the positive
and negative terminals of the battery are accidentally contacted by a metallic object.
• When the player is not to be used for a long time, remove the battery.
• If battery leakage occurs, wipe off any deposit in the battery compartment, and insert a new
battery. In case the deposit adheres to you, wash it off thoroughly.
7
Locating controls
Player (right ear side)
3
4
1 2
5
6
1
(repeat)/AUTO TRACK switch
2 M.D.S.E switch
3 POWER switch
4 OPE indicator
5 ./> (skip/search) buttons
* The button has a tactile dot.
8
7
89 0
6 PLAY/STOP* button
7 VOL +*/– buttons
8 USB connector
9 INPUT (analog audio input) jack
0 REC/ERASE button
Basic operations
Listening to music stored in your player
First, insert a battery into your player (page 7) and record some audio data to the player’s built-in
memory.
Note
Disconnect the player from your computer before listening to music.
1. Put the player on your ears.
Basic operations
Note
Remove earrings before wearing the player to avoid
injury.
(Continued)
9
2. Start playback.
1
2
PLAY/STOP
POWER OPE
3
–
VOL
+
1 Set the POWER switch to ON.
The OPE indicator lights up in green.
2 Press PLAY/STOP.
A short beep is heard in the headphones and playback starts.
3 Press VOL +/– to adjust the volume.
During playback, the OPE indicator slowly flashes in green.
Playback stops after the last track has been played.
10
Other operations
>
To
Go to the beginning of the next track
Go to the beginning of the current track
Go to the beginning of previous tracks
Go to the beginning of succeeding tracks
Adjust the volume
Stop playback
Turn off the power
–
VOL
Basic operations
.
+
Do this
Press > once.*1
Press . once.
Press . repeatedly.
Press and hold . to quickly locate the track you
want.*2
Press > repeatedly.*1
Press and hold > to quickly locate the track you
want.*2
Press VOL +/–.
Press and hold VOL +/– to quickly turn up or down
the volume.
Press PLAY/STOP.
Set the POWER switch to OFF.
*1 A short beep sounds for each track. When you press > during the last track or .during the first track,
a long beep sounds.
*2 While holding down the button, a short beep sounds for each track. When the first track is reached, a series
of three short beeps sound and playback starts from the beginning of the first track.
Tip
Playback starts from the position where it was last stopped.
To start playback from the first track, press and hold . or > to return to the first track.
11
Recording from another audio device
You can connect your player to another audio device, such as a CD player, and record audio from
that device. The audio is converted into MP3 files and stored in the player’s internal memory.
Note
The volume and sound quality of the audio from the connected external audio device will affect the recording.
Be sure to adjust the volume and turn off sound effects on the external audio device before recording.
You can check the playback volume of the external audio device by connecting the player as ordinary stereo
headphones with its power turned off (see “Using the player as stereo headphones” on page 15).
POWER OPE
REC/ERASE
INPUT
to the headphones
jack
CD player,
cassette recorder,
etc.
Analog connection cord (supplied)
1
Connect another audio device.
Connect the supplied analog connection cord to the INPUT (analog audio input) jack of the
player and to the headphones jack of the other audio device.
2
3
Set the POWER switch to ON to turn on the player.
4
Start playback on the connected external audio device.
Recording starts.
While recording, you can listen to the audio of the MP3 files the player has created at a
sampling frequency of 44.1 kHz and bit rate of 128 kbps.
Press REC/ERASE on the player.
A short beep sounds in the headphones and the OPE indicator lights up in red.
Note
While recording from another audio device, do not set the POWER switch to OFF on the player.
To stop recording
Press REC/ERASE.
12
About recorded tracks
• Whenever you stop recording, the audio recorded up to that point will be stored as a track.
• A new track is recorded after the end of the last track already stored.
• During recording if the player’s memory becomes full, the existing tracks will be erased
starting with the first track.
To separate tracks automatically (Auto Track)
Set the /AUTO TRACK switch to ON before pressing REC/ERASE in step 3.
Recording from the external audio device will automatically be paused when 3 seconds of
silence are detected, and all audio recorded to that point will be stored as a track. Recording will
start again for another new track when an incoming signal is detected.
Note
Erasing tracks one by one
You can erase tracks while playing, one track at a time.
1
2
Play the track you want to erase.
Press and hold REC/ERASE.
Two short beeps sound in the headphones, and the first 5 seconds of the track are repeated
three times while the OPE indicator is flashing in red.
Make sure this is the track you want to erase.
If you decide not to erase the track
Press PLAY/STOP.
Playback starts normally from the beginning of the track without erasing the track.
The track will not be erased either if no buttons are pressed while the first 5 seconds of the
track are repeated.
3
Press REC/ERASE.
The OPE indicator flashes quickly in red.
When a long beep is heard, the track is erased, the OPE indicator starts flashing in green,
and playback starts normally from the next track.
Notes
• Do not turn off the power while erasing a track.
• It takes about 10 seconds to erase a track.
13
Basic operations
Track separation may not be done correctly depending on the condition of the external audio device and the
song to be recorded.
B Advanced operations
/AUTO TRACK
OFF
ON
M.D.S.E
OFF
Changing the sound
quality (M.D.S.E)
The M.D.S.E (MP3 Digital Sound Enhancer)
allows you to enjoy clear digital sound and a
resonant bass.
ON
Playing a track
repeatedly (Repeat Play)
Set the /AUTO TRACK switch to ON.
After the track has been played 10 times
repeatedly, playback stops.
Set the M.D.S.E switch to ON.
To return to normal play mode
Set the /AUTO TRACK switch to OFF.
Notes
• If the sound is distorted when using the M.D.S.E
function, turn down the volume.
• The M.D.S.E function does not work on MP3
files encoded with a bit rate of 320 kbps to ensure
their high-quality sound.
To return to the normal sound
Set the M.D.S.E switch to OFF.
14
Using the player as stereo headphones
You can use the player as a pair of ordinary stereo headphones using the supplied analog
connection cord.
1
2
Set the POWER switch to OFF.
Connect the player to another audio device.
Connect the supplied analog connection cord to the INPUT jack of the player and to the
headphones jack of the other audio device.
to the headphones jack
Advanced operations
INPUT
CD player,
cassette recorder,
etc.
Analog connection cord (supplied)
3
Start playback on the other audio device.
Adjust the volume on the connected audio device.
Notes
• If you set the POWER switch to ON, the sound from the connected audio device will not be heard on the
player.
• You cannot adjust the volume or change the sound quality on this player while using it as the ordinary
headphones.
15
B Additional information
Precautions
Cleaning
General
Clean the player casing with a soft cloth
slightly moistened with water or a mild
detergent solution.
• Never use the player where it will be
subjected to extremes of light, temperature,
moisture or vibration.
• Remove earrings when using this player to
avoid injury.
Road Safety
Do not use this player while driving, cycling,
or operating any motorized vehicle. It may
create a traffic hazard and is illegal in many
areas. It can also be potentially dangerous to
play your player at a high volume while
walking, especially at pedestrian crossings.
You should exercise extreme caution or
discontinue use in potentially hazardous
situations.
Preventing hearing damage
Avoid using this player at a high volume.
Hearing experts advise against continuous,
loud and extended play. If you experience a
ringing in your ears, reduce the volume or
discontinue use.
Consideration for others
Keep the volume at a moderate level. This
will allow you to hear outside sounds and to
be considerate to the people around you.
Warning
If there is lightning when you are using your
player, take off the player from your ears
immediately.
Sony is not liable for any lost or damaged
data or program modifications as a result
of our repairs.
16
Note
Do not use any type of abrasive pad, scouring
powder or solvent such as alcohol or benzene as it
may mar the finish of the casing.
If you have any questions or problems
concerning your player, please consult your
nearest Aiwa dealer.
Troubleshooting
If you experience any of the following difficulties while using your player, use this
troubleshooting guide to help you remedy the problem. Should any problem persist, consult your
nearest Aiwa dealer.
For trouble concerning operations while connected to your computer, also refer to
“Troubleshooting” in the separate manual for the Music Transfer software.
Operation
Cause/Remedy
There is no sound.
c The volume level is set to zero.
Turn up the volume (page 11).
c The power is not turned on.
Set the POWER switch to ON.
c There is condensation inside the player.
Let the player sit for a few hours.
c The battery is exhausted.
Replace the battery with a new one (page 7).
c The player is not functioning normally.
Remove the battery to reset the player.
c The volume when recording from another audio device was not
loud enough.
Increase the volume on the connected audio device and record
again.
c The bit rate used when encoding the MP3 files was low.
Transfer MP3 files encoded with higher bit rates to the player.
c When recording from the external audio device connected to the
player, turn off sound effects on the external audio device.
c The battery is exhausted.
Replace the battery with a new one (page 7).
c The external audio device used for recording was not connected
properly or the plugs were dirty.
c The audio output from the external audio device contained noise.
c Noise may have been introduced when creating MP3 files on your
computer due to the conditions of the computer.
The buttons do not work.
The volume is not loud
enough.
The sound is distorted.
Playback stops suddenly.
There is noise in the
playback sound.
Battery
Symptom
Cause/Remedy
Battery life is short.
c The operating temperature is below 0°C (32°F).
Battery life becomes shorter in cold temperatures due to battery
characteristics. This is not a malfunction.
Other
Symptom
Cause/Remedy
The player gets warm.
c The player gets warm if it is used for an extended period of time.
This is not a malfunction.
17
Additional information
Symptom
Specifications
Supported audio file format
MP3 Bit rate: 8 - 320 kbps
Sampling frequencies: 24/22.05/16/32/
44.1/48 kHz
MP3 files encoded with a combination of
sampling frequency of 22.05 kHz and bit rate of
160 kbps are not playable on this player.
Frequency response
20 - 20,000 Hz (single signal measurement)
Input
INPUT: Stereo mini-jack
USB connector
Signal-to-noise ratio (S/N)
70 dB or more (at 128 kbps)
Operating temperature
5ºC - 35ºC (41ºF - 95ºF)
Power output
7 mW + 7 mW
Power source
One LR03 (size AAA) alkaline battery:
1.5 V DC × 1
Battery life
Approx. 11 hours with a Sony LR03 (size AAA)
alkaline battery
Mass
Approx. 100 g (3.5 oz) (including battery)
Accessories
See page 6.
Design and specifications are subject to change
without notice.
18
Index
A
R
Recording 12
Repeat Play 14
Auto Track 13
S
B
Skip/search 11
Battery 7
T, U
C, D
Cleaning 16
Connecting to another audio device 12, 15
Transfer 4
Troubleshooting 17
V, W, X, Y, Z
E, F, G
Volume 10, 11
Erasing tracks 13
H, I, J, K
Additional information
Headphones
Putting on 9
Using as stereo headphones 15
L
Locating the first track 11
M, N, O
M.D.S.E (MP3 Digital Sound Enhancer)
14
Music Transfer Solid Memory Edition 4
P, Q
Playback 10
Precautions 16
19
For the customers in the USA
http://www.aiwa.com/
Sony Corporation Printed in Korea