1
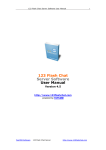
NEX-3/NEX-5/NEX-5C
The new functions provided by this firmware update and their respective
operations are described here.
Please refer to the “Instruction Manual,” and the “α Handbook” contained on
the supplied CD-ROM.
© 2010 Sony Corporation
A-DTQ-100-11(1)
Soft key Settings
[Soft key Settings] has been added to [Setup] on the menu.
This item allows you to customize the function of soft keys B and C.
Soft key A
Soft key C
Soft key B
Note
• You cannot customize soft key A.
Customizing soft key B
Pressing soft key B will activate [Shoot. Tips] in the default setting. You can assign one
of the following functions instead to use it by pressing soft key B.
Shoot Mode/Shoot. Tips/PrecisionDig. Zoom/ISO/White Balance/Metering Mode/
FlashCompensation/DRO/Auto HDR/Creative Style/MF Assist
1 [Menu] t [Setup] t [Soft key B Setting] t desired function.
2GB
Continued r
Customizing soft key C
Pressing soft key C will activate [Shoot Mode] in the default setting. You can assign
either 3 of the following functions instead to use them by pressing soft key C.
Autofocus Area/ISO/White Balance/Metering Mode/FlashCompensation/DRO/Auto
HDR/Creative Style
1 [Menu] t [Setup] t [Soft key C Setting] t [Custom].
2 [Menu] t [Setup] t Assign a function to [Custom 1], [Custom 2], or
[Custom 3].
You do not need to set functions for 1, 2, and 3 all at once.
In the default setting, [Custom 1] is assigned to [ISO], [Custom 2] to [White Balance],
and [Custom 3] to [DRO/Auto HDR].
Using the newly assigned function
You can use the function you just assigned to soft key B or C as follows.
Soft key B:
1 When the assigned function is
displayed at the lower right corner of
the screen, press soft key B.
Soft key C:
1 When [Custom] is displayed, press soft
key C.
2 Select [Custom 1/2 /3] by pressing the
right or left side of the control wheel.
Soft key B
Soft key C
Note
• You can use the assigned function only in P (Program Auto), A (Aperture Priority), S (Shutter Priority),
and M (Manual Exposure) shooting modes.
3GB
Menu start
The [Menu start] function is added to the menu. This item allows you to select whether
to always display the first screen of the menu or to display the screen of the item you set
the last time.
1 [Menu] t [Setup] t [Menu start] t desired setting.
Top
Always displays the first screen of the menu.
Previous
Displays the last item set. This will make it easier to quickly reset
the last item you set previously.
4GB
MF Assist
There used to be only 2 settings, [On] (2 seconds) and [Off], in the [MF Assist] function.
However, you can set the duration for which the image is to be enlarged when an
E-mount lens is attached.
1 [Menu] t [Setup] t [MF Assist] t desired setting.
No Limit
Enlarges the display until [Exit] is selected.
5 Sec
Enlarges the image for 5 seconds.
2 Sec
Enlarges the image for 2 seconds.
Off
Does not enlarge the image.
Note
• When an A-mount lens is attached, the display is enlarged until you select [Exit] as in the same way as
[No Limit], even if you select [2 Sec] or [5 Sec].
Enlarged position of [MF Assist] is maintained
With [MF Assist], previously, the image was enlarged from the center. However, the
upgraded firmware maintains the position from which the image is to be enlarged until
the camera is turned off in manual focus mode.
Note
• The image is enlarged from the position in focus in Direct Manual Focus mode.
5GB
Other improvements in operation
The upgraded firmware will make following improvements as well.
Changing the selected menu item
If you turn counterclockwise or press the top of the control wheel when the first item of
the list is selected, your selection moves to the last item. If you turn clockwise or press
the bottom of the control wheel at the last item of the list, your selection moves to the
first item.
Aperture setting is maintained in movie recording
mode
If you start recording movies, the camera used to adjust the aperture automatically.
However, the aperture setting is maintained even after you start recording movies in
“Background Defocus Control” mode and A (Aperture Priority) mode. The following
information will be displayed.
- Shoot mode (“Bkground Defocus” or A)
- F-value
Note
• You cannot adjust the aperture during movie recording.
6GB
Continued r
Autofocus function with A-mount lenses
Upgrading Mount Adaptor LA-EA1 (sold separately) makes autofocus (Single-shot AF)
possible when an A-mount SAM or SSM lens is attached to the camera. You can also use
autofocus (Single-shot AF) in movie recording mode by pressing the shutter button
halfway down.
For information on upgrading the Mount Adaptor, please visit the Sony Support web
site.
http://www.sony.net/
Notes
• You cannot use the AF illuminator when using an A-mount lens.
• The autofocus speed will be slower compared to when an E-mount lens is attached.
• The sound of the lens and the camera in operation may be recorded during movie recording. You can
avoid this by selecting [Menu] t [Setup] t [Movie Audio Rec] t [Off].
• It may take a long time or may be difficult for the camera to focus, depending on the lens used or the
subject.
7GB