1
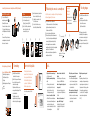
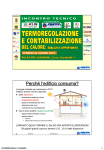
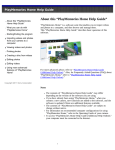
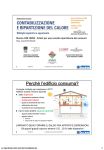
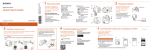
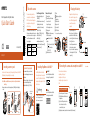
©2014 Sony Corporation Printed in Thailand Interchangeable Lens Digital Camera Quick Start Guide E-mount 4-546-409-11(1) ILCE-QX1 3 Inserting a memory card Note: Make sure that the memory card is correctly oriented when inserting. cards are used for storing pictures of [20M] (default setting) or video. microSD memory card This manual covers two models: one that comes with a supplied lens and one that does not comes a supplied lens. The model name varies if the lens is supplied. Model name Lens ILCE-QX1 Not supplied ILCE-QX1L E16-50mm We recommend that you use the wrist strap to avoid dropping the camera and smartphone. Attach the wrist strap to the camera and place your hand through the loop ˎˎ Weight limitation: 850 g (1 lb 14 oz) Check the supplied items Names of main parts ˎˎ Rechargeable Power button Power/Charge/Movie lamp Green: Power ON Orange: Charging Red: Recording a movie Display panel : Indicates that a memory card is not inserted : Indicates the Wi-Fi Settings : Single Connection (default) : Multi Connection : Wi-Fi OFF Lens release button battery pack NP-FW50 (1) Power zoom lens (1) (including lens front cap/ pre-attached to the camera) (ILCE-QX1L only) ˎˎ Body cap (1) (ILCE-QX1 only) ˎˎ Micro USB cable (1) ˎˎ Wrist strap (1) ˎˎ Smartphone attachment (1) ˎˎ Quick Start Guide (this manual) (1) ˎˎ Reference Guide (1) ˎˎ E16-50mm 4 Installing PlayMemories Mobile™ Install PlayMemories Mobile to the smartphone before using the camera. If PlayMemories Mobile is already installed, update it to the latest version. Terminal side Android Search for PlayMemories Mobile from Google Play and install it. iPhone For details on PlayMemories Mobile, refer to the support website http://www.sony.net/pmm/ DSC-QX10 Printed side The camera is designed to be connected to a smartphone via Wi-Fi. You can transfer images to a smartphone on the spot just after shooting. Hook for the wrist strap Memory Stick Micro media 2 About the camera Using the wrist strap (supplied) Insert a microSD memory card (sold separately) or Memory Stick Micro™ (M2) media (sold separately) before shooting. ˎˎ Memory 1 Search for PlayMemories Mobile from App Store and install it. Flash (flash pop-up) button Microphone Shutter button Image sensor* Lens contacts* RESET button * Do not touch this part directly. 5 Charging the battery Charge the battery before using the camera. To charge, use the micro USB cable (supplied) to connect the camera to a computer. Battery Cover To open the battery cover: Move the lever to the direction and hold it there. Pull the battery cover to the direction, then open it to the direction. ˎˎ Turn off the power when the battery is being charged. ˎˎ If you do not have a computer, use the AC adaptor AC-UD10 (sold separately). Multi terminal Connecting the camera and a smartphone via Wi-Fi Continued The connection method varies depending on the type of smartphone. Confirm your smartphone type and connect via Wi-Fi. Android (incompatible with NFC) Power button Turn on the power of the camera. Start PlayMemories Mobile on the smartphone. Select the SSID as printed on the label on the back side of the camera’s battery cover. Input the password, as printed on the same label (first time only). 6 Connecting the camera and a smartphone via Wi-Fi (continued) Android (NFC-compatible) iPhone Touch the N Mark of the smartphone against the (N mark) of the camera. Powered on: Continue to touch (1-2 seconds) without moving until PlayMemories Mobile starts up. Powered off: Keep the camera and smartphone touched until the camera is turned on. Shooting images (continued) Screen of PlayMemories Mobile Switching shooting modes Shutter/movie button Settings Switching between still image/ movie Zoom Turn on the power of the camera. On the smartphone, select [Settings], then select [Wi-Fi]. Select the SSID as printed on the label on the back side of the camera’s battery cover. Input the password, as printed on the same label (first time only). Confirm the connection to the SSID of the camera. Go back to the Home screen, then start PlayMemories Mobile. Power button 8 Terminating End PlayMemories Mobile to return to the Home screen. Turn off the power of the camera. ˎˎ If you turn off the power of the camera before ending PlayMemories Mobile, an error message will be displayed. This is not a malfunction. The display screen for the application is subject to change without notice by future upgrades. Refer to the Help Guide The Help Guide is an online manual. Refer to the Help Guide when you would like to know further details, settings and operations of PlayMemories Mobile, and precautions. http://rd1.sony.net/help/ilc/1440/ h_zz/ Attaching the camera to a smartphone Attach the camera to a smartphone after fixing the smartphone attachment (supplied) to the camera. Fix the camera to the attachment. Put the camera into the slot of the attachment, align the white marks, then rotate the attachment until it clicks. Open the clamps of the attachment. Extend the clamps of the attachment and attach it to a smartphone while holding the camera tightly (camera body and lens). ˎˎ Do not swing the camera around with a smartphone attached to it, as the smartphone may slip out of the attachment. ˎˎ Make sure no buttons are caught when the smartphone is attached. Slide the removal lever to the lens side and rotate the attachment. Sony mark (top) Smartphone Attachment 7 Removing the smartphone attachment Removal lever Shooting images Start PlayMemories Mobile on the smartphone. Shoot images with the shutter button of the camera or PlayMemories Mobile. [2M] images are transmitted automatically to the smartphone, and a review screen is displayed. [20M] images are saved into the memory card of the camera (default setting). White mark Q&A Why doesn’t the camera charge? ˎˎ Turn the power off. Why is the power lamp flashing red? ˎˎ Memory card is not inserted correctly. Insert it in the correct direction (see the section 3 “Inserting a memory card”). How can I correct the date/time? ˎˎ When Wi-Fi connection between the camera and the smartphone is made, the date/time on the camera is automatically set to that of the smartphone. How can I return to the default setting? ˎˎ Turn on the power of the camera, then press the RESET button. How do I change the settings such as image size? ˎˎ You can make changes on the settings screen of PlayMemories Mobile. How can I see the number of images or Wi-Fi settings? ˎˎ Refer to the “Reference Guide” (supplied) or the “Help Guide (HTML)”. Why has the power of the camera turned on unexpectedly? ˎˎ If an NFC-enabled smartphone is close to the camera, the power may turn on accidentally. This is not a malfunction. Why are movies not transferred to my smartphone after shooting? ˎˎ Movies are recorded on a memory card, but are not transferred automatically. Why is the password required again? ˎˎ Depending on the model of your smartphone, the password may be required again even if you have set the password. In this case, perform the connecting operation again (see the section 5 “Connecting the camera and a smartphone via Wi-Fi”).