1
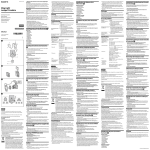
4-168-158-01(1) 4 FA-MA1AM : : Macro Light Adaptor Adaptateur Macro Light DT 50mm F1.8 SAM DT 30 F2.8 Macro SAM 5 1 2 3 4 HVL-RLAM © 2009 Sony Corporation Printed in Japan ( 3 1 How to use this unit Use this unit when attaching a HVL-RLAM or HVL-MT24AM to a lens. 2 3 English The Sony FA-MA1AM Macro Light Adaptor is designed for use only with the lens of a Sony Digital Single Lens Reflex Camera (referred to below as “camera”). Before using this unit, please read this manual thoroughly. 1 Compatible lenses DT 50mm F1.8 SAM DT 30mm F2.8 Macro SAM Identifying the parts 3 1 2 3 4 2 4 Attachment ring Adaptor ring (inside) Lock ring (outside) Clips (three) Before attaching this unit Detach the lens cap. Turn off the power of the camera. 1 1 HVL-RLAM HVL-MT24AM /Operating Instructions/Mode d’emploi/ Manual de instrucciones FA-MA1AM 55 ø87 55 3 2 Attaching this unit 1 Turn the attachment ring in the direction of the arrow to detach it from the adaptor ring. 2 Loosen the lock ring by turning it in the direction of the arrow until it stops. -3 4 5 HVL-MT24AM Notes Do not pull the lock ring when it is loose or turn it more than necessary. Doing so may cause it to come off from the adaptor ring. HVL-RLAM LOCK 3 LOCK 3 Attach the adaptor ring to the lens. Lightly press the adaptor ring with the mark ( ) facing up so that the three clips click into place on the silver ring of the lens. HVL-MT24AM Notes When attaching the adaptor ring, be careful it does not hit the lens. Tips The three clips should form an inverted triangle when in position on the lens. Make sure none of the clips overlaps with the focus mode switch. (-3) 4 Tighten the lock ring in the direction of the arrow until it clicks into place. When the lock ring is tightened correctly, the mark ( 1 2 ) is near the top position. 5 Attach the attachment ring and then attach the accessory. 1 HVL-RLAM: Align the mark ( ) on the side of the attachment ring with the mark ( ) on the lock ring , then turn the attachment ring in the direction of the arrow until it is aligned with the LOCK mark on the lock ring . HVL-MT24AM: Align the mark ( ) on the side of the attachment ring with the mark ( ) on the lock ring , then turn the attachment ring in the direction of the arrow until it is aligned with the LOCK mark on the lock ring . You do not need the adaptor ring supplied with each accessory. Recording Refer to the operating instructions supplied with your accessory. When carrying You can attach the lens cap to the lens with this unit attached. Detaching this unit 1 Turn off the power of the camera. 2 Detach this unit after detaching the accessory. Tips Detach this unit by doing the attaching steps in reverse. If this unit does not detach easily, do not pull it with excessive force. Lightly press the tip of each clip one at a time and try to detach this unit again. (Continued on the reverse side.) 5 1 3 Cet Adaptateur Macro Light Sony FA-MA1AM est conçu pour l’appareil photo numérique reflex à objectif interchangeable Sony (appelé ci-dessous « l’appareil photo »). Avant d’utiliser cet article, veuillez lire attentivement ce manuel. El adaptador de iluminación macro FA-MA1AM Sony a sido diseñado para utilizarse con objetivos de una cámara reflex digital Sony (a partir de ahora “cámara”). Antes de utilizar esta unidad, lea detenidamente este manual. Comment utiliser l’adaptateur Cómo utilizar esta unidad Objectifs compatibles DT 50mm F1.8 SAM DT 30mm F2.8 Macro SAM Objetivos compatibles DT 50mm F1.8 SAM DT 30mm F2.8 Macro SAM Identification des éléments Identificación de las partes Avant de fixer l’adaptateur Antes de instalar esta unidad Fixation de l’adaptateur Instalación de esta unidad 1 Tournez la bague de fixation dans le sens de la flèche pour la détacher de la bague d’adaptation. 2 Desserrez la bague de verrouillage en la tournant dans le sens de la flèche jusqu’à l’arrêt. 1 Gire el anillo de acoplamiento en el sentido de la flecha para quitarlo del anillo adaptador. 2 Afloje el anillo de bloqueo girándolo en el sentido de la flecha hasta que se pare. Remarques Ne tirez pas sur la bague de verrouillage lorsqu’elle est desserrée ou ne la tournez pas plus que nécessaire. Elle pourrait se détacher de la bague d’adaptation. Notas No tire del anillo de bloqueo cuando esté flojo ni lo gire más de lo necesario. De lo contrario, podría desprenderse del anillo adaptador. Utilisez cet adaptateur lorsque vous fixez un HVL-RLAM ou HVL-MT24AM à un objectif. 2 1 2 3 4 4 1 Español Français HVL-RLAM 2 Bague de fixation Bague d’adaptation (intérieur) Bague de verrouillage (extérieur) Clips (trois) 1 2 3 4 Appuyez légèrement sur la bague d’adaptation avec le repère ( ) orienté vers le haut de sorte que les trois clips s’encliquettent dans l’anneau argenté de l’objectif. HVL-MT24AM Conseils Les trois clips doivent former un triangle inversé lorsque la bague est en place sur l’objectif. Assurez-vous qu’aucun des clips ne recouvre le commutateur du mode de mise au point. (-3) Sugerencias Las tres presillas deberán formar un triángulo invertido cuando estén en posición sobre el objetivo. Cerciórese de que ninguna presilla quede sobre el selector de modo de enfoque. (-3) 4 Serrez la bague de verrouillage en la tournant dans le sens de la flèche jusqu’à ce qu’elle s’encliquette. 4 Apriete el anillo de bloqueo en el sentido de la flecha hasta que chasquee en su lugar. 5 Rattachez la bague de fixation puis l’accessoire. 5 Fije el anillo de acoplameinto y después el accesorio. Prise de vue Grabación Transport Vous pouvez fixer le capuchon d’objectif sur l’objectif lorsque l’adaptateur est en place. Para transportar Usted podrá fijar la tapa para el objetivo al objetivo con esta unidad instalada. Retrait de l’adaptateur Desmontaje de esta unidad 1 Éteignez l’appareil photo. 2 Retirez l’adaptateur après avoir détaché l’accessoire. 1 Apague la cámara. 2 Desmonte esta unidad después de haber desmontado el accesorio. Conseils Détachez cet adaptateur en procédant dans le sens inverse du montage. Si l’adaptateur ne se détache pas facilement, ne tirez pas dessus avec force. Appuyez légèrement sur l’extrémité de chaque clip, l’une après l’autre, et essayez à nouveau de le détacher. Sugerencias Desmonte esta unidad realizando los pasos de instalación en orden inverso. Esta unidad no se desmonta fácilmente; no aplique excesiva fuerza. Presione ligeramente la punta de cada presilla, una tras otra, y vuelva a tratar de desmontar esta unidad. ) est près du HVL-RLAM : Alignez le repère ( ) sur le côté de la bague de fixation sur le repère ( ) de la bague de verrouillage , puis tournez la bague de fixation dans le sens de la flèche jusqu’à ce qu’elle soit alignée sur le repère LOCK de la bague de verrouillage . HVL-MT24AM : Alignez le repère ( ) sur le côté de la bague de fixation sur le repère ( ) de la bague de verrouillage , puis tournez la bague de fixation dans le sens de la flèche jusqu’à ce qu’elle soit alignée sur le repère LOCK de la bague de verrouillage . Vous n’avez pas besoin de la bague d’adaptation fournie avec chaque accessoire. Remarques sur l’emploi English (Continued from the front side.) Notes on use Always turn off the power of the camera when attaching or detaching this unit. Do not subject this unit to excessive shock when attached. Doing so may cause this unit to come off or be damaged. Do not hold the camera or lens by this unit or the accessory when this unit or the accessory are attached. This unit may come off and the camera or lens may fall. Do not use excessive force when detaching the clips. Specifications Dimensions: Maximum diameter Total length Mass: Included items: Approx. Ø 87 mm (3 1/2 in.) Approx. 55 mm (2 in.) Approx. 55 g (1.9 oz) Macro Light Adaptor (1), Set of printed documentation Design and specifications are subject to change without notice. is trademarks of Sony Corporation. Presione ligeramente el anillo adaptador con la marca ( ) hacia arriba de forma que las tres presillas chasqueen en su lugar en el anillo plateado del objetivo. Notas Cuando fije el anillo adaptador, tenga cuidado de que no golee el objetivo. Reportez-vous au mode d’emploi fourni avec votre accessoire. 4 3 Fije el anillo adaptador al objetivo. Remarques Lorsque vous fixez la bague d’adaptation, faites attention de ne pas toucher l’objectif. Lorsque la bague de verrouillage est serrée correctement, le repère ( haut. Anillo de acoplamiento Anillo adaptador (interior) Anillo de bloqueo (exterior) Presillas (tres) Quite la tapa para el objetivo. Apague la cámara. Détachez le capuchon d’objectif. Éteignez l’appareil photo. 3 Fixez la bague d’adaptation sur l’objectif. 3 Utilice esta unidad cuando instale un HVL-RLAM o HVL-MT24AM a un objetivo. Éteignez toujours l’appareil photo avant de fixer ou de retirer l’adaptateur. N’exposez pas l’adaptateur à un choc excessif lorsque vous le fixez. Il pourrait se détacher ou être endommagé. Ne prenez pas l’appareil photo ou l’objectif par l’adaptateur ou l’accessoire lorsque l’adaptateur ou l’accessoire est fixé. L’adaptateur peut se détacher et l’appareil photo ou l’objectif tomber. Ne forcez pas trop lorsque vous détachez les clips. Spécifications Dimensions : Diamètre maximale Longueur totale Poids : Articles inclus : Environ Ø 87 mm (3 1/2 po.) Environ 55 mm (2 po.) Environ 55 g (1,9 oz) Adaptateur Macro Light (1), Jeu de documents imprimés La conception et les spécifications peuvent être modifiées sans préavis. est une marque commerciale de Sony Corporation. Cuando apriete correctamente el anillo de bloqueo, la marca ( de la posición superior. ) quedará cerca HVL-RLAM: Alinee la marca ( ) del lado del anillo de acoplamiento con la marca ( ) del anillo de bloqueo , y después gire el anillo de acoplamiento en el sentido de la flecha hasta que quede alineada con la marca LOCK del anillo de bloqueo . HVL-MT24AM: Alinee la marca ( ) del lado del anillo de acoplamiento con la marca ( ) del anillo de bloqueo , y después gire el anillo de acoplamiento en el sentido de la flecha hasta que quede alineada con la marca LOCK del anillo de bloqueo . Usted no necesitará el anillo adaptador suministrado con todos los accesorios. Consulte el manual de instrucciones suministrado con su accesorio. Notas sobre la utilización Antes de insatalar o desmontar esta unidad, apague la cámara. No someta esta unidad a golpes excesivos cuando la instale. Si lo hiciese, la unidad podría soltar o dañarse. No sujete la cámara ni el objetivo por esta unidad ni el accesorio cuando haya instalado esta unidad y el accesorio. Esta unidad podría desprenderse o el objetivo podría caer. No utilice fuerza excesiva cuando desenganche las paresillas. Especificaciones Dimensiones: Diámetro máximo Longitud total Peso: Elementos incluidos: Aprox. Ø 87 mm Aprox. 55 mm Aprox. 55 g Adaptador de iluminación macro (1), Juego de documentación impresa El diseño y las especificaciones están sujetos a cambios sin previo aviso. es marca comercial de Sony Corporation.