1
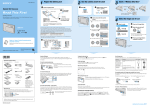
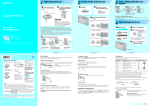
Prepare the battery pack
1
1
2
Insert the battery pack.
Push the back part of the battery pack
gently until it clicks into place.
2
Lift out the inlet plug and
connect to the wall outlet
(wall socket).
1
Turn the camera on/set the clock
Select
2
.
3
Insert a “Memory Stick Duo” (not
supplied)
Terminal side
Open the lens cover or
press the POWER button.
Lighting
Battery charger
Insert the “Memory Stick Duo”
all the way in until it clicks.
When there is no “Memory Stick Duo” inserted
3
CHARGE lamp
Plug
Set the clock with the control
button.
The camera records/plays back images using the internal memory (58 MB). t “User’s Guide/
Troubleshooting” (page 22)
1 Select the date display format with v/V, then press
Light on: Charging
z.
Light off: Completed (Practical charge)
Clock Set
If you continue charging the battery pack for about
one more hour (until it is fully charged), the
charge will last slightly longer.
Y/M/D
M/D/Y
D/M/Y
2005 / 1 /
• Connect the battery charger to an easily accessible wall outlet (wall socket) close by.
• Even if the CHARGE lamp is not lit, the battery charger is not disconnected from the AC power source
(mains) as long as it is connected to the wall outlet (wall socket). If some trouble occurs while using the
battery charger, immediately shut off the power by disconnecting the plug from the wall outlet (wall socket).
• When charging is finished, disconnect the battery charger from the wall outlet (wall socket), and remove the
battery pack from the battery charger.
• The time required to fully charge the supplied battery pack from when it is completely discharged at a
temperature of 25°C (77°F) is approximately 220 min., and the practical charging time is approximately
160 min. Charging may take longer under certain circumstances or conditions.
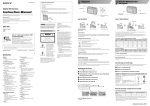
Digital Still Camera
Read This First
1
12 : 00
OK
AM
Cancel
2 Select each item with b/B and set the numeric value
1
Select a mode.
Still image:
with v/V, then press z.
Select
Clock Set
2005 / 1 /
1
12 : 00
OK
AM
Cancel
Insert the charged battery pack.
Before operating the unit, please read this manual and “User’s Guide/Troubleshooting” (separate volume)
thoroughly, and retain them for future reference.
2005 / 1 /
3M
VGA(E-Mail)
16:9(HDTV)
Movie:
Image Size
Select
• The screen above is for still images.
• For movies, select [640(Fine)] (“Memory Stick PRO
Duo” only), [640(Standard)] or [160].
• The recordable number of still images or the
recordable time of movies is indicated at the right
side of [Image Size].
.
10 : 30
OK
AM
Cancel
4
Press
(Image Size) to
complete the setting.
Close the battery/
“Memory Stick Duo”
cover.
button
2-656-805-11 (2)
Printed on 100% recycled paper using VOC
(Volatile Organic Compound)-free vegetable
oil based ink.
Checking the accessories supplied
• Rechargeable battery pack
NP-FT1 (1)/Battery case (1)
1
50 pic
• To cancel, select [Cancel] and press z.
Battery eject lever
• Battery charger BC-CS3 (1)
Select the size with v / V.
3:2
Y/M/D
M/D/Y
D/M/Y
© 2005 Sony Corporation Printed in Japan
3
(Image Size).
1M
3 Select [OK] with B, then press z.
Operating Instructions
Insert the battery pack while
pressing the battery eject lever
with the tip of the battery.
Press
.
Clock Set
Open the battery/
“Memory Stick Duo”
cover.
2
Y/M/D
M/D/Y
D/M/Y
DSC-T9
3
4
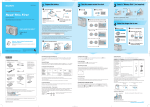
Select the image size for use
• USB, A/V, DC IN cable for
multi-use terminal (1)
• Wrist strap (1)
A “Memory Stick Duo” is not
supplied.
The camera has its own internal
memory (58 MB), however,
purchase of a “Memory Stick
Duo” is recommended for
shooting more images.
Using the AC Adaptor
To change the date and time
On still image sizes
You can connect the camera to a wall outlet (wall socket) using the AC-LS5K AC Adaptor (not
supplied). t “User’s Guide/Troubleshooting” (page 15). Refer to the operating instructions
supplied with the AC Adaptor.
Select [Clock Set] in the
(Setup) screen and perform the procedure in step 3 above.
t “User’s Guide/Troubleshooting” (pages 47 and 57)
For details on the image size t “User’s Guide/Troubleshooting” (page 12)
To check the remaining battery time
Open the lens cover or press POWER button to turn on and check the time on the LCD screen.
Remaining indicator
60min
“Memory Stick Duo”: you
can use a “Memory Stick
Duo” with your camera.
Image size
Guidelines
• Midnight is indicated as 12:00 AM, and noon as 12:00 PM.
• If you selected [D/M/Y] in step 3-1, set the time on a 24-hour cycle.
6M (2816×2112)
For printing in A4 size or high density
images in A5 size
• The displayed time remaining may not be correct under
certain circumstances.
• Unless you set the clock, the Clock Set screen appears each time the camera is turned on.
• The following screen appears when the camera is turned on for the second time or afterwards.
• CD-ROM (Cyber-shot
application software) (1)
• Operating instructions: “Read
This First” (this manual) (1)
• Operating instructions:
“User’s Guide/
Troubleshooting” (1)
Open the battery/“Memory Stick Duo” cover and slide the battery eject lever in the direction of
the arrow. Grasp the edges of the battery pack to pull the battery pack out. To avoid dropping the
battery pack, do not hold the camera with the battery slot facing down when the battery eject
lever is out.
No. of images
Printing
Less
Fine
More
Rough
3:2* (2816×1872)
When turning on the power
60min
3M (2048×1536)
1M (1280×960)
For printing in postcard size
VGA(E-Mail)
(640×480)
For recording a larger number of images
For attaching images to e-mail or creating
web pages
16:9(HDTV)**
(1920×1080)
To remove the battery pack
“Memory Stick”: you cannot
use a “Memory Stick” with
your camera.
.
On the clock display
• It takes about one minute until the correct battery remaining
time appears.
Remaining time
The default settings are marked with
When opening the lens cover
• When opening the lens cover, be careful not to touch the lens.
For viewing images on a wide TV or a
TV compatible with High-vision***
* Images are recorded in the same 3:2 aspect ratio as photograph printing paper or postcards, etc.
** Both edges of the image may be cut off when printing t “User’s Guide/Troubleshooting” (page 91)
*** By using a “Memory Stick” slot or USB connection, you can enjoy higher quality images.
On the recordable number of still images and recordable time of movies
Other memory cards cannot
be used.
Recordable number of still images and recordable time of movies vary depending on the image
size selected.
• For details on “Memory Stick
Duo” t “User’s Guide/
Troubleshooting” (page 97)
For details on recordable number or time t “User’s Guide/Troubleshooting” (page 21)
Notes
• Charge the supplied NP-FT1 battery pack before using the camera for the first time.
• The LCD screen is manufactured using extremely high-precision technology so over 99.99% of the
pixels are operational for effective use. However, there may be some tiny black points and/or bright
points (white, red, blue or green in color) that constantly appear on the LCD screen. These points are
normal in the manufacturing process and do not affect the recording in any way.
• The camera is a precision instrument. Be careful not
Hook
to bump the lens or the LCD screen, and not to apply
force to it. Attach the strap to prevent the camera
from damage by being dropped, etc.
Additional information on this product and answers to frequently asked questions can be
found at our Customer Support Website.
Battery eject lever
Still images
To turn off the power
Movies
Maximum number of recordable images
Maximum recordable time
Close the lens cover or press the POWER button again.
To use your camera abroad — Power sources
You can use your camera, the supplied battery charger, and the AC-LS5K AC Adaptor (not
supplied) in any country or region where the power supply is within 100 V to 240 V AC,
50/60 Hz.
• Do not use an electronic transformer (travel converter), as this may cause a
malfunction.
• If the camera is running on battery power and you do not operate the camera for about three minutes, the
camera turns off automatically to prevent wearing down the battery pack (Auto power-off function).
Changing the language setting
You can change the screen display to show messages in a specified language. To change the
language setting, press MENU to display the menu screen. Select
(Setup) with the control
button, then, select [ A Language] in
(Setup1), and select the desired language. t “User’s
1
Guide/Troubleshooting” (page 55)
• The number of recordable images and time can differ according to shooting conditions.
To remove a “Memory Stick Duo”
Access lamp
Open the battery/“Memory Stick Duo” cover, then push the
“Memory Stick Duo” in once.
When the access lamp is lit
Never remove the battery/“Memory Stick Duo” or turn off
the power. The data may be corrupted.
http://www.sony.net/
continued on the reverse
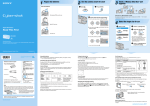
Shoot images easily (Auto adjustment mode)
5
Holding the camera
1
Shoot still images (Scene Selection)
2
Select a mode.
1
Shoot with the shutter button.
Select
2
.
View/delete images
6
1
Press MENU.
Select
2
.
Select an image with b/B.
60min
Still image (auto adjustment
mode):
Select
3/9
Press and hold the
shutter button halfway
down to focus.
.
AE/AF lock indicator
Flashing indicator
t Indicator lit/beeps
Program
Auto
Camera
Press the shutter button
fully down.
The shutter sounds.
101-0003
Mode
2005 1 1 10:30PM
BACK/NEXT
3
60min
Movie:
VOLUME
Still image: the image size is displayed
Select
(Camera) with b, then
select a mode with v/V.
Movie:
/
Select
VGA
Still image:
button
is displayed
Movie:
button
.
Program
Auto
Camera
To play back a movie, press z.
AF range finder frame
WB
ISO
60min
STD
640
B
10/10
00:00:03
Movie:
(STEADY SHOT)
button
Zoom button
Position the subject in the center of the focus
frame.
Press the shutter button
fully down.
• For details on modes, see below.
• The setting is maintained even when the power is turned
off.
60min
101_0010
STOP
(Screen display
switch) button
4
Press MENU to turn off the menu.
5
Shoot with the shutter button.
Control button
VOLUME
Rewind/Fast forward: b/B
(Return to normal playback: z)
Volume: v/V
Stop playback: z
button
button
Control button
Control button
To stop recording, press the shutter button fully down again.
Using the control button
Using the zoom
60min
Playback bar
2005 1 1 10:30PM
REV/CUE
MENU button
REC
• Movies with the image size [160] are displayed a size
smaller.
To cancel the Scene Selection
To delete images
Select [Auto] or [Program] with v/V.
1 Display the image you want to delete and press
VGA
96
Using the flash for
still images
Zoom button
60min
(Delete).
2 Select [Delete] with v, then press z.
60min
S AF
60min
Checking the last
image you shot
(Quick Review)
VGA
60min
101-0029
60min
VGA
96
8/8
Review
Shooting close-up
(Macro)
2005 1 1 10:30PM
S AF
RETURN
60min
VGA
96
Using the
self-timer
To cancel the deletion
• When the zoom scale exceeds 3×, the camera uses the Digital Zoom function.
For details on the [Digital Zoom] settings and the image quality t “User’s Guide/Troubleshooting”
(page 48)
• You cannot change the zoom scale while shooting a movie.
Select [Exit], then press z.
Delete
Exit
BACK/NEXT
S AF
Checking the last still image you shot (Quick Review)
Press b (
) on the control button.
To cancel, press b again.
• The image may appear rough right after playback starts.
• To delete the image, press
(Delete) and select [Delete] with v on the control button, then press z.
Using the self-timer
Before step 2, press V (
) on the control button.
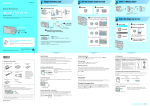
Scene Selection modes
To view an enlarged image (playback zoom)
The following modes are predetermined to match the scene conditions.
Press
Press the shutter button, the self-timer lamp flashes, and a beep sounds until the shutter operates
(approximately 10 seconds later).
Magnifying glass
The subject appears on the LCD
screen magnified by up to 3.5×.
To cancel, press V again.
Soft snap
Shoots portraits of people,
flowers, etc., with a gentle
atmosphere.
Self-timer lamp
Distance to the subject
1 cm (13/32 inch)
2 cm (13/16 inch)
5 cm (2 inches)
10 cm (4 inches)
20 cm (7 7/8 inches)
Selecting a flash mode for still images
Before step 2, press v ( ) on the control button repeatedly until the desired mode is selected.
No indicator
Strobes if it is dark (default setting)
• Using a tripod (not supplied) is recommended.
Forced flash
SL
Slow synchro (Forced flash)
The shutter speed is slow in a dark place to clearly shoot the background that is
out of flash light.
• Shooting distance (when [ISO] is set to [Auto])
W side: Approx. 0.1 to 2.8 m (3 15/16 inches to 9 feet 2 1/4 inches)
T side: Approx. 0.25 to 2.3 m (9 27/32 inches to 7 feet 6 9/16 inches)
• The flash strobes twice. The first time is to adjust the light quantity.
• While charging the flash,
is displayed.
Shooting close-up (Macro)
Before step 2, press B (
If you shoot a still image of a subject that is difficult to focus on
• The focal distance to a subject is approx. 1 cm to
20 cm (13/32 inch to 7 7/8 inches).
• If the subject is closer than approx. 50 cm (19 3/4 inches), use the Macro mode (left column).
• When the camera cannot focus on the subject automatically, the AE/AF lock indicator changes to flashing
slowly and the beep does not sound. Recompose the shot and focus again.
• The optical zoom is locked to the W side and
cannot be used.
Subjects difficult to focus on are:
No flash
) on the control button.
To cancel, press B again.
Magnification scale
3.5×
2.2×
1.1×
0.5×
0.3×
– Distant from the camera and dark
– The contrast between the subject and its
background is poor.
– Seen through glass
– Moving fast
– Reflective light or with a lustrous finish
– Flashing
– Backlit
To brighten up the display
When your image appears to be unclear under bright light such as outside light, you can brighten
the LCD backlight up.
• When you press the zoom button, the image is
enlarged using the digital zoom.
1.1
Landscape
Shoots landscapes, etc., by
focusing on a distant subject.
High-speed shutter
Shoots moving subjects outdoors
or in other bright places.
To store enlarged images: [Trimming] t “User’s Guide/Troubleshooting” (page 46)
To play back a series of images (Slide Show)
While playing back still images, press
(Slide Show). To cancel, press
again.
• You can change your settings such as changing Music files. For details on a variety of
operations and settings for the slide show. t “User’s Guide/Troubleshooting” (page 27)
Viewing an index screen
Shoots whitish scenes brightly.
Shoots night scenes at a distance
without losing the dark
atmosphere of the surroundings.
60min
Shoots portraits in dark places.
Fireworks are recorded in all their
splendor.
• Setting the zoom all the way to the W side is recommended.
• The in-focus range becomes narrow, and the complete subject may not entirely be in focus.
• The Auto Focus speed drops.
• To shoot at even closer distances than close-ups (Macro) recording, use
(Magnifying glass mode) in the
Scene mode.
For more detail t “User’s Guide/Troubleshooting” (page 20)
3/9
• SINGLE DISPLAY
Shortest shooting distance from the lens surface
The anti-blur function is equipped with the camera.
* The shutter speed becomes slower, so using a tripod is recommended.
Setting all the way to the W side: Approx. 8 cm (3 1/4 inches)
Setting all the way to the T side: Approx. 25 cm (9 7/8 inches)
To cancel the anti-blur function, set the mode switch to other than [Auto] in
(Camera) on the
menu (right column), then press
(STEADY SHOT) button (shown above) to display the
indicator. To turn on the anti-blur function, press the
(STEADY SHOT) button again.
• When the mode switch is set to [Auto] in
(Camera) on the menu, you cannot cancel the
anti-blur function.
• You can change the anti-blur mode. t “User’s Guide/Troubleshooting” (page 51)
To use the functions set by the control button with Scene Selection
t “User’s Guide/Troubleshooting” (page 16)
101-0003
• SINGLE DISPLAY
BACK/NEXT
2005 1 1 10:30PM
VOLUME
If you press again, the sixteen-image
index screen appears.
1 While an index screen is displayed, press
control button, then press z.
(Delete)
Green selection frame
Candle*
Shoot candlelit scenes, without
spoiling the atmosphere.
Before shooting in step 5, select the settings with the control button. Some functions are not
available, depending on the Scene Selection mode. When you press the button to select functions
that cannot be combined with Scene Selection, a beep sounds. t “User’s Guide/
Troubleshooting” (page 26)
(Delete) and select [Select] with v/V on the
2 Select the image you want to delete with v/V/b/B, then press z to display the
indicator on the selected image.
To cancel a selection
Select an image you have previously selected for deletion, then press z
to delete the
indicator from the image.
Anti-blur function
To identify items on the screen
VGA
To delete images in index mode
Fireworks*
Twilight portrait*
(Index) and select an image with v/V/b/B.
To return to the single-image screen, press z. To display the next (previous) index screen, press
b/B.
Shoots seasides or lakesides, with
the blue of the water clearly
recorded.
Whenever you switch
(Screen display switch) button (shown above), the LCD display is
switched on and off as shown below.
LCD backlight up t Histogram on t Indicators off t Indicators on
Cancel playback zoom: z
Snow
Twilight*
.
Adjust the portion: v/V/b/B
Press
Beach
while displaying a still image.
To undo the zoom, press
SELECT
3 Press
TO NEXT
(Delete).
4 Select [OK] with B, then press z.
• To delete all the images in the folder, select [All In This Folder] with v/V in step 1 instead of [Select], then
press z.