1
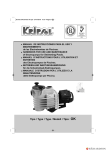
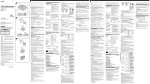
2-686-605-11(1)
A
WARNING
1
AC Adaptor/Charger
Adaptateur secteur/
chargeur
4
5
6
qa
To Charge the Battery Pack
To avoid electrical shock, do not open the cabinet.
Refer servicing to qualified personnel only.
1 Set the mode change switch to CHARGE.
The AC Power cord must only be changed at a qualified service shop.
2
Operating Instructions
Mode d’emploi
8
9
Replace the battery with the specified type only. Otherwise, fire or injury
may result.
PRECAUTION
The set is not disconnected from the AC power source (mains) as long as it
is connected to the wall outlet, even if the set itself has been turned off.
Disposal of Old Electrical & Electronic Equipment
(Applicable in the European Union and other European
countries with separate collection systems)
This symbol on the product or on its packaging indicates that
this product shall not be treated as household waste. Instead it
shall be handed over to the applicable collection point for the
recycling of electrical and electronic equipment. By ensuring
this product is disposed of correctly, you will help prevent
potential negative consequences for the environment and
human health, which could otherwise be caused by
inappropriate waste handling of this product. The recycling of
materials will help to conserve natural resources. For more
detailed information about recycling of this product, please
contact your local Civic Office, your household waste disposal
service or the shop where you purchased the product.
q;
3
qh
qj
qs
VCR/CAMERA
WARNING
BATTERY LIFE
TIME TO CHG
h
m
NORMAL FULL
qd
qf
qk
ql
qg
2 Connect the AC Power cord to this unit.
Troubleshooting
Symptom
Digital Single Lens Reflex
Camera does not work.
3 Connect the AC Power cord to a wall outlet.
CAUTION
7
See illustration C-1.
To reduce fire or shock hazard, do not expose the unit to rain or moisture.
There is a beep and the display window comes on.
4 Install the battery pack.
Charging begins. When the battery life indicator becomes
and the
CHARGE lamp lights up, normal charge is completed. The QUICK
MODE lamp lights up during quick charging.
For a full charge, which allows you to use the battery slightly longer
than a “normal charge”, leave the battery pack installed until the battery
life indicator becomes
and the CHARGE lamp goes out.
Remove the battery pack when required. It can be used even if charging
is not completed.
5 When charging is complete, remove the battery pack.
Installing two battery packs simultaneously
This unit allows installation of two battery packs simultaneously.
Charging starts with the battery pack installed in Slot 1.
When two battery packs are installed but not simultaneously, charging
starts with the battery pack installed first regardless of whether it is in
Slot 1 or 2.
Note
This unit cannot charge two battery packs simultaneously.
The battery is not charged.
Power immediately turns
off even though there is
sufficient battery life, or the
displayed battery life
differs from the actual time.
The display is not switched.
The rapid charging or
SuperQuick (SQ) Charge is
not performed.
To install the battery pack
AC-VQ900AM
B
See illustration C-2.
Notes on Use
2
This unit does not have dust-proof, splash-proof or water-proof
specifications.
3
© 2006 Sony Corporation Printed in Japan
Charging
1
Owner’s Record
The model and serial numbers are located on the bottom of the unit.
Record the serial number in the space provided below.
Refer to these numbers whenever you call upon your Sony dealer
regarding this product.
• Designed for use with compatible Sony batteries.
• Only charge recommended battery packs with this unit.
To remove the battery pack
Compensation for Recorded Content
We will not provide compensation for a failure to record or play back
images, sound or other content due to a malfunction of the battery back, AC
adapter/charger.
Slide the battery pack in the direction of the arrow and lift it straight out.
Charging temperature
Model No. AC-
Serial No.
• To provide maximum battery efficiency, the recommended temperature
range when charging is 10 °C to 30 °C (50 °F to 86 °F).
• This unit complies with quick charging, but charging outside the
recommended temperature range will lead to longer charging times in
order to protect the battery pack. Once the charging time has been
extended, it will not return to quick charging even if the temperature is
brought within the recommended temperature range. Reattach the
battery and then recharge it.
WARNING
4
To reduce fire or shock hazard, do not
expose the unit to rain or moisture.
Connecting cord
C
1
3
4
This symbol is intended to alert the user to the presence
of uninsulated “Dangerous voltage” within the
product’s enclosure that may be of sufficient magnitude
to constitute a risk of electric shock to persons.
2
1
To remove
This symbol is intended to alert the user to the presence
of important operating and maintenance (servicing)
instructions in the literature accompanying the
appliance.
CAUTION
You are cautioned that any changes or modifications not expressly
approved in this manual could void your authority to operate this
equipment.
D
The contents of the display window change each time you
press the DISPLAY change button.
1
1
2
Note:
This equipment has been tested and found to comply with the limits for a
Class B digital device, pursuant to Part 15 of the FCC Rules. These limits
are designed to provide reasonable protection against harmful
interference in a residential installation. This equipment generates, uses,
and can radiate radio frequency energy and, if not installed and used in
accordance with the instructions, may cause harmful interference to radio
communications.
However, there is no guarantee that interference will not occur in a
particular installation. If this equipment does cause harmful interference
to radio or television reception, which can be determined by turning the
equipment off and on, the user is encouraged to try to correct the
interference by one or more of the following measures:
– Reorient or relocate the receiving antenna.
– Increase the separation between the equipment and receiver.
– Connect the equipment into an outlet on a circuit different from that to
which the receiver is connected.
– Consult the dealer or an experienced radio/TV technician for help.
1
2
2
1
3
2
Two battery packs installed in Slot 1 and Slot 2
The Graphical Symbols with Supplemental Marking is located on the
bottom of the unit.
A battery pack installed in Slot 1 only
NOTICE FOR THE CUSTOMERS IN THE U.S.A AND CANADA
1
4
2
NOTICE FOR THE CUSTOMERS IN THE UNITED KINGDOM
A moulded plug complying with BS 1363 is fitted to this equipment for
your safety and convenience.
•Do not place the unit in a location where it is:
– Extremely hot or cold
Placing this unit in locations subject to the direct sunlight such as on
dashboards or near heating apparatus may cause this unit to deform or
malfunction.
– Dusty or dirty
In locations such as the seashore and other sandy areas or where dust
clouds occur, protect the unit from sand and dust. There is risk of break
down.
– Very humid
– Vibrating
Charge the battery pack on a flat surface without vibration.
• Do not use the unit placed in a narrow space, such as between a wall and
furniture.
• Attach the battery pack firmly.
The battery terminal may be damaged if the battery pack is not attached
correctly.
• Do not use this unit in a place with strong radio waves or radiation.
Images may not be recorded or played back correctly.
• To protect the battery pack, remove the battery pack from the unit as soon
as the charging is completed.
• Do not apply mechanical shock or drop the unit.
• Keep the unit away from a TV or AM receivers. In particular, noise from
the device may enter a TV or radio if it is placed nearby.
• Use this unit near to a wall outlet. This is to ensure that the power plug
can be immediately unplugged from the wall outlet to turn the power off
if some abnormality occurs during use.
• Be sure that nothing metallic comes into contact with the metal parts of
the unit or connecting plate. If it does, a short may occur and the unit may
be damaged.
• Do not connect this unit to a voltage adaptor (travel converter) for
overseas travel. This may result in overheating or other malfunction.
• While the unit is in use, it gets warm. But this is normal.
• Unplug the unit from the wall outlet after use. To disconnect the cord,
pull it out by the plug. Never pull the cord itself.
• Connect this unit to an available wall socket. Even though the CHARGE
lamp of this unit is off, it is not disconnected from the power source. If
any trouble occurs while the unit is in use, unplug it from the wall socket
to disconnect the power source.
• The negligible amount of electric current will flow into the AC adaptor/
charger as long as the AC adaptor/charger is plugged into the wall outlet.
• Unplug the unit from the wall outlet if it will not be used for extended
period of time. To disconnect the cord, pull it out by the plug. Never pull
the cord itself.
• Do not operate the unit with a damaged cord or if it has been dropped or
damaged.
• The nameplate indicating operating voltage, power consumption, etc. is
located on the bottom.
• Always keep the metal contacts clean.
• Do not disassemble or convert the unit.
• Do not remove the ferrite core attached to the connecting cord. Use the
connecting cord with the ferrite core attached to prevent unnecessary
radio waves from being emitted.
If the plug supplied with this equipment has a detachable fuse cover,
be sure to attach the fuse cover after you change the fuse. Never use
the plug without the fuse cover. If you should lose the fuse cover,
please contact your nearest Sony service station.
5
2
1
2
English
The AC-VQ900AM AC Adaptor/Charger can be used as follows:
This unit can be used as an AC adaptor or a battery charger with the
supplied AC Power cord connected to a wall outlet.
• Operates Sony equipment (digital single lens reflex cameras, etc.)
• Charges Sony rechargeable battery packs (M series)
This unit has the following functions when used with “InfoLITHIUM”
battery packs:
– Enables quick charging
(Quick charging is faster than normal charging, such as with a battery
charger supplied with a camera.)
– Displays approximate Remaining time and Battery life.
– Battery packs marked “SQ” also support SuperQuick charging, which is
faster than normal or quick charging.
For details on “InfoLITHIUM” and SuperQuick (SQ) charging, see
““InfoLITHIUM” battery packs and SuperQuick (SQ) charging.”
• Use only lithium ion type battery packs. This unit cannot be used to
charge Ni-Cd or Ni-MH type battery packs.
• This unit may not be compatible with some equipment (digital single
lens reflex cameras, etc.) Check your equipment before use.
If the CHARGE lamp lights and
does not flash again:
If the CHARGE lamp goes out
because the charging time has
passed, there is no problem.
If the CHARGE lamp flashes
again:
The problem is with this unit.
If the CHARGE lamp lights and
does not flash again:
If the CHARGE lamp goes out
because the charging time has
passed, the problem is with the
battery pack first installed.
Charging time
The following table shows the charging time for a main battery pack that
has been completely discharged.
Quick Charge
Normal charge
70 min
Full charge
130 min
* The NP-FM55H does not support
SuperQuick (SQ) charging.
• For how to check the battery life, refer to the instruction manual of your
video equipment.
• The charging time may differ depending on the condition of the battery
pack or the ambient temperature.
• The approximate times shown are when charging an empty battery pack
with this unit at 25 °C (77 °F).
• Approximate minutes to charge an empty battery pack fully (Full charge).
• Approximate minutes in parentheses indicate the time when you charge
normally (Normal charge).
• To ascertain the battery life, refer to the instruction manual of the video
equipment which you use.
Notes
• When the mode change switch is set to VCR/CAMERA during charging,
charging stops.
• If the CHARGE lamp does not light or flash, check that the battery pack is
correctly attached to the AC adaptor/charger. If it is not attached it will
not be charged.
• Quick charging is only performed with “InfoLITHIUM” battery packs.
• If anything goes wrong during charging, the charge lamp blinks and
“WARNING” appears on the display. For details, see “Troubleshooting”.
Display window
“InfoLITHIUM” indicator
WARNING indicator
TIME TO CHG (charge) indicator
Time indicator
BATTERY LIFE (battery remaining
time) indicator
qj VCR/CAMERA indicator
qk Full charge indicator
ql Battery life indicator
qs
qd
qf
qg
qh
See illustration B.
For details of the connection, refer to the operating instructions of the
camera.
1 Set the mode change switch to VCR/CAMERA.
2 Connect the AC Power cord to this unit.
3 Connect the AC Power cord to a wall outlet.
4 Connect the connecting cord to the camera.
Notes
• If you set the mode change switch to CHARGE while operating the
camera, the power supply to the camera stops.
• You cannot charge the battery pack attached to this unit if you set the
mode change switch to VCR/CAMERA.
• Keep this unit away from the equipment you are using if the picture is
disturbed.
• The connecting cord may not be compatible with some equipment. Check
your equipment before use.
• The illustrated example is of connection to a DSLR-A100 digital single
lens reflex camera.
“InfoLITHIUM” battery packs and
SuperQuick (SQ) charging
This unit supports “InfoLITHIUM” battery packs (M series). The unit’s
function of displaying the battery life is available when using in
combination with “InfoLITHIUM” compatible equipment (mainly
camcorders). Battery packs marked “SQ” also support SuperQuick
charging, which is faster than normal or quick charging.
What is the “InfoLITHIUM” ?
The “InfoLITHIUM” is a lithium ion battery pack which can exchange data
with compatible electronic equipment about its battery consumption. Sony
recommends that you use the “InfoLITHIUM” battery pack (M series) with
electronic equipment having the
mark.
“InfoLITHIUM” is a trademark of Sony Corporation.
What is SuperQuick (SQ) Charge?
See illustration D.
This unit shows the remaining times until normal charge and full charge are
complete in the display window. You can change the displayed information
by pressing the DISPLAY change button.
SuperQuick (SQ) Charge is the general name of a quick charging feature
and power system. The combination of the “InfoLITHIUM” batteries
having the
or
mark and their corresponding devices realizes this
feature. SuperQuick (SQ) Charge provides a vast reduction in the charging
time in comparison to conventional quick charging (or ordinary charging).
Press DISPLAY while charging is underway.
The charge mode lamp lights up as shown below in accordance with the
charge mode.
x SuperQuick (SQ) Charge underway
t The “SQ MODE” lamp lights up.
x Quick charging underway
t The “QUICK MODE” lamp lights up.
The charge mode lamp goes out when normal charge is completed.
After attaching a battery pack, wait for about 1 min. Each time you press
DISPLAY, the slot indicator lamp lights up and the display in the display
window changes to the display shown below.
When two battery packs are attached simultaneously, the time display of
the battery pack not being charged will automatically return to the time
display of the battery pack being charged after about 10 seconds.
Here is an example of installation of a battery pack in Slot 1 first and then
in Slot 2. The slot indicator lamp corresponds to the slot number.
1 Battery life if the first installed battery pack is installed in your
“InfoLITHIUM” electronic equipment.
The battery life is not displayed if it is less than five minutes.
2 Remaining time until normal charging of the first installed
battery pack is complete.
The normal charge time is not displayed after normal charging is
complete.
3 Remaining time until full charging of the first installed battery
pack is complete.
The full charge time is not displayed after full charging is complete.
The normal charge time is not displayed after normal charging is
complete.
6 Remaining time until full charging of the last installed battery
pack is complete.
The full charge time is not displayed after full charging is complete.
* The battery life indicates the remaining time of each battery pack if installed in the
same equipment (camcorder, etc.) in which it was used prior to recharging. With a
digital single lens reflex camera, the battery remaining time varies considerably
depending on the shooting method. Take the battery remaining time as a guide to
the amount of charge in the battery pack. For details, refer to ““InfoLITHIUM”
battery packs and SuperQuick (SQ) charging.”
Notes
Using the unit as an AC Adaptor
Please contact your nearest Sony dealer in connection with the product
with the problem.
To Check Charging
Identifying the parts
Thank you for purchasing the Sony AC Adaptor/Charger.
Before operating the unit, please read this manual thoroughly and retain it
for future reference.
If the CHARGE lamp flashes
again:
Install another battery pack.
The battery life is not displayed if it is less than five minutes.
See illustration A.
6
• Do not lift the unit by holding the battery pack.
• When installing the battery pack, be sure not to hit it against the terminal
shutter.
• Be careful not to pinch your fingers while installing or removing the
battery pack.
5 Remaining time until normal charging of the last installed
battery pack is complete.
Terminal shutter
Slot 1
CHARGE lamp 1
Slot 2
CHARGE lamp 2
Mode change switch
CHARGE mode lamp
Display window
Slot indicator lamp
DISPLAY change button
Connecting cord
t Check through the following chart
Remove the battery pack from this unit, then install the same battery
pack again.
4 Battery life if the last installed battery pack is installed in your
“InfoLITHIUM” electronic equipment.
1
2
3
4
5
6
7
8
9
q;
qa
The CHARGE lamp blinks,
and “WARNING” is
displayed in the display
window.
Notes
If any difficulty should arise, unplug the unit and contact your nearest Sony
dealer.
1
Should the fuse in the plug supplied need to be replaced, a fuse of the
same rating as the supplied one and approved by ASTA or BSI to
BS1362 (i.e., marked with
or
mark) must be used.
See illustration C-2.
NP-FM55H
Others
2
1 Place the battery pack on this unit with the b mark facing the
terminal shutter.
2 Slide the battery pack in the direction of the arrow.
Press the battery pack until the terminal shutter completely enters the
unit.
Cause/Solution
•The power plug is disconnected from the
wall outlet.
t Insert into the wall outlet.
•The connecting cable is not properly
connected.
t Connect properly.
•The mode change switch is set to CHARGE.
t Set the mode change switch to VCR/
CAMERA.
•The mode change switch is set to VCR/
CAMERA.
t Set the mode change switch to CHARGE.
•Fully charge again.
t The battery life will be correctly
displayed.
•When using a digital single lens reflex
camera, the battery life may vary
considerably depending on the method of
use. For details, refer to “About the battery
life”.
t Refer to “About the battery life”.
The display shown below may appear if a
battery pack is charged outside of the
recommended charging temperature range of
10 °C to 30 °C (50 °F to 86 °F). In this case,
charging can be performed, but it will not be
performed with quick charging or SuperQuick
(SQ) Charge to protect the battery pack.
• No value is indicated for a new battery pack that has not yet been fitted to
any equipment. The display shows “– – – –”. Attach the new battery pack
to your digital single reflex camera etc. and use for about 20 seconds
before charging with this unit.
• The time display shows the approximate time when charging at 25 °C (77
°F). The time display may differ from the actual charging time depending
on the environment of use. The time may not be displayed depending on
the condition of the battery pack. This is not a malfunction.
• It may take a while for the time to appear after DISPLAY is pressed.
• It may take a while for the time to appear with a battery pack that has not
been charged.
• When you attach a fully charged battery pack to this unit, “TIME TO CHG
FULL 1h” may appear on the display. This is not a malfunction.
• The displayed time may differ from the actual time in the following cases.
This is not a malfunction.
– If the battery pack is removed between normal charge and full charge.
(Full charge requires about one hour after normal charge is complete.)
– If charging a battery pack that has not been used for a long time. (Fully
charge the battery pack.)
About the battery life
While charging the battery pack, this unit will show the battery life with
your video equipment, etc. on the following conditions.
•Using the “InfoLITHIUM” battery pack
•Using the electronic equipment having the
mark
Make sure that you use the battery pack having the
mark
Consult the operating instructions supplied with your video equipment if it
is applied to “InfoLITHIUM”.
About one minute after charging starts, BATTERY LIFE appears on the
display.
• While being used as a charger, this unit indicates the battery life if the
battery pack being charged is used in your video equipment. This
function is available when using “InfoLITHIUM” (M series) battery packs
in combination with compatible equipment (mainly camcorders). Check
that the battery pack has the
mark. Check in the operating
instructions of your video equipment whether it is “InfoLITHIUM”
compatible.
• If the battery pack was fitted in a digital single lens reflex camera before
charging, the display indicates the battery life if it were fitted in a
camcorder with a power consumption equivalent to that of the digital
single lens reflex camera. To display the battery life of a new battery pack,
first attach it to your digital single reflex camera etc. and use it for about
20 seconds. Then charge the battery pack with this unit.
• BATTERY LIFE appears on the display one minute after charging starts.
• When using two or more “InfoLITHIUM” compatible video equipment
units, the battery life indicated is that of the last unit to be fitted with a
battery pack.
• The displayed remaining time is the approximate time when recording
via the viewfinder. The remaining time is shorter when using the LCD
display.
• The battery life may not be displayed with certain video equipment.
• A battery life of less than five minutes is not displayed.
• The time display may show “– – – –” in the following cases. This is not a
malfunction.
– If the battery life is less than five minutes.
– If the displayed time differs from the actual charging time. (Continue
charging until fully charged.)
– If the battery is not “InfoLITHIUM”. (Battery life display and other
functions are not available.)
– If the battery pack has never been fitted to this unit before. (Attach the
battery pack to your digital single reflex camera etc. and use for about 20
seconds before charging with this unit.)
Specifications
AC-VQ900AM
Input
Output
100 - 240 V AC 50/60 Hz 33 W
7.6 V DC 3.0 A (CAMERA)
8.4 V DC 2.9 A (BATT)
Operating temperature
0 °C to 40 °C (32 °F to 104 °F)
Storage temperature
–20 °C to +60 °C (–4 °F to +140 °F)
Dimensions
Approx. 123 × 48 × 135 mm (w/h/d)
(Projections are not included (4 7/8 × 1 15/16 × 5 3/8 inches)
in the dimensions.)
Mass
Approx. 490 g (1 lb. 1 oz.)
Included items
AC Adaptor/Charger (AC-VQ900AM) ............ (1)
AC Power cord ..................................................... (1)
Set of printed documentation
Design and specifications are subject to change without notice.
is a trademark of Sony Corporation.
Use a commercially available AC plug adaptor (not supplied), if necessary,
depending on the design of the wall outlet.
Wall outlet
AC-VQ900AM
AC plug adaptor (not supplied)
Do not connect this unit to a voltage adaptor (travel converter) for
overseas travel. This may result in overheating or other malfunction.
Printed on 100% recycled paper using
VOC (Volatile Organic Compound)-free
vegetable oil based ink.
Français
A
1
4
5
6
qa
7
2
8
9
q;
3
qh
qj
qs
VCR/CAMERA
WARNING
BATTERY LIFE
TIME TO CHG
h
m
NORMAL FULL
qd
qf
qk
ql
qg
B
2
3
Nous vous remercions pour l’achat de cet adaptateur secteur/chargeur
Sony.
Avant d’utiliser l’appareil, veuillez lire attentivement ce manuel et le
conserver pour toute référence future.
L’adaptateur secteur/chargeur AC-VQ900AM peut être utilisé comme suit :
Cet appareil peut être utilisé comme adaptateur secteur ou chargeur de
batterie en raccordant le cordon d’alimentation secteur fourni à une prise
murale.
• Permet d’utiliser des appareils Sony (appareils photo reflex numériques à
objectifs interchangeables, etc.)
• Permet de charger des batteries rechargeables Sony (série M)
Les fonctions suivantes sont disponibles sur cet appareil lorsque vous
utilisez des batteries rechargeables de type « InfoLITHIUM » :
– Charge rapide
(La charge rapide est plus rapide que la charge normale avec un chargeur
de batterie fourni avec un appareil photo.)
– Affichage de la durée restante approximative et de l’autonomie de la
batterie.
– Les batteries rechargeables portant la marque « SQ » sont également
compatibles avec la charge SuperQuick qui est plus rapide que la charge
normale ou rapide.
Pour plus d’informations sur les batteries « InfoLITHIUM » et la charge
SuperQuick (SQ), reportez-vous à la section « Batteries rechargeables
« InfoLITHIUM » et charge SuperQuick (SQ) ».
•N’utilisez que des batteries rechargeables au lithium-ion. Cet appareil
ne peut pas être utilisé pour charger des batteries rechargeables Ni-Cd
ou Ni-MH.
•Il est possible que cet appareil ne soit pas compatible avec certains
appareils (appareils photo reflex numériques à objectifs
interchangeables, etc.).
AVERTISSEMENT
1
Afin de réduire les risques d’incendie ou de décharge électrique, n’exposez
pas cet appareil à la pluie ou à l’humidité.
Pour prévenir les risques d’électrocution, ne pas ouvrir le boîtier.
Ne confier l’entretien de l’appareil qu’à un technicien qualifié.
Le cordon d’alimentation secteur doit être remplacé dans un centre de
réparations agréé uniquement.
6 Temps restant jusqu’à la fin d’une charge complète de la
dernière batterie installée.
Nomenclature
Voir l’illustration A.
Obturateur de borne
Fente 1
Voyant CHARGE 1
Fente 2
Voyant CHARGE 2
Sélecteur de réglage du mode
Témoin de mode CHARGE
Fenêtre d’affichage
Témoin de fente
Touche de réglage DISPLAY
(affichage)
qa Cordon de raccordement
1
2
3
4
5
6
7
8
9
q;
Fenêtre d’affichage
qs Indicateur « InfoLITHIUM »
qd Indicateur WARNING
(avertissement)
qf Indicateur TIME TO CHG
(charge)
qg Indicateur de durée
qh Indicateur BATTERY LIFE
(autonomie de la batterie)
qj Indicateur VCR/CAMERA
qk Indicateur de charge complète
ql Indicateur d’autonomie de la
batterie
Utilisation de l’appareil comme
adaptateur secteur
Voir l’illustration B.
Pour plus d’informations sur le raccordement, reportez-vous au mode
d’emploi de l’appareil photo.
1 Réglez le sélecteur de réglage du mode sur VCR/CAMERA.
2 Raccordez le cordon d’alimentation secteur à cet appareil.
3 Raccordez le cordon d’alimentation secteur à une prise murale.
4 Raccordez le cordon de raccordement à l’appareil photo.
Remarques
• Si vous réglez le sélecteur de réglage de mode sur CHARGE tout en
utilisant l’appareil photo, ce dernier est mis hors tension.
• Vous ne pouvez pas charger la batterie rechargeable installée sur cet
appareil si vous réglez le sélecteur de réglage de mode sur VCR/
CAMERA.
• Eloignez cet appareil de l’appareil que vous utilisez s’il perturbe l’image.
• Le cordon de raccordement risque de ne pas être compatible avec certains
appareils. Vérifiez la compatibilité de votre appareil avant toute
utilisation.
• L’exemple de l’illustration représente le raccordement à un appareil photo
numérique reflex à objectifs interchangeables DSLR-A100.
ATTENTION
4
Remplacer la pile par une pile du type specifie uniquement. Sinon, cela peut
provoquer un incendie ou des blessures.
Pour charger la batterie
PRECAUTION
1 Réglez le sélecteur de réglage du mode sur CHARGE.
L’appareil n’est pas déconnecté de la source d’alimentation secteur tant
qu’il reste branché sur la prise murale, même s’il a été mis hors tension.
2 Raccordez le cordon d’alimentation secteur à cet appareil.
Traitement des appareils électriques et électroniques en
fin de vie (Applicable dans les pays de l’Union Européenne
et aux autres pays européens disposant de systèmes de
collecte sélective)
Ce symbole, apposé sur le produit ou sur son emballage,
indique que ce produit ne doit pas être traité avec les déchets
ménagers. Il doit être remis à un point de collecte approprié
pour le recyclage des équipements éalectriques et
électroniques. En s’assurant que ce produit est bien mis au
rebut de manière appropriée, vous aiderez à prévenir les
conséquences négatives potentielles pour l’environnement et
la santé humaine. Le recyclage des matériaux aidera à
préserver les ressources naturelles. Pour toute information
supplémentaire au sujet du recyclage de ce produit, vous
pouvez contacter votre municipalité, votre déchetterie ou le
magasin où vous avez acheté le produit.
Cordon de raccordement
C
2
1
3
4
2
1
Remarques sur l’utilisation
Pour retirer
la batterie
Cet appareil n’est pas étanche à la poussière, aux projections d’eau et à
l’eau en général.
Mise en charge
• Conçu pour une utilisation avec des batteries Sony compatibles.
• Ne chargez que des batteries rechargeables recommandées avec cet
appareil.
D
Le contenu de la fenêtre d’affichage change chaque fois que
vous appuyez sur la touche de réglage DISPLAY.
1
2
2
1
3
2
1
4
2
1
5
2
1
6
2
Deux batteries sont installées dans la fente 1 et la fente 2.
2
Une batterie est installée dans la fente 1 uniquement.
1
1
Compensation concernant l’enregistrement
Aucune compensation ne sera octroyée en cas de problème
d’enregistrement ou de lecture d’images, de son ou autre, suite à un
problème de fonctionnement de la batterie rechargeable ou de
l’adaptateur/chargeur secteur.
Voir l’illustration C-1.
3 Raccordez le cordon d’alimentation secteur à une prise secteur.
Un bip est émis et la fenêtre d’affichage est activée.
4 Installez la batterie.
La charge commence. Lorsque l’indicateur d’autonomie de la batterie
devient
et que le voyant CHARGE s’allume, la charge normale est
terminée. Le témoin QUICK MODE s’allume pendant la charge rapide.
Pour une charge complète, qui vous permet d’utiliser la batterie
légèrement plus longtemps qu’une « charge normale », laissez la batterie
en place jusqu’à ce que l’indicateur d’autonomie de la batterie devienne
et que le voyant CHARGE s’éteigne.
Retirez la batterie si nécessaire. Elle peut être utilisée même si elle n’est
pas entièrement chargée.
5 Lorsque la charge est terminée, retirez la batterie.
Installation simultanée de deux batteries
Cet appareil permet d’installer deux batteries simultanément.
La batterie qui se trouve dans la fente 1 est chargée en premier.
Si les deux batteries sont installées une après l’autre, la charge
commence par la première batterie installée, qu’elle se trouve dans la
fente 1 ou 2.
Autres
• Ne placez pas l’appareil dans un endroit :
– extrêmement chaud ou froid
Placer cet appareil dans des endroits soumis à la lumière directe du soleil
comme sur un tableau de bord ou à proximité d’un chauffage peut
entraîner sa déformation ou un dysfonctionnement.
– poussiéreux ou sale
Dans les endroits tels qu’au bord de la mer ou dans d’autres endroits
sablonneux ou dans lesquels des nuages de poussière se produisent,
protégez l’appareil contre le sable et la poussière. Il y a un risque de
panne.
– très humides
– soumis à des vibrations
Chargez la batterie rechargeable sur une surface plane exempte de
vibrations.
• N’utilisez pas l’appareil dans un endroit exigu, notamment entre un mur
et un meuble.
• Installez la batterie rechargeable correctement.
Le connecteur de la batterie peut être endommagé si la batterie
rechargeable n’est pas placée correctement.
• Cet appareil ne doit pas être utilisé dans un endroit soumis à des
radiations ou à des ondes radio fortes.
Les images risquent de ne pas être enregistrées ou lues correctement.
• Pour protéger la batterie, retirez-la de l’appareil dès que la charge est
terminée.
• N’exposez pas cet appareil à des chocs mécaniques ou à des chutes.
• Eloignez cet appareil des téléviseurs et récepteurs AM. Les parasites de
l’appareil risquent d’être reçus par un téléviseur ou une radio placé(e) à
proximité.
• Utilisez cet appareil à proximité d’une prise murale. Ainsi, la fiche
d’alimentation pourra être débranchée immédiatement de la prise murale
pour couper l’alimentation en cas d’anomalie en cours d’utilisation.
• Veuillez à ce qu’aucun objet métallique ne touche les pièces métalliques
de l’appareil ou la plaque de connexion. Sinon un court circuit pourrait se
produire et endommager l’appareil.
• Ne raccordez pas cet appareil à un adaptateur de tension (convertisseur)
pour les voyages à l’étranger. Ceci risque d’entraîner une surchauffe de
l’appareil ou un autre problème de fonctionnement.
• Pendant son fonctionnement, la température de cet appareil peut
augmenter. Ceci est toutefois normal.
• Débranchez l’appareil de la prise murale après utilisation. Pour
débrancher le cordon, tirez-le par la fiche et jamais directement par le
cordon.
• Raccordez cet appareil à une prise murale disponible. Même si le voyant
CHARGE de cet appareil est éteint, ce dernier n’est pas débranché de la
source d’alimentation. En cas de problème lorsque l’appareil est en cours
d’utilisation, débranchez-le de la prise murale pour couper l’alimentation.
• Une quantité négligeable de courant électrique circule dans l’adaptateur/
chargeur secteur tant que ce dernier est branché sur la prise murale.
• En cas de non utilisation prolongée du lecteur, débranchez l’appareil de la
prise murale. Pour débrancher le cordon, tirez-le par la fiche et jamais
directement sur le cordon.
• N’utilisez pas l’appareil lorsque le cordon est endommagé ou si l’appareil
est tombé ou a été endommagé.
• La plaque signalétique indiquant la tension de fonctionnement, la
consommation électrique, etc., se trouve sous l’appareil.
• Gardez toujours les contacts métalliques bien propres.
• Ne démontez pas et ne modifiez pas l’appareil.
• Ne retirez pas le noyau de ferrite fixé au cordon de raccordement. Utilisez
le cordon de raccordement avec le noyau de ferrite fixé pour éviter
l’émission d’ondes radio inutiles.
En cas de difficulté, débranchez l’appareil et contactez votre revendeur
Sony.
* L’autonomie de la batterie indique la durée restante de chaque batterie rechargeable
avec le même appareil (caméscope, etc.) que celui utilisé avant la charge. Avec un
appareil photo numérique reflex à objectifs interchangeables, l’autonomie restante
de la batterie varie considérablement en fonction de la méthode de prise de vue.
Utilisez l’autonomie restante de la batterie pour avoir une idée approximative de la
charge de la batterie rechargeable. Pour plus d’informations, reportez-vous à la
section « Batteries rechargeables « InfoLITHIUM » et charge SuperQuick (SQ) ».
Remarques
• Aucune valeur n’est indiquée pour une nouvelle batterie rechargeable qui
n’a pas encore été utilisée. « – – – – » est affiché. Installez la nouvelle
batterie rechargeable sur votre appareil photo numérique reflex à objectifs
interchangeables, etc. et utilisez-la pendant environ 20 secondes avant de
procéder à la charge avec cet appareil.
• Le temps de charge indiqué est approximatif lorsque la mise en charge est
effectuée à 25 °C (77 °F). Il peut varier par rapport au temps de charge réel
selon l’environnement d’utilisation. Il est possible que le temps de charge
ne s’affiche pas selon l’état de la batterie rechargeable. Ceci n’est pas un
problème de fonctionnement.
• L’affichage du temps de charge peut prendre un moment après avoir
appuyé sur DISPLAY.
• L’affichage du temps de charge peut prendre un moment avec une
batterie rechargeable non chargée.
• Lorsque vous installez une batterie complètement chargée sur cet
appareil, l’indication « TIME TO CHG FULL 1h » peut apparaître dans la
fenêtre d’affichage. Ceci n’est pas un problème de fonctionnement.
• Le temps indiqué peut être différent du temps réel dans les cas suivants.
Ceci n’est pas un problème de fonctionnement.
– Si la batterie rechargeable est retirée pendant une charge normale et une
charge complète. (Une charge complète nécessite environ une heure
après la fin de la charge normale.)
– Lorsque vous chargez une batterie qui n’a pas été utilisée pendant
longtemps. (Rechargez complètement la batterie.)
Dépannage
Symptôme
Cause/Remède
L’appareil photo
•La fiche d’alimentation est débranchée de la
numérique reflex à objectifs prise murale.
interchangeables ne
•Le câble de raccordement n’est pas raccordé
fonctionne pas.
correctement.
t Raccordez-le correctement.
•Le sélecteur de réglage du mode est réglé sur
CHARGE.
t Réglez le sélecteur de mode sur VCR/
CAMERA.
La batterie n’est pas
•Le sélecteur de réglage du mode est réglé sur
chargée.
VCR/CAMERA.
t Réglez le sélecteur de mode sur
L’alimentation est tout de •Procédez de nouveau à une charge complète
suite coupée, bien que
de la batterie.
l’autonomie de la batterie
t L’autonomie de la batterie s’affichera
soit suffisante ou le temps
correctement.
restant affiché soit différent •Lors de l’utilisation d’un appareil photo
du temps réel.
numérique reflex à objectifs interchangeables,
l’autonomie de la batterie peut varier
considérablement selon la méthode utilisée.
Pour plus de détails, reportez-vous à la
section « A propos de l’autonomie de la
batterie ».
L’affichage ne change pas.
t Lisez la section « A propos de l’autonomie
de la batterie ».
La recharge rapide ou la
L’affichage ci-dessous peut apparaître si une
recharge SuperQuick (SQ) batterie est rechargée en dehors de la plage de
n’est pas effectuée.
température recommandée (10°C à 30°C (50 °F
à 86 °F)). Dans ce cas, la recharge est normale
et les fonctions de recharge rapide ou
SuperQuick (SQ) n’agissent par afin de
protéger la batterie.
Remarque
Cet appareil ne permet pas de charger deux batteries simultanément.
Pour installer la batterie
Voir l’illustration C-2.
1 Placez la batterie sur cet appareil avec le repère b orienté vers
l’obturateur de borne.
2 Faites glisser la batterie dans le sens de la flèche.
Appuyez sur la batterie jusqu’à ce que l’obturateur de borne soit
complètement introduit dans l’appareil.
Pour retirer la batterie
Voir l’illustration C-2.
Température de charge
• Pour que l’efficacité de la batterie soit optimale, la plage de
température recommandée pendant la charge est comprise entre 10 °C
et 30 °C (50 °F et 86 °F).
• Cet appareil est compatible avec la charge rapide mais si la plage de
température recommandée n’est pas respectée, le temps de charge
sera plus long, afin de protéger la batterie. Si le temps de charge est
prolongé, une charge rapide n’est plus possible, même si la
température revient dans la plage de température recommandée.
Remettez la batterie en place, puis rechargez-la.
Le temps de charge complète n’est pas affiché lorsque la charge
complète est terminée.
Faites glisser la batterie dans le sens de la flèche, puis tirez-la tout droit.
Le voyant CHARGE
clignote et « WARNING »
apparaît dans la fenêtre
d’affichage
t Consultez le tableau suivant
Retirez la batterie de l’appareil, puis remettez-la en place.
Si le témoin CHARGE clignote
encore :
Installez une autre batterie
« InfoLITHIUM ».
Si le voyant CHARGE s’allume
mais ne clignote plus :
Si le voyant CHARGE s’éteint
parce que la batterie est chargée,
il n’y a aucun problème.
Si le témoin CHARGE clignote
encore :
Le problème vient de l’appareil.
Si le voyant CHARGE s’allume
mais ne clignote plus :
Si le voyant CHARGE s’éteint
parce que la batterie est chargée,
le problème vient de la première
batterie installée.
Remarques
• Ne soulevez pas l’appareil en saisissant la batterie.
• Lorsque vous installez la batterie, veillez à ne pas heurter l’obturateur de
la borne.
• Faites attention à ne pas vous pincer les doigts lorsque vous installez ou
retirez la batterie.
Temps de charge
Le tableau suivant indique le temps de charge quand la batterie principale
est complètement déchargée.
Charge rapide
Contactez votre revendeur Sony et apportez-lui l’appareil qui ne
fonctionne pas.
NP-FM55H
Charge normale
70 min
Charge complète
130 min
* Le NP-FM55H n’est pas compatible
avec la charge SuperQuick (SQ).
• Reportez-vous au mode d’emploi fourni avec votre appareil vidéo pour
savoir comment vérifier l’autonomie de la batterie.
• Le temps de charge peut varier selon l’état de la batterie ou la température
ambiante.
• Les temps approximatifs indiqués correspondent à la charge d’une
batterie vide avec cet appareil à 25 °C (77 °F).
• Temps de recharge approximatif en minutes pour recharger
complètement une batterie vide (Recharge complète).
• Le temps entre parenthèses indiquent approximativement le nombre de
minutes pour une recharge normole (Recharge normale).
• Pour vérifier l’autonomie de la batterie, reportez-vous au mode d’emploi
de l’appareil vidéo utilisé.
Remarques
• Si le sélecteur de réglage du mode est réglé sur VCR/CAMERA pendant
la charge, celle-ci s’arrête.
• Si le voyant CHARGE ne s’allume pas ou clignote, vérifiez que la batterie
est installée correctement sur l’adaptateur secteur/chargeur. Si elle n’est
pas installée correctement, elle ne charge pas.
• La charge rapide est uniquement effectuée avec des batteries
« InfoLITHIUM ».
• En cas de problème pendant la mise en charge, le voyant de charge
clignote et « WARNING » apparaît dans la fenêtre d’affichage. Pour plus
de détails, reportez-vous à la section « Dépannage ».
Pour vérifier la charge
Voir l’illustration D.
Cet appareil indique les durées restantes jusqu’à ce que la charge normale
et la charge complète soient terminées dans la fenêtre d’affichage. Vous
pouvez modifier les informations affichées en appuyant sur la touche de
réglage DISPLAY.
Appuyez sur DISPLAY pendant la charge.
Après avoir installé la batterie rechargeable, attendez environ 1 minute. A
chaque pression sur DISPLAY, le témoin de fente s’allume et l’affichage de
la fenêtre d’affichage passe à celui représenté ci-dessous.
Lorsque deux batteries sont reccordées simultanément, au bout de
10 secondes environ, l’indication d’autonomie de la batterie qui n’est pas en
charge revient automatiquement à l’indication d’autonomie de la batterie
en charge. Voici un exemple d’installation de batterie rechargeable dans la
fente 1, puis la fente 2. Le témoin de fente correspond au numéro de
fente.
1 Autonomie si la première batterie installée est placée dans
votre appareil électronique « InfoLITHIUM ».
L’autonomie n’est pas affichée si elle est inférieure à cinq minutes.
2 Temps restant jusqu’à la fin d’une charge normale de la
première batterie installée.
Le temps de charge normal n’est pas affiché lorsque la charge est
terminée.
3 Temps restant jusqu’à la fin d’une charge complète de la
première batterie installée.
Le temps de charge complète n’est pas affiché lorsque la charge
complète est terminée.
4 Autonomie de la batterie si la dernière batterie installée est
placée dans votre appareil électronique « InfoLITHIUM ».
L’autonomie n’est pas affichée si elle est inférieure à cinq minutes.
5 Temps restant jusqu’à la fin d’une charge normale de la
dernière batterie installée.
Le temps de charge normale n’est pas affiché lorsque la charge est
terminée.
Batteries rechargeables
« InfoLITHIUM » et charge
SuperQuick (SQ)
Cet appareil est compatible avec les batteries rechargeables
« InfoLITHIUM » (série M). La fonction d’affichage de l’autonomie de la
batterie de l’appareil est disponible lors de l’utilisation en association
avec un appareil compatible « InfoLITHIUM » (principalement des
caméscopes). Les batteries rechargeables portant la marque « SQ » sont
également compatibles avec la charge SuperQuick qui est plus rapide
que la charge normale ou rapide.
Que signifie « InfoLITHIUM » ?
Les batteries « InfoLITHIUM » sont des batteries au lithium-ion qui peuvent
échanger des informations sur leur consommation avec des appareils
électroniques compatibles. Nous vous recommandons d’utiliser une batterie
« InfoLITHIUM » (série L) avec les appareils électroniques portant la
marque
.
« InfoLITHIUM » est une marque commerciale de Sony Corporation.
Qu’est-ce qu’une recharge SuperQuick (SQ) ?
Une recharge SuperQuick (SQ) est le nom donné à une fonction associant
une recharge rapide et un système électrique. Cette fonction agit avec les
batteries « InfoLITHIUM » portant la marque
ou
et les appareils
supportant ce type de batterie. Une recharge SuperQuick (SQ) s’effectue en
un temps nettement inférieur à une recharge classique (ou une recharge
ordinaire).
Le témoin de mode de recharge s’allume comme indiqué ci-dessous selon le
mode de recharge.
x Recharge SuperQuick (SQ) en cours
t Le témoin « SQ MODE » s’allume.
x Recharge rapide en cours
t Le témoin « QUICK MODE » s’allume.
Le témoin du mode de charge s’éteint lorsque la charge normale est
terminée.
A propos de l’autonomie de la batterie
Pendant la charge de la batterie rechargeable, cet appareil indique
l’autonomie de la batterie avec votre appareil vidéo, etc. dans les conditions
suivantes.
• Vous utilisez une batterie « InfoLITHIUM »
• Vous utilisez un appareil électrique portant la marque
Veillez à utiliser une batterie rechargeable portant la marque
.
Reportez-vous au mode d’emploi fourni avec votre appareil vidéo
concernant « InfoLITHIUM ».
Environ une minute après le début de la mise en charge, BATTERY LIFE
apparaît dans la fenêtre d’affichage.
• Lors de l’utilisation comme chargeur, cet appareil indique l’autonomie de
la batterie si la batterie en cours de charge est utilisée sur votre appareil
vidéo. Cette fonction est disponible lors de l’utilisation de batteries
rechargeables « InfoLITHIUM » (série M) en association avec un appareil
compatible (principalement des caméscopes). Vérifiez que la batterie
rechargeable porte la marque
. Vérifiez dans le mode d’emploi
de votre appareil vidéo si celui-ci est compatible « InfoLITHIUM ».
• Si la batterie rechargeable a été insérée dans un appareil photo numérique
reflex à objectifs interchangeables, l’affichage indique l’autonomie de la
batterie si elle est insérée dans un caméscope dont la consommation
d’énergie est équivalente à celle de l’appareil photo numérique reflex à
objectifs interchangeables. Pour afficher la durée de vue d’une nouvelle
batterie rechargeable, installez-la d’abord sur votre appareil photo
numérique reflex à objectifs interchangeables, etc. et utilisez-la pendant
environ 20 secondes. Chargez ensuite la batterie avec cet appareil.
• BATTERY LIFE apparaît dans la fenêtre d’affichage une minute après le
début de la mise en charge.
• Si vous utilisez deux appareils vidéo compatibles « InfoLITHIUM » ou
plus, l’autonomie de la batterie indiquée est celle du dernier appareil sur
lequel la batterie a été utilisée.
• La durée restante indiquée correspond à la durée approximative lors d’un
enregistrement avec le viseur. La durée restante est plus courte en cas
d’utilisation de l’écran LCD.
• Il est possible que l’autonomie de la batterie ne s’affiche pas avec certains
appareils vidéo.
• L’autonomie de la batterie n’est pas affichée si elle est inférieure à cinq
minutes.
• « – – – – » peut apparaître dans la fenêtre d’affichage dans les cas suivants.
Ceci n’est pas un problème de fonctionnement.
– Si l’autonomie de la batterie est inférieure à 5 minutes.
– Si le temps affiché et le temps de charge réel sont différents. (La charge
continue jusqu’à la charge complète.)
– Si la batterie n’est pas une « InfoLITHIUM ». (L’affichage de l’autonomie
de la batterie ainsi que d’autres fonctions ne sont pas disponibles.)
– Si la batterie rechargeable n’a jamais été insérée dans cet appareil.
(Installez la batterie rechargeable sur votre appareil photo numérique
reflex à objectifs interchangeables, etc. et utilisez-la pendant environ
20 secondes avant de procéder à la charge avec cet appareil.)
Spécifications
AC-VQ900AM
Entrée
Sortie
100 V – 240 V CA 50/60 Hz 33 W
7,6 V CC 3,0 A (CAMERA)
8,4 V CC 2,9 A (BATT)
Température de fonctionnement
0 °C à +40 °C (+32 °F à +104 °F)
Température d’entreposage
–20 °C à +60 °C (–4 °F à +140 °F)
Dimensions
environ 123 × 48 × 135 mm (l/h/p)
(4 7/8 × 1 15/16 × 5 3/8 pouces)
Poids
environ 490 g (1 livre 1 ounce)
Articles inclus
Adaptateur secteur/chargeur (AC-VQ900AM) ...... (1)
Cordon d’alimentation secteur .................................. (1)
Jeu de documents imprimés
La conception et les spécifications sont sujettes à modifications sans préavis.
est une marque commerciale de Sony Corporation.
Ne pas raccorder cet appareil à un adaptateur de tension (convertisseur)
prévu pour les voyages à l’étranger. Il pourrait chauffer et être
endommagé.