1
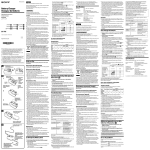
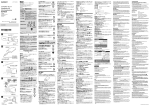
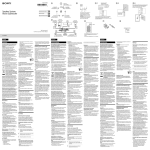
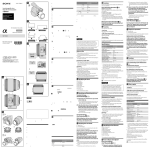
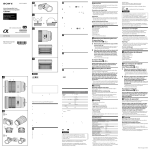
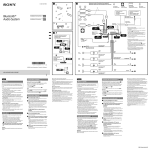
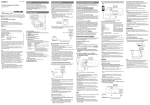
4-442-237-11(1) Thank you for purchasing the Sony Battery charger. Battery Charger Chargeur de Batterie Before operating this Battery charger, please read this manual thoroughly and retain it for future reference. Owner’s Record The model and serial numbers are located on the bottom. Record the serial number in the space provided below. Refer to these numbers whenever you call upon your Sony dealer regarding this product. Model No. BC-TRX Operating Instructions Mode d’emploi Serial No. The nameplate indicating operating voltage, power consumption, etc. is located on the bottom. WARNING To reduce the risk of fire or electric shock, 1) do not expose the unit to rain or moisture. 2) do not place objects filled with liquids, such as vases, on the apparatus. NOTICE FOR THE CUSTOMERS IN THE U.S.A. AND CANADA IMPORTANT SAFETY INSTRUCTIONS SAVE THESE INSTRUCTIONS. DANGER - TO REDUCE THE RISK OF FIRE OR ELECTRIC SHOCK, CAREFULLY FOLLOW THESE INSTRUCTIONS. BC-TRX © 2012 Sony Corporation Printed in China This power unit is intended to be correctly orientated in a vertical or floor mount position. For connection to a supply not in the U.S.A., use an attachment plug adapter of the proper configuration for the power outlet. CAUTION ˎˎDo not use this unit in a narrow space such as between a wall and furniture. ˎˎUse the nearby wall outlet (wall socket) when using this unit. Even when the CHARGE lamp of this unit is off, the power is not disconnected. If any trouble occurs while this unit is in use, unplug it from the wall outlet (wall socket) to disconnect the power. ˎˎThe BC-TRX battery charger can only be used to charge lithium ion type battery packs (type X/type N/type G/type D/type K) and “InfoLITHIUM” battery packs (type G/type D/type T/type R). ˎˎDesigned for use with compatible Sony battery packs. ˎˎThis unit cannot be used to charge a nickel cadmium type or nickel metal hydride type battery pack. ˎˎ“InfoLITHIUM” is a trademark of Sony Corporation. ˎˎLe chargeur de batterie BC-TRX ne peut être utilisé que pour charger des batteries rechargeables au lithium-ion (type X/type N/type G/ type D/type K) et des batteries rechargeables « InfoLITHIUM » (type G/type D/type T/type R). ˎˎIl est conçu pour les batteries rechargeables Sony compatibles. ˎˎCet appareil ne peut pas être utilisé pour charger une batterie rechargeable nickel-cadmium ou nickel-hydrure métallique. ˎˎ« InfoLITHIUM » est une marque commerciale de Sony Corporation. Switching lever Levier de commutation 1 2 Battery pack Batterie rechargeable 1 mark Repère 2 Do not expose the batteries to excessive heat such as sunshine, fire or the like. NOTICE FOR THE CUSTOMERS IN THE U.S.A. CAUTION You are cautioned that any changes or modifications not expressly approved in this manual could void your authority to operate this equipment. NOTE This equipment has been tested and found to comply with the limits for a Class B digital device, pursuant to Part 15 of the FCC Rules. These limits are designed to provide reasonable protection against harmful interference in a residential installation. This equipment generates, uses, and can radiate radio frequency energy and, if not installed and used in accordance with the instructions, may cause harmful interference to radio communications. However, there is no guarantee that interference will not occur in a particular installation. If this equipment does cause harmful interference to radio or television reception, which can be determined by turning the equipment off and on, the user is encouraged to try to correct the interference by one or more of the following measures: ˋˋReorient or relocate the receiving antenna. ˋˋIncrease the separation between the equipment and receiver. ˋˋConnect the equipment into an outlet on a circuit different from that to which the receiver is connected. ˋˋConsult the dealer or an experienced radio/TV technician for help. Output switch Sélecteur de sortie Battery type mark Repère de type de batterie The set is not disconnected from the AC power source (mains) as long as it is connected to the wall outlet (wall socket), even if the set itself has been turned off. Battery mark Repère de la batterie Power plug Fiche d’alimentation Battery to be recharged for this product is follows Brand Name Sony Battery Type NP-BX1 NP-BN1 NP-BN NP-BG1 NP-FG1 DC 3.6 V DC 3.6 V DC 3.6 V DC 3.6 V DC 3.6 V Rating 2.3 Wh 2.3 Wh 3.4 Wh 3.4 Wh (Typical Capacity) 4.5 Wh (1,240 mAh) (630 mAh) (630 mAh) (960 mAh) (960 mAh) Brand Name Battery Type Sony NP-FT1 NP-FR1 NP-BD1 NP-FD1 NP-BK1 DC 3.6 V DC 3.6 V DC 3.6 V DC 3.6 V DC 3.6 V Rating 2.4 Wh 4.4 Wh 2.4 Wh 2.4 Wh 3.4 Wh (Typical Capacity) (680 mAh) (1,220 mAh) (680 mAh) (680 mAh) (970 mAh) Notes on Use This unit does not have dust-proof, splash-proof or water-proof specifications. Warranty for Recorded Content Contents of the recording cannot be compensated if recording or playback is not made due to a malfunction of this unit. Charging status indicator lamp Témoin d’état de la charge 3 CHARGE lamp Témoin CHARGE 3 2 USB rechargeable device (Digital camera, etc.) Appareil rechargeable par l’USB (Appareil photo numérique, etc.) Supplied Micro USB cable or other USB cable compatible with your device Câble micro-USB fourni ou autre câble USB compatible avec votre appareil Where not to place this unit Do not place this unit in any of the following locations, whether it is in use or in storage. Doing so may lead to a malfunction. ˎˎIn direct sunlight such as on dashboards or near heating apparatus, as this unit may become deformed or malfunction ˎˎWhere there is excessive vibration ˎˎWhere there is strong electromagnetism or radiant rays ˎˎWhere there is excessive sand In locations such as the seashore and other sandy areas or where dust clouds occur, protect this unit from sand and dust. There is a risk of malfunction. Precautions on Use ˎˎConnect this unit to an available wall outlet (wall socket). Even when the CHARGE lamp of this unit is off, the power is not disconnected. If any trouble occurs while this unit is in use, unplug it from the wall outlet (wall socket) to disconnect the power. ˎˎDo not use this unit in a narrow space such as between a wall and furniture. ˎˎAttach the battery pack firmly to this unit when charging the battery pack. ˎˎThe battery terminal may be damaged if the battery pack is not attached correctly. ˎˎTo protect the battery pack, remove it from this unit when charging is completed. ˎˎDo not drop or apply mechanical shock to this unit. ˎˎKeep this unit away from TVs or AM receivers. Noise from this unit may enter a TV or radio if placed nearby. ˎˎUnplug this unit from the wall outlet (wall socket) after use. ˎˎBe sure that nothing metallic comes into contact with the metal parts of this unit. If it does, a short may occur and this unit may be damaged. ˎˎDo not connect this unit to a voltage adaptor (travel converter) for overseas travel. This may result in overheating or another malfunction. ˎˎThe battery pack and this unit can become warm during or immediately after recharging. ˎˎThe USB connector of this unit is for output only. Do not connect it to the USB port of a computer, etc. Doing so may cause a malfunction. ˎˎSome USB rechargeable devices cannot be used with this unit. Also, some devices may not be operable while recharging. Check the charging specifications in the instruction manual of your device. ˎˎWhen you use the USB connector of this unit, attach a battery pack to the connected device. Not doing so may cause data loss from the device or damage due to the device crashing. ˎˎBe warned that some devices may suddenly lose their input memory regardless of whether they are used with the USB connector of this unit. (For details, refer to the instruction manual supplied with your device.) Always back up the input memory beforehand. Sony is not liable for any loss of input memory when using this unit. ˎˎMake sure before using this unit that its current and voltage match those of the outlet. ˎˎDepending on the conditions of use of this unit’s USB connector, this unit may automatically shut down for safety reasons if the input current is too high. ˎˎSony does not guarantee operation of this unit if you use it with a USB hub or USB extension cable. Always follow the designated connecting method of the USB cable supplied with your device. ˎˎWhen not using this unit, disconnect the USB cable from its USB connector and store it. Maintenance ˎˎIf this unit gets dirty, wipe it using a soft dry cloth. ˎˎIf this unit gets very dirty, wipe it using a cloth with a little neutral solvent added, and then wipe it dry. ˎˎDo not use thinners, benzine, alcohol, etc., as they will damage the surface of this unit. ˎˎWhen you use a chemical cleaning cloth, refer to its instruction manual. ˎˎUsing a volatile solvent such as an insecticide or keeping this unit in contact with a rubber or vinyl product for a long time may cause deterioration or damage to this unit. When the CHARGE lamp keeps blinking quickly When charging the battery pack for the first time in one of the following situations, the CHARGE lamp may blink quickly. If this happens, remove the battery pack from this unit, reattach it and charge it again. When the battery pack is left for a long time When the battery pack is left installed in the camera for a long time Immediately after purchase If the CHARGE lamp keeps blinking quickly, check through the following chart. Remove the battery pack that is being charged and then firmly attach the same battery pack again. The CHARGE lamp blinks again: Install another battery pack. To Charge the Battery Pack The CHARGE lamp lights up and does not blink again: If the CHARGE lamp goes out because the charging time has passed, there is no problem. The battery pack is charged by attaching it to this unit. 1 Set the output switch of this unit to “BATTERY CHARGE”. 2 Attach the battery pack. Before attaching When using a type N, D, T, R or K battery pack, do the following steps before attaching it to this unit. *If you use a type X or type G battery pack, you do not need the following procedure. Lift the switching lever up. (See illustration -1) Press the switching lever to the point marked on the illustration until it clicks. (See illustration -2) How to attach the battery pack Align the mark on the battery pack in the direction of the mark on the charger and insert it. (See illustration -1) (The battery pack illustrated is type X.) ˎˎAttach the battery pack with its mark facing up. When attaching a type X or K battery pack, insert it along the left side of the attachment part of this unit as shown by the arrow in illustration -2. After fully inserting it, press lightly in the direction of the arrow until the CHARGE lamp lights up. (See illustration -3) 3 Lift the power plug and connect it to a wall outlet (wall socket). Always connect the power plug with the prongs at the top. (See illustration ) Do not connect the power plug with the prongs at the bottom. (See illustration ) The CHARGE lamp (orange) lights up and charging begins. The CHARGE lamp goes out when the battery pack is about 90 % charged. The charging status indicator lamp goes out when charging is completed. (Full charge) You can check the approximate charging status with the charging status indicator lamp. , ... Off, , ... Lit up Charging status CHARGE lamp indicator lamp Immediately after attaching the battery pack - 30 % 30 % - 60 % 60 % - 90 % 90 % - Full charge Full charge completed The charge level shown by the charging status indicator lamp and the percentages in the above table are rough guides. The actual status may differ depending on the ambient temperature or the condition of the battery pack. To remove the battery pack Lift the battery pack up and remove it. Charging time The following table shows the charging time for a battery pack that is completely discharged. NP-BD1/ Battery NP-BG1/ NP-FD1/ NP-FR1 NP-BK1 NP-BX1 NP-BN1 NP-BN pack NP-FG1 NP-FT1 Full 135 90 110 125 130 190 180 charge time ˎˎApproximate number of minutes to charge an empty battery pack. ˎˎFor more about the battery life, see the instruction manual of your digital still camera. ˎˎThe charging time may differ depending on the condition of the battery pack or the ambient temperature. ˎˎThe times shown are for charging an empty battery pack which has been run down with a digital still camera, using this unit at an ambient temperature of 25 °C (77 °F). Charging temperature The temperature range for charging is 0 °C to 40 °C (32 °F to 104 °F). For maximum battery efficiency, the recommended temperature range when charging is 10 °C to 30 °C (50 °F to 86 °F). To use the battery pack quickly You can remove the battery pack from this unit and use it even if charging is not completed. However, the charging time affects the time that the battery pack can be used. Notes ˎˎIf the CHARGE lamp does not light up, check if the battery pack is firmly attached to this unit. ˎˎWhen a fully charged battery pack is installed, the CHARGE lamp lights up once and then goes out. ˎˎA battery pack that has not been used for a long time may take longer than usual to charge. Use this unit with the USB cable (See illustration ) 1 Set the output switch of this unit to “USB POWER 5V 1500mA”. 2 Connect your device to this unit. 3 Lift the power plug up and connect it to a wall outlet (wall socket). 4 After the device is completely recharged, unplug this unit and disconnect the device from this unit. This unit supports worldwide voltages 100 V to 240 V. Do not use an electronic voltage transformer, as this may cause a malfunction. Troubleshooting When the CHARGE lamp blinks, check through the following chart. The CHARGE lamp blinks in two ways. Blinks slowly: Turns on and off repeatedly every 1.5 seconds Blinks quickly:Turns on and off repeatedly every 0.15 seconds The action to be taken depends on the way the CHARGE lamp blinks. When the CHARGE lamp keeps blinking slowly Charging is pausing. This unit is in the standby state. If the room temperature is out of the appropriate temperature range, charging stops automatically. When the room temperature returns to the appropriate range, the CHARGE lamp lights up and charging restarts. We recommend charging the battery pack at 10 °C to 30 °C (50 °F to 86 °F). The CHARGE lamp blinks again: The problem is with this unit. The CHARGE lamp lights up and does not blink again: If the CHARGE lamp goes out because the charging time has passed, the problem is with the battery pack first installed. Please contact your nearest Sony dealer in connection with the product that may have a problem. The battery pack cannot be charged. ˎˎThis unit is not connected to the wall outlet (wall socket). Connect this unit to the wall outlet (wall socket) properly. ˎˎThe output switch of this unit is set to “USB POWER 5V 1500mA”. Set the output switch of this unit to “BATTERY CHARGE”. ˎˎBattery pack is attached at an angle or upside down. Attach the battery pack to this unit correctly. The device connected by the USB cable does not work. ˎˎThis unit is not connected to the wall outlet (wall socket). Connect this unit to the wall outlet (wall socket) properly. ˎˎThe output switch of this unit is set to “BATTERY CHARGE”. Set the output switch of this unit to “USB POWER 5V 1500mA”. ˎˎThe device connected to this unit may need to be operated. Refer to the instruction manual of the connected device. Specifications Input rating 100 V - 240 V AC 50 Hz/60 Hz 11 W Output rating Battery charge terminal: 4.2 V DC 860 mA (BATTERY CHARGE) 5.0 V DC 1,500 mA (USB POWER 5V 1500mA) Operating temperature 0 °C to 40 °C (32 °F to 104 °F) Storage temperature –20 °C to +60 °C (–4 °F to +140 °F) Dimensions (Approx.) 54 mm × 45 mm × 90 mm (w/h/d) (2 1/4 inches × 1 13/16 inches × 3 5/8 inches) Mass Approx. 105 g (3.7 oz) Included items Battery Charger (BC-TRX) (1) Micro USB cable (1) Set of printed documentation Design and specifications are subject to change without notice. Merci pour l’achat de ce chargeur de batterie Sony. Avant d’utiliser ce chargeur de batterie, veuillez lire attentivement ce manuel et le conserver pour toute référence future. Aide-mémoire Les numéros de modèle et de série se situent sous l’appareil. Prendre en note le numéro de série dans l’espace prévu ci-dessous. Se reporter à ces numéros lors des communications avec le détaillant Sony au sujet de ce produit. Modèle no BC-TRX No de série La plaque signalétique indiquant la tension de fonctionnement, la consommation, etc. se trouve sous l’appareil. AVERTISSEMENT Pour réduire les risques d’incendie ou d’électrocution, 1) n’exposez l’appareil à la pluie ou à l’humidité ; 2) ne placez pas d’objets remplis de liquides (vases, etc.) sur l’appareil. AVIS À LA CLIENTÈLE AUX ÉTATS-UNIS ET AU CANADA IMPORTANTES INSTRUCTIONS DE SECURITE - CONSERVEZ CES INSTRUCTIONS DANGER AFIN DE REDUIRE LE RISQUE D’INCENDIE OU DE DECHARGE ELECTRIQUE, SUIVEZ EXACTEMENT CES INSTRUCTIONS Cet appareil peut être installé en position verticale ou horizontale. Pour le brancher sur une source d’alimentation hors des États-Unis, utilisez l’adaptateur de fiche approprié à la configuration de votre prise électrique. ATTENTION ˎˎN’utilisez pas cet appareil dans un espace confiné, comme entre un mur et un meuble. ˎˎUtilisez une prise murale proche lorsque vous utilisez cet appareil. Même lorsque le témoin CHARGE de cet appareil est éteint, l’alimentation n’est pas coupée. Si un problème devait se produire pendant l’utilisation de cet appareil, débranchez celui-ci de la prise murale pour le mettre hors tension. L’appareil n’est pas déconnecté de la source d’alimentation secteur tant qu’il reste branché sur la prise murale, même s’il a été mis hors tension. N’exposez pas les piles à une chaleur excessive, notamment aux rayons directs du soleil, à une flamme, etc. AVIS À LA CLIENTÈLE AUX ÉTATS-UNIS AVERTISSEMENT Par la présente, vous êtes avisé du fait que tout changement ou toute modification ne faisant pas l’objet d’une autorisation expresse dans le présent manuel pourrait annuler votre droit d’utiliser l’appareil. Note L’appareil a été testé et est conforme aux exigences d’un appareil numérique de Classe B, conformément à la Partie 15 de la réglementation de la FCC. Ces critères sont conçus pour fournir une protection raisonnable contre les interférences nuisibles dans un environnement résidentiel. L’appareil génère, utilise et peut émettre des fréquences radio; s’il n’est pas installé et utilisé conformément aux instructions, il pourrait provoquer des interférences nuisibles aux communications radio. Cependant, il n’est pas possible de garantir que des interférences ne seront pas provoquées dans certaines conditions particulières. Si l’appareil devait provoquer des interférences nuisibles à la réception radio ou à la télévision, ce qui peut être démontré en allumant et éteignant l’appareil, il est recommandé à l’utilisateur d’essayer de corriger cette situation par l’une ou l’autre des mesures suivantes : ˋˋRéorienter ou déplacer l’antenne réceptrice. ˋˋAugmenter la distance entre l’appareil et le récepteur. ˋˋBrancher l’appareil dans une prise ou sur un circuit différent de celui sur lequel le récepteur est branché. ˋˋConsulter le détaillant ou un technicien expérimenté en radio/ téléviseurs. Les batteries pouvant être rechargées pour ce produit sont les suivantes Marque Sony Type de batterie NP-BX1 NP-BN1 NP-BN NP-BG1 NP-FG1 Valeur nominale DC 3,6 V DC 3,6 V DC 3,6 V DC 3,6 V DC 3,6 V (Capacité typique) 4,5 Wh 2,3 Wh 2,3 Wh 3,4 Wh 3,4 Wh (1 240 mAh) (630 mAh) (630 mAh) (960 mAh) (960 mAh) Marque Type de batterie Sony NP-FT1 NP-FR1 NP-BD1 NP-FD1 NP-BK1 DC 3,6 V DC 3,6 V DC 3.6 V DC 3,6 V DC 3,6 V Valeur nominale 2,4 Wh 4,4 Wh 2.4 Wh 2,4 Wh 3,4 Wh (Capacité typique) (680 mAh) (1 220 mAh) (680 mAh) (680 mAh) (970 mAh) Remarques concernant l’emploi Cet appareil n’est pas étanche à la poussière, aux éclaboussures d’eau ou à l’eau. Garantie concernant les enregistrements L’utilisateur ne pourra pas être dédommagé pour une absence d’enregistrement ou de lecture due à une défectuosité de cet appareil. Où ne pas poser l’appareil Ne posez pas cet appareil aux endroits suivants, ni pour la charge ni pour l’entreposage. Ceci peut entraîner une panne. ˎˎÀ la lumière directe du soleil, comme sur le tableau de bord d’une voiture ou à proximité d’un appareil de chauffage, car l’appareil peut se déformer ou tomber en panne. ˎˎÀ un endroit exposé à des vibrations excessives ˎˎÀ un endroit exposé à un électromagnétisme ou à des radiations ˎˎÀ un endroit où il y a beaucoup de sable Au bord de la mer ou sur des sols sableux, où aux endroits où des nuages de poussière sont fréquents, protégez l’appareil du sable ou de la poussière. L’appareil risquerait sinon de tomber en panne. Précautions d’emploi ˎˎRaccordez cet appareil à une prise murale disponible. Même lorsque le témoin CHARGE de cet appareil est éteint, l’alimentation n’est pas coupée. Si un problème devait se produire pendant l’utilisation de cet appareil, débranchez celui-ci de la prise murale pour le mettre hors tension. ˎˎN’utilisez pas cet appareil dans un espace confiné, comme entre un mur et un meuble. ˎˎInsérez bien la batterie rechargeable dans cet appareil avant de la charger. ˎˎLa borne de la batterie peut être endommagée si la batterie n’est pas insérée correctement. ˎˎPour protéger la batterie rechargeable, retirez-la de cet appareil lorsque la charge est terminée. ˎˎNe laissez pas tomber ou n’appliquez pas de choc mécanique à cet appareil. ˎˎGardez cet appareil à l’écart des téléviseurs ou récepteurs AM. Placé près d’un téléviseur ou d’un poste de radio, cet appareil peut causer du bruit. ˎˎDébranchez cet appareil de la prise murale après utilisation. ˎˎVeillez à ne pas mettre d’objets métalliques au contact des pièces métalliques de cet appareil. Ceci pourrait causer un court-circuit et endommager l’appareil. ˎˎNe branchez pas cet appareil sur un adaptateur de tension (convertisseur de voyage) lorsque vous voyagez à l’étranger. Ceci pourrait causer une surchauffe ou une autre défaillance. ˎˎLa batterie rechargeable et cet appareil peuvent devenir chauds pendant ou immédiatement après la charge. ˎˎLe connecteur USB de cet appareil ne peut être utilisé que comme sortie. N’y raccordez pas le port USB d’un ordinateur, etc. Ceci peut causer un dysfonctionnement. ˎˎCertains appareils rechargeables par l’USB ne peuvent pas être utilisés avec cet appareil. De plus, certains appareils ne peuvent pas être utilisés pendant la charge. Vérifiez les caractéristiques concernant la charge dans le mode d’emploi de votre appareil. ˎˎLorsque vous utilisez le connecteur USB de cet appareil, insérez une batterie sur l’appareil raccordé. Sinon les données de l’appareil pourraient être perdues ou une défaillance de l’appareil pourrait causer d’autres dommages. ˎˎIl faut savoir que la mémoire d’entrée de certains appareils peut être perdue même s’ils sont utilisés avec le connecteur USB de cet appareil. (Pour plus d’informations, reportez-vous au mode d’emploi fourni avec votre appareil.) Faites toujours une sauvegarde de la mémoire d’entrée au préalable. Sony décline toute responsabilité en cas de perte de la mémoire d’entrée suite à l’utilisation de cet appareil. ˎˎAvant d’utiliser cet appareil, assurez-vous que son courant et sa tension correspondent à ceux de la prise. ˎˎSelon les conditions d’utilisation du connecteur USB de cet appareil, cet appareil peut s’arrêter automatiquement pour des raisons de sécurité si le courant entrant est trop élevé. ˎˎSony ne garantit pas le fonctionnement de cet appareil s’il est utilisé avec un concentrateur USB ou un câble-rallonge USB. Raccordez toujours le câble USB fourni avec votre appareil de la façon indiquée. ˎˎLorsque vous n’utilisez pas cet appareil, débranchez le câble USB du connecteur USB et rangez-le. Entretien ˎˎLorsque cet appareil est sale, essuyez-le avec un chiffon sec et doux. ˎˎLorsque cet appareil est très sale, essuyez-le avec un chiffon et un peu de solvant neutre puis séchez-le. ˎˎN’utilisez pas de diluants, benzine, alcool, etc. car ils endommageraient la surface de cet appareil. ˎˎSi vous utilisez un tissu de nettoyage chimique, consultez son mode d’emploi. ˎˎL’emploi d’un solvant volatil, comme un insecticide, ou la mise en contact direct de cet appareil avec un produit en caoutchouc ou en plastique pendant une longue période peut détériorer ou endommager cet appareil. (Suite à la page arrière) Le témoin d’état de la charge vous donne une idée approximative de l’état de charge de la batterie. , ... Éteint, , ... Allumé Témoin d’état de la Témoin CHARGE charge Immédiatement après l’installation de la batterie rechargeable - 30% 30 % - 60 % 1 60 % - 90 % 90 % Charge complète Charge complète terminée 2 Le niveau de charge indiqué par le témoin d’état de charge et les pourcentages dans le tableau ci-dessus sont approximatifs. L’état de charge réel peut être différent selon la température ambiante et l’état de la batterie rechargeable. Puissance nominale de sortie Température de fonctionnement Température d’entreposage –20 °C à +60 °C (–4 °F à +140 °F) Dimensions (environ) 54 mm × 45 mm × 90 mm (l/h/p) (2 1/4 pouces × 1 13/16 pouces × 3 5/8 pouces) Poids environ 105 g (3,7 oz) Articles inclus Chargeur de batterie (BC-TRX) (1) Câble micro-USB (1) Jeu de documents imprimés La conception et les spécifications peuvent être modifiées sans préavis. 1 Pour retirer la batterie rechargeable 2 Relevez la batterie rechargeable et retirez-la. 1 Borne de charge de la batterie : 4,2 V CC 860 mA (BATTERY CHARGE) 5,0 V CC 1 500 mA (USB POWER 5V 1500mA) 0 °C à 40 °C (32 °F à 104 °F) Temps de charge Le tableau suivant montre le temps de charge pour une batterie rechargeable complètement déchargée. 2 NP-BD1/ Batterie NP-BG1/ rechargeable NP-BX1 NP-BN1 NP-BN NP-FG1 NP-FD1/ NP-FR1 NP-BK1 NP-FT1 Temps de charge 135 90 110 125 130 190 180 complète ˎˎNombre approximatif de minutes pour charger une batterie rechargeable vide. ˎˎPour de plus amples informations sur l’autonomie de la batterie, reportez-vous au mode d’emploi de votre appareil photo numérique. ˎˎLe temps de charge peut être différent selon l’état de la batterie rechargeable ou la température ambiante. ˎˎLes temps indiqués correspondent à la charge d’une batterie rechargeable vide, usée sur un appareil photo numérique, avec cet appareil à une température ambiante de 25 °C (77 °F). Température de charge 3 La température doit se situer entre 0 °C et 40 °C (32 °F et 104 °F) pour la charge. Pour une efficacité maximale de la batterie, la température conseillée pour la charge est de 10 °C à 30 °C (50 °F et 86 °F). 3 Pour utiliser rapidement la batterie rechargeable Vous pouvez retirer la batterie rechargeable de cet appareil et l’utiliser même si la charge n’est pas terminée. Cependant, le temps de charge a une influence sur l’autonomie de la batterie rechargeable. Remarques ˎˎSi le témoin CHARGE ne s’allume pas, vérifiez si la batterie rechargeable est bien insérée dans cet appareil. ˎˎLorsqu’une batterie chargée est installée, le témoin CHARGE s’allume une fois puis s’éteint. ˎˎUne batterie rechargeable qui n’a pas été utilisée pendant longtemps peut être plus longue à charger que la normale. Utilisez cet appareil avec un câble USB (Voir l’illustration ) 3 1 Réglez le sélecteur de sortie de cet appareil sur « USB POWER 5V 1500mA ». 2 Raccordez votre appareil à cet appareil. 3 Relevez la fiche d’alimentation et branchez-la sur une prise murale. 4 Lorsque l’appareil est complètement chargé, débranchez cet appareil ainsi que votre appareil de celui-ci. 2 Lorsque le témoin CHARGE clignote, vérifiez les points du tableau suivant. Le témoin CHARGE clignote de deux façons. Clignotement lent : S’allume et s’éteint toutes les 1,5 secondes de façon répétée. Clignotement rapide :S’allume et s’éteint toutes les 0,15 secondes de façon répétée. La mesure à prendre dépend de la façon dont le témoin CHARGE clignote. Lorsque le témoin CHARGE continue de clignoter lentement La charge est en pause. Cet appareil est en attente. Si la température de la pièce est hors de la plage de températures appropriée, la charge s’arrête automatiquement. Lorsque la température de la pièce revient dans la plage appropriée, le témoin CHARGE s’allume et la charge redémarre. Il est conseillé de charger la batterie rechargeable entre 10 °C et 30 °C (50 °F et 86 °F). Lorsque le témoin CHARGE continue de clignoter rapidement (Suite de la page avant) Pour charger la batterie La batterie rechargeable se charge lorsqu’elle est insérée dans cet appareil. 1 Réglez le sélecteur de sortie de cet appareil sur « BATTERY CHARGE ». 2 Insérez la batterie rechargeable. Avant de l’insérer Si vous utilisez une batterie rechargeable de type N, D, T, R ou K procédez de la façon suivante avant de la mettre sur cet appareil. * Si vous utilisez une batterie rechargeable de type X ou de type G, la procédure suivante est inutile. Levez le levier de commutation. (Voir l’illustration -1) Basculez le levier de commutation sur le point comme indiqué sur l’illustration jusqu’à ce qu’il s’encliquette. (Voir l’illustration -2) Comment insérer la batterie rechargeable Alignez le repère sur la batterie rechargeable dans le sens du repère sur le chargeur et insérez la batterie. (Voir l’illustration -1) (La batterie rechargeable illustrée est de type X.) ˎˎInsérez la batterie rechargeable avec son repère orienté vers le haut. Une batterie rechargeable de type X ou K doit être insérée le long du côté gauche de la pièce de fixation de cet appareil, comme indiqué par la flèche sur l’illustration -2. Après l’avoir insérée complètement, appuyez légèrement dans le sens de la flèche jusqu’à ce que le témoin CHARGE s’allume. (Voir l’illustration -3) 3 Relevez la fiche d’alimentation et branchez-la sur une prise murale. Raccordez toujours la fiche d’alimentation avec les broches orientées vers le haut (Voir l’illustration ). Ne raccordez pas la fiche d’alimentation avec les broches orientées vers le bas (Voir l’illustration ). Le témoin CHARGE (orange) s’allume et la recharge commence. Le témoin CHARGE s’éteint lorsque la batterie est chargée à environ 90 %. Le témoin d’état de charge s’éteint quand la charge est terminée. (Charge complète) La première fois que vous chargez la batterie dans une des situations suivantes, le témoin CHARGE peut clignoter rapidement. Dans ce cas, retirez la batterie de cet appareil puis réinsérez-la et chargez-la de nouveau. Si la batterie est restée longtemps inutilisée Si la batterie est restée longtemps dans l’appareil photo Immédiatement après l’achat Si le témoin CHARGE continue de clignoter rapidement, vérifiez les points du tableau suivant. Retirez la batterie rechargeable qui a été chargée et insérez-la de nouveau fermement dans le chargeur. Le témoin CHARGE clignote de nouveau : Installez une autre batterie. Le témoin CHARGE clignote de nouveau : Le problème vient de cet appareil. Le témoin CHARGE s’allume et ne clignote plus : Si le témoin CHARGE s’éteint parce que le temps de charge est dépassé, il n’y a aucun problème. Le témoin CHARGE s’allume et ne clignote plus : Si le témoin CHARGE s’éteint parce que le temps de charge est dépassé, le problème vient de la première batterie installée. 1 Veuillez contacter le revendeur Sony le plus proche du produit présentant éventuellement un problème. La batterie ne peut pas être chargée. ˎˎCet appareil n’est pas raccordé à une prise murale. Raccordez cet appareil à une prise murale. ˎˎLe sélecteur de sortie de cet appareil est réglé sur « USB POWER 5V 1500mA ». Réglez le sélecteur de sortie de cet appareil sur « BATTERY CHARGE ». ˎˎLa batterie rechargeable est insérée de manière inclinée ou pas du bon côté. Insérez la batterie rechargeable correctement à cet appareil. L’appareil raccordé par le câble USB ne fonctionne pas. ˎˎCet appareil n’est pas raccordé à une prise murale. Raccordez cet appareil à une prise murale. ˎˎLe sélecteur de sortie de cet appareil est réglé sur « BATTERY CHARGE ». Réglez le sélecteur de sortie de cet appareil sur « USB POWER 5V 1500mA ». ˎˎL’appareil raccordé à cet appareil doit peut-être être activé. Reportez-vous au mode d’emploi de l’appareil raccordé. Spécifications Puissance nominale d’entrée 100 V - 240 V CA 50 Hz/60 Hz 11 W Cet appareil supporte les tensions du monde entier, de 100 V à 240 V. N’utilisez pas un transformateur électronique de tension car ceci pourrait provoquer un dysfonctionnement. En cas de problème 2 3 4