1
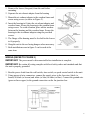
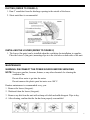
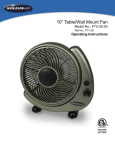
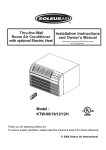
Soleus Air Ultra Quiet Ventilation Fan
Model No: FE1-05 / FE1-07 / FE1-09 / FE1-11
50 CFM / 70 CFM / 90 CFM / 110 CFM
Operating Instructions
FE1-05-01
FE1-07-01
FE1-09-01
FE1-11-01
#######
3092716
FE1 Series Ventilation Fans
© 2007 Soleus Air International
Thank you for choosing a Ventilation Fan. This owner’s manual will provide you with valuable
information necessary for the proper care and maintenance of your new product. Please take a
few moments to thoroughly read the instructions and familiarize yourself with all the operational aspects of your new fan.
For your own records, please attach a copy of your sales receipt to this manual. Also, write the
store name/location, date purchased, and serial number below:
Store Name: ____________________________________________________
Location: ______________________________________________________
Date Purchased: _________________________________________________
Serial Number (located on back of unit): ______________________________
IMPORTANT SAFETY INSTRUCTIONS
1. This product must be installed by a qualified technician
2. Do not mount in a ceiling thermally insulated to a value greater than R40
3. Designed to be mounted in the ceiling only
4. WARNING: To reduce the risk of fire or electric shock; do not use this fan with any solid-state
speed control device.
5. WARNING: To reduce the risk of electric shock, disconnect power before servicing.
6. NOTE: For Use in Kitchens, please refer to Figure 1.
7. WARNING: To reduce the risk of fire, electric shock, or injury to persons, observe the following:
A. Use this unit in the manner intended by the manufacturer. If you have questions, please
contact Soleus Air.
B. Before servicing or cleaning the unit, switch power off at the service panel and lock the
service panel to prevent power from being switched on accidentally. If the service panel
cannot be locked, securely fasten a prominent warning, such as a tag, onto the service
panel.
8. CAUTION: For general ventilating use only. Do not use to
exhaust hazardous or explosive materials and vapors.
2
INSTALLATION INSTRUCTIONS
WARNING: TO REDUCE THE RISK OF FIRE, ELECTRIC SHOCK, OR INJURY TO
PERSONS, OBSERVE THE FOLLOWING:
A. Installation work and electrical wiring must be done by qualified persons in
accordance with all applicable safety codes and standards, including fire-rated
construction.
B. Sufficient air is needed for proper combustion and exhausting of gases through the
flue of fuel burning equipment to prevent back drafting. Follow the heating
equipment manufacturer’s guidelines and safety standards such as those published by
the local code authorities.
C. When cutting or drilling into a wall or ceiling, do not damage electrical wiring and
other hidden utilities.
D. Ducted fans must always be vented to the outdoors.
E. If the unit is to be installed over a tub or shower, it must be marked appropriately for
the application and connected to a GFCI (Ground Fault Circuit Interrupter) protected
branch circuit.
F. NEVER place a switch where it can be reach from a tub or shower.
HOUSING INSTALLATION (REFER TO FIGURE 2)
For FE1-09 & FE1-11
Rough Opening: 9.25” D x 9.25” W
Housing Size: 9” D x 7.75” H x 9” W
For FE1-05 & FE1-08
Rough Opening: 6.75” D x 6.75” W
Housing Size: 6.625” D x 7.125” H x 6.625” W
(Continued on page 4)
3
1. Remove the louver (fan grate) from the unit before
mounting.
2. Separate the air exhaust adaptor from the housing
3. Mount the air exhaust adapter to the wooden frame and
secure using screws (as show in Figure 2).
4. Insert the housing to fit into the air exhaust adaptor and
wooden frame. Secure the housing to the wooden frame
using screws. To avoid vibration, place rubber washers
between the housing and the wooden frame. Secure the
housing to the air exhaust adaptor using the provided
screws.
5. The flange of the housing must be leveled for the louver
to fit properly.
6. Hang the unit to the roof using hangers when necessary.
7. Both installations seen in figure 2 can be used at the
same time.
WIRING (REFER TO FIGURE 3)
IMPORTANT: The power must be disconnected before installation is complete.
IMPORTANT: Be certain all wiring complies with local safety codes and standards and that
the unit is properly grounded.
1. Run the power leads from the wall switch, time switch, or speed control switch to the unit.
2. Using approved wire connectors, connect the supply wires to the fan wires: black (or
brown) to black (or brown) and white (or blue) to white (or blue). Connect the ground wire
(green or bare copper) to the ground connection on the fan junction box.
4
DUCTING (REFER TO FIGURE 4)
1. Run 4” round duct from the discharge opening to the outside of the house.
2. Sheet metal duct is recommended.
INSTALLING THE LOUVER (REFER TO FIGURE 2)
1. The louver (fan grate) can be installed when the ventilation fan installation is complete.
Place the louver’s (fan grate) mounting clips in to the slot holes on both sides of the unit.
MAINTENANCE
WARNING: DISCONNECT THE POWER SOURCE BEFORE SERVICING
NOTE: Never use gasoline, benzene, thinner, or any other chemicals for cleaning the
ventilation fan.
Do not allow water to get into the motor.
Do not immerse the plastic parts hot water over 100° F
Routine maintenance is recommended every year.
1. Remove the louver (fan grate)
2. Wash and clean the louver (fan grate)
3. Remove any dirt from the unit with a damp soft cloth and mild detergent. Wipe to dry.
4. After cleaning, confirm that the fan has been properly reassembled.
5
WARRANTY
One Year Limited Warranty
Soleus International Inc. warrants the accompanying Soleus Air Ventilation Fan to be free of defects in material and
workmanship for the applications specified in its operation instruction for a period of ONE (1) year from the date of
original retail purchase in the United States.
If the unit exhibits a defect in normal use, Soleus International Inc. will, at its option, either repair or replace it, free of
charge within a reasonable time after the unit is returned during the warranty period.
As a condition to any warranty service obligation, the consumer must present this Warranty Certificate along with a
copy of the original purchase invoice.
THIS WARRANTY DOES NOT COVER:
• Damage, accidental or otherwise, to the unit while in the possession of a consumer not caused by a defect in
material or workmanship.
• Damage caused by consumer misuse, tampering, or failure to follow the care and special handling provisions
in the instructions. This includes dents, accidental or otherwise, to the base and head of the unit.
• Damage to the finish of the case, or other appearance parts caused by wear.
• Damage caused by repairs or alterations of the unit by anyone other than those authorized by Soleus
International Inc.
• Freight and Insurance cost for the warranty service.
ALL WARRANTIES, INCLUDING ANY IMPLIED WARRANTY OF MERCHANT ABILITY ARE LIMITED TO
ONE-YEAR DURATION OF THIS EXPRESS LIMITED WARRANTY. SOLEUS INTERNATIONAL INC.
DISCLAIMS ANY LIABILITY FOR CONSEQUENTIAL OR INCIDENTAL DAMAGES AND IN NO EVENT
SHALL SOLEUS INTERNATIONAL INC’S LIABILITY EXCEED THE RETAIL VALUE OF THE UNIT FOR
BREACH OF ANY WRITTEN OR IMPLIED WARRANTY WITH RESPECT TO THIS UNIT.
This warranty covers only new products purchased from our authorized dealers or retailers. It does not cover used, salvaged, or refurbished products.
As some states do not allow the limitation or exclusion of incidental or consequential damages, or do not allow
limitation on implied warranties, the above limitations and exclusions may not apply to you. This warranty gives you
specific legal rights, and you may also have other rights that vary from state to state.
For Technical Support & Warranty Service
Please Call (888) 876-5387
Or Write To:
Soleus International Inc.
9451 Telstar Ave.
El Monte, CA 91731 USA
www.soleusair.com
6