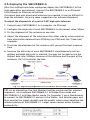
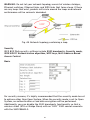
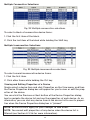
1
SMC2586W-G
1
Copyright
Information furnished by SMC Networks, Inc. (SMC) is believed to be accurate and reliable. However, no responsibility is assumed by SMC for its use,
nor for any infringements of patents or other rights of third parties which
may result from its use. No license is granted by implication or otherwise
under any patent or patent rights of SMC. SMC reserves the right to change
specifications at any time without notice.
Copyright © 2004 by
SMC Networks, Inc.
38 Tesla
Irvine, California 92618
All rights reserved.
Trademarks
SMC is a registered trademark; and EliteConnect is a trademark of SMC
Networks. Other product and company names are trademarks or registered
trademarks of their respective holders.
2
Limited Warranty Statement:
SMC Networks, Inc. (“SMC”) warrants its products to be free from defects in
workmanship and materials, under normal use and service, for the applicable
warranty term. All SMC products carry a standard 90-day limited warranty
from the date of purchase from SMC or its Authorized Reseller. SMC may, at
its own discretion, repair or replace any product not operating as warranted
with a similar or functionally equivalent product, during the applicable warranty term. SMC will endeavor to repair or replace any product returned
under warranty within 30 days of receipt of the product. The standard limited warranty can be upgraded to a Limited Lifetime* warranty by registering
new products within 30 days of purchase from SMC or its Authorized
Reseller. Registration can be accomplished via the enclosed product registration card or online via the SMC Web site. Failure to register will not affect
the standard limited warranty. The Limited Lifetime warranty covers a product during the Life of that Product, which is defined as the period of time
during which the product is an “Active” SMC product. A product is considered to be “Active” while it is listed on the current SMC price list. As new
technologies emerge, older technologies become obsolete and SMC will, at
its discretion, replace an older product in its product line with one that
incorporates these newer technologies. At that point, the obsolete product is
discontinued and is no longer an “Active” SMC product.A list of discontinued products with their respective dates of discontinuance can be found at:
http://www.smc.com/index.cfm?action=customer_service_warranty.
All products that are replaced become the property of SMC. Replacement
products may be either new or reconditioned. Any replaced or repaired product carries either a 30-day limited warranty or the remainder of the initial
warranty, whichever is longer. SMC is not responsible for any custom software or firmware, configuration information, or memory data of Customer
contained in, stored on, or integrated with any products returned to SMC
pursuant to any warranty. Products returned to SMC should have any customer installed accessory or add-on components, such as expansion modules, removed prior to returning the product for replacement. SMC is not
responsible for these items if they are returned with the product.
Customers must contact SMC for a Return Material Authorization number
prior to returning any product to SMC. Proof of purchase may be required.
Any product returned to SMC without a valid Return Material Authorization
(RMA) number clearly marked on the outside of the package will be returned
to customer at customer’s expense. For warranty claims within North
America, please call our toll-free customer support number at (800) 7624968. For further information about warranty claims outside North America,
please visit www.smc.com and choose the link to your region.
Customers are responsible for all shipping charges from their facility to SMC.
SMC is responsible for return shipping charges from SMC to customer.
3
WARRANTIES EXCLUSIVE:
IF AN SMC PRODUCT DOES NOT OPERATE AS WARRANTED ABOVE, CUSTOMER’S SOLE REMEDY SHALL BE REPAIR OR REPLACEMENT OF THE
PRODUCT IN QUESTION, AT SMC’S OPTION. THE FOREGOING WARRANTIES
AND REMEDIES ARE EXCLUSIVE AND ARE IN LIEU OF ALL OTHER WARRANTIES OR CONDITIONS, EXPRESS OR IMPLIED, EITHER IN FACT OR BY
OPERATION OF LAW, STATUTORY OR OTHERWISE, INCLUDING WARRANTIES OR CONDITIONS OF MERCHANTABILITY AND FITNESS FOR A
PARTICULAR PURPOSE. SMC NEITHER ASSUMES NOR AUTHORIZES ANY
OTHER PERSON TO ASSUME FOR IT ANY OTHER LIABILITY IN CONNECTION WITH THE SALE, INSTALLATION, MAINTENANCE OR USE OF ITS
PRODUCTS. SMC SHALL NOT BE LIABLE UNDER THIS WARRANTY IF ITS
TESTING AND EXAMINATION DISCLOSE THE ALLEGED DEFECT IN THE
PRODUCT DOES NOT EXIST OR WAS CAUSED BY CUSTOMER’S OR ANY
THIRD PERSON’S MISUSE, NEGLECT, IMPROPER INSTALLATION OR TESTING, UNAUTHORIZED ATTEMPTS TO REPAIR, OR ANY OTHER CAUSE
BEYOND THE RANGE OF THE INTENDED USE, OR BY ACCIDENT, FIRE,
LIGHTNING, OR OTHER HAZARD.
LIMITATION OF LIABILITY:
IN NO EVENT, WHETHER BASED IN CONTRACT OR TORT (INCLUDING NEGLIGENCE), SHALL SMC BE LIABLE FOR INCIDENTAL, CONSEQUENTIAL,
INDIRECT, SPECIAL, OR PUNITIVE DAMAGES OF ANY KIND, OR FOR LOSS
OF REVENUE, LOSS OF BUSINESS, OR OTHER FINANCIAL LOSS ARISING
OUT OF OR IN CONNECTION WITH THE SALE, INSTALLATION, MAINTENANCE, USE, PERFORMANCE, FAILURE, OR INTERRUPTION OF ITS PRODUCTS, EVEN IF SMC OR ITS AUTHORIZED RESELLER HAS BEEN ADVISED
OF THE POSSIBILITY OF SUCH DAMAGES. SOME STATES DO NOT ALLOW
THE EXCLUSION OF IMPLIED WARRANTIES OR THE LIMITATION OF INCIDENTAL OR CONSEQUENTIAL DAMAGES FOR CONSUMER PRODUCTS, SO
THE ABOVE LIMITATIONS AND EXCLUSIONS MAY NOT APPLY TO YOU. THIS
WARRANTY GIVES YOU SPECIFIC LEGAL RIGHTS, WHICH MAY VARY FROM
STATE TO STATE. NOTHING IN THIS WARRANTY SHALL BE TAKEN TO
AFFECT YOUR STATUTORY RIGHTS.
* SMC will provide warranty service for one year following discontinuance
from the active SMC price list. Under the limited lifetime warranty, internal
and external power supplies, fans, and cables are covered by a standard
one-year warranty from date of purchase.
SMC Networks, Inc.
38 Tesla
Irvine, CA 92618
4
Federal Communication Commission Interference Statement
This equipment has been tested and found to comply with the limits for a
Class B digital device, pursuant to Part 15 of the FCC Rules. These limits are
designed to provide reasonable protection against harmful interference in a
residential installation. This equipment generates, uses and can radiated
radio frequency energy and, if not installed and used in accordance with the
instructions, may cause harmful interference to radio communications.
However, there is no guarantee that interference will not occur in a particular installation. If this equipment does cause harmful interference to radio or
television reception, which can be determined by turning the equipment off
and on, the user is encouraged to try to correct the interference by one of
the following measures:
• Reorient or relocate the receiving antenna.
• Increase the separation between the equipment and receiver.
• Connect the equipment into an outlet on a circuit different from that to
which the receiver is connected.
• Consult the dealer or an experienced radio/TV technician for help.
FCC Caution: To assure continued compliance, (example – use only shielded
interface cables when connecting to computer or peripheral devices). Any
changes or modifications not expressly approved by the party responsible
for compliance could void the user’s authority to operate this equipment.
This transmitter must not be collocated or operating in conjunction with any
other antenna or transmitter.
FCC Radiation Exposure Statement
This equipment complies with FCC radiation exposure limits set forth for an
uncontrolled environment. This equipment should be installed and operated
with minimum distance 20 cm between the radiator & your body.
This device complies with Part 15 of the FCC Rules. Operation is subject to
the following two conditions: (1) This device may not cause harmful interference, and (2) this device must accept any interference received, including
interference that may cause undesired operation.
Industry Canada - Class B
This digital apparatus does not exceed the Class B limits for radio noise
emissions from digital apparatus as set out in the interference-causing
equipment standard entitled “Digital Apparatus,” ICES-003 of Industry
Canada.
5
Cet apparel numerique respecte les limites de bruits radioelectriques applicables aux appalreils umeriques de Classe B prescrites dans la norme sur le
material brouilleur: “Appareils Numeriques,” NMB-003 edictee par
l’Industrie.
EC Conformance Declaration CE 0560 (!)
SMC contact for these products in Europe is:
SMC Networks Europe,
Edificio Conata II,
Calle Fructuós Gelabert 6-8, 2o, 4a,
08970 - Sant Joan Despí,
Barcelona, Spain.
This RF product complies with R&TTE Directive 99/5/EC. For the evaluation
of the compliance with this Directive, the following standards were applied:
• Electromagnetic compatibility and radio spectrum matters (ERM)
EN300 328-1 (2001-12)
EN300 328-2 (2001-12)
• Electromagnetic Compatibility (EMC) Standard for radio equipment and
services
EN301 489-1
EN301 489-17
• Safety Test
EN60950
Safety Compliance
Wichtige Sicherheitshinweise (Germany)
1. Bitte lesen Sie diese Hinweise sorgfältig durch.
2. Heben Sie diese Anleitung für den späteren Gebrauch auf.
3. Vor jedem Reinigen ist das Gerät vom Stromnetz zu trennen. Verwenden
Siekeine Flüssigoder Aerosolreiniger. Am besten eignet sich ein ange
feuchtetes Tuch zur Reinigung.
4. Die Netzanschlu ßsteckdose soll nahe dem Gerät angebracht und leicht
zugänglich sein.
5. Das Gerät ist vor Feuchtigkeit zu schützen.
6. Bei der Aufstellung des Gerätes ist auf sicheren Stand zu achten. Ein
Kippen oder Fallen könnte Beschädigungen hervorrufen.
7. Die Belüftungsöffnungen dienen der Luftzirkulation, die das Gerät vor
Überhitzung schützt. Sorgen Sie dafür, daß diese Öffnungen nicht
abgedeckt werden.
8. Beachten Sie beim Anschluß an das Stromnetz die Anschlußwerte.
9. Verlegen Sie die Netzanschlußleitung so, daß niemand darüber
fallen kann. Es sollte auch nichts auf der Leitung abgestellt werden.
6
10. Alle Hinweise und Warnungen, die sich am Gerät befinden, sind zu
beachten.
11. Wird das Gerät über einen längeren Zeitraum nicht benutzt, sollten Sie es
vom Stromnetz trennen. Somit wird im Falle einer Überspannung eine
Beschädigung vermieden.
12. Durch die Lüftungsöffnungen dürfen niemals Gegenstände oder
Flüssigkeiten in das Gerät gelangen. Dies könnte einen Brand bzw. elek
trischen Schlag auslösen.
13. Öffnen sie niemals das Gerät. Das Gerät darf aus Gründen der eletrischen
Sicherheit nur von authorisiertem Servicepersonal geöffnet werden.
14. Wenn folgende Situationen auftreten ist das Gerät vom Stromnetz zu
trennen und von einer qualifizierten Servicestelle zu überprüfen:
a. Netzkabel oder Netzstecker sind beschädigt.
b. Flüssigkeit ist in das Gerät eingedrungen.
c. Das Gerät war Feuchtigkeit ausgesetzt.
d. Wenn das Gerät nicht der Bedienungsanleitung entsprechend
funktioniert oder Sie mit Hilfe dieser Anleitung keine
Verbesserung erzielen.
e. Das Gerät ist gefallen und/oder das Gehäuse ist beschädigt.
f. Wenn das Gerät deutliche Anzeichen eines Defektes aufweist.
15. Stellen Sie sicher, daß die Stromversorgung dieses Gerätes nach der EN
60950 geprüft ist. Ausgangswerte der Stromversorgung sollten die
Werte von AC 7,5-8V, 50-60Hz nicht über oder unterschreiten sowie
den minimalen Strom von 1A nicht unterschreiten. Der arbeitsplatzbezo
gene Schalldruckpegel nach DIN 45 635 Teil 1000 beträgt
70dB(A) oder weniger.
7
Table of Contents
1. Introduction
10
1.1 Overview
10
1.2. FeaturesPackage Contents
10
1.3 Features
10
1.4 LED Definitions
13
2. First-Time Installation and Configuration
14
2.1 Selecting a Power Supply Method
14
2.2 Mounting the SMC2586W-G on a Wall
15
2.3 Preparing for Configuration
16
2.4 Configuring the SMC2586W-G
17
2.5 Deploying the SMC2586W-G
24
3. Using Web-Based Management
25
3.1 Overview
25
3.2 Viewing Status
27
3.3 General Operations
29
3.4 Configuring TCP/IP Related Settings
36
3.5 Configuring IEEE 802.11b/g-Related Settings
38
3.6 Configuring Advanced Settings
48
4. EliteConnect Management Utility
53
4.1 Introduction
53
4.2 Tutorial
55
4.3 Using SMC EliteConnect™ Management Utility
63
Appendix A: Default Settings
88
Appendix B: Troubleshooting
89
Appendix C : Distances and Data Rates
92
Appendix D: Technical Specification
93
8
9
1. Introduction
1.1 Overview
The SMC2586W-G is a versatile device that can be configured to be in one of
the 3 operational modes—Access Point, Bridge Master, and Bridge Slave—for
various wireless bridging applications. With the convenient Web-based user
inteface, a network administrator can easily and clearly manage the
SMC2586W-G.
1.2 Features Package Contents
• SMC2586W-G
• User Guide
• CD ROM
• 2 dBi Antenna
• R-SMA/RP-TNC Adapter
• Cat 5 Cable
• 12V AC Adapter (EU-type or UK type plug adapter available with models
shipping to Europe)
1.3 Features
• IEEE 802.11b/g Compliant
Operational modes.
• Access Point. The AP enables IEEE 802.11 Stations (STAs) to
automatically associate with it via the standard IEEE 802.11
association process. In addition, the IEEE 802.11 WDS (Wireless
Distribution System) technology can be used to manually establish
wireless links between two APs or between an AP and a Bridge
Master.
• Bridge Master. Use this mode to provide the Bridge Master
functionality of the SMC2682W. The Bridge Master mode is designed
to work in those networks where SMC2682W Wireless Bridge Slaves
are already installed. The Bridge Master enables Bridge Slaves to
automatically associate with it. It also enables IEEE 802.11 Stations,
which are on the same LAN as the Bridge Master, to automatically
associate with it via the standard IEEE 802.11 association process.
In addition, the IEEE 802.11 WDS (Wireless Distribution System)
technology can be used to manually establish wireless links between
two Bridge Masters or between a Bridge Master and an AP.
• Bridge Slave. Use this mode to provide the Bridge Slave
functionality of the SMC2682W. The Bridge Slave mode is designed
to work in those networks where SMC2682W Wireless Bridge
Masters are already installed.
10
• 64-bit and 128-bit WEP (Wired Equivalent Privacy). For wireless
data encryption.
• IEEE 802.1x/RADIUS. When the SMC2586W-G is in Access Point
mode, it can be configured to authenticate wireless users and
distribute encryption keys dynamically by IEEE 802.1x Port-Based
Network Access Control and RADIUS (Remote Authentication Dial-In
User Service).
• WPA (Wi-Fi Protected Access). The SMC2586W-G supports the
new WPA standard. Both WPA-PSK (Pre-Shared Key) mode and full
WPA mode are supported. WPA is composed of TKIP (Temporal Key
Integrity Protocol) and IEEE 802.1x and serves as a successor to
WEP for better WLAN security.
• Enabling/disabling SSID broadcasts. When the SMC2586W-G is in
AP or Bridge Master mode, the administrator can enable or disable
the SSID broadcasts functionality for security reasons. When the
SSID broadcasts functionality is disabled, an STA or Bridge Slave
cannot associate with the AP or Bridge Master with an ANY network
name (SSID, Service Set ID); the correct SSID has to be specified on
the STA or Bridge Slave.
• MAC-address-based access control. When the SMC2586W-G is in
AP or Bridge Master mode, it can be configured to block unautho
rized STAs or Bridge Slaves based on MAC (Media Access Control)
addresses. The ACL (Access Control List) can also be downloaded
from a TFTP server.
• Transmit power control. Transmit power of the SMC2586W-G can
be adjusted to control the area of coverage.
• Wireless client isolation. When the SMC2586W-G is in AP or
Bridge Master mode, wireless-to-wireless traffic between STAs can
be blocked so that the STAs cannot see each other. This capability
can be used in hotspots applications to prevent wireless hackers
from attacking other wireless users’ computers.
• Link integrity. When the SMC2586W-G is in AP or Bridge Master
mode and the Ethernet LAN interface is detected to be disconnected
from the wired network, all currently associated wireless clients
(STAs and Bridge Slaves) are disassociated by the SMC2586W-G and
no wireless client can associate with it thereafter.
• Associated wireless clients status. Showing the status of all wire
11
less clients (STAs and Bridge Slaves) that are associated with the
SMC2586W-G.
• Detachable antenna. The SMC2586W-G antenna can be replaced
with SMC high-gain antennas for long operating range.
• DHCP client. The SMC2586W-G can automatically obtain an IP
address from a DHCP server.
• DHCP server. The SMC2586W-G can automatically assign IP addresses to
computers or other devices by DHCP (Dynamic Host Configuration Protocol).
• Static DHCP mappings. The administrator can specify static IP
address to MAC address mappings so that the specified IP addresses
are always assigned to the hosts with the specified MAC addresses.
• Showing current DHCP mappings. Showing which IP address is
assigned to which host identified by a MAC address.
• Packet Filtering. The SMC2586W-G provides Layer 2, Layer 3, and
Layer 4 filtering capabilities.
Firmware Tools
• Firmware upgrade. The firmware of the SMC2586W-G can be upgraded
via the following methods:
• TFTP-based. Upgrading firmware by TFTP (Trivial File Transfer
Protocol).
• HTTP-based. Upgrading firmware by HTTP (HyperText Transfer
Protocol).
• Configuration backup. The configuration settings of the SMC2586W-G
can be backed up to a file via TFTP or HTTP.
• Configuration reset. Resetting the configuration settings to factorydefault values.
Management
• Web-based management for configuring and monitoring
SMC2586W-G via a Web-Browser.
• Single administrator logon. Only one administrator can log
on to the SMC2586W-G for management purposes at a time.
12
• SNMP. SNMP (Simple Network Management Protocol) MIB I, MIB II,
IEEE 802.1d, and Private Enterprise MIB are supported.
• UPnP. The SMC2586W-G responds to UPnP discovery messages so
that a Windows XP user can locate the SMC2586W-G in My Network
Places and use a Web browser to configure it.
• Telnet. The SMC2586W-G can be managed by Telnet.
• System log. For system operational status monitoring.
• Local log. System events are logged to the on-board RAM
of the SMC2586W-G and can be viewed using a Web browser.
• Remote log by SNMP trap. Systems events are sent in the
form of SNMP traps to a remote SNMP management server.
• Remote log by BSD Syslog. Systems events are sent in the
form of BSD Syslog (RFC3164) to a remote Syslog server.
• Power over Ethernet. Supplying power to an SMC2586W-G over an
Ethernet cable using optional SMCPWR-INJ3 Power Injector (IEEE 802.3af
compliant). This feature facilitates large-scale wireless LAN deployment.
• Hardware Watchdog Timer. If the firmware gets stuck in an invalid state,
the hardware watchdog timer will detect this situation and restart the
SMC2586W-G. This way, the SMC2586W-G can provide continuous services.
1.4 LED Definitions
There are several LED indicators on the SMC2586W-G. They are defined as
follows:
• ALV: Alive. Blinks when the SMC2586W-G is working normally.
• RF: IEEE 802.11b/g interface activity
• LAN: Ethernet LAN interface activity
• PWR: Power
13
2. First-Time Installation and Configuration
2.1 Selecting a Power Supply Method
The SMC2586W-G can be powered by either the supplied power adapter or
the optional SMCPWR-INJ3 EliteConnect™ Power Injector. The SMC2586W-G
automatically selects the suitable power depending on your decision.
To power the SMC2586W-G by the supplied power adapter:
1. Plug the power adapter to an AC socket.
2. Plug the connector of the power adapter to the power jack of the
SMC2586W-G.
NOTE: This product is intended to be power-supplied by a Listed Power
Unit, marked “Class 2” or “LPS” and output rated “12V DC, 1.25 A
minimum” or equivalent statement.
NOTE: Units shipping to Europe will have a EU-type or UK-type plug adapter
added separately. The plug adapter simply needs to be inserted over the US
type plug to conform to EU or UK power specifications.
To power the SMC2586W-G by SMCPWR-INJ3 Power Injector:
1. Connect the power cord cable from power outlet to the SMCPWR-INJ3
power connector.
Fig. 1. Connecting the power cord cable to SMCPWR-INJ3.
2. Check the “POWER” LED: if system is normal, the LED will be on (Green
light); otherwise, the “POWER” LED will be off.
3. Connect the Ethernet cable (RJ-45 Category 5) from Ethernet
Hub/Switch to the “DATA IN” port of SMCPWR-INJ3 Power Injector.
4. Connect another Ethernet cable (RJ-45 Category 5) from “POWER &
DATA OUT” port of the SMCPWR-INJ3 Power Injector to the SMC2586W-G
Wireless Bridge.
14
Fig. 2. Connecting Ethernet cables to SMCPWR-INJ3.
5. Check the “ACTIVE” LED: if power is successfully fed into the
SMC2586W-G, the “AC-TIVE” LED will be on (Red light); otherwise, the
“ACTIVE” LED will be off.
6. If the electricity current is over the normal condition (Io°÷1.0 A), the
“ACTIVE” LED will flash (Red light).
NOTE: SMCPWR-INJ3 is specially designed for “SMC2586W-G
EliteConnect™ 2.4GHz 802.11g Wireless Bridge. The use of SMCPWR-INJ3
with other Ethernet-ready devices that are not compliant to IEEE802.3af
may cause damage to the devices.
2.2 Mounting the SMC2586W-G on a Wall
The SMC2586W-G is wall-mountable.
1. Stick the supplied sticker for wall-mounting.
2. Use a f7.0mm driller to drill a 25mm-deep hole at each of the cross marks.
3. Plug in a supplied plastic conical anchor in each hole.
4. Screw a supplied screw in each plastic conical anchor for a proper depth
so that the SMC2586W-G can be hung on the screws.
5. Hang the SMC2586W-G on the screws.
Fig. 3. Mounting the SMC2586W-G on a wall.
15
2.3 Preparing for Configuration
To configure an SMC2586W-G, a managing computer with a Web browser is
needed. For first-time configuration of an SMC2586W-G, an Ethernet network interface card (NIC) should have been installed in the managing computer. For maintenance configuration of a deployed SMC2586W-G, either a
wireless computer or a wired computer can be employed as the managing
computer.
NOTE: If you are using the browser, Opera, to configure an SMC2586W-G,
click the menu item File, click Preferences... click File types, and edit the
MIME type, text/html, to add a file extension“.sht” so that Opera can work
properly with the Web management pages of the SMC2586W-G.
Since the configuration/management protocol is HTTP-based, you have to
make sure that the IP address of the managing computer and the IP address
of the managed SMC2586W-G are in the same IP subnet (the default IP
address of SMC2586W-G is 192.168.2.50 and the default subnet mask is
255.255.255.0.) [DHCP Client is enabled by default. It will default to
192.168.2.50 if there is no DHCP server available on the network.]
Connecting the Managing Computer and the SMC2586W-G
To connect the managing computer and the SMC2586W-G for the first-time,
you have two choices as illustrated in Fig. 4
Fig. 4. Connecting a managing computer and an SMC2586W-G via Ethernet.
You can use either a cross-over Ethernet cable (included in the package) or a
switch/hub with 2 straight-through Ethernet cables.
NOTE: One connector of the Ethernet cable must be plugged into the LAN
Ethernet port of the SMC2586W-G for configuration.
16
Changing the TCP/IP Settings of the Managing Computer
Use the Windows Network Control Panel Applet to change the TCP/IP settings of the managing computer, so that the IP address of the computer and
the IP address of the SMC2586W-G are in the same IP subnet. Set the IP
address of the computer to 192.168.2.xxx (the default IP address of the
SMC2586W-G is 192.168.2.50) and the subnet mask to 255.255.255.0.)
[DHCP Client is enabled by default. It will default to 192.168.2.50 if there is
no DHCP server available on the network.]
TIP: You can use SMC2586W-G Scan Utility on the CD-ROM to scan for all
the SMC2586W-Gs on the network. Double-click a scanned SMC2586W-G to
launch the Web browser to manage the SMC2586W-G. Note that this utility
does not discover the SMC2682W.
NOTE: On Windows 2000/XP, SMC2586W-G Scan Utility can only be run by a
user with administrator privilege.
NOTE: For some versions of Windows, the computer needs to be restarted
for the changes of TCP/IP settings to take effect.
2.4 Configuring the SMC2586W-G
The 2586W-G is DHCP client enabled by default. If there is a DHCP server on
your network it will get a DHCP address from your server. If there is no
DHCP server available the 2586W-G will default to 192.168.2.50 IP address.
TIP: For maintenance configuration of an SMC2586W-G, the SMC2586W-G
can be reached by its host name using a Web browser. For example, if the
SMC2586W-G is named “AP”, you can use the URL “http://AP” to access the
Web-based management interface of the SMC2586W-G.
Entering the User Name and Password
To log onto the Web based management interface, you will be prompted to
enter the user name and password. For first time configuration, use the
default user name “admin” and default password “smcadmin”, respectively.
And then click Log On.
Fig. 5 Entering the user name and password.
17
NOTE: It is strongly recommended that the password be
changed to other value for security reasons. On the start page,
click the General, Password link to change the value of the
password (see Section 3.3.1 for more information).
TIP: Since the Status page shows the current settings and status of the
SMC2586W-G, it can be saved or printed within the Web browser for future
reference.
Fig. 6. The Status page.
Step 1: Selecting an Operational Mode
Fig. 7. Operational modes settings.
18
The SMC2586W-G supports 3 operational modes for meeting various wireless connectivity requirements:
• Access Point (AP). The AP mode enables IEEE 802.11 Stations (STAs) to
automatically associate with it via the standard IEEE 802.11 association
process. In addition, the IEEE 802.11 WDS (Wireless Distribution System)
technology can be used to manually establish wireless links between two
APs or between an AP and a Bridge Master.
• Bridge Master (BM). Use this mode to provide the Bridge Master
functionality of the SMC2682W. The Bridge Master mode is designed to
work in those networks where SMC2682W Wireless Bridge Slaves are
already installed. The Bridge Master enables Bridge Slaves to
automatically associate with it. It also enables IEEE 802.11 Stations, which
are on the same LAN as the Bridge Master, to automatically associate
with it via the standard IEEE 802.11 association process. In addition, the
IEEE 802.11 WDS (Wireless Distribution System) technology can be used
to manually establish wireless links between two Bridge Masters or
between a Bridge Master and an AP.
• Bridge Slave (BS). Use this mode to provide the Bridge Slave functional
ity of the SMC2682W. The Bridge Slave mode is designed to work in
those networks where SMC2682W Wireless Bridge Masters are already
installed.
In any mode, the SMC2586W-G forwards packets between its Ethernet
interface and wireless interface for wired hosts on the Ethernet side and
wireless host(s) on the wireless side.
There are 2 types of wireless links between two SMC2586W-Gs or
between an SMC2586W-G and another wireless device.
• WDS. This type of wireless link is specified in the IEEE 802.11 standard
for communication between two IEEE 802.11 APs. Wireless packets
transmitted along the WDS link comply with the IEEE 802.11 WDS
(Wireless Distribution System) format at the link layer.
• BM-BS. This type of wireless link is used in the SMC2682W for
providing LAN-to-LAN bridging services. To establish this type of wireless
link between two SMC2682W, one SMC2682W must be in Bridge Master
(BM) mode and the other must be in Bridge Slave (BS) mode. The
SMC2586W-G provides this type of wireless link for backward
compatibility with the SMC2682W.
19
The relationships among the operational modes and the wireless link
types are shown in the following table:
Table 1. Operational modes vs. wireless link types.
From the table, a WDS link can be establish between two APs, a BM-BS link
can be established between a Bridge Master and a Bridge Slave, but no
wireless link can be established between a Bridge Slave and an AP.
Select an operational mode and click Save at the bottom of this page, and
then you are brought back to the start page.
Step 2: Configuring TCP/IP Settings
Fig. 8. TCP/IP settings.
Go to the TCP/IP Addressing section to configure IP address settings. The
IP address can be manually set or automatically assigned by a DHCP server
on the LAN (Default: DHCP client enabled). If you are manually setting the
IP address, Subnet mask, and Default gateway settings, set them appropriately, so that they comply with your LAN environment. In addition, you can
specify the Host name and Domain (DNS suffix) of the SMC2586W-G.
When you are finished, click Save at the bottom of this page, and then you
are brought back to the start page.
20
Step 3: Configuring IEEE 802.11 Settings
Fig. 9. IEEE 802.11g communication settings.
Go to the IEEE 802.11, Communication section in the Web-based
Management user interface to configure IEEE 802.11g-related communication
settings, including Channel number and Network name (SSID).
The number of available RF channels depends on local regulations.
NOTE: The Regulatory domain setting of the SMC2586W-G
sold in the U.S. and Canada is not configurable. It’s set to FCC
by default. As a result, only channels from 1 to 11 are available.
NOTE: For two SMC2586W-Gs or one wireless client computer
and one SMC2586W-G to establish a wireless link, both devices
must be configured with the same channel number and SSID.
If the SMC2586W-G was configured to be in AP or Bridge Master mode, and
you want to use WDS to establish inter-SMC2586W-G wireless links, configure the WDS settings.
Fig. 10. Wireless Distribution System settings.
21
To enable a WDS link:
1. Specify the MAC address of the AP or bridge at the other end of the WDS link.
2. Select the corresponding Enabled check box.
For example, assume you want two SMC2586W-Gs with MAC addresses
00-02-65-01-62-C5 and 00-02-65-01-62-C6 to establish a WDS link
between them. On SMC2586W-G 00-02-65-01-62-C5, set the peer MAC
address of port 1 to 00-02-65-01-62-C6 and on SMC2586W-G 00-02-6501-62-C6, set the peer MAC address of port 1 to 00-02-65-01-C5.
3. When you are finished, click Save at the bottom of this page. You will be
brought back to the Status page.
TIP: Plan your wireless network and draw a diagram, so that you know how
the SMC2586W-G is connected to other peer APs or wireless bridges by WDS.
Fig. 11. Sample wireless bridge network topology.
Fig. 12. Network topology containing a loop.
22
Step 4: Reviewing and Applying Settings
Fig. 13. Settings changes are highlighted in red.
On the start page, you can review all the settings you have made. Changes
are highlighted in red. If they are OK, click Restart for the new settings to
take effect.
NOTE: It takes about 7 seconds for the SMC2586W-G to complete its
restart process.
NOTE: If you decide not to change settings of the SMC2586W-G, be sure
to log off by clicking the Log Off button on the left menu. This way another
administrator can log on to the device to do configuration and management. If you do not click the Log Off button or have not interacted with
the Web management interface for a period of time specified by the Web
admin idle timeout setting (5 minutes by default), you’ll be automatically
logged off by the device.
23
2.5 Deploying the SMC2586W-G
After the settings have been configured, deploy the SMC2586W-G to the
field application environment. Connect the SMC2586W-G to an Ethernet
LAN through an Ethernet switch/hub.
If external high-gain directional antennas are needed, it may be difficult to
align the antennas. Here are some suggestions for antenna alignment.
To adjust the alignments of a pair of SMC high-gain antennas:
1. Connect each SMC2586W-G to a computer via Ethernet.
2. Configure the date rate of each SMC2586W-G to the lowest value, 1Mbps.
3. Fix the alignment of the antenna on one side.
4. Adjust the alignment of the antenna on the other side by using response
time information obtained from PINGing (run PING.exe) the “fixed-side”
computer.
5. Fine-tune the alignment of the antenna until you get the best response
time.
6. Increase the data rate of each SMC2586W-G simultaneously until an
optimal workable data rate is reached. You may not be able to use the
highest data rate, 54Mbps, because of the distance and the gain of the
antennas. Fig. 14 illustrates the idea.
Fig. 14. Adjusting alignments of external directional antennas.
TIP: As an alternative, the Link Monitor function can be used for antenna
alignment. Just configure SMC2586W-G 1 to Bridge Slave mode and
SMC2586W-G 2 to Bridge Master mode. On Computer 1, use a Web browser
to connect to SMC2586W-G 1 and go to the Status, Link Monitor page, and
then monitor the signal strength and link quality values when adjusting the
antenna posture of SMC2586W-G 1. Larger values means better wireless
connectivity.
24
3. Using Web-Based Management
3.1 Overview
Fig.15 The Start page.
Menu Structure
The left side of the start page contains a menu for you to carry out commands. Here is a brief description of the hyperlinks on the menu:
• Home. For going back to the start page.
• Status. Status information.
• Wireless Clients. The status of the wireless clients (STAs and
Bridge Slaves) currently associated with the SMC2586W-G.
• DHCP Mappings. Current IP-MAC address mappings of the built-in
DHCP server.
• System Log. System events log.
• Link Status (Slave mode)
• General. Global operations.
• Operational Mode. Operational mode settings.
• Password. For gaining rights to change the settings of the SMC2586W-G.
• Firmware Tools. For upgrading the firmware of the SMC2586W-G,
backing up and restoring configuration, and configuration reset of
the SMC2586W-G.
• TCP/IP. TCP/IP-related settings.
25
• Addressing. IP address settings for the SMC2586W-G to work with
TCP/IP.
• DHCP Server. Settings for the DHCP (Dynamic Host Configuration
Protocol) server on the SMC2586W-G.
• IEEE 802.11. IEEE 802.11g-related settings.
• Communication. Basic settings for the IEEE 802.11g interface of the
SMC2586W-G to work properly with wireless clients.
• Security. Security settings for authenticating wireless users and
encrypting wireless data.
• Advanced. Advanced settings of the SMC2586W-G.
• Packet Filters. Ethernet Type Filters, IP Protocol Filters, and TCP/UDP
Port Filters settings.
• Management. UPnP, System Log, and SNMP settings.
Log Off Command
Fig. 16 Log Off.
There is a Log Off button at the bottom left hand side of the menu for you to
log off from the Web management interface. Another administrator can only
log in to perform management tasks after you log off.
Save, Save & Restart, and Cancel Commands
Fig. 17. Save, Save & Restart, and Cancel.
There are three buttons - Save, Save & Restart, and Cancel - at the bottom of
each page. Clicking Save stores the settings changes to the memory of the
SMC2586W-G and brings you back to the start page. Clicking Save & Restart
stores the settings changes to the memory of the SMC2586W-G and restarts
the SMC2586W-G immediately for the settings to take effect. Clicking Cancel
discards any settings changes and brings you back to the start page.
If you click Save, the start page will reflect the fact that the configuration settings have been changed by showing two buttons—Restart and Cancel. In addition, changes are highlighted in red. Clicking Cancel discards all the changes.
Clicking Restart restarts the SMC2586W-G for the new settings to take effect.
26
Fig. 18 Settings have been changed.
Home and Refresh Commands
Fig. 19 Home and Refresh.
At the bottom of each status page shows read-only information and two buttons—
Home and Refresh. Clicking Home brings you back to the start page.
Clicking Refresh updates the shown status information.
3.2 Viewing Status
Associated Wireless Clients
Fig. 20 Status of associated wireless clients.
On this page, the status information of each associated client (STA or Bridge
Slave), including its MAC address, IP address, user name, number of bytes it
has send, number of bytes it has received, and the time of its last activity, is
shown.
27
Current DHCP Mappings
Fig. 21 Current DHCP mappings.
On this page, all the current static or dynamic DHCP mappings are shown. A
DHCP mapping is a correspondence relationship between an IP address
assigned by the DHCP server and a computer or device that obtains the IP
address. A computer or device that acts as a DHCP client is identified by its
MAC address.
A static mapping indicates that the DHCP client always obtains the specified
IP address from the DHCP server. You can set static DHCP mappings in the
Static DHCP Mappings section of the DHCP Server configuration page (see
Section 3.4.2). A dynamic mapping indicates that the DHCP server chooses
an IP address from the IP address pool from the DHCP Server configuration
page.
System Log
Fig. 22 System log.
System events are recorded in the memory of the SMC2586W-G. The logged
information is useful for troubleshooting purposes. The system events are
divided into several categories, and you can select which categories of
events to log. See Section 3.6 System Log for more information.
28
When the SMC2586W-G is in Bridge Slave mode, you can use the Link
Monitor status page to monitor the link quality and signal strength sensed
by its RF module. Larger values means better wireless connectivity to its
associated Bridge Master. This feature is especially useful when you are
aligning a pair of directional antennas for long range bridging applications.
Refer to Section 2.5 for more information about antenna alignment.
NOTE: The values are updated every 20 seconds.
3.3 General Operations
Selecting an Operational Mode
Fig. 23. Operational modes settings.
The SMC2586W-G supports 3 operational modes for meeting various wireless connectivity requirements:
• Access Point (AP). The AP mode enables IEEE 802.11 Stations (STAs) to
automatically associate with it via the standard IEEE 802.11 association
process. In addition, the IEEE 802.11 WDS (Wireless Distribution System)
technology can be used to manually establish wireless links between two
APs or between an AP and a Bridge Master.
• Bridge Master (BM). Use this mode to provide the Bridge Master functionality of the SMC2682W. The Bridge Master mode is designed to work in
29
those networks where SMC2682W Wireless Bridge Slaves are already
installed. The Bridge Master enables Bridge Slaves to automatically associate with it. It also enables IEEE 802.11 Stations, which are on the same LAN
as the Bridge Master, to automatically associate with it via the standard
IEEE 802.11 association process. In addition, the IEEE 802.11 WDS (Wireless
Distribution System) technology can be used to manually establish wireless
links between two Bridge Masters or between a Bridge Master and an AP.
• Bridge Slave (BS). Use this mode to provide the Bridge Slave functionality
of the SMC2682W. The Bridge Slave mode is designed to work in those networks where SMC2682W Wireless Bridge Masters are already installed.
In any mode, the SMC2586W-G forwards packets between its Ethernet interface and wireless interface for wired hosts on the Ethernet side and wireless
host(s) on the wireless side.
There are 3 types of wireless links between two SMC2586W-Gs or between
an SMC2586W-G and another wireless device.
• STA-AP. This type of wireless link is specified in the IEEE 802.11 standard
for communication between an IEEE 802.11 Station (STA) and an IEEE 802.11
Access Point (AP). An STA is usually a client computer (PC or PDA) with a
WLAN network interface card (NIC).
• WDS. This type of wireless link is specified in the IEEE 802.11 standard for
communication between two IEEE 802.11 APs. Wireless packets transmitted
along the WDS link comply with the IEEE 802.11 WDS (Wireless Distribution
System) format at the link layer.
• BM-BS. This type of wireless link is propriety and was used in the legacy
SMC2682W for providing LAN-to-LAN bridging services. To establish this
type of wireless link between two SMC2682W, one SMC2682W must be in
Bridge Master (BM) mode and the other must be in Bridge Slave (BS) mode.
The SMC2586W-G provides this type of wireless link for backward compatibility with the SMC2682W.
The relationships among the operational modes and the wireless link types
are shown in the following table:
Table 2. Operational modes vs. wireless link types.
30
From the table, a WDS link can be establish between two APs, a BM-BS link
can be established between a Bridge Master and a Bridge Slave, but no wireless link can be established between a Bridge Slave and an AP.
Fig. 24 Connectivity Limitation.
In Fig. 24 packets from STA cannot reach X, and vice versa.
Changing Password
Fig. 25 Password.
On this page, you can change the user name and password for the rights to
modify the configuration of the SMC2586W-G. The new password must be
typed twice for confirmation.
Managing Firmware
Fig. 26 Firmware management protocol setting.
Firmware management operations for the SMC2586W-G include firmware
upgrade, configuration backup, configuration restore, and configuration
reset. Firmware upgrade, configuration backup, and configuration restore can
be achieved via HTTP or TFTP. The HTTP-based way is suggested because it’s
more userfriendly. However, due to different behavior of different Web
31
browser types and versions, HTTP-based firmware management operations
may not work properly with some Web browsers. If you cannot successfully
perform HTTP-based firmware management operations with your Web
browser, try the TFTP-based method.
Upgrading Firmware by HTTP
Fig. 27 Firmware upgrade by HTTP.
To upgrade firmware of the SMC2586W-G by HTTP:
1. Click Browse and then select a correct firmware .bin file. The firmware file
path will be shown in the Firmware file name text box.
2. Click Upgrade to begin the upgrade process.
Backing up and Restoring Configuration Settings by HTTP
Fig. 28 Firmware backup by HTTP.
To back up configuration of the SMC2586W-G by HTTP:
1. Click Back Up.
2. You’ll be prompted to open or save the configuration file. Click Save.
3. The configuration file is named SMC2586W-G_Backup.hex. Don’t change
the configuration file name in the Save As dialog box. Select a folder in
which the configuration file is to be stored. And then, click Save.
NOTE: The procedure may be a little different with different Web browsers.
Fig. 29 Configuration restore by HTTP.
32
To restore configuration of the SMC2586W-G by HTTP:
1. Click Browse and then select a correct configuration .hex file. You have to
make sure the file name is the SMC2586W-G_Backup.hex. The file path will
be shown in the Configuration file name text box.
2. Click Restore to upload the configuration file to the SMC2586W-G.
Upgrading Firmware by TFTP
Fig. 30 TFTP server settings.
When usinge TFTP as the firmware management protocol, you can configure
settings for the SMC2586W-G’s TFTP client to communicate with a TFTP
server. If the TFTP client does not get a response from the TFTP server
within a period specified by the Timeout setting, it will resend the previous
request. The Max number of retries setting specifies the maximummal number
of resend before the TFTP client stops communicating with the TFTP server.
The SMC2586W-G Installation CD includes a TFTP server program
(TftpSrvr.exe) for firmware upgrade. Run this program on the computer
which serves as a TFTP server.
Fig. 31 Firmware upgrade by TFTP.
To upgrade firmware of the SMC2586W-G by TFTP:
1. Use a computer that will serve as a TFTP server and as a managing computer to trigger the upgrade process.
2. Connect the computer and one of the LAN Ethernet switch port with a
standard Ethernet cable.
3. Configure the IP address of the computer so that the SMC2586W-G and
the computer are in the same IP subnet.
4. Run the TFTP Server utility on the computer. Specify the folder in which
the firmware files reside.
5. On the computer, run a Web browser and click the General, Firmware
Tools hyperlink.
33
6. Choose TFTP as the Firmware management protocol.
7. Specify the IP address of the computer, which acts as a TFTP server. If
you don’t know the IP address of the computer, open a Command Prompt
from the computer running the TFP server, and type IpConfig, then press the
Enter key.
8. Trigger the firmware upgrade process by clicking Upgrade.
Fig. 32 TFTP Server.
NOTE: After the dialog box of the TFTP server program appears, be sure to
specify the folder that the downloaded firmware files reside.
NOTE: Make sure the Accept read requests check box of TFTP Server is selected.
NOTE: The LAN IP address of the SMC2586W-G and the IP address of the TFTP
server must be in the same IP subnet for TFTP to work.
NOTE: It is highly recommended that the TFTP server and the to-be-upgraded
SMC2586W-G be connected by Ethernet and on the same LAN.
NOTE: After the firmware is upgraded, be sure to delete the contents of the Web
browser cache, so that the Web management pages can be shown correctly.
NOTE: A failed upgrade may corrupt the firmware and cause the SMC2586W-G
to fail to restart. When this occurs, call for technical support.
TIP: If you want to remotely upgrade the firmware of a deployed SMC2586W-G
from the In-ternet, adjust the Timeout and Max no. of retries settings of
TFTP Server for remote TFTP upgrade to succeed.
34
Backing up and Restoring Configuration Settings by TFTP
Fig. 33. Configuration backup/restore.
To back up configuration of the SMC2586W-G by TFTP:
1. Use a computer that will serve as a TFTP server and as a managing
computer to trigger the backup process.
2. Connect the computer and one of the LAN Ethernet switch port with a
standard Ethernet cable.
3. Configure the IP address of the computer so that the computer and the
SMC2586W-G are in the same IP subnet.
4. Run the TFTP Server utility on the computer. Select the Accept write
requests check box, and specify the folder to which the configuration settings of the SMC2586W-G will be saved.
5. On the computer, run a Web browser and click the General, Firmware Tools
hyperlink.
6. Choose TFTP as the Firmware management protocol.
7. Within the Configuration Backup/Restore section, specify the IP address
of the computer, which acts as a TFTP server. If you don’t know the IP
address of the computer, open a Command Prompt, and type IpConfig, then
press the Enter key.
8. Trigger the backup process by clicking Back Up. The backup file is named
SMC2586W-G_Backup.hex.
NOTE: Remember to select the Accept write requests check box of TFTP Server.
To restore configuration of the SMC2586W-G by TFTP:
1. Use a computer that will serve as a TFTP server and as a managing computer to trigger the restoring process.
2. Connect the computer and one of the LAN Ethernet switch port with a
standard Ethernet cable.
3. Configure the IP address of the computer so that the computer and the
SMC2586W-G are in the same IP subnet.
4. Run the TFTP Server utility on the computer. Specify the folder in which
35
the configuration backup file resides. A configuration backup file is named
SMC2586W-G_Backup.hex.
5. On the computer, run a Web browser and click the General, Firmware
Tools hyperlink.
6. Choose TFTP as the Firmware management protocol.
7. Within the Configuration Backup/Restore section, specify the IP address
of the computer, which acts as a TFTP server. If you don’t know the IP
address of the computer, open a Command Prompt from the computer running the TFP server, and type IpConfig, then press the Enter key.
8. Trigger the restoring process by clicking Restore. The SMC2586W-G will
then download the configuration backup file from the TFTP server.
NOTE: Make sure the file is a valid configuration backup file for the
SMC2586W-G.
TIP: If you want to remotely back up or restore configuration from the
Internet, adjust the Timeout and Max no. of retries settings of TFTP Server
for remote TFTP configuration backup/restore to succeed.
Resetting Configuration to Factory Defaults
Fig. 34 Configuration reset.
Click on the Reset button to reset the device configuration to factory
defaults.
3.4 Configuring TCP/IP Related Settings
Addressing
Fig. 35 TCP/IP settings.
36
The IP address of the SMC2586W-G can be manually set (Set Manually) or
automatically assigned by a DHCP server on the LAN (Obtain from a DHCP
Server – enabled by default). If you are manually setting the IP address,
Subnet mask, and Default gateway settings, set them appropriately, so that
they comply with your LAN environment. In addition, you can specify the
Host name and Domain (DNS suffix) of the SMC2586W-G.
DHCP Server
Fig. 36 Basic DHCP server settings.
The SMC2586W-G can automatically assign IP addresses to client computers
by DHCP. In this section of the management page, you can specify the
Default gateway, Subnet mask, Primary DNS server, and Secondary DNS
server settings that will be sent to a client at its request. Additionally, you
can specify the first IP address that will be assigned to the clients and the
number of allocateable IP addresses.
NOTE: There should be only one DHCP server on the LAN; otherwise, DHCP
would not work properly. If there is a DHCP server on the LAN already, disable the DHCP server functionality of the SMC2586W-G.
NOTE: By default the DHCP server function is disabled.
37
DHCP Mappings
Fig. 37 Static DHCP mappings.
IP addresses of servers are often static so that clients could always locate
the servers by the static IP addresses. By using Static DHCP Mappings, you
can ensure that a host will get the same IP address when it requests one
from the DHCP server. Therefore, instead of configuring the IP address of an
intranet server manually, you can configure the server to obtain an IP
address by DHCP and it is always assigned the same IP address.
To always assign a static IP address to a specific DHCP client:
1. Specify the MAC address of the DHCP client and the IP address to be
assigned to it. Then, give a description of this mapping.
2. Select the corresponding Enabled check box.
3.5 Configuring IEEE 802.11b/g-Related Settings
Communication
Basic IEEE 802.11b/g-related communication settings include AP functionality,
Regulatory domain, Channel number, Network name (SSID), Data rate, and
Transmit power.
Fig. 38 Basic IEEE 802.11b/g communication settings.
38
For specific needs such as configuring the SMC2586W-G as a wireless LANto-LAN bridge, the AP functionality can be disabled, so that no wireless
client can associate with the SMC2586W-G. (This will only work while the
SMC2586W-G bridges are configured in AP/WDS mode, if you are using
Master/Slave mode and disable the AP functionality on the Master no
wireless clients or bridge slaves will be able to connect.)
Since the IEEE 802.11g-based SMC2586W-G is also IEEE 802.11b compatible, you can configure the Policy setting to meet your backwards compatibility needs. If the SMC2586W-G is used in an environment in which all
wireless clients are IEEE 802.11b-based, set Policy to b only. If all the
wireless clients are IEEE 802.11g-based, set Policy to g only. For maximum
flexibility, set Policy to Mixed. This mode enables SMC2586W-G to support both IEEE 802.11b- and IEEE 802.11g-based wireless clients.
The number of available RF channels depends on local regulations; therefore
you have to choose an appropriate regulatory domain to comply with local
regulations. The SSID of a wireless client computer and the SSID of the
SMC2586W-G must be identical for them to communicate with each other.
NOTE: The Regulatory domain setting of the SMC2586W-G sold in the U.S.
and Canada in not configurable. It’s set to FCC by default. As a result, only
channels from 1 to 11 are available.
If there is RF interference, you may want to reduce the Data rate for more
reliable wireless transmission. In most cases, leave the setting to Auto.
The transmit power of the RF module of the SMC2586W-G can be adjusted
so that the RF coverage of the SMC2586W-G can be changed.
Link Integrity
Fig. 39 Link integrity settings.
When the SMC2586W-G is in AP or Bridge Master mode and the Ethernet
LAN interface is detected to be disconnected from the wired network, all
currently associated wireless clients (STAs and Bridge Slaves) are disassociated by the SMC2586W-G and no wireless client can associate with the
SMC2586W-G. The detection mechanism is based on pinging the IP address
specified in Reference host.
39
Wireless Distribution System
Fig. 40 Wireless Distribution System.
Traditionally, access points are connected by Ethernet. By IEEE 802.11
Wireless Distribution System (WDS), APs can communicate with one another
wirelessly. For example, in Fig. 40, AP 2 acts as an access point for the notebook computers and it forwards packets sent from the notebook computers
to AP 1 through WDS. Then, AP 1 forwards the packets to the Ethernet LAN.
Packets destined for the notebook computers follow a reverse path from the
Ethernet LAN through the APs to the notebook computers. In this way, AP 2
plays a role of “AP repeater”.
Fig. 41 LAN-to-LAN bridging.
By WDS, two or more LAN segments can be connected wirelessly. As illustrated in Fig. 41Fig, a pair of wireless LAN-to-LAN bridges is used to connect
two LAN seg-ments. Since the SMC2586W-G is WDS-enabled, it can be used
as a wireless bridge even when it is in AP mode.
NOTE: An SMC2586W-G can have up to 6 WDS links to other APs or
wireless bridges.
40
Fig. 42 Wireless Distribution System settings.
To enable a WDS link:
3. Specify the MAC address of the AP or bridge at the other end of the WDS
link.
4. Select the corresponding Enabled check box.
For example, assume you want two SMC2586W-Gs with MAC addresses 0002-65-01-62-C5 and 00-02-65-01-62-C6 to establish a WDS link between
them. On SMC2586W-G 00-02-65-01-62-C5, set the peer MAC address of
port 1 to 00-02-65-01-62-C6 and on SMC2586W-G 00-02-65-01-62-C6, set
the peer MAC address of port 1 to 00-02-65-01-C5.
TIP: Plan your wireless network and draw a diagram, so that you know how
an AP is connected to other peer APs or wireless bridges by WDS.
TIP: Plan your wireless network and draw a diagram, so that you know how a
bridge is connected to other peer bridges by WDS. See the following figure
for an example network-planning diagram.
Fig. 43 Sample wireless bridge network topology.
41
WARNING: Do not let your network topology consist of wireless bridges,
Ethernet switches, Ethernet links, and WDS links that form a loop. If there
are any loops that exist, packets will circle around the loops and network
performance will be seriously degraded.
Fig. 44 Network topology containing a loop.
Security
IEEE 802.11b/g security settings include SSID broadcasts, Security mode,
IEEE 802.11 Authentication algorithm, WEP keys, MAC-Address-Based
Access Control.
Basic
Fig. 45 Basic IEEE 802.11g security settings.
For security reasons, it’s highly recommended that the security mode be set
to options other than Open System. When the security mode is set to Open
System, no authentication or and data encryption will be performed.
Additionally, you can disable the SSID broadcasts functionality so that a
wireless client (STA or Bridge Slave) with an “ANY” SSID cannot associate
with the SMC2586W-G.
42
Wireless Client Isolation is a feature for the SMC2586W-G in AP or Bridge
Master mode to block wireless-to-wireless traffic between STAs so that the
STAs cannot see each other. This feature is useful for WLANs deployed in
public places. This way, hackers have no chance to attack other wireless
users in a hotspot.
When the Wireless client isolation setting is set to wireless clients (STAs)
associated to this SMC2586W-G, which acts as an AP, cannot see each other,
and wireless-to-wireless traffic between the STAs is blocked.
When the setting is set to All APs in This Subnet, traffic among wireless
users of different SMC2586W-Gs in the same IP subnet is blocked. The
behaviors are illustrated in the following figures.
Fig. 46 Behavior of the “This AP Only” wireless client isolation option.
Fig. 47 Behavior of the “All APs on This Subnet” wireless client isolation option.
43
As illustrated in Fig. 46 when AP 1 and AP 2 are using the “This AP Only”
option, AP1 blocks wireless traffic between STA 1 and STA 2, while wireless
traffic between STA 2 and STA 3, which are associated with different APs, is
still allowed. If the “All APs in This Subnet” option is used as shown in Fig. 47,
AP 1 and AP 2 communicates with each other via an inter-AP protocol to
share their STA association information to block wireless traffic among all
the STAs.
There are up to 7 security modes:
• Open System. No authentication, no data encryption.
• Static WEP. WEP (Wired Equivalent Privacy) keys must be manually configured.
• Static TKIP (WPA-PSK). Only TKIP (Temporal Key Integrity Protocol)
mechanism of WPA (Wi-Fi Protected Access) is enabled. In this mode, you
have to specify the Pre-shared key, which will be used by the TKIP engine
as a master key to generate keys that actually encrypt outgoing packets
and decrypt incoming packets.
NOTE: The number of characters of the Pre-shared key setting must be at
least between 8 and can be up to 63.
• IEEE 802.1x EAP without Encryption (EAP-MD5). The IEEE 802.1x
functionality is enabled and the user-name/password-based EAP-MD5
authentication is used. No data encryption.
• IEEE 802.1x EAP with Static WEP (EAP-MD5). The IEEE 802.1x
functionality is enabled and the user-name/password-based EAP-MD5
authentication is used. Data encryption is achieved by static WEP.
• IEEE 802.1x EAP with Dynamic WEP (EAP-TLS, EAP-TTLS, PEAP). The
IEEE 802.1x functionality is enabled and dynamic WEP key distribution
authentication (EAP-TLS, EAP-TTLS, or PEAP) is used. Data encryption is
achieved by dynamic WEP.
• IEEE 802.1x EAP with Dynamic TKIP (WPA). This is a full WPA mode, in
which both the TKIP and IEEE 802.1x dynamic key exchange mechanisms
are enabled. The SMC2586W-G is highly secured in this mode.
In the above security modes, a back-end RADIUS (Remote Authentication
Dial-In User Service) server is needed if IEEE 802.1x functionality is enabled.
See Section 3.5.3 for more information about IEEE 802.1x and RADIUS.
According to the IEEE 802.11 standard, WEP can be used for authentication
and data encryption. Normally, Shared Key authentication is used if WEP
data encryption is enabled. In rare cases, Open System authentication may
be used when WEP data encryption is enabled. The Authentication algorithm
setting is provided for better compatibility with wireless client computers
44
with various WLAN network adapters. There are three options available,
including Open System, Shared Key, and Auto.
When WEP is enabled by a security mode, the Key length can be specified to
be 64 Bits or 128 Bits. The Selected key setting specifies the key to be used
as a send-key for encrypting traffic from the local device side to the remote
device side. All 4 WEP keys are used as receive-keys to decrypt traffic from
the remote device side to the local device side.
NOTE: Each field of a WEP key setting is a hexadecimal number from 0-9, AF. For example, when the security mode is Static WEP and the key length is
64 Bits, you could set Key 1 to “00012E3ADF”.
MAC-Address-Based Access Control
Fig. 48 MAC-address-based access control settings.
With MAC-Address-Based Access Control, you can specify the wireless
clients (STAs or Bridge Slaves) that are permitted or not permitted to associate with the SMC2586W-G. When the table type is set to inclusive, entries
in the table are permitted to associate with the SMC2586W-G. When the
table type is set to exclusive, entries in the table are not permitted to associate with the SMC2586W-G.
NOTE: MAC-address-based access control is only available when the
SMC2586W-G is in AP or Bridge Master mode.
To deny wireless clients’ access to the wireless network:
1. Select Enabled from the Functionality drop-down list.
2. Set the Access control type to exclusive.
3. Specify the MAC address of a wireless client to be denied access, and
then click Add.
4. Repeat Step 3 for each other wireless client.
To grant wireless clients’ access to the wireless network:
1. Select Enabled from the Functionality drop-down list.
45
2. Set the Access control type to inclusive.
3. Specify the MAC address of a wireless client to allow access, and then
click Add.
4. Repeat Step 3 for each other wireless client.
To delete an entry in the access control table:
• Click Delete next to the entry.
NOTE: The size of the access control table is 64.
Fig. 49 MAC ACL download settings.
Instead of manually entering MAC addresses to the access control table one
by one, you can prepare a text file that contains all the MAC addresses and
put it on a TFTP server, and then download the MAC ACL (Access Control
List) file from the TFTP server to the SMC2586W-G. Fig. 50 shows the
contents of a sample ACL file.
Fig. 50 Sample MAC ACL file.
To download a MAC ACL file from a TFTP server:
1. Specify the IP address of the TFTP server in the TFTP server IP address
text box.
2. Specify the name of the MAC ACL file on the TFTP server in the MAC
ACL file name text box.
3. Click Download.
46
IEEE 802.1x/RADIUS
IEEE 802.1x Port-Based Network Access Control is a new standard for solving
some security issues associated with IEEE 802.11, such as lack of user-based
authentication and dynamic encryption key distribution. With IEEE 802.1x, a
RADIUS (Remote Authentication Dial-In User Service) server, and a user
account database, an enterprise or ISP (Internet Service Provider) can manage
its mobile users’ access to its wireless LANs. Before granting access to a
wireless LAN supporting IEEE 802.1x, a user has to issue his or her user
name and password or digital certificate to the backend RADIUS server by
EAPOL (Extensible Authentication Protocol Over LAN). The RADIUS server
can record accounting information such as when a user logs on to the wireless
LAN and logs off from the wireless LAN for monitoring or billing purposes.
The IEEE 802.1x functionality of the access point is controlled by the security
mode (see Section 3.5.2.1). So far, the wireless access point supports two
authentication mechanisms—EAP-MD5 (Message Digest version 5), EAP-TLS
(Transport Layer Security). If EAP-MD5 is used, the user has to give his or
her user name and password for authentication. If EAP-TLS is used, the
wireless client computer automatically gives the user’s digital certificate
that is stored in the computer hard disk or a smart card for authentication.
And after a successful EAP-TLS authentication, a session key is automatically
generated for wireless packets encryption between the wireless client computer
and its associated wireless access point. To sum up, EAP-MD5 supports only
user authentication, while EAP-TLS supports user authentication as well as
dynamic encryption key distribution.
Fig. 51 IEEE 802.1x and RADIUS.
47
SMC2586W-G supports IEEE 802.1x and can be configured to communicate
with two RADIUS servers. When the primary RADIUS server fails to respond,
SMC2586W-G will try to communicate with the secondary RADIUS server.
You can specify the length of timeout and the number of retries before communicating with the secondary RADIUS server after failing to communicate
with the primary RADIUS server.
An IEEE 802.1x-capable wireless access point and its RADIUS server(s) share
a secret key so that they can authenticate each other. In addition to its IP
address, a wireless access point can identify itself by an NAS (Network
Access Server) identifier. Each IEEE 802.1x-capable wireless access point
must have a unique NAS identifier.
Fig. 52 IEEE 802.1x/RADIUS settings.
3.6 Configuring Advanced Settings
Packet Filters
The SMC2586W-G provides layer 2 (Ethernet Type Filters), layer 3 (IP
Protocol Filters), and layer 4 (TCP/UDP Port Filters) filtering capabilities.
The configuration processes for the filters are similar.
Functionality: whether this filtering capability is enabled or disabled.
Policy for matched packets: how a matched packet is processed—discard or pass.
To enable a filtering rule: select the check box to the left of the rule.
48
Ethernet Type Filters
Fig. 53 Ethernet type filters settings.
The Ethernet type filed of the MAC (Media Access Control) header of a packet incoming from the WLAN or Ethernet interface is inspected for filtering. In
a rule, specify the hex-decimal Ethernet type number and give the rule a
name.
IP Protocol Filters
Fig. 54 IP protocol filters settings.
The protocol, source address, and destination address fields of a packet
incoming from the WLAN or Ethernet interface is inspected for filtering. In a
rule, specify the hexadecimal protocol number, source IP address range
(Source IP Address AND Source Subnet Mask), and destination IP address
range (Destination IP Address AND Destination Subnet Mask).
A source (destination) IP address range is determined by performing an AND
operation on the source (destination) IP address field and the source (destination) subnet mask field. For example, if the source IP address field is
192.168.0.1 and the source subnet mask field is 255.255.255.0, the result
source IP address range is 192.168.0.0 to 192.168.0.255.
49
TCP/UDP Port Filters
Fig. 55 TCP/UDP port filters settings.
The destination port field the TCP or UDP header of a packet incoming from
the WLAN or Ethernet interface is inspected for filtering. In a rule, specify
the decimal Destination Port, Protocol type (TCP/UDP), and the name of the
higher-level protocol (Application Name).
Management
Fig. 56 Basic management settings.
The SMC2586W-G can be managed by Telnet. This functionality can be
either enabled or disabled.
As the SMC2586W-G allows only one administrator to log on for management, you have to log off before another can log on. If you forget to log off
or have not interacted with the Web management interface for a period
specified by the Web admin idle timeout setting (de-fault: 5 minutes), you’ll
be automatically logged off by the SMC2586W-G.
UPnP
Fig. 57 UPnP settings.
UPnP (Universal Plug and Play) enables a Windows XP user to automatically
discover peripheral devices. When the UPnP functionality is enabled, you can
see the SMC2586W-G in My Network Places of Windows XP. The
SMC2586W-G can be given a user-friendly name that will be shown in My
Network Places. Double-clicking the icon in My Network Places that refers to
the SMC2586W-G will launch the Web browser for you to configure the
SMC2586W-G.
50
NOTE: Make sure you have installed the necessary Windows UPnP
components on your Windows XP computer.
System Log
Fig. 58 System log settings.
System events can be logged to the on-board RAM of the SMC2586W-G
(Local log) or sent in the form of SNMP trap (Remote log by SNMP trap) or
BSD Syslog (Remote log by BSD Syslog) to a remote SNMP trap monitoring
server or remote Syslog server, respectively. See the next subsection for
more information about SNMP trap settings. Set the IP address of the Syslog
server in the Syslog server IP address text box.
The system events are divided into the following categories:
• General: system and network connectivity status changes.
• Built-in AP: wireless client association and WEP authentication status
changes.
• MIB II traps: Cold Start, Warm Start, Link Up, Link Down and SNMP
Authentication Failure.
NOTE: The SNMP Authentication Failure trap is issued when using an incorrect community string to manage the SMC2586W-G via SNMP and the SNMP
MIB II OID, snmpEnableAuthenTraps, is enabled (disabled by default).
51
SNMP
Fig. 59 SNMP settings.
The SNMP (Simple Network Management Protocol) functionality can be disabled, and you can specify the name (used as a password) of the read-only
and read-write community. In addition, up to 5 SNMP trap targets can be set
in the SNMP Trap Table.
To specify a trap target:
1. Type the IP address of the target host.
2. Type the Community for the host.
3. Select the corresponding check box next to the IP address text box.
4. EliteConnect Management Utility
52
4. EliteConnect Management Utility
4.1 Introduction
This chapter gives introductory information, such as the design goal and features, on SMC EliteConnect™ Management Utility.
In Chapter 4.2, it outlines EliteConnect Management Utility’s basic functionality by using a sample device list file, which is installed by the setup package of EliteConnect Management Utility. EliteConnect Management Utility is
designed to manage SMC2582W-B EliteConnect 802.11b Wireless Bridge and
SMC2586W-G EliteConnect 802.11g Wireless Bridges.
Chapter 4.3 details all the EliteConnect Management Utility capabilities.
What is the EliteConnect Management Utility?
Managing a large number of WLAN devices is not an easy task. Several critical issues have to be taken into consideration when planning a large wireless
network:
• Remote diagnosis
• Remote configuration
• Remote firmware upgrade
• Remote device configuration backup and restore
Only when these issues are correctly addressed can the deployed WLAN
become an easily maintained network. That is the major reason why SMC
EliteConnect™ Management Utility is developed making management of a
large WLAN easy. By EliteConnect Management Utility’s “batch processing”
capabilities, managing wireless devices becomes a simple click-and-go matter.
Features
Device List Manipulation. EliteConnect Management Utility enables the
network administrator to build a device list, which contains information
about the deployed WLAN devices.
• Annotations of devices. The following items of information can be annotated
to each device in the list:
• Device ID. Identifier of the device.
• Device name. Name of the device.
• Project name. Name of the deployment project with which the device is
associated.
• Geographical Zone 1, Zone 2, and location. Geographical zone and
location in which the device is deployed.
• Comments. Remarks about the device.
53
• DNS domain name. DNS (Domain Name System) domain name of the
device.
These information items serve as memos for the network administrator and
they are optional. And the following information items must be specified so
that EliteConnect Management Utility can communicate with the device by
HTTP (HyperText Transfer Protocol):
• IP address. IP address of the device.
• HTTP port. HTTP port through which the device accepts HTTP traffic.
Either the IP address or DNS domain name, or both, must be specified,
otherwise EliteConnect Management Utility has no way to recognize the
device.
• Device system information retrieval. EliteConnect Management Utility
can retrieve some useful system information about the device, including:
• MAC address. MAC (Media Access Control) address of the device.
• Firmware version. Version information about the firmware of the device.
This information is useful when doing firmware upgrade.
• System up time. How long the device has operated from its most recent
startup.
• Model description. Description of the device model designated by the
manufacturer.
• Cut, Copy, Paste, Delete, Undo, and Redo operations. These operations are
supported to edit device lists.
• Filtering. This functionality enables the network administrator to see the
selected devices based on the following criteria:
• Project name
• Geographical Zone 1
• Geographical Zone 2
• Firmware version
• Sorting. This functionality enables the network administrator to arrange a
device list in specific order.
• Printing. Printing of a device list.
• Sending device lists by e-mail. Sending a device list to others by e-mail
within EliteConnect Management Utility.
54
• Device Management. The network administrator can manage devices one
by one or in a batch fashion.
• Configuring by Web browser. Launching the default Web browser to
manage the selected device.
• Batch processing. Applying a network management command to multiple
devices at a time. The following commands are supported:
• Check Alive. Checking whether the selected devices are operating.
• Change SSID. Changing the SSID setting of every selected device.
• Upgrade Firmware by TFTP and HTTP. Upgrading device firmware.
• Back up Configuration by TFTP and HTTP. Retrieving device
configuration files from devices and save them to the local hard disk.
• Restore Configuration by TFTP and HTTP. Restoring saved device
configuration files to devices.
• Event Logging. The result of each network management command is
shown in a log window, and it can be optionally saved to the hard disk for
later reference.
NOTE: EliteConnect Management Utility fully supports SMC2582W-B and
SMC2586W-G Wireless Bridges while “Check Alive” function is only
supported in SMC2682W.
4.2 Tutorial
Before getting started with this tutorial, you have to install EliteConnect
Management Utility by running the setup program on a PC and prepare an
SMC2582W-B EliteConnect 802.11b Wireless Bridge or SMC2586W-G
EliteConnect 802.11g Wireless Bridge.
55
Overview
User Interface
Fig. 60 Main user interface.
The main user interface of EliteConnect Management Utility is three-paned.
The upper right pane is the Device List View, which shows the devices to
manage. The upper left pane is the Workspace Window, which enables you to
filter the active device list or switch to another device list. The bottom pane
is the History Log View.
EliteConnect Management Utility is equipped with a menu bar and two toolbars for functions such as device list editing, device management. In addition, when you right click anywhere in the active device list, a shortcut menu
will appear for you to quickly carry out commands.
How Does It Work?
EliteConnect Management Utility communicates with the SMC Wireless
Bridges by HTTP. A network management command calls CGI (Common
Gateway Interface) functions on a selected device to configure the device
and get status information from it. Network batch commands are implemented
by using multithreading techniques, thus, a click-and-go- style of device
management can be achieved.
56
Connecting the Managing PC and a Managed Device
You need at least one SMC2582W-B EliteConnect 802.11b Wireless Bridge or
SMC2586W-G EliteConnect 802.11g Wireless Bridge to follow the remainder
of the tutorial. Connect the PC on which EliteConnect Management Utility
will run and the device with Ethernet. And then, configure the IP address of
the PC and of the device so that they are in the same IP subnet.
Running SMC EliteConnect™ Management Utility
Fig. 61 SMC EliteConnect™ Management Utility in the Program Files folder.
Click the Start button, point to Program Files, point to the SMC
EliteConnect Management Utility folder, and click the SMC EliteConnect
Management Utility icon to run EliteConnect Management Utility. A new
device list file will be created when the main user interface of EliteConnect
Management Utility appears.
The New command on the File menu enables you to create device list files.
The Open command on the File menu enables you to open existing device
list files.
Building a Device List
Adding a New Device
On the Insert menu, click New Device, and then a new device item is added
to the device list and the Device Properties dialog box appears for you to
enter device properties.
The Deployment and Identification groups of properties and the Comments
property are optional for annotation purposes. You have to specify either IP
address or Domain name and Port so that EliteConnect Management Utility
knows how to communicate with the device. Enter the IP address of the
SMC2582W-B or SMC2586W-G you use for this tutorial. Use 0 or 80 as the
port number. The 0 port will be converted to 80 internally by EliteConnect
Management Utility. Then click Apply. After that, you will notice the changes
you have made in the device list.
57
Fig. 62 Device Properties dialog box.
On the left side of the title bar of the Device Properties dialog box is a “Pin”
button. Click this button to pin the dialog box (the icon will be changed
to ) so that it will always stay on top of other windows. Otherwise, the
Device Properties dialog box disappears if you click anywhere outside of the
dialog box.
Clicking New Device adds a new item to the device list. You can repeat this
procedure several times to add more items to the device list.
Viewing and Editing Device Properties
If there are a number of device items in the device list. You can click the
Previous or Next button of the Device Properties dialog box to navigate the
device list and see the properties of each device. As an alternative, you can
click any device item in the device list to see its properties when the Device
Properties dialog box is “pinned.”
If the Device Properties dialog box is not shown, you can see the properties
of a selected device by carrying out the Properties command on the View
menu.
The properties of a device can be edited in the Device Properties dialog box.
Be sure to click Apply for your changes to take effect.
58
Editing the Device List
Fig. 63 Edit menu.
Select the desired device item from the device list. You can select consecutive
device items by clicking while holding the Shift key. And you can select
inconsecutive device items by clicking while holding the Ctrl key. The Select
All command on the Edit menu enables you to select all devices in the device
list.
Selected device items can be deleted, cut or copied to the Clipboard. Device
items cut or copied to the Clipboard can be pasted back to the device list.
These operations can be performed by carrying out the corresponding
commands on the Edit menu.
Viewing the Device List
Viewing All Opened Device List Files
Fig. 64 All opened device list files.
If several device list files are opened, you can switch between them by clicking the
corresponding tree items on the File tab of the Workspace window. For
example, in Fig. 64, the sample device list file installed by the setup program
59
of EliteConnect Management Utility and an empty new device list file have
been opened.
Filtering the Device List
Fig. 65 Filter View of the Workspace window.
You can filter a device list by clicking a tree item on the Filter tab of the
Workspace window. The tree hierarchy represents filtering criteria. Clicking
the “All” tree item (level 0—no filtering) shows all devices in the device list. A
level-1 tree item represents filtering by Project. A level-2 tree item represents filtering by Geographical Zone 1. A level-3 tree item represents filtering by Geographical Zone 2. A level-4 tree item represents filtering by
Firmware version.
For example, Fig. 65 illustrates that the sample device list is filtered so that
only the devices that belong to the “Chain Restaurant 1” project and
deployed in “New York” are shown in the Device List View.
NOTE: You cannot edit properties of any device when the device list is filtered.
Sorting the Device List
The device list can be sorted by clicking a column header of the Device List
View. For example, if you click the IP Address header, the device list will be
sorted in an ascending or-der by IP address, as shown by Fig. 66.
Fig. 66 Sorting by IP address, in ascending order.
Clicking the IP Address header one more time sorts the device list in a
descending order, as shown by Fig. 67.
60
Fig. 6. Sorting by IP address, in descending order.
NOTE: If a newly opened device list file is sorted, an asterisk mark “*” will
be added to the file name shown in the title bar of EliteConnect Management
Utility, which means the contents of the device list file have been modified.
Rearranging the Column Order
Fig. 68 Rearranging the column order by a drag-and-drop operation.
The column order can be rearranged by drag-and-drop operations. Just drag
a column header and drop it to another position. For example, as shown in
Fig. 68, the Zone 1 column will be inserted between the Status and the
Project columns after the drag-and-drop operation is completed.
Showing or Hiding Some Columns
Fig. 69 Showing or hiding some device list columns.
61
Any device list columns can be hidden by clearing corresponding check
boxes next to the menu items of the Columns sub-menu of the View menu.
Clicking an unchecked menu item shows its corresponding device list column, and the menu item becomes checked next time you open the Columns
sub-menu.
Managing Devices
After selecting one or more devices in the device list, you can carry out the
device management commands on the Device menu to manage the selected
device(s). The following sub-sections give two examples. Need a new picture,
the new utility does not have the change radius server option.
Fig. 70 Device menu.
Checking Whether Devices Are Alive
Select the device item in the device list, which you have created in the
Adding a New Device Section for your SMC2582W-B or SMC2586W-G, and
then carry out the Check Alive command on the De-vice menu. The User
Name and Password dialog box will appear.
Fig. 71 User Name and Password dialog box.
After EliteConnect Management Utility gets the administration credential, it
tries to communicate with the device to check whether it is working. The
progress will be shown in the History Log View. The results of the management command will be shown in the Status column of the device list as well
as the History Log View.
If the Status column shows “Alive,” the MAC Address, Firmware, Up Time,
and Model columns also show system information about the device.
62
Fig. 72 History Log View.
Configuring a Device by Web Browser
Select the device item in the device list, which represents the SMC2582W-B
or SMC2586W-G you use for this tutorial, and then carry out the Configure
by Web Browser command on the Device menu. The default Web browser will
be launched for you to manage the device.
4.3 Using SMC EliteConnect™ Management Utility
This chapter provides more detailed explanations of the EliteConnect
Management Utility functionalities.
User Interface Overview
Main User Interface
Fig. 73 Main user interface.
63
The main user interface of EliteConnect Management Utility consists of
three-paned. The upper right pane is the Device List View, which shows the
devices to manage. The upper left pane is the Workspace Window, which
enables you to filter the active device list or switch to another device list.
The bottom pane is the History Log View. In addition, EliteConnect
Management Utility is equipped with a menu bar and two toolbars for functions such as device list editing and device management.
Device List View
Fig. 74 Device List View.
The Device List View provides a view for the active device list file. There are
12 columns, including Device ID, Project, Zone 1, Zone 2, Location, Device
Name, IP Address, Do-main Name, HTTP Port, Comments, MAC Address,
Firmware, Status, Up Time, and Model. Each column shows a property of a
device (see “Viewing and Editing Properties of a Device” Section on page 79
for more information).
A device item can be selected by clicking it. Right clicking anywhere in the
Device List View shows a shortcut menu for you to quickly carrying out commands (see “Shortcut Menu” Section on page 69 for more information).
Workspace Window
There are two tabs—Filter and File—in the Workspace window, which enables
you to filter the active device list and switch between opened device list
files, respectively.
64
Filter View
Fig. 75 Filter View.
EliteConnect Management Utility analyses the structure of the devices items
in the active device list and shows the results in a tree fashion on the Filter
tab of the Workspace window. The active device list can be filtered by clicking a tree item (see Section 4.3.3.6 for more information).
65
File View
Fig. 76 File View.
The File tab of the Workspace window lists all opened device list files so that
you to quickly switch between them (see “Viewing All Opened Device List
Files” Section on page 81 for more information).
History Log View
Fig. 77 History Log View.
The History Log View shows progress and results of network management
commands. The contents of the History Log View can also be saved to a log
file for later reference (see “Logging Options” Section on page 75 for more
information).
Menu
Carrying out the menu commands can access the majority of EliteConnect
Management Utility functionalities. The following menu commands are provided if at least one device list file is opened:
• File
• New. Create a new document.
• Open. Open a new document.
66
• Close. Close the active document.
• Save. Save the active document.
• Save As. Save the active document with a new name.
• Print. Print the active document.
• Print Preview. Display full pages.
• Print Setup. Change the printer and printing options.
• Send. Send the active document through electronic mail.
• Shortcuts to up to 4 MRU (Most Recently Used) files.
• Exit. Quit the application; prompts to save documents.
• Edit
• Undo. Undo the last action.
• Redo. Redo the previously undone action.
• Cut. Cut the selection and put it on the Clipboard.
• Copy. Copy the selection and put it on the Clipboard.
• Paste. Insert Clipboard contents.
• Delete. Delete the selection.
• Select All. Select the entire document.
• View
• Columns. Show or hide the device list columns.
• Clear History. Clear contents of the History Log View.
• Toolbars. Show or hide the toolbars.
• Status Bar. Show or hide the status bar.
• Workspace. Show or hide the Workspace window.
• History. Show or hide the History window.
• Properties. Show the first selected item’s properties.
• Insert
• New Device. Add a new device to the active device list.
• Device
• Check Alive. Check whether the selected devices are alive.
67
• Configure by Web Browser. Launch the default Web browser to configure
the first selected device.
• Change SSID. Change the SSID setting of selected device.
• Change Password. Change the password setting of selected device.
• Upgrade Firmware by TFTP. Upgrade the firmware of selected device by TFTP.
• Back up Configuration by TFTP. Back up the configuration of selected
device to a file by TFTP.
• Restore Configuration by TFTP. Restore the configuration of selected
device from a file by TFTP.
• Upgrade Firmware by HTTP. Upgrade the firmware of selected device by
HTTP.
• Back up Configuration by HTTP. Back up the configuration of selected
device to a file by HTTP.
• Restore Configuration by HTTP. Restore the configuration of selected
device from a file by HTTP.
• Cancel Waiting Commands. Cancel all waiting device management
commands (see Section 4.3.4.1.2 for more information).
• Tools
• Options. Change application options.
• Window
• Cascade. Arrange windows so they overlap.
• Title. Arrange windows as non-overlapping tiles.
• Arrange Icons. Arrange icons at the bottom of the window.
• Help
• About. Display EliteConnect Management Utility version number and
copy right information.
68
Shortcut Menu
Fig. 78 Shortcut menu
Right clicking anywhere within the Device List View brings up a shortcut
menu as shown in Fig. 78 The commands on the shortcut menu are shortcuts to some of the main menu commands.
• Cut—Cut command on the Edit menu
• Copy—Copy command on the Edit menu.
• Paste—Paste command on the Edit menu.
• Delete—Delete command on the Edit menu.
• Select All—Select All command on the Edit menu.
• Add New Device—New Device command on the Insert menu.
• Check Alive—Check Alive command on the Device menu.
• Configure by Web Browser—Configure by Web Browser command on the
Device menu.
• Change SSID—Change SSID command on the Device menu.
• Change Password—Change Password command on the Device menu.
• Back up Configuration by TFTP—Back up Configuration by TFTP
command on the Device menu.
• Restore Configuration by TFTP—Restore Configuration by TFTP
command on the Device menu.
• Back up Configuration by HTTP—Back up Configuration by HTTP
69
command on the Device menu.
• Restore Configuration by HTTP—Restore Configuration by HTTP
command on the Device menu.
• Properties—Properties command on the View menu.
Toolbars
Toolbar commands are shortcuts to some of the main menu commands.
There are two tool-bars—Basic and Device.
Fig. 79 Basic toolbar.
The commands in the Basic toolbar (from left to right) are listed as follows:
• New on the File menu.
• Open on the File menu.
• Save on the File menu.
• Cut on the Edit menu.
• Copy on the Edit menu.
• Paste on the Edit menu.
• Delete on the Edit menu.
• Undo on the Edit menu.
• Redo on the Edit menu.
• Print on the File menu.
• About on the Help menu.
Device
Fig. 80 Device toolbar.
The commands in the Device toolbar (from left to right) are listed as follows:
• Properties on the View menu.
• New Device on the Insert menu.
70
• Check Alive on the Device menu.
• Configure by Web Browser on the Device menu.
• Change Password on the Device menu.
• Change SSID on the Device menu.
• Change RADIUS Servers on the Device menu.
• Upgrade Firmware by TFTP on the Device menu.
• Back up Configuration by TFTP on the Device menu.
• Restore Configuration by TFTP on the Device menu.
• Upgrade Firmware by HTTP on the Device menu.
• Back up Configuration by HTTP on the Device menu.
• Restore Configuration by HTTP on the Device menu.
Customizing Your Working Environment
EliteConnect Management Utility window layout and application behavior
can be customized to your preference.
Showing, Hiding, Docking, Floating,
and Repositioning View Windows
The toolbars, status bar, Workspace window, and the History Log View window can be docked to the top, bottom, left, or right side of the main window.
And they can be shown or hidden by carrying out corresponding commands
on the View menu.
You can double-click the title bar of the Workspace window or the History
Log View window in docked state to make it “float”. Double-clicking a floating
window restores the window to its previous dock state. You can click and
hold the title bar of a window, and then drag the window to dock it to another
place. Is this way, the layout of EliteConnect Management Utility windows
can be freely customized. For example, EliteConnect Management Utility can
be re-laid out like Fig. 82
71
Fig. 81 Floating Workspace window.
Fig. 82 History Log View docked to the right side.
72
Rearranging the Column Order of the Device List View
Fig. 83 Rearranging the column order by a drag-and-drop operation.
The column order can be rearranged by drag-and-drop operations. Just drag
a column header and drop it to another position. For example, as shown in
Fig. 83, the Zone 1 column will be inserted between the Status and the
Project columns after the drag-and-drop operation is completed.
Showing or Hiding the Columns of the Device List View
Fig. 84 Showing or hiding some device list columns.
Any device list columns can be hidden by clearing corresponding check boxes
next to the menu items of the Columns sub-menu of the View menu. Clicking
an unchecked menu item shows its corresponding device list column and the
menu item becomes checked next time you open the Columns sub-menu.
Configuring the Application Behavior
On the Tools menu, click Options, and then the Options dialog box appears.
In this dialog box, you can configure EliteConnect Management Utility’s
behavior.
73
General Options
Fig. 85 General tab.
On this tab, you can specify the action taken when a device item in the
active device list is double-clicked, the number of simultaneous device management commands, and whether the Device Password List function will be
enabled.
There are two options for the action taken when a device item is doubleclicked—Launches the default Web browser to configure the device or
Shows the device’s properties (default). Except the Configure by Web
Browser command, all other device management commands on the Device
menu are “batch” commands that can be applied to several devices at a
time. When a batch menu command is carried out, one internal command
data structure is generated for each selected device and inserted into a
“work queue.” For example, if 50 devices have been selected and a batch
command is carried out, there will be 50 device management commands
inserted into the queue. And then, first n commands are extracted from the
queue for execution, where n is specified by the Number of simultaneous
device management commands box, and other commands in the queue are
put to waiting state. After one in-action command is completed, another
command in the queue is extracted and put to execution. This process
continues until all commands in the queue are completed.
Since a username and password pair is needed for EliteConnect Management
Utility to communicate with each device, you are, by default, prompted to
enter the credential information at the start of a batch device management
command. As an alternative, you can build a Device Password List and let
EliteConnect Management Utility use the list instead of prompting you every
time.
A device password list is a text file with the “.plt” file name extension. And
its format is as Fig. 86 shows. The username and password in each text line
must be separated by a comma.
74
Fig. 86 A sample Device Password List.
Select the Use the following Device Password List instead of asking for
device user name and password check box, and specify the location of the
device password list file by clicking the “…” button.
Logging Options
Fig. 87 Logging tab.
On this tab, you can specify whether the contents of the History Log View
are also saved to a log file.
To enable logging to a file, select the Enable logging events to a text file
check box and then the location of the log file will be shown in the Log file
box.
NOTE: The View button is disabled if the log file has not been created by
EliteConnect Management Utility. Otherwise, you can click the button to
view the contents of the log file.
TFTP Server Options
Fig. 88 TFTP Server tab.
75
On this tab, you can configure behavior parameters of EliteConnect
Management Utility’s built-in TFTP server for device firmware upgrade.
EliteConnect Management Utility supports a “pull” style and a “push” style
of device firmware upgrade. The pull style is achieved by HTTP and TFTP,
while the push style is solely achieved by HTTP. The pull style works like the
following:
1. EliteConnect Management Utility issues an HTTP command to the device
to trigger the firmware upgrade process.
2. The device’s TFTP client downloads (pulls) firmware files from the built-in
TFTP server of EliteConnect Management Utility.
3. EliteConnect Management Utility polls the device to check the results of
the firmware upgrade by HTTP.
In the push style of firmware upgrade, EliteConnect Management Utility
use HTTP to upload (push) firmware files to the device’s built-in Web server.
Device configuration backup and restore are similar to firmware upgrade.
The TFTP-related configuration backup/restore procedure is like the following:
1. EliteConnect Management Utility issues an HTTP command to the device
to trigger the configuration backup process.
2. If for backup, the device’s TFTP client uploads configuration files to the
built-in TFTP server of EliteConnect Management Utility. If for restore,
the device’s TFTP client downloads configuration files from EliteConnect
Management Utility’s TFTP server.
3. EliteConnect Management Utility polls the device to check the results of
the configuration backup/restore by HTTP.
For solely HTTP-based configuration backup/restore, EliteConnect Management
Utility communicates with the device’s built-in Web server to download or
upload configuration files.
For configuration backup by TFTP to succeed, the Accept write requests
check box must be selected. For configuration restore and firmware upgrade
by TFTP to succeed, the Accept read requests must be selected. Configure
the Timeout and Max no of retries based on the communication characteristics
between EliteConnect Management Utility and the managed devices.
Experiments may be needed to find out appropriate values for these parameters.
Clicking Reset to Defaults resets the settings on this tab to default values.
76
HTTP Options
Fig. 89 HTTP tab.
On this tab, you can configure behavior parameters of EliteConnect
Management Utility’s Web client engine—Microsoft Internet Explorer control.
You may refer to Microsoft documentation about how to pick good values for
Connect retries, Connect timeout, Receive timeout, and Send timeout.
Experiments are helpful in determining values for these parameters.
Clicking Reset to Defaults resets the settings on this tab to default values.
Working with Device Lists
A device list file is designated with the “.dlt” file name extension. Each
device item in a device list contains information about the device’s properties.
Manipulating Device List Files
The New, Close, Open, Save, and Save As commands and MRU (Most Recently
User) file shortcuts on the File menu enable you to perform corresponding
file operations to device list files.
Adding a New Device to the Active Device List
Fig. 90 Device Properties dialog box.
77
To add a new device item to the active device list, click New Device on the
Insert menu. And then a new device item is added to the device list and the
Device Properties dialog box ap-pears for you to enter device properties.
The Deployment and Identification groups of properties and the Comments
property are optional for annotation purposes. You have to specify either IP
address or Domain name and Port so that EliteConnect Management Utility
knows how to communicate with the de-vice. Click Apply for your changes to
take effect. The changes will be immediately reflected in the device list.
EliteConnect Management Utility automatically fills the properties in the
Device/network command status group after successful Check Alive command execution.
On the left side of the title bar of the Device Properties dialog box is a
“Pin” button. Click this button to pin the dialog box (the icon will be
changed to ) so that it will always stay on top of other windows.
Otherwise, the Device Properties dialog box disappears if you click anywhere outside of the dialog box.
Clicking New Device adds a new device item to the device list. You can repeat
this procedure several times to add more device items to the device list.
Selecting Devices
Click on the selected device. Three types of selection are supported—single
selection, multiple consecutive selections, and multiple inconsecutive selections.
Single Selection
Fig. 91 Single selection.
Click a device item to select it. A selected device item is highlighted.
78
Multiple Consecutive Selections
Fig. 92 Multiple consecutive selections.
To select a block of consecutive device items:
1. Click the first item of the block.
2. Click the last item of the block while holding the Shift key.
Multiple Inconsecutive Selections
Fig. 93 Multiple inconsecutive selections.
To select several inconsecutive device items:
1. Click the first item.
2. Click other items while holding the Ctrl key.
Viewing and Editing Properties of a Device
Single-select a device item and click Properties on the View menu, and then
the Device Properties dialog box will appear for you to view or edit the properties of the device.
You can click the Previous or Next button of the Device Properties dialog
box to navigate the device list and see the properties of each device. As an
alternative, you can click any device item in the device list to see its properties when the Device Properties dialog box is “pinned.”
NOTE: Be sure to click Apply for your changes to take effect.
NOTE: You cannot edit properties of any device when the device list is
filtered (see Section 4.3.3.6 for more information).
79
Editing the Device List
Fig. 94 Edit menu.
You can use the commands on the Edit menu to edit the active device list.
Refer to Section 4.3.1.5 for explanations of the commands.
Filter the Device List
Fig. 95 Device list filtering.
You can filter a device list by clicking a tree item on the Filter tab of the
Workspace window. The tree hierarchy represents filtering criteria. Clicking
the “All” tree item (level 0—no filtering) shows all devices in the device list. A
level-1 tree item represents filtering by Project. A level-2 tree item represents
filtering by Geographical Zone 1. A level-3 tree item represents filtering by
Geographical Zone 2. A level-4 tree item represents filtering by Firmware
version.
For example, Fig. 95 illustrates that the sample device list is filtered so that
only the devices that belong to the “Chain Restaurant 1” project and
deployed in “New York” are shown in the Device List View.
Sorting the Device List
The active device list can be sorted by clicking a column header of the
Device List View. For example, if you click the IP Address header, the device
list will be sorted in ascending order by IP address, as shown by Fig. 96
80
Fig. 96 Sorting by IP address, in ascending order.
Clicking the IP Address header one more time sorts the device list in
descending order, as shown by Fig. 97.
Fig. 97 Sorting by IP address, in descending order.
NOTE: If a newly opened device list file is sorted, an asterisk mark “*” will
be added to the file name shown in the title bar of EliteConnect Management
Utility, which means the contents of the device list file have been modified.
Viewing All Opened Device List Files
Fig. 98 Viewing all opened device list files.
81
You can switch between all opened device list files by clicking the corresponding tree items on the File tab of the Workspace window.
Arranging Device List Windows
The commands on the Window menu enable you to arrange your Device List
View window and switch between them.
Fig. 99 Window menu.
Cascading Windows
Fig. 100 Cascaded device list windows.
The Cascade command on the Window menu arranges the Device List View
windows so that they overlap.
Tiling Windows
Fig. 101 Tiled windows.
82
The Tile command on the Window menu arranges the Device List View windows as non-overlapping tiles.
Arranging Minimized Windows
Fig. 102 Minimized windows put in order.
The Arrange Icons command on the Window menu arranges minimized
Device List View windows so that they stay at the bottom.
Managing Devices
Except the Configure by Web Browser command, all other device management commands on the Device menu are “batch” commands that can be
applied to several devices at a time. (Refer to Section 4.3.2.4.1 for more
information about what “batch” means.)
Carrying out a Batch Management Command
The procedure for carrying out each batch device management command is
described below:
1. Select one or more devices in the active device list.
2. Click a batch command on the Device menu.
3. If the Device Password List functionality is not enabled, you will be
prompted to enter a user name and password for accessing the device (see
Section 4.3.2.4.1 for more in-formation).
Fig. 103 User Name and Password dialog box.
4. Enter username and password when prompted.
5. Monitor the progress of the command in the History Log View.
6. See the results of the command in the History Log View and in the Status
column of the Device List View.
83
NOTE: You have to make sure a device is reachable by EliteConnect
Management Utility through the IP address/domain name and port specified
in the device list.
Canceling Batch Command Execution
Fig. 104 Cancel Waiting Commands menu command.
When a network batch command is in execution, you can click Cancel
Waiting Commands on the Device menu to cancel all commands waiting in
EliteConnect Management Utility’s work queue.
After the currently in-action commands complete or fail, all waiting commands are canceled.
NOTE: Depending on the HTTP behavior parameters specified on the HTTP
tab of the Options dialog box, you may wait a long period before the waiting
commands are canceled (see “HTTP Options” Section on page 77 for more
information).
Checking Whether Devices Are Alive
To check whether the selected devices are alive, carry out the Check Alive
command.
If the Status column shows “Alive” after the device management command
is completed, the MAC Address, Firmware, Up Time, and Model columns also
show system information about the device.
Configuring a Device by Web Browser
To configure the selected device by Web browser, carry out the Configure by
Web Browser command.
Changing the SSID Setting of Devices
To change the SSID setting of selected device, carry out the Change SSID
command. You’ll be prompted to specify the new SSID.
84
Fig. 105 Changing SSID dialog box.
Changing the Administration User Name and Password of Devices
To change the administration user name and password settings of every
selected device, carry out the Change Password command.
If the Device Password List functionality is disabled, the Changing User
Name and Password dialog box will appear asking you to enter the Current
admin. user name, Current admin. password, New user name, and New
password.
Fig. 106 Changing User Name and Password dialog box
if not using a Device Password List.
The User type option is for future models that have different users with different
access rights. (SMC2582W-B and SMC2586W-G don’t support multiple
administration user name/password pairs.)
If the Device Password List functionality is disabled, Current admin. user
name and Current admin. password, New user name will not be shown in the
Changing User Name and Password dialog box.
Fig. 107 Changing User Name and Password dialog
box if using a Device Password List.
85
Changing the RADIUS Server Setting of Devices
To change the RADIUS server settings of every selected device, carry out
the Change RADIUS Servers command. You’ll be prompted to enter the
Primary RADIUS server and Secondary RADIUS server.
Fig. 108 Changing RADIUS Servers dialog box.
The WPA (Wi-Fi Protected Access) standard uses IEEE 802.1x Port-Based
Network Access Control and RADIUS (Remote Authentication Dial-In User
Service) for advanced WLAN se-curity.
Managing Device Firmware by TFTP
To manipulate firmware and configuration files of every selected device by
TFTP, carry out the various By-TFTP commands. You’ll be prompted to enter
the IP address of the TFTP server (most of the time, specify the IP address
of the computer on which EliteConnect Management Utility runs) and specify
the folder containing or to contain the files. Refer to Section 4.3.2.4.3 for
more information.
Fig. 109 TFTP Server dialog box.
Upgrading Device Firmware
Carry out the Upgrade Firmware by TFTP command.
Backing up Device Configuration
Carry out the Back up Configuration by TFTP command.
Restoring Device Configuration
Carry out the Restore Configuration by TFTP command.
Managing Device Firmware by HTTP
To manipulate firmware and configuration files of every selected device by
HTTP, carry out the various By-HTTP commands. You’ll be prompted to specify the folder containing or to contain the files. Refer to Section 4.3.2.4.3 for
more information.
86
Upgrading Device Firmware
Carry out the Upgrade Firmware by HTTP command.
Backing up Device Configuration
Carry out the Back up Configuration by HTTP command.
Restoring Device Configuration
Carry out the Restore Configuration by HTTP command.
Printing the Active Device List
To print the active device list, carry out the Print command on the File
menu. And you can preview the pages that will be printed by carrying out
the Print Preview command.
Sending the Active Device List to Others by E-mail
The active device list can be sent to others by e-mail. Click Send on the File
menu to do this.
87
Appendix A: Default Settings
TIP: Press the Default button on the powered-on SMC2586W-G to reset the
configuration settings to factory-default values.
88
Appendix B: Troubleshooting
Check the following first:
• Make sure that the power of the SMC2586W-G is on and the Ethernet
cables are connected firmly to the RJ-45 jacks of the SMC2586W-G.
• Make sure that the LED ALV of the SMC2586W-G is blinking to indicate
the SMC2586W-G is working.
• Make sure the types of the Ethernet cables are correct. Recall that there
are two types—straight-through and crossover.
Wireless Settings Problems
• The wireless client computer cannot associate with an SMC2586W-G.
• Is the wireless client set in infrastructure mode?
• Check the operating mode of the WLAN NIC.
• Is the SSID of the WLAN NIC identical to that of the prospective
SMC2586W-G?
• Check the SSID setting of the WLAN NIC and of the SMC2586W-G.
• Is the WEP functionality of the prospective SMC2586W-G enabled?
• Make appropriate WEP settings of the client computer to match those
of the SMC2586W-G.
• Is the prospective SMC2586W-G within range of wireless communication?
• Check the signal strength and link quality sensed by the WLAN NIC.
TCP/IP Settings Problems
Fig. 110. Communication stages for a client to reach its correspondent host.
89
For a wireless client computer to communicate with a correspondent host on
the Internet by the host’s domain name (e.g. http://www.wi-fi.com), it first
sends a DNS request to a DNS server on the Internet. The DNS request travels first to the AP, then the AP relays this request to the default gateway of
the client computer. Finally, this request is forwarded by the gateway to the
DNS server on the Internet. The DNS reply issued by the DNS server is
transmitted back to the client computer following a reverse path. When the
client computer receives the DNS reply, it knows the IP address of the correspondent host and sends further packets to this IP address.
As illustrated in Fig. 110, the communication path could be broken at some of
the stages. The OS-provided network diagnostic tool, ping.exe, can be
employed to find out TCP/IP-related communication problems.
NOTE: If two or more NICs are installed and operating on a client computer,
TCP/IP may not work properly due to incorrect entries in the routing table.
Use the OS-provided command-line network tool, route.exe, to add or delete
entries from the routing table. Or, use Windows-provided Device Manager to
disable unnecessary NICs.
Solve the following problems in order:
• My SMC2586W-G does not respond to ping from the client computer.
• Are two or more NICs installed on the client computer?
• Use Windows-provided Device Manager to disable unnecessary NICs.
• Is the underlying link (Ethernet or IEEE 802.11g) established?
• Make sure the Ethernet link is OK.
• Make sure the wireless settings of the wireless client computer and of
the SMC2586W-G match.
• Are the IP address of the client computer and the IP address of the
SMC2586W-G in the same IP subnet?
• Use WinIPCfg.exe or IPConfig.exe to see the current IP address of the
client computer. Make sure the IP address of the client computer and
the IP address of the SMC2586W-G are in the same IP subnet.
TIP: If you forget the current IP address of the SMC2586W-G, use Wireless
Router/AP Browser to get the information (see Appendix B-3).use the SMC
Scan utility that is on the CD.
• The DNS server(s) of the client computer do not respond to ping from
the client computer.
• Solve the preceding problems first.
90
• If you cannot find any incorrect settings of the SMC2586W-G, the
default gateway of the SMC2586W-G may be really down or there are
other communication problems on the network backbone.
Other Problems
• My SMC2586W-G has been set to obtain an IP address automatically by
DHCP. How can I know its acquired IP address so that I can manage it
using a Web browser?
• Use the SMC2586W-G Scan Utility (WLBrwsr.exe), which is included in
the SMC2586W-G Installation CD. This utility can discover nearby
SMC2586W-Gs and show their MAC addresses and IP addresses. In
addition, it can launch the Web browser on your computer.
NOTE: On Windows 2000/XP, SMC2586W-G Scan Utility can only be run
by a user with administrator privilege.
NOTE: SMC2586W-G Scan Utility does not scan the SMC2682W.
Fig. 111 SMC2586W-G Configuration Utility.
• My SMC2586W-G stops working and does not respond to Web
management requests.
• The firmware of the SMC2586W-G may be stuck in an incorrect state.
• Unplug the power connector from the power jack, and then re-plug the
connector to restart the SMC2586W-G.
• Contact our technical support representatives to report this problem,
If this happens after a failed firmware upgrade process, the firmware of
the SMC2586W-G may have been corrupted.
• If the SMC2586W-G still does not work after restarting, there may be
hardware component failures in the SMC2586W-G.
• Contact our technical support representatives for repair.
91
Appendix C : Distances and Data Rates
Important Notice: Maximum distances posted below are actual tested distance
thresholds. However, there are many variables such as barrier composition and
construction and local environmental interference that may impact your actual
distances and cause you to experience distance thresholds far lower than
those we post below. If you have any questions or comments regarding the
features or performance of this product, or if you’d like information regarding
our full line of wireless products, you can visit us on the web at www.smc.com
or you can call us toll-free at 800.SMC.4YOU. SMC Networks stands behind
this and every product we sell with a 30 day satisfaction guarantee and with
a limited-lifetime warranty.
92
Appendix D: Technical Specification
SMC2586W-G Wireless Bridge
Standards:
• 802.11b
• 802.11g
• 802.3
• 802.3u
• 802.3af
SMC2682W are in the Bridging
environment)
• Bridge Slave (used when
SMC2586W-G, SMC2582W-B, and
SMC2682W are in the Bridging
environment)
Interface:
• 10/100 Mbps RJ-45 Connector
• RS-232c Serial Connector
• 802.11b/g WLAN
Security:
• 64/128-bit WEP
• 802.1x
• WPA
• MAC address filtering
• Disabled SSID broadcast
• Wireless client isolation
Configuration and Management:
• Web-browser
• Telnet
• TFTP
• SNMP
• Syslog
• Event Logging
LEDs
• Power
• LAN
• WLAN
• Alive
Environmental
• Temperature: Operating (0~55C),
storage (-20~70C)
• Humidity: 5% to 95% noncondensing in storage
Electromagnetic Compatibility:
• FCC Class B
• Industry Canada
• CE
• ETS 300.328; ETS 300 826
Data rate & modulation:
• OFDM@54Mbps, CCK@11/5.5Mbps,
DQPSK@2Mbps and DBSK@1Mbps
Radio Technology:
• OFDM
• DSSS
Operating Range:
• Up to 1,155 feet
Channels:
• USA: 1-11 (FCC),
• Canada: 1-11 (IC),
• Europe: 1-13 (ETSI),
• France: 10-13
• Japan: 1-13 (Japan)
Frequency range:
• 2.402 ~ 2.472 GHz (North America)
• 2.402 ~ 2.4970 GHz (Japan)
• 2.402 ~ 2.4835 GHz (Europe ETSI)
• 2.4465 ~ 2.4835 GHz (France)
Transmission output Power:
• 18 dBm max
Receiving Sensitivity:
• < -80 dBm, Typical
Antenna:
• Removable Antenna with
R-SMA connector
Operational Modes:
• Access Point/Bridge (used in pure
SMC2586W-G bridging environment)
• Bridge Master (used when
SMC2586W-G, SMC2582W-B, and
93
Power Supply:
• Input: 100VAC 60Hz
• Output: 12VDC, 1A
Dimensions (without antenna):
• 8.5” x 5.5 “ x 1.25”
Weight:
• 0.96 lbs
SMCPWR-INJ3 Power Injector
Input Power Requirements
• AC Input Voltage
• AC Frequency
• AC Input Current
: 90 – 264Vac
: 47 – 63 Hz
: 2A at 100Vac, 1A at 240Vac, (-48Vdc)
Power over LAN output Specification
• Pin Assignments and Polarity: (_) 4/5 (_) 7/8
• Output Voltage:
• Aggregate Power:
50W (48Vdc)
Mechanical Requirement
Dimensions:
Weight:
4” x 5.5” x 1.5”
1.38 Lbs
Indicators
• System Indicator:
• AC Power (Green)
• Power Active (Red) 0.05 A°’Io°’0.8 A
• Over Current Protection (Red, Flash) Io°÷1.0 A
• Connectors Shielded Rj-45
Environmental Conditions
• Operating Temperature:
• Operating Humidity:
• Storage Temperature:
• Storage Humidity:
• Operating Altitude:
32° to 104° F (0° to 40° C)
Maximum 90% Non-condensing
-13° to 185° F (-25° to 85° C)
Maximum 95%, Non-condensing
-1000 to 10,000 ft. (-304.8 to 3048 m)
Safety Approval
• UL 1950
• CSA A22.2 No. 950
• EN 60950
• CB
Regulatory Compliance
• CE Compliance
Electromagnetic Emission and Immunity
• A. FCC Part 15 Class B
94
FOR TECHNICAL SUPPORT, CALL:
From U.S.A. and Canada (24 hours a day, 7 days a week)
(800) SMC-4-YOU; Phn: (949) 679-8000; Fax: (949) 679-1481
From Europe : Contact details can be found on
www.smc-europe.com or www.smc.com
INTERNET
E-mail addresses:
[email protected]
[email protected]
Driver updates:
http://www.smc.com/index.cfm?action=tech_support_drivers_downloads
World Wide Web:
http://www.smc.com/
http://www.smc-europe.com/
For Literature or Advertising Response, Call:
U.S.A. and Canada:
(800) SMC-4-YOU
Fax (949) 679-1481
Spain:
34-91-352-00-40
Fax 34-93-477-3774
UK:
44 (0) 1932 866553
Fax 44 (0) 118 974 8701
France:
33 (0) 41 38 32 32
Fax 33 (0) 41 38 01 58
Italy:
39 (0) 3355708602
Fax 39 02 739 14 17
Benelux:
31 33 455 72 88
Fax 31 33 455 73 30
Central Europe:
49 (0) 89 92861-0
Fax 49 (0) 89 92861-230
Nordic:
46 (0) 868 70700
Fax 46 (0) 887 62 62
Eastern Europe:
34 -93-477-4920
Fax 34 93 477 3774
Sub Saharan Africa:
216-712-36616
Fax 216-71751415
North West Africa:
34 93 477 4920
Fax 34 93 477 3774
CIS:
7 (095) 7893573
Fax 7 (095) 789 357
PRC:
86-10-6235-4958
Fax 86-10-6235-4962
Taiwan:
886-2-87978006
Fax 886-2-87976288
Asia Pacific:
(65) 238 6556
Fax (65) 238 6466
Korea:
82-2-553-0860
Fax 82-2-553-7202
Japan:
81-45-224-2332
Fax 81-45-224-2331
Australia:
61-2-8875-7887
Fax 61-2-8875-7777
India:
91-22-8204437
Fax 91-22-8204443
If you are looking for further contact information, please visit www.smc.com or
www.smc-europe.com.
Model Number: SMC2586W-G
38 Tesla
Irvine, CA 92618
Phone: (949) 679-8000