1
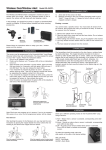
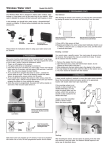
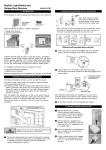
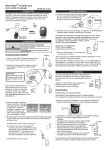
Gate Receiver
Model R4G
1. INTRODUCTION
The R4G receiver is an access control receiver capable of having up to 1000 remote controls. Each remote control can be individually added, deleted,
or temporary disabled. The following advanced features are also available:
·
·
·
·
NC / NO output selection
Relay latch / momentary contact selection
Latch duration
Momentary contact duration
Occupied – Lights when the
displayed memory location
(remote) is occupied
Antenna Connector –
For connection to
direct antenna or with
coax cable to a remote
antenna
Blocked – Lights when the
displayed memory location
(remote) is blocked
Relay – Lights when the
relay is triggered
LED display – Display
selected memory location
Program – Lights when the
receiver is in program mode, it
will not receive any incoming
signal during programming
DISP – To display information for the
memory location such as occupied
remotes, blocked remotes, empty
memory locations etc
ADD – To add remote control to the
receiver
ADV SET – Advanced
Features/Advanced
settings
DEL – To delete a remote control
ACT – To activate or inactive a
remote control (This function may
be called Block and Unblock)
12V-24V AC/DC
Relay Com
NO Contact
Scroll Down – Scroll all the memory
locations to check their status, such
as occupied, blocked, empty etc.
2. INSTALLATION
1. Hang the receiver with 2 screws (Provided in the package).
2. Connect the push button or radio terminals to the 2 contacts labeled “Relay Com” and “NO Contact”.
3. Connect the 12V – 24V AC/DC power supply to the 2 indicated terminals. You will hear 3 beeps after
plugging in the power supply.
3. OPERATION
Basic functions
Add Remote Controls to auto assigned location
Display
ADD
->
Press
Display
-> ADD ->
-> Press the button on the Remote, if hear 3 beeps confirmed the
remote is programmed to the memory location [0 0 0].
Press
Display will then show the next available memory location.
Press
DISP
twice to exit or add another remote by pressing its button.
–1–
3. OPERATION (CONT)
Delete Remote Control
Delete the remote control(s) from the memory location, e.g. 123.
Display
DEL ->
Display
1 2 3
->
Press
DEL
->
Press
->
->
Press
DEL
Press
-> If hear 3 beeps, confirmed the memory
location [123] is deleted.
Press DISP twice to exit or enter another memory location to delete.
Block Remote Control (Inactivate)
This is to temporary disable specific remote control(s) from the memory location, e.g. 123.
Display
ACT
->
1 2 3
->
Press
Display
->
->
ACT
Press
->
Press
ACT
Press
-> If hear 3 beeps, confirmed the memory
location [123] is blocked.
Press DISP twice to exit or enter another memory location to block.
If a signal from a blocked remote is received, the receiver will sound a long beep and the memory location will be displayed. But the relay will
not be activated.
Unblock Remote Control (Activate)
This is to reactivate the blocked remote control(s), e.g. 123.
ACT ->
Display
1 2 3
->
Press
Press
Display
-> ACT
Press
->
->
Press
ACT
-> If hear 3 beeps, confirmed the memory
location [123] is unblocked.
Press
DISP twice to exit or enter another memory location to unblock.
Add Remote Control to designated location
Add the remote control(s) to the memory location you want to add a remote, e.g. 123.
Display
ADD
->
1 2 3
->
Press
Display
-> ADD
Press
->
-> ADD
Press
Press
->
If hear 3 beeps, confirmed the Remote
is programmed to the memory location
[123].
The display will then show the next available memory location.
Press DISP twice to exit or add another remote by pressing ADD
again.
Display Menu
[DISP] [1] – Display status for all memory locations
[DISP] [2] – Occupied memory locations
[DISP] [3] – Empty memory locations
[DISP] [5] – Unblocked memory locations
After entering the specific display menu, the display can be shown by scrolling down with the
key to show all the related memory locations.
Example: To show all occupied memory locations
Display
1-> 2
DISP ->
Press
->
Press
-> (all the occupied memory locations will be shown, all with the occupied LED on)
Press
You can also display a specific memory location by entering the memory location number in any on of the display sub-menu.
Example: You want to check memory location 123 to see if it is occupied, but you are in the blocked sub-menu, i.e. [DISP][4]
Display
DISP
Press
->
Display
->
4
Press
->
->
1 2 3
Press
You can check whether the blocked LED is ON or not, occupied LED will also show whether this memory location is occupied or not.
–2–
3. OPERATION (CONT)
Advanced Features
Relay Trigger Selection: NO/NC/Toggle
Display
ADV
SET
Display
->
->
Press
->
1
then enter;
Press
[1] for NO – the RELAY LED will stay off.
[2] for NC – the RELAY LED will stay on.
[3] for Toggle – the RELAY LED will subject to previous relay setting. If the relay is in NO, then the RELAY LED will keep stay off. After activated, the
RELAY LED will change to on. If the relay is in NC, then the RELAY LED will keep stay on. After activated, the RELAY LED will change to off.
If hear 3 beeps, confirmed the change in relay trigger setting.
Note: The factory default is set to NO.
Relay Trigger Pulse Duration
To change the setting:
ADV
SET
Display
->
->
Press
2
Display
->
then enter;
Press
[1] for 0.3 second
[2] for 0.5 second
[3] for 1.0 second
[4] for 2.0 seconds
[5] for 5.0 seconds
If hear 3 beeps, confirmed the change in relay trigger duration setting.
Note : The factory default is 0.3 second.
Enable / Disable Beeping
To change the beep setting:
Display
ADV ->
SET
3
->
Press
Display
->
then enter;
Press
[1] enable beeping
[2] disable beeping
If hear 3 beeps, confirmed the change in beep setting.
Note : The factory default is Enable.
Erase/Format memory
The memory can be completely erased or formatted.
To erase/format memory:
Display
ADV
SET
Press
->
Display
0
->
Press
->
Display
then enter
1
or
2
->
->
Press
[1] to erase the1st memory
[2] to erase the 2nd memory
If hear 3 beeps, confirmed the memory content is copied. You need to restart the unit by disconnecting the power supply then reconnects it again.
–3–
4. ACCESSORIES
Optional accessories can be added to the Gate Receiver. Skylink offers Keychain Transmitter Model R3-T4 and R3-T2 to work with your Gate Receiver.
For more information, please visit our website at www.skylinkhome.com or contact us.
5. FCC
This device complies with Part 15 of the FCC Rules. Operation is subject to the following two conditions: (1) This device may not cause harmful interference, and (2)
This device must accept any interference received, including interference that may cause undesired operation.
WARNING:
Changes or modifications to this unit not expressly approved by the party responsible for compliance could void the user’s authority to operate the equipment.
NOTE:
This equipment has been tested and found to comply with the limits for a Class B digital device, pursuant to Part 15 of the FCC Rules. These limits are designed to provide
reasonable protection against harmful interference in a residential installation. This equipment generates, uses and can radiate radio frequency energy and, if not installed
and used in accordance with the instructions, may cause harmful interference to radio communications.
However, there is no guarantee that interference will not occur in a particular installation. If this equipment dose cause harmful interference to radio or television reception,
which can be determined by turning the equipment off and on, the user is encouraged to try to correct the interference by one or more of the following measures:
- Reorient or relocate the receiving antenna.
- Increase the separation between the equipment and receiver.
- Connect the equipment into an outlet on a circuit different from that to which the
receiver is connected.
- Consult the dealer or an experienced radio/TV technician for help.
6. WARNING
WARNING
To prevent possible SERIOUS INJURY or DEATH from a closing door/gate:
- Activate door/gate ONLY when it can be seen clearly, is properly adjusted, and there are no obstructions to door/gate travel.
- ALWAYS keep door/gate in sight until completely closed. NEVER permit anyone to cross path of closing door/gate.
CAUTION:
Disconnect power to access device before installing the receiver or servicing this unit.
7. WARRANTY
If, within one year from date of purchase, this product should become defective (except battery), due to faulty workmanship or materials, it will be repaired or replaced,
without charge. Proof of purchase and a Return Authorization are required.
8. CUSTOMER SERVICE
If you would like to order Skylink’s products or have difficulty getting them to work,
please :
1. visit our FAQ section at www.skylinkhome.com , or
2. email us at [email protected] , or
3. call our toll free at 1-800-304-1187 from Monday to Friday, 9 am to 5 pm EST.
Fax (800) 286-1320
CUSTOMER SERVICE
17 Sheard Avenue, Brampton, Ontario, Canada L6Y 1J3
Email:[email protected]
http://www.skylinkhome.com
P/N. 101Z440-001
©2006 SKYLINK GROUP