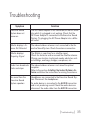
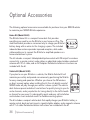
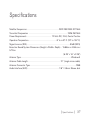
1
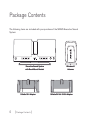
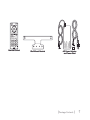
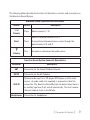
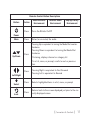
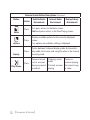
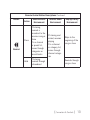
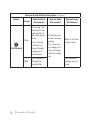
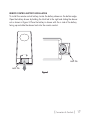
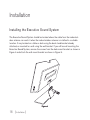
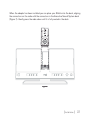
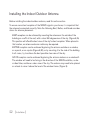
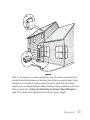
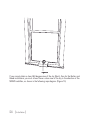
Installation & User Guide
Stiletto ™
Executive Sound System
Congratulations on the purchase of your new SIRIUS
Stiletto Executive Sound System!
Your new SIRIUS® Stiletto™ Executive Sound System lets you enjoy SIRIUS Satellite
Radio’s digital entertainment in your home or office and listen to live broadcasts and
stored content. Its two-way speaker design ensures accurate reproduction of any music or audio you listen to. While docked in the Executive Sound System, your Stiletto
can capture both scheduled and unscheduled SIRIUS programming.
For the latest information about this and other SIRIUS products and accessories, visit
http://www.sirius.com.
To enhance your Stiletto listening experience, several optional accessories are available to make your Stiletto even more versatile. Turn to page 36 for more information.
Table of Contents
Table of Contents. . . . . . . . . . . . . . . . . . . . . . . . . . . 3
Warning and Safety Information. . . . . . . . . . . . . . . . . . .
FCC Caution. . . . . . . . . . . . . . . . . . . . . . . . . . . . . . .
Canadian Compliance . . . . . . . . . . . . . . . . . . . . . . . . . . .
Safety Precautions. . . . . . . . . . . . . . . . . . . . . . . . . . . . .
Warnings . . . . . . . . . . . . . . . . . . . . . . . . . . . . . . . .
4
4
4
4
5
Package Contents. . . . . . . . . . . . . . . . . . . . . . . . . . . 6
Controls & Connectors. . . . . . . . . . . . . . . . . . . . . . . . 8
Remote Control Reference Guide. . . . . . . . . . . . . . . . . . . . . . 10
Remote Control Battery Installation. . . . . . . . . . . . . . . . . . . . 17
Installation. . . . . . . . . . . . . . . . . . . . . . . . . . . . .
Installing the Executive Sound System. . . . . . . . . . . . . . . . . . . . Connecting the AC Power Adapter . . . . . . . . . . . . . . . . . . . . . Docking the SIRIUS Radio . . . . . . . . . . . . . . . . . . . . . . . . .
Installing the Indoor/Outdoor Antenna. . . . . . . . . . . . . . . . . . . . Subscribing to the SIRIUS Service. . . . . . . . . . . . . . . . . . . . .
Operation . . . . . . . . . . . . .
Scheduling a Recording. . . . . . . .
Editing a Scheduled Recording . . . . .
Using the Preset and the Band Buttons . .
.
.
.
.
.
.
.
.
.
.
.
.
.
.
.
.
.
.
.
.
.
.
.
.
.
.
.
.
.
.
.
.
.
.
.
.
.
.
.
.
.
.
.
.
.
.
.
.
.
.
.
.
.
.
.
.
.
.
.
.
.
.
.
.
18
18
19
20
22
29
. 30
. . 30
. . 33
. 33
Troubleshooting. . . . . . . . . . . . . . . . . . . . . . . . . . . 35
Optional Accessories. . . . . . . . . . . . . . . . . . . . . . . .
36
Specifications. . . . . . . . . . . . . . . . . . . . . . . . . . . .
37
Warranty. . . . . . . . . . . . . . . . . . . . . . . . . . . . . . . 38
Copyrights & Trademarks . . . . . . . . . . . . . . . . . . . . . . 39
[ Table of Contents ]
Warning and Safety Information
FCC Caution
Any changes or modifications not expressly approved by the party responsible for
compliance could void the user’s authority to operate this equipment.
This device complies with part 15 of the FCC Rules.
Operation is subject to the following two conditions:
1. This device may not cause harmful interference, and
2. This device must accept any interference received, including interference that
may cause undesired operation.
This transmitter must not be co-located or operating in conjunction with any other
antenna or transmitter.
Canadian Compliance
This Class B digital apparatus complies with Canadian ICES-003.
Cet appareil numérique de la classe B est conforme à la norme NMB-003 du Canada.
Safety Precautions
Be sure to observe the following warnings. Failure to follow these safety instructions
and warnings may result in a serious accident and/or personal injury.
[ Warning and Safety Information ]
• Installation must be performed according to this installation guide. SIRIUS is not
responsible for issues arising from installations not performed according to the procedures in this installation guide.
• Use only the provided AC Power Adapter.
• Do not install or use the unit where it will be exposed to high levels of humidity,
moisture, or dust.
• To avoid short circuits, do not open the unit, and never put or leave any metallic
objects (coins, tools, etc.) inside the unit.
• If the unit emits smoke or unusual odors, turn the power off immediately and disconnect the unit from any power source.
• Do not drop the unit or subject it to strong shocks.
• The installation and use suggestions contained in this installation guide are subject
to any restrictions or limitations that may be imposed by applicable law. The
purchaser should check applicable law for any restrictions or limitations before
installing and/or operating this unit.
Warnings
Cleaning and Maintenance
If the Executive Sound System becomes dirty, turn the power off and wipe it clean with
a soft cloth. Do not use hard cloths, strong cleaning fluids, paint thinner, alcohol, or
other volatile solvents to clean. These may cause damage to the unit.
[ Warning and Safety Information ]
Package Contents
The following items are included with your purchase of the SIRIUS Executive Sound
System:
BAND
Executive Sound System
with Desk Mount Bracket
Stiletto SL2 Adapter
[ Package Contents ]
Windowsill
Antenna
Stiletto SL10 & SL100 Adapter
mute
back
home
options
display
+
preset
tune
1
2
4
5
7
8
9
jump
0
FM
3
6
Remote Control
Wall Mount Bracket
AC Power Adapter
and Power Cord
[ Package Contents ]
Controls & Connectors
Figure 1 identifies the buttons, controls, and connectors of the Stiletto Executive
Sound System.
Docking
Connector
Presets 6-10
Presets 1-5
Band
Power
BAND
Volume
Headphones
ANT
AUX IN
DC12V
Figure 1
[ Connectors & Controls ]
The following tables describe the functions of the buttons, controls, and connectors on
the Executive Sound System.
Executive Sound System Button Descriptions
Button
1–10
Presets
Action
Press
Description
Selects presets 1–10.
Selects the preset band A, B, or C
Band
Volume
Press
A second and subsequent press cycles through the
preset bands, A, B, and C
Turn
Increases or decreases the audio volume
Executive Sound System Connector Descriptions
Connector
ANT
Description
Connection for the Indoor/Outdoor Antenna.
DC12V
Connection for the AC Adapter.
AUX IN
Optional audio input for a CD player, MP3 player or other audio
source. An audio cable (not supplied) is required to utilize this
connection. The Executive Sound System can detect when there is
an auxiliary input and it will switch automatically. You must remove
the input cable to listen to the Stiletto.
Headphones
Connection for headphones.
[ Connectors & Controls ]
Remote Control Reference Guide
Figure 2 and the table following identify and describe the buttons of the remote control. The remote control works when the Stiletto is in the Executive Sound System.
Power
Back
back
mute
Mute
home
Home
Select
Media Dial (CCW)
Rewind
Media Dial (CW)
Options
Fast-Forward
options
display
Rewind
Love
Preset
Tune
Jump
+
preset
tune
1
2
3
4
5
6
7
8
9
jump
0
FM
Figure 2
10 [ Connectors & Controls ]
Display
Fast-Forward
Play/Pause
Volume
Numeric
Keypad
FM
Remote Control Button Descriptions
Button
Action
Satellite Radio
Environment
Internet Radio
Environment
Press
Turns the Stiletto On/Off
Press
Mutes (or un-mutes) the audio
Replay/Library
Environment
Power
Mute
Pressing Up is equivalent to turning the Media Dial counterclockwise
Up/Down
Press
Pressing Down is equivalent to turning the Media Dial
clockwise
If listening, displays channel or category list
If in a list, menu, or prompt, scrolls to next or previous
item
Press
Left/Right
Select
back
Pressing Right is equivalent to Fast-Forward
Pressing Left is equivalent to Rewind
Press
Selects highlighted items in a list, menu, or prompt
Press
Returns back to the screen displayed just prior to the currently displayed screen
[ Connectors & Controls ]
11
Remote Control Button Descriptions Continued
Button
Action
Press
home
Press
options
Internet Radio
Environment
Replay/Library
Environment
First press returns to the Home screen
Additional press returns to the Now Playing screen
Displays available options for the currently displayed
screen
If no options are available, nothing is displayed
Press
Cycles between 3-channel display mode, 6-channel display mode, artist name, and song title when in the channel
browsing mode
Press
Pauses a broadcast or resumes
playing a paused
broadcast
display
Play/Pause
Satellite Radio
Environment
12 [ Connectors & Controls ]
If playing, mutes
audio
If muted, resumes
playing
Pauses or
resumes playing
the current song
or show
Remote Control Button Descriptions Continued
Button
Action
Press
Rewind
Hold
Satellite Radio
Environment
If listening,
rewinds a
broadcast to the
previous song or
show
If in a channel
or preset list,
moves through
categories or
preset banks
If listening,
rewinds through
a broadcast
Internet Radio
Environment
If listening and
muted, resumes
playing
If in a channel
or category list,
moves through
channel categories
Replay/Library
Environment
Skips to the
beginning of the
song or show
Rewinds through
song or show
[ Connectors & Controls ]
13
Remote Control Button Descriptions Continued
Button
Action
Press
Fast-Forward
Hold
Satellite Radio
Environment
If listening, fastforwards in the
replay buffer to
the next song or
show
If in a channel
or preset list,
moves through
categories or
preset banks
Fast-Forwards
through the
replay buffer
14 [ Connectors & Controls ]
Internet Radio
Environment
Replay/Library
Environment
If listening and
muted, resumes
playing
Skips to the next
song or show
If in a channel
or category list,
moves through
channel categories
Fast-Forwards
through song or
show
Remote Control Button Descriptions Continued
Button
Action
Press
Satellite Radio
Environment
Replay/Library
Environment
Saves the song
or show if possible, or adds to
favorites when
song/show cannot be saved
While recording,
prompts to stop
recording
Love
Internet Radio
Environment
Adds the artist/song to the favorites
list
Displays recording setup screen
Hold
+/–
Volume
Press
preset
Press
tune
Press
While recording,
prompts to stop
recording
+ increases the audio volume
— decreases the audio volume
Changes to the preset mode and displays the list of
preset channels
A second and subsequent press cycles through the
preset banks, A, B, and C
Changes to the direct tuning mode where channel numbers may be entered
[ Connectors & Controls ]
15
Remote Control Button Descriptions Continued
Button
0-9
Action
Press
Satellite Radio
Environment
Internet Radio
Environment
Replay/Library
Environment
In Tune Mode: Directly selects the channel indicted by
the numbers which are pressed
In Preset Mode: Selects presets 0 – 9
Jumps to a preselected traffic/weather channel
jump
FM
FM
Press
A second press returns to the previous channel or
song/show
No action
Press
(FM is disabled when the Stiletto is in the Executive Sound
System)
16 [ Connectors & Controls ]
Remote Control Battery Installation
To install the remote control battery, locate the battery drawer on the bottom edge.
Open the battery drawer by holding the latch tab to the right and sliding the drawer
out as shown in Figure 3. Place the battery in drawer with the + side of the battery
facing up and slide the drawer back into the remote control.
+
Latch Tab
Latch Tab
Figure 3
[ Connectors & Controls ]
17
Installation
Installing the Executive Sound System
The Executive Sound System should be located where the cable from the indoor/outdoor antenna can reach it when the indoor/outdoor antenna is installed in a suitable
location. It may located on a table or desk using the desk stand bracket already
attached, or mounted to a wall using the wall bracket. If you will be wall mounting the
Executive Sound System, remove the screws from the desk mount bracket as shown in
Figure 4 and attach the wall mount bracket as shown in Figure 5.
Figure 4
18 [ Installation ]
Figure 5
Connecting the AC Power Adapter
Connect the AC Power Adapter to the DC12V connector at the rear of the Executive
Sound System (Refer to Figure 1 on page 8 for the location of this connection.) Plug
the AC adapter into a working AC outlet.
[ Installation ]
19
Docking the SIRIUS Radio
Two adapters are included with the Executive Sound System which allows it to be
used with the Stiletto 2 and the Stiletto 10/100 model radios. Before you can place
your Stiletto into the dock, you will need to install the adapter for your model of Stiletto
radio into the dock.
Refer to page 6 where the adapters are shown and identify the correct adapter for
your model of Stiletto radio. Take the adapter for your radio and place it into the dock
as shown in Figure 6. When correctly inserted into the dock, the adapter will snap into
place and be flush with the bottom and rear of the docking area as shown.
BAND
Figure 6
20 [ Installation ]
When the adapter has been installed you can place your Stiletto into the dock, aligning
the connectors on the radio with the connectors in the Executive Sound System dock
(Figure 7). Gently press the radio down until it is fully seated in the dock.
Satellite Radio
Internet Radio
Library
back
options
home
display
BAND
Figure 7
[ Installation ]
21
Installing the Indoor/Outdoor Antenna
Before installing the indoor/outdoor antenna, read this entire section.
To ensure consistent reception of the SIRIUS signal in your home, it is important that
the antenna be oriented correctly. Note the following Best, Better, and Good considerations for antenna placement.
BEST reception can be achieved by mounting the antenna on the outside of the
building on a soffit at the roof, with a clear 360 degree view of the sky. (Figure 8, A)
This position will afford the best view of the sky for best reception. When placed in
this location, an antenna extension cable may be required.
BETTER reception can be achieved by placing the antenna outside on a window,
on a porch, or on a patio (Figure 8, B), or by mounting it to the side of the building.
In all cases, try to achieve the best possible clear view of the sky.
GOOD reception can be achieved by placing the antenna indoors on a windowsill.
The window will need to be facing in the direction of the SIRIUS satellites, as described later, and have a clear view of the sky. The antenna may need to be placed
on a book to raise it above the level of the window frame. (Figure 9)
22 [ Installation ]
A.
B.
Figure 8
Note: If your location is in major metropolitan area, the antenna can possibly be
located inside the home because terrestrial transmitters are used to boost signal
strength. If you are able to achieve a good terrestrial signal with the antenna
indoors, you can disregard the remainder of these antenna installation instructions.
Refer to the section, Testing and Optimizing the Antenna Signal Strength on
page 27 for details about displaying the terrestrial signal strength.
[ Installation ]
23
Figure 9
If you cannot obtain a clear 360 degree view of the sky (Best), then for the Better and
Good installations you must at least have a clear view of the sky in the direction of the
SIRIUS satellites, as shown in the following map diagram. (Figure 10)
24 [ Installation ]
SKY
NORTH
WEST
1
4
5
EAST
3
2
HORIZON
SOUTH
Figure 10
Use the map to find the area you are located in (1 to 5). Then find the direction in
which you need to have a clear view of the sky:
Area 1: You will need a location with a clear view of the sky facing EAST or
NORTHEAST or SOUTHEAST
Area 2: You will need a location with a clear view of the sky facing NORTH or
NORTHEAST
Area 3: You will need a location with a clear view of the sky facing NORTH or
NORTHWEST
Area 4: You will need a location with a clear view of the sky facing WEST or
NORTHWEST or SOUTHWEST
Area 5: You will need a clear view of the sky facing STRAIGHT UP (Outdoors only,
refer to Figure 8)
[ Installation ]
25
The location for the antenna must have an unobstructed view of the sky in the direction
indicated for your area. (Figure 11)
For example, suppose you live in Area 2. You determined that your antenna will need
to have a clear view of the sky facing North or Northeast. The exact direction is
determined by your specific location in Area 2 relative to the X on the map: If you live
in Texas, you will need a more North facing clear view of the sky whereas if you live in
southern California, you will need a more Northeast facing clear view of the sky.
NORTH
EAST
WEST
SOUTH
Figure 11
Once you have found a suitable location for the antenna, route the antenna cable to
the home dock. Be sure you avoid any obstructions that could crimp, kink, or twist
the cable. Use protective grommets wherever rough openings are encountered. If the
antenna is installed outdoors, route the cable from the antenna location to the interior
of the home, working the cable through the basement, under a window sill, etc., and
make adjustments to take up cable slack as necessary. Connect the antenna cable to
the antenna connector of the dock. (Refer to Figure 1 on page 8.) Optional antenna
extension cables are available if needed.
26 [ Installation ]
Testing and Optimizing the Antenna Signal Strength
The stronger the SIRIUS signal strength, the less likely it is that you will experience an
interruption of the audio when listening to a broadcast. To assist you in adjusting the
antenna aiming for optimal reception, your SIRIUS radio can display a screen showing
the strength of the SIRIUS signal being received, similar to Figure 12.
To access the antenna aiming or signal indicator screen, consult the user guide
which accompanied your SIRIUS radio. The SATELLITE portion of the display screen
(Figure 9) shows the strength of the signal being received from the satellite, while the
TERRESTRIAL portion of the display screen shows the strength of the signal being
received from terrestrial based transmitters, if available.
Antenna Aiming
Adjust your antenna
position to maximize signal
strength.
SATELLITE
TERRESTRIAL
Press BACK when done
Figure 12
Aiming the antenna consists of two adjustments. The first adjustment is to tilt the clamshell at a 45 degree angle. While observing the signal strength, make small adjustments
to the angle of tilt of the clamshell until the highest possible signal strength is achieved.
(Figure 13)
[ Installation ]
27
THIS SURFACE OF THE
ANTENNA SHOULD BE
POINTED AT THE SKY
TOWARDS THE DIRECTION
OF THE SATELLITES
Figure 13
The second adjustment is to turn the antenna slightly to the left or right until the highest possible signal strength is achieved. (Figure 14)
Figure 14
28 [ Installation ]
If you find that it is not possible to receive a good SIRIUS signal in your location,
SIRIUS offers a outdoor home antenna which can be mounted to the exterior of the
home. The outdoor home antenna offers more mounting options, such as mounting on
an existing mast or satellite dish mast, and provides 30 ft. of antenna cable.
For more tips on installing the antenna, please visit the SIRIUS website at http://www.
sirius.com and click on the Install/Activate link.
Subscribing to the SIRIUS Service
Before you can listen to SIRIUS radio, you must activate your device.
• The Stiletto must be receiving the SIRIUS signal throughout the activation procedure.
• The built-in activation guide will help you through the activation process. To subscribe your Stiletto, simply follow the on-screen instructions. (Figure 15)
• You may also subscribe online at https://activate.sirius.com/ or by phone:
1.888.539.7474.
Figure 15
[ Installation ]
29
Operation
If you want to use headphones to listen to your Executive Sound System, plug the
headphones into the headphone jack on the right side of the unit shown in Figure 10.
If you want to connect an audio device such as an MP3 player or CD player to your
Executive Sound System, connect the audio output from audio device to the AUX IN
connection on the right side of the unit shown in Figure 16.
Headphones
AUX IN
Figure 16
Scheduling a Recording
To schedule a recording, select Setup New Recording from the Recording menu.
(Figure 17) If have not already set your time zone, you will be prompted to set it.
(Figure 18)
The New Recording screen allows you to set the parameters of the recording. (Figure
19) Use the Media Dial to highlight a parameter and press the Select button. Then
30 [ Operation ]
use the Media Dial to scroll the list until the correct selection is highlighted, and
press the Select button to select it. When complete, select Done.
Figure 17
Figure 18
Figure 19
The following table describes each parameter of the scheduled recording.
Parameter
Description
Notes
Channel
Any SIRIUS broadcast
channel may be selected
If a channel which has been locked
with the parental control feature is selected, the password must be entered
before you can listen to the recording
Date
The date of the recording
Dates may be selected from the present date to 4 weeks in the future
Start Time
The time of day the
recording will begin
If the date and time chosen has
already passed, you will receive a
warning when you attempt to save the
scheduled recording
Duration
The amount of time to
record
Recording times of 15 minutes to 6
hours may be selected
[ Operation ]
31
Parameter
Description
Notes
• No: The recording will take place
once at the specified time/date
• Weekly: The recording will take
place every seven days at the
specified time
Repeating
The recording can be set
to repeat at scheduled
intervals
• Daily: The recording will take place
every day at the specified time
• Mon - Fri: The recording will take
place every Monday through Friday
at the specified time
• Sat - Sun: The recording will take
place every Saturday and Sunday
at the specified time
Keep Last
For a repeating recording,
you may specify how many
previously recorded shows
to keep
32 [ Operation ]
• 1,2,3,5,10 Shows: Keeps the
selected number of previous
recordings
• All Shows: Keeps all previous
recordings
• If any option other than All is
set, the oldest recordings will
be automatically deleted as new
recordings are created
Editing a Scheduled Recording
Once you’ve set up a scheduled recording, you can review and edit the recording
settings by choosing Already Scheduled from the Recording menu. Selecting this
option will display a list of all recordings already scheduled. (Figure 20) Selecting a
scheduled recording from the list will take you to the Edit Recording screen and allow
you to make changes to the parameters for that recording. (Figure 21)
Figure 20
Figure 21
Using the Preset and the Band Buttons
The channel presets you have stored in the Stiletto may be selected by pushing the
1–10 preset buttons when in the Satellite Radio mode. To select the preset band (A,
B, or C), press and release the Band button until the desired preset band is displayed.
While presets cannot be saved using the 1–10 preset buttons on the Executive Sound
System, they can be saved using the Stiletto. To save a channel as a preset:
1. Tune to the desired channel.
2. Press the
Options button.
[ Operation ]
33
3. Highlight Save Channel as Preset and press the Select button. (Figure 22)
4. The Presets (A, B, C) Screen will be displayed. Use the Media Dial to highlight
the preset where you want the channel saved. Press and hold the Select Button to save the channel as a preset.
Figure 22
Presets can also be added quickly from the All Channels list without tuning to each
channel. Simply highlight the desired channel and press Options
Add this channel
to Presets. The device will automatically display the next “(empty)” preset for your to
use. Press and hold the Select button to save the channel in the highlighted slot.
To remove a channel as a preset, select the preset slot you no long desire and press
Options
Remove this Preset.
34 [ Operation ]
Troubleshooting
Symptom
Solution
Executive Sound
System does not
power on
The AC Power Adapter is not connected, or the AC outlet
into which it is plugged is not working. Check that the
AC Power Adapter is connected to the Executive Sound
System. Try plugging the AC Power Adapter into a different outlet.
Stiletto displays: Antenna Not Detected
The indoor/outdoor antenna is not connected to the Executive Sound System. Check the antenna connection.
Stiletto displays:
Acquiring Signal
The Stiletto is searching for a satellite signal.
Check for obstacles over or around the satellite antenna.
Change your location to eliminate nearby obstacles such
as buildings, overhangs, bridges, overpasses, etc.
Audio from broadcasts
starts and stops
The indoor/outdoor antenna is not aimed for optimal
reception.
Refer to the section Installing the Indoor/Outdoor Antenna and follow the instructions for aiming the antenna.
No sound from the
Executive Sound
System speakers
Headphones are connected to the Executive Sound System. Disconnect the headphones.
An audio device is connected to the AUX IN connection
and is not producing sound. Check the audio device or
disconnect the audio cable from the AUX IN connection.
[ Troubleshooting ]
35
Optional Accessories
The following optional accessories are available for purchase from your SIRIUS retailer
to maximize your SIRIUS Stiletto experience.
Home Kit (Model SLH2)
The Stiletto Home Kit is a compact home dock that provides
everything you need to use the Stiletto in your home or office. The
sleek home dock provides a convenient way to charge your Stiletto’s
battery along with an extra slot for charging a spare. The included
indoor/outdoor antenna provides improved reception, while audio
cables enable you to connect the Stiletto to amplified speakers or a
home entertainment system.
The kit includes a compact tabletop/desktop home dock with FM output for wireless
connectivity, a remote control, audio cables an adjustable indoor/outdoor windowsill
antenna with 20’ of cable, and an AC Adapter. Detailed installation instructions are
included with the kit.
Vehicle Kit (Model SLV2)
If you plan to use your Stiletto in a vehicle, the Stiletto Vehicle Kit will
maximize your safety and provide convenience by positioning the Stiletto
for easy viewing and operation. Whether you choose the FM wireless
or direct connect option when installing the kit, the rich digital sound of
SIRIUS radio will play through your vehicle’s stereo system. The vehicle
dock features preset and direct tune buttons for quickly tuning to your favorite channels, and a jump button for tuning directly to the traffic/weather channel for your area. It is designed for quick and easy self-installation
and includes a vent and dash mount for flexible mounting options.
The kit includes a compact vehicle dock that rapidly charges your Stiletto’s battery, a
remote control, dash and vent mounts, cigarette lighter adapter, and a magnetic antenna
with 21’ of cable. Detailed installation instructions are included with the kit.
1
36 [ Optional Accessories ]
2
3
4
6
7
8
9
preset
tune
5
0
jump
Specifications
Satellite Frequencies . . . . . . . . . . . . . . . . . . . . . . . . . . . . . . . 2322.293/2330.207 MHz
Terrestrial Frequencies . . . . . . . . . . . . . . . . . . . . . . . . . . . . . . . . . . . . . . . 2326.250 MHz
Power Requirements . . . . . . . . . . . . . . . . . . . . . . . . . 12 Volts DC, 2.0A, Center Positive
Operation Temperature . . . . . . . . . . . . . . . . . . . . . . . . . . . -5° to +40° C (23° to 104° F)
Signal-to-noise (S/N) . . . . . . . . . . . . . . . . . . . . . . . . . . . . . . . . . . . . . . . . . . 90dB (MP3)
Executive Sound System Dimensions (Height x Width x Depth) . . 15.88cm x 40.64cm x
5.72cm
(6.25” x 16” x 2.25”)
Antenna Type . . . . . . . . . . . . . . . . . . . . . . . . . . . . . . . . . . . . . . . . . . . . . . . . . Windowsill
Antenna Cable Length . . . . . . . . . . . . . . . . . . . . . . . . . . . . . . . 21’ (single micro-cable)
Antenna Connector Type . . . . . . . . . . . . . . . . . . . . . . . . . . . . . . . . . . . . . . . . . . . . . SMB
Audio Interface (AUX) . . . . . . . . . . . . . . . . . . . . . . . . . . . . . . . 1/8” / 3.5mm Stereo Jack
[ Specifications ]
37
Warranty
12 Month Warranty
SIRIUS Satellite Radio Inc. (the “Company”) warrants to the original retail purchaser of this product
that should this product or any part thereof, under normal use and conditions, be proven defective in
material or workmanship within 12 months from the date of original purchase, such defect(s) will be
repaired or replaced with new or reconditioned product (at the Company’s option) without charge
for parts and repair labor. To obtain repair or replacement within the terms of this Warranty, the
product is to be delivered with proof of warranty coverage (e.g. dated bill of sale), specification of
defect(s), transportation prepaid, to the location shown below under WARRANTY RETURN.
This Warranty does not extend to the elimination of externally generated static or noise, to correction
of antenna problems, to costs incurred for installation, removal or reinstallation of the product, or to
damage to tapes, compact discs, speakers, accessories, or vehicle electrical systems.
This Warranty does not apply to any product or part thereof which, in the opinion of the Company,
has suffered or been damaged through alteration, improper installation, mishandling, misuse,
neglect, accident, or by removal or defacement of the factory serial number/bar code label(s). THE
EXTENT OF THE COMPANY’S LIABILITY UNDER THIS WARRANTY IS LIMITED TO THE REPAIR
OR REPLACEMENT PROVIDED ABOVE AND, IN NO EVENT, SHALL THE COMPANY’S LIABILITY EXCEED THE PURCHASE PRICE PAID BY PURCHASER FOR THE PRODUCT.
This Warranty is in lieu of all other express warranties or liabilities. ANY IMPLIED WARRANTIES,
INCLUDING ANY IMPLIED WARRANTY OF MERCHANTABILITY, SHALL BE LIMITED TO THE
DURATION OF THIS WRITTEN WARRANTY. ANY ACTION FOR BREACH OF ANY WARRANTY HEREUNDER INCLUDING ANY IMPLIED WARRANTY OF MERCHANTABILITY MUST
BE BROUGHT WITHIN A PERIOD OF 48 MONTHS FROM DATE OF ORIGINAL PURCHASE. IN
NO CASE SHALL THE COMPANY BE LIABLE FOR ANY CONSEQUENTIAL OR INCIDENTAL
DAMAGES FOR BREACH OF THIS OR ANY OTHER WARRANTY, EXPRESS OR IMPLIED,
WHATSOEVER. No person or representative is authorized to assume for the Company any liability
other than expressed herein in connection with the sale of this product. Some states do not allow
limitations on how long an implied warranty lasts or the exclusion or limitation of incidental or consequential damage so the above limitations or exclusions may not apply to you. This Warranty gives
you specific legal rights and you may also have other rights which vary from state to state.
WARRANTY RETURN: To obtain repair or replacement within the terms of this Warranty, please
return product to an authorized retailer or call Customer Service at 1-800-869-5187; proof of
purchase and description of defect are required. Products to be returned to an approved warranty
station must be shipped freight prepaid.
38 [ Warranty ]
Copyrights & Trademarks
© 2007 Sirius Satellite Radio Inc. All Rights Reserved.
® “SIRIUS” and related marks, the SIRIUS dog logo, channel names and logos are
registered trademarks of Sirius Satellite Radio Inc. All other trademarks, service marks,
sports team names, album art, and logos are the property of their respective owners.
All Rights Reserved.
™ Stiletto series is a trademark of Sirius Satellite Radio Inc.
Hardware, subscription, and activation fee required. For full Terms & Conditions, visit
http://sirius.com. Prices and programming are subject to change. Not available in HI
and AK. Equipment and subscription sold separately. Installation required with some
equipment.
[ Copyrights & Trademarks ]
39
sirius.com
SIRIUS Satellite Radio Inc.
1221 Avenue of the Americas
New York, NY 10020
800.869.5590
SLEX2 (SLEX2111407a)
OO.ABCD1.001