1
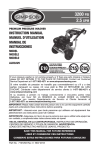
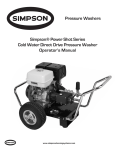
Pressure Washers
PS3000
Pressure Washer
Operator’s Manual
www.simpsoncleaning.com
INTRODUCTION
Thank you for purchasing this Simpson® pressure washer. For nearly 50 years, Cleaning and
Paint Professionals have relied on the superior quality of Simpson Cleaning Systems for their
pressure washing needs. Whether you purchased this machine to produce income or simply
wanted the best pressure washer on the market today, we truly appreciate your business.
Please take time to carefully read this manual and become familiar with your pressure washer.
It is extremely important to know the applications, limitations and hazards associated with using
pressurized cleaning equipment.
Simpson® pressure washers are designed to provide years of service for professional use.
Proper use, care, and maintenance of this machine will provide a significant return on your
investment.
Prior to shipping, this machine was tested to ensure it met the performance and quality standard
that Simpson® has long built its reputation.
GOOD CLEANING!!!
page 2
www.simpsoncleaning.com
Table of Contents
1.0 Safety Do’s and Don’ts
4
1.1 - Danger . . . . . . . . . . . . . . . . . . . . . . . . . . . . . . . . . . . . . . . . . . . . . . . . . . . . . . . . . . . . . . . . . . . . . . . . . 4
1.2 - Warning . . . . . . . . . . . . . . . . . . . . . . . . . . . . . . . . . . . . . . . . . . . . . . . . . . . . . . . . . . . . . . . . . . . . . . . . . 4
1.3 - Caution . . . . . . . . . . . . . . . . . . . . . . . . . . . . . . . . . . . . . . . . . . . . . . . . . . . . . . . . . . . . . . . . . . . . . . . . . 4
1.4 - Notice . . . . . . . . . . . . . . . . . . . . . . . . . . . . . . . . . . . . . . . . . . . . . . . . . . . . . . . . . . . . . . . . . . . . . . . . . . 4
2.0 Operating Instructions
5
2.1 - Machine Preparation . . . . . . . . . . . . . . . . . . . . . . . . . . . . . . . . . . . . . . . . . . . . . . . . . . . . . . . . . . . . . . . 5
2.2 - Hose Connections . . . . . . . . . . . . . . . . . . . . . . . . . . . . . . . . . . . . . . . . . . . . . . . . . . . . . . . . . . . . . . . . 5
2.3 - Before Starting Machine . . . . . . . . . . . . . . . . . . . . . . . . . . . . . . . . . . . . . . . . . . . . . . . . . . . . . . . . . . . . 6
2.4 - Starting Gasoline / Diesel Engine Machines . . . . . . . . . . . . . . . . . . . . . . . . . . . . . . . . . . . . . . . . . . . . . 6
2.5 - Pressure Washing . . . . . . . . . . . . . . . . . . . . . . . . . . . . . . . . . . . . . . . . . . . . . . . . . . . . . . . . . . . . . . . . . 7
2.6 - Stopping the Machine . . . . . . . . . . . . . . . . . . . . . . . . . . . . . . . . . . . . . . . . . . . . . . . . . . . . . . . . . . . . . . 7
3.0 Cleaning Nozzles
8
4.0 Cleaning and Applying Detergent
9
5.0 Maintenance
10
5.1 - Pump Crankcase Lubrication . . . . . . . . . . . . . . . . . . . . . . . . . . . . . . . . . . . . . . . . . . . . . . . . . . . . . . . 10
5.2 - Preventative Maintenance . . . . . . . . . . . . . . . . . . . . . . . . . . . . . . . . . . . . . . . . . . . . . . . . . . . . . . . . . 10
6.0 Pump and Unloader Valve Diagnosis
11
7.0 Pressure Washer Limited Warranty
12
www.simpsoncleaning.com
page 3
1.0
Safety Do’s and Don’ts
This machine produces a high pressure spray, follow these instructions to avoid the risk of injury.
1.1
-
Wear proper face protection when operating a pressure washer.
Never aim spray gun at yourself, another person, animals or plants
Keep hands and feet clear of the cleaning nozzle at all times.
Operate in well ventilated areas ONLY!
Use ONLY those parts and accessories recommended for these machines.
Never operate machine without Belt Guard securely in place.
1.2
-
Danger
Warning
Read all instructions and familiarize yourself with the unit before operating.
Read engine manual instructions completely.
Always engage the trigger safety lock when the gunvalve is not in use.
Relieve the pressure in the system before uncoupling hoses.
Never start the machine until the quick couplers are checked to make sure the sleeves are locked.
Do not tamper with unloader valve adjustment or alter engine speed.
Do not fill the fuel tank when the engine is running or still hot.
Do not use on unsupported elevated surfaces (i.e. ladders).
Do not try to repair a leak in the hose or connection while the system is under pressure.
Do not substitute any component part on this machine.
Use ONLY Simpson® replacement parts as originally installed.
The use of incorrect parts could cause serious personal injury.
Always keep hands and fingers clear of cleaning nozzles.
Always relieve the pressure in the system before uncoupling the quick couplers.
1.3
Caution
- Use ONLY the cleaning nozzle size designed for your model.
- Do not start the machine until water is turned on at the faucet and water is flowing from the end of the
extension.
1.4
Notice
-
Close fuel valve when transporting or storing unit.
Let the machine run for several minutes before starting to pressure-wash.
Check oil level in engine each time gas tank is filled.
Keep air filter clean and engine in tune.
Keep incoming water filter clean.
Incoming water supply must deliver gallons per minute greater than machine capacity. If
questionable, check supply at machine. If supply is insufficient, do not operate from this outlet. For
residental use, the outlet closest to the meter tap will usually deliver the highest gallons per minute output.
- DO NOT connect to shallow wells used for lawn sprinkling. Connect only to clean city water supply or deep
domestic well.
page 4
www.simpsoncleaning.com
2.0
Operating Instructions
2.1
Machine Preparation
1. Check oil level in the pump and fill with
proper grade of oil (Fig. 2.1-1) (See Pump
Maintenance).
2. Check engine oil level and fill with proper
grade oil if necessary (Fig. 2.1-2).
3. Check fuel supply (Fig. 2.1-3). Fill if
necessary (see engine owner’s manual.)
4. Check the hose, gun, and accessories for
damage or wear. Repair or replace if
necessary.
5. Check the female quick-couplers for oring seals. Replace if necessary.
2.2
Hose Connections
www.simpsoncleaning.com
page 5
2.0
Operating Instructions
2.2
Hose Connections (cont.)
1. Connect discharge hose to machine outlet. (Fig. 2.2-1)
2. If optional low pressure downstream, in-line chemical injector is to be used (i.e. a Simpson SC 242 or
252 Series chemical injector) connect the injector at this time (Fig. 2.2-2). For instructions on connections
and use, see in-line chemical injector operating instructions
3. Connect gunvalve to discharge hose with quick coupler (Fig. 2.2-3). DO NOT INSTALL CLEANING
NOZZLE AT THIS TIME. Quick coupler sleeves must be pushed into locked position to prevent accidental uncoupling (Fig. 2.2-5).
4. Check inlet water filter for blockage then connect water supply hose to machine. Use a 3/4" I.D. or larger
hose with standard 3/4" garden hose fittings. (Fig. 2.2-4)
Incoming water supply must deliver gallons per minute greater than machine capacity.
If questionable, check supply at machine. If supply is insufficient, do not operate from this
outlet. For residental use, the outlet closest to the meter tap will usually deliver the highest
gallons per minute output. DO NOT connect to shallow wells used for lawn sprinkling. Connect
only to clean city water supply or deep domestic well.
2.3
Before Starting Machine
DO NOT OPERATE GASOLINE AND DIESEL ENGINES IN ENCLOSED AREAS! OPERATE
IN WELL VENTILATED AREAS ONLY!
FIGURE 2.3 - GUNVALVE, EXTENSION, & NOZZLE
1.
2.
3.
4.
Locate machine on a level plane.
Turn on water supply. There should be no nozzle in the extension at this point.
Pull gunvalve trigger, allowing air in system to escape.
When water flows in a full steady stream, release gunvalve trigger. (Fig. 2.3)
2.4
Starting Gasoline / Diesel Engine Machines
1. Check position of fuel valve, and if closed, open valve. For more detailed information on starting the
machine’s engine, see engine instruction manual.
2. Choke: Close choke on carburetor by moving lever in proper direction. If engine is warm or air temperature is high, close choke valve half-way, or keep it open fully.
3. Machines with recoil start: Turn engine ON/OFF switch to the “ON” position. Pull the recoil starter grip
lightly until resistance is felt, then pull briskly.
Machines without APR (Automatic Pressure Relief): If the engine fails to start after 1 or 2 pulls
of the recoil, pressure will build-up in the system. To relieve the pressure squeeze the gunvalve
trigger and allow water to flow freely. There should be NO nozzle or obstruction at the end of
the extension.
4. After engine starts, open choke gradually.
5. Warm up engine for 3 minutes without load.
page 6
www.simpsoncleaning.com
2.0
Operating Instructions
2.5
Pressure Washing
WEAR PROPER FACE PROTECTION WHEN OPERATING A PRESSURE WASHER!
1. Select the cleaning nozzle or accessory best suited for the cleaning job.
NOTE: Some accessory nozzles function as both a high pressure cleaning nozzle and
low pressure chemical injector nozzle (i.e. vari-tip nozzles). See specific accessory nozzle operating
instructions for more information.
2. PUT GUNVALVE TRIGGER IN LOCKED POSITION (Fig. 2.4).
3. Connect cleaning nozzle, chemical injector control nozzle, or accessory
nozzle or attachment to gunvalve extension quick coupler (Fig. 2.2).
4. Push quick coupler sleeve into LOCKED position to prevent accidental loss
of nozzle. Then unlock gunvalve trigger.
5. Check the system for water leaks, fuel leaks, oil leaks, hose kinks, etc.
Correct any problems before proceeding.
6. Machine is now ready for operation.
HIGH PRESSURE SPRAY CAN PENETRATE THE SKIN AND
CAUSE SERIOUS INJURY! NEVER POINT THE SPRAY GUN AT
YOURSELF, OTHER PEOPLE, OR ANIMALS. SHOULD SPRAY
PENETRATE THE SKIN, SEEK MEDICAL ATTENTION IMMEDIATELY!
2.6
FIG. 2.4 - GUNVALVE
SAFETY TRIGGER
Stopping the Machine
1. If you have been using a chemical injector, be sure to flush out the chemical by running clean water
through the system.
2. Allow machine to run for 1 minute without load to cool before stopping.
3. Operate “STOP” lever or switch to shut off machine (See engine instruction manual).
4. Pull recoil starter until compression resistance is felt. Store the machine in this position to help prevent
valve warpage or sticking.
5. Close Fuel Valve. For Electric Models Turn “ON/OFF” switch on machine to the “OFF” position.
FAILURE TO CLOSE THE FUEL VALVE ON THE ENGINE CAN CAUSE FUEL LEAKAGE
WHEN THE MACHINE IS BEING TRANSPORTED!
6. Turn off water supply.
7. Remove the cleaning nozzle or accessory from the extension quick coupler..
8. Pull gunvalve trigger to release all pressure in the system, then LOCK THE GUNVALVE TRIGGER (Fig.
2.4).
9. Hoses may now be disconnected from the machine.
Failure to release pressure before disconnecting the hose quick coupler will result in the quick
coupler o-ring seal blowing out. This o-ring must be replaced before operating machine.
www.simpsoncleaning.com
page 7
3.0
Cleaning Nozzles
There are up to five different quick connect nozzle spray tips, four high pressure and
one low pressure “Soap” nozzle. The operator can select a high pressure nozzle
spray pattern which best suits the cleaning application.
THE BLASTER: (RED)
Provides a concentrated spot of high pressure water allowing you to be
further from the surface being cleaned and to blast off stubborn material.
USE CAUTION with this nozzle as the force available will actually penetrate soft materials or surfaces. Use for reaching high areas such as
under eaves. Cleaning tar, chewing gum etc. from sidewalks. Breaking
up large areas of loose paint to allow stripping nozzle to get under surface. Removing excess mortar from brick construction. Removing rust
flakes from steel.
THE STRIPPER: (YELLOW)
Provides a narrow fan of concentrated water pressure for removing paint,
mildew, etc. By testing several angles between the spray and the surface
being worked, the best angle may quickly be identified. Use to remove
loose paint from wood, masonry, metal, etc. Remove heavy oxidation,
mildew, and marine growth from boats, etc. Clean heavy equipment.
THE CLEANER (GREEN)
Provides a wider fan for pressure cleaning and rinsing. Use for removing
mildew, light to medium oxidation, and dirt from aluminum siding. Rinse
stripped areas. General light cleaning in preparation for painting.
THE RINSER (WHITE)
Provides a wide fan for cleaning and rinsing.Use for general wash-down,
light cleaning, rinsing off chemicals used in building restoration, and sweeping driveways and parking areas.
THE SOAPER (BLACK)
A low pressure nozzle used to apply cleaning solutions.
Note: Cleaning solutions cannot be applied with high pressure spray
tips (Red, Yellow, Green or White).
page 8
www.simpsoncleaning.com
4.0
Cleaning and Applying Detergent
IMPORTANT: Use detergents designed specifically for pressure washers.
Household detergents could damage pump.
To apply detergent follow these steps:
1. Prepare pressure washer detergent solution as required by manufacturer.
2. Place detergent siphon tube/filter into solution.
3. Make sure “SOAPER” nozzle (Black) is installed.
4. Apply cleaning solution to a dry surface, starting at lower portion of areas to be washed
and work upward, using long, overlapping strokes. To prevent streaking, DO NOT allow
detergent to dry on.
IMPORTANT: You must flush the injection system after each use by placing siphon hose
into a bucket of clean water, then run pressure washer in low pressure (Black nozzle) for
2 minutes.
www.simpsoncleaning.com
page 9
5.0
Maintenance
5.1
Pump Crankcase Lubrication
Proper pressure washer pump crankcase lubrication will help extend the working life of the
machine. Follow these important recommended guidelines:
- Change oil after initial 50 hour run-in period.
- Simpson pump oil is recommended as the first choice. Change Simpson pump oil at 250 hour intervals.
- If Simpson pump oil is not available, a high quality 30 weight non-detergent oil may be used. These oils
should be changed every 100 hours.
- Direct drive machines should have the pump oil changed at least every 50 hours, regardless of the type
of oil used. More frequent oil changes will further enhance the pump’s working life.
- Pump oil level can be checked with a dip stick or, for pumps with oil level sight gauges, viewing the sight
gauge. Oil level is correct if at the center of the circle. If oil level is low, fill to correct level with recommended oil. DO NOT OVERFILL crankcase!
- Some pumps may not have either a dipstick or sight gauge. Oil levels in these pumps can only be checked
by draining the crankcase and measuring the oil amount. If oil level is incorrect, replace with the proper
amount and type as recommended by the pump manufacturer.
5.2
Preventative Maintenance
- Give model and serial number when ordering parts or requesting information. See Section 1.5, Machine
Warning Tags and Specification Plate, Fig. 1-4.
- Read all instructions and familiarize yourself with the unit before operating.
- Keep incoming water filter clean.
- Use only nozzles of size furnished with machine.
- Drain water from pressure hoses, gun and extension and accessories after use.
- Protect pump from freezing. Failure to remove water from the pump in freezing temperatures will result in
damaged pump manifold. A winterizing siphon kit (Part No. WK 590-10) is available for this purpose. Using
this kit, a 50-50 mixture of ethylene glycol type anti-freeze and water is siphoned into the pump to replace
the plain water.
- Use ONLY injector of the size and type designed for your model.
- DO NOT tamper with unloader valve adjustment or alter engine speed.
- DO NOT connect siphon hose to pump inlet for the purpose of siphoning cleaning chemicals through
pump. The machine is designed for direct loop up to water supply.
- DO NOT exceed 140° F temperature on incoming water supply.
Gasoline and Diesel Engines:
- Keep air filter clean and engine in tune.
- Check oil level in engine each time gas tank is filled. Change oil in the engine at required intervals, and use
only recommended grade engine oil.
- ALWAYS close fuel valve when transporting or storing unit.
- Before storing unit for long periods of time, drain fuel tank and carburetor of all fuel. As an alternative, use a
commercially available gasoline preservative additive when storing machine for shorter periods (up to 6
months).
Electric Models:
- Check the condition of the electrical cord. Damaged cords should be replaced.
- DO NOT REMOVE THE GROUND FAULT INTERRUPTER (GFCI) FROM THE ELECTRICAL CORD.
page 10
www.simpsoncleaning.com
6.0
Troubleshooting
PROBLEM
N o P ressure
Low P ressure
P ulsation or H oses V ibrating
W ater Leak ing U nder P um p
W ater in P um p O il
PROBABLE CAUSE
SOLUTION
B rok en B elts (if A pplicable)
Im proper B elt T ension (if
A pplicable)
R eplace B elts
A djust B elt T ension
C logged Inlet W ater F ilter
C logged N ozzle
C lean or R eplace W ater Inlet F ilter
C lean D ebris from N ozzle
W orn or Incorrect N ozzle
Im proper B elt T ension (if
A pplicable
Im proper E ngine R .P .M .
R eplace N ozzle w ith C orrect S ize
Inadequate W ater S upply
A djust B elt T ension
C onsult S ervice C enter
C heck W ater S upply and C lean
Inlet F ilter
Inadequate W ater S upply
P artially C logged N ozzle
D ebris in P um p V alves
Incorrect N ozzle S ize
C heck W ater S upply and Inlet
W ater F ilter
C lean or R eplace N ozzle
C onsult S ervice C enter
Install C orrect S ize N ozzle
W orn P lunger S eals
W orn or D am aged P lungers
P um p R unning D ry
C onsult S ervice C enter
C onsult S ervice C enter
C heck W ater S upply
W orn P um p S eals
W orn or D am aged P lungers
C onsult S ervice C enter
C onsult S ervice C enter
C ondensation in P um p C rank case
C hange O il
O il Level T oo H igh
P um p O il Leak
W rong O il T ype
O perating on U nlevel S urface
T ire P ressure T oo Low or F lat
D rain O il and F ill to P roper level
D rain O il and F ill w ith C orrect O il
S im pson 30 W T N on-D etergent
M ove T o Level S urface
Inflate T ire or R epair Leak
R ecoil S tarter H ard to P ull
P ressure B uilt up in S ystem
P ull T rigger w hile S tarting U nit
E ngine D ies W hen T rigger is
R eleased
U nloader V alve is B rok en or
M isadjusted
C onsult S ervice C enter
www.simpsoncleaning.com
page 11
7.0
Pressure Washer Limited Warranty
At SIMPSON CLEANING SYSTEMS, we only distribute top quality industrial / commercial / personal pressure
washers that are designed for heavy-duty use, maximum reliability, durability, and long life. Our pressure
washers are built for all duty applications and steady use due to higher quality levels.
The manufacturer of this product agrees to repair or replace designated parts that prove defective within the
warranty period of one (1) year listed in the chart below. Specific limitations/extensions and exclusions apply,
and are listed in the chart below. This warranty covers defects in material and workmanship and not parts
failure due to normal wear, depreciation, abuse, accidental damage, negligence, improper use, maintenance,
or storage. To make a claim under the terms of the warranty, all parts said to be defective must be available
or returned (if requested) to SIMPSON CLEANING SYSTEMS designated Warranty Service Center for
warranty inspection. The judgments and decisions of the Warranty Service Center concerning the validity of
warranty claims are final.
These warranties pass through to the end user. As a factory authorized and trained Warranty Service Center
the factory will honor the terms of all component warranties and satisfy claims of the appropriate warranty
provisions.
Normal wear items include, but are not limited to, Valves and Seals, which are not covered by this warranty.
This Warranty replaces all other warranties, express or implied, including without limitation any warranties of
merchantability or fitness for a particular purpose and all such warranties are hereby disclaimed and excluded
by the manufacturer. The Manufacturer’s warranty obligation is limited to repair and replacement of defective
products as provided herein and the Manufacturer shall not be liable for any further loss, damages, or
expenses – including damages from shipping, accident, abuse, acts of God, misuse, or neglect. Neither is
damage from repairs using parts nor purchased from the manufacturer or alterations performed by non-factory
authorized personnel. Failure to install and operate equipment according to the guidelines put forth in the
instruction manual shall void warranty.
This warranty does not cover the following: machines used for rental purposes, damage resulting from shipping
(claims must be filed with freighter), accident, abuse, act of God, misuse, or neglect. Neither is damage from
repairs or alterations performed by non-factory authorized personnel or failure to install and operate equipment
according to the guidelines put forth in the instruction manual.
The manufacturer will not be liable to any persons for consequential damage, for personal injury, or for
commercial loss.
page 12
www.simpsoncleaning.com
7.0
Pressure Washer Limited Warranty (cont.)
Parts / Components
CAT PUMPS®
Warranty Period and Details
Two (2) years on pump (workmanship or defects
on material. Lifetime on forged brass manifold against
freezing.
Warranty does not apply to failures on other pump parts due
to:
Freight damage
Freeze damage
Damage caused by parts or accessories not obtained
from / or approved by Simpson
Normal wear of moving parts or components affected
by moving parts.
Engines
Covered by engine manufacturer warranty. See engine manual.
Machine Frame
One (1) year from date of purchase.
Accessories
Ninety (90) days. Includes tips, guns, wands
www.simpsoncleaning.com
page 13
710xxxx
06/10 rev0
©2010, Simpson Cleaning Systems, LLC. All Rights Reserved. Specifications subject to change without notice.
1825 Greenleaf Avenue Elk
• , Grove Village, IL 60007
:
• Phone (847) 348-1500 • Fax: (847) 882-7229
page 14
www.simpsoncleaning.com