1
Gigaset C2 / englisch / A31008-C002-B001-2-QD19 / cover_0_Vorlage.fm / 25.03.2003
s
ENGLISH
Be inspired
Gigaset C2 / englisch / A31008-C002-B001-2-QD19 / covers_I-II.fm / 28.03.2003
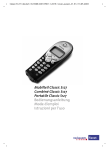
Brief overview
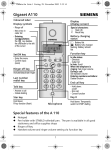
Brief overview
Talk/Handsfree key:
Top half:
◆ Answer a call
◆ Initiate dialling
◆ Switch from handsfree to
"earpiece" mode
Display (display screen)
Bottom half:
◆ Switch from "earpiece"
to handsfree mode
◆ Lights up: Handsfree is
activated
◆ Flashes: Incoming call
Current functions and
display keys
The display keys give you
access to the functions
shown in the display.
Message key
◆ Access to Calls and
Messages list
◆ Flashes: New
messages or calls
Open directory
Key 1
Select network mailbox/
answering machine (press
for approx. 2 sec. )
Star key
◆ Ringer on/off (press for
approx. 2 seconds)
◆ When texting: Toggles
between upper/lower
case and digits
2
Charge status
U fully
charged
= flashes: battery is
almost flat or is charging
= flat
U
Û u vMENU
End call and
On/Off key
◆ End call
◆ Cancel function
◆ One menu level back
(press briefly)
◆ Back to idle status
(press for approx.
1 second)
◆ Handset on/off (press
for approx. 2 seconds)
Hash key
Keypad lock on/off (press
for approx. 1 second)
Speed dial list key
Open speed dial list(press
briefly)
Microphone
Recall key
Insert a dial pause (hold
key down)
Gigaset C2 / englisch / A31008-C002-B001-2-QD19 / C_2IVZ.fm / 28.03.2003
Contents
Contents
Brief overview . . . . . . . . . . . . . . . . . . . . . . . . . . . . . . . 2
Safety precautions . . . . . . . . . . . . . . . . . . . . . . . . . . . 5
Preparing to use your phone . . . . . . . . . . . . . . . . . . . 6
Preparing to use the handset . . . . . . . . . . . . . . . . . . . . . . . . . . . . . . . . . . . . . . . . . . . .
Manual registration . . . . . . . . . . . . . . . . . . . . . . . . . . . . . . . . . . . . . . . . . . . . . . . . . . . .
Changing the display language . . . . . . . . . . . . . . . . . . . . . . . . . . . . . . . . . . . . . . . . . . .
Changing the base . . . . . . . . . . . . . . . . . . . . . . . . . . . . . . . . . . . . . . . . . . . . . . . . . . . . .
Attaching the belt clip . . . . . . . . . . . . . . . . . . . . . . . . . . . . . . . . . . . . . . . . . . . . . . . . . .
Activating/deactivating the handset . . . . . . . . . . . . . . . . . . . . . . . . . . . . . . . . . . . . . . .
Activating/deactivating the keypad lock . . . . . . . . . . . . . . . . . . . . . . . . . . . . . . . . . . . .
6
7
8
8
9
9
9
Operating the telephone, menu overview . . . . . . . 9
Display keys . . . . . . . . . . . . . . . . . . . . . . . . . . . . . . . . . . . . . . . . . . . . . . . . . . . . . . . . . . 9
Main menu . . . . . . . . . . . . . . . . . . . . . . . . . . . . . . . . . . . . . . . . . . . . . . . . . . . . . . . . . 10
Date and Time . . . . . . . . . . . . . . . . . . . . . . . . . . . . . 10
Setting the date and the time . . . . . . . . . . . . . . . . . . . . . . . . . . . . . . . . . . . . . . . . . . .
Changing the time mode . . . . . . . . . . . . . . . . . . . . . . . . . . . . . . . . . . . . . . . . . . . . . .
Setting the alarm clock . . . . . . . . . . . . . . . . . . . . . . . . . . . . . . . . . . . . . . . . . . . . . . . .
Cancelling a wake-up call . . . . . . . . . . . . . . . . . . . . . . . . . . . . . . . . . . . . . . . . . . . . . .
Setting an appointment . . . . . . . . . . . . . . . . . . . . . . . . . . . . . . . . . . . . . . . . . . . . . . .
10
11
11
12
12
Making calls . . . . . . . . . . . . . . . . . . . . . . . . . . . . . . 13
Making external calls and ending a call . . . . . . . . . . . . . . . . . . . . . . . . . . . . . . . . . . .
Internal calls, ending a call . . . . . . . . . . . . . . . . . . . . . . . . . . . . . . . . . . . . . . . . . . . . .
Answering a call . . . . . . . . . . . . . . . . . . . . . . . . . . . . . . . . . . . . . . . . . . . . . . . . . . . . .
Handsfree . . . . . . . . . . . . . . . . . . . . . . . . . . . . . . . . . . . . . . . . . . . . . . . . . . . . . . . . . .
Muting the handset during an external call . . . . . . . . . . . . . . . . . . . . . . . . . . . . . . . .
13
13
13
13
14
Directory and speed dial list . . . . . . . . . . . . . . . . . 14
Storing a telephone number in the directory . . . . . . . . . . . . . . . . . . . . . . . . . . . . . . .
Storing a telephone number in the speed dial list . . . . . . . . . . . . . . . . . . . . . . . . . . .
Managing entries in the directory and speed dial list . . . . . . . . . . . . . . . . . . . . . . . . .
Linking a call-by-call number with a phone number . . . . . . . . . . . . . . . . . . . . . . . . .
Last number redial list . . . . . . . . . . . . . . . . . . . . . . . . . . . . . . . . . . . . . . . . . . . . . . . . .
Viewing the calls and messages list . . . . . . . . . . . . . . . . . . . . . . . . . . . . . . . . . . . . . .
14
15
15
16
16
17
3
Gigaset C2 / englisch / A31008-C002-B001-2-QD19 / C_2IVZ.fm / 28.03.2003
Contents
Using several handsets . . . . . . . . . . . . . . . . . . . . . . 17
Internal consultation calls . . . . . . . . . . . . . . . . . . . . . . . . . . . . . . . . . . . . . . . . . . . . . .
Accepting/rejecting call waiting during an internal call . . . . . . . . . . . . . . . . . . . . . . .
Using a handset as a room monitor . . . . . . . . . . . . . . . . . . . . . . . . . . . . . . . . . . . . . . .
Setting the Walk and Talk mode . . . . . . . . . . . . . . . . . . . . . . . . . . . . . . . . . . . . . . . . .
17
17
17
19
Handset settings . . . . . . . . . . . . . . . . . . . . . . . . . . . 19
Activating/deactivating Auto Answer . . . . . . . . . . . . . . . . . . . . . . . . . . . . . . . . . . . . .
Adjusting the loudspeaker volume . . . . . . . . . . . . . . . . . . . . . . . . . . . . . . . . . . . . . . .
Changing the ringer tone . . . . . . . . . . . . . . . . . . . . . . . . . . . . . . . . . . . . . . . . . . . . . . .
Activating/deactivating advisory tones . . . . . . . . . . . . . . . . . . . . . . . . . . . . . . . . . . . .
Restoring the handset factory settings . . . . . . . . . . . . . . . . . . . . . . . . . . . . . . . . . . . .
19
20
20
20
21
Appendix . . . . . . . . . . . . . . . . . . . . . . . . . . . . . . . . . 22
Care and contact with liquid . . . . . . . . . . . . . . . . . . . . . . . . . . . . . . . . . . . . . . . . . . . .
Service (Customer Care) . . . . . . . . . . . . . . . . . . . . . . . . . . . . . . . . . . . . . . . . . . . . . . .
Specifications . . . . . . . . . . . . . . . . . . . . . . . . . . . . . . . . . . . . . . . . . . . . . . . . . . . . . . . .
Character set chart . . . . . . . . . . . . . . . . . . . . . . . . . . . . . . . . . . . . . . . . . . . . . . . . . . . .
Predictive text . . . . . . . . . . . . . . . . . . . . . . . . . . . . . . . . . . . . . . . . . . . . . . . . . . . . . . . .
Warranty Certificate Ireland . . . . . . . . . . . . . . . . . . . . . . . . . . . . . . . . . . . . . . . . . . . . .
22
22
23
23
24
25
Index . . . . . . . . . . . . . . . . . . . . . . . . . . . . . . . . . . . . . 26
4
Gigaset C2 / englisch / A31008-C002-B001-2-QD19 / start_guide_time.fm / 28.03.2003
Safety precautions
Safety precautions
$
!
Only use the power supply unit supplied, as indicated on the underside of
the device.
Fit only the recommended rechargeable batteries (page 23) of the same
type! Use no other types of batteries or non-rechargeable batteries, as they
could damage health and cause personal injury.
‹
Œ
Ensure correct polarity when fitting rechargeable batteries, and use the
battery type according to these instructions (you will see polarity symbols in
the handset's battery compartments).
The operation of medical appliances may be affected. Be aware of the
technical conditions within the particular environment (e.g. doctor's practice).
The handset may cause an intrusive 'hum' in hearing aids.
The handset is not watertight (page 22).
Drivers must not use their phones while driving (Walk and Talk function).
Switch off your phone while on board an aircraft (Walk and Talk function).
Ensure that it cannot be switched on again accidentally.
Do not use the phone in environments subject to explosion hazard (e.g. auto
paint shops).
ƒ
Ensure that your Gigaset is accompanied by these instructions when you give
it to others to use.
Dispose of the batteries and phone in accordance with environmental
regulations.
i
Not all of the functions described in these instructions are available in all
countries.
5
Gigaset C2 / englisch / A31008-C002-B001-2-QD19 / start_guide_time.fm / 28.03.2003
Preparing to use your phone
Preparing to use your phone
The pack contains:
◆ one Gigaset C 2 handset,
◆ one charging shell,
◆ one belt clip for the handset,
◆ two batteries,
◆ one power supply unit with power cord,
◆ one set of operating instructions.
Preparing to use the handset
The display is protected by a plastic film. Remove the protective plastic film!
Inserting the batteries
◆ Insert the batteries ensuring correct polarity – see figure on left.
◆ Position the battery cover so that it is open by around 3 mm, then slide up until it
closes with a click,
◆ To open the battery cover, press on the chequered area and slide down.
W
6
Use only the rechargeable batteries recommended by Siemens on
page 23! Never use conventional batteries (non-rechargeable) or other
battery types as this may cause significant damage to health and
property. For example, the jacket of the battery could be destroyed
(hazardous). The phone could also malfunction or be damaged.
Gigaset C2 / englisch / A31008-C002-B001-2-QD19 / start_guide_time.fm / 28.03.2003
Preparing to use your phone
Placing the handset into the base (registering) and charging the batteries
When you place the C 2 handset into the C 200/C 250, C 100/C 150 or S 100/S 150 base,
it will register to the base automatically. Proceed step by step as follows:
1. Place the handset in the base with the display up.
2. Wait till the handset has registered automatically to the base: This operation takes
around one minute. While registration is in progress the screen displays
Registering and Base 1 flashes. The allocated internal number appears in the top
left of the display after registration.
3. Now leave the handset in the charging shell for the batteries to charge - the batteries
are supplied uncharged. Battery charging is indicated in the top right of the display
by the flashing battery icon =.
W
For the initial charge we recommend a continuous, uninterrupted
charging period of five hours, whatever charge status is indicated. After
a while the charge capacity of the batteries will decrease for technical
reasons.
The battery charging status is correctly displayed only after uninterrupted charging/
discharging. You should therefore avoid removing the batteries unnecessarily and
ending the charging process prematurely.
◆ Once initial charging is complete, you can replace your handset in the
i
charging shell after each call. Charging is controlled electronically.
This ensures that the batteries are charged in a way that maximises
their life.
◆ The batteries heat up during charging. This is normal and not
dangerous.
Manual registration
If automatic registration is interrupted or if you wish to use your C 2 handset at a
different Gigaset base (1000, 2000, 3000 or 4000 family), then you must register it
manually. You must initiate handset registration on the handset and on the base.
7
Gigaset C2 / englisch / A31008-C002-B001-2-QD19 / start_guide_time.fm / 28.03.2003
Preparing to use your phone
1. On the handset
[______________]
MENU
Press the display key to open the menu.
[__________] [_____________________________________________________________]
Handset Settings
[_________
OK ]
Select the menu item and confirm.
[__________] [_____________________________________________________________]
Register Handset
[_________
OK ]
Select the menu item and confirm.
[__________] [_____________________________________________________________]
Base 2
[_________
OK ]
Select base (1–4) and confirm, e.g. Base 2.
[_______]
OK
Enter the system PIN of the base (the default is 0000)
and confirm.
Base 2 flashes in the display when the system PIN has been entered.
2. On the base
Please refer to the operating instructions for the base to find out how to prepare the
base for registration.
Changing the display language
You can view the display texts in different languages.
[______________]
MENU
Press the display key to open the menu.
[__________] [_____________________________________________________________]
Handset Settings
[_________
OK ]
Select the menu item and confirm.
[__________] [_____________________________________________________________]
Language
[_________
OK ]
Select the menu item and confirm. The current
language is checked ‰ (the default language is
English).
[_________] [_________]
OK
Select a language and confirm.
Long press (back to idle status).
If you set the wrong language in error, press MENU M 2. Now select the correct
language with s and press OK to confirm your choice.
Changing the base
If your handset is registered to more than one base, you can set it to a particular base or
to the base that has the best reception (Best Base).
MENU; s Handset Settings OK; sSelect Base OK; s(select a base or Best
Base) OK
8
Gigaset C2 / englisch / A31008-C002-B001-2-QD19 / start_guide_time.fm / 28.03.2003
Operating the telephone, menu overview
Attaching the belt clip
Push the belt clip onto the back
of the handset until the lugs click
into the recesses on either side of
the handset.
Activating/deactivating the handset
To activate the handset press the 'end call' key a and hold.
To deactivate the handset, press the 'end call' key a again in the idle status and hold.
The handset activates automatically when placed in the charging shell.
Activating/deactivating the keypad lock
You can lock the keys on your handset by pressing and holding the hash key R
(confirmation tone; you see the Ø icon in the display) and unlock them by pressing
and holding the hash key again.
The keypad lock deactivates automatically when you receive a call. It re-activates when
the call is finished.
i
When the keypad lock is active, you cannot even call emergency
numbers.
Operating the telephone, menu overview
Display keys
The display keys are the horizontal rocker keys just below the display. Depending on
the particular operating situation, their function changes according to whether you
press the left or right side of the key. The current function is shown in the display
directly above the key to which it relates. Here is a typical example:
Û
u vMENU
Display keys
9
Gigaset C2 / englisch / A31008-C002-B001-2-QD19 / start_guide_time.fm / 28.03.2003
Date and Time
The various symbols have the following meanings when the keys are pressed:
[__________]
•
[________]
INT
[_______]
OK
[______________]
MENU
Last number redial key: Open the list of the last 10 numbers you dialled.
INT key: Open the list of handsets when in idle status.
OK key: Confirm menu function or confirm an input and store.
Menu key: Open the main menu when in idle status
Open a status-dependent menu while making a call.
Scroll up / down.
Move cursor left / right.
¼
Access to wake-up function.
[_______]
Û
Delete key: Delete input from right to left one character at a time.
Reverting to idle status from anywhere in the menu
Press the 'end call' key a for around 1 second, or press no key: The display
automatically reverts to the idle status after 2 minutes.
Changes which you have not confirmed/stored by pressing OK will be rejected.
Main menu
To open the main menu, with the telephone in idle status
press the display key MENU and scroll to the required option using s.
1
2
3
4
5
6
7
8
9
SMS
Select Services
Additional Features
Calender/Clock
Audio Settings
Call Charges
Handset Settings
Base Settings
Voice Mail
The menu options that are
available will depend on your
base.
Date and Time
Setting the date and the time
Correct date and time settings are essential if you want to know exactly when calls were
received.
10
Gigaset C2 / englisch / A31008-C002-B001-2-QD19 / start_guide_time.fm / 28.03.2003
Date and Time
[_______________]
MENU
Open the menu.
[__________] [_____________________________________________________________]
Calender/Clock
[_________]
OK
Select the menu item and confirm.
[__________] [_____________________________________________________________]
Date/Time
[_________]
OK
Select the menu item and confirm.
[_______]
OK
Enter the date and confirm. Example: For 1.5.2003,
enter Q1Q5QI.
[_______]
OK
Enter the time and confirm. Example: For 9.35,
enter QOI5.
With the 12-hour display, select a.m. or p.m. and
confirm.
[__________] [_________]
OK
Long press (back to idle status).
¼ appears on the bottom line of the display.
Changing the time mode
You can choose between the 12 or 24 hour display (the factory setting is 24 hour).
MENU; s Calender/Clock OK; sTime Mode OK; s(select display) OK (‰ = On);
a long press (back to idle status).
Setting the alarm clock
Precondition: The date and time have already been set (page 10).
Activating/deactivating the alarm clock
Activate: ¼; Alarm Clock OK; (‰ = On).
To deactivate: ¼; Alarm Clock OK; (‰ disappears).
Setting the wake-up time
Activate the alarm clock.
[_______]
OK
Enter the wake-up time and confirm. The top line of
the screen displays the alarm clock icon ¼.
Long press (back to idle status).
If you are using the 12 hour clock display, select a.m. or p.m. with s and
confirm (‰ = On).
A wake-up call only sounds when the handset is in the idle status and the room monitor
function or Walk and Talk is not activated. When you deactivate the alarm clock the ¼
icon will only go out if there is no active appointment.
i
To find out how to set the wake-up volume and melody, turn to page 20.
11
Gigaset C2 / englisch / A31008-C002-B001-2-QD19 / start_guide_time.fm / 28.03.2003
Date and Time
Cancelling a wake-up call
~ (press any key). The alarm clock is still switched on.
Setting an appointment
To set an appointment you must enter and store the required date and time.
Activating/deactivating the appointment function
MENU; s Calender/Clock OK; Set Appointment OK (‰ = On).
Confirm again if an appointment is activated.
[_______]
OK
[_______]
OK
Enter the date and confirm.
[_______]
OK
Enter the time and confirm.
[_______]
OK
Enter a name for the appointment (up to
16 characters long) and confirm (for inputting text
see page 23).
Long press (back to idle status).
The top line displays the alarm clock icon ¼.
The handset will only display an appointment when it is in the idle status. An
appointment is not displayed when the room monitor or the Walk and Talk function is
active.
If you are using the 12 hour clock display, select a.m. or p.m. with s and
confirm (‰ = On).
i
To find out how to set the wake-up volume and melody, turn to page 20.
Deactivating an appointment call
Press the display key OK. The alarm clock icon ¼ disappears when the alarm clock is not
activated.
Cancelling an appointment
MENU; s Calender/Clock OK; Set Appointment OK (‰ disappears).
Viewing an appointment you have not kept
If the handset reminds you of an appointment but you do not keep it, a message appears
in the display together with the name of the appointment. Press any key to cancel the
message.
12
Gigaset C2 / englisch / A31008-C002-B001-2-QD19 / tel_direct_hands_sett.fm / 28.03.2003
Making calls
Making calls
Making external calls and ending a call
External calls are calls into the public telephone network.
~ (enter the number), press c (Talk/Handsfree key).
To end the call: press a ('end call' key).
i
◆ You can also press the Talk/Handsfree key c first (you hear the
dialling tone) and then enter the number.
◆ You can use the end call key a to cancel the dialling operation.
Inserting a dialling pause
You can insert a dialling pause between the prefix and the actual telephone number. To
do this, press S for around 2 seconds. Now enter the telephone number.
Internal calls, ending a call
Calls to other handsets that are registered to the same base are free of charge.
Calling a specific handset
Press INT; s (select handset) c. Or: press INT 2 (example)
To end the call: Press the 'end call' key a.
Calling all handsets ('group call')
Press INT and P. To end the call: Press the 'end call' key a.
Answering a call
Your handset rings, the call is displayed on the screen and the handsfree key d flashes.
Press c (top half of the key).
If the Auto Answer function is activated (page 19) you just need to lift the handset out
of the charging shell to take the call.
Handsfree
Activating/deactivating handsfree
Before you dial: ~ (enter the number); press d (bottom half of the key).
During a call: press d (bottom half of the key).
To deactivate: press d (top half of the key).
If you wish to place the handset in the charging shell during a call you must press the
bottom half of the d key and hold it down while you position the handset in the shell.
i
You should inform your caller that you intend to use the handsfree
function before you activate it.
13
Gigaset C2 / englisch / A31008-C002-B001-2-QD19 / tel_direct_hands_sett.fm / 28.03.2003
Directory and speed dial list
Adjusting the volume while in handsfree mode during a call
Press the bottom half of the key again.
[_______] [_______ ]
Decrease or increase the volume.
[_______]
OK
Now press the display key to store the setting.
Muting the handset during an external call
Press INT. The call is 'held' (wait melody).
To end the call: s ******Back****** OK.
Directory and speed dial list
You can store up to 100 numbers in the directory and the speed dial list.
The directory makes dialling easier for you. You open the directory with the h key.
You can mark any directory entry as 'VIP'.
The speed dial list is a special directory in which you can store particularly important
numbers such as private telephone numbers and prefixes of network providers (socalled 'call-by-call numbers'). You open the speed dial list with the C key.
The speed dial list is operated in just the same way as the directory, except for the
way in which entries are stored.
◆ The EATONI predictive text helps you input names (page 24, this feature is
deactivated when you purchase your phone).
◆ Please refer to the Character Set Chart (page 23) to see how to enter text correctly.
◆ You can enter up to 32 digits for a number and up to 16 letters for a name.
◆ Turn to page 13 for instructions on how to insert a dialling pause.
Storing a telephone number in the directory
h (open directory); MENU; New Entry OK.
[_______]
OK
Enter the number and confirm.
[______________]
MENU
Enter the name and press the display key.
[_____________________________________________________________]
[__________]
Save Entry
OK
Confirm. The entry is stored.
Long press (back to idle status).
14
Gigaset C2 / englisch / A31008-C002-B001-2-QD19 / tel_direct_hands_sett.fm / 28.03.2003
Directory and speed dial list
Storing a telephone number in the speed dial list
You can assign a digit (0, 2–9) to up to nine entries on your speed dial list. When you
press and hold one of these digits, e.g. '3', and press the top half of the d key you are
immediately connected to the telephone number that is assigned '3'.
C (open speed dial list); MENU; New Entry OK.
[_______]
OK
Enter the number and confirm.
[______________]
MENU
Enter the name and press the display key.
[_____________________________________________________________]
[__________]
Save Entry
OK
Confirm. The entry is stored.
[_______________]
MENU
Press the display key to open the menu.
[__________] [_____________________________________________________________]
Shortcut
[_________]
OK
Select the menu item and confirm.
[__________] [_____________________________________________________________]
Shortcut: 2
[_________]
OK
Select the digit and confirm.
Long press (back to idle status).
Speed dial digits cannot be assigned more than once at a time.
Dialling with the directory/speed dial list
h or C (open directory or speed dial list); s (select an entry); c.
Or: h or C; ~ (enter first letter, or scroll using s); c
Managing entries in the directory and speed dial list
To use one of the following functions, just press the directory key h or the speed dial
list key C. Then with the display keysselect the directory or speed dial list entry and
press MENU to open the list. Use the skey to scroll to the menu function you require.
New Entry
Use Number
Edit Entry
Delete Entry
VIP Entry
Copy and Edit
Send Entry
Delete List
Send List
For the directory only (h)
For the directory only (h)
15
Gigaset C2 / englisch / A31008-C002-B001-2-QD19 / tel_direct_hands_sett.fm / 28.03.2003
Directory and speed dial list
The 'Mark as VIP' and 'copy and edit' functions
You can mark the directory entries of particularly important callers as VIP (Very
Important Person); this links a particular melody to them. You can then tell who is
calling you from the ringer melody. Precondition: The caller's number has been
identified.
So that you do not have to enter a similar entry twice, you can create a copy and then
edit that entry.
Sending a single entry or complete list to a handset
You can send individual entries or the entire list to another C 2 or S 1 handset or a
Comfort handset in the Gigaset 4000, 3000 or 2000 series that is registered to the same
base. VIP settings and speed dial (shortcut) digits are not sent.
h or C (open directory or speed dial list); s (select an entry); MENU.
[__________] [_____________________________________________________________]
Send Entry
[_________
OK ]
or ...
[__________] [_____________________________________________________________]
Send List
[_________
OK ]
Select the menu item and confirm.
Send complete list:
Select the menu item and confirm.
... then
[__________] [_____________________________________________________________]
INT 2
[_________
OK ]
Select the handset to which you wish to send the
entry or list and confirm, e.g. handset 2. Your
selections are sent to that handset.
Long press (back to idle status).
Linking a call-by-call number with a phone number
This function can be used to put a network provider's prefix (which is stored in the speed
dial list) in front of the telephone number ('linking').
C (open speed dial list); s MENU; Use Number OK.
Open the directory.
[_________] [_________]
OK
Select the number and confirm.
Press the Talk/Handsfree key.
Last number redial list
The last number redial list contains the ten last dialled numbers.
Dialling telephone numbers from the last number redial list
Þ (open last number redial list); s (select an entry); c.
16
Gigaset C2 / englisch / A31008-C002-B001-2-QD19 / tel_direct_hands_sett.fm / 28.03.2003
Using several handsets
Managing entries in the last number redial list
Þ (open last number redial list); s (select an entry); MENU
Use Number
Copy to Directory
Delete Entry
Delete List
Viewing the calls and messages list
New calls/messages are indicated by a message in the display. Press the message key f
to view the corresponding list.
Using several handsets
Transferring a call to another handset
Press INT, selects(handset) or Calling all , press c (top half).
The internal user answers: press a ('end call' key).
Internal consultation calls
You can make an internal call while an external call is in progress.
Press INT; s (select handset); press c (top half of the key).
To end the call: MENU; Back OK (back to the outside caller).
Accepting/rejecting call waiting during an internal call
If you get an external call while conducting an internal call, you will hear the call
waiting tone (short tone).
To accept the call: MENU; Accept Call Waiting OK
(you speak to the outside caller).
To reject the call: MENU; Reject Call Waiting OK
(you speak to the internal caller).
The rejected call waiting tone can still be heard at other handsets.
Using a handset as a room monitor
With this function, a previously stored internal or external number is called when a set
noise level in the room is reached (the baby cries). When you answer the call you hear
the noise in the baby's room. The room monitor remains activated on the handset even
after you hang up.
The handset should be between 1 and 2 metres away from the baby. The microphone
must be directed towards the baby.
When the room monitor is activated, incoming calls to the handset which is near the
baby are indicated without a ring tone, they are just shown on the display.
When entering an external phone number, make sure that the line to which you want
the room monitor to be transferred is not blocked by an activated answering machine.
17
Gigaset C2 / englisch / A31008-C002-B001-2-QD19 / tel_direct_hands_sett.fm / 28.03.2003
Using several handsets
◆ If you redirect your room monitor to an external number, then you should tell that
number's owner.
◆ The room monitor's call to an external phone number stops after about 90 seconds,
to an internal number (handset) it stops after about 180 seconds (depending on the
base).
W
Always check the settings of the room monitor before you leave
home, e.g. sensitivity and phone line.
i
The room monitor function severely curtails the handset's operating time.
If necessary you should place the 'room monitor handset' in the charger
to ensure that the battery does not run down.
Activating the room monitor function and entering the 'call to' number for
the first time
MENU; s Additional Features OK; Room Monitor OK.
[__________] [_____________________________________________________________]
Call Internal
[_________
OK ]
Select the menu item and confirm.
[_________] [_________]
OK
Select the handset and confirm.
or ...
[__________] [_____________________________________________________________]
Call External
[_________
OK ]
[_______]
OK
Enter an external number as the 'call to' number:
Select the menu item and confirm.
Enter the number and confirm.
If the room monitor is activated, you go straight to the room monitor setting when you
press the display key MENU (open menu).
Setting the room monitor's sensitivity
MENU; s Additional Features OK; Room Monitor OK; s Level Features OK.
[_________] [_________]
OK
Select Low or High and confirm.
Deactivating the room monitor
To turn the room monitor off from outside (depends on the base), take the call that the
room monitor has initiated, and press O R. The room monitor function will
deactivate around 90 seconds after the call ends. The room monitor will make no
further calls. The other room monitor functions on the handset (e.g. no ringer) will
remain activated until you press MENU and OK on the handset that is in the baby's
room.
18
Gigaset C2 / englisch / A31008-C002-B001-2-QD19 / tel_direct_hands_sett.fm / 28.03.2003
Handset settings
Setting the Walk and Talk mode
The Walk and Talk function allows two C 2 handsets (maximum range 300 metres) to
call each other no matter how far they are from the base.
Precondition:
◆ Both handsets have been registered to the same base or
◆ Both handsets are registered to different bases and both are set to Best Base
(page 8) or
◆ One of the handsets is not registered to any base and the registered handset is set
to Best Base or
◆ Neither handset is registered to a base.
i
In Walk and Talk mode
◆ The handsets cannot be reached by incoming calls,
◆ Handset operating times are severely curtailed.
Activating/deactivating the Walk and Talk mode
MENU; s Additional Features OK; s Walk and Talk OK.
To deactivate: MENU; s Walk and Talk Off OK.
Ring and advisory tones are set in exactly the same way as if your handsets at home
were in range of the base (page 20 and page 21).
'Activate/deactivate ringer' (page 20) and 'Activate/deactivate keypad lock' (page 9) are
available in the Walk and Talk mode.
i
The Walk and Talk mode is retained even when you switch your handset
off and back on.
Handset settings
Your handset is preset. You can change the settings to suit your requirements.
Activating/deactivating Auto Answer
With this function you simply lift the handset out of its charging shell when a call arrives
- there is no need to press c (the default is On).
MENU; s Handset Settings OK; Auto Answer OK (‰ = On);
press a and hold (return to idle status).
19
Gigaset C2 / englisch / A31008-C002-B001-2-QD19 / tel_direct_hands_sett.fm / 28.03.2003
Handset settings
Adjusting the loudspeaker volume
You can adjust the earpiece volume on three levels (1–3) and the handsfree volume on
five levels (1–5) – you can even do this while an external call is in progress.
MENU; s Audio Settings OK; Earpiece Volume OK; v(select volume) OK or
MENU; s Audio Settings OK; Handsfree Volume OK; v(select volume) OK;
press a and hold (return to idle status).
Changing the ringer tone
You can set the ringer volume individually for a call, for a wake-up call or for an
appointment. There are six different volumes and ten melodies for you to choose from.
Changing the ringer melody
MENU; s Audio Settings OK; s Ringer Melody OK; s(select function) OK.
If you set all ringer tones the same, then the current setting will be used automatically
for external calls: To do this, select All Ringer Tones and confirm twice with OK.
Adjusting the ringer volume
MENU; s Audio Settings OK; s Ringer Volume OK; v(select volume) OK;
press a and hold (return to idle status).
Activating/deactivating the ringer
All handsets ring when there is an incoming call.
Cancelling the ringer permanently: Press the star key P and hold.
The Ú icon appears in the display.
To activate: Press the star key P and hold.
i
To cancel the ringer for the current call, press the display key MENU
and then Silent.
Activating/deactivating advisory tones
The following advisory tones can be activated and deactivated individually (the default
setting is On).
◆ Key click: Every key press is confirmed
◆ Acknowledge tones: Confirmation tone, Error tone, End-of-menu tone
◆ Battery tone: The batteries must be charged.
MENU; s Audio Settings OK; s Advisory Tones OK.
20
Gigaset C2 / englisch / A31008-C002-B001-2-QD19 / tel_direct_hands_sett.fm / 28.03.2003
Handset settings
either ...
[_____________________________________________________________]
[__________]
Key Tones
OK
or ...
Activate/cancel key click:
Confirm (‰ = On).
Activate/cancel battery warning tone:
[__________] [_____________________________________________________________]
Battery Low
[_________]
OK
Select the menu item and confirm.
[__________] [_____________________________________________________________]
On
[_________]
OK
Select condition (Off, On, During Call) and confirm,
e.g. On (checked ‰).
Press the 'end call' key briefly to return to the
previous menu level.
or ...
[__________] [_____________________________________________________________]
Confirmation Tone
[_________]
OK
Activate/cancel confirmation tones:
Select the menu item and confirm (‰ = On).
... then
Long press (back to idle status).
Restoring the handset factory settings
You can reset settings and changes you have made. Entries in the directory, the calls list
and the speed dial list and the handset's registration on the base will be retained. Press
the 'end call' key a to cancel the reset.
MENU; s Handset Settings OK; s Reset Handset OK.
[________]
OK
Press the display key to confirm the prompt.
Long press (back to idle status).
Factory settings of the handset
Earpiece volume
Handsfree volume
Ringer volume
Ringer melody
Auto answer
Battery tone/Key click/Confirmation tone
display language
Alarm clock/appointment
1
3
5
1
activated
activated
English
deactivated
Appointment name
Last number redial list
Room monitor/room monitor sensitivity
deleted
empty
deactivated/high
page 20
page 20
page 20
page 20
page 19
page 20
page 8
page 11/
page 12
page 12
page 16
page 18/
page 18
21
Gigaset C2 / englisch / A31008-C002-B001-2-QD19 / appendix.fm / 25.03.2003
Appendix
Appendix
Care and contact with liquid
!
Wipe the base and handset with a damp cloth (use no solvent) or an antistatic cloth.
Never use a dry cloth. This can cause static.
If the handset should come into contact with liquid, on no account switch the device
on. Remove all batteries immediately.
Allow the liquid to drain out of the device, and then pat all parts of the device dry.
Keep the handset with the batteries removed in a warm, dry place for at least 72 hours.
In many cases, you will then be able to use it again.
Service (Customer Care)
Our online support on the Internet:
www.my-siemens.com/customercare
If you need any repair work, or have a guarantee claim to submit, our
Service-Center Ireland 18 50 77 72 77
will give you quick and reliable assistance. Keep your till receipt handy.
You will find more service numbers in the section entitled "Service" at the end of
this booklet.
Replacement or repair services are not offered in countries where our product is not sold
by authorised dealers.
Country-specific features have been taken into account.
The C2 handset is approved for use in Switzerland and throughout the EU.
The CE mark certifies conformity of the device with the essential requirements of the
R&TTE directive.
Excerpt from the original declaration
"We, Siemens AG, declare that the above mentioned product is manufactured according to our Full
Quality Assurance System certified by CETECOM ICT Services GmbH with the registration number
"Q810820M" in compliance with ANNEX V of the R&TTE Directive 99/05/EC. The presumption of
conformity with the essential requirements regarding Council Directive 99/5/EC is ensured"
Senior Approvals Manager
The Declaration of Conformity (DoC) has been signed. In case of need a copy of the original DoC
can be made available via the company hotline.
22
Gigaset C2 / englisch / A31008-C002-B001-2-QD19 / appendix.fm / 25.03.2003
Appendix
Specifications
Recommended batteries: Nickel-metal-hydride (NiMH)
Sanyo Twicell 700; Sanyo Twicell 650; Panasonic 700 mAh; GP 700 mAh;
YDT AAA SUPER 700; VARTA PhonePower AAA 700 mAh.
Handset operating times/charging times
Capacity
Standby time
Calling time
Charging time
700 mAh
approx. 170 hours (7 days) approx. 13 hours
approx. 5 hours
These operating and charging times apply only when using the recommended batteries.
Character set chart
Standard characters
Press the relevant key repeatedly or hold it down
1x
a
d
g
j
m
p
t
w
.
2x
1
b
e
h
k
n
q
u
x
,
Abc--> abc
abc --> 123
#
@
Space
3x
â
c
f
i
l
o
r
v
y
?
*
\
4x
£
2
3
4
5
6
s
8
z
!
/
&
5x
$
ä
ë
ï
6x
¥
á
é
í
7x
¤
à
è
ì
8x
9x
10 x 11 x 12 x 13 x 14 x
â
ê
î
ã
ç
ö
7
ü
9
0
(
§
ñ
ß
ú
ÿ
+
)
ó
ò
ô
õ
ù
ý
<
û
æ
:
=
ø
¿
>
å
¡
%
“
‘
;
_
Creating and editing text (without predictive text)
You can create and edit text in a number of ways:
◆ The cursor is controlled with u v.
◆ Characters (to the left of the cursor) are deleted with Û.
◆ Characters are added to the left of the cursor.
◆ To switch from upper case to lower case letters, press P before you enter the letter.
Pressing P again switches from lower case letters to digits. Press again to return to
upper case letters.
23
Gigaset C2 / englisch / A31008-C002-B001-2-QD19 / appendix.fm / 25.03.2003
Appendix
Predictive text
The EATONI predictive text helps you to write names (Directory, Speed Dial List).
Each key between Q and O is assigned several letters and characters which all
appear on a selection line immediately above the softkeys (beneath the text area) as
soon as you press a key. When you are entering letters, the letter you are most probably
looking for is greyed. This letter is at the beginning of the selection line and is
transferred to the text area.
Peter K
KLJ5
Û
U
u v MENU
Name in the directory
Selection line
If this letter is the one you want, confirm it by pressing the next key. If the letter selected
by the EATONI is not the one you want, then press the hash key R repeatedly until the
required letter appears greyed in the display line and is transferred to the text area. To
write an "@", give the hash key R one long and one short press.
P
R
Pressing the star key for approx. 2 seconds switches from abc mode to Abc,
from Abc to 123 and from 123 back to abc again (applies to text you
subsequently enter).
Goes to the next letter in the selection list (greyed).
Activating/deactivating predictive text
Predictive text is activated and deactivated according to specific functions.
Precondition: You are in the text input field (Directory, Speed Dial List).
MENU; sPredictive Text OK (‰ = On);
Give the c 'end call' key a short press to return to the text field. Now enter your text.
24
Gigaset C2 / englisch / A31008-C002-B001-2-QD19 / appendix.fm / 25.03.2003
Appendix
Warranty Certificate Ireland
◆ Without prejudice to any claim the user (customer) may have in relation to the
dealer or retailer, the customer shall be granted a manufacturer's Guarantee under
the conditions set out below:
◆ In the case of new devices and their components exhibiting defects resulting from
manufacturing and/or material faults within 24 months of purchase, Siemens shall,
at its own option and free of charge, either replace the device with another device
reflecting the current state of the art, or repair the said device. In respect of parts
subject to wear and tear (including but not limited to, batteries, keypads, casing),
this warranty shall be valid for six months from the date of purchase.
◆ This Guarantee shall be invalid if the device defect is attributable to improper care or
use and/or failure to comply with information contained in the user manuals. In
particular claims under the Guarantee cannot be made if:
– The device is opened (this is classed as third party intervention)
– Repairs or other work done by persons not authorised by Siemens.
– Components on the printed circuit board are manipulated
– The software is manipulated
– Defects or damage caused by dropping, breaking, lightning or ingress of
moisture. This also applies if defects or damage was caused by mechanical,
chemical, radio interference or thermal factors (e.g.: microwave, sauna etc.)
– Devices fitted with accessories not authorised by Siemens
◆ This Guarantee shall not apply to or extend to services performed by the authorised
dealer or the customer themselves (e.g. installation, configuration, software
downloads). User manuals and any software supplied on a separate data medium
shall be excluded from the Guarantee.
◆ The purchase receipt, together with the date of purchase, shall be required as
evidence for invoking the Guarantee. Claims under the Guarantee must be
submitted within two months of the Guarantee default becoming evident.
◆ Ownership of devices or components replaced by and returned to Siemens shall vest
in Siemens.
◆ This Guarantee shall apply to new devices purchased in the European Union. For
Products sold in the Republic of Ireland the Guarantee is issued by Siemens Ireland
Limited, Ballymoss Road, Sandyford Industrial Estate, Dublin 18 - The Republic of
Ireland.
◆ Any other claims resulting out of or in connection with the device shall be excluded
from this Guarantee. Nothing in this Guarantee shall attempt to limit or exclude a
Customers Statutory Rights, nor the manufacturer's liability for death or personal
injury resulting from its negligence.
◆ The duration of the Guarantee shall not be extended by services rendered under the
terms of the Guarantee.
◆ Insofar as no Guarantee default exists, Siemens reserves the right to charge the
customer for replacement or repair.
◆ The above provisions does not imply a change in the burden of proof to the
detriment of the customer.
To invoke this Guarantee, please contact the Siemens helpdesk on 1850 777 277. This
number is also to be found in the accompanying user guide.
25
Gigaset C2 / englisch / A31008-C002-B001-2-QD19 / C_2SIX.fm / 28.03.2003
Index
Index
A
F
Acknowledge tones . . . . . . . . . . . . . . 20
Activating, refer to the relevant function
Advisory tones . . . . . . . . . . . . . . . . . 20
Alarm clock . . . . . . . . . . . . . . . . . . . . 11
Answer (auto) . . . . . . . . . . . . . . . . . . 19
Answering a call . . . . . . . . . . . . . . . . 13
Appointment . . . . . . . . . . . . . . . . . . 12
Auto answer . . . . . . . . . . . . . . . . . . . 19
Factory settings . . . . . . . . . . . . . . . . . 21
B
Batteries . . . . . . . . . . . . . . . . 5, 6, 7, 23
Battery tone . . . . . . . . . . . . . . . . . . . 20
Belt clip. . . . . . . . . . . . . . . . . . . . . . . . 9
Best base . . . . . . . . . . . . . . . . . . . 8, 19
C
Call (internal, external) . . . . . . . . . . . 13
Call waiting (internal call) . . . . . . . . . 17
Call-by-Call numbers . . . . . . . . . . . . . 14
Calls list . . . . . . . . . . . . . . . . . . . . . . 17
Care of the telephone . . . . . . . . . . . . 22
Character set (Chart) . . . . . . . . . . . . . 23
Charge indicator (batteries) . . . . . . . . . 7
Charge status . . . . . . . . . . . . . . . . . . . 2
Connect . . . . . . . . . . . . . . . . . . . . . . 17
Consultation call (internal). . . . . . . . . 17
Copy/store a number . . . . . . . . . . 14, 16
Customer Care (Service) . . . . . . . . . . 22
Customer service. . . . . . . . . . . . . . . . 22
D
Date setting . . . . . . . . . . . . . . . . . . . 10
Deactivating, refer to the relevant
function
Dialling pause . . . . . . . . . . . . . . . . . . 13
Directory . . . . . . . . . . . . . . . . . . . 14, 16
Display . . . . . . . . . . . . . . . . . . . . . . 8, 9
12/24 hour . . . . . . . . . . . . . . . . . . 11
E
Earpiece mode . . . . . . . . . . . . . . . . . . 2
Earpiece volume . . . . . . . . . . . . . . . . 20
Ending/transferring a call . . . . . . . 13, 17
26
G
Group call . . . . . . . . . . . . . . . . . . . . . 13
H
Handset
activate/deactivate . . . . . . . . . . . . . . 9
change to another base . . . . . . . . . . . 8
muting . . . . . . . . . . . . . . . . . . . . . . 14
operating and charging times . . . . . 23
preparing to use . . . . . . . . . . . . . . . . 6
restore factory settings/reset . . . . . . 21
settings . . . . . . . . . . . . . . . . . . . . . 19
use as room monitor . . . . . . . . . . . . 17
Handset at a glance . . . . . . . . . . . . . . . 2
Handset charging times . . . . . . . . . . . 23
Handsfree
activate/deactivate . . . . . . . . . . . . . 13
volume . . . . . . . . . . . . . . . . . . . 14, 20
Hearing aids. . . . . . . . . . . . . . . . . . . . . 5
I
Internal consultation calls . . . . . . . . . . 17
Internal dialling . . . . . . . . . . . . . . . . . 13
K
Keys . . . . . . . . . . . . . . . . . . . . 2, 10, 13
key click . . . . . . . . . . . . . . . . . . . . . 20
key press (confirmation tone) . . . . . 20
keypad lock . . . . . . . . . . . . . . . . . . . 9
L
Language, see Display
Last number redial . . . . . . . . . . . . . . . 16
delete list . . . . . . . . . . . . . . . . . . . . 17
list . . . . . . . . . . . . . . . . . . . . . . . . . 17
List (calls, messages, last number
redial) . . . . . . . . . . . . . . . 17
Lock (keypad) . . . . . . . . . . . . . . . . . . . 9
Loudspeaker volume . . . . . . . . . . . . . 20
Lower/upper case . . . . . . . . . . . . . . 2, 23
Gigaset C2 / englisch / A31008-C002-B001-2-QD19 / C_2SIX.fm / 28.03.2003
Index
M
Making calls . . . . . . . . . . . . . . . . . . . 13
Medical appliances . . . . . . . . . . . . . . . 5
Melody . . . . . . . . . . . . . . . . . . . . . . . 20
Menu
end tone . . . . . . . . . . . . . . . . . . . . 20
guidance through the menu . . . . . . . 9
Messages list . . . . . . . . . . . . . . . . . . 17
Microphone . . . . . . . . . . . . . . . . . . . . 2
Muting (handset) . . . . . . . . . . . . . . . 14
N
volume . . . . . . . . . . . . . . . . . . . . . 20
Signal tone, see Advisory tones
Specifications . . . . . . . . . . . . . . . . . . 23
Speed dial list . . . . . . . . . . . . . . . . . . 14
storing numbers . . . . . . . . . . . . . . . 14
Standard characters (Chart) . . . . . . . . 23
Star key . . . . . . . . . . . . . . . . . . . . . . . 20
T
Time functions/Time mode . . . . . . 10, 11
Time setting . . . . . . . . . . . . . . . . . . . 10
Tone (battery, error, confirmation) . . . 20
Network provider . . . . . . . . . . . . . . . 14
Noise level (room monitor) . . . . . . . . 18
Number, see Directory
U
O
V
Operating time
handset . . . . . . . . . . . . . . . . . . . . . 23
in Walk and Talk mode . . . . . . . . . . 19
room monitor . . . . . . . . . . . . . . . . 18
Operation (preparing to use your
phone) . . . . . . . . . . . . . . 6
P
Pack contents . . . . . . . . . . . . . . . . . . . 6
PIN . . . . . . . . . . . . . . . . . . . . . . . . . . . 8
Power supply unit . . . . . . . . . . . . . . . . 5
Predictive text . . . . . . . . . . . . . . . . . . 24
Upper/lower case . . . . . . . . . . . . . . 2, 23
VIP (directory entry) . . . . . . . . . . . . . . 16
Volume
handsfree/earpiece mode . . . . . 14, 20
loudspeaker . . . . . . . . . . . . . . . . . . 20
ringer . . . . . . . . . . . . . . . . . . . . . . . 20
W
Wait melody . . . . . . . . . . . . . . . . . . . 14
Walk and Talk. . . . . . . . . . . . . . . . . . . 19
Warning tone, see Advisory tones
Warranty . . . . . . . . . . . . . . . . . . . . . . 25
Writing digits . . . . . . . . . . . . . . . . . 2, 23
R
Registering a handset . . . . . . . . . . . . . 7
Removing protective film . . . . . . . . . . . 6
Reset, see Factory settings . . . . . . . . . 21
Ringer . . . . . . . . . . . . . . . . . . . . . . . 20
Room monitor . . . . . . . . . . . . . . . . . 18
S
Safety precautions . . . . . . . . . . . . . . . 5
Select/change base . . . . . . . . . . . . . . . 8
Send (directory entry) . . . . . . . . . . . . 16
Sensitivity (room monitor) . . . . . . . . . 18
Service . . . . . . . . . . . . . . . . . . . . . . . 22
Setting
appointment . . . . . . . . . . . . . . . . . 12
date . . . . . . . . . . . . . . . . . . . . . . . 10
display language . . . . . . . . . . . . . . . 8
time/alarm clock . . . . . . . . . . . . . . 10
27
Gigaset S1 / ndl / A31008-S001-B002-2-6Z19 / Service.fm / 31.03.2003
Service
You can get assistance easily when you have technical questions or questions about
how to use your device by using our online support service on the Internet at:
www.my-siemens.com/customercare.
Abu Dhabi. . . . . . . . . . . . . . . 0 26 42 38 00
Argentina . . . . . . . . . . . . 0 80 08 88 98 78
Australia . . . . . . . . . . . . . . . 18 00 62 24 14
Austria . . . . . . . . . . . . . . . . 05 17 07 50 04
Bahrain . . . . . . . . . . . . . . . . . . . . . 40 42 34
Bangladesh . . . . . . . . . . . . . . 0 17 52 74 47
Belgium . . . . . . . . . . . . . . . . 0 78 15 22 21
Bosnia Herzegovina . . . . . . . 0 33 27 66 49
Brazil . . . . . . . . . . . . . . . . 0 80 07 07 12 48
Brunei . . . . . . . . . . . . . . . . . . . 02 43 08 01
Bulgaria. . . . . . . . . . . . . . . . . . 02 73 94 88
Cambodia . . . . . . . . . . . . . . . . 12 80 05 00
Canada . . . . . . . . . . . . . . 1 88 87 77 02 11
China . . . . . . . . . . . . . . . 0 21 50 31 81 49
Croatia . . . . . . . . . . . . . . . . . 0 16 10 53 81
Czech Republic . . . . . . . . . . 02 33 03 27 27
Denmark . . . . . . . . . . . . . . . . . 35 25 86 00
Dubai . . . . . . . . . . . . . . . . . . 0 43 96 64 33
Egypt. . . . . . . . . . . . . . . . . . . 0 23 33 41 11
Estonia . . . . . . . . . . . . . . . . . . 06 30 47 97
Finland . . . . . . . . . . . . . . . . 09 22 94 37 00
France . . . . . . . . . . . . . . . . . 01 56 38 42 00
Germany . . . . . . . . . . . . . . .01805 333 222
Greece . . . . . . . . . . . . . . 0 80 11 11 11 16
Hong Kong . . . . . . . . . . . . . . . 28 61 11 18
Hungary . . . . . . . . . . . . . . . 06 14 71 24 44
Iceland . . . . . . . . . . . . . . . . . . . 5 11 30 00
India . . . . . . . . . . . . . . 01 13 73 85 89 - 98
Indonesia . . . . . . . . . . . . 0 21 46 82 60 81
Ireland . . . . . . . . . . . . . . . . 18 50 77 72 77
Italy. . . . . . . . . . . . . . . . . . . 02 66 76 44 00
Ivory Coast . . . . . . . . . . . . . . . 80 00 03 33
Jordan . . . . . . . . . . . . . . . . . . 0 64 39 86 42
Kenya . . . . . . . . . . . . . . . . . . . . 2 72 37 17
Kuwait . . . . . . . . . . . . . . . . . . . 2 45 41 78
Latvia . . . . . . . . . . . . . . . . . . . . 7 50 11 14
Lebanon . . . . . . . . . . . . . . . . . 01 44 30 43
Libya . . . . . . . . . . . . . . . . . . 02 13 50 28 82
Lithuania. . . . . . . . . . . . . . . . 8 22 74 20 10
Luxembourg . . . . . . . . . . . . . 43 84 33 99
Macedonia. . . . . . . . . . . . . . . . 02 13 14 84
Malaysia. . . . . . . . . . . . . . . 03 21 63 11 18
Malta . . . . . . . . . . . . 00 35 32 14 94 06 32
Mauritius . . . . . . . . . . . . . . . . . . 2 11 62 13
Mexico . . . . . . . . . . . . . .01 80 07 11 00 03
Morocco . . . . . . . . . . . . . . . . . 22 66 92 09
Netherlands. . . . . . . . . . . . 0900-3333102
New Zealand . . . . . . . . . . . 08 00 27 43 63
Norway . . . . . . . . . . . . . . . . . . 22 70 84 00
Oman. . . . . . . . . . . . . . . . . . . . . . 79 10 12
Pakistan . . . . . . . . . . . . . . . 02 15 66 22 00
Philippines . . . . . . . . . . . . . . 0 27 57 11 18
Poland . . . . . . . . . . . . . . . . 08 01 30 00 30
Portugal . . . . . . . . . . . . . . . . 8 00 85 32 04
Qatar . . . . . . . . . . . . . . . . . . . . 04 32 20 10
Romania . . . . . . . . . . . . . . 02 12 04 60 00
Russia. . . . . . . . . . . . . . . . (800) 200 10 10
Saudi Arabia . . . . . . . . . . . . 0 22 26 00 43
Serbia. . . . . . . . . . . . . . . . . 01 13 22 84 85
Singapore . . . . . . . . . . . . . . . . 62 27 11 18
Slovak Republic . . . . . . . . . 02 59 68 22 66
Slovenia . . . . . . . . . . . . . . . . 0 14 74 63 36
South Africa. . . . . . . . . . . . 08 60 10 11 57
Spain . . . . . . . . . . . . . . . . . . 9 02 11 50 61
Sweden . . . . . . . . . . . . . . . . 0 87 50 99 11
Switzerland . . . . . . . . . . . . 08 48 21 20 00
Taiwan . . . . . . . . . . . . . . . . 02 25 18 65 04
Thailand. . . . . . . . . . . . . . . . 0 22 68 11 18
Tunisia . . . . . . . . . . . . . . . . . 0 71 86 19 02
Turkey . . . . . . . . . . . . . . . 0 21 65 79 71 00
Ukraine . . . . . . . . . . . . . . 8 80 05 01 00 00
United Arab Emirates . . . . . 0 43 31 95 78
United Kingdom . . . . . . . 0 87 05 33 44 11
USA . . . . . . . . . . . . . . . . .1 88 87 77 02 11
Vietnam . . . . . . . . . . . . . . . . . . 45 63 22 44
33
separate page before cover backpage
Gigaset C2 / türkisch / A31008-C002-B001-2-QD19 / cover_back_Vorlage.fm / 01.04.2003
A3 1 0 0 8 - C0 0 2 - B0 0 1 - 2 - QD1 9
Issued by
Information and Communication mobile
Haidenauplatz 1
D-81667 Munich
© Siemens AG 2003
All rights reserved. Subject to availability.
Right of modification reserved.
Printed in Germany (02/2003).
Siemens Aktiengesellschaft
http://www.my-siemens.com
No A31008-C002-B001-2-QD19