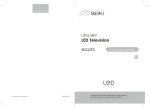
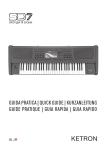
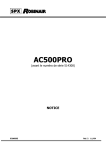
1
Sistema SoundBar de sonido envolvente de alta definición
Enceinte acoustique ambiophonique à haute definition
SB201C
USER MANUAL
MANUAL DEL USUARIO
MANUEL DE L’UTILISATEUR
En
Read the User Manual carefully before using the SoundBar and keep it for further
reference.
Es
Lea cuidadosamente el Manual del Usuario antes de utilizar el “SoundBar” y
consérvelo para referencia posterior.
Fr
Veuillez lire attentivement le Manuel de l’utilisateur avant d’utiliser le système
SoundBar, puis gardez-le soigneusement pour des références futures.
SEIKI_Soundbar UG-English Original_v2.indd 1
2012/8/3 18:58:25
SEIKI_Soundbar UG-English Original_v2.indd 2
2012/8/3 18:58:25
CONTENTS
CONTENTS
2
Precautions
3
Preparations
Unpacking the SoundBar
Front View / Controls / Rear View
Wall Mounting
Remote Control
4
Connecting the SoundBar
8
Operating the SoundBar
10
Troubleshooting
11
Specifications
12
FCC
13
Warranty 14
English
Important Safety Instructions
1
SEIKI_Soundbar UG-English Original_v2.indd 1
2012/8/3 18:58:25
IMPORTANT SAFETY INSTRUCTIONS
IMPORTANT SAFETY INSTRUCTIONS
English
This symbol indicates that there are important
operating and maintenance instructions in the literature
accompanying this unit.
This symbol indicates that dangerous voltage
constituting a risk of electric shock is present within this
unit.
• All the safety and operating instructions should be read before operating this product and retained for further
reference.
• All warnings on the appliance and in the operating instructions should be adhered to.
• Do not use this apparatus near water or moisture.
• Clean the apparatus only with a slightly damp cloth.
• Do not block any ventilation openings. Install in accordance with the manufacturer’s instruction.
• Do not install near any heat source, such as radiator, heat registers, stoves or any other sources of heat.
• Protect the power cord from being walked on or pinched particularly at the plugs, convenience receptacle,
and at the point where they exit from the apparatus.
• Only use attachments/accessories specified by manufacturer.
• Unplug the apparatus during lightning storms or when unused for long periods of time.
• Refer all servicing to qualified personnel. Servicing is required when the apparatus has been damaged in
any way, such as power supply cord or plug is damaged, liquid has been spilled or objects have fallen into,
the apparatus has been exposed to rain or moisture, does not operate normally, or has been dropped.
• WARNING: To reduce the risk of fire or electric shock, do not expose this apparatus to rain or moisture. The
apparatus shall not be exposed to dripping or splashing and that objects with liquids, such as vases, shall
not be placed on the apparatus.
No naked fame source such as candles should be placed on the product.
• WARNING: The battery or battery pack shall not be exposed to excessive heat such as sunshine, fire or the
like.
• CAUTION: Changes or modifications not expressly approved by the manufacturer could avoid the user’s
authority to operate this device.
• CAUTION: Usage of controls or adjustment or performance of products other than those specified herein
may result in hazardous exposure.
ELECTRICAL INFORMATION
Use this appliance only with the supplied AC adapter. Using non-approved power supplies will void the
warranty.
Mains Supply: The mains operating voltage of this unit is marked on a rating plate on the AC adapter.
The means of disconnecting this appliance from the mains supply is the AC Adapter/mains plug. This should
be unobstructed and readily operable at all times.
2
SEIKI_Soundbar UG-English Original_v2.indd 2
2012/8/3 18:58:25
PRECAUTIONS
PRECAUTIONS
Security
Location
• Place this product on dry stable surface away from heat and damp and where it is unlikely to fall or
be knocked over.
• Never put this product in direct sunlight or near heat sources.
• There are two rubber pads on the back of the SoundBar. These are provided to ensure these is
space behind the SoundBar for the rear-mounted acoustic ports to operate correctly. Do not remove
the rubber pads.
• If you are using the SoundBar for TV sound, place it certainly under or above the TV screen. Do not
stand a TV on it.
English
• Before operation, check if the voltage of this product is in line with the local voltage.
• Hold the plug to disconnect it from the mains outlet. Do not pull the power cord.
• Disconnect the plug as soon as liquid or objects enter this product. Discontinue use of this product
until it has been tested and verified by a qualified service technician.
3
SEIKI_Soundbar UG-English Original_v2.indd 3
2012/8/3 18:58:25
PREPARATIONS
PREPARATIONS
Unpacking the SoundBar
English
• Carefully unpack the unit. If it is damaged, please return it to the stores you purchased for
replacement. Remember to take your purchase receipt with you.
• Retain the user manual. If you pass the unit onto a third part, make sure to include this
manual.
• We suggest you retain the packaging. If you dispose of it, do so having regard to any
recycling regulations in your area.
The carton should contain:
SB201C SoundBar
Wall Mount Bracket & Screws
User Manual
Remote Control with Battery
User Manual
AC Adapter
Three-way RCA Audio Cable
4
SEIKI_Soundbar UG-English Original_v2.indd 4
2012/8/3 18:58:26
PREPARATIONS
Front View / Controls
1
2
3
4
English
5
1.
Switch the SoundBar on or to standby.
2.
SOURCE
Select the audio source between LINE /
COAXIAL.
3.
MODE
Select the sound mode among Movie /
Music / News / Games.
4.
VOL+ / Increase or decrease the volume.
5.
Mode Indicators
Lights up correspondingly when you
cycle among MOVIE / MUSIC / NEWS /
GAMES sound modes.
6.
Source Indicators
Lights up correspondingly when you
cycle between COAX / LINE input
sources.
6
7.
7
8
9
Volume Indicator
Displays the current volume.
8.
Power Indicator
Illuminates Green when the SoundBar is
on. Illuminates Red when the SoundBar
is in standby mode.
9.
IR (Infrared Receiver)
Receive IR signals from the remote
control.
5
SEIKI_Soundbar UG-English Original_v2.indd 5
2012/8/3 18:58:26
PREPARATIONS
Rear View
Model: SB201C
Input Power: 15V
2.4A 36W
This device complies with part 15 of the FCC rules. Operation is
subject to t he f ollowing t wo c onditions: (1) t his device may not
cause harmful interference, and (2) this device must accept any
interference received i ncluding i nterference that m ay c ause
undesired operation.
English
MADE IN CHINA
Model: SB201C
Input Power: 15V
2.4A 36W
This device complies with part 15 of the FCC rules. Operation is
subject to t he f ollowing t wo c onditions: (1) t his device may not
cause harmful interference, and (2) this device must accept any
interference received i ncluding i nterference that m ay c ause
undesired operation.
MADE IN CHINA
1
2
3
1. DC IN
Connect to the power supply.
2. LINE IN
Connect to an analog audio output on the TV or an analog device.
3. COAXIAL IN
Connect to a coaxial audio output on the TV or a digital device.
Wall Mounting
• Place the wall mount bracket on a wall that the strength is sufficient surface and then secure
it with appropriate screws.
• Fit the SoundBar into the corresponding slots of the wall mount bracket. For secure
installation, make sure the mounting studs slide down to the right into the bottom of the
slots.
Model: SB201C
Input Power: 15V
2.4A 36W
This device complies with part 15 of the FCC rules. Operation is
subject to t he f ollowing t wo c onditions: (1) t his device may not
cause harmful interference, and (2) this device must accept any
interference received i ncluding i nterference that m ay c ause
undesired operation.
MADE IN CHINA
Warning: You might need to find other appropriate screws based on your own wall materials.
6
SEIKI_Soundbar UG-English Original_v2.indd 6
2012/8/3 18:58:26
PREPARATIONS
Remote Control
The first time you operate the remote control,
please pull out the safety strip to activate the
battery.
1
2
3
English
4
5
1. Open the battery compartment.
2. Insert one CR2025 battery, with the
polarity (+/-) as indicated.
1.
2.
Switch the SoundBar on or to standby.
Mute and restore the volume.
3. VOLUME +/Adjust the volume.
4. Sound Mode Buttons
• MOVIE
Select the Movie sound mode.
3. Close the battery compartment.
Notes:
•
Remove the batteries from the remote
control when not in use for a long period
of time.
•
Do not install new batteries with used
ones and do not mixture different types of
batteries.
•
Dispose of batteries in accordance with
local regulations.
• NEWS
Select the News sound mode.
• MUSIC
Select the Music sound mode.
• GAMES
Select the Games sound mode.
5. Source Buttons
• LINE
Switch the audio source to ANALOG.
• COAX
Switch the audio source to COAXIAL.
7
SEIKI_Soundbar UG-English Original_v2.indd 7
2012/8/3 18:58:26
CONNECTING THE SOUNDBAR
CONNECTING THE SOUNDBAR
The SoundBar is supplied with a three-way audio cable. It is adapted to
connect both digital and stereo analog input sources.
Gently split the cable with the black plugs from the cables with red/white plugs.
English
The black cable can be used for digital source, the red/white cables for analog source.
Three-way RCA Audio Cable
Connect audio through digital audio cables
Good Quality Audio
Connect the COAX socket on the SoundBar to the COAXIAL/DIGITAL OUT socket on
the device using a coaxial cable.
Note: COAX can only support PCM audio input.
Connect to the
Digital Audio out
Note: Photos shown Black Coaxial Cable
connection only.
8
SEIKI_Soundbar UG-English Original_v2.indd 8
2012/8/3 18:58:27
CONNECTING THE SOUNDBAR
Connect audio through analog audio cables
Basic Quality Audio
Connect the LINE socket on the SoundBar to the Audio socket on the device using
analog cables.
English
Red plug
White plug
Connect to the
Analog Audio out
Note: Photos shown Red & White Analog
Cables connection only.
Connect Power to the SoundBar
Connect the provided AC adapter to the DC-IN socket on the SoundBar and the other
end to the wall outlet.
9
SEIKI_Soundbar UG-English Original_v2.indd 9
2012/8/3 18:58:27
OPERATING THE SOUNDBAR
OPERATING THE SOUNDBAR
Before using the SoundBar to play audio from connected devices, please make the
necessary connections described in this user manual and switch the SoundBar to
the correct source for other devices.
English
Switching the SoundBar On or to Standby
Press the button on the SoundBar or the
the SoundBar on or to standby.
button on the remote control to switch
• The LED display will show the selected source, volume, the sound mode etc.
when the SoundBar is switched on.
• The LED display will show “POWER” in red when the SoundBar is in standby
mode.
Note: The button on the SoundBar or the button on the remote control does
not switch off the SoundBar completely. Please disconnect the AC adapter from the
mains socket if you plan to leave the SoundBar unattended for long periods of time.
Selecting an Input Source
Press the SOURCE button on the SoundBar repeatedly to select the desired input
source between LINE /COAX, or you can select by the remote control directly.
• The LED display will show the selected source.
Adjusting the Volume
Press the VOL+/- buttons on the SoundBar or the VOLUME+/ - buttons on the
remote control to adjust the volume.
• The volume range of this SoundBar is from 0 (Min.) to 30 (Max.).
• The LED display will show “- -“when the volume is zero.
Muting the Sound
Press the MUTE button on the remote control repeatedly to mute or restore the
sound.
• The LED display will show “- -“when the sound is muted.
• You also can restore the sound by pressing the VOL+/- buttons.
Selecting the Sound Mode
Press the MODE button on the SoundBar repeatedly to select the desired sound
mode among Movie/Music/News/Games, or you can select by the remote control
directly.
• The LED display will show the selected sound mode.
10
SEIKI_Soundbar UG-English Original_v2.indd 10
2012/8/3 18:58:27
TROUBLESHOOTING
TROUBLESHOOTING
PROBLEM
No power
Buzzing or Humming
English
No sound from SoundBar
REMEDY
• Make sure AC power cord is securely connected to an
AC socket.
• Press the Power button on the remote control or on the
SoundBar.
• Connect the correct audio cable from the SoundBar to
the TV or other devices.
• Select the correct audio input source.
• Make sure that the SoundBar is not muted. Press VOL
+/- to restore the sound.
• Make sure that both ends of the audio cables are
connected securely.
• Test on an alternate device or replace the audio cable.
11
SEIKI_Soundbar UG-English Original_v2.indd 11
2012/8/3 18:58:27
SPECIFICATIONS
SPECIFICATIONS
Speakers
English
Frequency Response
Audio Amplifier
Sound Pressure Level
Supported Sampling Frequencies
Supported Linear PCM Bit Depths
SPDIF Sample Range
Supported Audio Engine
Input sensitivity (mV)
Inputs
Power Input
Voltage
Dimensions
Net Weight
Gross Weight
Storage Temperature
Operating Temperature
2 x 2.5” full range
2 x 2.5” Woofer
Full Range: 200 Hz – 20 kHz (+/- 3dB)
Woofer: 60 Hz – 10 kHz (+/- 3dB)
Integrated Class-D @ 20 watts x 2 CH, 4Ω THD
= 1%, 1kHz
87 dB ([email protected])
32Khz, 44.1KHz, 48KHz, 96KHz
16-bit, 24-bit
96KHz 24bit
High-Performance 32-Bit 73.728MHz DSP Audio
Engine
500 mV rms
SPDIF Coaxial (rear), Analog RCA (rear)
15 DC, 36 W Max.
100 – 240 V~, 50/60 Hz
37.4” (L) x 3.5” (W) x 2.28” (H)
5.5 lbs.
7.8 lbs.
32F – 140F
41F – 95F
12
SEIKI_Soundbar UG-English Original_v2.indd 12
2012/8/3 18:58:27
THE FCC WANTS YOU TO KNOW
THE FCC WANTS YOU TO KNOW
This equipment generates, uses, and can radiate radio frequency energy and, if not installed
or used in accordance with the instructions, may cause harmful interference to radio
communications. However, there is no guarantee that interference will not occur in a particular
installation.
English
This equipment has been tested and found to comply with the limits for a Class B digital
device, pursuant to Part 15 of the FCC Rules. These limits are designed to provide reasonable
protection against harmful interference in a residential installation.
If this equipment does cause harmful interference to radio or television reception, which can
be determined by turning the equipment off and on, the user is encouraged to try to correct
the interference by one or more of the following measures: 1) reorient or relocate the receiving
antenna; 2) increase the separation between the equipment and the receiver; 3) connect the
equipment to an outlet on a circuit different from that to which the receiver is connected; 4)
consult the dealer or an experienced radio/TV technician for additional suggestions.
Any changes or modifications not expressly approved by the party responsible for compliance
could void the user’s authority to operate the equipment. Where shielded interface cables have
been provided with the product or specified additional components or accessories elsewhere
defined to be used with the installation of the product, they must be used in order to ensure
compliance with FCC regulation.
Canadian DOC statement
Standard Television Receiving Apparatus Canada BETS-7
This Class B digital apparatus complies with Canadian ICES-003.
13
SEIKI_Soundbar UG-English Original_v2.indd 13
2012/8/3 18:58:27
SEIKI AV PRODUCT’s LIMITED WARRANTY TO ORIGINAL CONSUMER
Audio and Video Products (the “Product”)
English
This Product (including any accessories included in the original packaging) as supplied and distributed in new condition,
is warranted by SEIKI DIGITAL INC. (SEIKI) to the original consumer purchaser against defects in material and workmanship
(“Warranty”) as follows:
1. LABOR : For a period of ninety (90) days from date of original consumer purchase, if this Product or any part is determined by
SEIKI, or a SEIKI authorized service provider, to be defective, SEIKI will repair or replace the Product with refurbished product
of similar or better quality, at SEIKI’s option, at no charge to the original consumer, or pay the labor charges to any SEIKI
authorized service provider. After the ninety (90) days Warranty period, you must pay for all labor charges.
2. PARTS : For a period of ninety (90) days from the date of original consumer purchase, SEIKI will supply, at no charge to the
original consumer, rebuilt or refurbished replacement parts in exchange for defective parts, or will replace the Product with
refurbished product of similar or better quality, at SEIKI’s option, at no charge to the original consumer. After the ninety (90)
days Warranty period, you must pay for the costs of all parts.
3. SHIPPING COSTS : Notwithstanding the foregoing, the original consumer is responsible for any shipping charges incurred to
ship the Product or part(s) to SEIKI or to an SEIKI authorized customer service provider, for diagnosis, repair or replacement.
To obtain Warranty Service and Troubleshooting information call our toll free customer service line at:
1‐855‐MY‐SEIKI (1‐855‐697‐3454)
Please have your model and serial number available along with your date of purchase.
You can also visit us online and REGISTER your SEIKI product at:
www.SEIKIDIGITAL.com
To receive Warranty service, the original consumer purchaser must contact SEIKI for problem determination and service procedures.
Proof of purchase in the form of a bill of sale or receipted invoice, evidencing that the Product is within the applicable Warranty
period(s), MUST be presented to SEIKI, or an authorized customer service provider, in order to obtain the requested service.
Exclusions and Limitations
This Warranty covers manufacturing defects in materials and workmanship encountered in the normal, non‐commercial use of
the Product, and does not cover (a) damage or failure caused by or attributable to abuse, misuse, failure to follow instructions,
improper installation or maintenance, alteration, accident, or excess voltage or current; (b) improper or incorrectly performed
repairs by non-authorized service facilities; (c) onsite consumer instruction or adjustments; (d) transportation, shipping, delivery,
insurance, installation or set‐up costs; (e) costs of product removal, transportation or reinstallation costs; (f ) ordinary wear and
tear, cosmetic damage or damage due to acts of nature, accident; (g) commercial use of the Product; (h) modification of, or to any
part of the Product. In addition, this Warranty does not cover images “burnt” into the screen. This Warranty applies to the original
consumer only and does not cover products sold AS IS or WITH ALL FAULTS, or consumables (e.g., fuses, batteries, bulbs etc.), and
the Warranty is invalid if the factory-applied serial number has been altered or removed from the Product. This Warranty is valid
only in the United States and Canada, and only applies to products purchased and serviced in the United States and Canada. All
replaced parts and products, and products on which a refund is made, become the property of the Warrantor.
NO WARRANTIES, WHETHER EXPRESS OR IMPLIED, INCLUDING, BUT NOT LIMITED TO, ANY IMPLIED WARRANTIES OF
MERCHANTABILITY OR FITNESS FOR A PARTICULAR PURPOSE, OTHER THAN THOSE EXPRESSLY DESCRIBED ABOVE
SHALL APPLY. THE WARRANTOR FURTHER DISCLAIMS ALL WARRANTIES AFTER THE EXPRESS WARRANTY PERIOD STATED
ABOVE. NO OTHER EXPRESS WARRANTY OR GUARANTY GIVEN BY ANY PERSON, FIRM OR ENTITY WITH RESPECT TO THE
PRODUCT SHALL BE BINDING ON THE WARRANTOR. REPAIR, REPLACEMENT, OR REFUND OF THE ORIGINAL PURCHASE
PRICE ‐ AT THE WARRANTOR’S SOLE DISCRETION ‐ ARE THE EXCLUSIVE REMEDIES OF THE CONSUMER. THE WARRANTOR
SHALL NOT BE LIABLE FOR ANY INCIDENTAL OR CONSEQUENTIAL DAMAGES CAUSED BY THE USE, MISUSE OR INABILITY
TO USE THE PRODUCT. NOTWITHSTANDING THE FOREGOING, CONSUMER’S RECOVERY SHALL NOT EXCEED THE
PURCHASE PRICE OF THE PRODUCT SOLD BY SEIKI. THIS WARRANTY SHALL NOT EXTEND TO ANYONE OTHER THAN THE
ORIGINAL CONSUMER WHO PURCHASED THE PRODUCT AND IS NOT TRANSFERABLE.
Some states do not allow the exclusion or limitation of incidental or consequential damages, or allow limitations on warranties, so
the above limitations or exclusions may not apply to you. This Warranty gives you specific rights, and you may have other rights,
which vary from state to state.
Please send all correspondence to:
SEIKI DIGITAL INC.
c/o SEIKI Digital Customer Service
6880 Commerce Blvd., Canton, MI 48187 USA
[email protected]
14
SEIKI_Soundbar UG-English Original_v2.indd 14
2012/8/3 18:58:27
CONTENTIDOS
CONTENIDOS
16
Precauciones
17
Preparaciones
Desempacando el SoundBar
Vista Frontal/ Controles/Vista Posterior
Montaje en Pared
Control Remoto
18
Conectando el SoundBar
22
Operando el SoundBar
24
Solución de Problemas
25
Especificaciones
FCC
26
27
Garantía 28
Español
Información Importante de Seguriddad
15
SEIKI_Soundbar UG-English Original_v2.indd 15
2012/8/3 18:58:27
INFORMACIÓN IMPORTANTE DE SEGURIDAD
INFORMACIÓN IMPORTANTE DE SEGURIDAD
Este símbolo indica que hay instrucciones importantes
de operación y mantenimiento en la literatura que
acompaña esta unidad.
Español
Este símbolo indica que la presencia alto voltaje
constituye un riesgo de choque eléctrico dentro de la
unidad.
• Todas las instrucciones de seguridad y de operación deben ser leídas antes de operar este producto y
debe ser retenida para futuras referencias.
• Todas las precauciones en el electrodoméstico y las instrucciones de operación deben ser seguidas
estrictamente.
• No usar este aparato cerca del agua y de la humedad.
• Limpiar el aparato solo con una franela levemente humedecida.
• No bloquear ninguna de las aperturas de ventilación. Instalar de acuerdo con las instrucciones del
fabricante.
• No instalar cerca de cualquier fuente de calor, tales como radiadores, registradores de calor, hornos o
cualquier otra fuente de calor.
• Proteger el cable de energía de pisadas o pinchazos particularmente en los enchufes, tomacorriente de
conveniencia, y en el punto en que ellos salen del aparato.
• Solo usar acoples/accesorios especificados por el fabricante.
• Desconectar el aparato durante tormentas o cuando no se usa por periodos extendidos de tiempo.
• Referir todos los mantenimientos a personal calificado. El mantenimiento se requiere cuando el aparato
ha sido dañado de cualquier manera, tales como daño en el cable de energía o enchufe, se ha derramado
algún líquido o algún objeto a caído en el aparato, si el aparato ha sido expuesto a la lluvia o humedad, no
opera normalmente o se ha caído.
• ADVERTENCIA: Para reducir el riesgo de incendio o choque eléctrico no exponer este aparato a la lluvia
o a la humedad. El aparato no será expuesto empaparse o salpicaduras, y los objetos con líquidos, tales
como floreros, no serán puestos sobre el aparato.
• Ninguna fuente de llamas tales como velas deben ser puestas sobre el producto.
• ADVERTENCIA: La batería o paquete de batería no debe ser expuesta a calor excesivo tal como rayos
solares, fuegos o similares.
• PRECAUCIÓN: Cambios o modificaciones no aprobadas expresamente por el fabricante pueden evitar
que el usuario opere el aparato.
• PRECAUCIÓN: El uso de controles o ajustes o rendimiento de productos que no sean los especificados
aquí puede resultar en una exposición peligrosa.
INFORMACIÓN ELÉCTRICA
Usar este electrodoméstico solo con el adaptador AC suministrado. Usar un suministro de energía no
aprobado anulará la garantía.
Medios de Suministro: Los medios de voltaje de operación para esta unidad están marcados en la placa de
clasificación en el adaptador AC.
Los medios de desconectar este electrodoméstico de los medios de suministros son el Adaptador AC/medios
de enchufe. Esto no debe tener obstáculos y estar rápidamente operativo a todo momento.
16
SEIKI_Soundbar UG-English Original_v2.indd 16
2012/8/3 18:58:27
PRECAUCIONES
PRECAUCIONES
Seguridad
• Antes de la operación, verificar si el voltaje de este producto está en línea con el voltaje local.
• Sostener el enchufe para desconectarlo de los tomacorrientes. No halar el cable de energía.
• Desconectar el enchufe tan pronto como un líquido o un objeto ingrese a este producto.
Descontinuar el uso de este producto hasta que haya sido probado y verificado por un técnico
calificado.
Ubicación
Español
• Colocar este producto en una superficie seca y estable lejos del calor y la humedad y donde no sea
probable que caiga o que sea tirado.
• Nunca ponga este producto directo contra los rayos solares o cerca de fuentes de calor.
• Hay dos almohadillas de caucho en la parte posterior del SoundBar. Estas son suministradas para
asegurar que haya espacio detrás del SoundBar para que los puertos acústicos de montaje trasero
operen correctamente. No remover estas almohadillas de caucho.
• Si está usando el SoundBar para el sonido del TV, colocar exactamente debajo o arriba de la
pantalla del TV. No parar un TV sobre el SoundBar.
17
SEIKI_Soundbar UG-English Original_v2.indd 17
2012/8/3 18:58:27
PREPARACIONES
PREPARACIONES
Desempacando el SoundBar
• Desempaque cuidadosamente la unidad. Si esto está dañado, por favor regrese a las
tiendas donde usted lo compró para reemplazo. Recuerde llevar el recibo de compra con
usted.
• Guarde el manual del usuario. Si usted pasa esta unidad a una tercera parte, asegurarse
de incluir este manual.
Español
• Le sugerimos que guarde el empaque. Si usted lo desecha, hágalo teniendo en cuenta las
regulaciones de reciclaje en su área.
El cartón debe contener:
SB201C SoundBar
Soporte de Montaje en Pared y Tornillos
User Manual
Control Remoto con Batería
Manual del Usuario
Adaptador AC
Cable de Audio RCA de
Tres Vías
18
SEIKI_Soundbar UG-English Original_v2.indd 18
2012/8/3 18:58:28
PREPARACIONES
Vista Frontal / Controles
1
2
3
4
Español
5
1.
Coloca el SoundBar en encendido o
reposo.
2.
SOURCE
Selecciona la fuente de audio entre
LINE /COAXIAL.
3.
MODE
Selecciona el modo de sonido entre
MOVIE/MUSIC/NEWS/GAMES.
4.
VOL+ / Aumenta o disminuye el volumen.
5.
Indicadores de Modo
La luz se prende de forma acorde
cuando usted recorre el ciclo de modos
de sonido de MOVIE/MUSIC/NEWS/
GAMES.
6.
Indicadores de Fuente
La luz se prende de forma acorde
cuando recorre el ciclo de fuentes de
entrada COAX/LINE.
6
7.
7
8
9
Indicador de Volumen
Muestra el volumen actual.
8.
Indicador de Energía
Se ilumina en Verde cuando el
SoundBar está encendido. Se ilumina
en Rojo cuando el SoundBar está en
modo reposo.
9.
IR (Receptor Infrarrojo)
Recibe señales IR provenientes del
control remoto.
19
SEIKI_Soundbar UG-English Original_v2.indd 19
2012/8/3 18:58:28
PREPARACIONES
Vista Posterior
Model: SB201C
Input Power: 15V
2.4A 36W
This device complies with part 15 of the FCC rules. Operation is
subject to t he f ollowing t wo c onditions: (1) t his device may not
cause harmful interference, and (2) this device must accept any
interference received i ncluding i nterference that m ay c ause
undesired operation.
MADE IN CHINA
Model: SB201C
Input Power: 15V
2.4A 36W
Español
This device complies with part 15 of the FCC rules. Operation is
subject to t he f ollowing t wo c onditions: (1) t his device may not
cause harmful interference, and (2) this device must accept any
interference received i ncluding i nterference that m ay c ause
undesired operation.
MADE IN CHINA
1
2
3
1. DC IN
Conecta la fuente de energía.
2. LINE IN
Conectar a una fuente análoga de salida de audio en el TV o en el dispositivo análogo.
3. COAXIAL IN
Conecta la salida de audio coaxial en el TV o el dispositivo digital.
Montaje en Pared
• Colocar el soporte de montaje en pared, en la pared que tenga la suficiente superficie para
sostener y luego asegurarlo con los tornillos apropiados.
• Colocar el SoundBar en las ranuras correspondientes en el soporte de montaje de pared.
Para una instalación segura, asegurarse de que las tachuelas de montaje se deslicen hacia
abajo a la derecha de la base de las ranuras.
Model: SB201C
Input Power: 15V
2.4A 36W
This device complies with part 15 of the FCC rules. Operation is
subject to t he f ollowing t wo c onditions: (1) t his device may not
cause harmful interference, and (2) this device must accept any
interference received i ncluding i nterference that m ay c ause
undesired operation.
MADE IN CHINA
Advertencia: Podrias necesitar elegir los tornillos convenientes de acuerdo con el material de
la pared.
20
SEIKI_Soundbar UG-English Original_v2.indd 20
2012/8/3 18:58:28
PREPARACIONES
Control Remoto
La primera vez que usted opere el control
remoto, por favor hale la tira de seguridad
para activar la batería.
1
2
3
4
2. Insertar una batería CR2025, con la
polaridad (+/-) como se indica.
Español
5
1. Abrir el compartimento de la batería.
1.
2.
Enciende o pone en reposo al SoundBar.
Pone en mudo o restablece el sonido.
3. VOLUME +/Ajusta el volumen.
4. Botones de Modo de Sonido
3. Cerrar el compartimento de la batería.
• MOVIE
Selecciona el modo de sonido en
Película.
Notas:
•
Remover las baterías del control remoto
cuando no se use por largo tiempo.
• NEWS
Selecciona el modo de sonido en
Noticias.
•
No instalar nuevas baterías con baterías
usadas y no mezclar diferentes tipos de
baterías.
• MUSIC
Selecciona el modo de sonido en
Música.
•
Desechar las baterías de acuerdo a las
disposiciones locales.
• GAMES
Selecciona el modo de sonido en
Juegos.
5. Botones de Fuente
• LINE
Cambia la fuente de sonido a
ANÁLOGO.
• COAX
Cambia la fuente de sonido a
COAXIAL.
21
SEIKI_Soundbar UG-English Original_v2.indd 21
2012/8/3 18:58:28
CONECTANDO EL SOUNDBAR
CONECTANDO EL SOUNDBAR
El SoundBar se suministra con un cable de audio de tres vías. Se
adapta para conectarlo tanto a fuentes de entrada digitales y estéreo
analógicas.
Separe con cuidado el cable con las clavijas negras de los cables con las clavijas
rojo/blanco.
Español
El cable negro se puede utilizar para una fuente digital, los cables rojo/blanco para
una fuente analógica.
Cable de Audio RCA
de Tres Vías
Conectar el audio a través de los cables digitales de audio.
Buena Calidad de Audio
Conectar el enchufe COAXIAL en el SoundBar al enchufe de SALIDA COAXIAL/
DIGITAL en el dispositivo usando el cable coaxial.
Nota: COAXIAL solo puede soportar entrada de audio PCM.
Conecte a la salida
de Audio Digital
Nota: Las fotos mostradas presentan únicamente
la conexión del Cable Coaxial Negro.
22
SEIKI_Soundbar UG-English Original_v2.indd 22
2012/8/3 18:58:29
CONECTANDO EL SOUNDBAR
Conectar el Audio a través Cables Análogos de Audio
Calidad de Audio Básica
Conectar el enchufe LINE en el SoundBar al enchufe de Audio en el dispositivo que
usa el cable análogo.
Español
Clavija Roja
Clavija Blanca
Conecte a la salida de
Audio Analógica
Nota: Las fotos mostradas presentan
únicamente la conexión de los Cables
Analógicos Rojo y Blanco.
Conecte Alimentación a la Barra de Sonido
Conecte el adaptador de CA a la toma de DC-IN nel Barra de Sonido y el otro extremo
a la tomacorriente de pared.
23
SEIKI_Soundbar UG-English Original_v2.indd 23
2012/8/3 18:58:29
OPERANDO EL SOUNDBAR
OPERANDO EL SOUNDBAR
Antes de usar el SoundBar para tocar audio desde los dispositivos conectados,
por favor hacer las conexiones necesarias descritas en este manual del usuario y
colocar el SoundBar a las fuentes correctas para los otros dispositivos.
Encendiendo el SoundBar o Dejándolo en Reposo
Presionar el botón en el SoundBar o el botón en el control remoto para
encender el SoundBar o para ponerlo en reposo.
Español
• El visualizador LED mostrará la fuente seleccionada, el volumen, el modo de
sonido, etc.
• El visualizador LED mostrará “POWER” en rojo cuando el SoundBar está en
modo reposo.
Note: El botón en el SoundBar o el botón del control remoto no apaga
completamente el SoundBar. Por favor desconectar el adaptador AC de los
enchufes si usted planea dejar sin atención el SoundBar por largos periodos de
tiempo.
Seleccionando la Fuente de Entrada
Presionar el botón SOURCE del SoundBar repetidamente para seleccionar la
fuente de entrada entre LINE/COAX, o usted puede seleccionarlo directamente
desde el control remoto.
• El visualizador LED mostrará la fuente seleccionada.
Ajustando el Volumen
Presionar los botones VOL+/V en el SoundBar o los botones VOLUME+/- en el
control remoto para ajustar el volumen.
• Los rangos de volumen de este SoundBar son desde 0 (mínimo) a 30 (Máximo).
• El visualizador LED mostrará "- - " cuando el volumen esté en cero.
Enmudeciendo el Sonido
Presionar el botón MUTE en el control remoto repetidamente para enmudecer o
restaurar el sonido.
• El visualizador LED mostrará "- - " cuando el audio está en mudo.
• Usted también puede restaurar el sonido al presionar los botones VOL+/-.
Seleccionando el Modo de Sonido
Presionar el botón MODE en el SoundBar repetidamente para seleccionar el
modo de sonido entre MOVIE/MUSIC/NEWS/GAMES, o usted puede seleccionar
directamente desde el control remoto.
• El visualizador LED mostrará el modo de sonido seleccionado.
24
SEIKI_Soundbar UG-English Original_v2.indd 24
2012/8/3 18:58:29
SOLUCIÓN DE PROBLEMAS
SOLUCIÓN DE PROBLEMAS
PROBLEMA
No hay energía
No hay sonido del SoundBar
Español
Zumbando o Silbando
REMEDIO
• Asegurarse que el cable de energía AC está
conectado a un enchufe AC.
• Presionar el Botón de Energía en el control remoto o
en el SoundBar.
• Conectar correctamente el cable de audio del
SoundBar al Tv u otros dispositivos.
• Seleccionar la fuente correcta de entrada de audio.
• Asegurarse que el SoundBar no esté en mudo.
Presionar VOL+/- para restaurar el sonido.
• Asegurarse que ambos extremos del cable de audio
están correctamente conectados.
• Verificar en un dispositivo alterno o remplazar el cable
de audio.
25
SEIKI_Soundbar UG-English Original_v2.indd 25
2012/8/3 18:58:29
ESPECIFICACIONES
ESPECIFICACIONES
Parlantes
Frecuencia de Respuesta
Español
Amplificador de Audio
Nivel de Presión de Sonido
Frecuencias de Muestreo Soportadas
Profundidades de Bit PCM Linear
Soportadas
Muestra de Rango SPDIF
Máquina de Audio Soportada
Sensibilidad de Entrada (mV)
Entradas
Entrada de Energía
Voltaje
Dimensiones
Peso Neto
Peso Bruto
Temperatura de Almacenamiento
Temperatura de Operación
2 x 2.5” rango máximo
2 x 2.5” Bafle
Rango completo: 200 Hz – 20 kHz (+/- 3dB)
Bafle: 60 Hz – 10 kHz (+/- 3dB)
Clase Integrada-D @ 20 varios x 2 CH, 4Ω THD
= 1%, 1kHz
87 dB ([email protected])
32Khz, 44.1KHz, 48KHz, 96KHz
16-bit, 24-bit
96KHz 24bit
Máquina de Audio DSP de Alto Rendimiento 32Bit 73.728MHz
500 mV rms
SPDIF Coaxial (trasero), RCA Análogo (trasero)
15 DC, 36 W Max.
100 – 240 V~, 50/60 Hz
37.4” (L) x 3.5” (W) x 2.28” (H)
5.5 lbs.
7.8 lbs.
32F – 140F
41F – 95F
26
SEIKI_Soundbar UG-English Original_v2.indd 26
2012/8/3 18:58:29
NOTAS DEL FCC
NOTAS DEL FCC
Se ha probado este equipo y se encontró que cumple con los límites para la Clase B de
dispositivos digitales, conforme a la Parte 15 de la Normas FCC. Dichos límites están
diseñados para proporcionar la protección razonable contra la interferencia dañina en una
instalación residencial.
Español
Este equipo genera, usa y puede irradiar energía de radiofrecuencia y, si no es instalado
o usado de acuerdo con las instrucciones, puede causar interferencia dañina a las
radiocomunicaciones. Sin embargo, no hay garantía que no ocurra interferencia en una
instalación particular.
Si el equipo causa interferencia dañina a la recepción de radio o televisión, lo cual puede
ser determinado al encender o apagar el equipo, se anima al usuario a tratar de corregir la
interferencia por una o más de las siguientes medidas:
• Reorientar o reubicar la antena de recepción.
• Incrementar la separación entre el equipo y el receptor.
• Conectar el equipo a un tomacorriente en un circuito diferente de aquel en el que el receptor
está conectado.
• Consultar al vendedor o un técnico experimentado en radio/TV por ayuda adicional.
Cualquier cambio o modificación no aprobados expresamente por la parte responsable para el
cumplimiento podría invalidar la autoridad del usuario para operar el equipo. En donde se han
proporcionado cables de interface con protección junto con el producto o con componentes
adicionales especificados o accesorios definidos en cualquier otra parte para utilizarse en
la instalación del producto, deben usarse con el objeto de asegurar el cumplimiento de los
reglamentos de FCC.
Declaración DOC del Canadá
Aparato Receptor de Televisión Estándar Canadá BETS-7
Este aparato digital de Clase B cumple con el ICES-003 del Canadá.
27
SEIKI_Soundbar UG-English Original_v2.indd 27
2012/8/3 18:58:29
GARANTÍA LIMITADA DE LOS PRODUCTOS DE SEIKI AV APLICABLE AL CONSUMIDOR ORIGINAL
Productos de audio y vídeo (el “Producto”)
Español
Este producto (incluyendo todos los accesorios que son incluidos en el embalaje original), suministrado y distribuido como
nuevo, tiene la garantía de SEIKI Digital INC. (SEIKI), válida para el comprador original) cubriendo defectos de materiales y mano
de obra (“Garantía”) de la siguiente manera:
1. MANO DE OBRA: Durante un período de noventa (90) días a partir de la fecha de la compra hecha por el consumidor
original, si ha sido comprobado por SEIKI o el proveedor de servicio autorizado por SEIKI que este producto o cualquier
pieza del mismo es defectuosa, SEIKI se compromete a reparar o sustituir el producto por otro reparado de igual o mejor
calidad, a decisión de SEIKI, sin costo alguno para el consumidor original, o sin pagar los gastos de mano de obra a cualquier
proveedor de servicio autorizado de SEIKI. Finalizados los noventa (90) días del período de garantía, usted debe pagar todos
los costes de mano de obra.
2. PIEZAS: Durante un período de noventa (90) días a partir de la fecha de la compra hecha por el consumidor original, SEIKI
suministrará, sin costo alguno para el consumidor original, las piezas de repuesto (reconstruidas o reparadas) a cambio de
las piezas defectuosas o reemplazará el producto por un producto renovado de calidad similar o mejor, a decisión de Seiki,
sin costo alguno para el consumidor original. Finalizados los noventa (90) días del período de garantía, usted debe pagar
los costes de todas las piezas.
3. GASTOS DE ENVÍO: No obstante, el consumidor original es responsable de los gastos de envío incurridos por enviar el
producto o la pieza (s) a SEIKI o a un proveedor de servicio al cliente autorizado por SEIKI, para el diagnóstico, reparación o
reemplazo.
Para obtener información sobre el servicio de garantía y resolución de problemas llame a nuestra línea
gratuita de servicio al cliente al:
1‐855‐MY‐SEIKI (1‐855‐697‐3454)
Tenga a mano el modelo y número de serie junto con su fecha de compra.
Usted también puedes visitarnos online y REGISTRAR su producto SEIKI en:
www.SEIKIDIGITAL.com
Para recibir el servicio de garantía, el comprador/consumidor original debe de ponerse en contacto con SEIKI para determinar el
problema y los procedimientos de servicio. Con el fin de obtener el servicio solicitado, una prueba de compra en forma de factura
o recibo que evidencie que el producto está dentro del período de garantía (s) correspondiente (s) DEBE SER presentada a SEIKI o
a un proveedor de servicio al cliente autorizado.
Exclusiones y limitaciones
Esta garantía cubre defectos de fabricación en materiales y mano de obra usando el producto en condiciones normales, no
comerciales, y no cubre (a) daños o averías causadas por o atribuibles a abuso, mal uso, a no seguir las instrucciones, instalación
o mantenimiento inadecuados , alteración, accidente, o de excesivo voltaje o corriente; (b) reparaciones inadecuadas o mal
realizadas por talleres no autorizados; (c) ajustes o instrucción del consumidor in situ; (d) el transporte, envío, entrega, seguros,
instalación o conjunto de los costes; (e) costes de recogida del producto, los costes de reinstalación o de transporte; (f ) el
desgaste normal, daños superficiales o daños debidos a fenómenos naturales, accidentes; (g) el uso comercial del producto;
(h) la modificación del producto o de cualquier pieza. Además, esta garantía no cubre las imágenes “quemadas” en la pantalla.
Esta garantía se aplica solamente al consumidor original y no cubre los productos vendidos CON FUNCIONAMIENTO NORMAL
o CON TODOS SUS FALLOS, o consumibles (por ejemplo, fusibles, baterías, bombillas, etc.), y la garantía no es válida si ha sido
alterado o eliminado el número de serie del producto. Esta garantía es válida sólo en Estados Unidos y Canadá, y sólo se aplica
a los productos comprados y pagados en Estados Unidos y Canadá. Todas las piezas y productos reemplazados, pasarán a ser
propiedad del garante.
NINGUNA GARANTÍA EXPRESA O IMPLÍCITA SE APLICARÁ, INCLUYENDO, PERO NO LIMITADO A GARANTIAS DE
COMERCIALIZACIÓN, INVIOLABLES, O APTITUD PARA CUALQUIER PROPÓSITO PARTICULAR, QUE NO SEA LA
EXPRESAMENTE ARRIBA DESCRITA EL GARANTE RENUNCIA A TODAS LAS GARANTÍAS DESPUÉS DEL PERÍODO DE
GARANTÍA EXPRESA INDICADO ANTERIORMENTE. NINGUNA OTRA GARANTÍA EXPRESA O GARANTÍA OTORGADA POR
CUALQUIER PERSONA, EMPRESA O ENTIDAD CON RESPECTO AL PRODUCTO SERÁ OBLIGATORIA PARA EL GARANTE.
REEMPLAZO O REEMBOLSO DEL PRECIO DE LA COMPRA ORIGINAL SON LOS RECURSOS EXCLUSIVOS DEL CONSUMIDOR
- AL EXCLUSIVO CRITERIO DEL GARANTE. EL GARANTE NO SERÁ EL RESPONSABLE DE NINGÚN DAÑO DIRECTO O
INDIRECTO CAUSADO POR EL USO, ABUSO O USO INDEBIDO DEL PRODUCTO. A PESAR DE LO ANTERIOR, LA REPOSICIÓN
AL CONSUMIDOR NO DEBERÁ EXCEDER EL PRECIO DE COMPRA DEL PRODUCTO VENDIDO POR SEIKI. ESTA GARANTÍA
NO SE EXTIENDE A NINGUNA PERSONA DISTINTA DEL CONSUMIDOR ORIGINAL QUE COMPRÓ EL PRODUCTO Y NO ES
TRANSFERIBLE.
Algunos de los estados no permiten la exclusión o limitación de daños incidentales o consecuentes, o permiten limitaciones en
garantías, por lo que las limitaciones o exclusiones anteriores podrian no ser aplicables a usted. Esta garantía le otorga derechos
específicos, y usted puede tener otros derechos que varían de estado a estado.
Por favor, envíe su correspondencia a:
SEIKI DIGITAL INC.
c/o SEIKI Digital Customer Service
6880 Commerce Blvd., Canton, MI 48187 ESTADOS UNIDOS
[email protected]
28
SEIKI_Soundbar UG-English Original_v2.indd 28
2012/8/3 18:58:29
TABLE DE MATIÈRES
TABLE DE MATIÈRES
30
Précautions
31
Preparatifs
Désemballage du Soundbar
Vue Avant/ Commandes/Vue Arrière
Montage Mural
Télécommande
32
Connexion du Soundbar
36
Utilisation du Soundbar
38
Diagnostic Des Anomalies
39
Spécifications
40
FCC
41
Garantie
42
Francés
Consigne de Sécurité Importante
29
SEIKI_Soundbar UG-English Original_v2.indd 29
2012/8/3 18:58:29
CONSIGNES DE SÉCURITÉ IMPORTANTES
CONSIGNES DE SÉCURITÉ IMPORTANTES
Ce symbole indique qu’il existe d’importantes
instructions de fonctionnement et d’entretien dans la
documentation accompagnant le présent dispositif.
Francés
Ce symbole indique qu’il existe une tension électrique
inappropriée exposant l’utilisateur à un risque
d’électrocution dans le présent dispositif.
• L’utilisateur doit tâcher de lire toutes les consignes de sécurité et d'utilisation du dispositif et les conserver
pour s’en référer à l’avenir.
• L’utilisateur est tenu de respecter tous les avertissements indiqués sur le dispositif ou ceux contenus dans
les instructions d’utilisation.
• Cet appareil ne doit pas être utilisé près de l’eau ou de l’humidité.
• Ne nettoyer l’appareil qu’avec un tissu légèrement humide.
• Ne bloquer aucune ouverture. Respecter les instructions d’installation du fabricant.
• Ne pas installer l’appareil près d’une source d’énergie comme le radiateur, les registres de chaleur, les
réchauds, etc.
• S’assurer que le cordon d’alimentation n’est pas piétiné ou pincé, principalement au niveau des fiches, du
réceptacle de convenance et à ses différents points d'attache à l’appareil.
• Utiliser uniquement les joints et les accessoires spécifiés par le fabricant.
• Débrancher l’appareil en cas de pluies orageuses accompagnées d’éclairs ou lorsqu’il n’est pas utilisé
après une longue période.
• Contacter un personnel qualifié pour tous travaux d’entretien. L’entretien est requis lorsque l’appareil a subi
des dommages de toute sorte, par exemple, l'endommagement du cordon d’alimentation ou de la fiche, le
déversement accidentel de liquide ou la chute d’objet sur celui-ci, son exposition à la pluie ou à l’humidité,
son mauvais fonctionnement ou lorsqu’il a été abandonné pendant longtemps.
• AVERTISSEMENT: Pour limite les risques d’incendie ou d’électrocution, ne pas exposer l’appareil à la pluie
ou à l’humidité. L’appareil ne doit pas être exposé à la stillation ou à la projection de matières dangereuses
et l'utilisateur doit éviter de poser les objets contenant des liquides (vases) sur celui-ci.
• Aucune source de flamme nue, comme les bougies, ne doit être placée sur l’appareil.
• AVERTISSEMENT: La batterie ou le bloc-batterie ne doit pas être exposé à la chaleur excessive, comme le
soleil, le feu ou autres.
• MISE EN GARDE: Les changements ou modifications non expressément approuvés par le fabricant
peuvent limiter l’autorité de l'utilisateur à manipuler ce dispositif.
• MISE EN GARDE: L’utilisation de commandes ou l’ajustement ou l’utilisation de produits autres que ceux
indiqués dans le présent manuel peuvent présenter des risques d’explosion.
INFORMATIONS RELATIVES AU SYSTÈME ÉLECTRIQUE
Utiliser uniquement l’adaptateur CA sur ce dispositif. L’utilisation de fournitures d’énergie non approuvées
annule la garantie.
Alimentation secteur: La tension de fonctionnement du dispositif est marquée sur une plaque de notation
figurant sur l’adaptateur CA.
Le débranchement du dispositif sur l’alimentation secteur se fait au niveau de l’adaptateur CA et de la fiche
secteur. Le branchement ne doit pas être brouillé et doit être prêt à l'utilisation à tout moment.
30
SEIKI_Soundbar UG-English Original_v2.indd 30
2012/8/3 18:58:29
PRÉCAUTIONS
PRÉCAUTIONS
Sécurité
• Avant l’utilisation, s’assurer que la tension de l’appareil correspond à la tension de la zone.
• Tenir la fiche pour la débrancher de la sortie du secteur. Ne pas tirer le cordon d’alimentation.
• Débrancher la fiche dès qu’un liquide ou des objets pénètrent dans l’appareil. Arrêter d’utiliser
l’appareil jusqu’à ce qu'il soit testé et vérifié par un technicien d’entretien qualifié.
Emplacement
• Placer le dispositif sur une surface sèche et plane, à l'abri de la chaleur et de l’humidité, où il ne peut
tomber ou basculer.
• Ne jamais placer le dispositif en contact direct avec les rayons du soleil ou à proximité d'une source
de chaleur.
• Si vous utilisez le SoundBar pour obtenir les signaux télé, le placer en dessous ou au-dessus de
l’écran de télévision. Ne pas déposer la télévision sur le dispositif.
Francés
• Il existe deux tampons en caoutchouc à l’arrière du SoundBar. Ces tampons permettent de s’assurer
qu'il y a de l’espace derrière le dispositif pour permettre aux ports acoustiques montés à l’arrière de
fonctionner convenablement. Ne pas déposer ces tampons.
31
SEIKI_Soundbar UG-English Original_v2.indd 31
2012/8/3 18:58:29
PRÉPARATIFS
PRÉPARATIFS
Désemballage du Soundbar
• Désemballer le dispositif avec soin. S’il est endommagé, le retourner pour remplacement au
magasin où il a été acheté. N’oubliez pas d'y présenter votre reçu d’achat.
• Conserver le manuel d’utilisation. Si vous remettez le dispositif à un tiers, tâchez d’y inclure
le manuel.
• Nous vous conseillons de conserver l’emballage. Si vous désirez le jeter, faites-le en tenant
compte de la règlementation relative au recyclage en vigueur dans votre localité.
Francés
Le carton doit contenir:
SoundBar SB201C
Support Mural et Vis
User Manual
Télécommande Accompagnée de la Pile
Adaptateur AC
Manuel de L’utilisateur
Câble Audio RCA à Trois Voies
32
SEIKI_Soundbar UG-English Original_v2.indd 32
2012/8/3 18:58:30
PRÉPARATIFS
Vue Avant/Commandes
1
2
3
1.
Mettez le SoundBar en mode Activé ou
En Attente.
2.
SOURCE
Sélectionner comme source audio le
mode LINE ou COAXIAL.
3.
MODE
Choisir comme mode de son Movie ou
Music ou News ou Games.
4.
VOL+ / Hausser ou baisser le volume.
5.
Indicateurs de mode
S’éclaire conformément au mode audio
sélectionné: MOVIE/MUSIC/NEWS/
GAMES.
6.
Indicateurs de source
S’éclaire conformément à la source
d’entrée sélectionnée: COAX/LINE.
6
7.
7
8
Francés
5
4
9
Indicateur de volume
Afficher le volume actuel.
8.
Indicateur de puissance
Le bouton est VERT lorsque le
SoundBar est en marche. Le bouton
est ROUGE lorsque le SoundBar est en
mode d'attente.
9.
IR (Récepteur Infrarouge)
Reçoit les signaux envoyés par la
télécommande.
33
SEIKI_Soundbar UG-English Original_v2.indd 33
2012/8/3 18:58:30
PRÉPARATIFS
Vue Arrière
Model: SB201C
Input Power: 15V
2.4A 36W
This device complies with part 15 of the FCC rules. Operation is
subject to t he f ollowing t wo c onditions: (1) t his device may not
cause harmful interference, and (2) this device must accept any
interference received i ncluding i nterference that m ay c ause
undesired operation.
MADE IN CHINA
Francés
1
2
3
1. DC IN
Se connecter à la source d’alimentation.
2. LINE IN
Se connecter à une sortie audio analogue de la télévision à un dispositif analogue.
3. COAXIAL IN
Se connecter à une sortie audio coaxiale de la télévision à un dispositif numérique.
Montage Mural
• Placer le support mural sur un mur pouvant le soutenir et y mettre les vis appropriées.
•
• Fixer le SoundBar dans les fentes correspondantes du support mural. Pour une installation
sécurisée, s’assurer que les goujons de fixation glissent vers la droite au fond des fentes.
Model: SB201C
Input Power: 15V
2.4A 36W
This device complies with part 15 of the FCC rules. Operation is
subject to t he f ollowing t wo c onditions: (1) t his device may not
cause harmful interference, and (2) this device must accept any
interference received i ncluding i nterference that m ay c ause
undesired operation.
MADE IN CHINA
Avertissement: Vous devez peut-être choisir les vis convenables selon le matériel de votre
mur.
34
SEIKI_Soundbar UG-English Original_v2.indd 34
2012/8/3 18:58:30
PRÉPARATIFS
Télécommande
Veuillez tirer la bande de sécurité pour activer
la pile lors de la première utilisation de la
télécommande.
1
2
3
4
5
1. Ouvrir le compartiment de la pile.
Francés
2. Introduire une pile de CC 2025 avec la
polarité (+/-) comme indiqué.
1.
2.
Mettez le SoundBar en mode Activé ou
En Attente.
Activer le mode muet et restituer le
volume.
3. VOLUME +/Ajuster le volume.
4. Boutons de mode de son
3. Fermer le compartiment de la pile.
Remarques:
•
Sortir les piles de la télécommande
lorsque celle-ci n’est pas utilisée pendant
une longue durée.
•
Ne pas associer les piles neuves aux
vieilles et ne pas mélanger plusieurs
types de piles.
•
Jeter les piles conformément à la
règlementation locale.
• MOVIE
Choisir le mode de son de Film.
• NEWS
Choisir le mode de son de
Informations.
• MUSIC
Choisir le mode de son de Musique.
• GAMES
Choisir le mode de son de Jeux.
5. Boutons de source
• LINE
Mettre la source audio en mode
ANALOGUE.
• COAX
Mettre la source audio en mode
COAXIALE.
35
SEIKI_Soundbar UG-English Original_v2.indd 35
2012/8/3 18:58:30
CONNEXION DU SOUNDBAR
CONNEXION DU SOUNDBAR
Le système SoundBar est livré avec un câble audio/vidéo et est adapté
à la connexion des sources numériques et analogiques.
Séparez lentement le câble avec des fiches noires des câbles aux fiches rouges/
blanches.
Le câble noir peut être utilisé pour la source numérique, et les câbles rouge et blanc
pour la source analogique.
Francés
Câble Audio RCA à Trois Voies
Connecter l’audio à travers les câbles audio numériques
Son audio de bonne qualité
Connecter la prise COAX du SoundBar sur la prise COAX/DIGITAL OUT de l’appareil
à l’aide du câble coaxial.
Remarque : La prise COAX ne peut prendre en charge que l’entrée audio PCM.
Connecter à la sortie
audio numérique
Remarque: Illustrations représentant la
connexion de câble coaxial noir uniquement.
36
SEIKI_Soundbar UG-English Original_v2.indd 36
2012/8/3 18:58:31
CONNEXION DU SOUNDBAR
Connecter l’audio à travers les câbles audio analogues
Son audio de qualité fondamentale
Connecter la prise LINE du SoundBar à la prise Audio de l’appareil à l’aide d’un câble
analogue.
Fiche rouge
Fiche blanche
Francés
Connecter à la sortie
audio analogique
Remarque: Illustrations représentant la
connexion des câbles coaxiaux rouge et
blanc uniquement.
Brancher l’alimentation sur le SoundBar
Branchez l’adaptateur CA sur la prise DC-IN du SoundBar et l'autre extrémité sur la
prise murale.
37
SEIKI_Soundbar UG-English Original_v2.indd 37
2012/8/3 18:58:31
UTILISATION DU SOUNDBAR
UTILISATION DU SOUNDBAR
Avant d’utiliser le SoundBar pour jouer des sons audio à partir des dispositifs
connectés, veuillez effectuer les branchements nécessaires décrits dans le présent
manuel et branchez le SoundBar à la source appropriée sur les autres appareils.
Mise du SoundBar en mode Activé ou En Attente
Appuyer sur le bouton du SoundBar ou sur le bouton
pour mettre le SoundBar en mode Activé ou En Attente.
de la télécommande
• L’affichage à DEL indique la source choisie, le volume, le mode du son, etc.
lorsque le SoundBar est activé.
• L’affichage à DEL indique "POWER" en rouge lorsque le SoundBar se trouve en
mode En Attente.
Francés
Remarque: Le bouton du soundBar ou le bouton de la télécommande ne
désactive pas complètement le SoundBar. Veuille déConnecter l’adaptateur CA de
la prise de secteur si vous désirez laisser le SoundBar inactif pendant longtemps.
Choix d’une source d’entrée
Appuyer de façon répété sur le bouton SOURCE du SoundBar pour choisir la
source d’entrée voulue entre LINE et COAX ou choisir directement à partir de la
télécommande.
• L’affichage à DEL indique la source choisie.
Réglage du volume
Appuyer sur les boutons VOL+/- du SoundBar ou sur les boutons VOLUME+/ - de la
télécommande pour régler le volume.
• La plage de volume du SoundBar varie entre 0 (Min.) et 30 (Max.).
• L'écran DEL s'affiche“- -“lorsque le volume est à zéro.
Rendre le son silenieux
Appuyer de façon répété sur le bouton MUTE de la télécommande pour rendre le
son silencieux ou pour le restaurer.
• L'écran DEL s'affiche “- -“lorsque le son est coupé.
• Vous pouvez également restaurer le son en appuyant sur les boutons VOL+/-.
Choix du mode de son
Appuyer de façon répété sur le bouton MODE du SoundBar pour choisir le mode
de son voulue entre Movie/Music/News/Games ou choisir directement à partir de la
télécommande.
• L’affichage à DEL indique le mode de son choisi.
38
SEIKI_Soundbar UG-English Original_v2.indd 38
2012/8/3 18:58:31
DIAGNOSTIC DES ANOMALIES
DIAGNOSTIC DES ANOMALIES
PROBLEME
Pas d’énergie
Pas de son en provenance
du SoundBar
Bourdonnement ou
ronronnement
RESOLUTION
• S’assurer que le cordon d’alimentation CA est
correctement connecté à une prise CA.
• Appuyer sur le bouton Power à partir de la
télécommande ou sur le SoundBar.
• Connecter le câble audio approprié entre le SoundBar
et la télévision (ou autres appareils).
• Sélectionner la source d’entrée audio appropriée.
• S’assurer que le SoundBar n’est pas en mode muet.
Appuyer sur le bouton VOL+/- pour restaurer le son.
• S’assurer que les deus extrémités des câbles audio
sont convenablement branchées.
• Tester le câble audio sur un autre appareil ou le
remplacer.
Francés
39
SEIKI_Soundbar UG-English Original_v2.indd 39
2012/8/3 18:58:31
SPÉCIFICATIONS
SPÉCIFICATIONS
Haut-parleurs
Réponse de fréquence
Amplificateur audio
Niveau de pression acoustique
Fréquences d’échantillonnage
Profondeurs linéaires appuyées du
PCM en Bit
Plage d’échantillonnage du SPDIF
Francés
Moteur audio appuyé
Sensitivité d'entrée (mV)
Entrées
Entrée d’énergie
Tension
Dimensions
Poids net
Poids brut
Température de stockage
Température de fonctionnement
2 x 2,5” plage complète
2 x 2,5” Woofer
Plage complète : 200 Hz – 20 kHz (+/- 3dB)
Woofer : 60 Hz – 10 kHz (+/- 3dB)
Integrated Class-D @ 20 watts x 2 CH, 4Ω THD
= 1%, 1kHz
87 dB ([email protected])
32Khz, 44.1KHz, 48KHz, 96KHz
16-bit, 24-bit
96KHz 24bit
Moteur audio DSP haute performance de 32-Bit
73,728MHz
500 mV rms
SPDIF Coaxial (arrière), RCA Analogue (arrière)
15 DC, 36 W Max.
100 – 240 V~, 50/60 Hz
37.4” (L) x 3.5” (W) x 2.28” (H)
5.5 lbs.
7.8 lbs.
32F – 140F
41F – 95F
40
SEIKI_Soundbar UG-English Original_v2.indd 40
2012/8/3 18:58:31
DÉCLARATION FCC
DÉCLARATION FCC
Le présent équipement a été soumis à des essais, de manière à établir sa conformité avec
les limites afférentes à un appareil numérique de classe B, en vertu de la section 15 des
règlements du FCC. Ces limites sont prévues afin de fournir une protection raisonnable contre
les interférences dangereuses dans une installation résidentielle.
Le présent équipement génère, utilise et peut irradier l’énergie de fréquence radio et s’il n’est
pas installé et utilisé conformément aux instructions, l’appareil peut causer une interférence
dangereuse à la communication radio. Cependant, il n’est pas garanti que l’interférence
n’interviendra pas dans une installation particulière.
Francés
Au cas où l’équipement provoque une mauvaise interférence à la réception radio ou télé
(interférence pouvant être déterminée en activant ou en désactivant l’équipement, il est
conseillé à l’utilisateur de rechercher l’interférence appropriée à travers au moins l’une des
mesures suivantes:
• Réorienter ou repositionner l’antenne de réception.
• Augmenter l’écart entre l’équipement et le récepteur.
• Connecter l’équipement à une sortie sur un circuit différent à celui sur lequel le récepteur
est connecté.
• Contacter le fournisseur ou un technicien radio/télévision expérimenté pour obtenir de l’aide.
Tout changement ou modification, non expressément approuvé par la partie responsable de la
conformité, peut entraîner la nullitédu droit d'utilisation de l'équipement.Si des câbles d'interface
blindée ont été fournis avec le produit ou si des composants supplémentaires ont été spécifiés
pour l'utilisation avec l'appareil, ces derniers doivent être utilisés pour assurer le respect des
règles FCC.
Déclaration du Ministère des communications canadien
Appareil standard de réception de télévision, Canada BETS-7
Cet appareil numérique de classe B est conforme à la norme NMB-003 du Canada.
41
SEIKI_Soundbar UG-English Original_v2.indd 41
2012/8/3 18:58:31
GARANTIE LIMITÉE AU CLIENT ORIGINAL DES PRODUITS SEIKI AV
Produits Audio et Vidéo (“ le Produit “)
Ce Produit (incluant n’importe quels accessoires inclus dans l’emballage original) comme fourni et distribué dans la nouvelle
condition, est garanti par SEIKI DIGITAL INC. (SEIKI) à l’acheteur original contre des défauts dans le matériel et la fabrication
(“Garantie”) comme suit :
1. MAIN-D’ŒUVRE: Pour une durée de quatre-vingt-dix (90) jours de la date d’achat par le client, si ce Produit ou n’importe
quelle partie déterminée par SEIKI, ou le prestataire de service autorisé de SEIKI, est défectueux, SEIKI réparera ou remplacera
le Produit par un produit de qualité semblable ou meilleure, selon le choix du SEIKI, gratuitement au consommateur original,
ou payera les frais de main-d’œuvre à n’importe quel prestataire de services autorisé de SEIKI. Après la période de Garantie
de quatre-vingt-dix (90) jours, vous devez payer pour toutes les charges de travail.
2. PARTIES: Pour une durée de quatre-vingt-dix (90) jours de la date d’achat par le client, SEIKI fournira, gratuitement au
consommateur original, des pièces de rechange reconstruites ou remises à neuf en échange des parties défectueuses, ou
remplacera le Produit par un produit remis à neuf de qualité semblable ou meilleure, selon le choix du SEIKI. Après la période
de Garantie de quatre-vingt-dix (90) jours, vous devez payer pour les coûts de toutes les parties.
3. COÛTS D’EXPÉDITION: Malgré ce qui précède, le consommateur original est responsable de n’importe quelles charges
d’expédition encourues pour expédier le Produit ou la (les) partie (s) à SEIKI ou à un prestataire de service autorisé de SEIKI,
pour un diagnostic, une réparation ou un remplacement.
Francés
Pour obtenir le Service de Garantie et d’informations, de Diagnostic des pannes appelez notre ligne gratuite de
service clients à:
1‐855‐MY‐SEIKI (1‐855‐697‐3454)
S’il vous plaît ayez votre modèle et numéro de série disponible avec votre date d’achat.
Vous pouvez aussi nous visiter en ligne et ENREGISTRER votre produit SEIKI à:
www.seikiworld.com
Afin de recevoir le service de Garantie, l’acheteur original doit contacter SEIKI pour la détermination du problème et des procédures
de service. Prouvez l’achat sous forme d’un acte de vente ou d’une facture acquittée, faisant la preuve que le Produit est dans la
période applicable de Garantie, DOIT être présenté à SEIKI, ou à un fournisseur de service clients autorisé, pour obtenir le service
demandé.
Exclusions et Limitations
Cette Garantie couvre des défauts industriels des matériels et la fabrication, rencontrés dans l’utilisation normale, sans but lucratif
du Produit et ne couvre pas (a) le dégât ou l’échec causé ou attribuable pour abus, l’emploi impropre, l’échec de suivre des
instructions, l’installation incorrecte ou le maintien, l’altération, l’accident, ou l’excès da tension de courant; (b) les réparations
incorrectes ou inexactement exécutées par installations de service non‐autorisé; (c) instruction ou rajustements sur place; (d)
transport, expédition , livraison, assurance, installation ou coûts d’installation; (e) les coûts de déplacement de produit, transport
ou coûts de réinstallation; (f ) usure ordinaire, dégâts cosmétiques ou dégâts en raison de phénomènes naturels, accident; (g)
utilisation commerciale du Produit; (h) modification de, ou à n’importe quelle partie du Produit. De plus, cette Garantie ne
couvre pas des images “brûlées” dans l’écran. Cette Garantie s’applique au consommateur original seulement et ne couvre pas
de produits vendus COMME TEL ou AVEC TOUTES LES FAUTES, ou des articles de consommation (par exemple, des fusibles, des
batteries, des ampoules etc) et la Garantie est invalide si le numéro de série d’usine‐appliqué a été changé ou enlevé du Produit.
Cette Garantie est valable seulement aux États‐Unis et au Canada et s’applique seulement aux produits achetés et entretenus
dans les États‐Unis et le Canada. Toutes les parties remplacées et des produits, et des produits sur lesquels un remboursement
est fait, deviennent la propriété du Débiteur.
AUCUNE GARANTIE, OU L’EXPRESS OU IMPLIQUÉ, Y COMPRIS, MAIS NON LIMITÉ À, N’IMPORTE QUELLES GARANTIES
IMPLIQUÉES DE VALEUR COMMERCIALE OU DE SANTÉ POUR UN BUT PARTICULIER, D’AUTRE QUE CEUX EXPRESSÉMENT
DÉCRITS CI‐DESSUS NE S’APPLIQUERA. LE DÉBITEUR DÉMENT PLUS LOIN TOUTES LES GARANTIES APRÈS LA PÉRIODE
FORMELLE DE GARANTIE PRÉSENTÉE CI-DESSUS. AUCUNE AUTRE GARANTIE FORMELLE OU GARANTIE DONNÉE PAR
N’IMPORTE QUELLE PERSONNE, SOCIÉTÉ OU ENTITÉ EN CE QUI CONCERNE LE PRODUIT N’ENGAGERA LE DÉBITEUR. LA
RÉPARATION, LE REMPLACEMENT, OU LE REMBOURSEMENT DU PRIX D’ACHAT ORIGINAL ‐ AU PROPRE JUGEMENT DU
DÉBITEUR ‐ SONT LES REMÈDES EXCLUSIFS DU CONSOMMATEUR. LE DÉBITEUR NE SERA PAS RESPONSABLE D’AUCUNS
DÉGÂTS FORTUITS OU CONSÉCUTIFS CAUSÉS PAR L’UTILISATION, LA MAUVAISE UTILISATION OU L’INCAPACITÉ
D’UTILISER LE PRODUIT. MALGRÉ CE QUI PRÉCÈDE, LE RÉTABLISSEMENT DU CONSOMMATEUR N’EXCÉDERA PAS LE
PRIX D’ACHAT DU PRODUIT VENDU PAR SEIKI. CETTE GARANTIE NE N’ÉTENDRA PAS À QUELQU’UN D’AUTRE QUE LE
CONSOMMATEUR ORIGINAL QUI A ACHETÉ LE PRODUIT ET N’EST PAS TRANSMISSIBLE.
Quelques états ne permettent pas l’exclusion ou la limitation de dégâts fortuits ou consécutifs, ou permettent des limitations sur
des garanties, donc les susdites limitations ou les exclusions ne peuvent pas s’appliquer à vous. Cette Garantie vous donne des
droits spécifiques et vous pouvez avoir d’autres droits, qui varient d’un état à un autre.
Veuillez envoyer toute correspondance à:
SEIKI DIGITAL INC.
c/o SEIKI Digital Customer Service
6880 Commerce Blvd., Canton, MI 48187 USA
[email protected]
42
SEIKI_Soundbar UG-English Original_v2.indd 42
2012/8/3 18:58:31
SEIKI_Soundbar UG-English Original_v2.indd 43
2012/8/3 18:58:31
SEIKI_Soundbar UG-English Original_v2.indd 44
2012/8/3 18:58:31
SEIKI_Soundbar UG-English Original_v2.indd 45
2012/8/3 18:58:31
Service Hotline / Servicio de Línea Telefónica / Service d’assistance téléphonique:
1-855-MY-SEIKI (1-855-697-3454)
www.SEIKIDIGITAL.com
© 2012 Seiki Digital Inc. All rights reserved.
SEIKI_Soundbar UG-English Original_v2.indd 46
Printed in China
2012/8/3 18:58:31