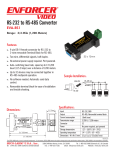
1
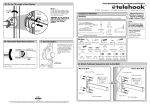
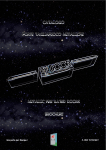
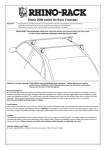
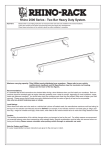
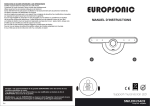
Door Closer Installation Manual
Installation Manual
Specifications:
ENFORCER
SD-C141S
Door widths
Door weight
Door types
Hand
Body
Arm
3’ 6" (1100mm) wide
88lbs. (40kg.) ~ 143lbs.(65kg.)
Metal or wood
®
SD-C141S
Door Closer
Non-handed
Anodized aluminum
Forged steel
Features:
• Reversible non-handed design
• Metal or wood doors up to 42" wide
• Two valve adjustments (Sweep and
Latch) for speed.
• Anodized aluminum body
• Silver finish
• Forged steel arms
• Includes hardware
Caution:
A misadjusted door closer can cause
damage or injury. Read the complete
installation manual before you begin
to insure correct installation.
What It Does:
SECO-LARM's SD-C141S Door Closer is designed to work on either left or right swinging doors. It has adjustable sweep
and latch speed for more control over how fast the door swings.
Fig. 1 -- Dimensions:
21/4” (58mm)
11
/16” (17mm)
WARNING: Incorrect mounting which leads to exposure to rain or moisture inside the enclosure could damage the
device and void the warranty.
WARRANTY This SECO-LARM product is warranted against defects in material and workmanship while used in normal
service for a period of one (1) year from the date of sale to the original consumer customer. SECO-LARM’s obligation is
limited to the repair or replacement of any defective part if the unit is returned, transportation prepaid, to SECO-LARM.
This Warranty is void if damage is caused by or attributed to acts of God, physical or electrical misuse or abuse, neglect,
repair, or alteration, improper or abnormal usage, or faulty installation, or if for any other reason SECO-LARM determines
that such equipment is not operating properly as a result of causes other than defects in material and workmanship.
The sole obligation of SECO-LARM, and the purchaser’s exclusive remedy, shall be limited to replacement or repair only, at
SECO-LARM’s option. In no event shall SECO-LARM be liable for any special, collateral, incidental, or consequential
personal or property damages of any kind to the purchaser or anyone else.
NOTICE: The information and specifications printed in this manual are current at the time of publication. However, the
SECO-LARM policy is one of continual development and improvement. For this reason, SECO-LARM reserves the right
to change specifications without notice. SECO-LARM is also not responsible for misprints or typographical errors.
Copyright © 2007 SECO-LARM U.S.A., Inc. All rights reserved. This material may not be reproduced or copied, in
whole or in part, without the written permission of SECO-LARM.
SECO-LARM® U.S.A., Inc.
16842 Millikan Avenue, Irvine, CA 92606
Tel: 800-662-0800 / 949-261-2999 Fax: 949-261-7326
Made in Taiwan
Website: www.seco-larm.com
E-mail: sales @seco-larm.com
®
PITSW6
DoorCloser.pmd
SECO-LARM U.S.A., Inc.
53/16” (133mm)
3” (75mm)
23/16”
(55mm)
83/16” (208mm)
13/8”
(40mm)
Door Closer Installation Manual
Door Closer Installation Manual
Fig. 2 -- Parts List
2 x 3/16" UNC Arm Door Frame Bracket Screws
4 x 3/16" - 24 Door Closer Body Attachment Screws
1 x Arm Axle Screw
1 x Arm Assembly
1 x Axle Cap
1 x Cover Plate
Adjustment:
1. Arm adjustment: (see Fig. 4).
• Loosen jam nut on adjustment arm.
• Thread arm in or out until adjustment arm is at 90 degree angle from the door frame.
• Tighten jam nut.
2. Closing speed adjustment: (see Fig. 5)
• Adjust sweep speed to the desired closing speed.
• Adjust latch speed so that just before the door closes all the way it slows just before latching.
Axle Cap
Door Closer Body
Latch Speed
Adjustment Screw
Fig. 4
Adjust arm to 90o angle from door
Adjust arm to 90o angle from door
90o
90o
Sweep Speed
Adjustment Screw
Left-Hand Door
Fig. 3
Right-Hand Door
Fig. 5
Step 1
Sweep
speed
adjustment
Left-Hand Door
Step 2
Faster
Slower
Latch
speed
adjustment
Faster
Slower
Right-Hand Door
Installation:
1. Determine the type of door swing (see Fig 3).
2. Select the appropriate template (Right Hand or Left Hand). Attach the template to the door.
3. Mark the mounting holes. 4 holes for the door closer body and 2 holes for the door frame arm
bracket.
4. Drill pilot holes for the screws.
5. Attach the door closer to the door and frame.
6. Adjust the door closer (see caution at the front of the manual).
SECO-LARM U.S.A., Inc.
Note: See template for location of adjustment screws.