1
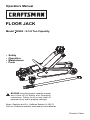
Operators Manual
FLOOR JACK
Model 950524 - 2-1/4 Ton Capacity
•
•
•
•
Safety
Operation
Maintenance
Parts
!
BEFORE using this product, read this manual
and follow all its Safety and Operating
instructions. Failure to do so may result in
personal injury and/or property damage.
Sears, Roebuck and Co., Hoffman Estates, IL 60179
Visit our Craftsman website: www.sears.com/craftsman
Printed in China
TABLE OF CONTENTS
Warranty
Save these instructions
Safety instructions
Assembly instructions
Operation
Maintenance
Troubleshooting
Parts
Service
.....P. 2
.....P. 2
.....P. 3
.....P. 4
.....P. 4 & P. 5
.....P. 6
.....P. 7
.....P. 7
.....Back cover
WARRANTY
CRAFTSMAN ONE YEAR FULL WARRANTY
If this Craftsman product fails due to a defect in material or workmanship within one year from
the date of purchase, return it to any Sears store or other Craftsman outlet in the United
States for free replacement.
This warranty applies for only 90 days from the date of purchase if this product is ever used
for commercial or rental purposes.
This warranty gives you specific legal rights, and you may also have other rights which vary
from state to state.
Sears, Roebuck and Co., Hoffman Estates, IL 60179
SAVE THESE INSTRUCTIONS
For your safety, read, understand, and follow the information provided with and on this jack.
• The owner and operator of this equipment shall have an understanding of this jack and safe
operating procedures before attempting to use. The owner and operator shall be aware
that use and repair of this product may require special skills and knowledge. Instructions
and safety information shall be conveyed in the operators native language before use of
this product is authorized. If any doubt exists as to the safe and proper use of this jack,
remove from service immediately.
• Inspect before each use. Do not use if broken, bent, cracked, or damaged parts (including
labels) are noted. Any jack that appears damaged in any way, operates abnormally or is
missing parts, shall be removed from service immediately.
• If the jack has been or suspected to have been subjected to a shock load (a load dropped
suddenly, unexpectedly upon it), immediately discontinue use until jack has been checked
by a Sears or other qualified service center. It is recommended that an annual inspection
be done by qualified personnel.
• Labels and Operators Manual are available from Sears (see PARTS section on page 7).
2
SAFETY INSTRUCTIONS
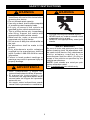
! WARNING
! WARNING
• Study, understand, and follow all
instructions with and on this device before
operating this device.
• Do not exceed rated capacity.
• Use only on hard, level surfaces capable
of sustaining rated capacity loads.
• Lift only on areas of the vehicle as
specified by the vehicle manufacturer.
• This is a lifting device only. Immediately
after lifting, support the vehicle with
appropriately rated vehicle stands.
• Never work on, under, or around a load
supported only by this device.
• Do not move or dolly the vehicle while on
the jack.
• No alterations shall be made to this
product.
• Only attachments and/or adapters
supplied by the manufacturer shall be
used. Contact 1-888-332-6419 for more
information.
• Failure to heed product markings or
warnings may result in personal injury or
property damage.
To avoid crushing and related injuries:
• NEVER work on, under or around a load
supported only by a jack.
• ALWAYS use appropriately rated jack
stands.
! SAFETY MESSAGE !
Be sure all tools and personnel are clear
before lowering load. No alterations shall
be made to this device. Only attachments
and/or adapters supplied by the
manufacturer shall be used. Lift only on
areas of the vehicle as specified by the
vehicle manufacturer.
NOTE: Jack stands are rated per pair
unless otherwise noted.
Use 1 matched pair per vehicle only.
! ADVERTENCIA
• Leer, comprender, y seguir las
instrucciónes antes de utilizar el aparato.
• El manual de instrucciónes y la
información de seguridad deben estar
comunicado en lengua del operador
antes del uso.
• No seguir estas indicaciónes puede
causar daños personales o materiales.
3
ASSEMBLY INSTRUCTIONS
TO ASSEMBLE THE CARRY HANDLE ONTO THE JACK
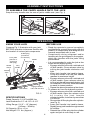
Snap the carry handle onto the nuts of jack’s middle axle. (see Fig. 1)
1
Carry handle
2
Nut of
middle axle
FIG. 1
OPERATION
KNOW YOUR JACK
BEFORE USE
Compare Fig. 2 illustration with your jack
BEFORE operation to become familiar with
the location of various jack components.
• Read the operator's manual completely
and familiarize yourself thoroughly with the
product, its components and recognize the
hazards associated with its use.
• Occasionally during shipment and/or
handling air can get trapped in the system,
which can interfere with the jacks lifting
performance.
• It is recommended to cycle the jack a few
times without applying load:
• Engage release valve with notched end
of jack handle. Close release valve by
turning the jack handle clockwise until
tight.
• Insert jack handle into handle sleeve.
Pump the handle until the jack saddle
reaches its maximum height.
• Engage release valve with notched end
of jack handle. Open release valve by
turning jack handle counterclockwise, but
no more than 1/2 full turn. Allow the saddle
to reach its lowest position.
• Repeat the above procedure a few times.
• To release air from the hydraulic system:
• Engage release valve with notched end
of jack handle. Open the release valve
by turning the jack handle
counterclockwise, but never by more than
1/2 full turn.
• Remove the oil filler plug from the cylinder.
(see Fig. 3)
• Insert jack handle into handle sleeve.
Rapidly pump jack handle through several
full strokes.
• Reinstall the oil filler plug into the cylinder
again and jack is now ready to use.
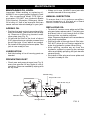
oil filler plug
(not shown,
on reservoir)
cover plate
(remove to
access oil
filler plug)
handle
sleeve
saddle
lifting arm
carry
handle
front
wheel
release
valve
frame
castor
base
jack handle
engage release
valve with this end
FIG. 2
SPECIFICATIONS
Rated Capacity: 2-1/4 Ton/4500 Lbs
Jack Dimensions: 21” x 8-1/2” x 5-1/2”
Lifting Range: 5-1/2” ~ 15” (Approx.)
(140mm - 381mm)
Oil Capacity: 90 cc ± 5 cc
Net Weight: 27.1 lbs. (Approx.)
4
OPERATION
• Continue to pump the jack handle to lift the
vehicle to the desired height. After lifting,
support the load with appropriately rated
jack stands BEFORE working on the
vehicle.
! Rated capacity of jack stands is per
pair, it is NOT the sum of individual
capacities unless specifically noted to the
contrary by the jack stand manufacturer.
Do Not exceed rated capacity. Ensure that
the vehicle support points are fully captured
between the outer lugs of both jack stands.
Use a matched pair of jack stands per
vehicle to support 1 end only. Use 1 pair
per vehicle only. Failure to do so may
result in sudden loss of load, which may
cause personal injury and/or property
damage.
OPERATING PRINCIPLES
• With release valve closed, an upward
stroke of the jack handle draws oil from the
reservoir tank into the plunger cavity.
Hydraulic pressure holds a valve closed,
which keeps the oil in the plunger cavity.
• A downward stroke of the jack handle
releases oil into the cylinder, which forces
the ram out. This raises the saddle. (NOTE:
To avoid damage to the cylinder if the load
exceeds the rated capacity of the jack, oil
is automatically released back into the
reservoir through the safety overload
valve.)
• When the ram reaches maximum
extension, oil is bypassed back into the
reservoir to prevent an over-extended ram
stroke and possible damage to the jack.
• Opening the release valve allows oil to flow
back into the reservoir. This releases
hydraulic pressure on the ram, which
results in lowering the saddle.
LOWERING THE JACK
! To avoid crushing injuries and property
damage: Keep hands and feet clear of work
area when lowering load.
• Raise load high enough to clear the jack
stands, then carefully remove jack stands
(always used in pairs).
• With notched end of jack handle, SLOWLY
open the release valve by turning the
handle counterclockwise, but never more
than 1/2 full turn. If the load fails to lower:
a. Use another jack to raise the vehicle
high enough to reinstall jack stands.
b. Remove the affected jack and then the
stands.
c. Using the other jack, lower the load by
turning the operating handle counterclockwise, but no more than 1/2 full turn.
• After removing jack from under the load,
push saddle down to reduce ram exposure
to rust and contamination.
HOW TO USE YOUR JACK
RAISING THE JACK
• With notched end of the jack handlle (see
Fig. 2) close release valve by turning the
handle clockwise.
• Chock the vehicle’s wheel with appropriate
devices to ensure lifting stability.
• Refer to the vehicle manufacturer’s owners
manual to locate approved lifting points on
the vehicle. Position jack so that the saddle
is centered under the load at an appropriate
lift point.
• Insert jack handle into handle sleeve. Pump
jack handle until saddle almost contacts the
vehicle. Check to see that the saddle is
centered and will contact the load lifting
point firmly.
5
MAINTENANCE
MAINTAINING OIL LEVEL
• When not in use, ALWAYS store jack with
saddle lowered all the way down.
Important: When adding or replacing oil,
ALWAYS use a good grade Hydraulic Jack
oil. We recommend Mobil DTE13M or
equivalent. DO NOT use Hydraulic Brake
Fluid, Alcohol, Glycerine, Detergent, Motor
Oil or dirty oil. Use of an improper fluid can
cause serious internal damage to your jack.
ANNUAL INSPECTION
To ensure that it is in optimum condition,
annual inspection of the jack at a Sears
Service Center is recommended.
REPLACING OIL
ADDING OIL
• To drain oil, remove cover plate and oil filler
plug and open release valve. Turn jack over
and drain old oil out through the oil filler
hole and into a suitable container.
Note: Dispose of hydraulic oil in accordance
with local regulations.
• Refill with new oil through the oil filler hole.
DO NOT allow dirt or foreign material to
enter the hydraulic system when filling.
• After refilling, remove any air from the
hydraulic system by opening the release
valve and rapidly pumping the jack handle
several times.
• Re-install oil filler plug and cover plate and
the jack is ready to use.
• Position the jack on level ground and fully
lower the saddle. (Ram will be all the way
in). Remove oil filler plug located under
cover plate (see Fig. 3).
• Oil should be filled to the level of about
3/16” above the inner cylinder as seen from
the oil filler hole. If low, add oil as needed.
• Re-install oil filler plug and cover plate. The
jack is now ready to use.
LUBRICATION
• Add lubricating oil to all moving parts as
needed.
PREVENTING RUST
• Check ram and pump plunger (see Fig. 3)
every few months for any signs of rust or
corrosion. Clean as needed by wiping with
an oily cloth.
Oil Filler Plug
Proper Oil Level
Ram all the way in
Release Valve
Plunger Down
FIG. 3
6
TROUBLESHOOTING
PROBLEM-SOLVING HINTS
Symptom
Possible Causes
Corrective Action
Jack does not lift load
• Release valve not tightly closed
• Overloaded - too much weight on jack
• Ensure release valve is tightly closed
• Reduce weight on jack
• Release valve not tightly closed
• Hydraulic unit malfunction
• Ensure release valve is tightly closed
• Replace power unit assembly
Jack does not lower after
unloading
• Oil reservoir overfilled
• Linkages binding
• Drain fluid to proper level
• Clean and lubricate moving parts
Poor lift performance
• Fluid level low
• Air trapped in system
• Ensure proper fluid level
• With ram fully retracted, open release
valve, pump handle several times to
expel trapped air
• Fluid level low
• Ensure proper fluid level
Jack bleeds off
(starts to lower) after lift
Does not lift to full
extension
PARTS
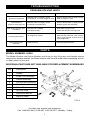
MODEL NUMBER: 50524
The Model Number and Serial Number are found on the lifting arm and handle sleeve
respectively. Always mention the Model Number and Serial Number when requesting service
or repair parts for your jack.
INDIVIDUAL PARTS ARE NOT AVAILABLE FOR REPLACEMENT ASSEMBLIES
Key
Description
1
Saddle
2
Power Unit Assembly
3
Handle Assembly
4
Front Wheel Assembly
5
Rear Castor Assembly
6
Cover Plate
7
Oil Filler Plug
—
Operators Manual
––
Warning Label
1
7
6
2
3
4
5
FIG. 4
For after sale support and assistance:
Call 1-888-332-6419, 8:00 AM - 4:45 PM CST., Monday - Friday
7
Get it fixed, at your home or ours!
Your Home
For repair – in your home – of all major brand appliances,
lawn and garden equipment, or heating and cooling systems,
no matter who made it, no matter who sold it!
For the replacement parts, accessories and
owner’s manuals that you need to do-it-yourself.
For Sears professional installation of home appliances
and items like garage door openers and water heaters.
1-800-4-MY-HOME®
(1-800-469-4663)
www.sears.com
Call anytime, day or night
(U.S.A. and Canada)
www.sears.ca
Our Home
For repair of carry-in items like vacuums, lawn equipment,
and electronics, call or go on-line for the location of your nearest
Sears Parts and Repair Center.
1-800-488-1222
Call anytime, day or night (U.S.A. only)
www.sears.com
To purchase a protection agreement (U.S.A.)
or maintenance agreement (Canada) on a product serviced by Sears:
1-800-827-6665 (U.S.A.)
Para pedir servicio de reparación
a domicilio, y para ordenar piezas:
1-888-SU-HOGAR®
(1-888-784-6427)
1-800-361-6665 (Canada)
Au Canada pour service en français:
1-800-LE-FOYERMC
(1-800-533-6937)
www.sears.ca
© Sears Brands, LLC
® Registered Trademark / TM Trademark / SM Service Mark of Sears Brands, LLC
® Marca Registrada / TM Marca de Fábrica / SM Marca de Servicio de Sears Brands, LLC
MC
Marque de commerce / MD Marque déposée de Sears Brands, LLC