1
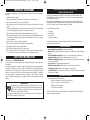
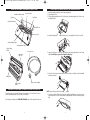
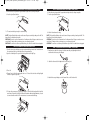
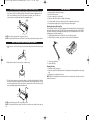
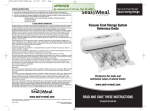
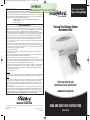
VS230_VS240_07EM1.qxd:VS230_VS24006EM1p.qxd
10/11/07
SERVICE INSTRUCTIONS
7:05 PM
Page 1
Vacuum Food Sealer
By adamss at 11:30 am, Oct 12, 2007
1. Do NOT attempt to repair or adjust any electrical or mechanical functions on this unit. Doing so will void the Warranty.
2. If you need to exchange the unit, please return it in its original carton, with a sales receipt, to the store where you
purchased it. If you are returning the unit more than 30 days after the date of purchase, please see the enclosed Warranty.
3. If you have any questions or comments regarding this unit’s operation or believe any repair is necessary, please write to our
Consumer Service Department or visit our website at www.seal-a-meal.com.
SUNBEAM PRODUCTS, INC. DOING BUSINESS AS JARDEN CONSUMER SOLUTIONS
303 NELSON AVENUE
NEOSHO, MO 64850
1 YEAR LIMITED WARRANTY
Sunbeam Products, Inc. doing business as Jarden Consumer Solutions or if in Canada, Sunbeam Corporation (Canada)
Limited doing business as Jarden Consumer Solutions, (collectively “JCS”) warrants that for a period of one year from
the date of purchase, this product will be free from defects in material and workmanship. JCS, at its option, will repair
or replace this product or any component of the product found to be defective during the warranty period.
Replacement will be made with a new or remanufactured product or component. If the product is no longer available,
replacement may be made with a similar product of equal or greater value. This is your exclusive warranty. Do NOT
attempt to repair or adjust any electrical or mechanical functions on this product. Doing so will void this warranty.
This warranty is valid for the original retail purchaser from the date of initial retail purchase and is not transferable.
Keep the original sales receipt. Proof of purchase is required to obtain warranty performance. JCS dealers, service
centers, or retail stores selling JCS products do not have the right to alter, modify or in any way change the terms and
conditions of this warranty.
This warranty does not cover normal wear of parts or damage resulting from any of the following: negligent use or
misuse of the product, use on improper voltage or current, use contrary to the operating instructions and disassembly,
repair or alteration by anyone other than JCS or an authorized JCS service center. Further, the warranty does not cover:
Acts of God, such as fire, flood, hurricanes and tornadoes.
What are the limits on JCS’s Liability?
JCS shall not be liable for any incidental or consequential damages caused by the breach of any express, implied or
statutory warranty or condition.
Except to the extent prohibited by applicable law, any implied warranty or condition of merchantability or fitness for a
particular purpose is limited in duration to the duration of the above warranty.
JCS disclaims all other warranties, conditions or representations, express, implied, statutory or otherwise.
JCS shall not be liable for any damages of any kind resulting from the purchase, use or misuse of, or inability to use the
products including incidental, special, consequential or similar damages or loss of profits, or for any breach of contract,
fundamental or otherwise, or for any claim brought against purchaser by any other party.
Some provinces, states or jurisdictions do not allow the exclusion or limitation of incidental or consequential damages
or limitations on how long an implied warranty lasts, so the above limitations or exclusions may not apply to you.
This warranty gives you specific legal rights, and you may also have other rights that vary from province to province,
state to state or jurisdiction to jurisdiction.
How to Obtain Warranty Service
In the U.S.A.
If you have any question regarding this warranty or would like to obtain warranty service, please call 1 (800) 557-4825
and a convenient service center address will be provided to you. Visit www.seal-a-meal.com for more information.
In Canada
If you have any question regarding this warranty or would like to obtain warranty service, please call 1 (800) 557-4825
and a convenient service center address will be provided to you. Visit www.seal-a-meal.com for more information.
Canisters, containers, bags, rolls, and other accessories: JCS makes no warranty, express or implied, written or oral,
including that of merchantability or fitness for any particular purpose with respect to canisters, containers, bags, rolls,
and any other accessories.
In the U.S.A., this warranty is offered by Sunbeam Products, Inc. doing business as Jarden Consumer Solutions located
in Boca Raton, Florida 33431. In Canada, this warranty is offered by Sunbeam Corporation (Canada) Limited doing
business Jarden Consumer Solutions located at 20 B Hereford Street, Brampton, Ontario L6Y 0M1. If you have any
other problem or claim in connection with this product, please write our Consumer Service Department. PLEASE DO
NOT RETURN THIS PRODUCT TO ANY OF THESE ADDRESSES OR TO THE PLACE OF PURCHASE.
www.seal-a-meal.com
© 2007 Sunbeam Products, Inc. doing business as Jarden Consumer Solutions. All rights reserved. Distributed by Sunbeam Products, Inc. doing business as Jarden
Consumer Solutions, Boca Raton, Florida 33431.
Printed in China
VS230/VS240/9100060001424
VS230/24007EM1
Space Saving Design
Vacuum Food Storage System
Reference Guide
Preserves the taste and
nutritional value of stored foods!
www.seal-a-meal.com
READ AND SAVE THESE INSTRUCTIONS
VS230/VS240
VS230_VS240_07EM1.qxd:VS230_VS24006EM1p.qxd
10/11/07
7:05 PM
Page 3
IMPORTANT SAFEGUARDS
When using electrical appliances, basic safety precautions should always be followed, including the
following:
1. Read the instructions carefully.
2. Do not use the Vacuum Food Sealer on wet or hot surfaces, or near a heat source.
3. Always use the Vacuum Food Sealer on a level flat surface.
4. Do not immerse any part of the Vacuum Food Sealer, power cord or plug into water or other
liquid.
5. To disconnect, unplug the power cord from the electrical outlet. Do not disconnect by pulling
on the cord. Always unplug the Vacuum Food Sealer before cleaning.
6. Do not operate the Vacuum Food Sealer with a damaged power cord or plug.
7. Do not operate the Vacuum Food Sealer if it malfunctions or is in any way damaged. If the cord
or the machine is damaged, it must be returned to an authorized service center. See warranty
for more information.
8. Use the Vacuum Food Sealer only for its intended use.
9. Close supervision is required when this product is used near children.
10. This appliance should not be operated by children.
11. Do not allow the Vacuum Food Sealer to be used as a toy.
12. The Vacuum Food Sealer is not for commercial use. If sealing more than 30 bags or canister in
a row, wait at least 25 minutes before continuing to use your vacuum food sealer.
SAVE THESE INSTRUCTIONS
This appliance is for HOUSEHOLD USE ONLY.
Do not attempt to service this product. Service should be performed by an authorized service
representative.
A short power-supply cord is provided to reduce the risk resulting from becoming entangled in
or tripping over a longer cord. Extension cords are available and are not prohibited from being
used when care is exercised in their use. When an extension cord is used the marked electrical
rating of the extension cord shall be no less than the marked electrical rating of the appliance.
The longer cord shall be arranged so that it does not drape over the counter-top or tabletop
where it is capable of being tripped over, snagged, or pulled on unintentionally, especially by
children.
POLARIZED PLUG
This appliance has a polarized plug (one blade is wider than the other). To reduce
the risk of electric shock, this plug is intended to fit into a polarized outlet only
one way. If the plug does not fit fully into the outlet, reverse the plug. If it still
does not fit, contact a qualified electrician.
Do not attempt to modify the plug in any way. If the plug fits loosely into the AC outlet or if
the AC outlet feels warm do not use that outlet.
-2-
START ENJOYING THE BENEFITS OF YOUR SEAL-A-MEAL®
VACUUM FOOD STORAGE SYSTEM
Thank you for purchasing this Seal-a-Meal® Vacuum Sealer. Seal-a-Meal® products have been
helping families save food, money and time for over 35 years. Now we are introducing the new
Press/Hold and Release system.
With the new Press/Hold and Release system you firmly press down on the lid and when the
Hands-Free Indicator Ligh illuminates you can remove your hands and let your vacuum sealer do
the rest! The machine continues to vacuum and then seal the bag.
Your unit includes the following:
• Food Sealer
• Starter Bag Kit
• Accessory Hose
• Accessory Hose Adapter
By preparing foods and meals in advance and storing with the Seal-a-Meal® Vacuum Storage
System, you save time and money.
FEATURES AND BENEFITS
•
•
•
•
•
•
•
•
•
Integrated Bag Storage and Cutter to make custom sized bags.
Moist Seal setting extends the length of the sealing cycle to provide the securest seal when liquid is
present.
Press/Hold and Release System makes it easy to close the lid and start the vacuum function.
Vacuums and Seals preserving the taste and nutritional value of stored foods.
Dishwasher Safe Drip Tray System can be removed from your vacuum sealer and cleaned in the
top rack of your dishwasher.
Accessory Port allows vacuum packaging with accessories.
Hands-free Indicator Light illuminates when it is safe to remove hands from the lid.
Sealing Indicator Light illuminates when the appliance is sealing the bag.
Open/Cancel Button cancels the vacuum and seal process or releases the lid once the vacuum and
sealing process are complete.
SEAL-A-MEAL® ACCESSORIES
•
Seal-a-Meal® Vacuum Food Storage Canisters:
- Stackable round canisters save space in the fridge or pantry.
- Easy to use - Accessory Hose connects directly to lid
- Dishwasher safe for easy cleaning
- Protect delicate foods and more
Visit the Seal-a-Meal® web site at www.seal-a-meal.com, for additional Hints and Tips, Questions
and Answers, Recipes, and Updates.
-3-
VS230_VS240_07EM1.qxd:VS230_VS24006EM1p.qxd
10/11/07
7:05 PM
Page 5
KNOW YOUR SEAL-A-MEAL® VACUUM FOOD STORAGE SYSTEM
Hands-free Indicator Light
Seal Level Switch
Bag Cover
Bag Cutter
HOW TO MAKE CUSTOM SIZED BAGS WITH THE INTEGRATED BAG ROLL
1. Open Lid and place bag roll into roll storage compartment.
2. Lift up Bag Cutter Bar.
3. Pull enough bag material from roll to hold item to be vacuum packaged, plus 3 inches. Lower
the Bag Cutter Bar.
Open/Cancel Button
Bag Cutter Bar
Accessory Port
4. Cut desired bag length from Bag Roll. Make sure to cut a straight line. Plug in Power Cord.
Vacuum Indicator Light
Sealing Indicator Light
Upper Sealing
Gasket
Accessory Hose
Removable
Drip Tray
5. Open the Lid. Place one end of the cut bag between the Sealing Strip and the Lower Sealing
Gasket. DO NOT place open end of bag in the Drip Tray
6. Close Lid. Position hands on both sides of the Lid. Press firmly on both sides of the Lid and hold
until the motor starts.
Sealing Strip
Accessory Hose Adapter
Lower Sealing
Gasket
PREPARING YOUR SEAL-A-MEAL® VACUUM FOOD STORAGE SYSTEM FOR USE
Carefully unpack your Seal-a-Meal® Vacuum Sealer and place it on a level surface. Be sure to
remove all packing materials from the inside of the machine.
Clean all parts according to the CARE AND CLEANING section in this manual before first use.
-4-
NOTE: Sealer will not operate if Lid is not properly closed.
7. Continue to hold the Lid. When the Hands-free Indicator Light illuminates, it is safe to remove
your hands from the Lid. The Sealing Indicator Light illuminates when the unit starts sealing the
bag.
-5-
VS230_VS240_07EM1.qxd:VS230_VS24006EM1p.qxd
10/11/07
7:05 PM
Page 7
HOW TO MAKE CUSTOM SIZED BAGS WITH THE INTEGRATED BAG ROLL (CONT.)
8. When the motor stops and the Progress Indicator Lights shut off, sealing is complete.
9. Press the Open/Cancel button.
10. The custom sized bag is ready for vacuum sealing.
NOTE: The Open/Cancel button can be used to cancel the process mid-cycle and open the Lid. The
bag will not be sealed when doing this.
CAUTION: This sealer is not for commercial use. If sealing more than 30 bags or canisters in a row
wait at least 25 minutes before continuing to use your vacuum food sealer.
CAUTION: The unit has a cool down period between cycles. Wait 20 seconds before using again.
HOW TO VACUUM SEAL WITH SEAL-A-MEAL® BAGS
1. Place the items to be sealed into a pre-cut or custom sized bag. Leave at least 3 inches between
the contents and the top of the bag to allow for bag contraction.
2. Open the Lid and place the open end of the bag down into the Drip Tray.
HOW TO VACUUM SEAL WITH SEAL-A-MEAL® BAGS (CONT.)
6. When the motor stops and the Progress Indicator Lights shut off, sealing is complete.
7. Press the Open/Cancel button.
8. Lift the Lid and remove the bag.
NOTE: The Open/Cancel button can be used to cancel the process mid-cycle and open the lid. The
bag will not be sealed when doing this.
CAUTION: This sealer is not for commercial use. If sealing more than 30 bags or canisters in a row
wait at least 25 minutes before continuing to use your vacuum food sealer.
CAUTION: The unit has a cool down period between cycles. Wait 20 seconds before using again.
HOW TO VACUUM SEAL WITH SEAL-A-MEAL® ACCESSORIES
1. Firmly insert one end of the Accessory Hose that came with your Lightweight On-the-Go
container into the Accessory Hose Adapter.
2. Attach the other end of the Adapter into the Accessory Port.
3. Close Lid.
4. Change Press to Select the appropriate Seal Level – Choose Moist for foods with high liquid
content or Regular for dry foods.
3. Attach the Accessory Adapter over the Vacuum Valve on the Container Lid.
5. To begin the vacuum process, press down firmly on Lid with both hands and hold until the
motor starts. Continue to hold the Lid. When the Hands-free Indicator Light illuminates, it is safe
to remove hands from the Lid. The unit continues to vacuum and seal the bag.
-6-
-7-
VS230_VS240_07EM1.qxd:VS230_VS24006EM1p.qxd
10/11/07
7:05 PM
Page 9
HOW TO VACUUM SEAL WITH SEAL-A-MEAL® ACCESSORIES (CONT.)
4. To begin the vacuum process, press down firmly on Lid with both hands and hold until the
motor starts. Continue to hold the Lid. When the Hands-free Indicator Light illuminates, it is
safe to remove hands from the Lid. The unit continues to vacuum. Once all of the air is
removed, the motor and indicator lights will automatically turn off.
NOTE: Sealer will not operate if Lid is not properly closed.
NOTE: The Open/Cancel button can also be used to cancel the process mid-cycle and open the Lid.
CARE AND CLEANING
1.
2.
3.
4.
5.
6.
Always unplug the unit before cleaning.
Do not immerse in water.
Do not use abrasives to clean the unit.
Wipe the outer surfaces with a soft, damp cloth and soap.
To clean the inside of the unit, wipe away any food or liquid with a paper towel.
Dry all parts thoroughly before you plug in and operate the unit again.
Cleaning the Removable Drip Tray
The Seal-a-Meal® Vacuum Food Sealer is equipped with a Removable Drip Tray to trap any liquid
that may be drawn from the bag. The Drip Tray contains antimicrobial protection, which inhibits
the growth of stain and odor causing bacteria and keeps the unit cleaner between uses. Normal
cleaning practices should be maintained.
1. Lift the lid and carefully remove the Drip Tray as to not spill any contents.
2. Wash the Drip Tray in warm, soapy water or on the top rack of the dishwasher.
HOW TO VACUUM SEAL WITH OTHER BRAND ACCESSORIES
1. Firmly insert one end of the Accessory Hose that came with your machine into the Accessory
Port.
2. Attach the other end of the Accessory Hose to the accessory.
3. Allow to dry completely.
4. Replace Drip Tray.
Cleaning the Bags
1. Wash bags in warm, soapy water.
2. Bags can be washed in the dishwasher if desired. Turn bags inside out and spread them over the top rack
only.
3. Allow bags to dry completely before using.
NOTE: DO NOT reuse bags if they have been used to store raw meats, fish, oily foods or have been
boiled or microwaved.
3. To begin the vacuum process, press down firmly on Lid with both hands and hold until the
motor starts. Continue to hold the Lid. When the Hands-free Indicator Light illuminates, it is safe
to remove hands from the Lid. The unit continies to vacuum. Once all of the air is removed, the
motor and indicator lights will automatically turn off
NOTE: Sealer will not operate if Lid is not properly closed.
NOTE: The Open/Cancel button can also be used to cancel the process mid-cycle and open the
Lid.
-8-
-9-
VS230_VS240_07EM1.qxd:VS230_VS24006EM1p.qxd
10/11/07
7:05 PM
Page 11
HINTS AND TIPS
•
•
•
•
•
•
•
TROUBLESHOOTING
Save Money: Buy in bulk, separate food into meal size portions, vacuum seal, and freeze.
Just remove a the sealed bag, thaw in the refrigerator, and prepare your meal.
Save Time: Prepare meals in advance, vacuum seal, store in the refrigerator or freezer, and
reheat for a quick, no-hassle meal.
Save Food: Vacuum seal leftovers to eliminate waste.
Save Flavor: Wash, vacuum, seal, and freeze seasonal fruits and vegetables to enjoy any
time of the year.
Save clothing, valuable documents, photographs, craft supplies, and much
more.
Portion Control: Separate food into individual portions, write nutritional information on
the bag, vacuum seal, and store.
Keep Food Fresh Longer.
PROBLEM
Nothing happens •
when I press down •
on the lid
•
•
•
•
Air is not
vacuumed from
the bag
Seal-a-Meal® Vacuum Food Storage System
Outperforms Conventional Bags & Wraps
Storage Time with
Conventional Bags &
Wraps
Freezer
Beef (Steaks, Roasts)
Beef (Ground, Stew Meat)
Lean Fish (Cod, Haddock)
Fatty Fish (Salmon, Sea Trout)
Pork Chops
Poultry
Soups and Sauces
Vegetables
Refrigerator
Cheese
Deli Meats
Fruits (Berries)
Vegetables
Pantry
Cereal
Coffee (Ground)
Cookies (Homemade)
Flour
Nuts
Storage Time with
Seal-a-Meal® Vacuum
Food Storage System
6 – 12 months
3 - 4 months
4 - 6 months
2- 3 months
4 – 6 months
6 – 12 months
2 - 4 months
6 – 9 months
2 – 3 years
1 year
2 years
1 year
2 – 3 years
2 – 3 years
1 – 2 years
2 – 3 years
2- 4 weeks
3 – 4 days
1 – 5 days
2 – 7 days
4 – 8 months
7 – 10 days
7 - 14 days
7 – 14 days
2 -3 months
2 weeks
1 -2 weeks
6 - 8 months
6 - 8 months
6 – 12 months
1 – 2 years
3 – 6 weeks
1 – 2 years
1 - 2 years
*Seal-a-Meal® storage time estimates may vary depending upon preparation, quality of food,
and storage conditions.
SOLUTION
•
•
•
•
•
•
•
Air has seeped
back into the
vacuumed bag
•
•
•
•
•
•
Check that there are not gaps, folds, wrinkles or holes in the pre-sealed bags.
Verify that the Drip Tray is inserted properly into the unit.
Make sure the Accessory Hose is not inserted into the Accessory Port.
Check for loose, worn or cracked Upper and Lower Sealing Gaskets.
Foods with high liquid contents may prevent the bag from sealing
properly. Cut bag open and wipe top inside of bag and reseal.
Check to see if bag is properly inserted into the Drip Tray.
Make sure you've placed the bag in the proper place. When making a
bag from a roll, make sure end of cut piece is on Sealing Strip, NOT over
Lower Sealing Gasket or in Drip Tray.
Check the seal of the bag. There may be a hole or wrinkle that is
allowing air to re-enter the bag. Carefully cut the bag open and re-seal
it, or use an entirely new bag.
Make sure there is no moisture or liquid from the food present within
the bag. You may need to cut open the bag and re-seal it in moist
setting, or use an entirely new bag. Partially freeze foods with excess
liquids, prior to vacuum sealing.
Make sure there were no food items with sharp edges that may have
punctured the bag. If you find a puncture hole seal the item in an
entirely new bag.
Make sure no liquids were drawn to the sealing strip area.
Check for loose, worn or cracked Upper and Lower Sealing Gaskets.
Moisture of foods with high liquid content will prevent the bag from
sealing properly. Cut bag open and wipe top inside of bag and reseal.
Bag melts
•
The sealing strip may have been too hot during the sealing process.
Allow the unit to cool for 20 seconds between uses. If the bag continues
to melt, allow the unit to cool with the lid in the upright position for 25
minutes before using.
Bag will not seal
•
•
Check that there aren’t any gaps, folds, wrinkles or holes in pre-sealed edges.
Moisture of foods with high liquid content will prevent the bag from
sealing properly. Cut bag open and wipe top inside of bag and reseal.
Make sure you've placed the bag in the proper place. When making a
bag from a roll, make sure end of cut piece is on Sealing Strip, NOT over
Lower Sealing Gasket or in Drip Tray.
Make sure you give the appliance time to cool down. Wait at least 20
seconds between seals.
•
•
-10-
Make sure the power cord is correctly plugged into the electrical outlet.
Make sure the power cord is not damaged in any way.
Make sure the electrical outlet is operative by plugging in another
appliance. If it is not, please check the circuit breakers or fuses in your home.
Make sure the bag is positioned correctly down in the vacuum channel.
(See Figures on previous pages)
Press down firmly on both sides of lid.
Wait 20 minutes to allow appliance to cool off, and then try using again.
-11-
VS230_VS240_07EM1.qxd:VS230_VS24006EM1p.qxd
10/11/07
7:05 PM
Page 13
RECIPES
OREGANO & GARLIC TOMATO SAUCE
Use this flavorful sauce immediately or pre-freeze and vacuum seal in a Seal-a-Meal® Vacuum Storage Bag for
easy reheating.
3 Tbsp.extra-virgin olive oil
2 medium yellow onions, chopped
2 cloves garlic, minced
3 28 oz cans whole peeled tomatoes
3 cups tomato sauce (15 oz. can plus 8 oz. can)
5 Tbsp. canned tomato paste
/2 tsp. black pepper, freshly ground
/4 tsp. dried oregano
3
/4 tsp. salt
3 cups swater
1 tsp. sugar
1
3
RECIPES
SAVORY HERBED CHICKEN WITH TRI-COLORED VEGETABLES
Seal-a-Meal® Vacuum Storage Bags will keep these vegetables perfectly frozen until you need them, simply prepare
ahead!
3 lbs. whole fryer chicken, cut into serving pieces
8 small red potatoes, cleaned and cut in half
4 carrots, peeled and cut into thirds
1 bunch fresh broccoli, cut into small florets
1 Tbsp. extra-virgin olive oil
2 Tbsp. water
2 tsp. Savory Herb Mix (see previous recipe)
In a large, heavy saucepan, heat the olive oil over medium heat. Add the onions and garlic and sauté until
softened, about 5 minutes. In a large bowl, crush the tomatoes and add to the saucepan with the remaining
ingredients. Stir uncovered for 45 minutes, stirring occasionally, reducing and slightly thickening the sauce.
Preheat the oven to 375°F. Arrange the chicken pieces, red potatoes, carrots and broccoli in a 9 x 13-inch
baking pan. In a small bowl whisk together the Savory Herb Mix, water, and olive oil. Brush the herb oil over
the chicken and vegetables and bake, uncovered, for 1 hour, or until the chicken is cooked completely
through, with no pink remaining in the thickest part of any individual piece. To serve, place the chicken on a
platter, spoon the vegetables around the chicken and drizzle any sauce over the entrée.
Makes 16 cups (4 quarts).
Serves 4.
COUNTRY SOUP-IN-A-CANISTER
COWGIRL COOKIES-IN-A-CANISTER
Save your leftovers in a Seal-a-Meal® Canister – keep fresh in your refrigerator or freezer.
1 lb beef stew meat
1 carrot
2 garlic cloves
basil to taste
1 6oz can tomato paste
2 1/2 tsp. black pepper, freshly ground
3 Tbsp. + 2 tsp. salt
2 Tbsp. dried onion flakes
2 Tbsp. dried parsley flakes
2 Tbsp. beef bouillon granules
1 cup uncooked rottini
1 small onion
2 celery ribs
1 28oz can diced tomatoes
3 quarts water
1
/2 cup uncooked wild rice
1
/2 cup dry yellow lentils
1
/2 cup pearl barley
1
/2 cup dry split peas
1
/2 cup dry red lentils
1 bay leaf
In a large stockpot, heat 1 tablespoon olive oil over medium heat. Add 1 pound beef stew meat, 1 small
diced onion, 1 carrot, peeled and diced, 2 ribs celery, with leaves, washed and diced, and 2 cloves garlic.
When the onion is slightly caramelized, add 1 28 oz. can diced tomatoes with basil, 1 6-oz. can tomato paste
and 3 quarts water.
Add remaining contents to the stockpot (except for the rottini), stir and bring to a boil. Reduce the heat to
low, cover and simmer for 1 hour. Taste and correct any seasonings, add the pasta and stir. Cover and simmer
an additional 20 minutes.
These cookies have a little bit of everything! Add dried fruit or use butterscotch chips to create your own
family favorites. Store your cookies in a Seal-a-Meal® Canister – perfect for the fridge or pantry!
1
/2 cup butter
1 egg
2 Tbsp. milk
1 tsp vanilla
1 cup emisweet chocolate chips
1 1/2 cup all-purpose flour
/2 cup white sugar
/2 cup walnuts
1
/2 cup rolled oats
1
/2 cup packed brown sugar
1
/4 tsp. baking powder
3
/4 tsp.baking soda
1
1
Preheat oven to 350°F. In a large bowl, cream butter until softened. Blend in egg, milk and vanilla, beating
until mixed. Add the in the rest of the contents and stir until well blended. Drop by rounded spoonfuls onto a
greased cookie sheet. Bake for 10 to 12 minutes. Remove from the oven and transfer the cookies to a wire rack
to cool.
ZESTY LIME MARINADE
⁄2 cup of fresh lime juice
2 tbs. grated lime peel
1
⁄2 cup of olive oil
Salt & pepper to taste
1
2 cloves of garlic- minced
1
⁄4 cup of cilantro – chopped fresh
2 tsp. of red pepper flakes
In a bowl, stir all ingredients until well blended. This is enough marinade for 2 pounds and works well with
chicken, beef, fish or shrimp.
Make 18 servings.
SAVORY HERB MIX
A flavorful seasoning – and check out www.seal-a-meal.com for more recipe ideas using Savory Herb Mix!
4 Tbsp. salt
4 Tbsp. granulated garlic or garlic powder (no salt added)
4 Tbsp. dried thyme
4 Tbsp. dried parsley
For best results, when marinating in a Seal-a-Meal Vacuum Storage Bag, place the food in a Seal-a-Meal Vacuum
Storage Bag, fold the bag over and place the unsealed bag inside another Seal-a-Meal Vacuum Storage Bag.
Vacuum seal. This helps retain the liquid in the bag.
2 Tbsp. ground paprika
2 Tbsp. onion powder
2 Tbsp. black pepper, freshly ground
Combine all ingredients and mix thoroughly. Place the mix in a Seal-a-Meal® Vacuum Storage Bag and seal
airtight. You may store the bag for 1 to 2 years without losing flavor.
-12-
-13-