1
THE T-RAX SPORT
INSTALLATION MANUAL
Please READ and FOLLOW all instructions carefully.
Tongue Weight Limitations
FINALLY – A
COMPANY THAT
LOVES BIKES AS
MUCH AS YOU DO.
Chances are, your bikes are just
like ours - your most valued
possessions. And if it has the
Saris name on it, nothing we
build goes out the door unless
it’s worth putting those possessions on. Call it obsessive. Call it
eccentric. We just chalk it up to
caring a hell of a lot about creating the last rack you’ll ever need.
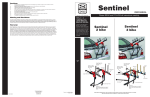
1
2
Receiver Base w/2”
Tongue Weight
Maximum Load
1-1/4”
200 lbs.
2 bikes/70 lbs.
200 lbs.
3 bikes/105 lbs.
300 lbs.
4 bikes/140 lbs.
300 lbs.
2 bikes/70 lbs.
300 lbs.
3 bikes/105 lbs.
300 lbs.
4 bikes/140 lbs.
2”
T-Rax Sport 2 bike (502)
T-Rax Sport 4 bike (504)
*35lbs. per bike maximum
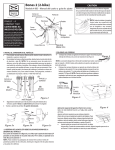
1. MOUNT CARRIER TO VEHICLE
Parts List
Item Description
T-RAX unit
Hitch Type
QTY
1
1A. 1-1/4” Receiver
1
adaptor
3
Pin with lanyard
1
4
Lock washer
1
5
Hitch pin bolt
1
6
Cotter pin
1
7
Sleeve
1
8
1/2” bolt
1
9
1/2” washer
1
10
1/2” nut
1
11
3/8” bolt
1
12
3/8” washer
1
13
3/8” nut
1
Remove adaptor bolt with 4mm hex wrench
provided.
Slide 2” adaptor off receiver.
1B. 2” Receiver
Tools Included: 4mm hex wrench
Tools Required: 3/4” (19mm) wrench x 2
9/16” wrench
Slide receiver into 1-1/4” hitch as illustrated.
Install threaded hitch pin bolt and lock washer
and fully tighten using 3/4” (19mm) wrench.
For added security part #3022 sold separately.
Slide receiver into 2” hitch as illustrated.
Install threaded hitch pin bolt and lock
washer fully tighten using 3/4” (19mm)
wrench. Install cotter pin.
For added security part #3022 sold separately.
MOUNT CARRIER TO VEHICLE CONTINUED:
2
Insert rack into the receiver base
and insert long bolt into receiver
and rack as shown.
5
Attach 1/2”washer.
8
Attach 3/8” washer and nut.
Tighten with a 9/16” wrench.
3
Insert pin into
bottom hole as
shown.
(Note: Pin can be removed when
rack is empty to fold rack down.
Do not drive with rack in down
position)
6
Attach nut loosely-do not
fully tighten until all nuts
and bolts are loosely
placed.
9
Attach bolt and securely tighten all
bolts with two 3/4” wrenches.
4
Secure with clip.
7
Place lanyard
ring around
sleeve. Insert
final bolt into
receiver base,
through sleeve
and out through
the other side
of the receiver
base.
ADJUST ARMS ON CARRIER:
10
12
11
Unhook clasp and pull pin
from the rack.
Rotate arm up and out away
from vehicle. Align holes and
insert pin.
To secure arm, be sure that the
clasp is closed.
MOUNT BIKES TO CARRIER:
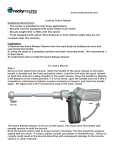
13
Place bikes on carrier arms, alternating direction of handle-bars. The purchase of Saris Protect-O-Pads(#2060)
is recommended to protect contact
areas. Make sure foam pads are free
of debris as it could scratch vehicle's
finish. Cover inner pedal of first bike
to avoid potential scratching of vehicle
finish.
14
Press yellow
button and
rotate/ slide
along tube
Rest cross tube in hold-down saddles. Note: To aid in
positioning of bicycles, hold-downs can be slid along arm
tube. Press the yellow button on stabilizer arm to move
the stabilizer into position to fit snugly against bicycle
down tube.
Note: Cable locks can be used to secure bikes to rack
(#981 locking cable recommended)
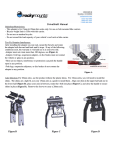
CHECK CARRIER STRAPS & STABILITY
Shown below are the different possible positions for mounting mens, womens, and non-traditional style frames.
Check Clearance. Bike must rest high enough to allow bike tires 12” minimum of ground clearance. It’s recommended
to load smallest and lightest bikes last.
Heaviest bikes should be placed closest to the vehicle (35lbs. per bike maximum)
To use tilt and release features, remove cotter and clevis pins and tilt carrier away from vehicle.
Note: Do not tilt carrier with bikes mounted.
Arms may be folded down when not in use. Pull pin on arm assembly, rotate arms down, and secure with pin and clasp.
CAUTIONS:
Cautions:
1) Read and follow instructions carefully. Save owner’s manual for future reference or parts information.
2) Be certain any future user of this carrier is aware of correct attachment and use.
3) Vehicle should be in good condition in the area at which the hitch is located. Refer to table on cover page for load
capacities and limitations.
4) Make sure bike tires are not directly behind exhaust pipe.
5) Do not exceed maximum load capacity of the carrier.
6) This hitch mounted carrier is not recommended for off road use.
7) Do not mount on any type of trailer or recreational vehicle.
8) Do not take carrier through car wash.
9) Replace straps at the first sign of wear. Replacement parts are available by contacting Saris at (800) 783-7257.
10) It’s the consumers responsibility to ensure that the use of this rack complies with local regulations, regarding issues
such as distance behind vehicle & partial covering of license plate and tail lights.
WARNING AND DISCLAIMER:
This carrier has been designed to carry bicycles on specific vehicles. Before installation, user must read and follow enclosed
instructions. User must attach carrier correctly to the vehicle, check its attachment before each use, and inspect carrier
parts for wear. Carrier's attachment to the vehicle is critical and beyond the control of the manufacturer. Manufacturer and
seller expressly disclaim any and all liability for personal injury, property damage or loss, whether direct, indirect, or incidental, resulting from the incorrect attachment, improper use, inadequate maintenance, or neglect of this carrier.
LIMITED WARRANTY:
Saris Cycling Group, Inc. ("Saris") warrants that your Saris product will be free from defects in materials and workmanship
for as long as you own the product. This warranty only extends to the original consumer buyer.This warranty does not
apply to parts that have worn out through normal use or been damaged through misuse, abuse, neglect, accident or unauthorized modifications. ANY IMPLIED WARRANTIES WHICH THE BUYER MAY HAVE ARE LIMITED IN DURATION TO THE TIME
THAT THE ORIGINAL CONSUMER BUYER OWNS THE PRODUCT. Some states do not allow limitations on how long an implied
warranty lasts, so the above limitation may not apply to you. At its option, Saris will repair or replace, or refund the purchase price of, any Saris product which is defective or fails to conform with this warranty under normal use and service. To
obtain
service under this warranty, return the defective Saris Product or part, freight prepaid, to Saris at the address below.
Please contact our customer service department prior to return to get a return authorization number. Repair or replacement
of a defective Saris product or refund of the purchase price, shall be the sole remedy of the buyer under this warranty, and
in no event shall Saris be liable for incidental or consequential damages, losses or expenses. Some states do not allow the
exclusion or limitation of incidental or consequential damages, so the above limitation or exclusion may not apply to you.
Made in the U.S.A.
18823 07/09
5353 Verona Road
Madison, WI 53711
800-783-7257
www.saris.com
Worldwide patents
issued and pending