Transcript
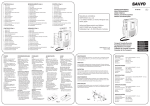
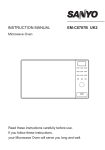
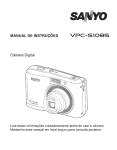
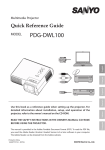
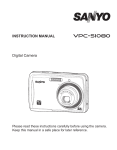
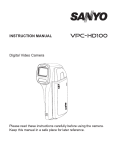
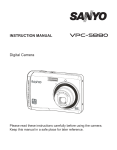
A. Thumbnail Mode
Safety Information
• Keep away from water, moisture and dust.
• Ambient Temperature should be 0~40°C. Do not
store the unit in hot or cold areas.
Digital Photo Frame
• Do not drop the unit or give a strong impact.
• Do not try to disassemble the unit by yourself.
LVF-PF72S
• Connect the AC adapter to the DC5V jack and to
the wall outlet.
User Guide
• Use attachments/accessories specified by the
manufacturer only.
• When left unused for a long period of time, the unit
should be unplugged from the wall outlet.
Warning: To reduce the risk of fire or electric shock,
do not expose the unit to rain, moisture and water.
Caution: Changes or modifications not expressly
Thank you for purchasing our 7” Digital Photo
Frame. You can play your favorite photos (JPEG
file) directly from a memory card or a USB flash
drive without a computer. Read the following
instructions for more details.
Figure 1
4 3
6 5
2 1
approved by the party responsible for compliance
could void the user's authority to operate the
B. Rotation
equipment.
Auto Rotation
FCC NOTICE
• In the initial setting of the unit, Auto Rotation
is set to ON in Setup menu. Landscape or
portrait display of a photo will be automatically
switched according to the unit orientation.
If the horizontally placed unit is rotated left
by 90 degrees, the photo will automatically
rotate by 90 degrees clockwise. If the vertically
placed unit is rotated right by 90 degrees, the
photo will automatically rotate by 90 degrees
counterclockwise.
Note 1: When the unit is placed horizontally, Auto
Rotation only works by rotating the unit
to left by 90 degrees. Rotating the unit to
right will not have any response. When
the unit is placed vertically, Auto Rotation
only works by rotating the unit to right by
90 degrees. Rotating the unit to left will
not have any response.
Note 2: The photo will be scaled down to an
appropriate size to fit in the height or
width of the unit if the photo orientation is
different from its original one.
This device complies with Part 15 of the FCC Rules.
Operation is subject to the following two conditions:
(1) this device may not cause harmful interference,
and (2) this device must accept any interference
received, including interference that may cause
undesired operation.
Canadian ICES-003 Information
This class B digital apparatus complies with
Canadian ICES-003.
12
7
11
8
CE
10
This set complies with the EMC Directive 2004/108
and with the LVD Directive 2006/95.
9
Figure 2
Product Overview (Figure 1)
Landscape position
1 LEFT/
Attach/Detach position
(Previous)
button
Portrait position
2 RIGHT/
7 SD/MMC/MS/xD
slot
(Next)
8 USB port
button
*Supports a USB
ash drive only.
9 DC5V jack
button
10 Stand receptacle
*Each press of the
button will adjust the
*For attaching the
brightness level.
supplied stand.
4 UP/
(Rotate) button 11 Power switch ON/
OFF
5 MODE/ (Stop) button
3 DOWN/
Landscape Viewing Portrait Viewing
Figure 3
(Brightness)
6 SEL.(Select) /
10.2
cm
Pause) button
(Play/ 12 Wall-mounting
holes
Attaching the Stand (Figure 2)
1. Inser t the round end of the stand into the
receptacle.
2. Rotate the stand to the direction as shown in
Figure until it is fixed tightly in position.
Note: The unit can be placed horizontally or
vertically for a landscape or portrait display.
Figure 4
Mounting the Photo Frame on Wall
(Figure 3)
1. Remove the stand from the unit.
2. Place the mounting holes of the unit on the wall
screws (not supplied) as shown in Figure.
Note: Take care when installing it. It may cause
damage or serious injury should it fall from
its mountings.
Figure 5
(A)
(B)
Connecting to the Power (Figure 4)
Figure 6
SD
(A)
Thumbnail Mode
: Select
1024 X 768
Inserting a Memory Card or a
USB Flash Drive (Figure 6)
2008/7/25
• This unit can play only JPEG format.
1. Insert your memory card into the memory card
slot according to the orientation marked on the
back of the unit.
(B)
Caution: Do not insert “Memory Stick Duo” or
“Memory Stick Pro Duo” into the unit. In case
of using them, be sure to attach “Memory Stick
Adapter” in order not to have a trouble to
remove it from the unit.
Figure 8
(A)
2008.1.1
AM
Sun Mon Tue Wed Thu
2
1
3
9
8
6
7
10
16
15
13
14
17
23
22
20
21
24
30
29
27
28
31
12:00:00
Fri
4
11
18
25
Sat
5
12
19
26
Jan - 1- 2008 Tuesday
(B)
Set Time
Set Date
12:00:00 AM
2008/01/01
OK
Cancel
OK
Cancel
Figure 9
File Number: 1/100
ROOT
(A)
SUPPORT
PICTURES
001_1
1
002_2
2
003_3
3
003_4
4
003_5
5
003_6
1024 X 768
File Number: 1/100
ROOT
2006/3/7
6
Save
Exit
Save File
SUPPORT
PICTURES
1024 X 768
001_1
1
002_2
2
003_3
3
003_4
4
003_5
5
003_6
6
2006/3/7
Save
Please Wait
100%
Viewing Photos and Slide Shows
(Figure 7)
Exit
Page: 1/1
Edit Mode
(B)
1600x900
Figure 10
Thumbnail Mode
: Select
2. Insert a USB flash drive to the USB port.
Note: This unit can display photos in either a
memory card or a USB flash drive at a
time. If a USB flash drive and a SD/MMC/
MS/xD card are inserted in the unit at the
same time, files in the USB flash drive will
be displayed. If you want to display files in
a SD/MMC/MS/xD card, remove the USB
flash drive from the unit.
Page : 1/1
1024 X 768
LVF-PF72S EN QG ( rev0317).indd
1
2008/07/25
Delete
Delete All
Note: Displaying photos bigger than 480 x 234
pixels will take longer time for loading.
1. Press LEFT or RIGHT button to select
“Photo” in the main menu, then press SEL./
button to confirm.
2. The slideshow starts.
3. To pause the slideshow, press SEL./
button.
Press SEL./
button again to restar t the
slideshow.
1. Press LEFT or RIGHT button to select
“Edit”
button.
in the main menu, and press SEL./
Then Edit Dialog window will appear.
2. Press RIGHT button to select “Delete”, then
press SEL./ button to enter the Edit mode.
3. Press LEFT or RIGHT button to select a photo,
and press DOWN button to select “Delete”, then
press SEL./
button to delete it. Press UP
button to deselect “Delete”.
Note 1: To delete all, press DOWN button and
press RIGHT button to select “Delete All”,
then press SEL./
button. Press UP
button to deselect “Delete All”.
Note 2: Press MODE /
button to return to the
main menu.
Caution:
Once power is switched off, the set time and
calendar will be reset, because there is no
battery back up in this unit.
A. Viewing the Clock & Calendar
Setup Menu
OSD menus
Interval Time
Sub menus
5 Sec., 15 Sec. , 30 Sec., 1 Min.,
5 Min., 30 Min., 1 Hour, 4 Hours,
Transition
12 Hours, 1 Day
No Effect, Random ,
Cover Up, Cover Down,
Uncover Left, Push Right,
Wipe Up, Wipe Down
12H , 24H
Fomat
Clock & Calendar Set The Time
Contrast
OSD Language
Set The Date
-4, -3, -2, -1, 0 , +1, +2, +3, +4
English , French,
German, Italian,
1. Press LEFT or RIGHT button to select
“Clock & Calendar” in the main menu and press
SEL./ button.
button will switch between
2. Pressing SEL./
Clock, Calendar and photos of a memory card.
3. Press MODE/
button again to return to the
main menu.
Dutch, Polish
Panel
Full Screen, Original*
Auto Rotation
On , Off
Reset
Confirm**
Exit Setup Mode
B. Setting Clock & Calendar
*
button.
3. Press UP or DOWN button to select “Set The
button, then “Set
Time”, and press SEL./
Time” window will appear on the screen.
4. Press LEFT or RIGHT button to select Hour,
Minute, Second or AM/PM and set the time by
pressing UP or DOWN button.
5. Press LEFT or RIGHT button to select “OK”
and press SEL./ button to set it.
Setting the Date
3. Press UP or DOWN button to select “Set The
Date”, and press SEL./
button, then “Set
Date” window will appear on the screen.
4. Press LEFT or RIGHT button to select Year,
Month or Day and set the calendar by pressing
UP or DOWN button.
5. Press LEFT or RIGHT button to select “OK”
and press SEL./ button to set it.
6. To leave the Setup menu, press MODE/
button again.
Notes
1. Press MODE/ button to enter the main menu.
2. Press LEFT or RIGHT button to select
“SETUP” in the main menu, then press SEL./
button.
3. Press UP or DOWN button to select an item in
the Setup menu, and press SEL./
or RIGHT
button to go to the Sub menus as shown in the
below table.
4. Press UP or DOWN button to select a setting,
then press SEL./
to set it.
5. To leave Setup menu, press MODE / button
again.
12/24 Hour
Calendar” and then press SEL./
Troubleshooting
No power
• Check if the AC adapter is plugged into the wall
outlet.
• Make sure there is power to the wall outlet.
Unable to view photos
• T h i s u n i t i s d e s i g n e d t o s h o w p h ot o s i n
standard JPEG format following the camera
industry standard. Some images in non-standard
JPEG format such as web images, scanned
images or photos in R AW format taken by
professional cameras cannot be displayed in
the unit correctly. Please use PC applications to
convert such images into standard JPEG format.
• Check if using compatible memory cards.
If photo display is slow
• Use lower resolution photo.
1. Press LEFT or RIGHT button to select
“Favorites” in the main menu, then press SEL./
button.
2. The slideshow will star t from the internal
memory.
3. Press MODE / button to enter the Thumbnail
Mode.
4. Press LEFT or RIGHT button to select the
photo you wish to play, then press SEL./
button.
5. The slideshow starts with the photo selected.
Clock & Calendar Setting (Figure 8)
Setting the Time
1. Hold the changeable frame and place it on the
unit.
2. Press the changeable frame for all the hooks to
be fixed in place.
Now the changeable frame is installed
successfully.
Page : 1/1
• Press LEFT or RIGHT button to select the
photo you wish to rotate in the slideshow, then
button to rotate by 90 degrees
press UP/
clockwise.
Note 1: Each press of UP/ button will rotate the
photo by 90 degrees clockwise.
Note 2: Manual Rotation can be also set in the
Thumbnail mode.
Note 3: All the rotation effects will be cancelled
when returning to the main menu.
Removing and Installing the
Changeable Frame (Figure 5)
B.Installing the Changeable Frame
Figure 7
Manual Rotation
1. Press LEFT or RIGHT button to select
“Setup” in the main menu, then press SEL./
button.
2. Press UP or DOWN button to select “Clock &
Release all the hooks in the edge of the
changeable frame by pulling up the changeable
frame using your fingers.
MS
B. Deleting Photos in the Internal
Memory
Viewing Files in the Internal
Memory (Figure 10)
1. Connect one end of the supplied AC adapter
(DC5V/1.5A) to the unit, and the other end to
the wall outlet.
2. Switch the power on ( to the position “I”) to turn
on the unit.
A.Removing the Changeable Frame
MMC
1. Press MODE/ button during the slideshow to
enter Thumbnail mode.
2. Press LEFT or RIGHT button to select the
photo you wish to play, then press SEL./
button.
Note: If the thumbnail has more than one page,
move the cursor to the last photo and
press RIGHT/
button to go to the next
page. Move the cursor to the first photo
and press LEFT/
button to return to the
previous page.
3. The slideshow starts with the photo selected.
Note 1: Refer to Setup Menu in this user guide for
the slideshow settings.
Note 2: Press MODE/ button again to return to
the main menu.
Spanish, Portuguese,
Select “Original” to display photos in their
original aspect ratios. Black bands appear on
left and right sides of the screen in landscape
view, or top and bottom of the screen in portrait
view. Select “Full Screen” to display photos in
full screen size.
** Selecting Reset will restore the initial settings.
(The initial settings are marked by squares in
the above table.)
Specifications
Display
7" colour TFT LCD panel
View Area
480 X 234 pixels, 16:9 aspect
Brightness
150 cd/m²
Contrast
150:1
Stand
Detachable
Memory Card Slot
SD/SDHC/MMC/MS/MS Pro/
I/O Ports
DC-in / USB 2.0 port
Internal Memory
About 45 photos can
ratio
xD
be stored (in case each
photo is less than 32
megapixels).
Editing Files in the Internal Memory
(Figure 9)
A. Copying Photos from a Memory Card
or a USB Flash Drive
1. Press LEFT or RIGHT button to select
“Edit”
in the main menu, and press SEL./
button.
Then “Edit Dialog” window will appear.
2. Press LEFT or RIGHT button to select “Copy”,
then press SEL./ button to enter the
Sub-menu.
3. Press UP or DOWN button to select a file, then
button to select photos you wish
press SEL./
to copy.
Note 1: Press SEL./
button on the selected
folder to enter the Sub-menu.
Note 2: To deselect the file, press SEL./
button
again on the selected file.
Note 3: Repeat the above step 3 to select some
files and the selected files will be
highlighted.
Note 4: The internal memory can store about 45
photos in case each photo is less than 32
megapixels.
4. Press RIGHT button and then LEFT button to
select “Save”, then press SEL./ button.
5. The file is now saved in the internal memory.
6. To exit Edit mode, press LEFT or RIGHT button
to select "Exit", then press SEL./ button.
Supported File
JPEG (up to approx. 144
Format
megapixels)
AC Adapter
Input: 100-240V ~50/60Hz
0.4A
For EU users only
Output: 5V / 1.5A
Dimensions
Approx.
206 x 139 x 33 mm
(W x H x D)
(Without Detachable Stand
Weight
and Changeable Frame)
Approx.
337g
(Without Detachable Stand
Accessories
and Changeable Frame)
AC adapter
Your SANYO product is designed and manufactured
with high quality materials and components which
can be recycled and reused. This symbol means
that electrical and electronic equipment, at their
end-of-life, should be disposed of separately from
your household waste. Please dispose of this
equipment at your local community waste collection/
recycling centre. In the European Union there are
separate collection systems for used electrical and
electronic products. Please help us to conserve the
environment we live in!
Detachable stand
White changeable frame
(Attached to the unit)
User Guide
6 bonus static stickers
Manufacturer and Address
SANYO Electric Co., Ltd.
5-5, Keihan-hondori, 2-chome, Moriguchi City
Osaka, Japan
Authorized Representative and Address
SANYO FISHER Sales(Europe) GmbH
Stahlgruberring 4,D-81829 Munich, Germany
Trademark Information
SD™ is a trademark.
2008/7/25
2009/3/18
下午 02:04:36