1
Quick Setup Guide
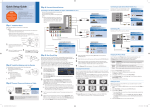
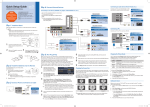
Step 4: Connect External Devices
Congratulations on the purchase of your new Samsung TV.
Read this setup guide to get your TV up and running quickly.
STOP
Please do not return this unit.
If you have problems operating your
TV, call:
1-800-SAMSUNG (1-800-726-7864)
For web support please visit:
www.samsung.com/support
Connecting an audio device (Home Theater, etc.)
Connect your TV to your Home Theater or other
audio device to enjoy enhanced Sound quality.
Connecting an AV device (DVD/Blu-ray player, cable/satellite box, etc.)
1-800-SAMSUNG (1-800-726-7864)
Samsung Electronics America, Inc.
105 Challenger Road Ridgefield Park, NJ 07660-0511
Samsung Electronics Canada Inc.
55 Standish Court Mississauga, Ontario L5R 4B2
Call Center hours of operation: Mon-Sun, 9:00 AM -12
AM EST.
To register this product, visit: www.samsung.com/
register.
Analog Audio connection
Using an Audio Cable
Use one of the connections below to connect your TV to an external A/V device. We recommend using HDMI for the highest picture quality.
Amplifier / DVD home theater
AUDIO IN
Best Connection
Audio (Not Supplied)
HD connection (up to 1080p)
Digital Audio connection
Using an HDMI Cable
HDMI Cable (Not Supplied)
Using an Optical Cable
DVD, Blu-ray player, HD cable box, HD STB (Set-Top-Box)
satellite receiver
HDMI OUT
DVD
Digital Audio System
Optical Cable (Not Supplied)
OPTICAL
Step 1: Install the Stand
Very Good Connection
Follow the steps below to connect the TV to the stand.
HD connection (up to 1080p)
HDMI to DVI Cable (Not Supplied)
✎✎NOTE
Using an HDMI to DVI Cable
xx Make sure to distinguish between the front and back of the Stand and
Guide Stand when assembling them.
xx Make sure that at least two persons lift and move the LCD TV.
xx Stand the product up to fasten the screws. If you fasten the screws with
the LCD TV placed down, it may lean to one side.
Audio Cable (Not Supplied)
Top view
Video Cable (Not Supplied)
Screws (M4 X L12)
Front
Stand using five screws (M4 X L12)
as shown.
Rear
2 With your TV upright, connect the 3 Fasten two screws (M4 X L12) at
TV to the Stand as shown.
position 1, and then fasten the
two screws (M4 X L2) at position
2.
2
Rear
1
Step 2: Install the Batteries into the Remote
To install batteries into your remote
control, follow these steps:
1. Lift the cover on the back of the
remote upward as shown in the figure
to the right.
VCR
VIDEO OUT
AUDIO OUT
Audio Cable (Not Supplied)
ends of the batteries to the diagram in the battery compartment.
3. Replace the cover.
Step 3: Connect Power and Antenna or Cable
VHF/UHF Antenna
COMPONENT OUT
AUDIO OUT
Blu-ray player
Antenna Cable (Not Supplied)
or
• Wall cable jack
• VHF/UHF Antenna
• Cable or Satellite box
Ant or Cable Out
Use a 75 ohm (round) cable.
Make sure the AC power cord is plugged in securely to
the wall outlet and the TV.
[QSG]BN68-02616A-00Eng.indd 1
DVI OUT
Using an D-Sub Cable
D-Sub Cable (Not Supplied)
✎✎When connecting to AV IN 1 on the back of your TV, attach the video cable (yellow) to the green jack next to the
Audio Cable (Not Supplied)
AUDIO OUT
AV IN 1 label. The jack will not match the color of the video cable (yellow).
6 Select the daylight savings time setting: Off or On, and then press the
Step 5: Run Plug & Play
When you turn on your TV for the first time, it automatically launches the Plug &
Play function. With Plug & Play, you can select the On Screen Display language, set
the clock mode, and launch the TV’s channel memorizing process.
It also displays connection instructions similar to those in this guide.
To navigate while Plug & Play is running, press the Up, Down, Left or Right arrow
buttons on your remote. To make a selection, press the ENTERE button.
To skip a screen, press the MENU button. To turn on your TV, press the POWER
button on the remote or on the TV. To run Plug & Play, follow these steps:
1 Using your remote control,
Plug & Play
Select Language of the OSD.
Menu Language
:
ENTERE button.
7 Select the time zone in which you live, and then press the ENTERE button.
8 After the time zone screen, The connection method for best HD screen
quality is displayed. Press Right arrow button on your remote to view each
screen in succession. Press the Blue button to skip this section.
9 The Enjoy your TV. screen appears. Then press the ENTERE button.
Changing the Screen Size
English
Español
Français
U Move E Enter
press the ENTERE button.
If you select Store Demo, the TV will reset your picture and audio settings
every 30 minutes.
3 Select Antenna Source and Channel Source. If Antenna Source is
Your TV has several screen size options, each designed to work best with specific
types of video input. If you have a cable box or satellite receiver, it may have its own
set of screen sizes as well.
To change the screen size, press the P.SIZE button on your remote. The first time
you press it, your TV displays the current setting. Thereafter, each time you press
the P.SIZE button, you change the size of the picture on the screen.
The following sizes are available:
Cable or Auto, you must select Channel Source to same type as your
cable system type. After selecting source, select Search; then press the
ENTERE button on your remote.
✎✎ Most cable systems are Standard(STD) systems, If you are not sure
about what kind of cable system you have, contact your cable company.
16:9 Wide screen
4:3 Standard screen
Wide Fit
After Plug & Play is complete, set your TV to Channel 3 or 4, according
to the directions for your cable or satellite box.
4 The TV memorizes the available channels. This process can take up to 45
minutes.
5 After the TV has memorized the channels, choose the Clock Mode. Select
Auto if you have a digital channel in your area. Select Manual if you don’t, or
if you have a cable or satellite box. When done, press the ENTERE button.
✎✎ If you select Manual, the clock setting screen appears.
Changing the Picture Mode
Your TV has four preset Picture Modes with factory adjusted settings, each
designed to give you an excellent picture under specific conditions.
The Picture Modes are listed and described in the table below:
Natural
Description
Brightens picture. For a vibrant, enhanced image in brightly lit or
sunny room.
For a bright, detailed picture in a normally lit room.
For a comfortable, easy-on-the-eyes picture in a normally lit room.
Movie
For a studio quality cinema picture in a dimly lit or dark room.
Mode
Dynamic
Standard
To change the Picture Mode, follow these steps:
1. Turn on your TV, press the TOOLS button on your remote.
The Tools menu appears.
2. Using the ▲ or ▼ on your remote, select Picture Mode.
3. On the Picture Mode menu, use the ◄ or ► on your remote to select the
Picture Mode you want.
4. Press the EXIT button to exit the menu.
Setting the Clock
✎✎ If your TV is attached to a cable or satellite box, skip Steps 3 through 5.
Connect Ant In to
AUDIO OUT
PC OUT
2 Select Home Use, and then
✎✎ Make sure to match the + and -
Using an HDMI to DVI Cable
Using a Component Cable
DVD, Blu-ray player, cable box, STB satellite receiver, VCR
select the language for the On
Screen Display (OSD), and then
press the ENTERE button.
2. Install two AAA batteries.
HDMI to DVI Cable (Not Supplied)
HD connection
DVD, Blu-ray player, cable box, STB satellite receiver, VCR
Audio/Video connection (480i only)
Using an Audio/Video Cable
Rear
Audio (Not Supplied)
Good Connection
Component Cable (Not Supplied)
Lowest Quality Connection
Stand
Device
Connect your TV to a PC to use it as
a Monitor.
Component connection (up to 1080p)
Audio Cable
(Not Supplied)
Guide Stand
1 Connect the Guide Stand to the
AUDIO OUT
DVI OUT
Connecting a PC
Before you can use your TV’s On/Off Timer, you must set the clock. To set the
clock, follow these steps:
1. Turn on your TV, press the MENU button on your remote, then select Setup →
Time.
2. Select Clock Mode, and then press the ENTERE button.
3. Choose Auto or Manual.
Zoom 1
Zoom 2
Screen Fit
✎✎Screen Fit: Displays the full image without any cut-off when HDMI (720p /
1080i / 1080p) or Component (1080i / 1080p) signals are inputted.
xx If you select Auto, the current time will be set automatically using the time
from a digital channel.
xx If you select Manual, you can set the Month, Day, Year, Hour, Minute
and am/pm directly by pressing up, down, left and right arrow button on
your remote.
4. Press the RETURN button on your remote when done.
2010-02-02 오후 8:27:44
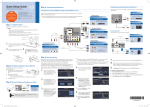
Step 6: The Internet@TV and Media Play Features
Remote Control Buttons and Functions
✎✎This is a special remote control for the visually impaired and has Braille points on the Power, Channel and Volume buttons.
POWER
Turns the TV on and off.
ON/OFF
SOURCE
Displays and selects the available video sources.
Turns the remote control light on or off. When on, the
buttons become illuminated for a moment when pressed.
(Using the remote control with this button set to off will
reduce the battery usage time.)
Press to directly access channels.
Press to select additional channels (digital) being
broadcasted by the same station. For example, to select
channel “54-3”, press “54”, then press “–” and “3”.
PRE-CH
MUTE
Adjusts the volume.
Quickly select frequently used functions.
INTERNET
TOOLS
INFO
RETURN
Returns to the previous menu.
These buttons are for the Channel list, Internet@TV,
Media Play menu, etc.
A
EXIT
B
C
MEDIA.P
FAV.CH
POWER
ON/OFF
SOURCE
POWER
Selects the on-screen menu items and changes the values
seen on the menu.
Exits the menu.
CC
MEDIA.P: Displays Media Play.
YAHOO: Runs Yahoo widget.
MTS: Press to choose stereo, mono or Separate Audio
Program (SAP broadcast).
FAV.CH: Displays Favorite Channel Lists on the screen.
P.SIZE: Selects the picture size.
CC: Controls the caption decoder.
ON/OFF
Changing Channels and Adjusting the Volume
PRE-CH
Change the channels by pressing the Channel button on the remote.
CH LIST
MENU
✎✎You can also change the channels by pressing the z
TOOLS
@TV
INTERNET
CONTENT
✎✎If your TV is attached to a cable or satellite box, change the channel using
the box’s remote.
PRE-CH
button on
the front panel of your TV and adjust the volume by pressing the y button.
INFO
MUTE
Viewing the On Screen Menus
Using Auto Motion Plus
RETURN
CH LIST
EXIT
@TV
MENU
To view the On Screen Menus, follow these steps:
INTERNET
CONTENT
A
B
C
D
1. Turn on your TV, press the MENU button on your
remote. The main menu appears.
TOOLS
INFO
MEDIA.P
MTS
The menu’s left side has the following menu
FAV.CH
P.SIZE Support.
options: Picture, Sound, Channel, Setup, Input, Application,
and
CC
Auto Motion Plus 120Hz™ technology virtually eliminates any blur in video that
include fast motion such as sports and action movies. To activate Auto Motion
Plus, follow these steps:
1. Turn on your TV, press the MENU button on your remote, then select Picture
Options → Auto Motion Plus 120Hz.
RETURN
EXIT
2. Press the ▲ or ▼ button on your remote to select a menu
option, and then
press the ENTERE button.
2. Select the Auto Motion Plus 120Hz setting you want.
A
B
3. When done using the menu, press the EXIT button on your
remote
toC exit.D
Selecting a Source
MEDIA.P
FAV.CH
MTS
P.SIZE
CC
To watch a movie on your Blu-ray player or watch
POWER
ON/OFF
your favorite TV show, you must select the correct
source. A source is a device, such as a Blu-ray/DVD
SOURCE
player, a cable/satellite box, antenna or a cable TV
input. Sources can be connected to your TV through
the HDMI, DVI, Component, Composite, or D-sub
connections, or through the Antenna or Cable In connections.
To view the signal from a source connected to the HDMI, DVI, Component,
Composite, or D-sub jack, press the SOURCE button on your remote. Each time
you press the SOURCE button, you change to a different source.
PRE-CH
✎✎ If noise occurs on the screen, please set up the Auto Motion Plus
120Hz to Off. If Auto Motion Plus 120Hz is Custom, you can set up
the Blur Reduction, Judder Reduction or Reset manually.
✎✎ If Auto Motion Plus 120Hz is Demo, you can compare the difference of
on and off modes.
3. Press the RETURN button on your remote when done.
Samsung Wireless LAN
Adapter
Wireless IP
sharer
Modem Cable (Not Supplied)
Samsung’s Wireless LAN adapter is sold separately and is offered by select
retailers, Ecommerce sites and Samsungparts.com. Samsung’s Wireless LAN
adapter supports the IEEE 802.11A/B/G and N communication protocols.
Samsung recommends using IEEE 802.11N. When you play the video over a IEEE
802.11B/G connection, the video may not play smoothly.
Most wireless network systems incorporate a security system that requires devices
that access the network through an access point or AP (typically a wireless IP
Sharer) to transmit an encrypted security code called an access key.
If Pure High-throughput (Greenfield) 802.11n mode is selected and the Encryption
type is set to WEP, TKIP or TKIPAES (WPS2Mixed) for your AP, Samsung TVs will
not support a connection in compliance with new Wi-Fi certification specifications.
TV Rear Panel
External Modem
(ADSL / VDSL / Cable TV)
LAN Cable (Not Supplied)
TV Rear Panel
The LAN Port on the Wall
LAN Cable (Not Supplied)
Configuring the Network Connection - Wireless
Configuring the Network Connection - Wired
Most home networks use the Dynamic Host Configuration Protocol (DHCP) to
configure network connections. Home networks that support DHCP automatically
provide the IP address, subnet mask, gateway, and DNS values your TV needs to
access the Internet so you don’t have to enter them manually.
To configure your network connection for a network that uses DHCP, follow these
steps:
1. Connect your TV to your network as shown in one of the illustrations above.
2. Turn on your TV, press the MENU button on your remote, and then select
Setup → Network.
5. On the Network Setup menu,
set Internet Protocol Setup and
DNS to Auto. Auto acquires and
enters the necessary internet
values automatically.
6. Select Network Test to check
Internet connectivity.
✎✎Some networks are Static IP
IP Address
:
Subnet Mask
:
Gateway
:
DNS
: Auto
DNS Server
:
r
5. On the Network Setup menu,
select an AP(Access Point) and
ad hoc network. if you have
selected network with a security
key, the Security Key screen
appears.
Network Setup
Select a network
: Not Selected
r
Internet Protocol Setup : Auto
6. Enter the security key using the
numbers on the remote, and then
press the Blue button on your
remote.
networks. If your network is a
U Move E Enter R Return
Static IP network, you can not
use DHCP to configure the network connection. Instead, you must enter
the IP Address, Subnet Mask, Gateway, and DNS Server manually. For
instructions explaining how to configure a Static IP network, see your user’s
manual.
IP Address
:
Subnet Mask
:
Gateway
:
DNS
: Auto
DNS Server
:
U Move E Enter R Return
✎✎ If your network uses WEP
security encryption, 0~9 and A~F will be available on the Security
Key screen. Use the Direction button on your remote to move to the
characters and the enter key to select them.
7. On the Network Setup menu, set Internet Protocol Setup and DNS to Auto.
The Auto acquires and enters the necessary internet values automatically.
8. Select Network Test to check internet connectivity.
Starting Internet@TV
To view the On Screen
Menus, follow these steps:
1. Turn on your TV, press
the MENU button
on your remote, then
select Application →
Content View.
2. Turn on your TV, press the MENU button on your remote, and the select Setup
→ Network.
4. Select Network Setup. The Network Setup screen appears.
Network Setup
Internet Protocol Setup : Auto
The instructions below are for networks that use the Dynamic Host Configuration
Protocol (DHCP) to configure network connections automatically. If your have a
Static IP network, see your user’s manual for configuration instructions.
To configure your network connection for a network that uses DHCP, follow these
steps:
1. Connect your TV to your network as shown in the illustrations above.
3. Set the Network Type to Wireless if it is not already set to Wireless.
4. Select Network Setup. The Network Setup screen appears.
MUTE
Adjust the volume by pressing the Volume button
on the remote.
The Modem Port on the Wall
3. Set the Network Type to Wired if it is not already set to Wired.
SOURCE
The LAN Port on the Wall
LAN Cable (Not Supplied)
Displays information on the TV screen.
D
MTS
P.SIZE
Link to various internet services.
TV Side Panel
or
There are two main ways to connect your TV to your network using cable,
depending on your network setup. They are illustrated below:
Displays channel list on the screen.
@TV
MENU
CONTENT
You can connect your TV to your LAN through a standard wireless router or
modem. To connect wirelessly, you must first attach a “Samsung Wireless LAN
Adapter” (WIS09ABGN - sold separately) to either the USB 1 (HDD) or USB 2 port
on the back of your TV. See the illustration below.
Network Connection - Wired
Cuts off the sound temporarily.
Changes channels.
CH LIST
Opens the OSD.
Displays the Content View, which includes Channel List,
Internet@TV, Media Play, and AllShare™.
Use these buttons in Media Play and Anynet+ modes.
(�: Controls recording on Samsung recorders that
have the Anynet+ feature)
Returns to the previous channel.
Your TV’s Internet@TV feature lets you connect to an ever-expanding portal of your
favorite on-line digital content. Customizable widgets give you access to Blockbuster,
Facebook, YouTube, Flickr, Netflix* and more - all on your HDTV. The Media Play
feature lets you connect to your PC through your home network and stream PC audio
and video files to your HDTV using your remote. To use IPTV or Samsung PC Share
Manager, you must connect your TV to your network. You can attach the TV to your
network in two ways, by cable, using CAT 5 cable, or wirelessly, using a Samsung
Wireless LAN Adapter. Instructions for both connection methods are below.
Network Connection - Wireless
✎✎For more information, see your user’s manual.
Recommended
My Applications
Connecting a USB Device for Media Play
by Date 1/1
2. Press the ◄ or ►
button to select
Samsung Apps
Settings
Login
Mark as Favorite
Sort by
Internet@TV, and the
ENTERE button. The
USER TERMS and PRIVACY POLICY windows appears, then select Yes.
3. Follow the directions on your screen to set up Internet@TV. For detailed
instructions, see your Owner’s Manual.
R Return
You can enjoy photo,
music, and movie files
stored on a USB device
by connecting it to the TV
and using the Media Play
feature. For Media Play
operating instructions,
please see your Owner’s
Manual.
MediaPlay
Videos
SUM
Change Device
View Devices E Enter R Return
✎✎For best Internet@TV results, your broadband company should provide
sustained download speeds of 3.5 mb/sec or more.
MUTE
BN68-02616A-00
CH LIST
MENU
[QSG]BN68-02616A-00Eng.indd 2
@TV
CONTENT
INTERNET
TOOLS
INFO
2010-02-02 오후 8:27:47