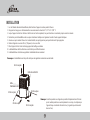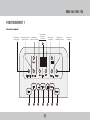
1
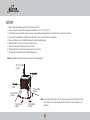
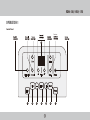
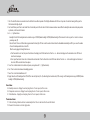
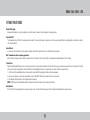
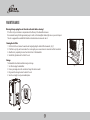
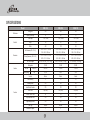
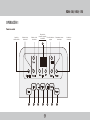
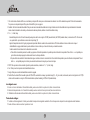
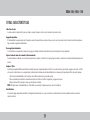
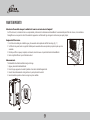
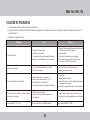
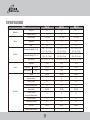
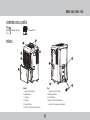
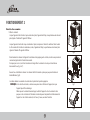
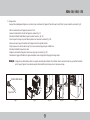
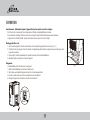
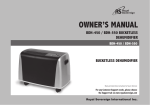
Owner’s Manual
DEHUMIDIFIER
RDH-130/ 150/ 170
Página en Español
17
Page en Français 33
Read and retain these instructions for future reference.
For any Customer Support needs, please choose the Support tab on
www.royalsovereign.com (USA)
www.royalsovereign.ca (Canada)
Royal Sovereign International Inc.
Dehumidifier
Model RDH-130 / RDH-150 / RDH-170
INTRODUCTION
Thank you for choosing Royal Sovereign to provide you and your family with premium “Air Comfort” solutions for your home, apartment, or office.
This Dehumidifier can be set-up in just minutes and if properly maintained, will give you many years of trouble free operation. This manual will
provide you with valuable information necessary for the proper care and maintenance for your new appliances. Please take a few moments and
read the instructions thoroughly.
Why Dehumidify?
Moisture in the air can lead to mold and mildew leaving a room smelling musty.
Dehumidifiers remove the moisture in the air making it better quality to breathe and protect the furnishings in a room from being damaged.
CONTENTS
Page
General use∙∙∙∙∙∙∙∙∙∙∙∙∙∙∙∙∙∙∙∙∙∙∙∙∙∙∙∙∙∙∙∙∙∙∙∙∙∙∙∙∙∙∙∙∙∙∙∙∙∙∙∙∙∙∙∙∙∙∙∙∙∙∙∙∙∙∙∙∙∙∙∙∙∙∙∙∙∙∙∙∙∙∙∙∙∙∙∙∙∙∙∙∙∙∙∙∙∙∙∙∙∙∙∙∙∙∙∙∙∙∙∙∙∙∙∙∙∙∙∙∙∙∙∙∙∙∙∙∙∙∙∙∙∙∙∙∙∙∙∙∙∙∙∙∙∙∙∙∙ 4
Precautions for Use∙∙∙∙∙∙∙∙∙∙∙∙∙∙∙∙∙∙∙∙∙∙∙∙∙∙∙∙∙∙∙∙∙∙∙∙∙∙∙∙∙∙∙∙∙∙∙∙∙∙∙∙∙∙∙∙∙∙∙∙∙∙∙∙∙∙∙∙∙∙∙∙∙∙∙∙∙∙∙∙∙∙∙∙∙∙∙∙∙∙∙∙∙∙∙∙∙∙∙∙∙∙∙∙∙∙∙∙∙∙∙∙∙∙∙∙∙∙∙∙∙∙∙∙∙∙∙∙∙∙∙∙∙∙∙∙∙∙ 4
Box Contents and Parts ∙ ∙∙∙∙∙∙∙∙∙∙∙∙∙∙∙∙∙∙∙∙∙∙∙∙∙∙∙∙∙∙∙∙∙∙∙∙∙∙∙∙∙∙∙∙∙∙∙∙∙∙∙∙∙∙∙∙∙∙∙∙∙∙∙∙∙∙∙∙∙∙∙∙∙∙∙∙∙∙∙∙∙∙∙∙∙∙∙∙∙∙∙∙∙∙∙∙∙∙∙∙∙∙∙∙∙∙∙∙∙∙∙∙∙∙∙∙∙∙∙∙∙∙∙∙∙∙∙∙ 5
Set-up∙∙∙∙∙∙∙∙∙∙∙∙∙∙∙∙∙∙∙∙∙∙∙∙∙∙∙∙∙∙∙∙∙∙∙∙∙∙∙∙∙∙∙∙∙∙∙∙∙∙∙∙∙∙∙∙∙∙∙∙∙∙∙∙∙∙∙∙∙∙∙∙∙∙∙∙∙∙∙∙∙∙∙∙∙∙∙∙∙∙∙∙∙∙∙∙∙∙∙∙∙∙∙∙∙∙∙∙∙∙∙∙∙∙∙∙∙∙∙∙∙∙∙∙∙∙∙∙∙∙∙∙∙∙∙∙∙∙∙∙∙∙∙∙∙∙∙∙∙∙∙∙∙∙∙∙ 6
Operation 1 ∙∙∙∙∙∙∙∙∙∙∙∙∙∙∙∙∙∙∙∙∙∙∙∙∙∙∙∙∙∙∙∙∙∙∙∙∙∙∙∙∙∙∙∙∙∙∙∙∙∙∙∙∙∙∙∙∙∙∙∙∙∙∙∙∙∙∙∙∙∙∙∙∙∙∙∙∙∙∙∙∙∙∙∙∙∙∙∙∙∙∙∙∙∙∙∙∙∙∙∙∙∙∙∙∙∙∙∙∙∙∙∙∙∙∙∙∙∙∙∙∙∙∙∙∙∙∙∙∙∙∙∙∙∙∙∙∙∙∙∙∙ 7 ~ 9
Operation 2 ∙∙∙∙∙∙∙∙∙∙∙∙∙∙∙∙∙∙∙∙∙∙∙∙∙∙∙∙∙∙∙∙∙∙∙∙∙∙∙∙∙∙∙∙∙∙∙∙∙∙∙∙∙∙∙∙∙∙∙∙∙∙∙∙∙∙∙∙∙∙∙∙∙∙∙∙∙∙∙∙∙∙∙∙∙∙∙∙∙∙∙∙∙∙∙∙∙∙∙∙∙∙∙∙∙∙∙∙∙∙∙∙∙∙∙∙∙∙∙∙∙∙∙∙∙∙∙∙∙∙∙∙∙∙∙∙∙ 10 ~ 11
Maintenance∙∙∙∙∙∙∙∙∙∙∙∙∙∙∙∙∙∙∙∙∙∙∙∙∙∙∙∙∙∙∙∙∙∙∙∙∙∙∙∙∙∙∙∙∙∙∙∙∙∙∙∙∙∙∙∙∙∙∙∙∙∙∙∙∙∙∙∙∙∙∙∙∙∙∙∙∙∙∙∙∙∙∙∙∙∙∙∙∙∙∙∙∙∙∙∙∙∙∙∙∙∙∙∙∙∙∙∙∙∙∙∙∙∙∙∙∙∙∙∙∙∙∙∙∙∙∙∙∙∙∙∙∙∙∙∙∙∙∙∙∙∙∙∙∙ 12
Troubleshooting∙∙∙∙∙∙∙∙∙∙∙∙∙∙∙∙∙∙∙∙∙∙∙∙∙∙∙∙∙∙∙∙∙∙∙∙∙∙∙∙∙∙∙∙∙∙∙∙∙∙∙∙∙∙∙∙∙∙∙∙∙∙∙∙∙∙∙∙∙∙∙∙∙∙∙∙∙∙∙∙∙∙∙∙∙∙∙∙∙∙∙∙∙∙∙∙∙∙∙∙∙∙∙∙∙∙∙∙∙∙∙∙∙∙∙∙∙∙∙∙∙∙∙∙∙∙∙∙∙∙∙∙∙∙∙∙∙∙∙∙ 13
Specification∙∙∙∙∙∙∙∙∙∙∙∙∙∙∙∙∙∙∙∙∙∙∙∙∙∙∙∙∙∙∙∙∙∙∙∙∙∙∙∙∙∙∙∙∙∙∙∙∙∙∙∙∙∙∙∙∙∙∙∙∙∙∙∙∙∙∙∙∙∙∙∙∙∙∙∙∙∙∙∙∙∙∙∙∙∙∙∙∙∙∙∙∙∙∙∙∙∙∙∙∙∙∙∙∙∙∙∙∙∙∙∙∙∙∙∙∙∙∙∙∙∙∙∙∙∙∙∙∙∙∙∙∙∙∙∙∙∙∙∙∙∙∙∙∙ 14
Warranty∙∙∙∙∙∙∙∙∙∙∙∙∙∙∙∙∙∙∙∙∙∙∙∙∙∙∙∙∙∙∙∙∙∙∙∙∙∙∙∙∙∙∙∙∙∙∙∙∙∙∙∙∙∙∙∙∙∙∙∙∙∙∙∙∙∙∙∙∙∙∙∙∙∙∙∙∙∙∙∙∙∙∙∙∙∙∙∙∙∙∙∙∙∙∙∙∙∙∙∙∙∙∙∙∙∙∙∙∙∙∙∙∙∙∙∙∙∙∙∙∙∙∙∙∙∙∙∙∙∙∙∙∙∙∙∙∙∙∙∙∙∙∙∙∙∙∙∙∙∙∙ 15
Contact information∙∙∙∙∙∙∙∙∙∙∙∙∙∙∙∙∙∙∙∙∙∙∙∙∙∙∙∙∙∙∙∙∙∙∙∙∙∙∙∙∙∙∙∙∙∙∙∙∙∙∙∙∙∙∙∙∙∙∙∙∙∙∙∙∙∙∙∙∙∙∙∙∙∙∙∙∙∙∙∙∙∙∙∙∙∙∙∙∙∙∙∙∙∙∙∙∙∙∙∙∙∙∙∙∙∙∙∙∙∙∙∙∙∙∙∙∙∙∙∙∙∙∙∙∙∙∙∙∙∙∙∙∙∙∙ 16
Página en Español∙∙∙∙∙∙∙∙∙∙∙∙∙∙∙∙∙∙∙∙∙∙∙∙∙∙∙∙∙∙∙∙∙∙∙∙∙∙∙∙∙∙∙∙∙∙∙∙∙∙∙∙∙∙∙∙∙∙∙∙∙∙∙∙∙∙∙∙∙∙∙∙∙∙∙∙∙∙∙∙∙∙∙∙∙∙∙∙∙∙∙∙∙∙∙∙∙∙∙∙∙∙∙∙∙∙∙∙∙∙∙∙∙∙∙∙∙∙∙∙∙∙∙∙∙∙∙∙∙∙∙∙∙∙∙∙∙ 17
Página en Français∙∙∙∙∙∙∙∙∙∙∙∙∙∙∙∙∙∙∙∙∙∙∙∙∙∙∙∙∙∙∙∙∙∙∙∙∙∙∙∙∙∙∙∙∙∙∙∙∙∙∙∙∙∙∙∙∙∙∙∙∙∙∙∙∙∙∙∙∙∙∙∙∙∙∙∙∙∙∙∙∙∙∙∙∙∙∙∙∙∙∙∙∙∙∙∙∙∙∙∙∙∙∙∙∙∙∙∙∙∙∙∙∙∙∙∙∙∙∙∙∙∙∙∙∙∙∙∙∙∙∙∙∙∙∙∙ 33
General Use
1. After unpacking the dehumidifier, wait 2 hours before using it. Common sense and caution must be used when installing, operating and maintaining any appliance.
2. This appliance should be used by adults only. Do not allow children to play with the appliance. Do not leave children unattended in an area where the appliance is operating.
Do not allow them to sit or stand on the appliance.
3. This appliance is designed to dehumidify domestic living areas, and should not be used for other purposes. It should be operated in an enclosed area to be most effective.
Close all doors, windows, and other outside openings to the room for maximum effectiveness.
4. Do not use outdoors.
5. Always remove the plug from the socket before performing maintenance operations, cleaning or when the dehumidifier will not be in used for an extended period.
6. Do not place heavy or hot objects on the top of the dehumidifier.
Precautions for use
1. Do not store or use gasoline, oil, sulphur, or other flammable vapors and liquids in the vicinity of this or any other appliance. Do not install the appliance near source of heat.
2. The appliance must not be modified in any way. Any modifications may be extremely dangerous.
3. Do not operate any appliance with a damaged cord or plug or after the appliance malfunctions, or has been damaged in any manner.
4. The use of accessory attachments is not recommended by the appliance manufacturer. It may cause injuries.
5. For your safety and protection, this dehumidifier is equipped with a three-prong grounding plug on the power cord.
Do not, under any circumstances, cut or remove the round grounding prong from the plug.
6. Your dehumidifier must plug directly into a properly grounded and polarized three-prong outlet.
If the wall outlet will not accept a three prong plug or if you are not sure the outlet is adequately grounded or protected by a time delay of fuse or circuit breaker, have a qualified
electrician install the proper outlet. Do not use an extension cord or an adapter plug.
7. Never unplug the dehumidifier by pulling on the power cord. Always grip the plug firmly and pull straight out from the outlet. Do not pinch, bend, or knot the power cord.
8. The appliance should remain upright during transportation. Remember to drain the dehumidifier before transporting.
4
RDH-130/ 150/ 170
BOX CONTENTS
User manual
Dehumidifier
PARTS
1
4
3
2
6
4
1
5
2
Front
1. Control panel
2. Air intake
3. Air outlet
4. Handles
5. Water bucket
6. Air filter (behind the air intake)
Rear
1. Drain hose outlet
2. Caster wheels
3. Electrical plug
4. Power cord buckle (used when storing the unit)
5
3
SET-UP
1. When first using the dehumidifier, operate the unit continuously 24 hours.
2. This unit is designed to operate with a working environment between 5 °C/41 °F and 35 °C/95 °F.
3. If the unit has been powered off and needs to be powered on again quickly, allow approximately three minutes for the correct operation to resume.
4. Do not connect the dehumidifier to a multiple socket outlet, which is also being used for other electrical appliances.
5. Make sure the Water bucket is correctly fitted otherwise the unit will not operate properly.
6. Allow at least 20cm (7.85 inch) of air space on all sides of the unit.
7. Place the unit away from the clothes dryer, heater or radiator.
8. The dehumidifier must be operated in an enclosed area to be most effective.
9. This dehumidifier is intended for indoor residential applications only.
Note: This dehumidifier should not be used for commercial or industrial applications.
15.7 in ( 40 cm)
or more
grille
7.9 in ( 20cm)
or more
7.9 in ( 20cm)
or more
7.9 in ( 20cm)
or more
7.9 in ( 20cm)
or more
Note: 4 Caster wheels at the bottom of the unit can move freely. Do not force Caster wheels to move
over the carpet, nor move the unit with water filled in the bucket. (The unit may flip over and
spill water.)
6
RDH-130/ 150/ 170
Operation 1
Control Panel
Continuous
8
1
2
3
5
4
7
6
7
1. Filter: The check filter feature is a reminder to clean the Air Filter for more efficient operation. The LED light will illuminate after 250 hours of operation. To reset after cleaning the filter, press the
Filter button and the light will go off.
2. Fan: Control the fan speed. Press to select either Turbo or Normal fan speed. Set the fan control to Turbo for maximum moisture removal. When the humidity has been reduced and quiet operation
is preferred, set the fan control to Normal.
3. & 4. +/ - : Up/Down buttons
• Humidity Set Control: The humidity level can be set within a range of 35%RH (Relative Humidity) to 85%RH (Relative Humidity) in 5% increments. For drier air, press the – button to set a lower
percentage value (%)
• Timer Set Control: There are 2 different timer programs when the Power light is ON. You can set the number of hours before the dehumidifier automatically turns OFF or you can set the number
of hours that will elapse before the unit turns ON.
When the unit is plugged in Power light will come on.
a. Press Power button to start unit, then press Timer button on the display to turn ON the timer function. Press the + or – button on the display to set the desired hour to turn OFF the unit
when the set time elapses.
b. Do not press Power button. Power cord is still connected to electrical outlet. Press the Timer button to turn ON the timer function. Press the + or – button on the display to set the desired
hour to turn ON the unit when the set time elapses.
5. T imer: Press to initiate the Auto start and Auto stop feature, in conjunction with “+/ -“(Up/Down buttons).
6. Cont.: Press to activate the continuous dehumidifying operation.
7. Power: Press to turn the dehumidifier on or off.
8. Display: Shows the set % humidity level from 35% to 85% or auto start/stop time (0.0~24) while setting, then shows the actual (±5% accuracy) room % humidity level in a range of 30%RH (Relative
Humidity) to 90%RH (Relative Humidity).
Error Codes:
AS- Humidity sensor error--Unplug the unit and plug it back in. If error repeats, call for service.
ES- Temperature sensor error-- Unplug the unit and plug it back in. If error repeats, call for service.
E1- Unit malfunction—Unplug the unit and plug it back in. If error repeats, call for service.
Protection Codes:
P1- Unit is defrosting-- Allow the unit time to automatically defrost. The error will clear after the unit self defrosts.
P2- Bucket is full or bucket is not in the right position.
8
RDH-130/ 150/ 170
Other features
Bucket Full Light
Glows when the bucket is ready to be emptied, or when the bucket is removed or not replaced in the proper position.
Auto Shut Off
The dehumidifier shuts off after 30 seconds when the bucket is full, or when the bucket is removed or not in the proper position. When the setting humidity is reached, the unit will
shut off automatically.
Auto Defrost
If ice forms on the evaporator coils, the compressor will be off and the fan will continue to run until defrosting is completed.
Wait 3 minutes before resuming operation
After the unit has stopped, it will not restart operation in the first 3 minutes. This is to protect the unit. Operation will automatically start after 3 minutes.
Clean Filter
When the Cleanfilter light flashes you can use the vacuum cleaner to remove dust accumulations from the filter. If necessary, wash in warm water and rinse several times. If the filter
is dirty, air circulation is compromised and the efficiency of the dehumidifying decreases. It is good practice to clean the filter at regular intervals.
1. On the front of the dehumidifier, pull out the bucket and remove the filter by pulling the handle on the grille downward.
2. Use a vacuum cleaner to remove dust accumulations from the filter. Wash the filter in warm water and rinse several times.
3. After washing the filter, allow it to dry completely before replacing it.
NOTE: DO NOT operate the dehumidifier without a filter because dirt and lint will clog it and reduce performance.
Auto-Restart
If the unit shuts off unexpectedly due to the power outrage or cut, it will restart with the previous function setting automatically when the power resumes.
9
Operation 2
Removing the collected water
1. Use the bucket
When the unit is off, if the bucket is full, the unit will beep 8 times and the Full indicator light will flash, the digital display
shows P2.
When the unit is on, if the bucket is full, the compressor turns off and the fan turns off after 30 seconds for drying the
water of the condenser, then the unit will beep 8 times and the Full indicator light will flash, the digital display shows P2.
Slowly pull out the bucket. Grip the left and right handles securely, and carefully pull out straight so water does not spill.
Do not put the bucket on the floor because the bottom of the bucket is uneven. Otherwise the bucket will fall and cause
the water to spill. (Fig.6 & 7)
Fig.6
Pour the water out and replace the bucket. The bucket must be in place and securely tightened for the dehumidifier to
operate. (Fig.8)
The machine will re-start when the bucket is restored in its correct position.
NOTE: When you remove the bucket, do not touch any parts inside of the unit. Doing so may damage the product.
Be sure to push the bucket gently all the way into the unit. Banging the bucket against anything or failing to
push it in securely may cause the unit not to operate. When you remove the bucket, if there is some water in the
unit you must dry it .
Fig.7
Fig.8
10
RDH-130/ 150/ 170
2. Continuous draining
Water can be automatically emptied into a floor drain by attaching the unit with a water hose (Ø 24mm/1 inch of diameter, not included Fig.9)
• Remove the water bucket from the unit and set aside.
• Lift up the side flap located on the right side of the unit as looking from the front (Fig.10)
• Insert the female threaded end of the water hose through the opening. (Fig.10a)
• Screw the gardening hose onto the threaded portion of the tray underneath the bucket opening (Fig. 10b)
• Make sure the hose is securely connected to the unit so there are no leaks.
• Direct the hose toward the drain, make sure that there are no kinks that will stop the water flowing.
• Place the end of the hose into the drain.
• Place the bucket back in the unit and make sure that it is located correctly. (Fig. 10c)
• Select the desired humidity setting and fan speed on the unit for continuous draining to start.
NOTE: If the unit stops operating, check that the bucket Full light is illuminated. If it is, remove the bucket and empty the water and then check the seal between the hose and the
unit. If there is a small leak then replace the hose gasket and re-tignten the hose.
Fig.9
Fig.10
Fig.10a
11
Fig.10b
Fig.10c
Maintenance
Warning: Always unplug the unit from the wall outlet before cleaning!
If the filter is dirty, air circulation is compromised and the efficiency of the dehumidifier decreases.
We recommend cleaning the filter approximately every 3 months, or the Cleaningfilter indicator light comes on your control panel.
This unit is equipped with a washable filter. Follow the instructions below to remove and clean it.
Cleaning the Air Filter
1. On the front of the unit, remove the water bucket and gently pulling the handle of filter downwards. (Fig.11)
2. If the filter is very dirty, wash in warm water. You can also gently use a vacuum cleaner to remove the dust that has collected.
3. Allow filter to dry completely, then insert back into the front of the dehumidifier.
4. Slide the filter grille back onto the front of the unit.
Storage
The dehumidifier should be drained before long term storage.
1. Turn off and unplug the dehumidifier.
2. Drain any remaining water in the unit and also through the side drain outlet.
3. Plug around the storage hooks on the back of the unit.
4. Store the unit upright in a dry, well-ventilated place.
Fig.11
12
RDH-130/ 150/ 170
Troubleshooting
1.Be sure the power cord is plugged into a working electrical outlet.
2.Check your room humidity level on display setting. The unit may simply be off because the humidity setting equals room humidity level.
3.Check for any obstructions.
Trouble
Cause
Solution
The unit does not work.
1. No power supply.
2. Unit is not turned on.
3. Humidity is set higher than the room humidity.
4. The power was shut off and automatically turned back on.
1. Plug power cord firmly into outlet and check fuse for that room.
2. Turn the unit on.
3. Set the humidity level on a lower percentage.
4. If a unit was turned off and turned on automatically the
compressor will take 5 minutes to start.
Water light is lit.
1. There is blockage of the flow of water in the unit.
2. The bucket is full of water.
1. Check the hose for crimps or blockage.
2. Make sure the water is emptied
The air in the room is still humid.
1. Air filter is dirty and or blocked.
2. The room temperature is below 5 °C (41 °F).
3. Poor air circulation or obstructions.
4. Humidity is set higher than the room humidity.
1. Clean the filter.
2. Raise the room temperature.
3. Improve the airflow by moving unit away from anything that
obstructs the airflow.
4. Set the humidity percentage to a lower percentage.
Relative humidity setting not being reached after
a long period of operation.
1. There are windows or doors opened.
2. Area is too large for the capacity of the dehumidifier.
1. Check to see the windows and doors are closed.
2. Change the location of the dehumidifier with-in room.
On the Display (ES, AS, E1, P1 or P2)
These are error codes and protection codes
See the CONTROL PANEL section.
13
SPECIFICATIONS
Model
Perfomance
RDH-130
RDH-150
RDH-170
Energy star
YES
YES
YES
Capacity (Pints/Day)
30
50
70
Power input
115V~, 60Hz
115V~, 60Hz
115V~, 60Hz
Electrical
Amps
4.2
5.5
6.9
Watts
Net / Gross Weight
420
14.09 × 10.47 × 19.92 in
358 × 266 × 506 mm
15.75 × 12.40 × 21.02 in
400 × 315 × 534 mm
29.76 / 33.07 lbs ( 13.5 / 15 kg)
570
15.59 × 14.02 × 23.74 in
396 × 356 × 603 mm
17.72 × 15.94 × 25.79 in
450 × 405 × 655 mm
37.48 / 41.89 lbs (17/19 kg)
765
15.59 × 14.02 × 23.74 in
396 × 356 × 603 mm
17.72 × 15.94 × 25.79 in
450 × 405 × 655 mm
43 / 46.3 lbs ( 19.5/ 21kg)
Refrigeration
R134A
R410A
R410A
370/330
Unit Dimension (W × D × H)
Dimension
Function
Packing Dimension (W × D × H)
Air Flow
M3/H(CFM)
260/220
370/330
Noise(Rating)
dB
52/49
56/53
53/51
Electric
Electric
Electric
Controls
Features
Tank volume(L)
5
10
10
Humidity sensor
YES
YES
YES
Auto Restart Function
YES
YES
YES
YES(250h)
Filter Check
YES(250h)
YES(250h)
24 Hour On/Off Timer
24
24
24
Easy-removable Filter
YES
YES
YES
Digital Display on Unit
YES
YES
YES
Filter Type
NORMAL
NORMAL
NORMAL
Variable Fan Speeds
2
2
2
14
RDH-130/ 150/ 170
FULL ONE YEAR WARRANTY
Royal Sovereign warrants each Dehumidifier to be free from defects in material and workmanship. Our obligation under this warranty is limited to the repair or replacement, free
of charge, when delivered to an authorized Royal Sovereign service center, of any defective part(s) thereof, other than parts damaged in transit. This warranty is in effect to the
original purchaser, for a period of one year from the date of purchase and is not transferable. This warranty shall apply only if the dehumidifier is used on Alternating Current (AC)
circuit, in accordance with the factory provided instructions which accompany it.
EXCLUSIONS
This warranty excludes and does not cover defects, malfunctions or failures of your Royal Sovereign Dehumidifiers, caused by repairs by unauthorized persons or service centers,
mishandling, improper installation, modification or unreasonable use including incorrect voltage, acts of God, or failure to provide reasonable and necessary maintenance. This
warranty is in lieu of any and all expressed warranties. In no event shall Royal Sovereign be liable for consequential or incidental damages. This limitation would not apply if you live
in a location that does not permit the exclusion of limitation of incidental or consequential damages. This warranty gives you specific legal rights and you may also have other rights
which vary from state to state.
www.royalsovereign.com
15
ROYAL SOVEREIGN INTERNATIONAL, INC.
2 Volvo Drive Rockleigh, NJ 07647 USA
TEL : +1) 800-397-1025
FAX : +1) 201-750-1022
RS INTERNATIONAL AUSTRALIA PTY. LTD.
30 Prime Drive, Seven Hills, NSW 2147, AUSTRALIA
TEL : +61) 2-9674-2127
FAX : +61) 2-9674-2027
RS Holland B.V.
Industrieweg 6K, 4104AR, Culemborg, The Netherlands
Tel: +31 (0)345 473 097 Fax: 31 (0)345 519 811
ROYAL SOVEREIGN INC.
1001, World Meridian II, 426-5, Gasan-dong, Geumcheon-gu, Seoul, 153-759, KOREA
TEL : +82)2-2025-8800 FAX : +82)2-2025-8830
RS CANADA INC.
1025 Westport Crescent, Mississauga On L5T 1E8 CANADA
TEL: +1) 905-461-1095 FAX: +1) 905-461-1096
TF: +1) 866 961-6673
www.royalsovereign.com
Manual del Usuario
DESHUMIDIFICADOR
RDH-130/ 150/ 170
Page en Français 33
Lea y conserve estas instrucciones para referencia futura.
Para cualquier asistencia al cliente las necesidades, por favor, seleccione la pestaña de soporte en
www.royalsovereign.com (USA)
www.royalsovereign.ca (Canada)
Royal Sovereign International Inc.
DESHUMIDIFICADOR
Model RDH-130 / RDH-150 / RDH-170
INTRODUCCIÓN
Gracias por elegir Royal Sovereign para brindarle a usted y a su familia con la prima de "Air Comfort " soluciones para su casa, apartamento u
oficina.
El deshumidificador puede ser puesta en marcha en cuestión de minutos y si el mantenimiento adecuado, le dará muchos años de operación
sin problemas. En este manual se le proporcionará valiosa información necesaria para el cuidado y mantenimiento de sus aparatos nuevos.
Por favor, tómese unos minutos y
lea las instrucciones cuidadosamente.
¿Por qué deshumidificar?
La humedad en el aire puede dar lugar a la formación de moho dejando un olor a humedad ambiente.
Deshumidificadores eliminar la humedad en el aire, por lo que es de mejor calidad para respirar y proteger los muebles en una habitación que
se dañen.
ÍNDICE
Page
Uso general∙∙∙∙∙∙∙∙∙∙∙∙∙∙∙∙∙∙∙∙∙∙∙∙∙∙∙∙∙∙∙∙∙∙∙∙∙∙∙∙∙∙∙∙∙∙∙∙∙∙∙∙∙∙∙∙∙∙∙∙∙∙∙∙∙∙∙∙∙∙∙∙∙∙∙∙∙∙∙∙∙∙∙∙∙∙∙∙∙∙∙∙∙∙∙∙∙∙∙∙∙∙∙∙∙∙∙∙∙∙∙∙∙∙∙∙∙∙∙∙∙∙∙∙∙∙∙∙∙∙∙∙∙∙∙∙∙∙∙∙∙∙∙∙∙∙∙ 20
Precauciones para el uso∙∙∙∙∙∙∙∙∙∙∙∙∙∙∙∙∙∙∙∙∙∙∙∙∙∙∙∙∙∙∙∙∙∙∙∙∙∙∙∙∙∙∙∙∙∙∙∙∙∙∙∙∙∙∙∙∙∙∙∙∙∙∙∙∙∙∙∙∙∙∙∙∙∙∙∙∙∙∙∙∙∙∙∙∙∙∙∙∙∙∙∙∙∙∙∙∙∙∙∙∙∙∙∙∙∙∙∙∙∙∙∙∙∙∙∙∙∙∙∙∙∙∙∙∙∙∙ 20
Contenido de la caja y piezas∙∙∙∙∙∙∙∙∙∙∙∙∙∙∙∙∙∙∙∙∙∙∙∙∙∙∙∙∙∙∙∙∙∙∙∙∙∙∙∙∙∙∙∙∙∙∙∙∙∙∙∙∙∙∙∙∙∙∙∙∙∙∙∙∙∙∙∙∙∙∙∙∙∙∙∙∙∙∙∙∙∙∙∙∙∙∙∙∙∙∙∙∙∙∙∙∙∙∙∙∙∙∙∙∙∙∙∙∙∙∙∙∙∙∙∙∙∙∙∙∙ 21
Configuración∙∙∙∙∙∙∙∙∙∙∙∙∙∙∙∙∙∙∙∙∙∙∙∙∙∙∙∙∙∙∙∙∙∙∙∙∙∙∙∙∙∙∙∙∙∙∙∙∙∙∙∙∙∙∙∙∙∙∙∙∙∙∙∙∙∙∙∙∙∙∙∙∙∙∙∙∙∙∙∙∙∙∙∙∙∙∙∙∙∙∙∙∙∙∙∙∙∙∙∙∙∙∙∙∙∙∙∙∙∙∙∙∙∙∙∙∙∙∙∙∙∙∙∙∙∙∙∙∙∙∙∙∙∙∙∙∙∙∙∙∙∙∙∙ 22
Operación 1∙∙∙∙∙∙∙∙∙∙∙∙∙∙∙∙∙∙∙∙∙∙∙∙∙∙∙∙∙∙∙∙∙∙∙∙∙∙∙∙∙∙∙∙∙∙∙∙∙∙∙∙∙∙∙∙∙∙∙∙∙∙∙∙∙∙∙∙∙∙∙∙∙∙∙∙∙∙∙∙∙∙∙∙∙∙∙∙∙∙∙∙∙∙∙∙∙∙∙∙∙∙∙∙∙∙∙∙∙∙∙∙∙∙∙∙∙∙∙∙∙∙∙∙∙∙∙∙∙∙∙∙∙∙∙∙∙∙ 23 ~ 25
Operación 2∙∙∙∙∙∙∙∙∙∙∙∙∙∙∙∙∙∙∙∙∙∙∙∙∙∙∙∙∙∙∙∙∙∙∙∙∙∙∙∙∙∙∙∙∙∙∙∙∙∙∙∙∙∙∙∙∙∙∙∙∙∙∙∙∙∙∙∙∙∙∙∙∙∙∙∙∙∙∙∙∙∙∙∙∙∙∙∙∙∙∙∙∙∙∙∙∙∙∙∙∙∙∙∙∙∙∙∙∙∙∙∙∙∙∙∙∙∙∙∙∙∙∙∙∙∙∙∙∙∙∙∙∙∙∙∙∙∙ 26 ~ 27
Mantenimiento∙∙∙∙∙∙∙∙∙∙∙∙∙∙∙∙∙∙∙∙∙∙∙∙∙∙∙∙∙∙∙∙∙∙∙∙∙∙∙∙∙∙∙∙∙∙∙∙∙∙∙∙∙∙∙∙∙∙∙∙∙∙∙∙∙∙∙∙∙∙∙∙∙∙∙∙∙∙∙∙∙∙∙∙∙∙∙∙∙∙∙∙∙∙∙∙∙∙∙∙∙∙∙∙∙∙∙∙∙∙∙∙∙∙∙∙∙∙∙∙∙∙∙∙∙∙∙∙∙∙∙∙∙∙∙∙∙∙∙∙∙∙ 28
Solución de problemas∙∙∙∙∙∙∙∙∙∙∙∙∙∙∙∙∙∙∙∙∙∙∙∙∙∙∙∙∙∙∙∙∙∙∙∙∙∙∙∙∙∙∙∙∙∙∙∙∙∙∙∙∙∙∙∙∙∙∙∙∙∙∙∙∙∙∙∙∙∙∙∙∙∙∙∙∙∙∙∙∙∙∙∙∙∙∙∙∙∙∙∙∙∙∙∙∙∙∙∙∙∙∙∙∙∙∙∙∙∙∙∙∙∙∙∙∙∙∙∙∙∙∙∙∙∙∙∙∙∙ 29
Especificación∙∙∙∙∙∙∙∙∙∙∙∙∙∙∙∙∙∙∙∙∙∙∙∙∙∙∙∙∙∙∙∙∙∙∙∙∙∙∙∙∙∙∙∙∙∙∙∙∙∙∙∙∙∙∙∙∙∙∙∙∙∙∙∙∙∙∙∙∙∙∙∙∙∙∙∙∙∙∙∙∙∙∙∙∙∙∙∙∙∙∙∙∙∙∙∙∙∙∙∙∙∙∙∙∙∙∙∙∙∙∙∙∙∙∙∙∙∙∙∙∙∙∙∙∙∙∙∙∙∙∙∙∙∙∙∙∙∙∙∙∙∙∙ 30
Garantía∙∙∙∙∙∙∙∙∙∙∙∙∙∙∙∙∙∙∙∙∙∙∙∙∙∙∙∙∙∙∙∙∙∙∙∙∙∙∙∙∙∙∙∙∙∙∙∙∙∙∙∙∙∙∙∙∙∙∙∙∙∙∙∙∙∙∙∙∙∙∙∙∙∙∙∙∙∙∙∙∙∙∙∙∙∙∙∙∙∙∙∙∙∙∙∙∙∙∙∙∙∙∙∙∙∙∙∙∙∙∙∙∙∙∙∙∙∙∙∙∙∙∙∙∙∙∙∙∙∙∙∙∙∙∙∙∙∙∙∙∙∙∙∙∙∙∙∙∙∙∙ 31
Información de contacto∙∙∙∙∙∙∙∙∙∙∙∙∙∙∙∙∙∙∙∙∙∙∙∙∙∙∙∙∙∙∙∙∙∙∙∙∙∙∙∙∙∙∙∙∙∙∙∙∙∙∙∙∙∙∙∙∙∙∙∙∙∙∙∙∙∙∙∙∙∙∙∙∙∙∙∙∙∙∙∙∙∙∙∙∙∙∙∙∙∙∙∙∙∙∙∙∙∙∙∙∙∙∙∙∙∙∙∙∙∙∙∙∙∙∙∙∙∙∙∙∙∙∙∙∙∙∙∙ 32
Página en Français∙∙∙∙∙∙∙∙∙∙∙∙∙∙∙∙∙∙∙∙∙∙∙∙∙∙∙∙∙∙∙∙∙∙∙∙∙∙∙∙∙∙∙∙∙∙∙∙∙∙∙∙∙∙∙∙∙∙∙∙∙∙∙∙∙∙∙∙∙∙∙∙∙∙∙∙∙∙∙∙∙∙∙∙∙∙∙∙∙∙∙∙∙∙∙∙∙∙∙∙∙∙∙∙∙∙∙∙∙∙∙∙∙∙∙∙∙∙∙∙∙∙∙∙∙∙∙∙∙∙∙∙∙∙∙∙ 33
Uso General
1. Después de desempacar el deshumidificador, espere 2 horas antes de utilizarlo. El sentido común y la precaución debe ser utilizada cuando la instalación, operación y
mantenimiento de cualquier electrodoméstico.
2. Este aparato debe ser utilizado sólo por personas adultas. No permita que los niños jueguen con el aparato. No deje niños solos en un área donde el aparato está en
funcionamiento. No permita que se sienten o se paren en el aparato.
3. Este aparato está diseñado para enfriar las zonas nacionales de vida, y no debe ser utilizado para otros fines. En que debe prestarse en un área cerrada para ser más eficaces.
Cierre todas las puertas, ventanas y otras aberturas al exterior de la sala para la eficacia máxima.
4. No use al aire libre.
5. Siempre retire el enchufe de la toma antes de realizar las operaciones de mantenimiento, limpieza o cuando el deshumidificador no se utiliza en durante un período prolongado.
6. No coloque objetos pesados o calientes en la parte superior del deshumidificador.
Precauciones Para el Uso
1. No almacene ni utilice gasolina, aceite, azufre u otros vapores y líquidos inflamables en las cercanías de este o cualquier otro electrodoméstico. No instale el aparato cerca de
fuentes de calor.
2. El aparato no debe ser modificado de ninguna manera. Cualquier modificación puede ser extremadamente peligroso.
3. No opere ningún aparato con un cable o enchufe dañado o después de un mal funcionamiento, o ha sido dañado de alguna manera.
4. El uso de accesorios no recomendados por el fabricante del aparato. Puede causar lesiones.
5. Para su seguridad y protección, este deshumidificador está equipado con un enchufe a tierra de tres clavijas en el cable de alimentación.
No, bajo ninguna circunstancia, corte o retire la clavija de conexión a tierra de la clavija.
6. Su deshumidificador debe conectar directamente a una toma de tierra y polarizado de tres puntas.
Si la toma de corriente no aceptará un enchufe de tres clavijas o si no está seguro de la salida está adecuadamente conectada a tierra o protegido por un retraso de tiempo de
fusible o circuito, a un electricista electricista instale un tomacorriente adecuado. No utilice un cable de extensión ni un adaptador.
7. Nunca desenchufe el deshumidificador tirando del cable de alimentación. Siempre agarre firmemente el enchufe y tire de la toma. No aplaste, doble,