1
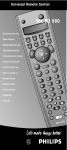
RR-949
REMOTE CONTROL
TÉLÉCOMMANDE
FERNBEDIENUNG
MANDO A DISTANCIA
COMANDO A DISTANZA
AFSTANDSBEDIENING
FJERNBETJENING
AUD
CD
TAPE
DVD
SAT
TV
VCR
CBL
POWER
VOL
BAND
MUTE
CH
T/V
PRESET TUNE PRESET
SURROUND +
ON SCREEN
GUIDE
MENU
SEARCH +
SEARCH –
PAUSE
TRACK –
PLAY
SEL
UP
TRACK +
DOWN
STOP
PRE
CH
RECALL
OPN/CLS
SUR-DELAY
1
2
3
DISC 1
DISC 2
DISC 3
MOVIE FILT
PROG
4
5
6
5.1 CH
DISC 4
DISC 5
DISC 6
TIME [REVIEW]
7
8
9
10
0
ENTER
SELECT
CLEAR [SCAN]
BACK
RANDOM [REPEAT]
CD
TUNER
AUX/V4
TAPE 1
TAPE 2
VIDEO 1
PTY
[SHIFT]
OFF
TA
AUX/V5
PHONO
VIDEO 2
VIDEO 3
TP
DISPLAY
ZONE
REC
RR-949
Owner’s Manual ............................. 2
Guide d’utilisation ........................ 10
Bedienungsanleitung .................. 20
Manual de Instrucciones ............ 30
Manuale di Istruzioni .................. 40
Gebruiksaanwijzing .................... 49
Brukermanual ............................... 58
English
RR-949
○ ○ ○ ○ ○ ○ ○ ○ ○ ○ ○ ○ ○ ○ ○ ○ ○ ○ ○ ○ ○ ○
Introduction
Thank you for purchasing the RR-949 Universal Remote
Control. It is designed to operate all current Rotel products as well as a wide range of popular audio and video
components from other manufacturers. You will find that
the RR-949 Remote Control is a significant improvement
over conventional remotes in overall convenience and
ease of operation.
AUD
CD
TAPE
DVD
1
SAT
TV
VCR
CBL
Some Preliminary Precautions
POWER
VOL
BAND
MUTE
CH
• The RR-949 is surprisingly rugged but it is not
indestructible. So please don’t drop it — particularly
not on a concrete floor! With normal care, the RR-949’s
low maintenance design will let you enjoy its convenience for years to come.
T/V
PRESET TUNE PRESET
SURROUND +
ON SCREEN
GUIDE
MENU
SEARCH +
SEARCH –
PAUSE
TRACK –
PLAY
SEL
UP
TRACK +
• When the RR-949 needs a bit of cleaning, use a soft,
lint-free damp cloth.
DOWN
STOP
PRE
CH
RECALL
OPN/CLS
2
SUR-DELAY
1
2
3
DISC 1
DISC 2
DISC 3
PROG
4
5
6
5.1 CH
DISC 4
DISC 5
DISC 6
TIME [REVIEW]
7
8
9
10
0
Battery Installation
Remove the RR-949 and the package of 4 AAA batteries
from the packing material. Turn the RR-949 over and lift
the cover off the battery compartment by compressing
the release tab and lifting up.
SELECT
ENTER
BACK
RANDOM [REPEAT]
CD
TUNER
AUX/V4
TAPE 1
TAPE 2
VIDEO 1
TA
AUX/V5
PHONO
VIDEO 2
VIDEO 3
TP
Place the four AAA batteries inside (follow the polarity
drawing on the bottom of the compartment) and replace
the cover. MAKE SURE you install the batteries correctly!
○ ○ ○ ○ ○ ○ ○ ○ ○ ○ ○ ○ ○ ○ ○ ○ ○ ○ ○ ○ ○ ○
DISPLAY
[SHIFT]
ZONE
OFF
REC
Using the RR-949
RR-949
3
2
• Above all, don’t try to take the RR-949 apart. There isn’t
anything inside you can fix anyway and disassembly
will void the warranty.
MOVIE FILT
CLEAR [SCAN]
PTY
Please take a few moments to read this user guide. You’ll
find the time well spent as it will significantly shorten
your search for remote control sanity.
The RR-949 can replace up to eight different remote controls. Stored in memory are control codes to operate your
specific audio/video components, selected from hundreds of models in the RR-949’s extensive database. Programming the RR-949 to operate your components takes
just minutes and need only be done once. See the PROGRAMMING section of this manual for easy to follow instructions.
3
English
RR-949
Once the programming is complete, you select a component with the press of a button and turn the RR-949 into
the remote control for your Rotel CD player or your Sony
TV set or your Panasonic video recorder. Then, you simply press command buttons that duplicate the functions
on the remote that came with your component.
Below the source selection button are five more command buttons: a row of four buttons used to control RDS
functions on tuners and receivers and a ZONE/REC button used for certain functions on preamplifiers, processors, and tape decks.
To operate the RR-949:
To get started, look at the layout of the RR-949 and the
following operating instructions:
Device Buttons
1
Eight buttons at the top of the RR-949 determine which
set of commands is currently active. For example, if you
press the AUDIO button (labeled AUD), the RR-949 becomes the remote control for your Rotel Surround Sound
Processor. If you press the TV button, the RR-949 becomes the remote control for your TV set.
These buttons are also used in programming the RR-949.
See the PROGRAMMING section below for details.
Command Buttons
Step Two: Press COMMAND buttons to operate the
component you have selected.
Remember that the COMMAND buttons duplicate many
controls on many different types of audio/video components and their function may vary depending on the type
of component selected. For example, the PLAY/SELECT
button engages the play mode on a CD Player, but it duplicates the SELECT function on a cable TV converter.
2
This large group of buttons duplicates the functions on
the remote controls for your audio/video components. A
general description of these functions follows. Detailed
information on the specific function of each button can
be found in the CONTROL COMMANDS tables.
At the top of this group of buttons are basic controls
such as Power, Volume, Channel Selection, etc.
Below these is a group of buttons that duplicate the
transport functions on a tape recorder or VCR (Stop,
Play, Pause, etc.) as well as the Up and Down commands
that might be found on a cable or satellite TV receiver.
The next group of buttons duplicates the numeric keypad
buttons such as might be used for direct track selection
on a CD Player or direct channel selection on a TV set.
Included in this section are special command buttons
providing functions found on various components.
Near the bottom of this group of buttons are ten round
source selection buttons labelled CD, TUNER, TAPE, etc.
These duplicate the source input selection buttons on a
receiver, preamplifier, or surround sound processor. The
function of these buttons is not the same as the DEVICE
buttons at the top of the remote control. The DEVICE buttons determine which command set is active on the
RR-949. The source select COMMAND buttons switch
inputs on the audio/video component being controlled.
4
Step One: Press a DEVICE button to activate the commands for the desired component. This command set
will remain active until you press a different DEVICE button.
Note: The RR-949 tells you which command set is active.
Each time you press a COMMAND button, the active DEVICE key blinks red to tell you which component you are
controlling. If the COMMAND button that you press has
no function in the active command set (for example, the
numeric keys in VCR mode), no DEVICE button will blink,
indicating that the COMMAND button is inactive.
The COMMAND buttons are labelled, often with multiple
labels if the button serves different purposes for different
kinds of components. As long as you remember that
pressing a DEVICE button turns the RR-949 into, for example, a CD player remote control or a VCR remote control, the functions of each button should be intuitive.
Tables listing the function of each button for each type of
component are supplied with this manual.
A few buttons have a second function, activated by
pressing and releasing the SHIFT button before pressing
the COMMAND button, as described below.
Shift Button
3
The SHIFT button activates additional commands for
some buttons. These functions are shown in italics on
the illustrations and in the command tables. To activate
one of these commands, press and release the SHIFT
button and then press the desired COMMAND button.
5
English
RR-949
○ ○ ○ ○ ○ ○ ○ ○ ○ ○ ○ ○ ○ ○ ○ ○ ○ ○ ○ ○ ○ ○
Programming
The RR-949 can replace up to eight different remote controls, one for each of the eight DEVICE buttons. Before
you use it, you must program the RR-949, i.e. tell it which
audio/video components you wish it to control.
The RR-949 contains hundreds of command sets for various A/V components. Programming the remote involves
selecting the command sets that correspond to the components in your system, and assigning them to the eight
DEVICE buttons by entering a three digit code. This need
only be done once during initial set-up of the RR-949.
The easiest way to proceed is to find your components
and corresponding three-digit codes from the list of
codes supplied with this manual. If your component is
not listed, there is an alternative auto-search method for
finding the right command set.
Step Five: Test the COMMAND buttons, using the tables
as a reference for the available functions. If the functions
do not work correctly, repeat the above steps, with the
next available 3-digit code from the list for your brand of
component.
Repeat the steps above for each of up to eight components, assigning each one to the appropriate DEVICE key.
Auto-Search Programming
If the code table does not provide a 3-digit code or if
none of the code numbers assigned to your brand of
component work, use the following auto-search method
to find a code number that will operate your components.
Step One: Turn on the component you wish to operate.
Step Two: Press the corresponding DEVICE button and
the MUTE button, simultaneously for one second or
more. The LED will light for 20 seconds.
Three Digit Code Programming
Find your audio/video component in the code list and
note the 3-digit code(s):
Step One: Turn on the component you wish to memorize.
Step Two: Press the corresponding DEVICE button (for
example, if you are memorizing the command set for a
CD player, press the CD DEVICE button at the top of the
RR-949). While pressing the DEVICE button, simultaneously press the MUTE button and hold both for at least
one second. The DEVICE key will light in red for 20 seconds, indicating that you have entered the program
mode. The next step must be done within this 20 second
period, or the RR-949 will revert to its standard operating
mode.
Step Three: Point the RR-949 at the audio/video component and enter the 3-digit code, using the numeric buttons. The DEVICE key will flash each time you enter a
digit. If you have entered the correct code, the component will turn off. If there is more than one 3-digit code
for your brand of source component, continue entering
additional 3-digit codes from the list until the component
turns off, indicating that you have found the right one.
Step Four: Store the code number by pressing the corresponding DEVICE button again. The button will blink
twice to confirm the storage of the code in memory.
6
Step Three: Press and hold the CH UP or CH DOWN button. This sends a succession of Power ON/OFF code signals that are stored in memory. Stop pressing the CH
button as soon as the component turns off, signifying that
you have found a code set that operates that component.
Step Four: Press the DEVICE button to store the code set
you have found. The button will blink twice to confirm
that you have stored the code.
Step Five: Test the remote control functions. If any do not
work properly, repeat the preceding steps until you find
the right code.
Displaying a Code Number
To find out which 3-digit code is currently stored on a DEVICE button:
Step One: Press the DEVICE button and the MUTE button
simultaneously for one second or more. The DEVICE button will light red for 20 seconds.
Step Two: Press the RECALL button. The DEVICE button
will blink a number of times, indicating the first digit in the
code, followed by a one second interval with the light off,
followed by a number of blinks indicating the second
digit, followed by another interval, followed by blinks indicating the third digit. For example, one blink, three
blinks, and eight blinks, with one second intervals in between, represents the 3-digit code number 138.
7
RR-949
English
Note: The number ZERO in a 3-digit code is represented
by 10 blinks.
Step Two: Press the DEVICE button corresponding to the
command set you wish to transfer in order to access the
command sets for that type of component.
○ ○ ○ ○ ○ ○ ○ ○ ○ ○ ○ ○ ○ ○ ○ ○ ○ ○ ○ ○ ○ ○
Step Three: Enter the 3-digit code for the audio/video
component you wish to transfer.
Volume Punch Through
It may be desirable to have the AUDIO or TV volume
commands available at all times. For example, when using the RR-949 to control your CD player, you might want
the VOLUME buttons (which would normally be inactive
in CD mode) to change the volume of your preamp or surround sound processor. This feature, called Volume
Punch Through, can be used to make the volume commands from either the AUDIO or TV device mode available in other device modes.
Step Four: Press the DEVICE button where you wish to
store the command set. It will blink twice to confirm.
Example: To store CD commands on the SAT DEVICE button, press the SAT DEVICE button in Steps One and Four.
Press the CD DEVICE button in Step Two.
To set-up the Volume Punch Through feature:
Step One: Press the DEVICE button (the device you wish
to transfer the volume function to) and the MUTE button
simultaneously for at least one second.
Step Two: Press the VOLUME UP button.
Step Three: Press the AUDIO or TV DEVICE button (the
device you wish to transfer the volume function from).
The DEVICE button will blink twice to confirm.
Example: To have the AUDIO volume command prevail in
the VCR mode, press the VCR DEVICE button in Step One
and the AUDIO DEVICE button in Step 3.
○ ○ ○ ○ ○ ○ ○ ○ ○ ○ ○ ○ ○ ○ ○ ○ ○ ○ ○ ○ ○ ○
Mapping a Component to
Another Device Button
In some systems, you may need to program one command set to another DEVICE button. For example, if you
have two CD players, you may wish to use the SAT DEVICE button to store and activate commands for a second CD player. To reassign device codes to another
button:
Step One: Press the new DEVICE button where you wish
to store the command set and the MUTE button simultaneously for at least one second.
8
9
Norsk
RR-949
○ ○ ○ ○ ○ ○ ○ ○ ○ ○ ○ ○ ○ ○ ○ ○ ○ ○ ○ ○ ○ ○
Voorbeeld: Om cd-speler commando’s over te zetten
naar de SAT-functie, drukt op de APPARATEN-toets SAT
in stappen 1 en 4 en op CD in stap 2.
Innledning
Takk for at du valgte Rotels universelle fjernbetjening
RR-949! Den er designet for å kunne betjene alle
nåværende Rotel-produkter samt et stort utvalg av
aktuelle audio- og videoprodukter fra andre produsenter.
Med sin enkle og komfortable betjening representerer
RR-949 et betydelig fremskritt i produksjonen av
fjernbetjeninger.
Noen forhåndsprosedyrer
• RR-949 er ekstremt solid og robust, men det er likevel
mulig å skade den. Derfor bør du unngå å slippe
fjernbetjeningen i gulvet - spesielt hvis du befinner deg
på et betonggulv! Ved normal og fornuftig bruk , vil
RR-949 - med sin vedlikeholdsfrie konstruksjon - gi
mange års nytte og glede.
• Når behovet for renhold av RR-949 oppstår, bør du
tørke av fjernbetjeningen med en myk, fuktig klut som
ikke loer.
• Fremfor alt: Ikke prøv å demonter RR-949! Du kan ikke
reparere noe inni denne fjernbetjeningen. Skulle du
likevel eksperimentere med demontering på egen
hånd, kan dette medføre at garantien ikke lenger er
gyldig.
Installasjon av batterier
Ta bort all emballasje før du fjerner dekselet på
fjernbetjeningens bakside ved å trykke i anvist retning.
Plasser så de fire batteriene i RR-949 (i henhold til
polaritet-anvisningen som er tegnet i bunnen av
batterirommet) før du setter dekselet på plass igjen. Du
bør FORSIKRE deg om at du har installert batteriene
korrekt!
○ ○ ○ ○ ○ ○ ○ ○ ○ ○ ○ ○ ○ ○ ○ ○ ○ ○ ○ ○ ○ ○
Bruk av RR-949
RR-949 kan erstatte opp til åtte forskjellige
fjernbetjeninger. Den har kontrollkoder lagret i
hukommelsen som gjør at den kan betjene audio/video
komponentene dine. Disse kodene velges ut fra de
mange hundre modellene som er i den meget omfattende
databasen i RR-949. Det tar kun noen få minutter å
programmere RR-949 til å betjene komponentene dine,
og dette trenger du å gjøre kun én gang. Se kapittelet om
«Programmering» for enkel veiledning i
programmeringsfunksjonene.
48
49
Norsk
RR-949
Når programmeringsoperasjonen er gjennomført, kan du
velge en komponent ved å trykke på en enkelt knapp på
fjernbetjeningen - da kan RR-949 betjene din Rotel CDspiller, Sony TV eller Panasonic videospiller. Nå kan du
duplisere funksjonene på den fjernbetjeningen som
fulgte med apparatet ditt, og disse funksjonene overføres
til RR-949.
For å komme i gang, bør du se på utformingen av RR-949
samt følgende betjeningsinstrukser:
Apparatknapper (DEVICE-knapper)
1
Kildevalgsknappene har ikke samme funksjon som
apparatknappene på toppen av fjernbetjeningen.
Apparatknappene avgjør hvilke kommandoer som er
aktive på RR-949, mens du med kildevalgsknappene kan
veksle mellom inngangene på de ulike audio/
videoproduktene.
Below the source selection button are five more command buttons: a row of four buttons used to control RDS
functions on tuners and receivers and a ZONE/REC button used for certain functions on preamplifiers, processors, and tape decks.
Det er de åtte knappene på toppen av RR-949 som avgjør
hvilket sett av kommandoer som til enhver tid er aktive.
For eksempel vil det å trykke på AUDIO-knappen (som er
merket med AUD), medføre at RR-949 blir fjernbetjening
for surroundprosessoren din, mens det å trykke på TVknappen gjør at RR-949 kan fjernbetjene TV-en din.
For å betjene RR-949:
Disse knappene benyttes også for å programmere
RR-949. Se kapittelet om «Programmering» for flere
detaljer.
2. Trykk på kommandoknapper («COMMAND») for å
betjene den komponenten du har valgt.
Kommandoknapper
2
Denne store gruppen av knapper dupliserer funksjonene
på de fjernbetjeningene som fulgte med audio/videoapparatene dine. Du finner en detaljert beskrivelse av
hver enkelt funksjon i tabellen «Rotel
kontrollkommandoer». Her følger en generell beskrivelse
av kommandoknappene:
Øverst på denne gruppen av knapper, finner du
basiskontrollene - som for eksempel av/på, volum og
kanalvalg.
Under basiskontrollene, er det en gruppe knapper som
dupliserer transportfunksjonene på en kassett- eller
videospiller (stopp, spill og pause) samt de opp/ned
funksjonene som ofte befinner seg på en kabel- eller
satellitt-TV mottaker.
Den neste gruppen knapper dupliserer de numeriske
knappene som brukes for direkte valg av spor på en CDspiller eller direktevalg av kanal på en TV. I denne
gruppen er det også inkludert spesielle
kommandoknapper som gir tilgang til ulike funksjoner
som befinner seg på forskjellige audio/video apparater.
1. Trykk på en apparatknapp («DEVICE») for å aktivere
kommandoene for den ønskede komponenten. Denne
kommandofunksjonen vil forbli aktiv inntil du trykker på
en annen apparatknapp.
Vær klar over at COMMAND-knappene dupliserer
mange kontroller på flere forskjellige apparater, og at
funksjonene derfor kan variere avhengig av hvilket
apparat du betjener. For eksempel vil det å trykke på
PLAY/SELECT-knappen få en CD-spiller til å starte
avspilling av CD-er mens den vil duplisere
valgfunksjonen på en kabel TV-konverter.
NB: RR-949 forteller deg hvilke kommandoer som er
aktive. Hver gang du trykker på en kommandoknapp, vil
den aktive apparatknappen blinke rødt for å fortelle deg
hvilken komponent du betjener. Dersom den
kommandoknappen du trykker på ikke har noen funksjon
på det apparatet du betjener, vil det ikke blinke noen
apparatknapp. Dette indikerer at kommandoknappen er
inaktiv.
Kommandoknappene er merket, ofte med flere
betegnelser dersom knappen har ulike funksjoner
avhengig av hvilket apparat som betjenes. Så lenge du er
klar over at det å trykke på en apparatknapp gjør RR-949
til betjening for f.eks. en CD-spiller, et TV-apparat eller en
videospiller, bør funksjonene av hver enkelt knapp være
selvforklarende. Bakerst i denne brukermanualen finner
du en tabelloversikt over samtlige funksjoner for hver
enkelt knapp og for hver enkelt type komponent.
Nederst i denne gruppen av knapper finner du ti runde
knapper for kildevalg som er merket med CD, TUNER,
TAPE osv. Disse dupliserer valgene av kildeinnganger på
en receiver, forforsterker eller surroundprosessor.
50
51
Norsk
RR-949
Noen få knapper har en sekundær funksjon, som kan
aktiveres ved at du trykker på (og slipper!) SHIFTknappen før du trykker på kommandoknappen. Dette er
beskrevet i kapittelet «Spesialknapper».
Spesialknapper
3
SHIFT-knappen aktiverer ytterligere kommandoer for
enkelte knapper. Disse funksjonene er omtalt med kursiv
skrift i illustrasjonene samt i tabellen. For å aktivere en av
disse kommandoene, trykk på og slipp SHIFT-knappen før
du trykker på den ønskede kommandoknappen.
○ ○ ○ ○ ○ ○ ○ ○ ○ ○ ○ ○ ○ ○ ○ ○ ○ ○ ○ ○ ○ ○
Programmering
Med RR-949 kan du erstatte opp til åtte forskjellige
fjernbetjeninger - en for hver av de åtte
apparatknappene. Før du bruker fjernbetjeningen, må du
programmere den, det vil si at du velger hvilke audio/
video-komponenter RR-949 skal betjene.
RR-949 inneholder hundrevis av kommandosett for ulike
audio/video-enheter. Det å programmere
fjernbetjeningen involverer også valg av kommandoer
som korresponderer med komponentene dine og å knytte
dem til de åtte apparatknappene ved å angi en 3-sifret
digital kode. Dette gjøres en gang for alle når du
programmerer RR-949 for første gang.
Den enkleste fremgangsmåten er å finne din komponent
og den korresponderende 3-sifrede koden i listen over
koder helt bakerst i denne brukermanualen. Hvis du ikke
finner enheten din på denne listen, er det en alternativ
automatisk søkemetode for å finne det korrekte
kommandosettet.
trinn i prosedyren må gjennomføres i løpet av 20
sekunder, ellers vil RR-949 vende tilbake til sin standard
betjenings-stilling.
3. Rett RR-949 mot audio/videokomponenten og tast inn
den 3-sifrede koden ved å bruke nummerknappene.
Apparatknappen («DEVICE») vil lyse hver gang du taster
et siffer. Hvis du taster riktig kode, vil komponenten slå
seg av. Dersom det finnes mer enn en 3-sifret kode for
det audio/video-merket du har, må du fortsette å taste 3sifrede koder fra tabellen inntil komponenten slår seg av
- noe som indikerer at du har funnet den riktige koden.
4. Du kan lagre den riktige koden ved å trykke på de
korresponderende apparatknappen en gang til. Knappen
vil da blinke to ganger som en bekreftelse på at den
riktige koden er lagret i minnet.
5. Du tester kommandoknappene, ved å bruke tabellen
som en referanse for funksjonene som er tilgjengelige.
Dersom funksjonene ikke virker som de skal, bør du
repetere prosedyren over - og benytte den neste
tilgjengelige koden fra listen over det audio/video
varemerket du har.
Gjenta trinnene fra 1 til 5 for hvert av de opp til åtte
komponentene du ønsker å betjene med RR-949. Hvert av
apparatene bør korresponderes til en passende
apparatknapp.
Auto-søk programmering
Dersom det ikke står angitt noen 3-sifret kode i tabellen
eller hvis ingen av de kodene som står oppgitt i tabellen
virker på din type komponent, bør du bruke følgende
automatiske søkemetode for å finne en kode som gjør at
RR-949 kan betjene komponentene dine.
3-sifret kodeprogrammering
1. Slå på den komponenten du ønsker å betjene.
Finn dine audio/videokomponenter i tabellen bakerst og
noter de 3-sifrede kodene for dine apparater:
1. Slå på den komponenten du ønsker å lagre i
fjernbetjeningens minne.
2. Trykk på den korresponderende apparatknappen
(«DEVICE»). Hvis du for eksempel ønsker å lagre
kommandofunksjonene for en CD-spiller, trykker du på
CD DEVICE øverst på RR-949. Mens du trykker på
apparatknappen, holder du samtidig inne MUTEknappen. Begge knappene bør holdes inne i minst ett
sekund. Apparatknappen vil lyse rødt i 20 sekunder - noe
som indikerer at du nå er inne i program-stilling. Neste
52
2. Trykk på den korresponderende apparatknappen
(«DEVICE») og MUTE-knappen samtidig i ett sekund eller
mer. Fjernbetjeningen vil lyse i 20 sekunder.
3. Trykk og hold inne kanal opp eller kanal ned - knappen
(«CH UP» eller «CH DOWN»). Dette sender en serie av
Power på/av kodesignaler som er lagret i
fjernbetjeningens minne mot komponenten du ønsker å
betjene. Når komponenten slår seg av er dette en
indikasjon på at du har funnet den riktige koden og du
kan slutte å trykke på kanal opp/kanal ned knappen.
53
Norsk
RR-949
4. Trykk på apparatknappen for å lagre den koden du har
funnet. Knappen vil blinke to ganger som en bekreftelse
på at du har lagret den riktige koden.
1. Trykk på DEVICE-knappen (det apparatet som du
ønsker å overføre volumfunksjonen til) og MUTEknappen samtidig i minst ett sekund.
5. Nå kan du teste fjernbetjeningsfunksjonene. Hvis noen
av dem ikke virker slik de skal, bør du repetere
prosedyren som er beskrevet ovenfor inntil du finner den
korrekte koden for din komponent.
2. Trykk på VOLUME UP-knappen
Å vise sifferkoden i displayet
For å finne ut hvilken 3-sifret kode som er lagret i
DEVICE-knappen til enhver tid, anbefales følgende
fremgangsmåte:
1. Trykk på DEVICE- og MUTE-knappen samtidig i minst
ett sekund. DEVICE-knappen vil da lyse rødt i 20
sekunder.
2. Trykk på RECALL-knappen. DEVICE-knappen vil da
lyse rødt et gitt antall ganger som indikerer det første
sifferet i koden etterfulgt av et intervall på et sekund uten
lys, etterfulgt av et gitt antall blink som angir det andre
sifferet i koden og deretter et intervall uten lys, etterfulgt
av den tredje serien med blink som indikerer kodens
tredje og siste siffer.
Eksempelvis vil ett, tre og åtte lysblink med et sekunds
mørke imellom representere kodenummeret 138.
NB: Nummeret 0 (null) angis ved hjelp av 10 blink i den 3sifrede koden.
○ ○ ○ ○ ○ ○ ○ ○ ○ ○ ○ ○ ○ ○ ○ ○ ○ ○ ○ ○ ○ ○
Volum gjennomslag
Det kan være ønskelig å ha volumkommandoene for
audio- og TV/video-apparatene tilgjengelige til enhver
tid. For eksempel er det praktisk å kunne endre
volumnivået på forforsterkeren eller surrounddekoderen
mens du benytter RR-949 til å betjene CD-spilleren
(Volumknappen vil normalt være inaktiv når RR-949
betjener CD-spilleren). Denne finessen som kalles volum
gjennomslag («Volume Punch Through»), kan benyttes
for å foreta justeringer av volumet på de audio- og video
komponentene som er tilgjengelig på fjernbetjeningens
apparatknapper.
For å benytte deg av volum gjennomslags finessen, kan
du benytte følgende fremgangsmåte:
54
3. Trykk på AUDIO eller TV DEVICE knappen (det
apparatet som du ønsker å overføre volumfunksjonen
fra). DEVICE-knappen vil blinke to ganger som en
bekreftelse på at overføringen er vellykket.
Eksempel: For at AUDIO volumet skal virke når RR-949 er
i VCR-stilling (videospiller), trykker du på VCR DEVICEknappen i 1. trinn og AUDIO DEVICE i 3. trinn (se den
trinnvise forklaringen over).
○ ○ ○ ○ ○ ○ ○ ○ ○ ○ ○ ○ ○ ○ ○ ○ ○ ○ ○ ○ ○ ○
Å legge en komponents
apparatkoder til en alternative
DEVICE-knapp
I noen systemer vil det kanskje være behov for å
programmere en kommando som du legger til en annen
DEVICE-knapp enn det som er naturlig. Hvis du for
eksempel har to CD-spillere, kan det være praktisk å
programmere og lagre betjeningskommandoene til din
andre CD-spiller under SAT DEVICE- knappen. For å
knytte apparatkoder til en annen knapp enn det som er
naturlig korresponderende, kan du gjøre følgende:
1. Trykk på den nye DEVICE-knappen hvor du ønsker å
lagre kommandoene og MUTE-knappen samtidig i minst
ett sekund.
2. Trykk på den DEVICE-knappen som korresponderer
med de kommandoene du ønsker å overføre. Dette gir
deg tilgang til kommandoene den typen komponenter
(f.eks. CD-spillere) har.
3. Tast inn den 3-sifrede koden for den audio/video
komponenten du ønsker å overflytte til en annen
apparatknapp.
4. Trykk på den DEVICE-knappen hvor du ønsker å lagre
kommandoene. Knappen vil blinke to ganger som en
bekreftelse på at overføringen er gjennomført.
Eksempel: For å lagre CD-kommandoer under SAT DEVICE-knappen, trykker du på SAT DEVICE-knappen i 1. og
4. trinn, mens du trykker på CD DEVICE-knappen i 2. trinn.
55
RR-949
REMOTE CONTROL
TÉLÉCOMMANDE
FERNBEDIENUNG
MANDO A DISTANCIA
COMANDO A DISTANZA
AFSTANDSBEDIENING
FJERNBETJENING
The Rotel Co. Ltd.
10-10 Shinsen-Cho
Shibuya-Ku
Tokyo 150-0045
Japan
Phone: +81-3-5458-5325
Fax: +81-3-5458-5310
Rotel of America
54 Concord Street
North Reading, MA 01864-2699
USA
Phone: +1 978-664-3820
Fax: +1 978-664-4109
Rotel Europe
Meadow Road
Worthing, West Sussex BN11 2RX
England
Phone: +44 (0)1903 524 813
Fax: +44 (0)1903 524 831
Rotel Deutschland
Kleine Heide 12
D-33790 Halle/Westf.
Germany
Phone: +49 5201-87170
Fax: +49 5201-73370
082 OMRR-949 121398