1
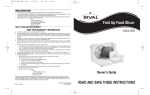
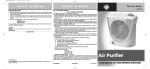
227505EM1 V.qxd
6/25/05
8:22
Page 1
SERVICE INSTRUCTIONS
2275
1. Do NOT attempt to repair or adjust any electrical or mechanical functions on this unit. Doing so will void the Warranty.
2. If you need to exchange the unit, please return it in its original carton, with a sales receipt, to the store where you
purchased it. If you are returning the unit more than 30 days after the date of purchase, please see the enclosed Warranty.
3. If you have any questions or comments regarding this unit’s operation or believe any repair is necessary, please write to our
Consumer Service Department or visit our website at www.rivalproducts.com
RIVAL
c/o THE HOLMES GROUP, INC.
CONSUMER SERVICE DEPARTMENT
13052 JURUPA AVENUE
FONTANA, CA 92337
ONE (1) YEAR LIMITED WARRANTY
Food Grinder
SAVE THIS WARRANTY INFORMATION
A. This Warranty applies only to the original purchaser of this product.
B. This Warranty applies ONLY to repair or replacement of any supplied or manufactured parts of this product that,
upon inspection by The Holmes Group, Inc. authorized personnel, is shown to have failed in normal use due to
defects in material or workmanship. The Holmes Group will determine whether to repair or replace the unit. This
Warranty does not apply to installation expenses.
C. Operating this unit under conditions other than those recommended or at voltages other than the voltage
indicated on the unit, or attempting to service or modify the unit, will render this WARRANTY VOID.
D. Unless otherwise proscribed by law, The Holmes Group shall not be liable for any personal injury, property or any
incidental or consequential damage of any kind resulting from malfunctions, defects, misuse, improper
installation or alteration of this product.
E. All parts of this product are guaranteed for a period of 1 year as follows:
1. Within the first 30 days from date of purchase, the store from which you purchased your product should
replace this product if it is defective in material or workmanship (provided the store has in-stock
replacement.) * If you intend to assert any claim in connection with the product, please follow the
instructions in paragraph F.
2. Within the first twelve months from date of purchase, The Holmes Group will repair or replace the product if
it is defective in material or workmanship, subject to the conditions in paragraph G.
F. If you have any other problem or claim in connection with this product, please write to our Consumer Service
Department.
G. IMPORTANT RETURN INSTRUCTIONS. Your Warranty depends on your following these instructions if you are
returning the unit to The Holmes Group, Inc.:
1. Carefully pack the item in its original carton or other suitable box to avoid damage in shipping.
2. Before packing your unit for return, be sure to enclose:
a) Your name, full address with zip code and telephone number,
b) A dated sales receipt or PROOF OF PURCHASE,
c) A check for return prepaid shipping and handling, and
d) The model number of the unit and the problem you are having. (Enclose in an envelope and tape directly to
the unit before the box is sealed.)
3. The Holmes Group recommends you ship the package U.P.S ground service for tracking purposes.
4. All shipping charges must be prepaid by you.
5. Mark the outside of your package:
RIVAL
c/o THE HOLMES GROUP, INC.
13052 JURUPA AVENUE
FONTANA, CA 92337
This Warranty gives you specific legal rights, and you may have other rights may vary by jurisdiction. The provisions of this
Warranty are in addition to, and not a modification of, or subtraction from, the statutory warranties and other rights and
remedies contained in any applicable legislation. To the extent that any provision of this Warranty is inconsistent with any
applicable law, such provision shall be deemed voided or amended, as necessary, to comply with such law.
Printed in China
2275/9100270000013
227505EM1
Owner’s Guide
READ AND SAVE THESE INSTRUCTIONS
227505EM1 V.qxd
6/25/05
8:22
Page 3
IMPORTANT SAFEGUARDS
When using electrical appliances, basic safety precautions should always
be followed, including the following:
1. Read all instructions before using.
2. To protect against the risk of electrical shock, do not immerse the
power unit, cord or plug in water or other liquid.
3. Close supervision is necessary when any appliance is used by or near
children.
4. Unplug from outlet when not in use, before putting on or taking off
parts, and before cleaning.
5. Avoid contacting moving parts. Never feed food by hand.
NOTE: ALWAYS USE THE FOOD PUSHER.
6. Do not operate any appliance with a damaged cord or plug, or after
appliance malfunctions, or is dropped or damaged in any manner.
Return appliance to the nearest authorized service facility (see
warranty) for examination, repair or electrical or mechanical
adjustment.
7. The use of attachments not recommended or sold by Rival® may
cause fire, electric shock or injury.
8. Do not use outdoors.
9. Do not let cord hang over edge of table or counter or touch hot
surfaces, including the stove.
10. To avoid the risk of cut type injury, do not use fingers to scrape food
away from the discharge disc while appliance is operating.
SAVE THESE INSTRUCTIONS
This appliance is for HOUSEHOLD USE ONLY. No user-serviceable parts inside.
Power Unit never needs lubrication. Do not attempt to service this product.
Do not immerse power unit, cord or plug in water or other liquid.
POLARIZED PLUG
This appliance has a polarized plug (one blade is wider than
the other). As a safety feature, this plug will fit in a
polarized outlet only one way. If the plug does not fit fully
in the outlet, reverse the plug. If it still does not fit, contact a
qualified electrician. Do not attempt to defeat this safety feature.
KNOW YOUR FOOD GRINDER
food platform
chopping cutter
grinding cutter
grinding chute
ring collar
power unit
feed screw
on/off switch
rotary cutter
knife
wrench
spring
food pusher
sausage stuffer
-2-
-3-
227505EM1 V.qxd
6/25/05
8:22
Page 5
HOW TO DETERMINE WHICH CUTTER TO USE
These are only a few suggestions. Choose the cutter to fit your personal tastes or
recipes.
GRINDING CUTTER
For finely ground texture: to make pâtés, spreads, hamburger, chopped liver,
baby food, etc.
CHOPPING CUTTER
For coarsely ground texture: vegetables, coarsely chopped beef for chili or soups,
relishes, etc.
HOW TO ASSEMBLE YOUR FOOD GRINDER
NOTE: Before using first time,
disassemble and wash GRINDING
CHUTE parts thoroughly. See page 5
for cleaning instructions.
1. Hold GRINDING CHUTE as
shown. Insert FEED SCREW into
GRINDING CHUTE (fig. 1).
2. Slide spring over shaft and into
fig. 2
fig. 3
fig. 1
end of FEED SCREW (fig. 2).
3. Place the ROTARY CUTTER
KNIFE on FEED SCREW SHAFT
so that the sharp edge is toward
the CHOPPING CUTTER DISC.
Be sure KNIFE rests fully on
SPRING (fig. 3).
4. Place either the grinding or
fig. 5
fig. 6
CHOPPING CUTTER DISC on fig. 4
shaft. ”Ears” of cutter must fit in notches of GRINDING CHUTE (fig. 4).
5. Screw RING COLLAR until tight against CUTTERS. If it binds, back up and start
again until COLLAR screws on easily. The last turn is harder as the SPRING is
compressed (fig. 5). NOTE: when properly assembled, SHAFT will protrude
from CUTTER DISC. If not tightened securely, unit will not grind properly. Use
WRENCH to tighten if necessary.
-4-
6. Slide FOOD PLATFORM snugly onto GRINDING
CHUTE. Do not operate without FOOD PLATFORM
in place (fig. 6).
7. Place GRINDING CHUTE at a right angle to POWER
UNIT and insert shaft as shown. You can feel
GRINDING CHUTE fit into place. Rotate GRINDING fig. 7
CHUTE into position as far as it will go (fig. 7).
NOTE: GRINDING CHUTE will not fit snugly if BLACK GASKET encircling shaft
is not in place.
HOW TO USE YOUR FOOD GRINDER
1. Position on counter. Plug into 120 volt AC outlet.
2. Place shallow wide bowl under GRINDING CHUTE to catch food.
3. Cut food into strips or cubes just smaller than the opening on GRINDING CHUTE.
4. Turn motor on. (NOTE: Always turn grinder “ON” before adding food.)
5. Place food onto FOOD PLATFORM. Feed food into the GRINDING CHUTE with
the FOOD PUSHER slowly and evenly. Most food will feed into grinder without
force.
If pressure is required, use FOOD PUSHER. Push gently – do not force.
CAUTION: Do not feed by hand. Use the FOOD PUSHER provided. Keep fingers
away from the CUTTERS while operating.
HOW TO CLEAN YOUR FOOD GRINDER
• CAUTION: Always unplug power unit when not in use, before inserting or
removing parts, and before cleaning.
• CAUTION: Never immerse power unit in water. Wipe with a damp cloth.
1. With unit unplugged, remove GRINDING CHUTE from power unit by turning
slightly to the right. Pull GRINDING CHUTE out.
2. Unscrew RING COLLAR. Remove CUTTER DISC, ROTARY CUTTER KNIFE,
SPRING and FEED SCREW from the GRINDING CHUTE SHAFT.
3. Wash these components, including GRINDING CHUTE, in hot soapy water.
Rinse and dry thoroughly. Parts should not be washed in dishwasher.
4. The CUTTER DISCS and CUTTER KNIFE should be coated with cooking oil after
washing to keep them lubricated and rust free.
-5-
227505EM1 V.qxd
6/25/05
8:22
Page 7
TIPS
• Raw meat or fish should be thoroughly chilled before grinding for minimum
loss of juices. During extensive grinding, fats from meats can build up inside
GRINDING CHUTE, slowing down the grinding efficiency and loading motor.
Stop the grinder, remove the GRINDING CHUTE, wash parts in hot water and
reassemble.
• Be sure food is free of bone, tough tendon, nut shells, etc., before grinding.
• Freshly ground meat should be refrigerated and cooked within 24 hours.
• Handle ground meat lightly to avoid packing it. To divide into even servings,
shape into balls first, then gently flatten these to the desired thickness. If you
season the patties when turning them, or after cooking, you will avoid the
packing that comes from working the seasoning into the raw ground meat.
Patties may be broiled or pan broiled with equal success. Do not flatten patties
in the pan with spatula – this removes desirable juices from the meat.
• When cooking extra-lean meat, a little fat or liquid (such as suet, eggs,
evaporated milk) will increase the meat flavor and juiciness, and make it more
tender. Proportions: 2 eggs, 4 tablespoons of evaporated milk or ground suet
for each pound or ground meat.
• For chili, use chopping cutter to coarsely grind beef. Flavor and texture of chili
as well as hamburger casseroles and soups, are greatly improved using coarsely
ground meat.
• Good quality beef, freshly ground and used at once, needs only light shaping.
You may wish to add some freshly ground onions or chives for additional
flavor.
-6-
THE RECIPES
PECAN-CHEESE BALL
1 package (8-oz.) sharp cheddar cheese 1 small onion
1 package (3- to 4-oz.) Roquefort cheese 1 teaspoon garlic salt
1
⁄2 to 3⁄4 cup chopped pecans
Cut cheese and onion in to small cubes and grind using grinding cutter. Sprinkle
with salt and mix thoroughly. Chill. Shape into a ball and roll in chopped pecans.
Serve with crackers. Yield: 1 cheese ball
FRESH CRAN-APPLE RELISH
2 cups fresh cranberries
2 apples, quartered and cored
1 orange, cut in eighths and seeded (do not
not remove peel)
1
⁄2 cup to 1 cup sugar (optional)
Grind fruits using either cutting disc. Alternate cranberries with apples and
oranges. Add sugar to taste. Chill thoroughly before serving. Makes 5 to 6 cups.
SAUCY HAMBURGER STEAKS
11⁄2 pounds boneless beef chuck roast
1/2 small onion
2 cans (10-oz.) cream of mushroom soup
1 to 2 tablespoons prepared mustard
4 teaspoons Worcestershire sauce
2 teaspoons horseradish
2 eggs, slightly beaten
3
⁄4 cup dry bread crumbs
1 tablespoon dried parsley flakes
Grind beef and onion using grinding cutter; set aside. Combine soup, mustard.
Worcestershire sauce and horseradish to form a smooth sauce. Remove 1/3 cup sauce
and combine with ground beef and onions. Add eggs, bread crumbs and parsley. Shape
into 8 patties. In a large skillet over medium heat, brown patties on both sides
(approximately 5 minutes per side). Remove patties. Pour off excess grease. Return
patties to skillet. Spoon sauce over each. Cover and allow to simmer 10 to 15 minutes,
turning and basting occasionally with sauce. Serve “steaks” with gravy over rice, noodles
or potatoes if desired. Makes 8 servings.
-7-
227505EM1 V.qxd
6/25/05
8:22
Page 9
CHEESY MEATLOAF
HOW TO USE YOUR SAUSAGE STUFFER
1
4 slices fresh bread
⁄2 teaspoon dried oregano
2 pounds boneless beef chuck roast
1 clove garlic, minced
1
⁄2 cup tomato juice
8 thin slices, cooked ham
2 eggs, beaten
11⁄2 cups (6-oz.) shredded mozzarella cheese
1
⁄2 cup chili sauce
1 tablespoon dried parsley
Grind bread using grinding cutter. Grind beef using grinding cutter. Combine
ground beef and bread crumbs with tomato juice, eggs, parsley flakes, oregano
and garlic. Pat out mixture on waxed paper into a rectangle as for a jelly roll.
Layer ham slices on top and sprinkle with cheese. Roll up and place seam side
down in a lightly greased 9 x 13-inch baking pan. Bake at 350° F for 1 hour. Pour
chili sauce over top of meatloaf. Bake 15 minutes. Makes 8 servings.
food platform
grinding chute
feed screw
rotary knife
chopping cutter
sausage stuffer
MEXICAN SALSA
1 medium onion, cut into pieces
4 medium tomatoes,
cut into small pieces
1 clove garlic
1
⁄2 teaspoon salt
1 tablespoon vegetable oil
1 tablespoon chili powder (optional)
Grind onion, tomatoes and garlic, using chopping cutter. In saucepan, combine
tomato mixture with remaining ingredients. Cook and stir over medium heat 10
minutes or until sauce is slightly thickened.
ring collar
spring
TO ATTACH SAUSAGE STUFFER
1. Insert feed screw into GRINDING CHUTE.
2. Slide spring over SHAFT and into end of FEED SCREW.
3. Place ROTARY KNIFE so that the sharp edge is next to the CHOPPING CUTTER
DISC.
4. Place SAUSAGE STUFFER through RING COLLAR. Screw RING COLLAR onto
GRINDING CHUTE.
5. To place GRINDING CHUTE on power unit, insert GRINDING CHUTE at slight
angle to the right and rotate it to the left into an upright position.
TO PREPARE MEATS AND CASINGS
1. To make link sausages, you will need casings (either natural or synthetic) which
may be purchased from a wholesale meat market, pork butcher, or your local
meat market. If purchased dry, casings should be soaked briefly in acidulated
water (2 cups water to 1 tablespoon vinegar).
-8-
-9-
227505EM1 V.qxd
6/25/05
8:22
Page 11
2. Meats must be ground and seasoned before making sausage links. Assemble
grinder using CHOPPING CUTTER. (If you prefer a very fine texture, use
GRINDING CUTTER).
TO STUFF CASINGS
1. Cut casing into 2 to 3 foot lengths.
2. Pull and gather all of casing over stuffer except the last four inches. Place
seasoned meat in GRINDING CHUTE. With FOOD PUSHER press mixture
through grinder. Stuff casing loosely as some will expand during cooking. As
casing begins to fill, tie securely at end with string.
3. Distribute meat through casing and twist into links as it fills to obtain desired
size and shape.
SAUSAGE PREPARATION
• Salt may affect flavor of sausage for long periods in freezer. If salt is added, plan
to use sausage in short time. Without salt, sausage may be stored for as long as
6 months in your freezer.
• Prick casing with a pin to allow air to escape while stuffing.
• Sausage made from fresh pork (not pre-cooked or smoked) should be stored in
the refrigerator in an air tight container for a maximum of 2 days. It should
always be thoroughly cooked before serving. To freeze sausage, wrap carefully
in moisture- and vapor-proof paper and use within 2 to 3 months.
GRILLING
Cover sausage links with water in a skillet. Bring water to a boil; remove from
heat. Let stand 10 minutes. Brush with butter or margarine. Cook links over wellburned down charcoals, turning frequently until browned and well done.
SAUSAGE RECIPE
OLD-TIME SAUSAGE
2 to 4 tablespoons salt
2 teaspoons thyme
1 to 2 tablespoons freshly ground
3/4 teaspoon crushed red pepper
black pepper
10 pounds fresh pork (about 20% fat)
1 to 2 tablespoons sage
Cut the pork into cubes before grinding. Mix thoroughly with spices. Grind using
either cutter depending on desired fine or coarse texture. Stuff sausage mixture
into casings. Twist into links of desired lengths.
Makes 10 pounds.
WAYS TO COOK SAUSAGES
(For each recipe, choose one of these methods)
PAN FRYING
Place sausage in cold pan with 1⁄4 to 1⁄2 cup water. Cover and simmer 5 minutes.
Drain. Remove cover and simmer sausages until well cooked.
BAKING
Arrange sausages in shallow baking pan. Bake in 350° F oven until browned and
well done.
-10-
-11-