1
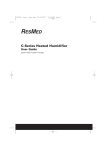
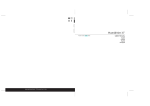
34824r2 C-Series Humidifier USA Eng-Spa.qxp
23/02/2007
3:34 PM
Page 1
3. Connecting the C-Series Heated Humidifier
7. Starting Therapy
WARNING
• Make sure the flow generator is switched off and unplugged at the power outlet before
connecting or disconnecting the humidifier.
C-Series Heated Humidifier
User Guide
• Always remove the water chamber before connecting or disconnecting the humidifier
and the flow generator.
1. Disconnect the flow generator power cord from the socket at the rear of the flow generator.
2. Fit the connector seal to the air outlet on the flow generator. Ensure the connector seal is fully
seated over the air outlet.
Signal cable
12. General Warnings and Cautions
1. Connect one end of the air tubing firmly onto the air outlet of the water chamber and the other
end to your mask.
A warning alerts you to possible injury.
2. Fit your mask as described in your mask user instructions.
• The humidifier, including the associated tubing, is for single-patient use and must not be re-used on another
person. This is to avoid the risk of cross-infection.
3. If necessary, set the humidity level as described in the section “Setting the Humidity Level”.
4. Press
on the flow generator to start therapy. Therapy starts straight away. The heating indicator on the flow generator lights when the humidifier is on.
5. Lie down and arrange the air tubing so that it is free to move if you turn in your sleep.
WARNING
Do not leave a long length of air tubing around the top of your bed. It could twist around
your head or neck while you are sleeping.
Power transfer cable
8. Stopping Therapy
Water chamber
on the flow generator.
3. Place the humidifier base on a firm, level surface near your bed at a level lower than your sleeping position. Ensure the surface is not sensitive to heat and moisture, or use a protective mat.
4. Align and place the flow generator on the humidifier base.
Power indicator
5. Connect the (black) humidifier signal cable into the signal cable socket, and the (gray) power
transfer cable into the power socket at the rear of the flow generator.
Do not attempt to use the system unless both cables are connected to the flow generator.
6. Plug the humidifier power cord into a power outlet. When the combined C-Series system is
powered, the green indicator lights on the flow generator and humidifier turn on.
Thank you for choosing the ResMed C-Series Heated Humidifier. The C-Series Heated Humidifier
is designed to humidify (moisten) the air delivered to your airway during CPAP (continuous positive
airway pressure) therapy. The C-Series Heated Humidifier attaches to your ResMed C-Series flow
generator with a simple latch mechanism.
This user guide contains the information you need for the correct use of your C-Series Heated
Humidifier.
4. Attaching and Detaching the Water Chamber
WARNING
• Beware of electrocution. Do not immerse the flow generator, humidifier or power cord in
water. Always unplug the device before cleaning and be sure that it is dry before plugging it back in.
CAUTION
– bleach, chlorine, alcohol- or ammonia-based solutions
– water softening and unapproved descaling agents.
The C-Series Heated Humidifier is indicated for humidification of the air delivered from the
ResMed C-Series CPAP System.
2. Detach the air tubing from the water chamber.
3. Press down the release latch on the humidifier and carefully slide the water chamber from the
humidifier base.
CAUTION
Federal law restricts this device to sale by or on the order of a physician.
2. Contraindication
The C-Series Heated Humidifier is contraindicated for use with patients whose upper (supraglottic)
airway has been bypassed. Please also refer to your C-Series Flow Generator User Guide for contraindications associated with CPAP therapy.
• Be careful not to place the device where it can be bumped and knocked over.
Wash the water chamber and connector seal in warm water, using a mild detergent (see previous
caution). Rinse them thoroughly with clean water and allow them to dry away from direct sunlight.
• Blocking the air inlet or tubing while the device is operating could cause it to overheat.
Weekly
13. Accessories
1. Fill the water chamber to the maximum water level mark with a solution of one part vinegar to
ten parts water.
3. Discard the solution and rinse the water chamber thoroughly with clean water.
Periodically
10. Troubleshooting
Problem
Possible Cause
Device not working (no dis- Power cord is not plugged in
play on LCD screen and/or
properly.
indicator light not lighting up)
Faulty power outlet.
Solution
Check that the power cord is plugged firmly
into the power outlet and the switch (if available) is on at the outlet.
Try another power outlet.
Leaking water chamber
The water chamber may be
damaged or cracked.
Contact your supplier for a replacement.
5. Filling the Water Chamber
No/low air flow
The air tubing is not connected
properly.
Adjust the air tubing connection.
The air tubing is blocked,
pinched or punctured.
Unblock or free the air tubing. Check the air
tubing for punctures.
WARNING
• Do not overfill the water chamber, as water may enter the flow generator and air tubing.
• Remove the water chamber from the humidifier before filling it with water.
The water chamber is overfilled. Make sure that the water level is not above
the maximum water level mark.
CAUTION
Condensation is forming in the
air tube.
Do not use any additives (eg, scented oils and perfumes). They may reduce the humidification output of the humidifier and/or cause deterioration of the water chamber materials.
Flow generator operation.
Carefully fill the water chamber to the maximum water level mark with distilled water only.
Press
to decrease the humidity setting.
See the Troubleshooting section in the flow
generator guide.
Water splashing on your face The water chamber is overfilled. Empty some water from the water chamber.
Air does not feel moist
Condensation is forming in the
air tube and mask.
Press
to decrease the humidity setting.
The humidity setting is set too
low.
Press
to increase the humidity setting.
Humidifier heating element is
not working.
6. Setting the Humidity Level
Air too moist
The aim of humidification is to deliver moist air to your mask, but to avoid having condensation
form in the air tubing. The temperature and humidity of the surrounding air will affect the setting
you need.
You can adjust the humidity setting at any time before or during therapy, to find the most comfortable and effective setting.
To set the humidity level press
or
on the flow generator; notice that the screen displays
“H” and the selected humidity level (eg, H. 3).
The OFF setting switches heated humidification off and delivers minimum humidification. A setting
of 6 delivers maximum humidification.
The humidification setting remains displayed on the screen for five seconds.
ResMed Ltd (Manufacturer) 1 Elizabeth Macarthur Drive Bella Vista NSW 2153 Australia
ResMed Corp (US Designated Agent) 14040 Danielson Street Poway CA 92064-6857 USA
ResMed (UK) Ltd (EU Authorized Representative) 65 Milton Park Abingdon Oxfordshire OX14 4RX UK
ResMed Offices Australia, Austria, Brazil, Finland, France, Germany, Hong Kong, Japan, Malaysia, Netherlands, Norway, New Zealand, Singapore,
Spain, Sweden, Switzerland, UK, USA (see www.resmed.com for contact details).
Patents pending. Design registrations pending.
Tango is a trademark of ResMed Ltd.
©2007 ResMed Ltd.
Global leaders in sleep and respiratory medicine
34824/2 07 02
www.resmed.com
Part Number
Item
34901
C-Series Water Chamber
14. Servicing
This product (C-Series Heated Humidifier) should be inspected by an authorized ResMed Service Center 5
years from the date of manufacture. Prior to this, the device is intended to provide safe and reliable operation
provided that it is operated and maintained in accordance with the instructions provided by ResMed.
Applicable ResMed warranty details are provided with the device at the time of original supply. Of course, as
with all electrical devices, if any irregularity becomes apparent, you should exercise caution and have the
device inspected by an authorized ResMed Service Center.
15. Technical Specifications
4. Discard any excess water.
Fill with distilled water only. Using distilled water will prolong the
life of your water chamber. Water from the faucet typically contains
minerals that will damage the base of your water chamber.
• The water chamber should not be attached when transporting the humidifier in the carry bag. Place the
water chamber in a separate compartment in the carry bag.
Daily
Wipe the humidifier base with a clean cloth.
1. Unplug the power cord from the power outlet and allow ten minutes for the heater plate and
any excess water to cool.
• Make sure that the water chamber is empty before transporting the humidifier.
• If you put the device on the floor, make sure the area is free from dust and clear of bedding, clothes or
other objects that could block the air inlet.
2. Let the solution soak for ten minutes.
Detaching the Water Chamber
• Only use distilled water with the C-Series Heated Humidifier.
• Do not wash the water chamber in a dishwasher.
If you notice white powder or deposits in the water chamber:
Release latch
A caution explains special measures for safe and effective use of the device.
• The C-Series Heated Humidifier is designed only for use with the ResMed C-Series System. Do not use the
humidifier with any other CPAP device.
– moisturizing, antibacterial or glycerine-based soaps
Attaching the Water Chamber
Heater plate
• Do not drop or insert any object into any opening or tubes.
• Use the humidifier only for its intended use as described in this guide.
• Do not use any of the following to clean any part of the humidifier. These solutions may
cause damage and reduce the life of the product:
Inspect the water chamber for wear and deterioration. Replace the water chamber if any component has cracked, become cloudy or pitted. Replace immediately if there is any leakage from the
water chamber.
CAUTION: Fill with distilled water only.
1. Intended Use
• Do not operate the humidifier if it is not working properly or if any part of it has been dropped or damaged.
• Do not attempt to dismantle the humidifier. There are no user-serviceable parts inside. Repairs and internal
servicing should only be performed by an authorized service agent.
Take care when handling your humidifier.
Allow ten minutes for the heater plate
and any excess water to cool.
Press down the release latch on the
humidifier and carefully slide the filled
water chamber onto the heater plate. The
release latch springs back to hold the
water chamber in place.
• If liquids are inadvertently spilled into or on the humidifier, unplug the device from the power outlet.
Disconnect the humidifier from the flow generator and allow it to drain and dry before using.
• No perceptible heating effect may be felt at low heat settings, depending on the ambient temperature.
WARNING
Release latch
• The humidifier should only be used with delivery tubes or accessories recommended by ResMed.
Connection of other delivery tubes or accessories could result in injury, or damage to the device.
• Keep the power cord away from heated surfaces.
9. Cleaning and Maintenance
Power cord
Humidifier base
• There exists the possibility that if the device is placed above the level of the patient and is tipped over, or if
the tubing is filled with condensate, the mask might fill with water. The device should be placed below the
level of the patient so that in the event of the device being tipped over, the tubing and mask do not fill with
water.
• Do not operate the humidifier if the device has a damaged power cord.
To stop your therapy at any time, remove your mask and press
Connector seal
• Always place the humidifier device lower than the level of the patient. If it is placed at or above the level of
the patient, heated water may flow down the air tubing and into the mask.
The humidity setting is set too
high.
High relative humidity in your
room.
White powder or deposits in The water leaves scaly mineral
the water chamber
deposits.
Contact your equipment supplier.
Press
to decrease the humidity setting.
Adjust your humidity setting.
Refer to the weekly cleaning instructions.
Use distilled water.
11. Symbols Which Appear on the C-Series Heated Humidifier
Attention. Consult
accompanying documents
Do not touch
Type CF equipment
Maximum water
level
Class II equipment
Drip proof
Hot surface
Canadian Standards
Association
Maximum heater plate temperature
185ºF (85ºC)
Temperature cut-out
199ºF (93ºC)
Maximum output humidity
95% relative humidity (control dial set to maximum setting, flow rate 50 L/min,
ambient temperature of 68°F (20°C), ambient relative humidity of 40%)
Maximum gas temperature
106°F (41°C) at 95°F (35°C) ambient temperature.
Dimensions (H x W x D)
3.4” x 7.5” x 16” (87 mm x 189 mm x 409 mm)
Water chamber capacity to maximum fill line 375 mL
Weight (Humidifier and unfilled water
chamber)
Power supply. Input range for Tango™ flow
generator with humidifier
Instantaneous peak power consumption
2 lb (920 g)
Maximum heater element power
120 VA (100 W)
Operating temperature
Operating humidity
Storage and transport temperature
+41°F to +104°F (+5°C to +40°C)
10–95% non-condensing
-4°F to +140°F (-20°C to +60°C)
Storage and transport humidity
10–95% non-condensing
Atmospheric pressure range
IEC 60601-1 Classification
Electromagnetic Compatibility
1060 hPa (sea level) to 680 hPa (8500 ft)
Class II (double insulation), Type CF
Refer to your flow generator user guide for details
*
110 V, 60 Hz; <90 VA (80 W) (maximum power consumption) *
<340 VA
Actual average power consumption will vary, depending on factors such as temperature setting, set pressure, the use of
accessories, height above sea level and ambient temperature.
The manufacturer reserves the right to change these specifications without notice.
16. Limited Warranty
ResMed warrants that your ResMed product shall be free from defects in material and workmanship for the
period specified below from the date of purchase by the initial consumer. This warranty is not transferable.
Product
ResMed humidifiers, ResControl™, ResLink™,
ResTraxx™
Warranty Period
1 Year
ResMed flow generators
2 Years
Accessories, water chamber, mask systems (including 90 Days
mask frame, cushion, headgear and tubing). Excludes
single-use devices.
Note: Some models are not available in all regions.
If the product fails under conditions of normal use, ResMed will repair or replace, at its option, the defective
product or any of its components. This Limited Warranty does not cover:
a) any damage caused as a result of improper use, abuse, modification or alteration of the product;
b) repairs carried out by any service organization that has not been expressly authorized by ResMed to perform
such repairs;
c) any damage or contamination due to cigarette, pipe, cigar or other smoke;
d) any damage caused by water being spilled on or into a flow generator.
Warranty is void on product sold, or resold, outside the region of original purchase. Warranty claims on defective product must be made by the initial consumer at the point of purchase.
This warranty is in lieu of all other express or implied warranties, including any implied warranty of merchantability or fitness for a particular purpose. Some regions or states do not allow limitations on how long an
implied warranty lasts, so the above limitation may not apply to you.
ResMed shall not be responsible for any incidental or consequential damages claimed to have occurred as a
result of the sale, installation or use of any ResMed product. Some regions or states do not allow the exclusion or limitation of incidental or consequential damages, so the above limitation may not apply to you. This
warranty gives you specific legal rights, and you may also have other rights which vary from region to region.
For further information on your warranty rights, contact your local ResMed dealer or ResMed office.
34824r2 C-Series Humidifier USA Eng-Spa.qxp
23/02/2007
3:34 PM
Page 2
3. Conexión del humidificador térmico C-Series
7. Comienzo del tratamiento
ADVERTENCIA
• Asegúrese de que el generador de aire esté apagado y desenchufado de la toma de corriente antes de conectar o desconectar el humidificador.
Humidificador térmico C-Series
Guía del usuario
• Retire siempre la cámara de agua antes de conectar o desconectar el humidificador y el
generador de aire.
1. Desconecte el cable de alimentación del generador de aire del enchufe ubicado en la parte
trasera del generador de aire.
2. Coloque la junta conectora a la salida de aire del generador de aire. Asegúrese de que la junta
conectora calce perfectamente en la salida de aire.
Cable de señal
12. Advertencias y precauciones generales
1. Conecte un extremo del tubo de aire firmemente a la salida de aire de la cámara de agua y el
otro extremo a la mascarilla.
Cable de transferencia de alimentación
2. Colóquese la mascarilla según se indica en las instrucciones para el usuario de la mascarilla.
• El humidificador, incluidos sus tubos asociados, es para ser usado por un único paciente y no debe volver a
utilizarse con ninguna otra persona. Esto es para evitar el riesgo de infecciones cruzadas.
3. Si fuera necesario, establezca el nivel de humedad descrito en la sección “Configuración del
nivel de humedad”
• Coloque siempre el humidificador por debajo del nivel del paciente. Si se colocara al mismo nivel o por
encima del paciente, cabe la posibilidad de que el agua caliente fluya por el tubo hacia la mascarilla.
4. Presione
en el generador de aire para comenzar el tratamiento. El tratamiento comienza de
inmediato. El indicador de calefacción del generador de aire se ilumina cuando se enciende el
humidificador.
• Si el dispositivo se coloca a un nivel superior al del paciente y se vuelca, o si el tubo se llena de condensación de agua, existirá la posibilidad de que la mascarilla se llene de agua. El dispositivo debe ponerse por
debajo del nivel del paciente, de manera que, en caso de que el dispositivo se vuelque, el tubo y la mascarilla no se llenarán de agua.
5. Acuéstese y acomode el tubo de aire de forma que pueda moverse libremente si usted se da
vueltas mientras duerme.
ADVERTENCIA
No deje extensiones largas de tubo de aire encima de la cabecera de su cama. Podrían
enrollarse en su cabeza o cuello mientras duerme.
Cámara de agua
Para detener el tratamiento en cualquier momento, quítese la mascarilla y presione
erador de aire.
en el gen-
9. Limpieza y mantenimiento
Cable de alimentación
Base del humidificador
Cerrojo de liberación
Indicador de alimentación
4. Alinee y coloque el generador de aire sobre la base del humidificador.
5. Conecte el cable de señal del humidificador (negro) en el enchufe del cable de señal y el cable
de transferencia de alimentación (gris) en el enchufe de alimentación ubicado en la parte posterior del generador de aire.
No intente usar el sistema a menos que ambos cables estén conectados al generador de aire.
Gracias por haber elegido el humidificador térmico C-Series de ResMed. El humidificador térmico
C-Series está diseñado para humidificar el aire suministrado a las vías respiratorias durante el
tratamiento con presión positiva continua en las vías respiratorias (CPAP por sus siglas en inglés).
El humidificador térmico C-Series se conecta al generador de aire C-Series de ResMed con un
simple mecanismo de cerrojo.
Esta guía del usuario contiene la información necesaria para el uso correcto del humidificador térmico C-Series.
6. Enchufe el cable de alimentación del humidificador a una toma de corriente. Cuando se
enciende el sistema combinado C-Series, se iluminan las luces indicadoras verdes del generador de aire y del humidificador.
4. Montaje y desmontaje de la cámara de agua
ADVERTENCIA
Tenga cuidado al manipular el humidificador. Espere 10 minutos para que se
enfríe la placa de calefacción y todo
exceso de agua.
Placa de
calefacción
Montaje de la cámara de agua
PRECAUCIÓN: Llene únicamente con agua destilada.
1. Uso indicado
El humidificador térmico C-Series está indicado para la humidificación del aire suministrado del sistema CPAP C-Series.
PRECAUCIÓN
La ley federal estipula que este aparato solamente puede ser vendido por un médico o por
orden de éste.
2. Contraindicación
El humidificador térmico C-Series está contraindicado en pacientes que no respiran por sus vías
respiratorias superiores (supraglóticas). Consulte también en la Guía del usuario del generador de
aire C-Series las contraindicaciones relativas al tratamiento con CPAP.
Presione el cerrojo de liberación del humidificador y deslice cuidadosamente la
cámara de agua llena hasta que quede
sobre la placa de calefacción. El cerrojo de
liberación vuelve a sostener la cámara de
agua en su lugar.
Cerrojo de
liberación
• Peligro de electrocución. No sumerja en agua el generador de aire, el humidificador ni el
cable de alimentación. Siempre desconecte el dispositivo antes de limpiarlo y asegúrese
de que esté seco antes de conectarlo nuevamente.
PRECAUCIÓN
• No utilice ninguno de los siguientes productos para limpiar cualquiera de las piezas del
humidificador. Estas soluciones pueden causar daños o reducir la vida útil del producto.
– blanqueador, soluciones a base de cloro, alcohol o amoníaco
– agentes desmineralizadores y decapantes no aprobados.
Inspeccione la cámara de agua para verificar que no haya desgaste ni deterioro. Reemplace la
cámara de agua si cualquier componente está agrietado, opaco o presenta una superficie irregular.
Reemplace de inmediato si hay escapes de la cámara de agua.
Si nota un polvo o depósitos de color blanco en la cámara de agua:
1. Llene la cámara de agua a la marca de nivel de agua máximo con una solución de una parte de
vinagre por diez partes de agua.
2. Deje reposar la solución durante diez minutos.
3. Deseche la solución y enjuague bien la cámara de agua con agua limpia.
Problema
Causa posible
Verifique que el cable de alimentación esté firmemente enchufado en la toma de corriente y que el
interruptor de ésta (en caso de haberlo) esté encendido.
Pruebe otra toma de corriente.
• Retire la cámara de agua del humidificador antes de llenarla de agua.
Para configurar el nivel de humedad, presione
o
en el generador de aire; tenga en cuenta
que en la pantalla aparece “H” y el nivel de humedad seleccionado (por ej., H. 3).
Si se selecciona la opción APAG, se desactiva la humidificación térmica y se suministra un mínimo
de humidificación. Una configuración en 6 suministra un nivel máximo de humidificación.
La configuración de humidificación permanece en pantalla durante cinco segundos.
Desobstruya o despeje el tubo de aire. Verifique que el
tubo de aire no esté perforado.
Se forma condensación en el
tubo de aire.
El aire no se siente
húmedo
Puede ajustar la configuración de humedad en cualquier momento antes del tratamiento o durante
éste, a fin de encontrar la configuración más cómoda y efectiva.
Ajuste la conexión del tubo de aire.
La cámara de agua está demasi- Asegúrese de que el nivel de agua no sobrepase la
ado llena.
marca del nivel máximo de agua.
Le salpica agua al
rostro
Presione
para disminuir la configuración de
humedad.
Funcionamiento del generador Consulte la sección Solución de problemas de la guía
de aire.
del generador de aire.
La cámara de agua está demasi- Extraiga un poco de agua de la cámara de agua.
ado llena.
Se forma condensación en el
tubo de aire y en la mascarilla.
Presione
humedad.
La configuración de humedad
está demasiado baja.
Presione
ara aumentar la configuración de
humedad.
Póngase en contacto con el proveedor de su equipo.
No funciona el calentador del
humidificador.
El aire está demasia- La configuración de humedad
do húmedo
está demasiado alta.
Núm. de pieza
Artículo
34901
Cámara de agua del C-Series
14. Servicio
Al cumplirse 5 años de su fabricación, este producto (humidificador térmico C-Series) debe ser inspeccionado por un centro de
servicio autorizado de ResMed. Hasta ese momento, el equipo está diseñado para funcionar de manera segura y fiable, siempre que se use y se mantenga de acuerdo con las instrucciones suministradas por ResMed. Cuando se entrega el equipo
nuevo, se acompañan los datos acerca de la garantía correspondiente de ResMed. De todas formas, y tal como ocurre con
todos los equipos eléctricos, si detecta alguna irregularidad en su funcionamiento, deberá tomar precauciones y hacer revisar
el equipo por parte de un centro de servicio autorizado de ResMed.
Temperatura máxima de la placa de calefacción
Temperatura de apagado:
185°F (85°C)
Humedad máxima de salida
95% humedad relativa (escala de control al máximo, tasa de flujo de 50 l/min,
temperatura ambiente de 68°F (20°C), humedad relativa del ambiente de 40%).
Temperatura máxima de gas
106°F (41°C) a 95°F (35°C) de temperatura ambiente.
Solución
El equipo no funEl cable de corriente no está
ciona (no aparece
debidamente conectado.
nada en el visor y/o
la luz del indicador
no se enciende)
La toma de corriente está defectuosa.
Llene con cuidado la cámara de agua hasta alcanzar la marca de nivel máximo, utilizando agua
destilada exclusivamente.
13. Accesorios
15. Especificaciones técnicas
No hay flujo de aire El tubo de aire no está debidao éste es muy bajo mente conectado.
El tubo de aire está obstruido,
torcido o roto.
El objetivo de la humidificación es suministrar aire húmedo a la mascarilla, a la vez que se evita la
formación de condensación en el tubo de aire. La temperatura y humedad del aire circundante
afectarán el nivel que usted necesitará.
• La cámara de agua no debe conectarse cuando se lleva el humidificador en la bolsa para el transporte.
Coloque la cámara de agua en un compartimento aparte en la bolsa de transporte.
• Bloquear la entrada de aire o el tubo mientras el dispositivo está funcionando puede hacer que éste se
sobrecaliente.
Cámara de agua con La cámara de agua puede estar Contacte a su proveedor para obtener un repuesto.
fuga
dañada o fisurada.
6. Configuración del nivel de humedad
• Asegúrese de que la cámara de agua esté vacía antes de transportar el humidificador.
Lave la cámara de agua y la junta conectora en agua tibia, usando un detergente suave (consulte la
precaución anterior). Enjuáguelas cuidadosamente en agua limpia y déjelas secar sin exponerlas a la
luz directa del sol.
Semanalmente
• No llene demasiado la cámara de agua, ya que podría entrar agua al generador de aire y
al tubo de aire.
Llene únicamente con agua destilada. El uso de agua destilada prolongará la vida útil de la cámara de agua. El agua de la llave generalmente contiene minerales que dañan la base de la cámara de agua.
• Use únicamente agua destilada con el humidificador térmico C-Series.
• Tenga cuidado de no colocar el dispositivo en un lugar en donde pueda recibir golpes y ser volteado.
10. Solución de problemas
No utilice ningún aditivo (por ej., perfumes o aceites aromáticos). Estos podrían reducir la
capacidad de humidificación del humidificador y/o provocar un deterioro de los materiales
de la cámara de agua.
Una precaución explica medidas especiales para el uso seguro y efectivo del dispositivo.
Diariamente
2. Desconecte el tubo de aire de la cámara de agua.
PRECAUCIÓN
• No deje caer ni inserte ningún objeto en ninguna de las aberturas ni en los tubos.
• Si coloca el dispositivo en el piso, asegúrese de que el área esté libre de polvo y que no haya ropa, ropa de
cama u otros objetos que pudieran obstruir la entrada de aire.
Limpie la base del humidificador con un paño limpio.
ADVERTENCIA:
• Es posible que no se perciba ningún efecto de calefacción en configuraciones bajas de calor, según la temperatura ambiente.
• No lave la cámara de agua en un lavaplatos.
1. Desenchufe el cable de alimentación de la toma de corriente y espere diez minutos para que se
enfríe la placa de calefacción y todo exceso de agua.
5. Llenado de la cámara de agua
• Mantenga el cable de conexión lejos de superficies calefaccionadas.
• El humidificador térmico C-Series está diseñado únicamente para su uso con el sistema de C-Series de
ResMed. No use el humidificador con ningún otro dispositivo de CPAP.
– jabones humectantes, antibacterianos o a base de glicerina
Periódicamente
4. Deseche todo exceso de agua.
• No haga funcionar el humidificador si el cable de alimentación del dispositivo presenta daños.
• Utilice el humidificador únicamente para el fin indicado en esta guía.
Desmontaje de la cámara de agua
3. Presione el cerrojo de liberación del humidificador y deslice cuidadosamente la cámara de agua
llena hasta que salga de la base del humidificador.
• Si se derraman líquidos de manera accidental sobre el humidificador, desenchufe el dispositivo de la toma
de corriente. Desconecte el humidificador del generador de flujo y permita que se drene y se seque antes
de volver a usarlo.
• No intente desmontar el humidificador. No contiene partes que puedan recibir un servicio de mantenimiento por parte del usuario mismo. Las reparaciones y el mantenimiento interno deberán ser efectuados únicamente por un agente de servicio autorizado.
ADVERTENCIA
3. Coloque la base del humidificador sobre una superficie firme y plana cerca de su cama, a un
nivel más bajo que el que usted adopte para dormir. Asegúrese de que la superficie no se vea
afectada por el calor y la humedad, o utilice una colchoneta protectora.
• El humidificador debe utilizarse únicamente con los accesorios o tubos de suministro recomendados por
ResMed. Su uso con otros accesorios o tubos de suministro podría producir lesiones o daños al equipo.
• No haga funcionar el humidificador si no está funcionando adecuadamente o si cualquiera se ha caído o
dañado cualquiera de sus piezas.
8. Detención del tratamiento
Junta conectora
Una advertencia le alerta sobre la posibilidad de lesiones.
para disminuir la configuración de
199°F (93°C)
Dimensiones (altura x ancho x profundidad) 3,4 pulgadas x 7,5 pulgadas x 16 pulgadas (87 mm x 189 mm x 409 mm)
Capacidad de agua hasta la línea de llenado 375 ml
máximo
Peso (humidificador y cámara de agua vacía) 2 lb (920 g)
Alimentación. Rango de entrada para generador de aire Tango™ con humidificador
Potencia máxima instantánea
110 V, 60 Hz; <90 VA (80 W) (máximo consumo de energía) *
Potencia máxima de calentador
120 VA (100 W)
Temperatura de funcionamiento
Humedad de funcionamiento
Temperatura de almacenamiento y de transporte:
Humedad de almacenamiento y de transporte
Rango de presión atmosférica
Clasificación CEI 60601-1
Compatibilidad electromagnética
+41°F a +104°F (+5°C a +40°C)
10-95% sin condensación
-4°F a +140°F (-20°C a +60°C)
*
<340 VA
10-95% sin condensación
1060 hPa (a nivel del mar) a 680 hPa (8500 pies)
Clase II (doble aislación), Tipo CF
Consulte detalles en la guía del usuario del generador de aire
La cifra real del consumo de energía promedio variará en función de factores tales como la configuración de la temperatura, la presión fijada, el uso de accesorios, la altura sobre el nivel del mar y la temperatura ambiente.
El fabricante se reserva el derecho de cambiar estas especificaciones sin previo aviso.
16. Garantía limitada
ResMed garantiza que su producto ResMed estará libre de todo defecto de material y mano de obra durante el plazo estipulado a continuación a partir de la fecha de adquisición por parte del consumidor inicial. Esta garantía no es transferible.
Presione
para disminuir la configuración de
humedad.
Ajuste la configuración de humedad.
Hay una humedad relativa alta
en su habitación.
Aparecen depósitos El agua deja escamas de depósi- Consulte las instrucciones de limpieza semanales.
o un polvo blanco en tos minerales.
la cámara de agua
Utilice agua destilada.
11. Símbolos que aparecen en el humidificador térmico C-Series
Atención. Consulte
los documentos
adjuntos
No tocar
Uperficie Caliente
Equipo tipo CF
Nivel máximo de
agua
Asociación
canadiense de
estándares
Equipo de clase II
A prueba de goteo
Producto
Plazo de la garantía
Humidificadores ResMed, ResControl™, ResLink™, ResTraxx™ 1 año
Generadores de aire ResMed
2 años
Accesorios, cámara de agua y sistemas de mascarillas (incluido 90 días
el armazón de mascarilla, la almohadilla, el arnés para la cabeza
y el tubo). No incluye los dispositivos desechables.
Nota: algunos modelos no se encuentran disponibles en todas las regiones.
Si el producto falla bajo condiciones de utilización normales, ResMed reparará o reemplazará, a opción suya, el producto defectuoso o cualquiera de sus componentes. Esta Garantía limitada no cubre:
a) cualquier daño causado como resultado de una utilización indebida, abuso, modificación o alteración del producto;
b) reparaciones llevadas a cabo por cualquier organización de servicio que no haya sido expresamente autorizada por ResMed
para efectuar dichas reparaciones;
c) cualquier daño o contaminación debida a humo de cigarrillo, pipa, cigarro u otras fuentes de humo;
d) cualquier daño causado por el derrame de agua sobre el generador de aire o hacia su interior.
La garantía queda anulada si el producto se vende o revende fuera de su región de compra original. Las reclamaciones de
garantía con respecto a productos defectuosos deben ser realizadas por el consumidor original en el punto de compra.
Esta garantía revoca cualquier otra garantía expresa o implícita, incluso cualquier garantía implícita de comerciabilidad o idoneidad para un propósito en particular. Algunas regiones o estados no permiten limitaciones respecto a la duración de una garantía implícita, por lo que es posible que lo que precede no sea aplicable en su caso.
ResMed no será responsable de ningún daño incidental ni emergente que se reclame por haber ocurrido como resultado de la
venta, instalación o utilización de cualquier producto de ResMed. Algunas regiones o estados no permiten la exclusión ni limitación de daños incidentales o emergentes, por lo que es posible que lo que precede no sea aplicable en su caso. Esta garantía le otorga derechos legales específicos, y es posible que usted tenga otros derechos que pueden variar de una región a
otra.
Para más información sobre los derechos que le otorga esta garantía, póngase en contacto con su distribuidor local de
ResMed o con una oficina de ResMed.