1
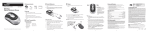
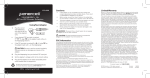
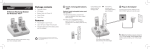
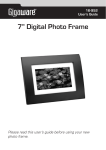
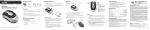
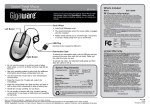
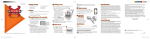
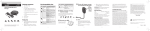
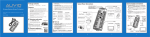
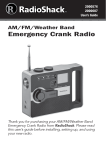
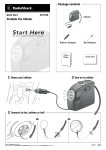
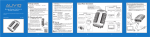
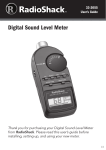
12-591 User’s Guide Daytime/Nighttime • Atomic-Controlled Projection Clock Radio Thank you for purchasing your Projection Clock Radio from RadioShack. Please read this user’s guide before installing, setting up, and using your new Projection Clock Radio. Contents Important Safety Instructions..............................................................................3 Package contents .......................................................................................................... 5 Features.......................................................................................................................... 5 Setup................................................................................................................... 6 Power Your Radio........................................................................................................... 6 Setting Time................................................................................................................. 10 Setting Alarms.............................................................................................................. 11 Using the alarm........................................................................................................ 11 Operation.......................................................................................................... 12 Tune to a Frequency..................................................................................................... 12 Preset Memory............................................................................................................. 12 Find a Preset Station................................................................................................ 13 Sleep Timer.................................................................................................................. 13 Connecting Auxiliary Audio Equipment....................................................................... 13 Using the Projector...................................................................................................... 14 Additional Information...................................................................................... 15 Specifications............................................................................................................... 15 FCC Information........................................................................................................... 16 Limited Warranty.......................................................................................................... 17 CAUTION ! RISK OF ELECTRIC SHOCK DO NOT OPEN WARNING: To reduce the risk of fire or shock hazard, do not expose this product to rain or moisture. CAUTION: TO REDUCE THE RISK OF ELECTRIC SHOCK, DO NOT REMOVE THE COVER OR BACK. NO USER-SERVICEABLE PARTS INSIDE. REFER SERVICING TO QUALIFIED PERSONNEL. The lightning symbol is intended to alert you to the presence of uninsulated, dangerous voltage within this product’s enclosure that might be of sufficient magnitude to constitute a risk of electric shock. Do not open the product’s case. ! The exclamation symbol is intended to inform you that important operating and maintenance instructions are included in the literature accompanying this product. Important Safety Instructions 1. Read these instructions. 2. Keep these instructions. 3. Heed all warnings. 4. Follow all instructions. 5. Unplug this product from the wall outlet before cleaning. Do not liquid cleaners or aerosol cleaners. Clean only with dry cloth. 6. Do not use this product near water. The apparatus shall not be exposed to dripping or splashing and that no objects filled with liquids, such as vases, shall be placed on apparatus. 7. Do not install near any heat sources such as radiators, heat registers, stoves, or other apparatus (including amplifiers) that produce heat. 8. Use only with the cart, stand, tripod, bracket, or table specified by the manufacturer or sold with the apparatus. When a cart is used, use caution when moving the cart/apparatus combination to avoid injury from tip-over. 9. Slots and openings in the cabinet are provided for ventilation and to ensure reliable operation of the product and to protect if from overheating. Do not block any ventilation openings. Install in accordance with the manufacturer’s instructions. 10. This product is equipped with a polarized AC line plug (a plug having one blade wider than the other). This plug will fit in the power outlet only one way. This is a safety feature. If you cannot insert the plug fully into the outlet, try reversing the plug. If the plug still doesn’t fit, contact your electrician to replace your obsolete outlet. Do not defeat the safety purpose of the polarized plug. If you need an extension cord, use a polarized cord. 11. Protect the power cord from being walked on or pinched particularly at plugs, convenience receptacles, and the point where they exit from the apparatus. 12. The mains plug of the apparatus should not be obstructed OR should be easily accessed during intended use. 13. To completely disconnect the power input, the mains plug of apparatus shall be disconnected from the mains. Unplug this apparatus during lightning storms or when unused for long periods of time. 14. Only use attachments/accessories specified by the manufacturer. 15. Refer all servicing to qualified service personnel. Servicing is required when the apparatus has been damaged in any way, such as power-supply cord or plug is damaged, liquid has been spilled or objects have fallen into the apparatus, the apparatus has been exposed to rain or moisture, does not operate normally, or has been dropped. 16. The rating plate is located on the bottom of the apparatus. Setup Package contents • Radio • User’s Guide • Quick Start Features • Projects time on the ceiling or wall • Automatically adjusts the brightness of the beam based on ambient lighting conditions • Time synchronizes with the U.S. government’s atomic clock, sets itself, and stays accurate • Dual alarms with snooze function • AM/FM radio with six memory presets Power Your Radio Connect the AC plug to a standard wall outlet. 1. Remove the battery cover. 2. Insert 2 AAA batteries (not supplied) matching the polarity symbols (+ and –) marked inside. 3. Replace the battery cover. b Battery Notes: • • • • Dispose of batteries promptly and properly. Do not burn or bury them. Do not expose batteries to excessive sunlight, fire or heat. Use only fresh batteries of the required size and type. Do not mix old and new batteries, different types of batteries (alkaline, or rechargeable), or rechargeable batteries of different capacities. AAA Install batteries for backup power. In the event of a power interruption, the backup batteries will retain your radio presets, the clock and alarm times in the memory only (normal clock, display and radio operation excluded): AAA Setup Setup PROJECTOR HI/MED/ AUTO/OFF Adjust the projection angle. •Turn projector on/off •Select brightness level DST AUTO/OFF Turn daylight savings on/off. LOCK TIME/DATE Slide to TIME/DATE to set time manually. Slide to LOCK to save. TIME ZONE Select your time zone. 12/24 Select 12 or 24 hour format. Projection Focus Adjust the image focus. RESET Restore to factory settings and clear all time and radio presets. Setup Image Rotate Setup Light sensor Helps to detect light levels to automatically adjust projector brightness. See page 14, Using the projector. M 1/ M 2 Turn on or stop alarm 1 or alarm 2. WAVE Hold down about 10 seconds to turn on/off the atomic clock function. Press to search for the atomic clock signal, e flashes. SET Set time and alarm. Change settings. + VOLUME – Adjust volume. •Stop the alarm for 10 minutes when the alarm sounds. •Briefly turn on the backlight /projector image. •Press and hold for 3 seconds to change backlight brightness level. G Turn on/off the radio. FM/AM/AUX Select the desired frequency. SLEEP Select a sleep timer in 60, 30, 15 minute increments. MEMORY •Hold down to store frequencies. •Press to recall the saved frequencies. AUX ⅛” (3.5mm) jack Connect auxiliary audio equipment. Setup SNOOZE/LIGHT Setup • If you do not plan to use the radio for a long time, remove the batteries. Batteries can leak chemicals that can damage electronic parts. Setting Time Your clock attempts to synchronize with the atomic time signal automatically when you first turn it on and whenever you press RESET. The reception icon e flashes while it is searching for a signal. After your clock displays the time, set the TIME ZONE switch to the local zone (Eastern, Central, Mountain, or Pacific). If the clock does not find the atomic time signal or when you are out of the local zone, set the time manually: 1. Slide LOCK TIME/DATE to TIME/DATE. 2. The current time flashes. Press or to select the time or hold down or to quick search in 10 minute increments. 3. Press SET to confirm and enter calendar mode. The month flashes. 4. Press or to select the month. 5. Press SET. The day flashes. 6. Press or to select the date. 10 RESET Setting Alarms 1. Hold down SET until the time display of ALARM 1 flashes. 2. Press or to select the alarm time, then press SET. 3. Press or to wake by the selected mode flashes. (alarm) or (radio AM/ FM band). The icon of 4. Press SET; the time display of ALARM 2 flashes. Follow Steps 2 and 3 to set alarm time and wake mode, or press SET to skip. 5. Press SET to save all alarm settings and go back to the regular clock display. Using the Alarm • To activate the alarm, press to release the 1 or 2 button. The corresponding alarm time and alarm mode appears on the display. 11 Setup 7. Press SET to confirm. The year flashes. 8. Press or to select the year. 9. Press SET to confirm and slide LOCK TIME/DATE to LOCK to save the setting. • To deactivate the alarm, press the 1 or alarm time and alarm mode disappear. 2 button down. The corresponding Operation Operation Press G to turn on the radio. The last frequency appears. Tune the Radio 1. Press FM/AM/AUX to toggle between FM, AM and auxiliary input. 2. To manually find a frequency, press or until the desired frequency sounds. To auto scan a frequency, hold down or for about 5 seconds, the radio will search for a broadcast automatically and stop when a strong signal is received. Preset Memory You can store up to six stations in the preset memory. 1. Hold MEMORY. The first preset station ( ) appears. 2. Press FM/AM/AUX to select the desired band and press or to select the desired frequency. 12 3. Press MEMORY to store the frequency and select the next preset frequency. 4. Repeat step 2–3 to store other preset frequencies. Find a Preset Station 1. Press MEMORY to recall the previous used memory frequency. Sleep Timer You can set your radio to turn off automatically after a predetermined period. Repeatedly press SLEEP to select 60, 30, or 15 minutes. Select OFF to turn off the sleep timer. SLEEP flashes during the sleep timer count down. Connecting Auxiliary Audio Equipment You can use your radio as an amplifier by connecting other audio equipment such as an MP3 or CD player. 1. Use an Æ“ (3.5mm) plug cable (not supplied) to connect the audio equipment to the AUX jack on the radio. 2. Press FM/AM/AUX until AU appears. 13 Operation 2. Press MEMORY again to go to the next preset frequency. 3. Adjust the sound control on your device. 4. Press POWER to turn off the radio. Operation Using the Projector Project the current time, date, or radio frequency on a wall or ceiling, and rotate the projection +/- 90 degrees. • AUTO – The projection brightness changes according to the ambient brightness. In order for auto light detection to work properly, make sure you do not cover or obstruct the light sensor (see page 8.) • OFF – When projection is OFF, press LIGHT/SNOOZE to briefly project the image, it lights about 10 seconds. • HI – High brightness. • MED – Medium brightness. • Image Rotate – Rotate the image to the desired angle. • Projection Focus – Adjust the image until a clear projection appears on a wall or ceiling. 14 Additional Information Specifications Power supply.................................................................................................................... 120V AC Output power................................................................................................................... 200 mW FM Frequency.............................................................................87.5 – 107.9 MHz, 200 kHz step AM Frequency.................................................................................. 530 – 1700 kHz, 10 kHz step Size (L x W x H)................................................................ 4.9 x 3.1 x 5.8 in (12.5 x 7.8 x 14.7 cm) Weight................................................................................................................ 17.64 oz. (0.8 kg) Specifications are subject to change and improvement without notice. Actual product may vary from the images found in this document. Additional Info 15 FCC Information Additional Info This equipment has been tested and found to comply with the limits for a Class B digital device, pursuant to Part 15 of the FCC Rules. These limits are designed to provide reasonable protection against harmful interference in a residential installation. This equipment generates, uses, and can radiate radio frequency energy and, if not installed and used in accordance with the instructions, may cause harmful interference to radio communications. However, there is no guarantee that interference will not occur in a particular installation. If this equipment does cause harmful interference to radio or television reception, which can be determined by turning the equipment off and on, the user is encouraged to try to correct the interference by one or more of the following measures: •Reorient or relocate the receiving antenna. •Increase the separation between the equipment and receiver. •Connect the equipment into an outlet on a circuit different from that to which the receiver is connected. •Consult your local RadioShack store or an experienced radio/TV technician for help. If you cannot eliminate the interference, the FCC requires that you stop using your equipment. Changes or modifications not expressly approved by RadioShack may cause interference and void the user’s authority to operate the equipment. This device complies with part 15 of the FCC Rules. Operation is subject to the condition that this device does not cause harmful interference. 16 Limited Warranty 17 Additional Info RadioShack warrants this product against defects in materials and workmanship under normal use by the original purchaser for ninety (90) days after the date of purchase from a RadioShack-owned store or an authorized RadioShack franchisee or dealer. RADIOSHACK MAKES NO OTHER EXPRESS WARRANTIES. This warranty does not cover: (a) damage or failure caused by or attributable to abuse, misuse, failure to follow instructions, improper installation or maintenance, alteration, accident, Acts of God (such as floods or lightning), or excess voltage or current; (b) improper or incorrectly performed repairs by persons who are not a RadioShack Authorized Service Facility; (c) consumables such as fuses or batteries; (d) ordinary wear and tear or cosmetic damage; (e) transportation, shipping or insurance costs; (f) costs of product removal, installation, set-up service, adjustment or reinstallation; and (g) claims by persons other than the original purchaser. Should a problem occur that is covered by this warranty, take the product and the RadioShack sales receipt as proof of purchase date to any RadioShack store in the U.S. RadioShack will, at its option, unless otherwise provided by law: (a) repair the product without charge for parts and labor; (b) replace the product with the same or a comparable product; or (c) refund the purchase price. All replaced parts and products, and products on which a refund is made, become the property of RadioShack. New or reconditioned parts and products may be used in the performance of warranty service. Repaired or replaced parts and products are warranted for the remainder of the original warranty period. You will be charged for repair or replacement of the product made after the expiration of the warranty period. RADIOSHACK EXPRESSLY DISCLAIMS ALL WARRANTIES AND CONDITIONS NOT STATED IN THIS LIMITED WARRANTY. ANY IMPLIED WARRANTIES THAT MAY BE IMPOSED BY LAW, INCLUDING THE IMPLIED WARRANTY OF MERCHANTABILITY AND, IF APPLICABLE, THE IMPLIED WARRANTY OF FITNESS FOR A PARTICULAR PURPOSE, SHALL EXPIRE ON THE EXPIRATION OF THE STATED WARRANTY PERIOD. EXCEPT AS DESCRIBED ABOVE, RADIOSHACK SHALL HAVE NO LIABILITY OR RESPONSIBILITY TO THE PURCHASER OF THE PRODUCT OR ANY OTHER PERSON OR ENTITY WITH RESPECT TO ANY LIABILITY, LOSS OR DAMAGE CAUSED DIRECTLY OR INDIRECTLY BY USE OR PERFORMANCE OF THE PRODUCT OR ARISING OUT OF ANY BREACH OF THIS WARRANTY, INCLUDING, BUT NOT LIMITED TO, ANY DAMAGES RESULTING FROM INCONVENIENCE AND ANY LOSS OF TIME, DATA, PROPERTY, REVENUE, OR PROFIT AND ANY INDIRECT, SPECIAL, INCIDENTAL, OR CONSEQUENTIAL DAMAGES, EVEN IF RADIOSHACK HAS BEEN ADVISED OF THE POSSIBILITY OF SUCH DAMAGES. Some States do not allow limitations on how long an implied warranty lasts or the exclusion or limitation of incidental or consequential damages, so the above limitations or exclusions may not apply to you. This warranty gives you specific legal rights, and you may also have other rights which vary from State to State. You may contact RadioShack at: RadioShack Customer Relations 300 RadioShack Circle, Fort Worth, TX 76102 04/08 Additional Info www.RadioShack.com 18 Additional Info 19 Protect the environment by recycling used electronics. Go to E-CyclingCentral.com to find an electronic recycling center near you. ©2009. RadioShack Corporation. All rights reserved. RadioShack and RadioShack.com are trademarks used by RadioShack Corporation. Printed in China 06A09 12-591