1
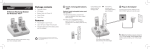
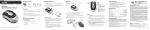
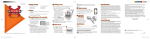
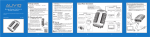
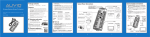
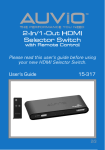
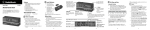
TM THE PERFORMANCE YOU NEED 40 W 2-Way In-Ceiling Speaker Please read this user’s guide before using your new speaker. User’s Guide 40-289 © 2009. Ignition L. P. All rights reserved. Auvio is a trademark used by Ignition L.P. Package and insert are recyclable. Insert contains recycled material. Package contents Speaker Template/paint mask User’s Guide Quick Start Features High quality speaker works well with any speaker system. Speaker frame and grille can be painted to blend in with any ceiling. 1 Installing the Speaker Prepare the Location To mount your speaker, you need the following items (not supplied) Drywall or keyhole saw Wire stripper Phillips screwdriver Pencil or marker 18-20 gauge speaker wire Be sure the mounting surface is: between 3/8 inch and 1¼-inch thick. has at least a 2 5/8-inch clearance behind the mounting surface. not in front of wall studs or other objects that might block the back of the speaker. 1. Remove the inner cardboard disc from the supplied template/paint mask and keep it for later. Use the outer portion of the mask as a template to mark the cutout Template hole size and location for mounting the speaker. 2. Use a drywall or keyhole saw to cut the hole. (Optional) Painting the Grille nNote: Do not paint internal speaker components. We recommend you spray-paint the grille so no paint gets in or blocks the holes. 1. To remove the grille, insert a paper clip into one of the openings and pull up. 2. Remove the dust cloth from behind the grille and replace it after you finish painting. (Optional) Painting the Frame To prevent paint from entering the speaker, remove the grille and insert the supplied cardboard paint mask. After the paint is dry, remove the paint mask and replace the grille. Template mask 2 Connecting speaker wires Connect the cable leads from the outputs on your amplifier to the input terminal posts on the rear of your loudspeaker cabinet. We recommend you use wire that is color-coded or otherwise marked on to help you connect the wire correctly. 1. Route the speaker wire to the speaker from the amplifier. 2. Separate about 4 inches of speaker wire at each end. 3. Using a wire stripper, remove about ¼ inch of insulation from each wire and twist the exposed ends. 4. Connect the positive marked (usually red) wire to a red speaker terminal by pressing the release tab. Insert the wire into the hole and release the tab. Repeat this procedure for the negative marked wire (usually black) and black terminal. Strip insulation 1/4 ’’ 1/4’’ Split wire 5. Connect the wire from the red speaker terminal to the amplifier’s positive (+) terminal, then connect the wire from the black speaker terminal to the amplifier’s negative (–) terminal. n Notes: Avoid routing the speaker wire near electrical wires. Do not nail, staple, or otherwise puncture the speaker wire. Before connecting your speaker to an amplifier, make sure the amplifier and all associated equipment is turned off. Make sure the impedance of the amplifier matches with the speaker. 3 Mounting the Speaker 1. Remove the grille to expose the mounting screws. 2. Be sure the mounting tabs are turned in, allowing the speaker to fit into the hole. Then insert the speaker into the mounting hole. 3. Use the supplied screws to tighten the mounting tabs to the wall or ceiling. Be careful not to overtighten. 4. Replace the grille. Mounting tabs nNote: When removing the speaker from the wall or ceiling, loosen the screws just enough to remove the speaker. This will prevent loss of the mounting tabs behind your wall. Maintenance Keep the amplifier’s volume at the low position when you first turn it on to avoid damaging the speaker. Do not use overrating power, otherwise sound quality can be destroyed and loudspeaker drivers can be damaged. Clean your speaker with a soft cloth to avoid damaging your loudspeaker. Specifications Power handling (RMS/MAX)...........................20W RMS/40W Max Impedance...........................................................................8 ohms Woofer.................................................................... 5.25 in(13.3cm) Tweeter......................................................................... 1 in (2.5cm) Sensitivity....................................................85dB+/-3dB @ 1W 1M Dimensions (W×H×D).............. 8 × 8 × 3.1” (202 × 202 × 80 mm) Specifications are subject to change and improvement without notice. Actual product may vary from the images found in this document. Limited Warranty Ignition L.P. warrants this product against defects in materials and workmanship under normal use by the original purchaser for one (1) year after the date of purchase. IGNITION L.P. MAKES NO OTHER EXPRESS WARRANTIES. This warranty does not cover: (a) damage or failure caused by or attributable to abuse, misuse, failure to follow instructions, improper installation or maintenance, alteration, accident, Acts of God (such as floods or lightning), or excess voltage or current; (b) improper or incorrectly performed repairs by persons who are not a Ignition L.P. Authorized Service Facility; (c) consumables such as fuses or batteries; (d) ordinary wear and tear or cosmetic damage; (e) transportation, shipping or insurance costs; (f) costs of product removal, installation, set-up service, adjustment or reinstallation; and (g) claims by persons other than the original purchaser. Should a problem occur that is covered by this warranty, take the product and the sales receipt as proof of purchase date to the place of purchase in the U.S. Ignition L.P. will, at its option, unless otherwise provided by law: (a) repair the product without charge for parts and labor; (b) replace the product with the same or a comparable product; or (c) refund the purchase price. All replaced parts and products, and products on which a refund is made, become the property of Ignition L.P. New or reconditioned parts and products may be used in the performance of warranty service. Repaired or replaced parts and products are warranted for the remainder of the original warranty period. You will be charged for repair or replacement of the product made after the expiration of the warranty period. IGNITION L.P. EXPRESSLY DISCLAIMS ALL WARRANTIES AND CONDITIONS NOT STATED IN THIS LIMITED WARRANTY. ANY IMPLIED WARRANTIES THAT MAY BE IMPOSED BY LAW, INCLUDING THE IMPLIED WARRANTY OF MERCHANTABILITY AND, IF APPLICABLE, THE IMPLIED WARRANTY OF FITNESS FOR A PARTICULAR PURPOSE, SHALL EXPIRE ON THE EXPIRATION OF THE STATED WARRANTY PERIOD. EXCEPT AS DESCRIBED ABOVE, IGNITION L.P. SHALL HAVE NO LIABILITY OR RESPONSIBILITY TO THE PURCHASER OF THE PRODUCT OR ANY OTHER PERSON OR ENTITY WITH RESPECT TO ANY LIABILITY, LOSS OR DAMAGE CAUSED DIRECTLY OR INDIRECTLY BY USE OR PERFORMANCE OF THE PRODUCT OR ARISING OUT OF ANY BREACH OF THIS WARRANTY, INCLUDING, BUT NOT LIMITED TO, ANY DAMAGES RESULTING FROM INCONVENIENCE AND ANY LOSS OF TIME, DATA, PROPERTY, REVENUE, OR PROFIT AND ANY INDIRECT, SPECIAL, INCIDENTAL, OR CONSEQUENTIAL DAMAGES, EVEN IF IGNITION L.P. HAS BEEN ADVISED OF THE POSSIBILITY OF SUCH DAMAGES. Some States do not allow limitations on how long an implied warranty lasts or the exclusion or limitation of incidental or consequential damages, so the above limitations or exclusions may not apply to you. This warranty gives you specific legal rights, and you may also have other rights which vary from State to State. You may contact Ignition L.P. at: Ignition L.P., 3102 Maple Ave Suite 450, Dallas, TX 75201 02/09 For product support, call 1-866-315-0426 Protect the environment by recycling used electronics. Go to E-CyclingCentral.com to find an electronic recycling center near you. Get more from your audio and video equipment. See what you’ve been missing. With Auvio, you control the experience. Auvio was established by a group of technophiles to provide high quality audio and video products without the high sticker price. The Auvio philosophy is for you to experience audio and video as it was intended to be: pure and distortion free. We know electronics can be intimidating. Auvio simplifies your experience by providing the right products, with the right specs, to work with your equipment. Be confident about your purchase: your new Auvio product incorporates the latest technology, is built to the highest quality standards, and reduces environmental impact by complying with RoHS environmental restrictions. 40-289 07A09 Printed in China